manuals.online logo
Brands
  1. Home
  2. •
  3. Brands
  4. •
  5. Philips
  6. •
  7. DVD Recorder
  8. •
  9. Philips DVDR980 Reference guide

Philips DVDR980 Reference guide

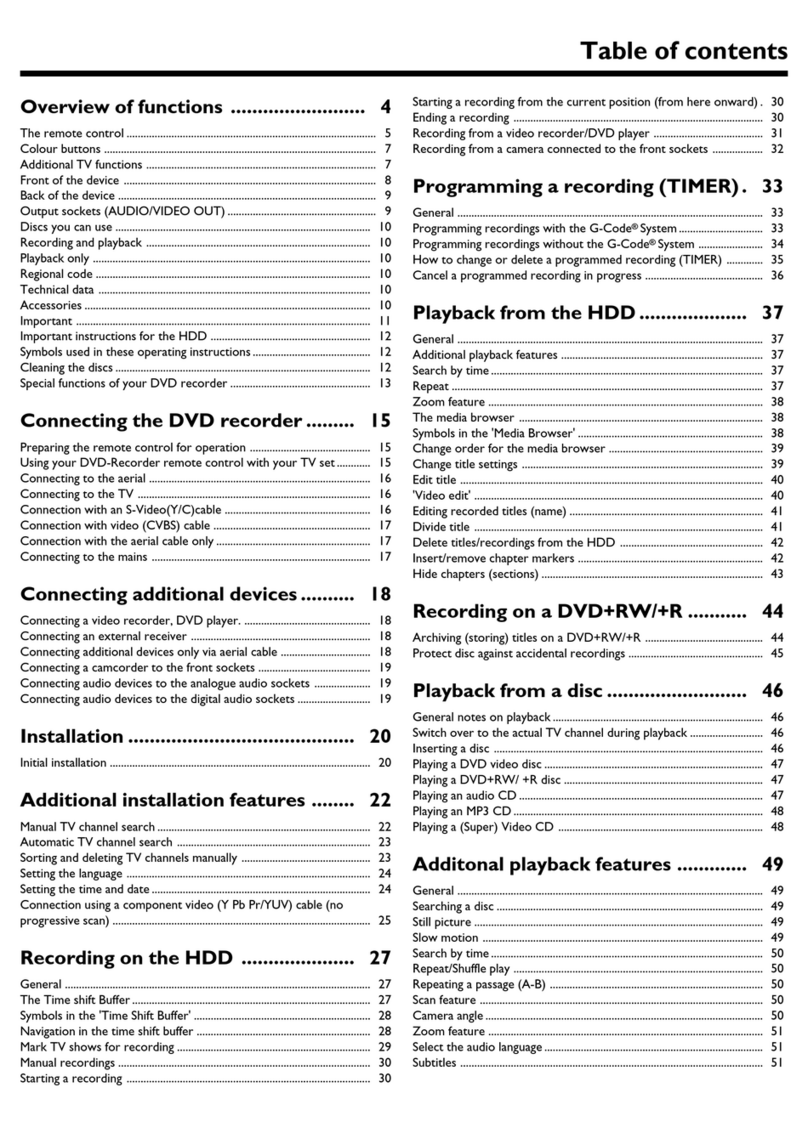
Quick Reference Card DVDR980/985/990 - DVDR1000MkII
Important
lDo not connect the power unti a other
connections are made.
lUnti you have comp eted the on-screen
insta ation procedure, the buttons on the
front of the recorder wi not work.
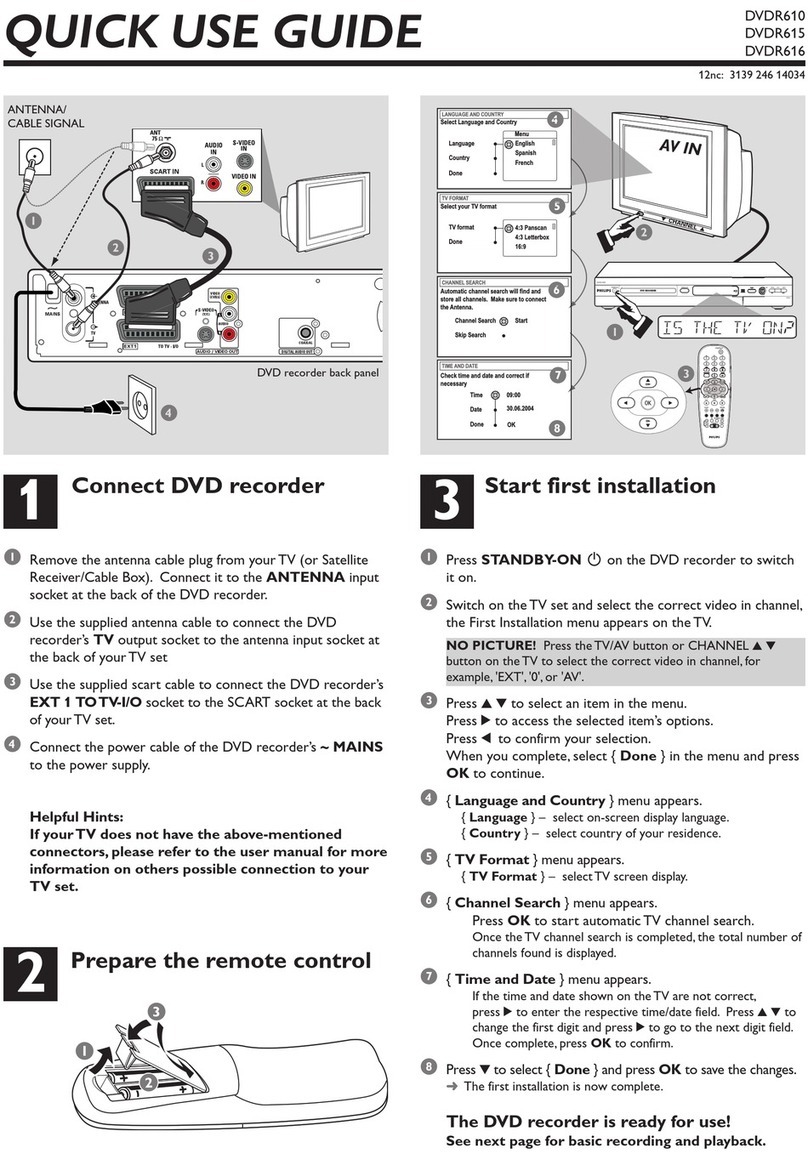
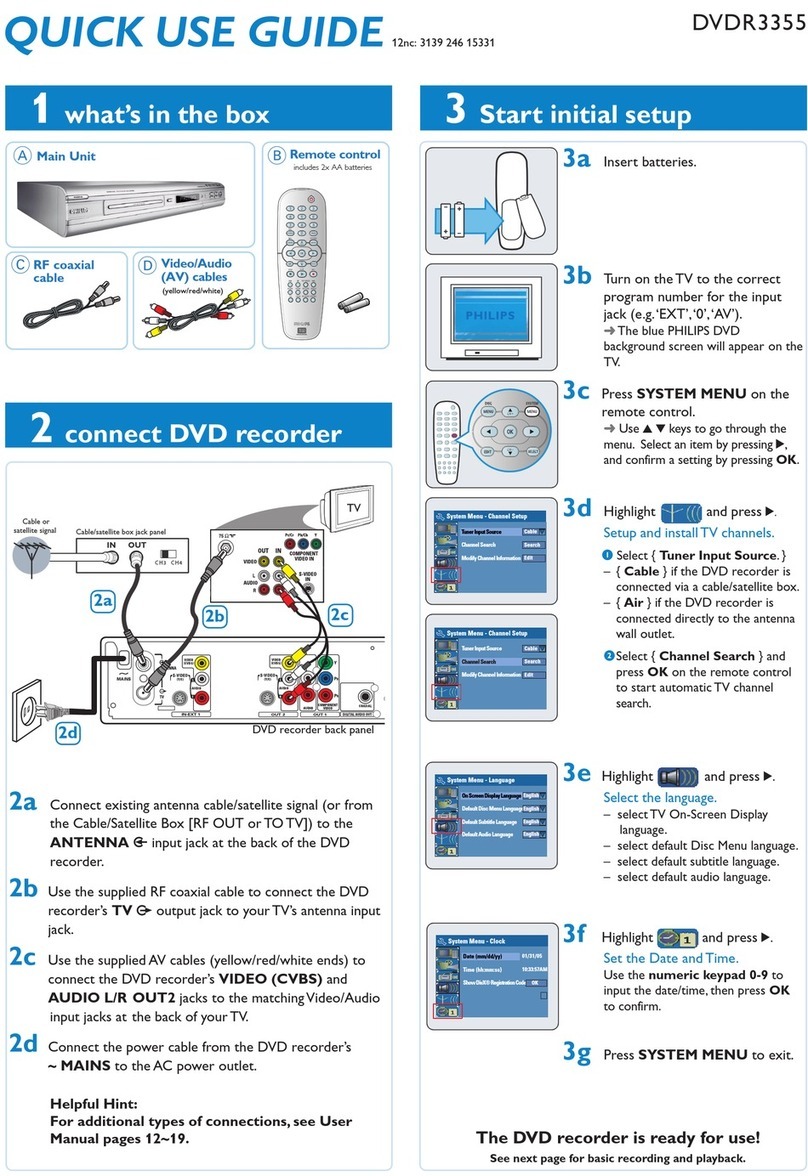
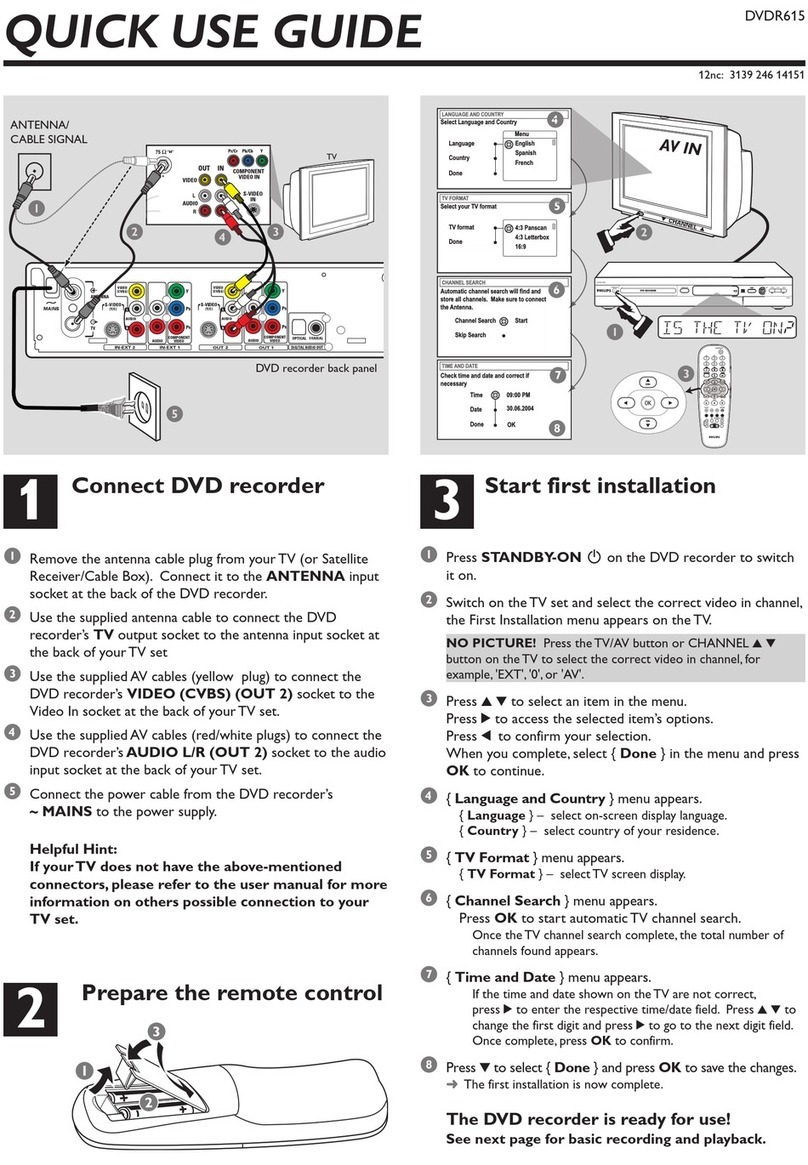
1 Connecting the antenna
lRemove the antenna (aerial) cable plug from your TV
set and insert it into the antenna socket at the back
of the DVD recorder.
lPlug one end of the antenna (aerial) cable supplied (1)
into the TV socket on the DVD recorder and the other
end into the antenna input socket on your TV set.
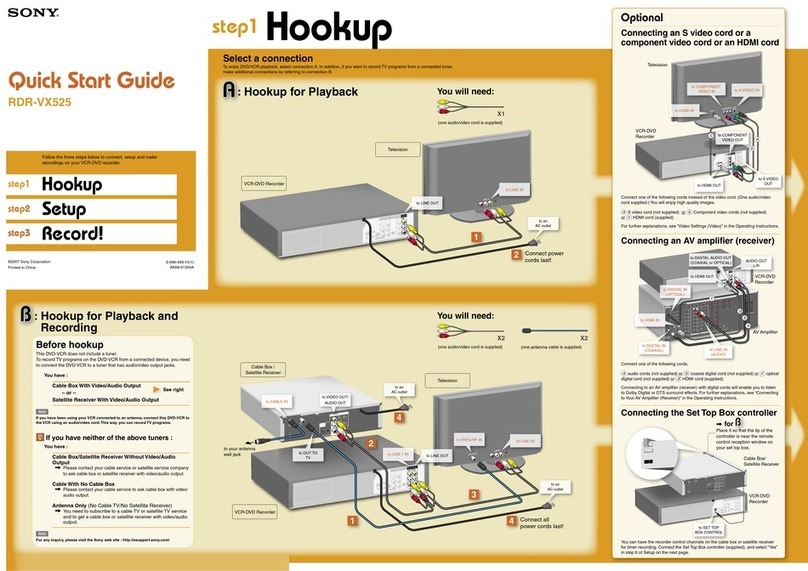
2 Connecting a TV set
lConnect at least the CART, -Video or CVB output
to the TV. Normally CART (2) is the best
connection.
lIf your TV has EasyLink, connect the CART first,
before connecting the power. Connect the DVD
Recorder to the TV’s EasyLink connector. Check
your TV manual for the appropiate CART input.
lWhen connecting a second TV, preferably use the
CART, -Video or CVB output. In case you want to
use an antenna cable, make use of a VCR or another
external RF modulator.
Note:
16:9 widescreen TVs may show only part of the DVD
recorder’s menu in certain screen modes. Change the screen
mode on the TV to see the full menu.
3 Connecting a VCR
lWhen connecting a VCR, the best order for the
CART connection is VCR - DVD Recorder - TV.
4 Connecting the power
lMake sure that all necessary connections are made
before connecting the DVD recorder to the power
supply.
lPlug the power cable supplied into the Power
connector on the rear of the recorder.
Switching on
lwitch on the TV set and select the programme
number of the DVD recorder (see operating manual
for your TV set).
lPress BSTANDBY/ON.
‰ The recorder display lights up, and the setup
menu (virgin mode screen) appears. This only occurs
the first time you start up the recorder.
lelect your preferred settings on the TV screen
using OK and the cursor keys on the remote
control.
Recording a TV programme
1Press MONITOR/TUNER to view the channel or
input that is currently selected.
2Use the CH+ or CH- keys to select the channel
from which you wish to record.
3Press SELECT to choose the record mode.
Use P for 2 hours, P+ for 2,5 hours*, LP for 3
hours, EP for 4 hours or EP+ for 6 hours*of
recording; the HQ mode is optimised for digital
camcorders.
4Press RECORD or REC/OTR to start recording.
5Press 9STOP to stop recording.
Important:
Recordings on a DVD+RW disc are normally started
from the position where the last recording was stopped.
From there on earlier recordings may be overwritten
without notice.
lTo prevent overwriting, hold the RECORD key
pressed until ‘SAFE RECORD’ appears on the display.
Recording from a camcorder or
video recorder
1Press MONITOR/TUNER to view the channel or
input that is currently selected.
2Use the CH+ or CH- keys to select the front input
(CAM1, CAM2 or CAM3 (DVDR985 only)) or rear
input (EXT1, EXT2, EXT3 or EXT4) from which you
want to record.
3Press SELECT to choose the record mode (HQ,
P, P+*, LP, EP or EP+*).
4Press RECORD or REC/OTR to start recording.
5Press ;PAUSE to pause recording or 9STOP to
end the recording.
Notes:
If the display shows ‘
NO SIGNAL
’ during recording from a
VCR, the ‘tracking control’ on the VCR may need adjustment.
The video signal of older analogue video tapes may cause
short ‘sync losses’ that lead to brief video interruptions during
the recording. The DVD Recorder will correct this with
seamless connections.
* DVDR990 DVDR1000 MKII only.
AUX- I/0
EXT 2
TO TV I/0
EXT 1
2
TV
EXT 4 EXT 3
Eng ish
DVDRQRC64373UKGBF1 08-05-2002 09:58 Pagina 1
To achieve maximum compatibility, make sure the disc
contains at least 5 minutes recorded in HQ mode, 10 minutes
in SP, 12 minutes in SP+*, 15 minutes in LP, 20 minutes in EP
or 30 minutes in EP+ mode*. For more information about
compatibility with DVD players refer to ‘Troubleshooting’ in
the instructions for Use.
Timer programming
Timer programming with the VIDEO
P us+®system
1Press TIMER on the remote control.
2elect ‘
VIDEO Plus
+
system
’ with v(up cursor) or
w(down cursor).
3Press u(right cursor).
4Enter the entire PlusCode number.
If you made a mistake you can correct it with CLEAR.
5Confirm with OK.
‰The data will appear on the TV screen.
6Confirm with OK.
‰The data has been stored in a timer block.
7To end, press TIMER.
8witch off with BSTANDBY/ON, otherwise the
timer recording cannot start.
Timer programming without the VIDEO
P us+ system
1Press TIMER on the remote control.
2elect ‘
Timer programming
’ with v(up cursor) or
w(down cursor).
3Press u(right cursor).
4Enter the date with v(up cursor) or w(down
cursor), or with the digit keys 0-9.
5Press u(right cursor).
6Enter the programme number from which you want
to record.
7Press u(right cursor).
8Enter the tart time.
9Press u(right cursor).
10 Enter the End time.
11 If you made a mistake, you can go back with t(left
cursor).
12 Confirm with OK.
‰The data has been stored in a timer block.
13 To end, press TIMER.
14 witch off with BSTANDBY/ON, otherwise the
timer recording cannot start.
* DVDR990 DVDR1000 MKII only.
Aborting a timer recording
lTo stop a timer recording in progress, press
BSTANDBY .
P aying a DVD-Video disc
lWhen ‘Autoresume’ is set to ‘
On
’ playback starts
automatically from the point where it was stopped
last time, otherwise it will play from the start of the
disc.
lThe disc may invite you to select an item from a
menu. If the selections are numbered, press the
appropriate numerical key; if not, use the wv(down
up cursor) or tu(left right cursor) keys to highlight
your selection, and press OK.
lTo stop playback at any time, press 9STOP or
DISC MENU.
P aying a DVD+RW/+R disc
lIf the inserted disc is write-protected, playback
always starts automatically.
lWhen you press 2PLAY, playback starts
automatically from the point where it was stopped
the last time the disc was played or recorded. If you
want to start playback from the beginning of the disc,
you can do so via the Index Picture creen.
lTo stop playback at any time, press 9STOP or
DISC MENU.
Handy shortcuts
On the Index Picture Screen
lTo move to the last title, hold KNEXT pressed.
lTo move to the first title, hold JPREVIOUS
pressed.
In monitor/tuner mode
lTo change Record Mode, press SELECT.
lTo select EXT1 in monitor/tuner mode, press 0.
In text input mode
lTo delete characters, press CLEAR.
lTo toggle upper/lower case characters, press
SELECT.
In edit mode (Favorite Scene Se ection)
lTo make chapters visible/hidden, press SELECT.
Eng ish
3104 125 6437.3
DVDRQRC64373UKGBF1 08-05-2002 09:58 Pagina 2

Other manuals for DVDR980

7

This manual suits for next models

3

Other Philips DVD Recorder manuals

Philips DVDR725H User manual

Philips

Philips DVDR725H User manual

Philips DVDR80/051 User manual

Philips

Philips DVDR80/051 User manual

Philips DVDR3597H/05 User manual

Philips

Philips DVDR3597H/05 User manual

Philips DVDR3570H User manual

Philips

Philips DVDR3570H User manual

Philips VideoPlus DVDR75 User manual

Philips

Philips VideoPlus DVDR75 User manual

Philips DVDR 80 User manual

Philips

Philips DVDR 80 User manual

Philips HTR5204 User manual

Philips

Philips HTR5204 User manual

Philips DVDR3600/31 User manual

Philips

Philips DVDR3600/31 User manual

Philips MRV645/01 Operating manual

Philips

Philips MRV645/01 Operating manual

Philips DVDR520H User manual

Philips

Philips DVDR520H User manual

Philips DVDR1000 MkII User manual

Philips

Philips DVDR1000 MkII User manual

Philips DVDR5350H/02/19 Operating instructions

Philips

Philips DVDR5350H/02/19 Operating instructions

Philips DVDR3475/37 User manual

Philips

Philips DVDR3475/37 User manual

Philips DVDR725H/00 User manual

Philips

Philips DVDR725H/00 User manual

Philips DVDR3350H User manual

Philips

Philips DVDR3350H User manual

Philips HDRW720/69 User manual

Philips

Philips HDRW720/69 User manual

Philips ShowView DVDR3300H User manual

Philips

Philips ShowView DVDR3300H User manual

Philips DVDR75/051 User manual

Philips

Philips DVDR75/051 User manual

Philips DVDR3355 User manual

Philips

Philips DVDR3355 User manual

Philips DVDR3360H Operating instructions

Philips

Philips DVDR3360H Operating instructions

Philips DVDR3350H User manual

Philips

Philips DVDR3350H User manual

Philips DVDR880/001 User manual

Philips

Philips DVDR880/001 User manual

Philips DVDR3590H/05 User manual

Philips

Philips DVDR3590H/05 User manual

Philips DVDR3350H User manual

Philips

Philips DVDR3350H User manual

Popular DVD Recorder manuals by other brands

THOMSON DTH8555 X user manual

THOMSON

THOMSON DTH8555 X user manual

Panasonic Diga DMR-EH75V operating instructions

Panasonic

Panasonic Diga DMR-EH75V operating instructions

Samsung DVD-R120 Quick setup guide

Samsung

Samsung DVD-R120 Quick setup guide

LG SP80 Quick setup guide

LG

LG SP80 Quick setup guide

Matsushita Electric DMR-ES15PL Service manual

Matsushita Electric

Matsushita Electric DMR-ES15PL Service manual

Panasonic DMR-EZ28K operating instructions

Panasonic

Panasonic DMR-EZ28K operating instructions

Sony RDR-HXD790 Service manual

Sony

Sony RDR-HXD790 Service manual

Curtis DVD2100 user guide

Curtis

Curtis DVD2100 user guide

Panasonic LQ-MD800 operating instructions

Panasonic

Panasonic LQ-MD800 operating instructions

JVC BD-X201M instructions

JVC

JVC BD-X201M instructions

Samsung DVD-VR300 instruction manual

Samsung

Samsung DVD-VR300 instruction manual

Panasonic DMR-EH57GN Service manual

Panasonic

Panasonic DMR-EH57GN Service manual

Pioneer DVR-231-S operating instructions

Pioneer

Pioneer DVR-231-S operating instructions

Medion MD 40570 user manual

Medion

Medion MD 40570 user manual

FUNAI HD-B2735 owner's manual

FUNAI

FUNAI HD-B2735 owner's manual

LG RH2T7-P2L owner's manual

LG

LG RH2T7-P2L owner's manual

Magnavox MRV640 Specifications

Magnavox

Magnavox MRV640 Specifications

LG RHT497H user manual

LG

LG RHT497H user manual

manuals.online logo
manuals.online logoBrands
  • About & Mission
  • Contact us
  • Privacy Policy
  • Terms and Conditions

Copyright 2025 Manuals.Online. All Rights Reserved.