Philips HQC888/00 Manual

DIRECTIONS FOR USE
ENGLISH 4
FRANÇAIS 10
21
27
STYLING BOOKLET
ENGLISH 30
FRANÇAIS 36
47
53
HQC888
3
áá««HHôô©©ddGG
áá««HHôô©©ddGG

Introduction
◗Dear customer, you have made the right choice!Your new Philips
3D Hair Clipper adapts to the contours of your head and enables
comfortable use.
◗To enjoy using the Philips 3D Hairclipper for a long time, we advise
you to read the following information.
◗In the enclosed booklet 'Modelling and Styling' and on the
interactive instruction CD-ROM you can find instructions and
many useful tips on how to achieve the haircut you want.
Important
Appliance
◗Check if the voltage indicated on the mains plug corresponds to
the mains voltage in your home before you connect the appliance.
C◗Make sure the appliance and the adapter do not get wet.
◗Use, charge and store the appliance at a temperature between
15cand 35c.
CD-ROM
C◗Protect the instruction CD-ROM from dust, humidity and from
extremely high or low temperatures.
C◗Do not put the CD-ROM in direct sunlight for a prolonged
period.
◗Do not scratch the surface of the CD-ROM.
◗Only write on the CD-ROM with a special marker.
◗If the CD-ROM is stored in a cold environment, do not use it until
it has reached room temperature.
◗Insert the CD-ROM with the printed side facing upwards.
Charging
Charge the appliance for 12 hours before you start using it for the first
time.
1Make sure the appliance is switched off while charging.
ENGLISH4

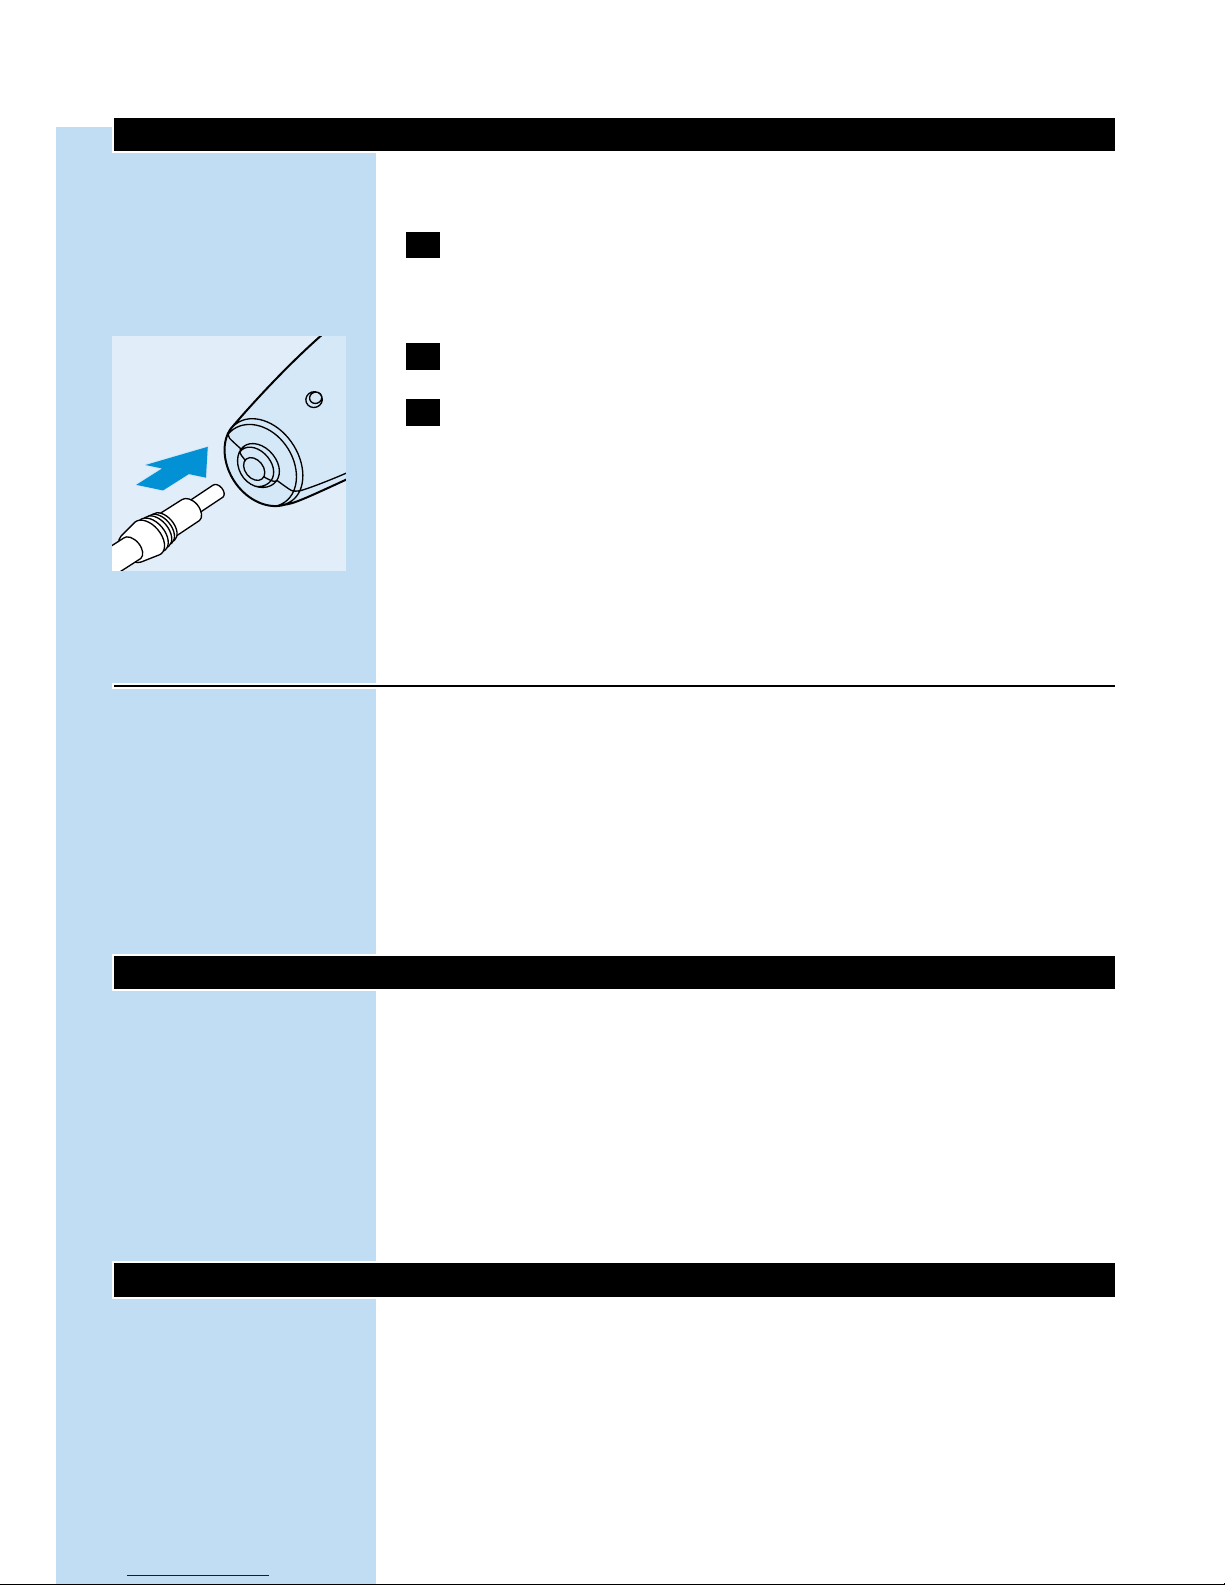
C2Insert the appliance plug into the appliance.
3Insert the mains plug into the wall socket.
BThe pilot light will go on to indicate that the appliance is charging.
BThis appliance is suitable for a mains voltage of 230V.
BOnly use the cord supplied with the appliance.
Do not charge the appliance for more than 24 hours.
A fully charged appliance has a cordless operating time of up to
50 minutes.
Optimising the lifetime of the battery
- After the appliance has been charged for the first time, do not
recharge it between clipping sessions. Continue using it and recharge
it only when the battery is (almost) empty.
- Discharge the battery completely twice a year by letting the motor
run until it stops.
- Do not keep the cord plugged into a wall socket all the time.
- If the appliance has not been used for a long period of time, it must
be recharged for 12 hours.
Corded clipping
◗To use the hair clipper connected to the mains:
Switch the hair clipper off, connect it to the mains and wait a few
seconds before switching it on.
If the battery is completely empty, wait a few minutes before switching
the appliance on.
Do not run the appliance from the mains when the battery is fully
charged.
Preparing for clipping
◗Also see the interactive instruction CD-ROM.
Clipping with comb attachment:
Select the small or large comb attachment, depending on the desired
hair length.
Hair length settings
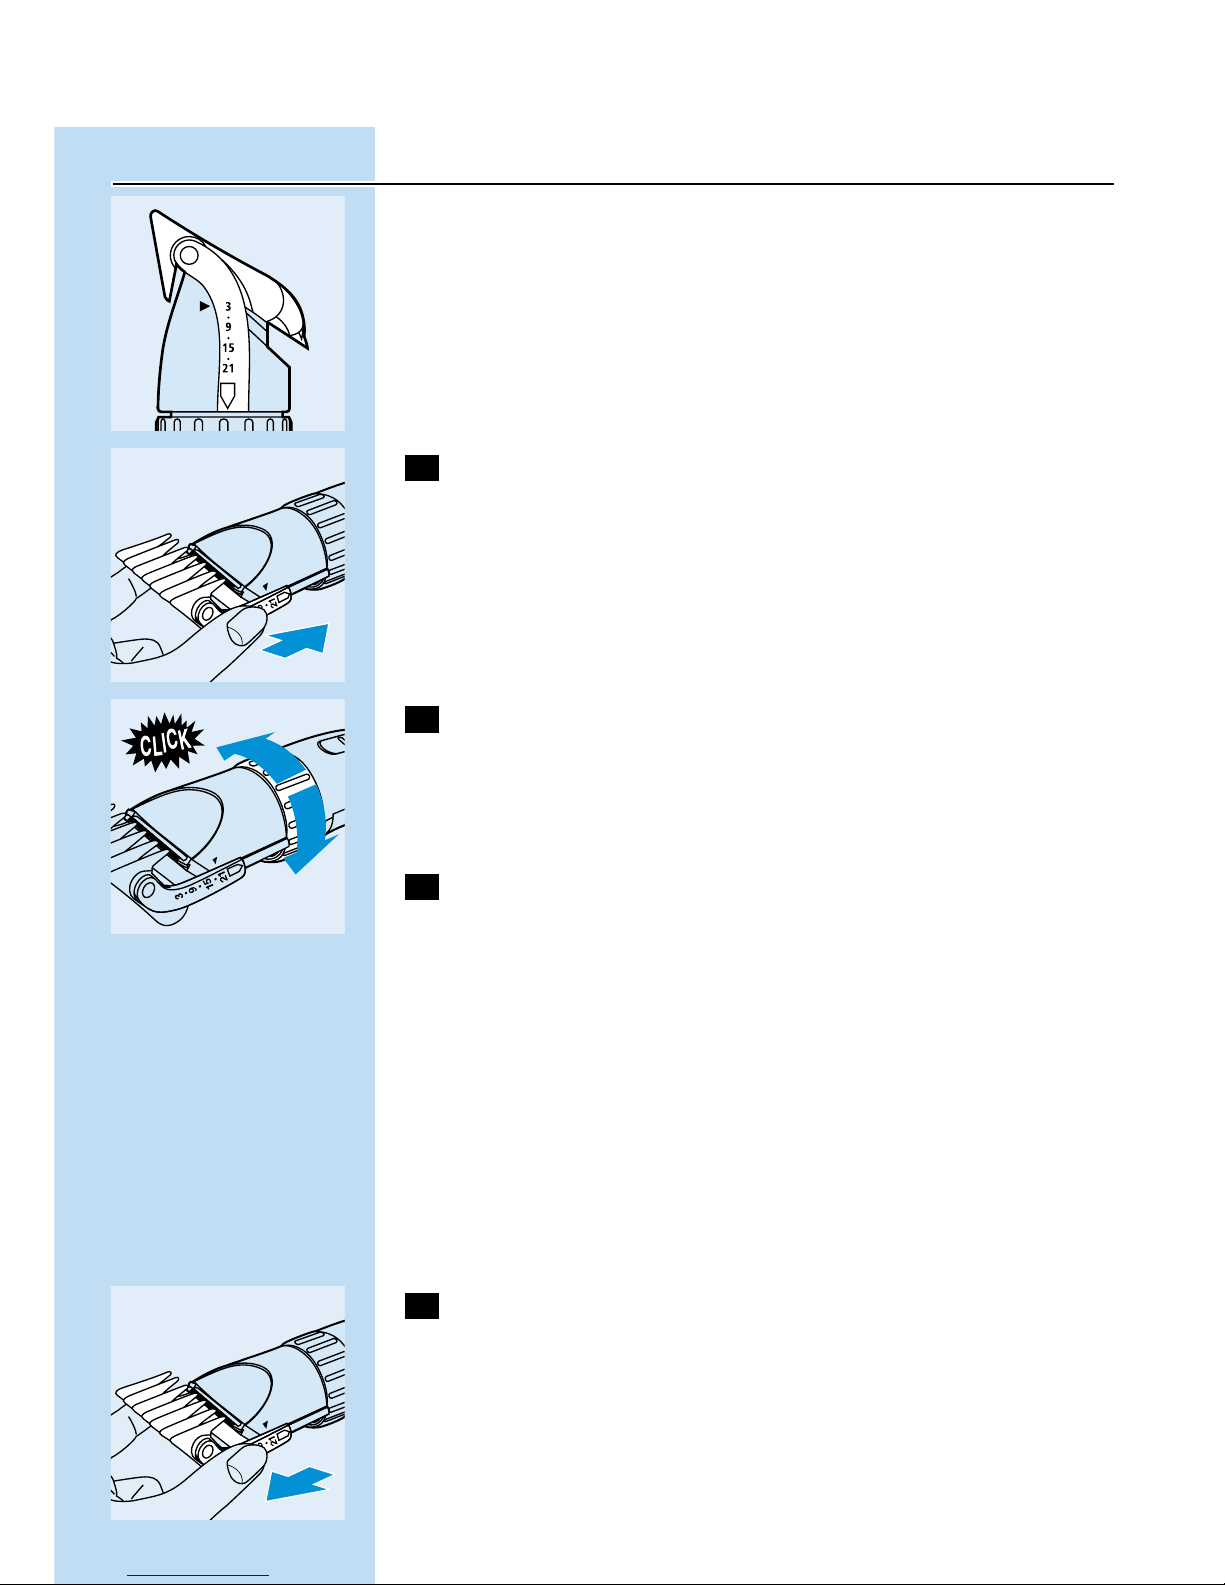
C◗The hair length settings are indicated in millimetres on the comb
sleeve.The settings correspond to the remaining hair length after
cutting.
- The small comb cuts hair to a length of 3 mm, 6 mm, 9 mm, 12 mm,
15 mm, 18 mm or 21 mm.
- The large comb cuts the hair to a length of 23 mm, 26 mm, 29 mm,
32 mm, 35 mm, 38 mm or 41 mm.
ENGLISH 5

C1Slide the comb holder into the guiding grooves of the appliance
until you hear a click.
Make sure that the holder is fully slotted into the grooves on both
sides.
C2Set the comb to the desired hair length by turning the hair
length adjustment ring (Precision Zoom Lock`) to the right or
to the left until the comb has been set to the desired hair
length.
◗We advise you to start clipping at the highest setting (large comb)
and to reduce the hair length setting in small steps until you reach
the desired hair length.
3Switch the appliance on.
◗Choose the appropriate hair cutting method from the booklet
'Modelling and Styling' or consult the interactive instruction CD-
ROM.
Tip: If a lot of hair has accumulated in the comb, remove the comb
attachment and blow and/or shake the hair from the comb. Removing
the comb does not change the hair length setting.
Tip:Write down the hair length settings selected to create a certain
hairstyle as a reminder for future clipping sessions.
Clipping without comb attachment
you can use the clipper without comb attachment to contour the
neckline and the area around the ears.You can also find instructions
and tips on the instruction CD-ROM.
C1Remove the comb attachment by pulling it off the appliance.
Never pull at the flexible top of the comb attachment. Always pull at
the sleeve.
The comb attachment keeps the cutting unit at a certain distance from
your head.This means that, if you use the clipper without the comb
attachment, your hair will be cut off very close to the skin.
Cleaning
Clean the appliance every time you have used it.
Do not use abrasives, scourers or liquids such as alcohol, petrol or
acetone to clean the appliance.
ENGLISH6

The appliance and the adapter may only be cleaned with the brush
supplied.
1Make sure the appliance is switched off and disconnected from
the mains before you start cleaning it.
2Remove the comb attachment.
C3Open the cutting unit by applying pressure to the centre of the
unit.
C4Clean the cutting unit and the inside of the appliance with the
brush supplied.
C5Close the cutting unit by pushing it back onto the appliance
until you hear a click.
The appliance does not need any lubrication.
Replacement
A worn or damaged cutting unit should only be replaced with an
original Philips cutting unit.
C1Open the cutting unit by applying pressure in the centre and
then remove it by pulling it upwards.
C2Place the two lugs of the new cutting unit into the guiding slots
and push the unit back onto the appliance.
ENGLISH 7

Environment
The built-in rechargeable battery contains substances which may
pollute the environment.
Remove the rechargeable battery when you discard the appliance.
Do not throw the battery away with the normal household waste but
dispose of it at an official collection point.
You can also take the appliance to a Philips service centre, where staff
will be happy to help you remove the battery and dispose of it in an
environmentally safe way.
1Disconnect the appliance from the mains and let the appliance
run until the motor stops.
2Open and remove the cutting unit.
C3Undo the screws and remove the metal clip by means of a
screwdriver.
C4Remove the front part by pulling it upwards.
C5Remove the hair length adjustment ring (Precision Zoom
Lock`) by pushing in the snap lugs on the cover and the
housing and pulling the ring off the appliance.
C6Separate the two housing parts by means of a screwdriver.
ENGLISH8

C7Pull out the printed circuit board.
C8Insert a screwdriver into the small slot in the printed circuit
board marked with an arrow. Push the screwdriver down until
part of the printed circuit board breaks off.
C9Open the plastic battery holder and take out the rechargeable
battery.
Do not connect the appliance to the mains again after it has been
opened!
Information & service
If you need information or if you have a problem, please visit the Philips
Web site at www.philips.com or contact the Philips Customer Care
Centre in your country (you will find its phone number in the
worldwide guarantee leaflet). If there is no Customer Care Centre in
your country, turn to your local Philips dealer or contact the Service
Department of Philips Domestic Appliances and Personal Care BV.
ENGLISH 9

Introduction
◗Cher consommateur, vous avez fait le bon choix!Votre nouvelle
tondeuse Philips 3D s'adapte aux contours de votre coiffure en
facilitant ainsi son utilisation.
◗Afin de pouvoir utiliser au mieux votre tondeuse Philips 3D, nous
vous conseillons de suivre les instructions qui suivent.
◗Pour réaliser la coupe que vous souhaitez, vous trouverez les
instructions ainsi que les conseils nécessaires dans le livret conseils
et sur le CD-ROM joints.
Important
Tondeuse
◗Avant de brancher l'appareil,vérifiez que la tension indiquée sur la
fiche correspond à la tension du secteur de votre logement.
C◗Assurez vous que l'appareil et son adaptateur ne soient pas en
contact avec de l'eau.
◗Utilisez, chargez et rangez l'appareil à une température comprise
entre 15cet 35c.
CD-ROM
C◗Protégez le CD-Rom de la poussière, de l'humidité et des fortes
températures
C◗Ne laissez pas le CD-Rom exposé aux rayons directs du soleil.
◗Faite attention à ne pas rayer le CD-Rom.
◗N'écrivez sur le CD-Rom qu'avec un feutre approprié.
◗Si le CD-Rom a été stocké à une température trop basse, ne
l'utilisez pas avant qu'il n'ait atteint la température ambiante.
◗Insérez le CD-Rom dans le lecteur face imprimée vers le haut.
FRANÇAIS10

Charge
Chargez l'appareil 12 heures au moins avant la première utilisation.
1Assurez-vous que l'appareil soit éteint lors de la charge.
C2Insérez le connecteur dans l'appareil.
3Insérez la fiche dans la prise de courant.
BLe témoin lumineux s'allumera pour indiquer que l'appareil est en
charge.
BTension d'utilisation: 230V.
BUtilisez uniquement le cordon fourni avec l'appareil.
Ne chargez pas l'appareil pendant plus de 24 heures.
Une charge complète vous autorise une utilisation de 50 min environ.
Durée des accumulateurs
- Après la première charge, utilisez l'appareil jusqu'à épuisement des
batteries.
- Déchargez les batteries complètement deux fois par an en laissant
tourner le moteur jusqu'à l'arrêt.
- Ne laissez pas le cordon d'alimentation branché sur le secteur
pendant ce temps.
- Si l'appareil n'a pas été utilisé pendant une longue période, rechargez
le pendant 12 heures au moins.
Utilisation sur secteur
◗Vous pouvez utiliser l'appareil directement sur le secteur.
Arrêtez l'appareil à l'aide du bouton M/A. Branchez la fiche dans la
prise de courant et attendez quelques secondes avant de mettre
l'appareil en Marche.
Si les batteries sont complètement déchargées : attendez quelques
minutes.
Vous ne devez pas utiliser l'appareil directement sur secteur si la
batterie est complètement chargée.
Préparation à l'emploi
◗Consultez également les instructions du CD-Rom
Taille avec guide de coupe
Choisissez un guide de coupe, petit ou large en fonction de la coupe
désirée.
FRANÇAIS 11

Réglages de la hauteur de coupe
C◗La hauteur de coupe est indiquée en millimètres sur le guide de
coupe. Hauteur des cheveux restant après la coupe.
- Le petit guide de coupe correspond à une hauteur de 3 mm, 6 mm,
9 mm, 12 mm, 15 mm, 18 mm or 21 mm.
- Le plus grand correspond à une hauteur 23 mm, 26 mm, 29 mm,
32 mm, 35 mm, 38 mm or 41 mm.
C1Faites glisser le support du peigne dans les rainures de
l'appareil jusqu'à ce que vous entendiez un clic.
Assurez vous que les deux guides soient bien positionnés dans les
glissières.
C2Choisissez la hauteur de coupe en faisant tourner la bague
(Precision Zoom Lock`) jusqu'à la hauteur désirée.
◗Nous vous conseillons de commencer par la hauteur la plus élevée
et de réduire au fur et à mesure.
3Mettez l'appareil en marche.
◗Choisissez la méthode la plus appropriée dans le livret conseils ou
consultez les instructions sur le CD-Rom.
Conseils: Si des cheveux se sont accumulés dans guide de coupe,
retirez le guide de coupe et soufflez dessus. Cela ne change en rien la
hauteur de coupe choisie.
Conseils: Notez la hauteur de coupe choisie pour une taille ultérieure.
Taille sans guide de coupe
Vous pouvez également utiliser la tondeuse sans le guide de coupe.Voir
instructions dans le CD-Rom.
C1Retirez le guide de coupe de l'appareil.
Ne prenez pas le guide de coupe par le peigne (flexible) mais par sa
base rigide.
Le guide de coupe permet de maintenir le couteau toujours à la bonne
distance. Sans guide de coupe vous devez donc rester le plus près
possible de la base du crâne.
FRANÇAIS12

Nettoyage
Nettoyez l'appareil après chaque utilisation.
N'utilisez pas de produits abrasifs, de tampons à récurer ou des
substances telles que l'alcool ou l'acétone pour nettoyer l'appareil.
Nettoyez l'appareil à l'aide de la brosse de nettoyage.
1Avant de commencer à nettoyer l'appareil, assurez-vous de
l'avoir éteint et débranché.
2Retirez le guide de coupe.
C3Retirez le couteau en poussant dessus, au centre.
C4Nettoyez l'unité de coupe et l'intérieur de l'appareil avec la
brosse de nettoyage.
C5Remontez le couteau en le replacant sur la tête jusqu'à
entendre un "click".
Il n'est pas nécessaire de lubrifier le couteau.
Remplacement
Utilisez uniquement une unité de rasage Philips d'origine pour
remplacer la votre, si elle est usée ou endommagée.
C1Retirez le couteau en poussant dessus, au centre.
FRANÇAIS 13

C2Placez les deux bras de la nouvelle unité de rasage dans les
rainures et repoussez l'unité dans l'appareil.
Environnement
La batterie rechargeable intégrée contient des substances susceptibles
de nuire à l'environnement.
Lorsque vous vous séparerez de votre appareil en fin de vie, retirez la
batterie.
Ne jetez pas la batterie avec les ordures ménagères habituelles, mais
déposez la dans un lieu assigné à cet effet.
Vous pouvez également déposer votre appareil dans un Centre Service
Agréé Philips, où l'on s'en chargera avec plaisir.
1Débranchez l'appareil de la prise de courant, et laissez le
fonctionner jusqu'à qu'à l'arrêt complet du moteur.
2Ouvrez et retirez l'unité de rasage.
C3Dévissez et retirez la partie métallique à l'aide du tournevis.
C4Retirez la partie supérieure.
C5Retirez le guide de coupe et le couteau.
FRANÇAIS14

C6Ouvrez le corps de l'appareil en deux, à l'aide du tournevis.
C7Otez le circuit imprimé.
C8Insérez un tournevis dans la fente du circuit marquée d'une
flèche. Poussez le tournevis jusqu'à rompre une partie du
circuit.
C9Ouvrez le support, en plastique, des accumulateurs et ôtez-les.
Ne branchez pas l'appareil sur le secteur après l'avoir ouvert.
Informations & Service
Pour toute réparation/information, ou en cas de problème, visitez notre
website: www.philips.com. Ou veuillez contacter le Service
Consommateurs Philips de votre pays (vous trouverez le numéro de
téléphone dans le dépliant sur la garantie internationale). S'il n'y a
aucun Service Consommateurs Philips dans votre pays, contactez votre
distributeur ou le Service Department de Philips Domestic Appliances
and Personal Care BV.
FRANÇAIS 15

16
B
B
B
..»»ZZGGÈÈddGG ∂∂ØØee áᣣ°°SSGGƒƒHH ∞∞««∏∏¨¨ààddGG ÉÉàà©©££bb ππ°°üüaaGG
..¬¬««∏∏YY ´´ƒƒÑÑ££ŸŸGG áá««FFÉÉHHôô¡¡ddGG ááMMƒƒ∏∏ddGG ÖÖëë°°SSGG
áá««FFÉÉHHôô¡¡ddGG ááMMƒƒ∏∏ddGG ‘‘ ÉÉ¡¡««ddGG ôô°°TTDDƒƒŸŸGG øøccÉÉeeCC’’GG ¤¤GG »»ZZGGÈÈ∏∏dd ∂∂ØØee ππNNOOCCGGººbb ..¬¬««∏∏YY ´´ƒƒÑÑ££ŸŸGG
áá««FFÉÉHHôô¡¡ddGG ááMMƒƒ∏∏ddGG øøee áá©©££bb ôô°°ùùææJJ ¿¿CCGG ¤¤GG ππØØ°°SSCC’’GG ¤¤GG »»ZZGGÈÈddGG ∂∂ØØee óó°°ûûHH..ÉÉ¡¡««∏∏YY ´´ƒƒÑÑ££ŸŸGG
IIOOÉÉYYGG øøÁÁ »»ààddGG áájjQQÉÉ££ÑÑddGG ´´õõffGG hh ∂∂««àà°°SSÓÓÑÑddGG øøee ááYYƒƒææ°°üüŸŸGG áájjQQÉÉ££ÑÑddGG áá°°SSÉÉee ííààaaGG
..ÉÉ¡¡ææëë°°TT
!¬ëàa ó©H AÉHô¡ dG ¤G RÉ¡÷G π°Uh IOÉYÉH º≤J ’
9
6
7
8
≈∏Y ¢ùÑ«∏«a áëØ°U IQÉjR ∂æe ƒLôf á∏ °ûe ájCG â¡LGh hCG áeóN ájCG ¤G âéàMG GPG
¿GƒæY â– âfÎf’G www.philips.comáeóÿ ¢ùÑ«∏«a õcôà ∫ɰüJ’G hCG
∑ó∏H ‘ øFÉHõdG
áeóN õcôe ∑Éæg ø j ⁄ GPG .(»ŸÉ©dG ¿Éª°†dG ≥ë∏e øe ∞JÉ¡dG ºbQ ≈∏Y ∫ƒ°ü◊G ∂æ Á )
áeóN õcôà π°üJEG hCG ¢ùÑ«∏«a äÉéàæe π«cƒH π°üJEG ,¬«a ø£≤J …òdG ó∏ÑdG ‘ øFÉHõdG
.á«°üî°ûdG ájÉæ©dGh á«dõæŸG äGhOCÓd ¢ùÑ«∏«a
ááeeóóÿÿGGhh ääÉÉeeƒƒ∏∏©©ŸŸGG
B
áá««HHôô©©ddGG

17
Éɪª¡¡ææccÉÉeeCCGG ‘‘ IIóójjóó÷÷GG ¢¢üü≤≤ddGG IIóóMMhh øøee ((ºº°°SSôôddGG ‘‘ ááææ««ÑÑŸŸÉÉcc)) ¿¿ÉÉàà©©££≤≤ddGG ™™°°VVƒƒHH ººbb
..RRÉÉ¡¡÷÷GG ¤¤GG áá©©££≤≤ddGG §§¨¨°°VV óóYYCCGG ººKK øøeehh áá°°üü°°üüııGG
ááÄÄ««ÑÑddGG
.áÄ«ÑdG …PDƒJ ób OGƒÃ IOhõŸG äÉjQÉ£ÑdG …ƒà–
.RÉ¡÷G øe ¢ü∏îàdG óæY ájQÉ£ÑdG ´õæH ºb
.¢Vô¨dG Gò¡d »ª°SQ õcôe óæY É¡æe ¢ü∏îJ πH ,∫õæŸG äÉjÉØf ™e ájQÉ£ÑdG »eôJ ’
AGó©°S ¿ƒØXƒŸG ¿ƒ «°S å«M äÉeóî∏d ¢ùÑ«∏«a õcôe …CG ¤G RÉ¡÷G òNCG ɰ†jCG ∂fÉ eÉH
.áÄ«Ñ∏d áæeBG á≤jô£H É¡æe ¢ü∏îàdG h ájQÉ£ÑdG ´õæd ∂JóYɰùÃ
..∑∑ôôÙÙGG ∞∞bbƒƒààjj ¿¿CCGG ¤¤GG π𪪩©jj RRÉÉ¡¡÷÷GG ´´OO hh AAÉÉHHôô¡¡ddGG øøYY RRÉÉ¡¡÷÷GG ππ°°üüaaGG
..¢¢üü≤≤ddGG IIóóMMhh ´´õõffGG hh ííààaaGG
..»»ZZGGÈÈ∏∏dd ∂∂ØØee áᣣ°°SSGGƒƒHH ÊÊóó©©ŸŸGG §§bbÓÓddGG ´´õõff hh »»ZZGGÈÈddGG ∂∂ØØHH ººbb
..≈≈∏∏YYCC’’GG ¤¤GG ¬¬ÑÑëë°°SS ∫∫ÓÓNN øøee »»eeÉÉeeCC’’GG AAõõ÷÷GG ´´õõffGG
((ΩΩhhhhõõddGG IIGGOOCC’’ áábbóóddGG ππØØbb)) ôô©©°°ûûddGG ∫∫ƒƒWW ππjjóó©©JJ áá≤≤∏∏MM ´´õõffGG‘‘ ááØØbbÉÉææddGG ™™££≤≤ddGG óó°°TT ∫∫ÓÓNN øøee
..RRÉÉ¡¡÷÷GG øøee áá≤≤∏∏◊◊GG ÖÖëë°°SS hh ±±ÓÓ¨¨ddGGhh AAÉÉ££¨¨ddGG
3
2
1
5
4
2B
B
B
B
áá««HHôô©©ddGG

18
∞∞««¶¶ææààddGG
.ΩGóîà°SG πc ó©H RÉ¡÷G ∞«¶æàH ºb
.RÉ¡÷G ∞«¶æàd ¿ƒà«°SC’G hCG ∫hÎÑdG hCG ∫ƒë dÉc πFGƒ°S hCG ᣰTÉc OGƒe Ωóîà°ùJ ’
.§≤a IOhõŸG IɰTôØdG ᣰSGƒH »FÉHô¡ dG ∫ƒÙG h RÉ¡÷G ∞«¶æJ Öéj
..¬¬ØØ««¶¶ææààHH AAóóÑÑddGG ππÑÑbb AAÉÉHHôô¡¡ddGG ¤¤GG ∫∫ƒƒ°°UUƒƒee ÒÒZZ ¬¬ffCCGG hh π𪪩©jj ’’ RRÉÉ¡¡÷÷GG ¿¿CCGG óóccCCÉÉJJ
..IIOOhhõõŸŸGG IIÉɰ°TTôôØØddGG áá©©££bb ´´õõææHH ººbb
..áá©©££≤≤ddGG §§°°SShh ≈≈∏∏YY §§¨¨°°††ddGG ∫∫ÓÓNN øøee ¢¢üü≤≤ddGG IIóóMMhh ííààaaGG
..IIOOhhõõŸŸGG IIÉɰ°TTôôØØddGG áᣣ°°SSGGƒƒHH RRÉÉ¡¡÷÷GG ππNNGGOO hh ¢¢üü≤≤ddGG IIóóMMhh ∞∞««¶¶ææààHH ººbb
..''''∂∂««∏∏cc'''' ä䃃°°UU ™™ªª°°ùùJJ ¿¿CCGG ¤¤GG RRÉÉ¡¡÷÷GG ¤¤GG ÉÉ¡¡££¨¨°°VV ∫∫ÓÓNN øøee ¢¢üü≤≤ddGG IIóóMMhh ¥¥ÓÓZZÉÉHH ººbb
.º«ë°ûJ …C’ RÉ¡÷G êÉàëj ’
3
2
1
5
4
∫∫GGóóÑÑàà°°SS’’GG
.¢ùÑ«∏«a øe á«∏°UCG iôNCÉH á ¡æe hCG áØdÉJ âfÉc GPG ¢ü≤dG IóMh ∫GóÑà°SG Öéj
..≈≈∏∏YYCC’’GG ¤¤GG ÉÉ¡¡ÑÑëë°°SS ∫∫ÓÓNN øøee ÉÉ¡¡YYõõff hh ÉÉ¡¡££°°SShh ≈≈∏∏YY §§¨¨°°††ddGG ∫∫ÓÓNN øøee ¢¢üü≤≤ddGG IIóóMMhh ííààaaGG1
B
B
B
B
áá««HHôô©©ddGG

19
..''''∂∂««∏∏cc'''' ä䃃°°UU ™™ªª°°ùùJJ ¿¿CCGG ¤¤GG RRÉÉ¡¡÷÷GG ‘‘ ÉÉ¡¡dd ¢¢üü°°üüııGG ¿¿ÉÉŸŸGG ‘‘ IIÉɰ°TTôôØØddGG áá°°SSÉÉee ππNNOOCCGG
.Úà¡÷G øe ΩÉ MÉH ádƒ°Uƒe á °SÉŸG ¿ƒ J ¿CG ócCÉJ
∫∫ƒƒWW ππjjóó©©JJ áá≤≤∏∏MM ôôjjhhóóJJ ∫∫ÓÓNN øøee ∂∂ddPP hh ôô©©°°ûûddGG ∫∫ƒƒ££dd ááHHƒƒZZôôŸŸGG áá««©©°°VVƒƒddGG QQÉÉ««ààNNÉÉHH ººbb
((ΩΩhhhhõõddGG IIGGOOCC’’ áábbóóddGG ππØØbb)) ôô©©°°ûûddGGáá««©©°°VVhh ââ««ÑÑããJJ ººààjj ¿¿CCGG ¤¤GG iiôô°°ùù««ddGG hhCCGG ≈≈ææªª««ddGG áá¡¡÷÷GG ¤¤GG
..Ü܃ƒZZôôŸŸGG ôô©©°°ûûddGG ∫∫ƒƒ££dd ÉÉ≤≤aahh IIÉɰ°TTôôØØddGG
¢¢††««ØØîîJJ ººKK øøeehh ((ÒÒÑÑddGG §§°°ûûŸŸGG)) ÖÖjjòò°°ûûJJ ááLLQQOO ≈≈∏∏YYCCÉÉHH ôô©©°°ûûddGG ÖÖjjòò°°ûûJJ áá««∏∏ªªYY AAóóÑÑHH ∂∂ëë°°üüææff
..∂∂jjóódd ππ°°††ØØŸŸGG ôô©©°°ûûddGG iiƒƒàà°°ùùee ¤¤GG ππ°°üüJJ ¿¿CCGG ¤¤GG IIÒÒ¨¨°°UU áá««ddÉÉààààee IIGGƒƒ££îîHH ôô©©°°ûûddGG ∫∫ƒƒWW ääÉÉLLQQOO
..RRÉÉ¡¡÷÷GG π𫫨¨°°ûûààHH ººbb
™™LLGGQQ hhCCGG ''''ííjjôô°°ùùààddGGhh ºº««ªª°°üüààddGG'''' ääÉɪª««∏∏©©ààddGG ÖÖqq««ààdd ÉÉ≤≤aahh ááÑѰ°SSÉÉææŸŸGG ¢¢üü≤≤ddGG áá≤≤jjôôWW QQÉÉ««ààNNÉÉHH ººbb
``ddGG
CD-Rom
..ääÉɪª««∏∏©©àà∏∏dd ππYYÉÉØØààŸŸGG
ºb hCG /h ïØfG h IɰTôØdG á©£b ´õæH ºb ,IɰTôØdG ‘ ô©°ûdG øe Òã dG ™qªŒ ” GPG :áë«°üf
IQÉàıG ô©°ûdG ∫ƒW á«©°Vh Ò¨j ’ IɰTôØdG ´õf á«∏ªY ¿G .IɰTôØdG øe ô©°ûdG ∂jôëàH
.É≤Ѱùe
É¡JGP ô©°ûdG á°üb ≈∏Y ®ÉØë∏d ∂dP h ¬JÎNG …òdG ô©°ûdG ∫ƒW á«©°Vh π«é°ùàH ºb :áë«°üf
.á«∏Ñ≤à°ùŸG äɰü≤∏d
IIOOhhõõŸŸGG IIÉɰ°TTôôØØddGG ΩΩGGóóîîàà°°SSGG ¿¿hhOO §§≤≤∏∏ddGG
»àdG á≤£æŸG h áÑbôdG §N ójóëàd ∂dP h IOhõŸG IɰTôØdG ¿hO §≤∏dG RÉ¡L ΩGóîà°SG ∂æ Á
.ÚfPC’ÉH §«–
`dG ‘ íFɰüædG h äÉeƒ∏©ŸG øe ójõŸG OÉéjG ɰ†jCG ∂fÉ eÉHCD-Rom.äɪ«∏©àdG
..RRÉÉ¡¡÷÷GG øøee ÉÉ¡¡ÑÑëë°°SS ∫∫ÓÓNN øøee IIOOhhõõŸŸGG IIÉɰ°TTôôØØddGG áá©©££bb ´´õõææHH ººbb
.±GôWC’G øe IɰTôØdG Öë°ùH ºb .GóHCG IɰTôØdG øe áfôŸG É«∏©dG á©£≤dG Öë°ùJ ’
¿CG »æ©j Gòg .RÉ¡é∏d ¢UÉ≤dG Aõ÷G h ¢SCGôdG ÚH áæ«©e áaɰùe ≈∏Y IɰTôØdG á©£b ßaÉ–
Iô°ûH øe GóL ÉÑjôb h GóL GÒ°üb ô©°ûdG ¢üb ¤G …ODƒ«°S IɰTôØdG ¿hO RÉ¡÷G ΩGóîà°SG
.¢SCGôdG
3
2
1
1
B
B
B
,
,
áá««HHôô©©ddGG

20
..RRÉÉ¡¡÷÷GG ¤¤GG RRÉÉ¡¡÷÷GG ¢¢ùùÑÑ≤≤ee ππ°°UUhhCCGG
..¢¢ùùHHÉÉ≤≤ddGG ‘‘ »»°°SSÉɰ°SSCC’’GG ¢¢ùùÑÑ≤≤ŸŸGG ππ°°UUhhCCGG
.øë°ûdG Ωƒ≤j RÉ¡÷G ¿CÉH ó«cCÉà∏d IAɰV’ÉH Ò°TCÉàdG Aƒ°V Ωƒ≤«°S
.âdƒa 230 hP »FÉHô¡ dG QÉ«àdG RÉ¡÷G Gòg Ö°SÉæj
.RÉ¡÷ÉH OhõŸG ∂∏°ùdG §≤a Ωóîà°SG
.áYɰS 24 øY ójõJ IÎØd RÉ¡÷G øë°ûJ ’
50 IóŸ ,∂∏°ùdG ΩGóîà°SG ¿hO ,𫨰ûà∏d âbh ≈∏Y πeÉ dÉH ¿ƒë°ûŸG RÉ¡÷G …ƒàëj
.á≤«bO
áájjQQÉÉ££ÑÑddGG IIÉÉ««MM ááddÉÉWWGG
-∫hGR πH ,ábôØàŸG äÉeGóîà°S’G ÚH ¬æë°ûH º≤J ’ ,¤hC’G Iôª∏d RÉ¡÷G øë°T ó©H
.AÉ¡àf’G ≈∏Y ájQÉ£ÑdG ∂°TƒJ ÉeóæY §≤a ¬æë°T IOÉYÉH ºb h ¬eGóîà°SG ≈∏Y
-¿CG ¤G πª©j ∑ôÙG ∑ôJ ∫ÓN ºc áæ°ùdG ‘ ¿ÉJôe πeÉ dÉH ájQÉ£ÑdG ≠jôØàH ºb
.∞bƒàj
.âbƒdG ∫GƒW ¢ùHÉ≤dG ¤G ’ƒ°Uƒe ∂∏°ùdG ∑ÎJ ’ -
.áYɰS 12 IóŸ ¬æë°T IOÉYG Öéj ,á∏jƒW IóŸ RÉ¡÷G ΩGóîà°SG ºàj ⁄ PG -
3
2
»»FFÉÉHHôô¡¡ddGG ∂∂∏∏°°ùùddGG ΩΩGGóóîîàà°°SSÉÉHH ôô©©°°ûûddGG ÖÖjjòò°°ûûJJ
ôô©©°°ûûddGG ÖÖjjòò°°ûûààdd õõ««¡¡ééààddGG
`dG ɰ†jCG ™LGQCD-Rom.äɪ«∏©à∏d πYÉØàŸG
::IIOOhhõõŸŸGG IIÉɰ°TTôôØØddGG ΩΩGGóóîîàà°°SSÉÉHH ôô©©°°ûûddGG ÖÖjjòò°°ûûJJ
.¬H ܃ZôŸG ô©°ûdG ∫ƒ£d É≤ah IÒÑ dG hCG IÒ¨°üdG IɰTôØdG QÉàNG
ôô©©°°ûûddGG ∫∫ƒƒWW áá««©©°°VVhh QQÉÉ««ààNNGG
hhCCGG ääÉÉ««©©°°VVƒƒddGG ≥≥aaGGƒƒààJJ ..IIÉɰ°TTôôØØddGG ±±ôôWW óóææYY ääGGÎΪª««∏∏ŸŸÉÉHH ÉÉ¡¡««ddGG ôô°°TTDDƒƒee ôô©©°°ûûddGG ∫∫ƒƒWW ääÉÉ««©©°°VVhh
..¢¢üü≤≤ddGG óó©©HH »»≤≤ÑÑààŸŸGG ôô©©°°ûûddGG ∫∫ƒƒWW ™™ee √√òògg ääÉɰ°SSÉÉ≤≤ŸŸGG
-hCG º∏e 12 hCG º∏e9 hCG º∏e6 hCG º∏e 3 ÉeG ¬dƒW íѰü«d ô©°ûdG ¢ü≤H IÒ¨°üdG IɰTôØdG Ωƒ≤J
.º∏e 21 hCG º∏e 18 hCG º∏e 15
-º∏e 32 hCG º∏e 29 hCG º∏e 26 hCG º∏e23 ÉeG ¬dƒW íѰü«d ô©°ûdG ¢ü≤H IÒÑ dG IɰTôØdG Ωƒ≤J
.º∏e 41 hCG º∏e 38 hCG º∏e 35 hCG
B
,
::»»FFÉÉHHôô¡¡ddGG ∂∂∏∏°°ùùddGG ™™ee ôô©©°°ûûddGG áᣣbb’’ ΩΩGGóóîîàà°°SS’’
.¬∏«¨°ûJ IOÉYG πÑb ¿GƒK ™°†Ñd Qɶàf’G ºK øe h ¢ùHÉ≤dÉH ¬∏°Uh ºK øe h RÉ¡÷G ∞«bƒàH ºb
.RÉ¡÷G 𫨰ûJ πÑb ≥FÉbO ™°†H ô¶àfG ,ÉeÉ“ áZQÉa ájQÉ£ÑdG âfÉc GPG
.πeÉ dÉH ICÉÑ©e ájQÉ£ÑdG âfÉc GPG ∫ƒ°Uƒe ƒg h RÉ¡÷G 𫨰ûàH º≤J ’
,
B
,
áá««HHôô©©ddGG

21
ááeeóó≤≤ee
øe ójó÷G OÉ©HC’G »KÓãdG ô©°ûdG Üò°ûe ¿EÉa !í«ë°üdG QGô≤dG äòîJG ó≤d ,…ΰûŸG ÉfõjõY
.íjôe ΩGóîà°SG ∂ëæª«d ∂°SCGQ OhóM ™e ∞q« àj ¢ùÑ«∏«a
,á∏jƒW IóŸ ¢ùÑ«∏«a øe ójó÷G OÉ©HC’G »KÓãdG ô©°ûdG Üò°ûe ΩGóîà°SÉH ´Éàªà°SÓd
.á«dÉàdG äÉeƒ∏©ŸG IAGô≤H ∂ë°üæf
`dG äɪ«∏©J ‘ h ''íjô°ùàdG h π« °ûàdG'' èàæŸG πNGO OhõŸG Öq«à dG ‘CD-Rom,
.É¡ÑZôJ »àdG á°ü≤dG ≈∏Y ∫ƒ°üë∏d Ió«Øe íFɰüf h äɪ«∏©J OÉéjG ∂fÉ eÉH
kkGGóóLL ºº¡¡ee
RRÉÉ¡¡÷÷GG
»FÉHô¡ dG QÉ«àdG ™e ≥aGƒàj »°SɰSC’G ¢ùÑ≤ŸG ‘ ¬«dG ô°TDƒŸG »FÉHô¡ dG QÉ«àdG ¿CG ócCÉJ
.RÉ¡÷G π«°UƒJ πÑb ∂dõæe ‘ »°SɰSC’G
.AÉŸÉH ÓàÑj ’ »FÉHô¡ dG ∫ƒÙG h RÉ¡÷G ¿CG ócCÉJ
.ájƒÄe áLQO 35h 15 ÚH Ée IQGôM ‘ RÉ¡÷G øjõîàH ºb h øë°TG h Ωóîà°SG
CR-Rom
`dG ≈∏Y ßaÉMCD-Romiƒ°ü≤dG á«dÉ©dG IQGô◊G øeh áHƒWôdG h QÉѨdG øe äɪ«∏©àdG
.á«fóàŸG hCG
`dG ™°†J ’CD-Rom.á∏jƒW IÎØd Iô°TÉÑŸG ¢ùª°ûdG á©°TCG É¡«dG π°üJ »àdG øcÉeC’G ‘
`dG í£°S ¢TóîH º≤J ’CD-Rom `dG ≈∏Y Öà J ’CD-Rom.¢UÉN ∂«ª°S º∏≤H ’G
`dG ¿Éc GPGCD-Romπ°üJ ¿CG ¤G ’G ¬eGóîà°SÉH º≤J ’ ,OQÉH ¿É e ‘ ÉXƒØfi
.áaô¨dG IQGôM ¤G ¬JQGôM
`dG ∫ÉNOÉH ºbCD-Rom√ÉŒÉH É¡«∏Y ´ƒÑ£ŸG á¡÷G ¿ƒ J ¿CG ≈∏Y ¢Uô◊G ™e
.≈∏YC’G
»»FFÉÉHHôô¡¡ddGG øøëë°°ûûddGG
.∫hC’G ΩGóîà°S’G πÑb áYɰS 12 IóŸ RÉ¡÷G øë°ûH ºb-
..øøëë°°ûûddGG áá««∏∏ªªYY ∫∫ÓÓNN π𪪩©jj ’’ RRÉÉ¡¡÷÷GG ¿¿CCGG óóccCCÉÉJJ1
B
,
B
,
,
,
,
,
,
,
,
B
áá««HHôô©©ddGG
,
,
,

22
Table of contents
Languages:
Other Philips Hair Clipper manuals

Philips
Philips QC5099 User manual

Philips
Philips HQC486 Manual

Philips
Philips QC5380 User manual

Philips
Philips QC5055/40 User manual

Philips
Philips HQC241 User manual

Philips
Philips QC 5000 User manual

Philips
Philips HC9452/15 User manual

Philips
Philips HQ-C888 User manual

Philips
Philips QC5580/32 User manual

Philips
Philips QC5530 User manual

Philips
Philips QC5000 User manual

Philips
Philips QC5070/80 User manual

Philips
Philips QC5115/15 User manual

Philips
Philips HS015/03 User manual

Philips
Philips HC7650 User manual

Philips
Philips QT4015 User manual

Philips
Philips QC5125 User manual

Philips
Philips QC5099/00 User manual

Philips
Philips Norelco QC5580 User manual

Philips
Philips QC5090 User manual