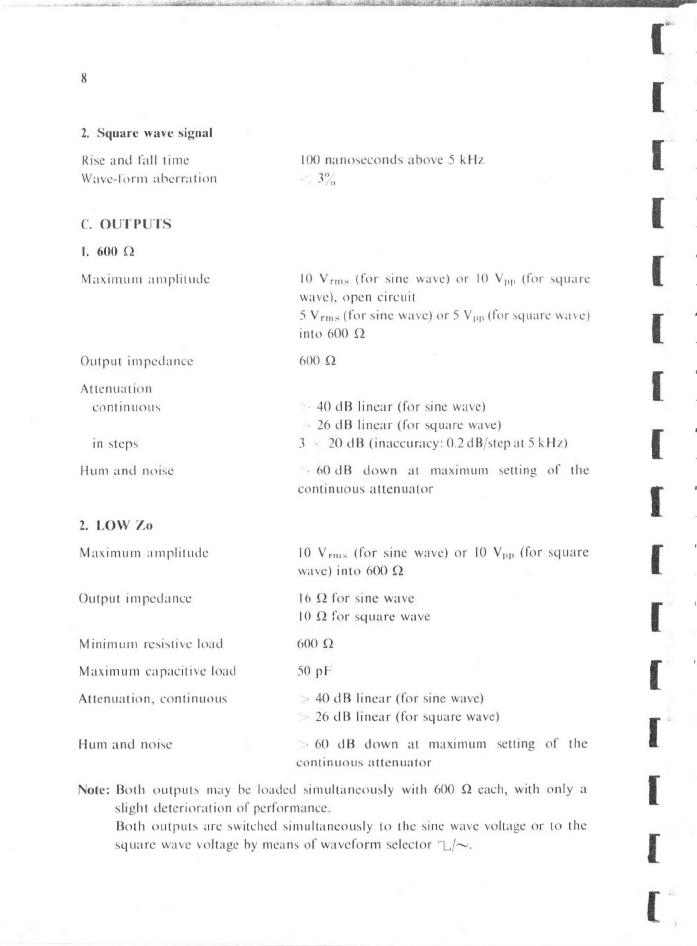
Philips PM 5125 User manual

1
~~~~..
`~
~,_.
,
,
r/~t
~Ta~c~.
_nJ+U~
PHILIPS
GENERATOR
PM
5125
5445
O51
25031
9499
450
04411
31511/1103
Manual.

Z
IMPORTANT
In
correspondence
concerning
this
instrument,
please
quote
the
type
number
and
the
serial
number
as
given
on
the
type
plate
at
the
rear
of
the
instrument.

3
Contents
GENERAL
I.
Introduction
II.
Technical
data
III.
Accessories
IV.
Description
of
the
block
diagram
5
6
10'
10
;
DIRECTIONS
FOR
USE
V.
Installation
17
VI.
Controls,
terminals
and
their
functions
18
VII.
Operation
20
SERVICE
DATA
VIII.
Circuit
description
23
IX.
Gaining
access
to
parts
2ff
X.
Survey
of
adjusting
elements
3p
XI.
Checking
and
adjusting
32
XII.
Fault
fi
nding
37
XIII.
Lists
of
parts
38
XIV.
Information
concerning
the
modular
system
and
optional
accessories
4$
A.
General
4g
B.
Coupling
accessories
50
C.
Coupling
instructions
S9
,

4
List
of
figures
Typical
frequency
response
curve
6
2
Typical
distortion
curve
7
3
Block
diagram
13
4
Rear
view
18
5
Controls
and
terminals
19
6
Load
diagram
20
7
Adjustment
of
distortion
22
8
Simplified
diagram
of
the
oscillator
23
9
Voltage
diagram
24
10
Thermis[or
circuit
25
I
I
Stand
assembly
28
12
Left-hand
view
indicating
the
adjusting
elements
31
13
Right-hand
view
indicating
the
adjusting
elements
31
14
Front
view
indicating
the
mechanical
components
39
IS
Stand
assembly
indicating
the
mechanical
components
40
16
Rear
view
indicating
the
mechanical
components
40
17A
Top
view
indicating
the
mechanical
components
41
17B
Bottom
view
indicating
the
mechanical
components
41
l8
Coupling
kit
52
19
Cover
kit
52
20
Stand
assembly
55
2l
Rack
-mounting,
exploded
view
57
22
Coupling
two
modular
units,
exploded
view
23
Printed
wiring
board
of
the
oscillator
GO
24
Printed
wiring
board
of
the
squarer
and
the
amplifier
61
25
Printed
wiring
board
of
the
power
supply
62
26
Printed
wiring
board
of
the
meter
circuit
63
27
Circuit
diagram
of
the
oscillator
65
28
Circuit
diagram
of
the
squarer,
the
amplifier
and
the
meter
circuit
72
29
Circuit
diagram
of
the
power
supply
79
30
Overall
diagram
86
[ I
L
J
L
i

1
.S.4f.'~i
...
.
...
.
A
Y
~
&
~..
ar;EASY
MlII~e9~i'sWJivZn
5
GENERAL
Introduction
0
The
generator
PM
5125
provides
stable
and
accurate
sine
and
square
wave
signals
in
the
frequency
range
from
10
Hz,
up
to
l
MHz.
The
midbank
frequency
response
is
lint
within
0.1
dB.
The
settling
time
(bounce)
is
very
short.
The
frequency
may
be
varied
in
steps
of
one
decade
and
continuously:
The
following
two
outputs
are
provided:
-
one
output
with
an
impedance
of
600
4.
The
output
voltage
may
he
varied
continuously
up
to
l0
V
(open
circuit)
as
well
as
in
four
accurate
steps
of
20
dB.
-
one
low
impedance
output.
The
output
voltage
may
be
varied
Conti-,
;
nuously
up
to
10
V.
Both
outputs
are
switched
simultaneously
to
sine
wave
or
to
square
wave.
The
output
voltage
is
monitored
by
means
of
a
built-in
voltmeterL
,
The
generator
frequency
may
be
synchronised
by
means
of
an
external'
signal.

6
Technical
data
i
]
0
Data
expressed
in
numerical
values
as
tolerances
are
guaranteed
by
the
factory.
r
The
other
numerical
values
are
for
information
only
and
indicate
the
f`
characteristics
of
an
average
instrument.
The
maximum
ambient
tem-
perature
is
45
°
C.
r
A.
FREQUENCY
Range
10
Hz...
1
MHz
in
fi
ve
overlapping
subranges
i
Inaccuracy
at
20
°
C
100
Hz
—
100
kHz:
<
3%
`
10
Hz
—
I
MHz:
~
5%
l
1E9
t
z05
Frequency
variations
at
mains
variations
off
10%
Temperature
coefficient
.0<
.oa
i
az
of
1
~
~ ~
l
-ol
oz
negligible
0.015%
per
°C
at
5
kHz
sF
ro
earm
s
F
.dl~[,I~o~
OA
~-
WN:
IOOHx
IkHz
Fig.
1.
Typicaljrequency
response
curve
AFH[
100MHz
IMN[
F
AE
OUE
NCY
_
M45066

Long
term
drift
Short
term
drift
B.
OUTPUT
SIGNALS
1.
Sine
wave
signal
Frequency
response
(See
Fig.
1)
Total
harmonic
distortion
(See
Fig.
2)
ID
05
08
0.7
0.
6
0.5
O.L
0.3
0.1
0,1
0.05%
in
7
hours
at
5
kHz
after
a
warming
up'
period
of
20
minutes
and
at
constant
ambient.
temperature
and
mains
voltage
0.005%
in
10
minutes
at
5
kHz
after
a
warming
;
up
period
of
20
minutes
and
at
constant
ambient
temperature
and
mains
voltage
I00
Hz
-
100
kHz:
Hat
within
~_
0.1
dB
referred
to
5
kHz
l0
Hz
-
I
MHz:
fl
at
within
~
0.2
dB
referred
to
5
kHz
10
Hz
-
100
kHz:
c3
°
io
at
600
kHz
<
1
°o
SPECIFICA
iION
IOHx
100Hz
IMHz
IONHz
Fig.
2.
Typrca!
distortion
curve
t
OOk
Hz
IMHx
FRE~VENCV
-►
MA6066A

J
s
I
Y
'
2.
Square
wave
signal
Rise
and
fall
time
Wave-Ibnn
aberration
C.
O
UT
PU"1'S
I.
600
4
Maximum
amplitude
Output
impedance
Attenuation
continuous
in
steps
Hum
and
noise
2.
LOW
""/
,a
Maximum
amplitude
Output
impedance
Minimum
resistive
load
Maximum
capacitive
load
Attenuation,
continuous
100
nanoseconds
above
5
kHz
3
"/„
10
V~,,,,
(for
sine
wave)
or
10
V,,,,
(for
square
wave),
open
circuit
5
V
r
,,,,,
(for
sine
wave)
or
5
V,,,,
(for
syuare
wave)
into
600
S2
600
4
40
d6
linear
(for
sine
wave)
26
dB
linear
(for
square
wave)
3
~
20
dB
(inaccuracy:
0.2
dB/s[epatSkHz)
60
dB
down
a[
maximum
setting
of
the
continuous
attenuator
10
V~,,,,
((or
sine
wave)
or
10
V„~
(for
square
wave)into
600
O
16
f2
for
sine
wave
10
52
for
square
wave
6(1(1
52
SO
pF
>
40
dB
linear
(for
sine
wave)
26
dB
linear
(for
square
wave)
Hum
and
noise
~
60
dB
down
at
maximum
setting
of
the
continuous
attenuator
Note:
Both
outputs
may
he
loaded
simultaneously
with
600
n
each,
with
only
a
slight
deterioration
of
performance.
Both
outputs
are
switched
simultaneously
to
the
sine
wave
voltage
or
to
[he
syuare
wave
voltage
by
means
of
waveform
selector
mo
t,/~.

D.
OUTPUT
METER
Indication
Scales
Inaccuracy
E.
SYNCHRONISATION
Range
Required
input
voltage
Maximum
input
DC
voltage
Input
impedance
F.
POWER
SUPPLY
The
meter
is
switched
simultaneously
by
means
of
the
waveform
selector
to
indicate:
a.
the
sine
wave
output
voltage
r.ms,
open
circuit,
or
b.
the
square
wave
output
voltage
p
-p,
open
circuit.
0—lOV
0-16dBm
<
5/
of
full
scale
deflection
max.
7%
{-
2%
of
set
frequency
with
a
negligible
deteriora-
tion
of
performance
,,
40
mV
r
,,,„
per
%hold
j-
I
S
V
100
kS2
Supply
voltage
I
IS
V
or
230
V
_~
IS"/„
Frequency
50
—
100
Hz
Power
consumption
28
W
G.
MECHANICAL
DATA
Dimensions
Weight
3
module
cabinet
(see
chapter
XIV)
5
kg
(I
I
Ibs)

,~
Accessories
Manual
Optional
accessories
Coupling
kit
PM
9500.
® [
~
-
A
selection
of
5
different
cover
kits
PM
9502...
PM
9506.
-
Rack
-mounting
kit
PM
9510
for
mounting
a
6
-module
cabinet
into
a
19"
rack.
-
Extension
test
board
4822
466
10165
for
carrying
out
measurements
r
on
the
plug-in
printed
wiring
boards
while
the
instrument
is
in
■`
operation.
The
description
and
ordering
information
of
these
accessories
are
given
in
chapter
XIV
of
this
manual.
Description
of
the
block
diagram
(See
Fig.
3)
This
instrument
contains
aphase-shift
oscillator,
an
amplifier,
a
squarer,
a
voltmeter,
two
attenuators
and
a
double
power
supply.
r
OSCILLATOR
The
phase
-shift
oscillator
consists
of
three
unity
gain
amplifier
stages.
The
fi
rst
two
amplifier
stages
give
each
aphase-shift
of
90°
for
the
oscillating
frequency
and
the
third
amplifier
stage
gives
aphase-shift
of
180°.
The
output
signal
of
the
third
amplifier
stage
is
fed
back
to
the
input
of
the
fi
rst
amplifier
stage.
The
amplifier
stages
are
coupled
by
means
of
impedance
converters
(emitter
followers).
The
unny
loop
gain
is
maintained
by
means
of
a
thermistor,
which
is
a
r'
part
of
the
collector
impedance
of
the
third
amplifier
stage.
FREQ.
Hz(SK3,
Rlr
-
Rlrt)
~('
The
frequency
of
the
oscillator
may
be
varied
continuously
by
means
of
the
double
potentiometer
Rlt
-
Rl~t
and
in
steps
of
one
decade
by
means
of
the
switch
SK3.
r
l
,,,

SYNC.
IN
(BU3)
The
frequency
of
the
oscillator
may
be
synchronised
by
means
of
an
external
source
connected
[o
the
terminal
BU3.
WAVEFORM
SELECTOR
'Z,/
(SK2)
The
sine
wave
generated
in
the
oscillator
is
applied
either
to
the
amplifier
(via
the
continuous
attenuator
R2r)
or
to
the
squarer
by
means
of
the
selector
switch
SK2.
In
position
~
of
SK2
the
sine
wave
signal
is
amplified
and
then
fed
to
the
output
terminal
LOW
Zo
(BU1),
to
the
step
attenuator
SK4
and
to
the
meter
M1,
which
monitors
the
output
voltage
at
BUI.
In
position
2,
of
SK2
the
squarer
converts
the
sine
wave
signal
into
a
square
wave
signal;
then
the
square
wave
signal
is
also
applied
to
the
terminal
LOW
Zo
(BU
l),
tothe
step
attenuator
SK4and
to
the
meter
M,1.
AMPLfTUDE
(R2r
—
R2rr)
~~
The
amplitude
of
the
output
signala[the[erminals
LOW
Zo
(BUI)
and
600
4
(BU4)
may
be
varied
continuously
by
means
of
the
double
poten-
tiometer
AMPLITUDE
(R2r
—
R2tt),
STEP
ATTENUATOR
(SK4)
The
amplitude
of
the
output
signal
at
the
terminal
600
S2
(BU4)
m4y
also
be
varied
in
steps
of
20
d6
by
means
of
the
attenuator
switch
SK4.

(3
SK3
FREOUENCV
RANGE
SELECTOR
1
AMPLIFIER
AMPLIFIER
T522
PHASE
SH/F
i
90
°
T525
PHASE
SHIFT
90
°
SVN
C.
IN
Q
BU3
3
AMPLIFIER
R1
Z
-R1II
GANGED
CONTINUOUS
FREQUENCY
CONTROL
T528-29
PHASE
SH/F!
!80
°
AMPLITUDE
~
CONTROL
T530-T53L
R<6
oscl«aroR
OUTPUT
STAGE
T532
ti
SQ
UARER
SCRMITT
TRIGGER
T
561---63
1
OUTPUT
STAGE
T
S6<
-
65
R
2
I
_R2II
GANGED
CONTINUOUS
AT
TEN
UATOR
AMP,'_
ICIER
~'
T581-BG
OUTPUT
STAGE
T
585-86
SK2
WAVE
FORM
SELECTOR
STEP
ATTEN
UATOR
SK4
8U4
60071
BU1
LOW
Z°
M
A
5045
Fig.
3.
Block
diagram

17
DIRECTIONS
FOR
USE
Installation
For
coupling
two
or
more
modular
units
refer
to
chapter
XIV.
A.
ADJUSTMENT
TO
THE
LOCAL
MAINS
VOLTAGE
(See
Fig.
4)
The
instrument
may
be
adjusted
to
a
mains
voltage
of
100...
130
V
or
200...
260
V
by
means
of
switch
SK12
on
the
rear
panel.
Incase
of
a
mains
voltage
of
100...
130
V,
the
fuse
VLI
rated
at
250
mA
(delayed
action)
should
be
replaced
by
a
fuse
with
a
500
mA-rating
(delayed
action).
B.
EARTHING
(See
Figs.
4
and
5)
The
instrument
should
be
earthed
in
conformity
with
the
local
safety
regulations.
This
can
be
done:
a,
via
the
supplied
3
-core
mains
cable,
b.
via
the
earthing
terminal
BU12,
marked
~,
on
the
rear
panel,
c.
via
[he
earthing
terminal
BU6, marked
1,
on
the
front
panel.
NOTE:
For
operation
as
a
single
unit
connect
BU6
to
BU7
The
units
of
the
modular
system
have
asemi-floating
circuit
so
that
the
circuit
need
to
be
earthed
at
one
point
only
when
several
units
are
coupled
together.
Earth
currents
which
may
give
rise
to
hum
are
thus
avoided.
The
terminals
BU6
and
BU12
are
connected
to
the
metal
frame
of
the
cabinet.
The
signal
earth
is
connected
directly
of
the
terminals
BU2,
BUS
and
BU7,
marked
-~-,
and
to
the
cabinet
via
a
100
kit
resistor.
This
provides
the
following
output
possibilities:
-
output
from
a
circuit
which
is
earthed
by
linking
BU7
(1)
to
BU6
(1)
-
output
from
a
circuit
which
is
earthed
via
other
coupled
modules
or
via
auxiliary
equipment.

is
Controls,
termincls
and
their
functions
(See
Figs.
4
and
5)
POWER
ON
(SK1,
LAI)
Frequency
dial
(RI)
FREQ.
Hz
(SK3)
AMPLITUDE
(R2)
dB-attenuator
(SK4)
Waveform
selector
~,/~
(SK2)
Output
terminal
LOW
Zo
(BUl)
Fig.
4.
Rear
view
CD12
SK12
VLl
On/off
switch
with
neon
indicator
Continuous
frequency
control
Frequency
control
in
steps.
The
output
frequency
given
in
Hz
is
equal
to
the
product
of
the
setting
of
SK3
and
the
setting
of
RI.
Continuous
control
of
the
amplitude
at
both
output
terminals
BUl
and
BU4.
Switch
for
setting
the
attenuation
of
the
ampli-
tude
at
terminal
BU4
in
four
steps
of
20
dB,
viz:
—60
dB,
—40
dB,
—20
dB
and
0
dB.
Switch
for
selecting
the
output
waveform
at
the
terminals
BU1
and
BU4.
The
output
voltage
at
this
terminal
may
be
varied
continuously
by
means
of
R2.
The
output
impedance
is
l0
S2
for
the
square
wave
and
16
f2
for
the
sine
wave.
CD11
MA67B3
f~
~
J
C
1
[~
J
~J
~J
l~`
]
J
C)
C1
~1

19.
Output
terminal
600
S2
(BU4)
SYNC.
IN
(BU3)
Signal
earth
(BU2,
BUS,
BU7)
Chassis
earth
(BU6,
front
panel)
(BU12,
rear
panel)
SK12,
rear
panel
CDI1,
rear
panel
CD12,
rear
panel
R1
BU3
BUS
The
output
voltage
at
this
terminal
may
be'
varied
continuously
by
means
of
R2
and
in
steps
of
20
dB
by
means
of
SK4.
The
output
impedance
is
600
S2.
Input
terminal
for
the
external
synchronisation'
signal.
Terminals
to
which
the
signal
earth
is
connected
Earthing
terminals
connected
to
Che
metal
frame`
of
the
cabinet.
The
signal
earth
and
the
chassis
earth
may
be
connected
by
linking
BU6
to
BU7.
Also
refer
to
chapter
V
—B.
Mains
voltage
selector
Mains
input
terminal
Mains
output
terminal
SK3
R2
Fig.
S.
Contro/s
and
terminals
LAi
SKl
SK4
BU6
MA6281
Mt
BU1
SK2
BU2
BU4
BU7

20
Operation
A.
CONNECTING
THE
LOAD
(See
Figs.
5
and
6)
—
Connect
the
load
to
the
terminal
"600
S2"
(BU4)
or
to
the
terminal
LOW
Zo
(BU
I).
—
The
resistive
load
connected
to
the
terminal
LOW
Zo
(BUI)
should
be
at
least
600
!Z.
The
capacitive
load
connected
to
the
same
terminal
should
not
exceed
50
pF.
—
The
load
connected
to
the
terminal
600
n
(BU4)
may
be
very
low.
—
Both
output
terminals
may
be
loaded
simultaneously,
with
a
slight
deterioration
of
the
performance
(as
indicated
in
chapter
II
"TECHNICAL
DATA"),
in
accordance
with
Fig.
6
and
the
table
below.
TABLE
OF
LOADS
Nornea/
minimum
(oad
impedance
(Maximum
rurrenr
/~
-
/7
mA)
Absofure
minimum
/oad
impedance
(Maximum
current
/t
=-
23
mAJ
R
a
=
o0
R
a
=600
S2
R6
=
00
Rp
-=
600
!7
Rp
=approaching
0
S2
Rp
.=
approaching
0
S2
R
a
--
600
S2
Rp
----
600
S2
R
a
=
400
S2
R
a
—
600
n
R
a
--
1200
n
It=I
I
+I2=mox.25mA
~
r.m,s.
P
-
P
Fig.
6.
Load
diagram
MA5043
a
r
l
r
r
t
r
l
r

21
B.
SWITCHING
ON
-
Switch
on
the
instrument
by
means
of
the
switch
POWER
ON
(SKI).
The
indicator
LAI
should
then
light
up.
-
Wai[
for
20
minutes
before
proceeding
with
the
following,
if
,a
stable
output
frequency
or
voltage
is
required.
C.
SELECTING
THE
FREQUENCY
1.
-Select
the
frequency
range
by
means
of
the
switch
"FREQ.
Hz"
(SK3).
-
Adjust
the
desired
frequency
within
the
selected
range
by
means
of
the
frequency
dial
(Rlr
-
Rln).
2.
-
if
synchronisation
of
the
generator
frequency
is
requited;
then
apply
an
external
signal
to
the
terminals
SYNC.
IN
(BU3
and
BU5).
This
signal
should
have
an
amplitude
of
40
mV
per
peccent
of
required
hold.
For
the
initial
set-up
make
sure
that
the
generator
frequency
corresponds
to
the
frequency
of
the
external
signal;
D.
SELECTING
THE
OUTPUT
VOLTAGE
-
Select
the
waveform
of
the
output
voltage
by
means
of
the
'switch
-
Set
the
attenuator
switch
"—dB"
(SK4)
to
position
0.
-
Adjust
the
amplitude
of
the
output
voltage
at
the
terminals
"LOW
Zo"
(BUl)
and
"600
S2"
(BU4)
continuously
by
means
of
the
attenuator
"AMPLITUDE"
(R2),
as
indicated
by
the
meter
ML
-
Adjust
the
amplitude
of
the
output
voltage
at
the
terminal
"6p0
S2"
(BU4)
in
steps
of
20
dB
by
means
of
the
attenuator
switch
"-dB"
(SK4).
Notes
1.
The
meter
M1
indicates
the
output
voltage
at
the
terminal
"LOW
Zo".
When
no
load
is
connected
to
the
terminal
"600
S2",
then
the
output
voltage
at
this
terminal
is
equal
to
the
indication
of
M
I
divided
by
a
factor:
-
1
in
position
0
dB
of
the
switch
"—dB"
(SK4)
-
10
in
position
—20
dB
of
the
switch
"---dB"
(SK4)
-
100
in
position
—40
dB
of
the
switch
"—dB"
(SK4)
-
1000
in
position
—60
dB
of
the
switch
"—d6"
(SK4).
When
a
600
S2
-load
is
connected
to
the
terminal
"600
Sl",
then
the
output
voltage
at
this
terminal
is
halved.

22
The
top
scale
of
the
meter
M
1
is
calibrated
for:
—
RMS
values
in
the
case
of
sine
wave
operation
—
peak
to
peak
values
in
the
case
of
square
wave
operation.
The
bottom
scale
of
MI
indicates
the
output
variations
in
dBm
(0
dBm
1
mW
into
600
n
(0.775
V)).
2.
When
the
waveform
selector
~,/~
is
in
position
2„
it
is
recommended
to
screen
the
output
at
the
terminal
"600
S2"
for
optimum
waveform
in
the
case
that
the
attenuator
"—dB"
is
set
to
its
lowest
position
(-60
dB).
3.
The
trimming
potentiometer
R45
(see
Fig.
12)
controls
the
distortion
and
the
settling
time.
A
lower
distortion
and
a
higher
settling
time
are
obtained
when
R45
is
turned
anti
-clockwise.
A
higher
distortion
and
a
lower
settling
time
are
obtained,
when
R45
is
turned
clockwise.
(see
Fig.
7)
i,<
ID
09
OH
07
0.
6
0.
5
0<
03
0.2
0.1
0
IO
Nz
Rt,S
MAXIMUM
R46
NORMAL
R<5
MINIMUM
SPECIFICATION
IOOMx
IM
Mx
Fig.
7.
Adjustmen(
ojdistortion
IOkNz
IOOk
Nz
IM
Nz
FRED
UENLV
MA5613A

23
SERVICE
DATA
Circuit
description
A.
OSCILLATOR
(See
Figs.
8,
9,
10
and
27)
The
sine
wave
oscillator
used
in
this
instrument
is
a
phase
-shift
oscillator
consisting
mainly
of
three
amplifier
stages
TS22,
TS25
and
TS29,
which'
are
coupled
by
means
of
the
emitter
followers
TS23—TS24,
TS26—TS27
and
TS30—TS21
respectively.
Two
identical
frequency
control
circuits
have
been
used.
The
fi
rst
one
is
connected
between
the
collector
and
the
emitter
of
TS22
and
consists,
of
the
capacitors
C21...C27
and
the
resistors
R24
—Rh
—R25.
The
second
one
is
connected
between
the
collector
and
the
emitter
of
T525
and
consists
of
the
capacitors
C28...C34
and
the
resistors
R30—Rlrr—R31.
These
networks
provide
each
aphase-shift
of
90°
at
the
oscillation
frequency,
f
o
.
.,a~
Fig.
8.
Simplified
diagram
of
the
oscillator

In
Fig.
9
the
phase
relationship
between
the
voltages
at
the
different
points
of
the
oscillator
has
been
drawn.
This
fi
gure
shows
that
the
phase
-shift
between
the
input
of
the
fi
rst
amplifier
stage
TS22
and
the
output
of
the
fi
rst
frequency
control
circuit
is
90°;
thus
the
phase
-shift
between
V,
and
Vy
is
90°.
The
same
applies
to
the
second
amplifier
stage
TS25
and
the
second
frequency
control
circuit;
thus
the
phase
-shift
between
V
s
and
V
s
is
90'.
The
phase
-shift
due
to
the
third
amplifier
stage
TS29
is
180'';
thus
the
phase
-shift
between
V
S
and
V
6
is
180°.
The
total
phase
-shift
is
then
90°
-}
90°
}-
180"
_=
360°.
Consequently,
the
input
voltage
V,
and
the
output
voltage
V
6
are
in
phase.
The
frequency
is
changed
in
steps
of
one
decade
by
switching
the
capa-
citors
C21...C27
and
C28...C34
in
steps
by
means
of
SK3.
Continuous
frequency
control
(ratio
1
10)
is
effected
by
means
of
the
double
potentiometer
Rlt
--
Rltt
The
output
amplitude
may
be
adjusted
with
R40
and
R42.
The
thermistor
R44
keeps
the
output
amplitude
constant.
R42
is
adjusted
in
such
a
way
that
Rs
(see
Fig.
10)
becomes
complementary
to
the
differential
resistance
of
R44.
Hence
n
V
total
becomes
zero.
pl
The
diodes
GR21--GR22
introduce
a
controlled
amount
of
non-linear
distortion,
which
results
in
a
shorter
settling
time
of
the
sine
wave
when
switching
over
to
the
lowest
frequency
range.
The
current
through
GR21—GR22
may
be
adjusted
with
R45.
V
t
V
fi
V4
V
2
V
5
V3
Frg.
9.
Voltage
diagram
Table of contents
Other Philips Inverter manuals

Philips
Philips SCP5300 Instruction Manual

Philips
Philips SCP5150 User manual

Philips
Philips PM5324 User manual

Philips
Philips PM 5508 User manual

Philips
Philips SCP5150 User manual

Philips
Philips Bodine ELI-S-600 User manual

Philips
Philips PM 5167 User manual

Philips
Philips ELI-S-20 User manual

Philips
Philips PM 5326 User manual

Philips
Philips Bodine ELI Series User manual
Popular Inverter manuals by other brands

ProVista Technology
ProVista Technology TSW600 Basic operating manual

Minarik
Minarik PCMXP Series user manual

IMEON ENERGY
IMEON ENERGY 9.12 installation guide

m-Dimension
m-Dimension 12Z8NV owner's manual

Bohmer-AG
Bohmer-AG i Series Operation manual

FLOWTECH
FLOWTECH flowcon Operation and maintenance manual