Phisung E06 User manual

Android GPS FHD Smart Mirror Camera
English Quick Start Guide

[To Customer]
Dear Customer,
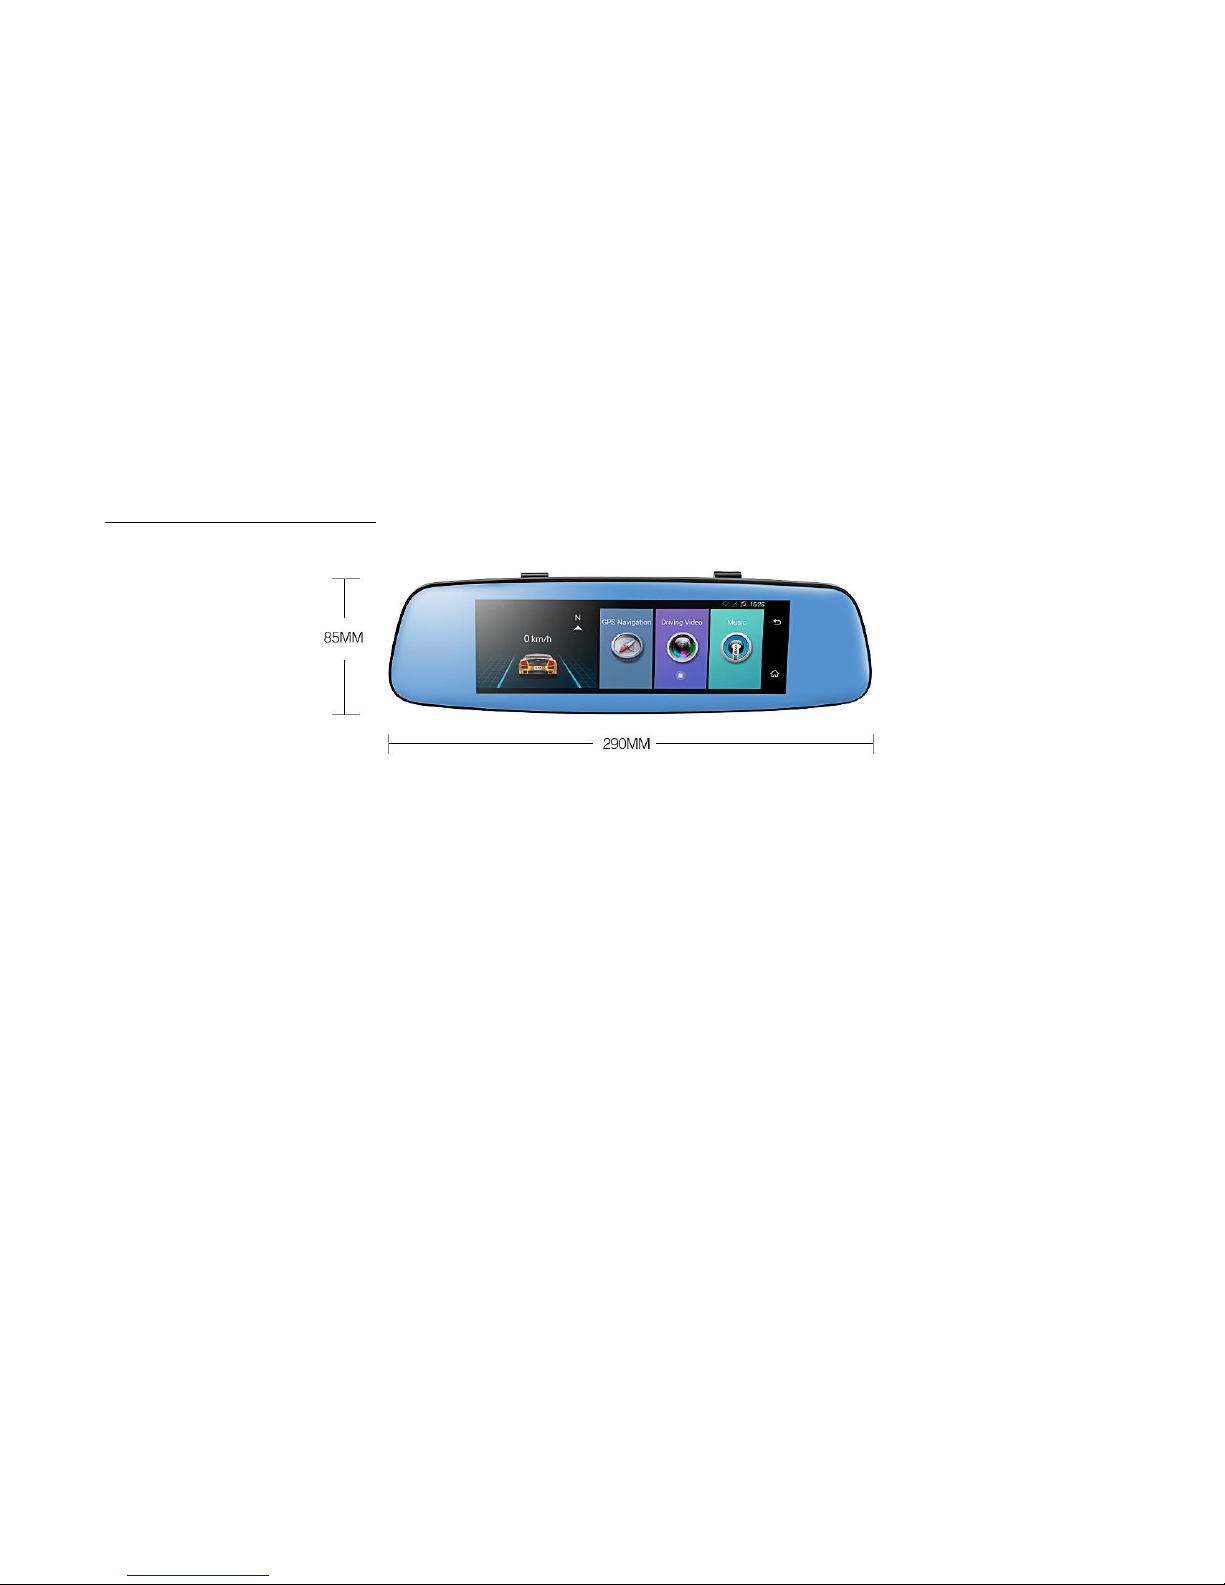
Thanks for buying our car camera, it is our honor and pleasure to serve you to using our product.
Before using this product, please read this manual very carefully and keep it properly. As production date and batch difference, the instruction maybe have
difference with the actual object. If any discrepancy in future, please adhere to the actual product instead.
Hope you will like this product and then we can build long term business relationship in near future. Your kindly feedback and support will prompt us to do the
better. Thank you.
Precautions:
Please observe all precautions before using our this car camera. Please follow all procedures outlined in this manual to correctly operate the device.
1. Do not attempt to disassemble or alter any part of the device that is not described in this guide.
2. For your safe driving, please don’t operate this car dvr when you are driving, and avoid any traffic accident by illegal operation.
3. Please don’t operate this car dvr when your car parking at gas station. Thank you.
4. Please test the GPS navigation outdoor. Power on dvr to start test it at spacious space , usually it will take around 1 minute to search the satellites and make the
gps location until the car dvr receive more than 4 satellites .
5. When this car camera locates at following surroundings: Indoor testing/ In the tunnel/ high building block/ bad weather/ dense of obstacles (trees or buildings) ,
etc. It maybe affect the GPS satellites signal and mobile communication reception.
6. Do not use other factory’s power cable to power supply our device. Please do not bend or press the power cable , so as to avoid machine failure or even fire
caused by device short-circuit and other accidents.
7. Due to the continuous improvement of the products, such as the user interface ,functions and technical parameters in this manual are modified without prior
notice.
8. This manual has been carefully checked, but has not ruled out the possibility of a small mistakes. If found, please kindly contact our company customer service
center.
9. All photos here are for reference only, specifications are subject to the actual product.

[Product Overview]
This device is with quad core processor, 16G EMMC + 1G DDR , and built in wifi, 4G, Bluetooth, dual channels video recording , as well as with Android 5.1 system.
Part one: basic functions
1. Dual Cams Recording & Parking view with line
It’s video quality is FHD1080P in front camera, back is 640*480 resolution. It supports dual cams recording simultaneously, G-sensor, loop recording function.
2. 4G internet Surfing
This device support internet surfing via 4G/3G/2G micro sim card. It supports online GPS navigation/Listen to Music/Webpage browse and remotely video
monitor . 4G internet surfing : GSM:900(B8)/1800(B3); WCDMA:2100(B1)/900(B8); LTE:FDD,2100(B1)/1800(B3)
3. GPS Navigation
With external GPS+BD high sensor GPS antenna, you could install GPS Map as your prefer, and allows you to choose the optimal route and reach your
destination without unnecessary trouble.
4. Bluetooth Handsfree
After pairing the bluetooth between dvr and smart phone, you could make and receive calls directly from the mirror dvr itself with the built-in MIC and speaker.
5. ADAS Plus
ADAS Plus function helps your driving safely and conveniently.
➢LDWS (Lane Departure Warning Systems)
A warning is triggered when lane departure is detected based on real time video recorded.
➢FCWS (Forward Collision Warning System)
A warning is triggered when a possible forward collision is detected based on real time video recorded.

➢FVMA (Forward Vehicle Moving Alarm)
An alert is triggered when the vehicle ahead of you moves based on the real-time video recorder.
6. Car Assist App Mobile Remote Monitor
With our unique remote monitor mobile app “Car Assist” and internet connection, it allows you to remote monitor your car driving path, and what happened
around your car. It supports live time preview, video playback and remote parking monitor in car assist app. Also, you could make some settings up of the car
dvr of brightness, video volume and etc.
7. WiFi hotspot
This device built in wifi hotspot,
8. FM transmitter function
Thanks to the FM transmission function, you could synchronize the mirror dvr music to your car audio with ease.
Remarks: This is not FM radio function
9. Multimedia entertainment
It built in speaker, you could listen to music, watch movie for fun.
10. Systems update
We can update the system online via OTA, or via the TF card.

Part two: E06 product structure.
Image 1: car dvr touch screen panel
1. 7.84 inch Touch Screen
You could touch operate here about the applications, and playback the video files directly on car dvr.

Image 2: car dvr interface and button
2. Power button
➢Power ON/OFF
When car dvr at OFF status, keep pressing Power button for 2-3 seconds, will turn on the car dvr;
Remarks: when you power on the device, please connect with our standard car charger into cigar lighter to power supply this device, do not use other DC power
cable or test it at home (Home’s power is not enough power for this device)
When car dvr at ON status, press again it for 2-3 seconds, you could shutdown the car dvr.
Remarks: when you car engineer is off, this car dvr will automatically enter sleep mode after 5 seconds. If you also want the car dvr power off, please manually press

the power button to turn off the car dvr.
➢Screen Sleep Mode
---When dvr at ON status, press the Power button, it will enter the screen sleep mode marked with position and time.
---Press again the Power button, it will get the screen background light totally off, the device just like the normal rearview mirror. Even if under screen sleep mode,
other functions: video recording/GPS navigation/ FM transmitter ect function still is working simultaneously.
---Press again, it will light up the screen display.
Image 3: Screen Sleep Mode marked with position and time
3. Front Lens
It could be adjustable and shoots in 1080p video.
4. Fixed Bucklet
The car dvr ‘s Fixed bucklet will be used the rubble rings to be attached on the car rearivew mirror.
5. DC power Mini USB Port
It is for car charger connecting to power supply the car dvr.
6. AV IN Port
Before turn on the dvr, please plug the rear camera into the AV IN port for dual camera recording and auto reverse parking functions.

7. TF card slot
Before turn on the car dvr, please insert the Class 10 High speed SDHC micro sd card into TF card slot for video recording. TF card maximum capacity support 32GB.
8. 4G/3G/2G Micro-SIM card slot
Insert the micro-sim card into this slot for internet surfing.
9. GPS antenna port
Before turn on the car dvr, please connect the GPS antenna for GPS satellites searching and location.
10. Speaker
Build in speaker, you could play the video with sound and music files at this device.
Please note that correct direction when we plug in the TF and SIM card into the dash camera, otherwise the camera can not find the SD card and SIM card.
SIM card plug direction: the chip side face to the dvr screen panel surface, the notch is upward, and then press and insert it (Image 4):
Image 4: SIM card insert way
TF card plug direction: the chip side face to the dvr backside surface, the notch is downward, and then press and insert it (image 5):
Image 5: TF card insert way

Part three: menu interface
After the car dvr switch on, it will enter the dvr’s main user interface as below:
Slide from right to left the menu, you will find “GPS navigation/ Driving Video/Music/Apps/ Bluetooth/FM station/Settings”

Image 6: Main Menu Interface
1. it will display the driving speed and direction.
Remarks: If GPS signal is weak, it will influence the speed accuracy)
2. GPS Navigation: click it will enter the default GPS navigation
3. Driving Video: click it will enter car video recording menu and settings
4. Music: click it will play the local music files from device or memory card.

5. Apps: click it will enter the systems default application and other app you downloaded into this car dvr as below image:
Image 7: App List
Here are some pre-installed applications for refer:
Browser: default Browser
CarPlayer: playback the video files from car dvr
CarSettings: setting of the car dvr
File Manager: include the internal dvr storage files and external sd card folder
FMStation: FM transmitter function entrance
Google Settings: setting of google
Google Map: pre-install google map, you also could download and install other map
Music: listen to music files from device or memory card
Google Store: support download other application into this device

6. Bluetooth shortcut: click it will quickly enter Bluetooth hands-free settings menu
7. FM station: click it will enter FM transmitter function menu
8. Settings: you could set up car dvr settings and android settings.
9. Back to previous menu
10. Back to main menu
[Main Functions Introduction]
Part one: function of video recording
Start video recording:
Insert the TF card into car dvr, and then turn on dvr, it will automatically start the front and rear camera video recording.
You could click the “Driving video” on main interface or click the dvr float mini window (If you choose “show Float button”) as image 6 to enter the driving

video recording menu as below (Image 7):
This device support Picture in Picture function
Image 8: Main menu with dvr float mini window
Dvr Float Mini
window

Image 9: Driving video recording menu
Function keys for video recording:
1. Switchover of front/PIP/ rear camera display
This car dvr support Auto Reverse Parking:
when get the car in reverse gear, the car dvr will automatically switch to the rear camera image with parking line preview (Image 8). After parking signal
disappear, the rear camera preview will automatically exit and back to previous preview mode.
Image 10: Auto Reverse Parking
Recording status
PIP mode
Time water marker
Playback
video/ph
otos
Start/Stop video recording
Take Photo
DVR settings
ADAS
Parking Line
Adjust the parking line

2. Video and photo files playback:
there are 2 ways to check and playback the current video files:
a) Enter “Driving Video” menu, and then click this button will enter the video files list as below (Image 8):
you could select the video files by time or by camera to playback it, also you could delete the video files you want.
➢Click one video file to playback, even if it will show dvr whole record duration, but it just will start the video to play by specified time you selected.
Image 11: Playback View List
b) Click the apps button to enter the Apps list menu, and then click car player button to play the video you want. Here you could choose Front
camera or Back Camera video to playback as below (Image 7):
Plus, you could slide touch the specific area to adjust the brightness/volume, or fast-forward/rewound the video files (as orange color arrow):
Select by time
Select by cam
Lock files
List/Thumbnails
view switch
Switch to the
delete mode
menu

Image 12: DVR car player
3. Start/Stop video recording
4. Take one photo
5. Click it will enter car dvr settings :
Play/ Pause
Current video
file whole
duration
Current video
Switch to the delete
mode menu
Front/Back cam
Video files list
Touch slid up
and down at
this area to
adjust the
brightness+/-
Touch slid up and
down at this area
to adjust the
Volume +/-
The area can be fast-forwarded /
rewound by sliding left and right

Image 13: car dvr settings
➢Auto-Save Time (Take effect after restarting video): set up the video loop recording time to 1min/2mins/3mins
➢Auto Exit Preview: set up the time of automatically exit from video recording preview to the main menu when dvr no any operation to save the power
➢Front Camera Quality (Take effect after restarting video): High (1080p) / Normal (720p)
➢Mute Record :ON/OFF of mute function for video recording
➢Show Float Button: ON/OFF of dvr mini float window to exit the video recording .If choose turn on Float window , you could see the dvr video recording
preview and other application (eg, GPS navigation ) at the same time.

➢Display GPS Water Mark : ON/OFF of gps speed water mark
➢Current Version : check the dvr software version
6. Click it will enter ADAS settings (Image12):
Image 14: ADAS settings
➢How to use the ADAS function?
A-Installation and Adjustment
A.1. Installation
Finish the installation, we need to adjust the camera location according the image taken by the camera. We suggest the right ahead is in the area 1/4 of the image,
ground level is in the middle of 1/5 area of the image.

Image 15: ADAS adjustment
ADAS can run correctly if we meet the above requirement. If the installation deviation is large, the experience maybe will be bad. Also please refer to the below
pictures:
Image 16: ADAS adjustment

A.2. Manual Adjustment
User can adjust the camera position manually, that will be good to finish the installation quickly.
Slide the horizontal calibration line, make it is aligned with the land line. Land line means the intersection line of sky and ground.
Slide the vertical calibration line, make it aligned with the right ahead of the car. Right ahead of the car means vertical connect line of meeting point of the two
lane and the middle point of the car engine cover.
A.3. Automatic calibration
First time to use the camera, it need automatic calibration to activate the function.
And we need the follow terms to make the automatic calibration entry into condition.
Meet the suggested requirement ( large deviation on left-or-right will lead to non-calibrated, vertical or horizontal deviation will lead to non-calibrated or
delayed the calibration)
Driving on the road with the speed more than 20KM/h
If we all meet the above requirements, the driving time need to be more than 1 minute.
After calibration, ADAS function will enter into use, and the estimated distance will be display above the frame of the ahead car
B- LDWS (lane departure warning system)
B.1. Trigger conditions
Auto calibration is finished
Driving speed is more than 50KM/h, and the GPS signal is normal (GPS speed is lower than car dashboard speed)
The left or right wheel of the car press to the clear driving lane
The driving turning radius is more than 250m
B.2. Warning status output
Left wheel press to the lane: lane area will turn red with prompt tone
Table of contents
Popular Automobile Accessories manuals by other brands

Snowsport
Snowsport all terrain plow Installation and operator's manual

Yakima
Yakima Landing Pad 11 manual

Hamg Shing
Hamg Shing KBT120N-51 user guide

BMW
BMW Universal Bluetooth manual

Metra Electronics
Metra Electronics AW-PW22 installation instructions

Fiamma
Fiamma KIT FORD CUSTOM L1 installation instructions