Phone Labs Cell Phone User manual


This page is intentionally left blank.
Enterprise Telephone User Guide

Contents
Installation
.
...............................
.
...............................
.
...............................
.
..........................
1
C
ontents
.
...............................
.
...............................
.
...............................
.
.........................
1
S
et Up
.
...............................
.
...............................
.
...............................
.
.............................
1
C
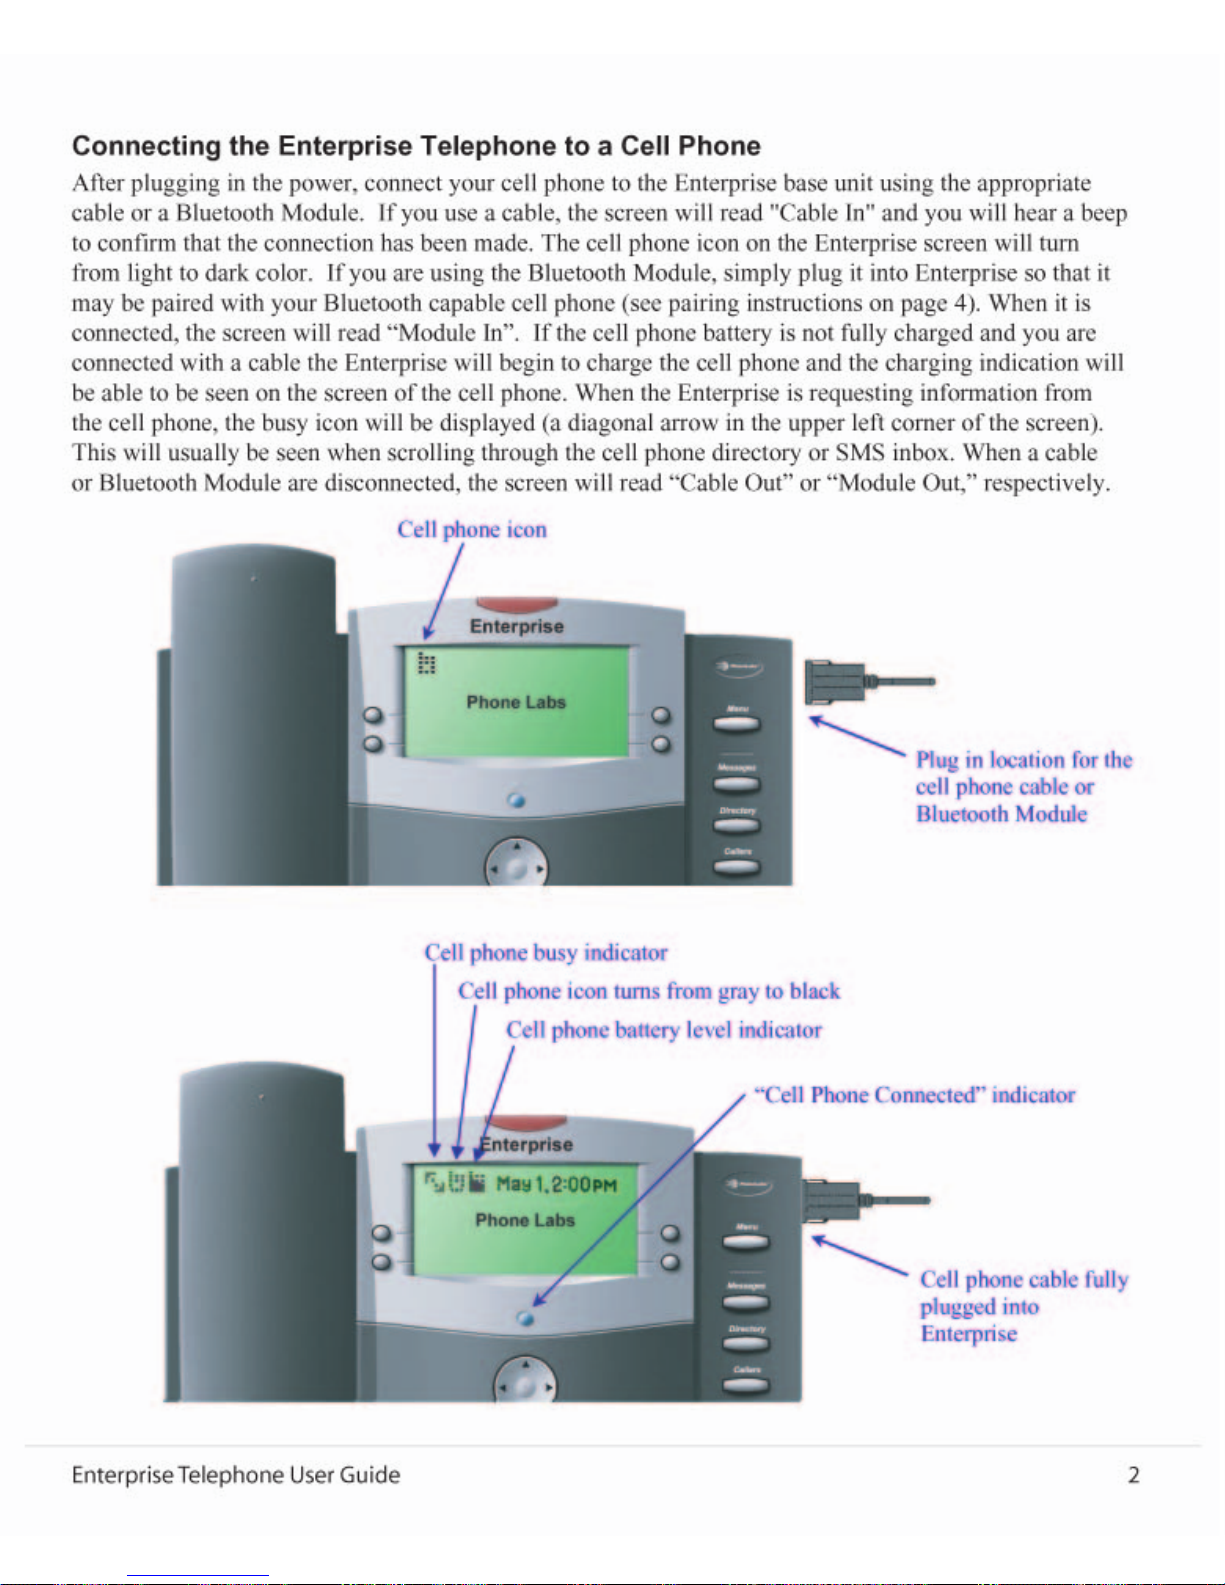
onnecting the Enterprise to a Cell Phone
.
...............................
.
...............................
.
....
2
F
eature Diagram
.
...............................
.
...............................
.
...............................
.
.................
3
D
ial Pad Dialing
.
...............................
.
...............................
.
...............................
.
.................
4
M
enu
.
...............................
.
...............................
.
...............................
.
...............................
.
..
4
1. Language ................................
.
...............................
.
...............................
.
.....................
4
2. Pair Bluetooth................................
.
...............................
.
...............................
.
...............
4
3. Date/Time ................................
.
...............................
.
...............................
.
....................
5
4. Clear Msg Indicator ................................
.
...............................
.
...............................
.
......
5
5. Banner ................................
.
...............................
.
...............................
.
.........................
5
M
essages
.
...............................
.
...............................
.
............................................................ 5
D
irectory
.
...............................
.
...............................
.
...............................
.
............................
7
C
allers
.
...............................
.
...............................
.
...............................
.
...............................
. 8
R
edial
.
...............................
.
...............................
.
...............................
.
...............................
.
.
9
C
all Waiting
.
...............................
.
...............................
.
...............................
.
.......................
9
H
old
.
...............................
.
...............................
.
...............................
.
...............................
.
....
9
M
ute
.
...............................
.
...............................
.
...............................
.
...............................
.
...
9
S
peaker
.
...............................
.
...............................
.
............................................................... 9
V
olume Bar
.
...............................
.
...............................
.
........................................................ 9
Receiver Volume................................
.
...............................
.
...............................
.
..............
9
Speaker Volume ................................
.
...............................
.
...............................
.
.............
1
0
Ringer Volume................................
.
...............................
.
...............................
.
...............
1
0
M
essage Waiting
.
...............................
.
...............................
.
...............................
.
..............
1
0
C
all Handling
.
...............................
.
...............................
.
...............................
.
...................
1
0
L
ive Call Transfer
.
...............................
.
...............................
.
...............................
.
........
1
0
V
oice Dialing
.
...............................
.
...............................
.
...............................
.
...................
1
0
O
ne
-T
ouch Dialing
.
...............................
.
...............................
.
...............................
.
..........
1
1
C
harging your Cell Phone
.
...............................
.
...............................
.
...............................
. 1
1
O
peration during Power Outage
.
...............................
.
...............................
.
......................
1
1
A
ccessory Port
.
...............................
.
...............................
.
...............................
.
.................
1
1
E
nterprise to Dock
-N-T
alk Accessory
.
...............................
.
...............................
.
.............
1
2
G
lossary
.
...............................
.
...............................
.
...............................
.
...........................
1
3
T
roubleshooting
.
...............................
.
...............................
.
...............................
.
...............
1
3
S
afety and Regulatory
.
...............................
.
...............................
.
...............................
.
......
1
4
Enterprise Telephone User Guide


BUTTON FEATURES
Dial Pad Dialing
To dial numbers telephone numbers using the Dial Pad, simply dial normally as you would using a land
l
ine telephon
e
. There is no need to dial special digits. You may dial a “#” following the number if you
w
ant slightly faster dialing.
P
re
-d
ialing Phone Numbers
P
ressing the Dial Pad keys will display digits on the LCD screen. These digits are then automatically
d
ial
e
d by going off
-h
ook by picking up the handset or pressing the Speaker key.
Dialing Hotkey Phone Numbers
W
hile the phone is on
-h
ook, you can press and hold down a single Dial Pad number in order to
a
utomatically go off
-h
ook and dial a number stored in t
h
e one
-t
ouch dialing key memory of the
c
ell phone.
Menu
Press the MENU key to enter the main menu. Select the number corresponding to the menu feature on
t
he Dial Pad of the Enterprise or use the Up, Down arrows to scroll through the list and press the
S
oft Key
b
utton “Choose” to activate the desired action.
N
OTE: Use of the Soft Key Navigation Buttons
You will be able to select from Soft Key button in order to “Choose” menu navigation or
f
eatures such as “Back” to go back a screen, “Save” to save the
m
enu choice, “Dial” to dial the
n
umber currently on the screen, “Redial” to drop the current call and redial the last number
d
ialed, “Pause” to add a pause to a dialing string, “Unhold” to release the hold on the call,
“
Options” to review additional option
s
for that screen, “Send” to send a Text Message, “Exit” to
e
xit the menu and return to the idle screen. Simply press the associated Soft Key button to
a
ctivate the desired feature.
1. Language
P
ress the number 1 key on your Dial Pad or highlight this opt
i
on and select the “Choose” Soft
K
ey button. Then select the desired language from the list and press the number of the language
o
n your Dial Pad or use the Up, Down arrows to highlight this option and select the “Choose” Soft
K
ey button to set the desire
d
selection.
2
. Pair Bluetooth
Use this option to pair to your bluetooth enabled cell phone with the Enterprise phone. First you
m
ust connect your Bluetooth Module to the Enterprise. You will know if it is properly
c
onnected to the Enterprise phone when
t
he display screen says “Module In” and it has a blue
f
lashing light. From the Menu,
P
ress
t
he number 2 key on your Dial Pad or highlight this option
u
sing the Up, Down arrows and select the “Choose”
So
ft
Ke
y Button. The LCD screen will
Enterprise Telephone User Guide 4

discover bluetooth devices. When prompted for a password, enter
3
774 on your cell phone dial pad.
N
OTE: The Bluetooth Module should only need to be paired once to your cell phone unless you change
b
luetooth cell phones and subsequently pair another cell phone.
O
nce the cell phone is
p
aired to the Bluetooth Module, the blue LED on the Bluetooth Module will turn
f
rom a flashing blue state to a steady blue state and the Enterprise phone will light its blue LED located
under the LCD screen and you will hear an audible beep. A Soft Key label, BT Off, will appear on the lower left
Soft Key. When this Soft Key is pressed, the Bluetooth Module will manually disconnect from the cell phone
and a new Soft Key will appear, BT On. Pressing this Soft Key will re-establish the bluetooth connection.
These Soft Keys may also be pressed during a call to switch the call back and forth between the cell phone
handset and the Enterprise. If you remove the Bluetooth Module, the blue light on the Enterprise will turn off
and the LCD screen will read "Module Out" and you will hear an audible beep.
NOTE: The Bluetooth Module will automatically connect and disconnect when you move the cell phone in
and out of the bluetooth range of approximately 30 feet. If you manually disconnect, the automatic connect
feature will not work until the connection is manually re-established.
3
. Date/Time
P
ress
t
he number 3 key on your Dial Pad or highlight this option using the Up, Down arrows and select
t
he “Choose”
So
ft
Ke
y Button. Use the Dial Pad to enter the month, day, hour, minu
t
e and AM or PM.
O
nce these items have been entered, you will be prompted to save the entries you have made. If you
p
ress the “Save” Soft Key Button, the Date and Time will saved in memory. It may also be automatically
u
pdated from the cell phone depen
d
ing on the functionality of the cell phone.
4
. Clear Msg Indicator
I
f your message indicator is flashing and you want to manually turn it off, press the number 4 key on your
D
ial Pad or highlight this option and select the “Choose” Soft Key to clear the message light.
5
. Banner
U
se the Text editor (see Text Messages for details on text editor) to display a custom message on the
s
creen when the Enterprise phone is idle.
Messages
Press the Messages key for access to the Messages menu which allows you to create or r
e
view various
t
ypes of messages.
T
he Messages options are:
1
.
D
ial Cell VM: Dials into your cell phone Voice Mail
2
.
R
ead Messages: Allows you to read your text messages
3
.
W
rite Message: Allows you to write, edit and “Send” test messages
4
.
O
ptions: Allows you to ch
a
nge the number dialed to your cell phone voice mail service
1
. Dial Cell VM
W
hen selecting this option, you do not need to enter your cell phone Voice Mail number for most cell
p
hones. Once you dial your Voice Mail, use the Dial Pad as prompted by your vo
i
ce mail service to
m
anage your mailbox as usual. If your cell phone does not connect properly to your voice mail, you will
Enterprise Telephone User Guide5

need to enter the specific number to access your voice mail service. If you do not know your access
number, contact your network operator for your Cell phone Voice Mail access number. If you do know
the number, select item 4 on the menu list, “Options” and select item “1” to enter your voice mail number.
See “4. Options” below for more information.
HINT: Most cell phones will dial into the voice mail service by pressing the “1” key on the Dial Pad.
2.
R
ead Messages
By selecting Read Messages from the menu, you can read new text messages or view the text
m
essages stored in your cell phone memory. Use the Left and Right arrows to scroll through the
l
ist. If the message is too long to fit on one screen, a flashing down arrow informs you that you
m
ay press the Down arrow to read more of the message or the Up arrow to scroll back up the
m
essage.
D
isplay Keys:
P
rev
D
isplays the pre
v
ious message that was received.
N
ext
D
isplays the next message in the list.
O
ptions
a
. Delete
Y
ou can delete a message you wish to discard. You will be prompted with the
q
uestion “Are you sure?” You may then “Choose” Yes or No.
b
. Reply You
c
an reply to a Text Message by pressing the “Reply” Soft Key. You may
t
hen enter a message. Pressing “Next” will bring up a screen with the phone number
o
f the person who sent the message. Pressing “Send” will “Send” the message through
t
he cell phone. You will be prompted with the message “Are you sure?” You may then
“Choose” Yes or No.
c
. Forward
Y
ou can forward a Text Message by pressing the FORWARD soft key. The
E
nter number screen will appear. Enter the telephone number of the person you wish
t
o forward the message to. You can then press “Send” to send the message to the person.
Y
ou will be prompted with the message “Are you sure?” You may then choose
“Yes” or “No”.
3
. Write Message
Y
ou will be able to write text messages by using this op
t
ion. The Enter Message screen will
a
ppear and you may type your message. Pressing “Next” will bring up a screen with the phone
n
umber of the person who sent the message. Pressing “Send” will send the message through the
c
ell phone. You will be prompte
d
with the message “Are you sure?” You may then choose
“
Yes” or “No”.
N
OTE: Repeatedly press a Dial Pad key until it cycles to the desired character. Pausing moves the
c
ursor to the next position. Special characters are located under the ‘1’ key. Ac
c
ented characters (such as
ä
, é, etc.) are grouped with the keys that contain the unaccented base character. The following illustration
s
hows the numbers, letters and symbols found on each Dial Pad key.
Enterprise Telephone User Guide 6

-
.
WXYZ9
WXYZ9
a b c 2 j k l 5 d e f 3
g h I 4
G
H I 4
p
q r s 7
P
Q R S
* +
L
eft arrow: delete
R
ight arrow: add a space.
U
se the Up and Down arrows to change case of the last shown character.
P
ressing a key repeatedly will cycle first through the lower case than the upper case letters.
P
ress the “Next” Soft Ke
y
to enter the destination phone number using the Digit Editor.
U
se the Dial Pad to enter a phone number with the Digit Editor. Use “Back” to go back and make
c
hanges to your message. Press “Send” to send your Text Message.
#
0
V
i ¿_1 ! ? & ( ) ,
m n o 6
M N O
w z y z 6
W X Y Z
t u v 8
T U
A B C J K L D E F
NOTE: Press the Dial Pad ke
y
s to enter a number (3
-d
igit area code, followed by the 7
-d
igit number).
P
ress the “Send” Soft Key to send the message.
U
se the “Delete” Soft Key to delete digits.
U
se the Left and Right arrows to move the cursor.
4
.
O
ptions
T
he menu choices are:
1.
E
dit C
e
ll VM #: Allows you to change the default cell phone number if necessary.
2.
S
ervice Centre #: Some cell phones require a Text Message Service Centre (phone number) to be
s
aved in the Enterprise memory. If you cannot “Send” Text messages from the Enterpris
e
, call
y
our Network Operator to find your Text Message service center, enter the Message Center
n
umber (phone number) and enter it here. This need only be done once and is only necessary on
a
few cell phone models.
Directory
Press the Directory key to vi
e
w the local Directory list resident in the Enterprise telephone. The local
D
irectory list contains the items that are saved in the Enterprise’s memory which can hold up to 500
n
ames and phone numbers. Use the Up and Down keys to scroll. The “Cell List”
s
oft key displays the
c
ell phone directory if available. Viewing the cell phone Directory with the Enterprise is not available on
a
ll cell phones. The “Options” Soft Key lets you manage your local Directory listings.
T
he local directory options are:
1. V
i
ew Cell Phonebook: View the contents of the cell phone Directory
2. Add Item: Add an item to your local Directory
3. Delete Item: Delete current item from your local Directory
Enterprise Telephone User Guide7

1.
E
dit Item: Change the name or number of the current item
2
.
S
ave Item to Cell: copies t
h
e current item to the cell phone
3
.
C
opy ALL from Cell: Copy all items from cell phone to local Directory
4
.
C
opy ALL to Cell: Copy all items from local Directory to cell phone Directory
5
.
D
elete ALL items: deletes all items from local Directory
In the local dir
e
ctory, you can search for items by pressing the key, which corresponds to the first letter of
t
he item you are looking for. Example: Press ‘6’ once to look for “Mary Smith”, press ‘6’ twice to look
f
or “Norman Jones”, etc. You can then use the Up or Dow
n
arrows to scroll through the Directory
l
istings.
T
he cell phone directory options are:
1.
V
iew Local Phonebook: Allows the review of individual cell phone Directory listings
2
.
C
opy Item from Cell: Copy an item from cell phone to local Directory
3
.
C
opy ALL
f
rom Cell: Copy the entire directory from the cell phone to local Directory
Dialing from the Directory:
P
ick up the handset to automatically dial the number on the screen or press the “Dial” Soft Key while a
d
irectory listing is on the screen to dial tha
t
phone number through the docked cell phone.
Callers
Press the Callers key to view the local Callers list records resident in the Enterprise telephone. The local
C
allers list contains the calls logged in the Enterprise memory which can hold up to 50 Ca
l
ler ID records.
U
se the Up and Down keys to scroll. The “Cell List” soft key displays the cell phone call list if available.
V
iewing the cell phone’s Callers from the Enterprise is not available on all cell phones. The “Options”
S
oft Key lets you mana
g
e your call list.
T
he local Callers options are:
1.
S
ave Item: Save current item to your local Directory
2
.
D
elete Item: Delete current item from your local Callers list
3
.
S
ave Item to Cell: copies the current item to the cell phone
4
.
D
elete ALL items: deletes a
l
l items from local Callers list
New items in the local call list are marked with a “n” icon. This is displayed until the item is viewed.
L
ong distance calls may be marked with an “i” if the telephone company provides that information.
T
o view Missed o
r
Received Calls in the cell phone’s memory, press the “Cell List” Soft Key. Some cell
p
hones allow you to display the missed calls and received calls in separate lists. Use the “Missed” and
“
Received” Soft Keys to switch between the lists.
D
ialing from the Callers List:
P
ick up the handset to automatically dial the number on the screen or press the “Dial” Soft Key to dial the
c
urrent Callers list item and then pick up the handset or turn on the Speaker.
H
INT: If the Right arrow key is flashing you can press it to add a “1” or an area code back in front of the
n
umber before dialing.
Enterprise Telephone User Guide 8

Redial
Press the Redial key to view the local Redial list resident in the Enterprise telephone. The local Redial
l
ist contains the calls you made that are logged in Enterp
r
ise memory. Use the Up and Down keys to
s
croll. The “Cell List” soft key displays the cell phone redial list if available. The cell phone redial list is
n
ot available on all cell phones. The “Options” Soft Key lets you manage your Redial list.
T
he lo
c
al Redial options are:
1
.
S
ave Item: Save current item to your local Directory
2
.
D
elete Item: Delete current item from your local Redial list
3
.
S
ave Item to Cell: copies the current item to the cell phone
4
.
D
elete ALL items: deletes all items from local Redial li
s
t
D
ialing from the Redial List:
P
ick up the handset to automatically dial the number on the screen or press the “Dial” Soft Key to dial the
c
urrent Redial list item and then pick up the handset or turn on the Speaker.
Call Waiting
Press the Call Waiting key to switch between active calls or to answer a second call after you hear the call
w
aiting tone. While on a call, you will hear a call waiting beep if another caller is trying to reach you; if
y
our cell phone supports Call Waiting Caller ID, you will
s
ee the number (and possibly name) of the
s
econd caller on your screen. Pressing the Call Waiting key will answer the incoming call. Pressing the
C
all Waiting key subsequent times will toggle between the two callers (if this feature is supported by your
c
ell phone).
Hold
Press the Hold key while on a call to place the call on “Hold”. The display will indicate that a
c
all is on “Hold”. Press the Hold key again to take a call off “Hold”.
Mute
Press the Mute key to mute the speakerphone’s microphone. T
h
e display will indicate the microphone is
m
uted. Press the Speaker key or press the Mute key again to take a call off “Mute”.
Speaker
Pressing the Speaker key will dial any digits displayed on the screen and turn on the speakerphone. The
S
peaker light
w
ill illuminate when the speakerphone is on. Pressing the Speaker button while on the
s
peakerphone call will end the call.
Volume Bar
Receiver Volume
D
uring a call using the handset, pressing the volume bar adjusts the receiver volume.
Enterprise Telephone User Guide9

Speaker Volume
During a call using the Speaker, pressing the volume bar adjusts the Speaker volume.
Ringer Volume
W
hen not on a call, pressing the volume bar adjusts the ringer volume. When the ringer is OFF, an icon
i
s displayed on the idle screen in place of the bann
e
r.
W
hen a Dock
-N-T
alk accessory is plugged into the Enterprise accessory port, you can use the “Do Not
D
isturb” to prevent extension telephones from ringing. Pressing the Volume Down key while the Ringer
i
s off puts the Enterprise in Do Not Disturb m
o
de. When in Do Not Disturb mode, the Ringer OFF icon
i
s displayed on the idle screen in place of the banner.
Message Waiting Indicators
If you receive a text message or a new voice mail message on your cell phone while it is connected to the
E
nterprise
b
ase unit, a Message Waiting prompt will appear on the LCD screen and the red LED at the
t
op of the phone will flash. Listening to the message from the Enterprise will cause the Message Waiting
i
ndicator to turn off. Disconnecting your cell phone from th
e
Enterprise will also cause the Message
W
aiting indicators to be turned off. If the message is a text message, press the “Text Msg” soft key to
v
iew the message.
Call Handling
Live Call Transfer
Placing a call from your cell phone:
I
f you wish to dial a call first from your cell phone while it is docked to the Enterprise telephone, you can
t
hen immediately transfer the call on to the Enterprise telephone by picking up the handset or pressing the
S
peaker key and press “##” to connect the call.
T
ransf
e
rring an active call from your cell phone to the Enterprise:
I
f you are on a call with your cell phone, you can transfer the call to the Enterprise. Connect the cell
p
hone to the Enterprise base unit during the call and you can continue the call on the E
n
terprise handset
o
r speakerphone. Some cell phones may require that you press ## to connect the call.
T
ransferring a call from the Enterprise to the cell phone:
Y
ou may also detach your cell phone from the Enterprise during a call and continue the cal
l
on your cell
p
hone at any time. If you are using the Bluetooth Module, you will need to disconnect it from the
E
nterprise to transfer the call to the cell phone.
Voice Dialing
Press and hold the “#” key down on the dial pad to begin a voice activated
c
all. After the tone, say the
n
ame and the call will be connected. This feature works only with cellular handsets that support voice
d
ialing from remote devices.
Enterprise Telephone User Guide 10

One
-T
ouch Dialing
If you have programmed phone numbers in to the Dial Pad keys of your cell phone (a feature
s
upported on most cell phones), you can press and hold the same key on the Enterprise and it
w
ill dial the same number associated with that key on the cell phone. This feature works only with
c
ellular handsets that support one
-t
ouch dia
l
ing from remote devices. You may also dial in this manner
w
hile the phone is on
-h
ook to automatically dial the one
-t
ouch number using the Hotkey dialing feature.
Charging your Cell phone
When your cell phone is connected to the Enterprise base unit and
i
s charging, the blue “connected” light
w
ill be illuminated and the battery level will be displayed on the Enterprise screen. The battery level will
c
ontinue to be displayed. The cell phone screen should also indicate that the cell phone is charging.
Op
e
ration during a Power Outage
The Enterprise will not be able to function during a power outage unless connected to some kind of
e
xternal power device. However, you can disconnect your cell phone and continue to use it during a
p
ower outage. All of your
d
irectories and programming will be maintained during the outage and will
f
unction again normally when power returns.
Accessory Port
The Enterprise telephone has an accessory port. This port can be used to connect various accessories to
a
llow additional
f
unctionality through a variety of cables. The DNT Cable allows a Dock
-N-T
alk
u
niversal cell phone docking station to be connected. This cables will allow you to use your existing
h
ome wiring to make all the analog phones in your home ring when your cell phone rings. It also allows
y
ou to make cell phone calls from any cell phone in the house.
O
ther planned accessories include the Recording Cable and Push
-t
o
-T
alk Dispatcher. Please go to
w
ww.phonelabs.com to se
e
the latest accessory port offerings.
Enterprise Telephone User Guide11


Glossary
Cell Phone
U
sed generically to refer to any wireless mobile handset that may be operating on different networks.
A
lso called wireless or mobile phones.
E
xtension Set
A
ny analog telephone set t
h
at is plugged into the Enterprise base unit using the Dock
-N-T
alk plugged
i
nto the accessory port.
S
IM card
S
ubscriber Information Module, a removable card that enables users to store personal information such as
p
hone numbers and SMS messages. This card may be transferred from one cell phone to another. Used
o
nly with GSM cell phones.
S
MS
S
hort Message Service or text messaging. The ability to send and receive text messages from
a
cell phone.
Troubleshooting
Voice Dial not working
S
ome cel
l
phones do not support this feature or require the dial pad cover to be flipped open for voice dial
t
o be activated.
“
PSTN detected” message is displayed
Your Dock
-N-T
alk accessory is plugged into a telephone line that is already in use by a landline
s
erv
i
ce. Disconnect the landline service before plugging into the Dock
-N-T
alk.
Enterprise Telephone User Guide13

Safety and Regulatory
W
hen using the Enterprise Wireless Desktop Terminal, follow these safety precautions to reduce the risk
o
f electric shock and personal injury:
1
.
R
ead and unde
r
stand all instructions.
2
.
U
nplug the unit from the wall outlets before cleaning. Do not use liquid cleaners or aerosol
c
leaners. Use a damp cloth for cleaning.
3
.
D
o not use this unit near water (example: a bathtub).
4
.
T
his unit should not be placed near or ov
e
r a radiator or heat register.
5
.
D
o not overload wall outlets and extension cords as this can result in the risk of fire or electric
s
hock.
6
.
U
se only the power source supplied with the unit.
7
.
D
o not disassemble this unit; take it to a qualified serviceman whe
n
service or repair is required.
O
pening or removing covers may expose you to dangerous voltages or other risks.
8
.
D
o not use this unit to report a gas leak in the vicinity of this unit.
9
.
U
nplug this product from the wall outlet and refer servicing to qualif
i
ed service personnel under
t
he following conditions:
a
.
W
hen the power supply cord or plug is damaged or frayed.
b
.
I
f the product has been exposed to rain, water or liquid has been spilled on the product,
d
isconnect the unit and allow it to dry out. Once dry,
i
t may be tested too see if it still
o
perates; however, do not open up the product.
c
.
I
f the product housing has been damaged.
d
.
I
f the product exhibits a distinct change in performance.
1
0.
A
void using the product during an electrical storm. There may be a remot
e
risk of electric shock
f
rom lightning.
FCC notices
T
his unit has been tested and found to comply with the limits for a Class x digital device as specified in
P
art 15 and Part 68 of FCC rules. These limits provide reasonable protection against radio an
d
TV
i
nterference in a residential area. However, your equipment might cause TV or radio interference even
w
hen operating properly. To eliminate interference, try one or more of the following corrective
m
easures:
•R
elocate or reorient the TV or radio.
•T
o
t
he extent possible, increase the distance between the equipment and the TV or radio.
•U
se outlets on different electrical circuits for the equipment and the TV or radio.
C
hanges or modifications not expressly approved by the party responsible for complian
c
e could void the
u
ser’s authority to operate the equipment.
Enterprise Telephone User Guide 14

Warranty Information
Phone Labs warrants to the original purchaser of the Enterprise™ that under normal operating conditions
this product will be free from defects in material and workmanship for a period of 12 months from the
original date of purchase. Phone Labs’ sole obligation under this warranty or under any other legal
obligation is to repair or replace, at its option, the product if it is deemed defective by Phone Labs during
the warranty period. This will be done free of charge with new or refurbished product or parts, at Phone
Labs option, when the product is returned to Phone Labs, freight or postage prepaid with the original sales
receipt during the warranty period. This warranty does not apply if the product has been otherwise
misused, abused, accidentally damaged, or damaged or malfunctions or fails to function as a result of an
act of God such as fire, flood or lightning (or other incidence of excessive or insufficient voltage) or failure
to follow instructions.
You are responsible for and must pre-pay shipping, handling and insurance costs relating to returning
products for repair or replacement.
Any replacement Product will be warranted for the remainder of the original warranty period or for thirty
(30) days, whichever is longer. The above remedies are the Consumer’s exclusive remedies for breach of
warranty. Phone Labs does not warrant against damages or defects in accessories or components not
manufactured by Phone Labs, or against damages resulting from such non-Phone Labs made products or
components. Phone Labs passes on to Buyer the warranty it received (if any) from the maker thereof for
such non-Phone Labs made products or components.
In no event shall Phone Labs be liable for incidental or consequential damages.
This warranty gives you specific legal rights and you may have other rights which vary from state to state.
Some states do not allow limitations on how long an implied warranty lasts or the exclusion or limitation
of incidental or consequential damages, so the above limitations may not apply to you. No Phone Labs
dealer nor any other person or entity other than Phone Labs may extend or modify this warranty and no
such modification or extension shall be effective unless it is in writing.
Enterprise Telephone User Guide15


ENT-ENG-1 Version 1.0
This manual suits for next models
1
Table of contents
Other Phone Labs Telephone manuals