PHOTON Solar User manual

Solar Installation Manual


3
CONTENTS
©Copyright 2017 Hunter Douglas Limited [ABN 98 009 675 709] • 02/17 • V1.3
1 GETTING STARTED
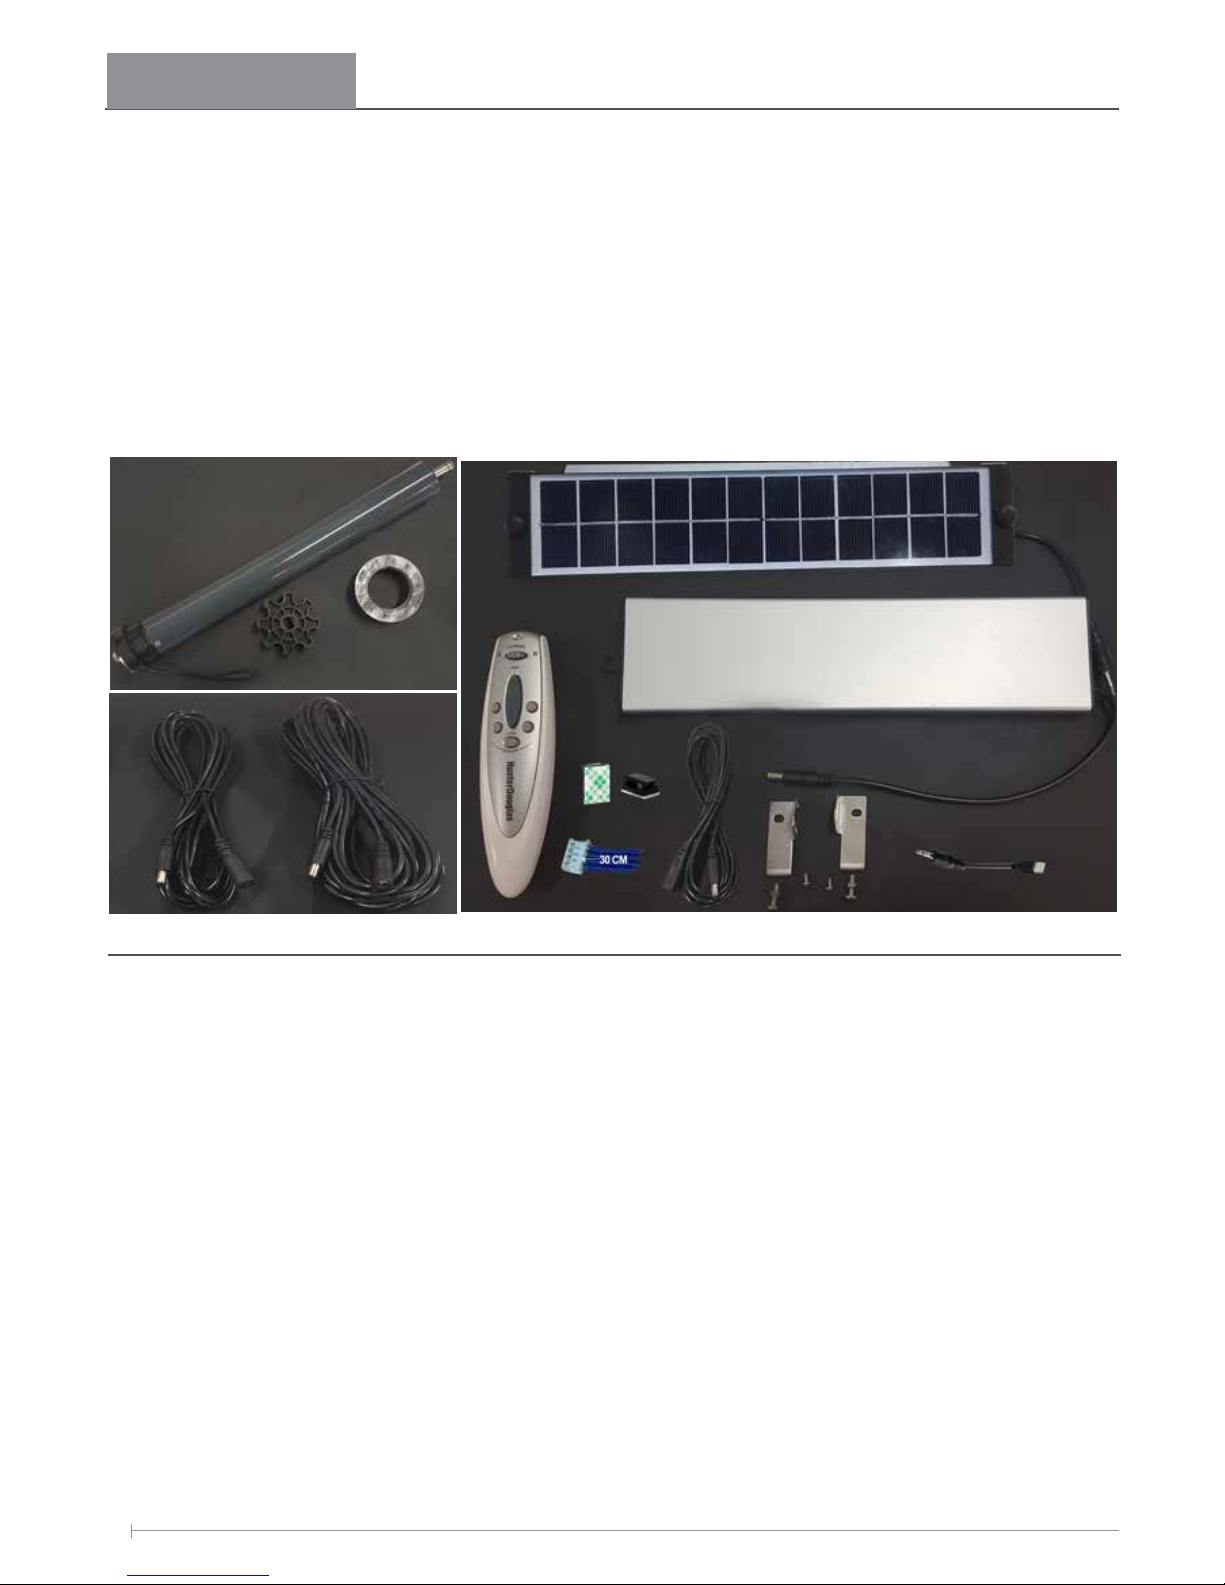
1.1 VERIFY PACKAGE CONTENTS....................................................................................................................................................4
1.2 TOOLS REQUIRED ....................................................................................................................................................................4
2 PARTS DESCRIPTION
2.1 BATTERY PACK / RECEIVER UNIT ...............................................................................................................................................5
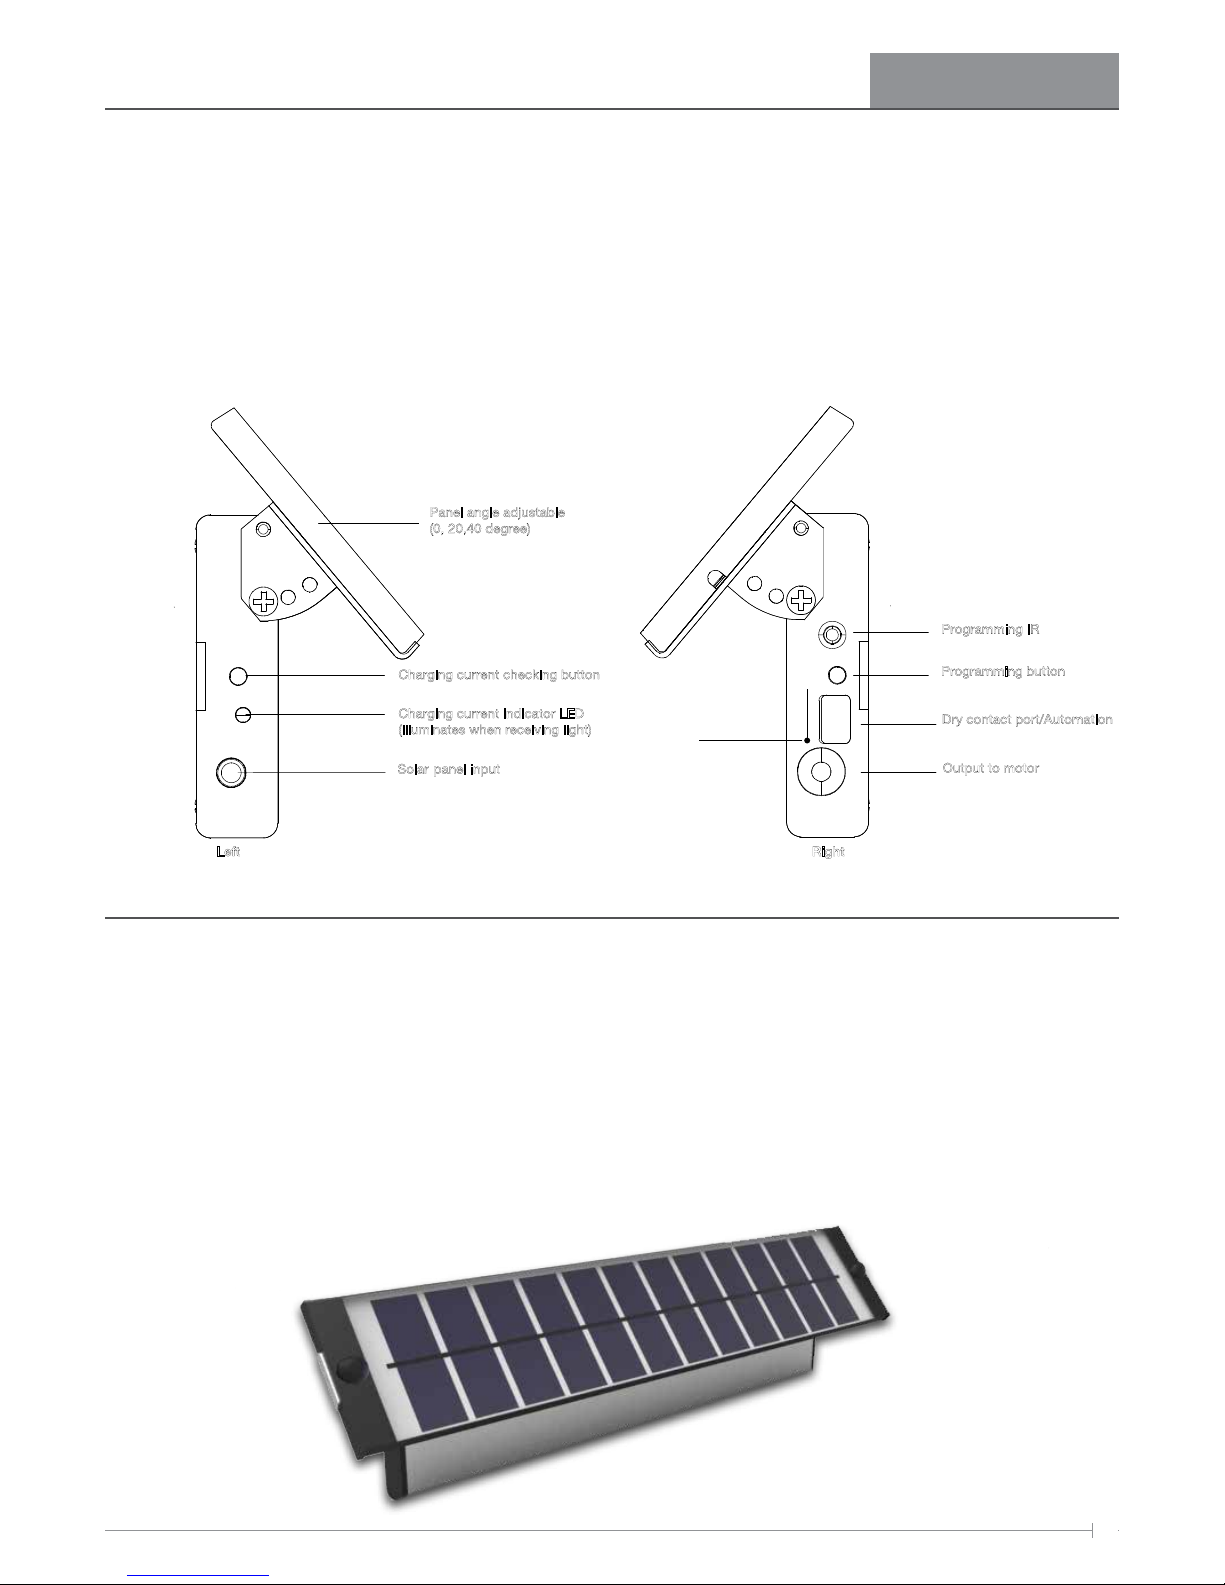
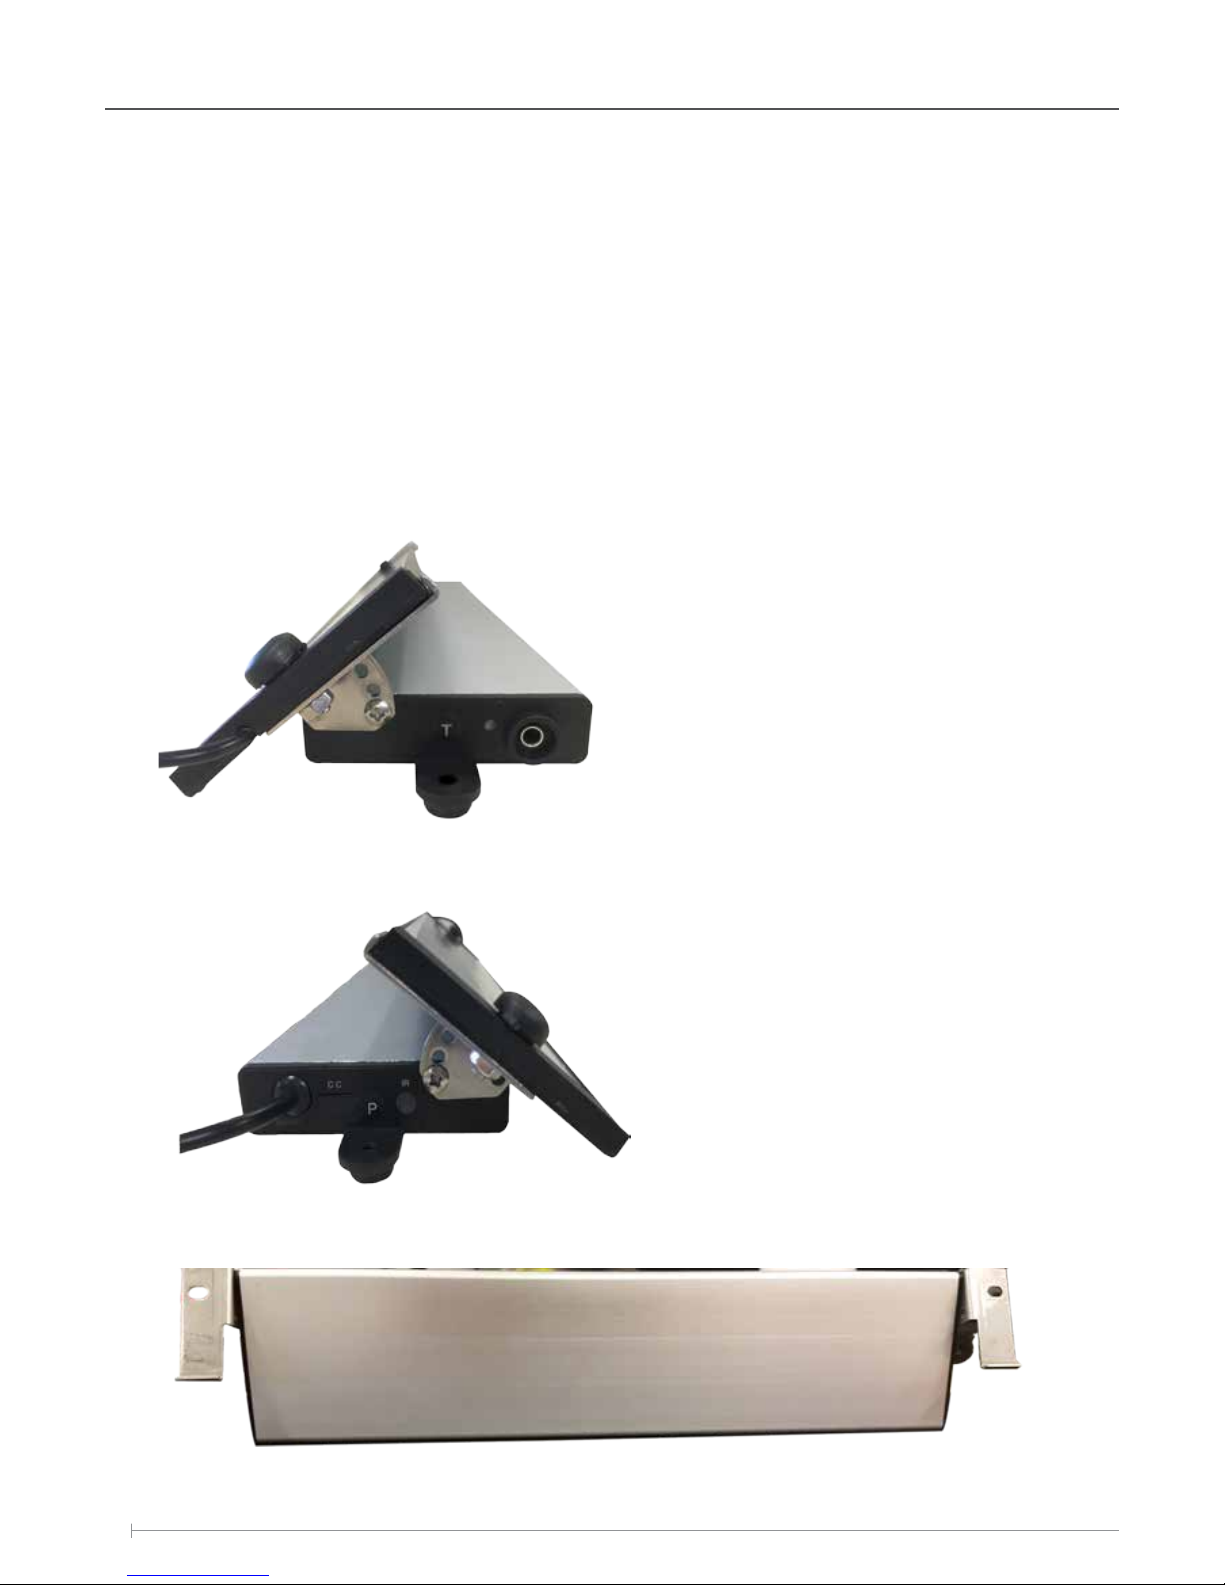
2.2 SOLAR PANEL / BRACKETS .......................................................................................................................................................5
2.3 POWER CABLE / EXTENSION CABLES ........................................................................................................................................6
2.4 REMOTE CONTROL...................................................................................................................................................................6
3 INSTALLATION / SETUP
3.1 INSERTING MOTOR IN TUBE .....................................................................................................................................................7
3.2 ATTACHING SOLAR PANEL TO BATTERY PACK/MOTOR DRIVE UNIT.............................................................................................8
3.3 OPTIMUM POSITION FOR SOLAR PANEL ....................................................................................................................................9
3.4 MOUNTING THE SOLAR PANEL ................................................................................................................................................10
MOUNTING REMOTELY (GUTTERS, FASCIA, ETC) ......................................................................................................................11
3.5 CONNECTING POWER CABLE FROM MOTOR TO BATTERY PACK/RECEIVER................................................................................11
3.6 PAIRING & PROGRAMMING REMOTE........................................................................................................................................12
3.7 CHANGE MOTOR DIRECTION ...................................................................................................................................................12
3.8 SETTING MOTOR LIMITS .........................................................................................................................................................13
3.9 DRY CONTACT/ AUTOMATION..................................................................................................................................................13
3.10 TIMER REMOTE ......................................................................................................................................................................14
4 HINTS & TIPS ..................................................................................................................................................................................15
5 TROUBLESHOOTING .......................................................................................................................................................................15
REMOTE CONTROL IS NOT WORKING WITH AWNING................................................................................................................15
AWNING IS MOVING SLOW......................................................................................................................................................15

4
A. Solar panel (Solar panel kit)
B. Battery pack / Receiver unit (Receiver Kit)
C. 3m power extension cable (Receiver kit)
D. Remote control (ordered separately)
E. Screws and brackets for Solar panel & screw caps
(Receiver kit)
1.2 Tools Required:
The general tools required when installing the solar powered awning motor are:
•Power drill & drill bits ( 3mm & 10mm)
•Phillips head screw driver
•Measuring/levelling tools
1. Getting Started
K
J
I
5m 10m
C.
D
B
A
E
H
FG
F. Dry Contact Cable 30cm (Receiver kit)
G. 3.5mm mono to USB cable, 1m ((Receiver kit)
H. Cable clips with double sided tape (Receiver kit)
I. Crown & Drive wheel, 78mm (ordered separately)
J. Motor (Motor kit)
K. Extension cables 5m, 10m (order separately)
1.1 Verify Package Contents:

5
F. Dry Contact Cable 30cm (Receiver kit)
G. 3.5mm mono to USB cable, 1m ((Receiver kit)
H. Cable clips with double sided tape (Receiver kit)
I. Crown & Drive wheel, 78mm (ordered separately)
J. Motor (Motor kit)
K. Extension cables 5m, 10m (order separately)
2.1 Battery Pack / Receiver Unit
The battery pack / receiver unit is what drives and controls the motor.
There are 2 components within this housing.
•Battery, this is where the power/charge is stored and supplies the motor with power to operate. The battery is
recharged via the solar panel and power management electronics
•Receiver unit, this contains the electronics that communicate with the motor, remote control and automation
system.
2. Parts Description
Panel angle adjustable
(0, 20,40 degree)
Charging current checking button
Charging current indicator LED
Solar panel input
Left Right
Programming
button
Dry contact port/Automation
Output to motor
Programming IR
(illuminates when receiving light)
2.2 Solar Panel
The solar panel is required to charge the integrated battery which powers the awning motor.
When mounting the solar panel, make sure it is located to capture as much direct sunlight as possible. This may not be
where the awning is located, in which case extension cables may be required.
Brackets have been designed to adjust at 0°, 20° & 40° to angle to the best position to capture direct sunlight
Image 1 Image 2
RF Antenna
5

6
2.3 Power Cables
The power cables come in three lengths, 3m, 5m and 10m.
Depending upon the location of the Solar panel, you may need to mount the panel remotely from the Awning to capture
the optimum sunlight for charging; extension cables are used for this purpose.
2.4 Remote Control
The remote control used to operate the Solar powered Awning is the Platinum remote control. This remote has four
individual RF channels, allowing the individual operation of 4 Awnings.
It is also possible to group mulitple awnings to one chanel.
2.4 Remote control
The remote control used to operate the Solar powered Awning is the Power Rise Platinum remote.
This remote has four individual RF channels, allowing the individual operation of 4 Awnings.
Parts Description
3m
Part: 34.232.000
10m
Part: 34.234.000
5m
Part: 34.233.000

7
3.1 Inserting motor in tube
The following step is only required if you have not ordered a complete blind.
Before the motor is inserted into the Awning tube, both Crown and Drive wheels will need to be attached to the motor.
Firstly slide the Crown wheel over the motor and match up the notch on the Crown wheel with the spline on the motor
collar.
Attach the Drive wheel to the shaft of the motor and slide the lock-in clip onto the end of the shaft.
Once Crown and Drive wheel are attached to motor, slide the motor into the Awning Tube.
3. Installation / Setup

8
3.2 Attaching Solar panel to Battery pack/receiver unit
The solar panel, brackets and battery pack/receiver all come as individual components that need to be assembled
together.
The solar panel brackets are mounted onto the battery pack/receiver in three different positions, 0°, 20° and 40°.
These three positions allow the solar panel to capture the maximum light emitted from the sun.
Step 1
Determine which angle the solar panel will sit at and attach the brackets to the battery pack/receiver; there are three
holes on the bracket (0°, 20° & 40°). Line up one of the three holes on the bracket with the battery pack receiver.
Make sure the tabs on the bracket face outwards from the battery pack/receiver.
Insert small screw to secure bracket.
Installation / Setup

9
Step 2
Attach the solar panel to the brackets with the nuts and set screws supplied, the cable coming from the solar panel
needs to be on the side of the ‘solar panel input’ port on the battery pack/receiver unit.
The head of the set screw sits on top of the solar panel and the nut is screwed on behind the solar panel, once attached
plug the cable from the solar panel into the ‘solar panel input’ port on the battery pack/receiver.
3.3 Optimum position for solar panel
The location of the solar panel should be in direct sunlight for the longest period of the day, this will ensure the battery
can be fully charged.
It is possible to mount the Solar unit on the front cover of the Awning headbox. This is generally the simplest installation
and does not require any extension cables.
If this is not possible due to the location of the awning, optional extension cables may be used to remote locate the
Solar unit. These are available in lengths of 3, 5 and 10 metres.
When looking for the best location for mounting the Solar unit, the panel should point due North to ensure year round
sun coverage.
If North is not possible from the
installation location, North East or North
West may also be used.
A southern facing solar panel or a solar
panel located underneath a roof or
ceiling will not be sufficient to charge
and enable use of the motor on a
regular basis.
The iphone App ‘Sun Seeker’ can
be used to find the best location for
installing the solar panel by showing the
travel path of the sun.
Installation / Setup

10
3.4 Mounting the solar panel
It is essential to ensure the panel is mounted in a location that receives at least a few hours of sunlight each day.
The receiver has been designed to utilise the Solar Panel on top as a water deflector. Ensure the receiver/panel are
mounted in a Horizontal plane to reduce the chance of water egress.
The Solar panel should not be mounted on the top of Aluminium or metal roofs, as this will reduce the RF range from the
remote control, and also decrease the battery life due to extreme temperatures from the roof.
Mounting on the front of the Headbox
When installing the solar panel on the front of the headbox a 10mm hole will need to be drilled to pass through the
power cable from the battery pack / receiver. Two 3mm holes are also required to fit it onto the headbox. Mount the
solar panel to the side where the motor is located on the Awning and mark where the holes need to be drilled.
It is possible to minimise the exposed 10mm hole by mounting the receiver unit 5mm further right before mounting.
This enables the power cable hole to be partially covered.
Installation / Setup
Passing through power cable
Solar panel mounted onto headbox with two screws
3.3 – Mounting the solar panel
Based on the positioning of the solar panel to capture as much sun as possible, this will determine
where it will be mounted.
Mounting on Headbox
If the solar panel can be mounted on the head box, there are two positions.
-Front or top of headbox if face fitted
-Front of headbox if fitted in reveal
When installing the solar panel on head box a 10mm hole will need to be drilled to pass through the
power cable from the battery pack / receiver and also two 3mm holes to fit it onto the headbox.
Mount the solar panel to the side where the motor is located on the Awning and mark where the
holes need to be drilled out.
Drilling holes into headbox
Passing through power cable
Solar panel mounted onto headbox with two screws
Drilling holes into headbox

11
Mounting Remotely (Gutters, Fascia etc)
If the solar panel needs to be positioned away from the Awning
so that it can capture the optimum sunlight, there are a few
options for mounting.
The ideal mounting locations would be on the gutter or fascia of
the building, the solar panel and battery pack / receiver in total
weigh less than 1kg.
When mounting remote from the Awning, always try to position
the solar panel to capture the maximum amount of sunlight for
the longest period of the day (most cases, this will be a true
North position). Also tilt/angle the solar panel once installed to fine tune it’s positioning.
Optional power extension cables are available to allow for long distance external mounting (up to 10 metres). When
running the power cable it is a good idea to place it under the gutter/eve so that it is tucked away from water and other
external weather conditions.
3.5 Connecting Power Cable from Motor to Battery Pack/Receiver
Once the location of the solar panel has been established, the
power cable will need to be connected between the motor and
battery pack / receiver.
The box will contain a 3m extension power cable, 5m and 10m
extension power cables can be purchased separately.
If the solar panel is to be mounted on the headbox, use the
supplied cable holders. Peel and stick the cable holder on the
inside of the head box and clip the power cable into it.
Installation / Setup
Mounting on headbox, extension cable not required.
Plug power cable from battery pack/ receiver into
motor power cable.

12
Installation / Setup
3.6 Pairing & Programming Remote
Complete steps 2-5 in less than 8 seconds.
1. Press the ‘Programming button’ on the battery / receiver unit, this will send the awning down. Allow the awning to
travel 500mm from the top and press the ‘Programming button’ to stop at this position. This will stop the awning
from travelling beyond its top limit prior to the limits being set. Refer to Image 2 (page 4)
2. Press and hold the ‘Programming button’ on the battery / receiver unit
3. While still holding the ‘programming button’, select the channel on the remote control that you want the Awning to
operate on.
4. Now press and hold the ‘up’ button. The Awning will jog to indicate that it has paired with the remote control.
5. Release the ‘programming button’ on the battery pack /receiver
6. To operate the Awning, select the channel (make sure the green light is illuminated) and press the up/down button.
To remove a previous programmed channel, complete the same process as above; however press the DOWN button
instead of UP.
3.7 Change Motor Direction
If the Motor is mounted on the right-hand side, the motor direction will need to be changed to operate the Awning.
1. Select the channel that the Awning is paired with.
2. Press and hold the ‘ALL’ button for six seconds; the LED indicator L.E.D on the top of the remote will start flashing
green.
3. Point the remote at the ‘Programming IR’ located on the right-hand side of the battery pack / receiver unit. Press
and hold the ‘UP’ button on the remote; the Awning will jog to indicate the direction has been changed.
4. Press the ‘ALL’ button on the remote to save the motor direction.

13
3.8 Setting Motor Limits
The motor limits are set manually with the hex screw driver provided or with a tool that the installer uses to set switch
motors with.
Below is a table that shows a motor positioned on the left or right side of the tube and the direction to turn the hex
screw to adjust the top and bottom limits.
The Solar receiver unit is supplied with enough charge from the factory to enable limit settings and several days of
operation before Sunlight is required to re-charge the battery.
To set the Top limit, press the UP button on the remote control, as the blind starts to move, turn the OPEN limit on the
motor head using the Hex driver tool to increase or decrease the limit. If you continually turn the limit fast enough (by
hand using the tool) the awning upper limit will creep up in small increments. If the power times out, select the channel
button on the remote control and press the UP button again.
Remember the green LED light must be illuminated on the remote control after selecting the correct channel for the
motor to respond.
Complete the same process above, but in the down position on the remote and using the Close limit Hex screw on the
motor head to set the bottom limit.
3.9 Dry contact/ Automation
Home automation is supported via the use of dry contact (Open, Common, Close); the port for dry contact is located on
the side of the battery pack / receiver.
Each unit will be supplied with a dry contact cable that plugs into the battery pack / receiver for home automation
control.
There is a rubber cap that sits over the dry contact port to protect it from water and debris; this will need to be removed
before the dry contact cable can be plugged in.
Limit settings can be adjusted using a limit setting tool,
hex key or flat head screwdriver. Power must be supplied
to the motor in the direction required in order to set the
limits. Turn the limit screws in the direction indicated
above to increase or decrease blind travel.
Installation / Setup

14
3.10 Timer Remote (Optional)
Please note: The Awning system is not designed to operate in high wind conditions. Please consider the local
environment in the immediate vicinity of the awning when choosing to use the Timer function. If the Timer was to deploy
an awning when unattended in high wind conditions, the products could be damaged or destroyed.
Timer should only be used on product in sheltered areas away from direct wind.
Configuring the correct product
When setting the Timer for use with the Awning, the ‘Set the Advanced Operation Mode For Specific Shade Types’
setting must be configured to product ‘1’.
Failure to set the Timer to the correct product may cause faulty operation from the product.
Refer to the instructions below to setup the correct product number.
Use the instruction provided with the Timer for the rest of the setup process.
Installation / Setup
Step. 1 Step. 3
Step. 2 Step. 4
* Ensure number 1 is selected
for Solar Awning Motor.

15
•While installing the Awning, plug the solar panel into the battery pack / receiver and sit it in the sun to charge
the battery.
•The Motor has a ‘fabric tensioning’ feature which allows for lock-down bolts or straps to be applied and the
awning operated without causing damage to the Awning or structure it is secured.
The motor will pull the Awning up and automatically torque stop, then back off the fabric by 2mm so that the fabric
is not stretched, but is kept tight.
•Tilt the solar panel on an angle to help water and debris slide off and not build up on solar panel.
•When mounting the solar panel externally from the Awning, always try and position it to capture the maximum
amount of sunlight for the longest period of the day. This will usually be facing a true North position. Also keep
in mind to position the solar panel to capture sunlight during the winter season.
•There is no need for mains power, this unit operates on 24v DC
•The ‘Charging current checking button’ located on the battery pack / receiver is set to display 2 stages of
current charge.
Orange LED, indicates that the battery has between 15-29mA of current and is currently charging.
Green LED indicates that the battery has 30+mA of current and is currently charging.
This will only operate and indicate in direct sunlight.
If the LED does not light up, this indicates that the battery is currently not being charged by the sun.
•Once or twice a year, it is recommended to clean the solar panel. Over a period of time dust, dirt, pollen, bird
droppings and other debris can negatively affect solar panel efficiency.
To clean the solar panel, fill a container/bucket with some warm water and soap (no other special chemicals
required). Clean the surface of the solar panel with a cloth, only clean the solar panel surface.
REMOTE CONTROL IS NOT WORKING WITH AWNING
•Make sure channel on remote control is selected (solid green light illumined on remote control) prior to pressing
the up/down button.
•Remote control is out of range, the range (open area without any obstructions) for the remote control is about
10m-15m.
•Check to make sure there is power/charge in the battery pack/ receiver. This can be done two ways.
•Press the ‘Charging current checking button’ on the battery pack / receiver.
An orange light appears, this indicates that the battery has between 15-29mA of current and the Solar Panel is
receiving enough light to charge the battery.
A green light appears, this indicates that the battery has 30+mA of current and indicates the Solar Panel is
currently receiving sufficient light to charge the battery.
If a light does not appear and the Awning is still operating, this indicates that the Solar Panel is not currently
receiving sufficient sunlight to charge the battery
AWNING IS MOVING SLOW
•Battery could be not charged or not receiving enough sunlight to re-charge.
•Press the ‘Charging current checking button’ on the battery pack / receiver.
An orange light appears, this indicates that the battery has between 15-29mA of current and the Solar Panel is
receiving enough light to charge the battery.
A green light appears, this indicates that the battery has 30+mA of current and indicates the Solar Panel is
currently receiving sufficient light to charge the battery.
If a light does not appear and the Awning is still operating, this indicates that the Solar Panel is not currently
receiving sufficient sunlight to charge the battery
•Make sure the solar panel is positioned in the best possible location to capture sunlight, if not it may need to be
relocated.
4. HINTS & TIPS
5. TROUBLESHOOTING

Table of contents
Popular Solar Panel manuals by other brands

AZO Digital
AZO Digital MPPT-3000 operating manual

Sunforce
Sunforce 50039 manual

Viessmann
Viessmann Vitovolt 200 Technical guide

Thermann
Thermann EVACUATED TUBE SOLAR HOT WATER SYSTEM owner's manual

Plug-In Solar
Plug-In Solar Sheet Metal/Flat Roof Mount Kit installation instructions

IBC SOLAR
IBC SOLAR AeroFix Series installation instructions

Sunna Design
Sunna Design Sol EVERGEN M Series installation guide

Sunna Design
Sunna Design Sol EVERGEN M Series user manual

Enernova
Enernova Solar Panel 160W user manual

FuturaSun
FuturaSun FU M Series Safety and installation manual

Generark
Generark SolarPower 2 user guide

CONCORD
CONCORD QC5528 quick start guide