PHOTOWATT PW72LHT-CB-XF User manual

INSTALLATION MANUAL
OF BIFACIAL MODULES
For professional use only

D84-P06-01 GB R3 21/04/2021 www.photowatt.com
1.0 GENERAL INFORMATION 3
1.1 INSTALLATION MANUAL DISCLAIMER 3
1.2 LIMITATION OF LIABILITY 3
2.0 SAFETY PRECAUTIONS 3
3.0 MECHANICAL / ELECTRICAL SPECIFICATIONS 3
4.0 UNPACKING AND STORAGE 5
5.0 MODULE INSTALLATION 6
5.1 MODULE WIRING 7
5.2 GROUNDING 10
6.0 MOUNTING INSTRUCTIONS 11
6.1 MOUNTING METHODS FOR FRAME BIFACIAL MODULE (BOLTING) 12
6.2 MOUNTING METHODS FOR FRAME BIFACIAL MODULE (CLAMPING) 14
6.3 MOUNTING METHODS FOR FRAME BIFACIAL MODULE (SINGLEAXIS TRACKER) 16
7.0 MAINTENANCE 17
8.0 MODULE CLEANING GUIDELINES 17
INDEX

D84-P06-01 GB R3 21/04/2021 www.photowatt.com
3
1.0
GENERAL INFORMATION
This general manual provides important safety informa-
tion relating to the installation, maintenance and han-
dling of bifacial double glass solar modules. Professional
installer must read these guidelines carefully and strictly
follow these instructions. Failure follow these instructions
may result in death, injury or property damage. The in-
stallation and handling of PV modules requires profes-
sional skills and should only be performed by qualiied
professionals. Installers must inform end -users (consum-
ers) about the aforesaid information accordingly.
The word “module” or “PV module” used in this manual re-
fers to one or more double glass solar modules. This man-
ual is only valid for the bifacial double glass module types
PW72LHTCBXF, PW72HTCBXF and PW60HTCBXF.
Please retain this manual for future reference. We recom-
mend visiting www.photowatt.com regularly for the most
updated version of bifacial module installation manual.
1.1
INSTALLATION MANUAL DISCLAIMER
The information contained in this manual is subject to
change by EDF ENR PWT without prior notice.
EDF ENR PWT gives no warranty of any kind whatsoever,
either explicitly or implicitly, with respect to the informa-
tion contained herein.
In the event of any inconsistency among dierent lan-
guage versions of this document, the English version
shall prevail. Please refer to our product lists and docu-
ments published on our website at: www.photowatt.com
as these lists are updated on a regular basis.
1.2
LIMITATION OF LIABILITY
EDF ENR PWT shall not be held responsible for damages of
any kind, including– without limitation – bodily harm, inju-
ry or damage to property, in connection with handling PV
modules, system installation, or compliance or non-com-
pliance with the instructions set forth in this manual.
2.0
SAFETY PRECAUTIONS
Warning: Before attempting to install, wire,
operate and/or service the module and other
electrical equipment, all instructions should
be read and understood. PV module connec-
tors pass direct current (DC) when exposed to sunlight or
other light sources. Contact with electrically active parts
of the module, such as terminals, can result in injury or
death, irrespective of whether or not the module and the
other electrical equipment have been connected.
GENERAL SAFETY
All Modules must be installed by licensed electricians
in accordance with the applicable electrical codes such
as, the latest National Electrical Code (USA) or Canadian
Electric Code (Canada) or other national or international
electrical codes.
Protective clothing (non-slip gloves, clothes,
etc.) must be worn during installation to prevent
direct contact with 30 VDC or greater, and to
protect hands from sharp edges.
Prior to installation, remove all metallic jewelry
to prevent accidental exposure to live circuits.
When installing modules in light rain, morning
dew, take appropriate measures to prevent wa-
ter ingress into the connectors, f. e. using con-
nector endcaps.
Do not allow children or unauthorized persons
near the installation site or module storage area.
• Use ellectrically insulated tools to reduce the risk of
electric shock.
• If the disconnects and over current protective devic-
es (OCPD) cannot be opened or the inverter cannot
be powered down, cover the fronts and backs of
modules in the PV array with an opaque material to
stop the production of electricity when installing or
working on a module or wiring.
• Do not install modules in strong wind.
• Do not use or install broken modules.
• Do not contact module surface if the front or rear
glass is broken. This may cause electric shock.
• Do not attempt to repair any part of the PV module.
The module does not contain any serviceable parts.
• Do not open the cover of the junction box at any
time.
• Do not disassemble a module or remove any module
part.
• Do not artiicially concentrate sunlight on a module.
• Do not connect or disconnect modules when current
from the modules or an external source is present.
3.0
MECHANICAL ELECTRICAL SPECIFICATIONS
Module electrical ratings are measured under Standard
Test Conditions (STC) of 1000 W/m2 irradiance, with an
AM 1.5 spectrum, and a cell temperature of 25°C. De-
tailed electrical and mechanical characteristics of EDF
ENR PWT crystalline silicon PV modules can be found in

D84-P06-01 GB R3 21/04/2021 www.photowatt.com
4
each product's datasheet. Main electrical characteristics
under STC are also stated on each module label. Please
refer to the datasheet or the product nameplate for the
maximum system voltage.
Under certain conditions, a module may produce more
current or voltage than its Standard Test Conditions rated
power. As a result, the module short-circuit current under
STC should be multiplied by 1.25, and a correction factor
should be applied to the open-circuit voltage (see Table
1 below), when determining component ratings and ca-
pacities.
TABLE 1. LOW TEMPERATURE CORRECTION FACTORS FOR OPENCIRCUIT VOLTAGE
Lowest Expected Ambient Temperature (°C/°F) Correction factor
24 to 20 / 76 to 68 1.02
19 to 15 / 67 to 59 1.04
14 to 10 / 58 to 50 1.06
9 to 5 / 49 to 41 1.08
4 to 0 / 40 to 32
-1 to -5 / 31 to 23
1.10
1.12
-6 to -10 / 22 to 14 1.14
-11 to -15 / 13 to 5 1.16
-16 to -20 / 4 to -4 1.18
-21 to -25 / -5 to -13 1.20
-26 to -30 / -14 to -22 1.21
-31 to -35 / -23 to -31 1.23
-36 to -40 / -32 to -40 1.25
Cvoc = 1-αVoc x (25 - T)
T (°C) is the lowest expected ambient temperature at the
system installation site
αVoc (%/ºC) is the voltage temperature coefficient of the
selected module (refer to corresponding datasheet)
OCPD rating selection should be done per the following
guidance, where the minimum OCPD rating possible is
determined by calculating the expected maximum cir-
cuit current for the PV system, and the maximum OCPD
rating constrained by the IEC 61215: 2016 and UL 1703:
2018 standard requirements for the certiied PV modules.
Alternatively, a more accurate correction factor for the
open-circuit voltage can be calculated using the follow-
ing formula:

D84-P06-01 GB R3 21/04/2021 www.photowatt.com
5
Minimum string fuse rating < X ≤ Maximum string fuse
rating
The maximum string fuse ratings can be found on the
product's datasheet for all the certiied EDF ENR PWT bi-
facial module types.
The minimum string fuse rating for compliance with NEC:
2017 code and IEC62548: 2016 requirement is suggested
to be determined as follows:
Minimum string fuse rating = IscSTC x 1.25 x Max (1.175,
Imppα÷ ImppSTC)
Imppα= the highest 3-hour current average resulting
from the simulated local simultaneous irradiances on
the front and rear sides of the PV array accounting for
elevation and orientation
IscSTC = the listed short circuit current at 0% bifacial
gain on the PV module datasheet or nameplate label
ImppSTC = the listed MPP operating current at 0% bifacial
gain on the PV module datasheet or nameplate label
An assembly, together with its overcurrent device (s),
that is listed for continuous operation at 100 percent of
its rating shall be permitted to be used at 100 percent of
its rating, and therefore shall not require the additional
1.25 multiplier.
Electrical calculations and design must be performed by
a competent engineer or consultant.
Please contact EDF ENR PWT’s technical support team
for additional information pertaining to engineering op-
timization and approval of project speciic module string
lengths.
4.0
UNPACKING AND STORAGE
PRÉCAUTIONS
• Modules should be stored in a dry and ventilated en-
vironment to avoid direct sunlight and moisture. If
modules are stored in an uncontrolled environment,
the storage time should be less than 3 months and
extra precautions should be taken to prevent con-
nectors from being exposed to moisture or sunlight,
like using connector endcaps. Connector endcaps
are available upon request.
• When unloading module pallets from containers,
please use a fork lift to remove the module pallets
and the forklift should be close to the ground in or-
der to avoid the top of module pallets touching the
top of the cabinet door. The thickness of forklift teeth
should be less than 75mm and the length of the fork-
lift teeth should be more than 2300mm.
• Unpack module pallets carefully, following the steps
shown on the pallet. Unpack, transport and store the
modules with care.
• Do not lift modules by their wires or junction box, lift
them by the frame.
• Do not place excessive loads on the module or twist
the module.
• Do not carry modules on your head.
• Do not drop or place objects (such as tools) on the
modules.
• Do not use sharp instruments on the modules.
• Do not leave modules unsupported or unsecured.
• Do not stand, step, walk and/or jump on modules un-
der any circumstances. Localized heavy loads may
cause severe micro-cracks at cell level, which in turn
may compromise module reliability and void EDF
ENR PWT’s warranty.
• Modules must always be unpacked and installed by
at least two people. Always use both hands when
handling modules with gloves.
• Do not change the wiring of bsypass diodes
• Keep all connectors clean and dry at all times.
• Do not expose the modules and its connectors to
any unauthorized chemical substance (e.g. oil, lubri-
cant, pesticide, etc.).
PRODUCT IDENTIFICATION
Each module has two identical barcodes (one in the lami-
nate under the front glass, the second on the rear side of
the module) that act as a unique identiier. Each module
has a unique serial number containing 14 digits.
A nameplate is also aixed to the rear glass of each mod-
ule. This nameplate speciies the model type, as well as the
main electrical and safety characteristics of the module.

D84-P06-01 GB R3 21/04/2021 www.photowatt.com
6
5.0
MODULE INSTALLATION
PRECAUTIONARY MEASURES AND
GENERAL SAFETY
• Prior to installing modules please obtain information
about any requirements and necessary approvals for
the site, installation and inspection from the relevant
authorities.
• Check applicable building codes to ensure that the
construction or structure (roof, facade, support, etc.)
can bear the module system load.
• EDF ENR PWT bifacial double glass solar modules
have been qualiied for Application Class A (equiva-
lent to Safety Class II requirements). Modules rated
under this class should be used in systems operating
at voltage above 50V or power above 240W, where
general contact access is anticipated.
• EDF ENR PWT bifacial double glass modules have
been certiied as Type 3 or Type 13 according to UL
1703, Type29 according to UL 61730 and as Class A or
Class C for ire performance according to IEC 61730-
2 for ire class performance, please refer to the data-
sheet or the product nameplate for the detailed types.
• Consult your local authority for guidelines and re-
quirements for building or structural ire safety.
UL 1703 SYSTEM FIRE RATING REQUIREMENTS
• The ire rating of this module is only valid when the
product is installed as speciied in the mechanical
mounting instructions.
• When installing the modules, ensure the assembly is
mounted over a ire-resistant roof covering rated for
the application.
• Photovoltaic systems composed of UL1703 or UL
61730 certiied modules mounted on a UL2703 certi-
ied mounting system should be evaluated in combi-
nation with roof coverings in accordance with UL1703
or UL 61730 standard, with respect to meeting the
same ire classiication as the roof assembly.
• Mounting systems with a System Fire Class Rating
(Class A, B or C), tested in conjunction with ire rat-
ed “Type 2” or “Type 13” or “Type 29” rated modules,
are considered acceptable for use with EDF ENR PWT
modules, provides the mounting system does not vi-
olate any other requirement of this manual.
• Any mounting system limitations on inclination or
accessory required to maintain a speciic System
Fire Class Rating should be clearly speciied in the
installation instructions and UL2703 certiication of
the mounting system supplier.
ENVIRONMENTAL CONDITIONS
• The module is intended for use in general open-air cli-
mates, as deined in IEC 6072121: Classiication of en-
vironmental conditions Part 21: Environmental condi-
tions appearing in nature. Temperature and humidity.
• Please consult the EDF ENR PWT technical support
department for more information on the use of mod-
ules in special climates, such as an altitude greater
than 2000 m, heavy snow, severe hail storm, hurri-
cane etc.
• Do not install modules near open lames or lamma-
ble materials.
• Do not immerse modules in water or constantly ex-
pose modules to water (either fresh or salt) (i.e. from
fountains, sea spray).
• Exposing modules to salt (i.e. marine environments)
or sulfur (i.e. sulfur sources, volcanoes) incurs the
risk of module corrosion.
• Do not expose modules and their connectors to any
unauthorized chemical substances (e.g. oil, lubricant,
pesticide, etc.), as modules may incur damages.
• Failure to comply with these instructions will void
EDF ENR PWT warranty.
• EDF ENR PWT modules have passed salt mist cor-
rosion resistance test according to IEC 61701, but
the corrosion may still occur on where the mod-
ules frame is connected to the bracket or where the
grounding is connected. Should the installation loca-
tion be near the ocean, EDF ENR PWT recommends
stainless steel or aluminum materials be used in the
areas with direct contact with the PV modules, and
the connection point should be protected with anti-
corrosion measures. For more information, please
contact EDF ENR PWT technical support team.
INSTALLATION REQUIREMENTS
• Ensure that the module meets the general technical
system requirements.
• Ensure that other systems components do not dam-
age modules mechanically or electrically.
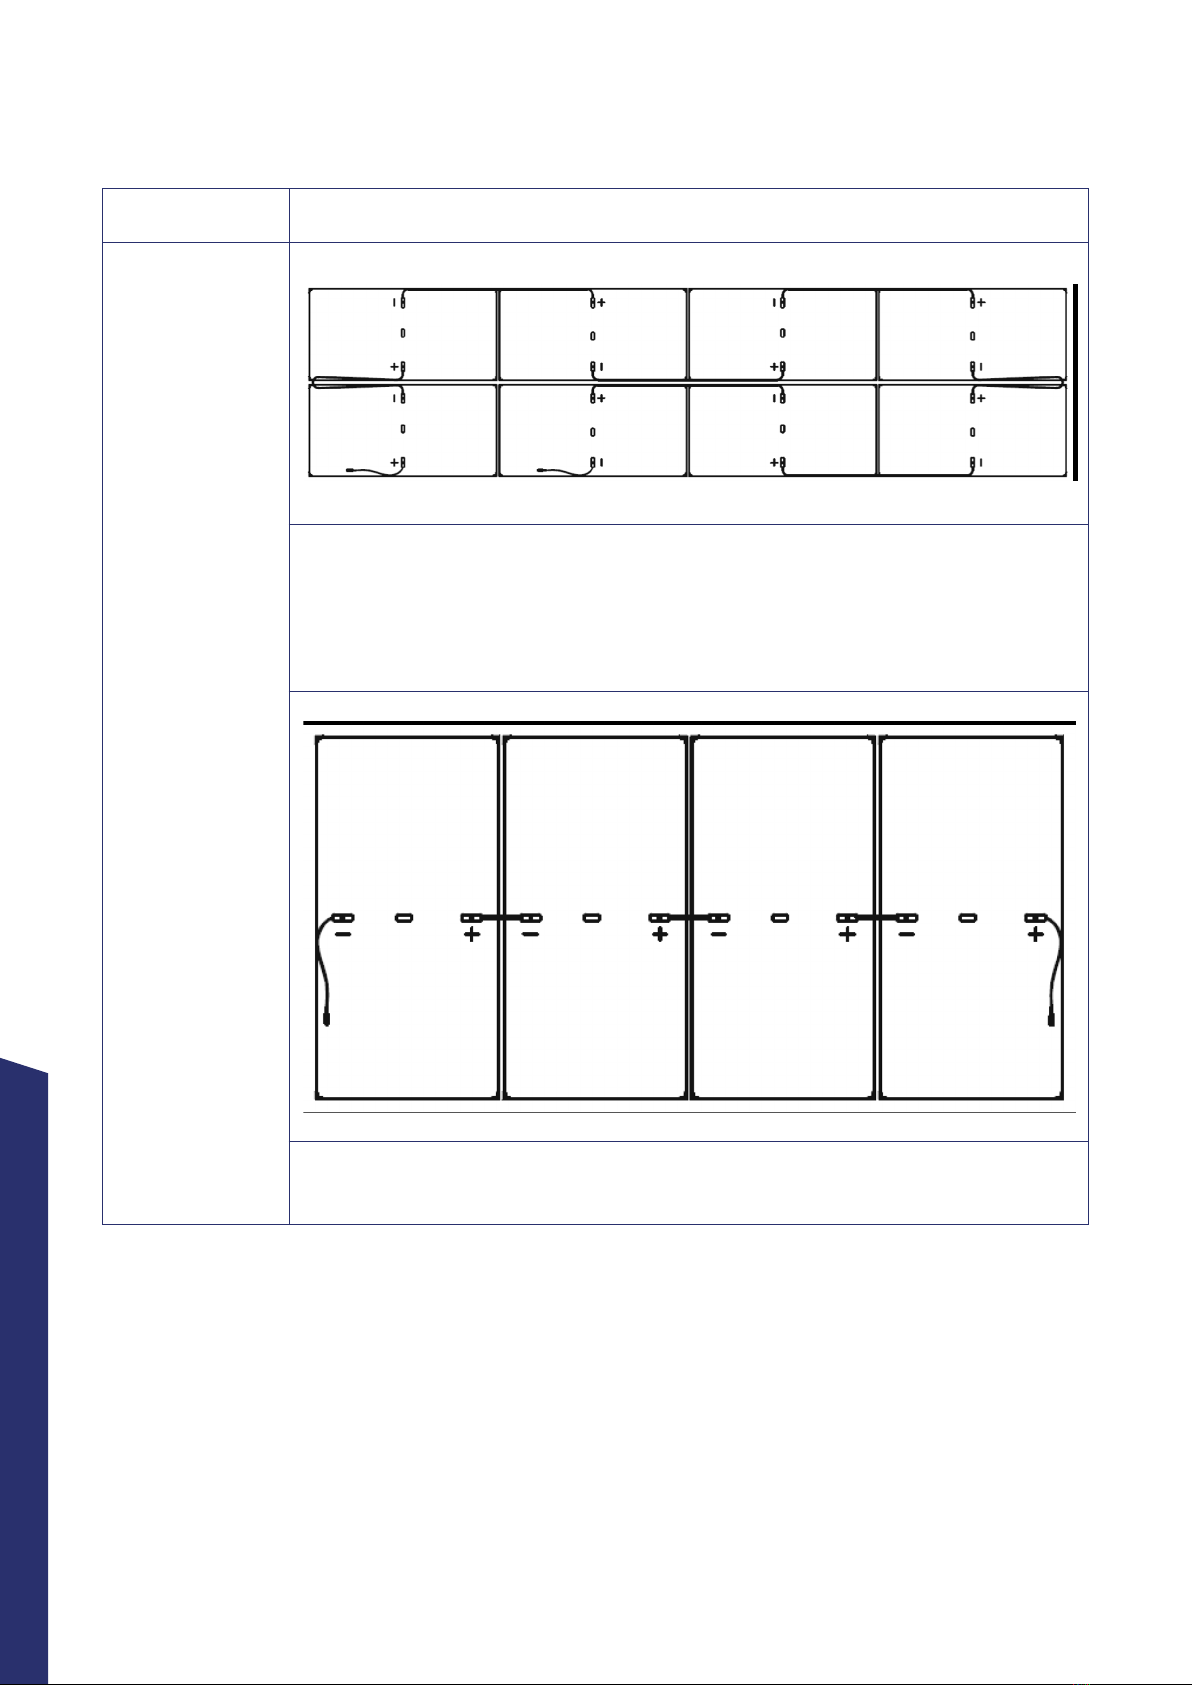
• Modules can be wired in series to increase voltage or
in parallel to increase current. To connect modules in
series, connect the positive terminal of one module
to the negative terminal of the next module. To con-
nect in parallel, connect the positive terminal of one
module to the positive terminal of the next module.
• The quantity of bypass diodes in the module’s junc-
tion box provided may vary depending on the model
series.
• Only connect the quantity of modules that corre-
sponds to the voltage speciications of the inverters

D84-P06-01 GB R3 21/04/2021 www.photowatt.com
7
used in the system. In addition modules must NOT be
connected together to create a voltage higher than
the maximum permitted system voltage stated on
the module nameplate, even under the worst local
temperature conditions (see Table 1 for the correc-
tion coeicients that apply to open-circuit voltage).
• A maximum of two strings can be connected in par-
allel without using an over-current protection device
(fuses, etc.) incorporated in series within each string.
Three or more strings can be connected in parallel
if an appropriate and certiied over-current protec-
tion device is installed in series with each string. And
it shall be ensured in the PV system design that the
reverse current of any particular string is lower than
the module maximum fuse rating under any circum-
stances.
• Only modules with similar electrical parameters
should be connected in the same string to avoid or
minimize mismatch eects in arrays.
• To minimize risk in the event of an indirect lightning
strike, avoid forming loops with the wiring when de-
signing the system.
• The recommended maximum series fuse rating is
stated on the product's datasheet.
• Modules should be safely ixed to bear all expected
loads, including wind and snow loads.
• After the installation of double glass modules, a 30
mm delection for framed module is allowed.
• For framed modules, a minimum clearance of 6.5
mm (0.25 in) between modules is required to allow
thermal expansion of the frames and modules.
OPTIMUM ORIENTATION AND TILT
• To maximize the annual yield, please calculate
the optimum orientation and tilt for PV modules in
that speciic installation site. The highest yields are
achieved when sunlight shines perpendicularly onto
the PV modules.
AVOID SHADING
• Even minor partial shading (e.g. from dirt deposits)
reduces the yield. A module can be considered to be
unshaded if its entire surface is free from shading all
year round. Sunlight should be able to reach at least
the front side of the module even on the shortest day
of the year.
• For optimizing the power generation of the rear side
of bifacial modules, obstacles between modules and
the mounting ground should be avoided as much as
possible.
• Constant shading conditions can aect module ser-
vice lifetime, due to accelerated ageing of the en-
capsulation material and thermal stress on the by-
pass diodes.
RELIABLE VENTILATION
• Bifacial modules use direct, relected, or diuse sun-
light on the backside to generate additional pow-
er. Therefore, bifacial modules are not suggested
to be used in building attached photovoltaic sys-
tems (BAPV). If BAPV, or similar mounting is still re-
quired, suicient clearance of at least 10 cm (3.94
in) between the module and the mounting surface
needs to be provided to allow cooling air to circulate
around the back of the module. This also allows con-
densation or moisture to dissipate.
• According to UL 1703, if any other speciic clearance
required for maintaining a system ire rating should
prevail. Detailed clearance requirements pertaining
to system ire ratings must be provided by your rack-
ing supplier.
5.1
MODULE WIRING
CORRECT WIRING SCHEME
• Ensure that the wiring is correct before starting up
the system. If the measured open circuit voltage
(Voc) and short-circuit current (Isc) dier substantial-
ly from the speciications, this indicates that there is
a wiring fault.
• When modules have been pre-installed but the sys-
tem has not been connected to the grid yet, each
module string should be kept under open-circuit
conditions and proper actions should be taken to
avoid dust and moisture penetration inside the con-
nectors.
• Do not connect dierent connectors (brand and
model) together.
• For PW72LHTCBXF, PW72HTCBXF and PW60HT-
CBXF modules, EDF ENR PWT oers several cable
length options to match various system conigura-
tions, which are shown in table 2:
• On below igures, bold lines represent cable installa-
tion pathways, while + and - connector correspond to
positive and negative module terminals respectively.
• Cables should always be fastened on module frames
or mounting rails, in order to avoid shading on mod-
ule rear side.
• In case where a cable connection method not includ-
ed in below table is used, please conirm suitable ca-
ble length with EDF ENR PWT’s sales representative.

D84-P06-01 GB R3 21/04/2021 www.photowatt.com
8
Module types Recommended wiring conigurations
PW72HTCBXF
PW60HTCBXF
PW72LHTCBXF
Landscape installation two rows:
PW72HTCBXF / PW72LHTCBXF Cable length per lead= 1400 mm
PW60HTCBXF Cable length per lead = 1250 mm
NOTICE : Adjacent modules in the same row need to be rotated 180 degrees for proper
installation.
Portrait installation one row:
PW72HT-CBXF / PW60HT-CBXF / PW72LHT-CBXF Cable length per lead = 400 mm (+),
280 mm (-)
TABLE 2 : SYSTEM CABLE CONFIGURATION FOR
PW72LHTCBXF, PW72HTCBXF AND PW60HTCBXF MODULES

D84-P06-01 GB R3 21/04/2021 www.photowatt.com
9
Module types Recommended wiring conigurations
PW72HTCBXF
PW60HTCBXF
PW72LHTCBXF Portrait installation two rows:
PW72HTCBXF / PW72LHTCBXF Cable length = 400 mm (+), 280 mm (-) & 1800 mm jumper
cable
PW60HTCBXF Cable length = 400 mm (+), 280 mm(-) &1400 mm jumper cable
NOTICE Modules in adjacent rows should be rotated 180 degrees for proper installation
Portrait installation one row: (Leap-frog for single-axis tracker)
PW72HT-CBXF Cable length = 1670 mm (+), 1670 mm (-)
PW72LHT-CBXF Cable length = 1850 mm (+), 1850 mm (-)
The maximum distance between two adjacent modules should be within 50 mm (1.96 in) for side with mounting
clamps, and within 25 mm (0.98 in) for side without mounting clamps, in order to meet system cable scheme.
Jumper
Cable

D84-P06-01 GB R3 21/04/2021 www.photowatt.com
10
CORRECT CONNECTION OF PLUG CONNECTORS
• Make sure that all connections are safe and properly
mated. The PV connectors should not be subjected
to stress from the exterior. Connectors should only
be used to connect the circuit. They should never be
used to turn the circuit on and o.
• Connectors are not waterproof when unmated.
When installing modules, connectors should be con-
nected to each other as soon as possible or appropri-
ate measures (like using connector endcaps) should
be taken to avoid moisture and dust penetrating into
the connector.
• Do not clean or precondition the connectors using
lubricants or any unauthorized chemical substances.
USE OF SUITABLE MATERIALS
• Only use dedicated solar cable and suitable plugs
(wiring should be sheathed in a sunlight-resistant
conduit or, if exposed, should itself be sunlight-re-
sistant) that meet local ire, building and electrical
regulations. Please ensure that all wiring is in perfect
electrical and mechanical condition.
• Installers may only use single-conductor cable listed
and labeled as USE2 or PV wire which is 90°C wet
rated in North America, and single conductor cable,
2.516 mm² (514 AWG), 90°C wet rated in other areas
(i.e. TUV 2PfG1169 or EN 50618 approved), with prop-
er insulation which is able to withstand the maximum
possible system open-circuit voltage. Only copper
conductor material should be used. Select a suitable
conductor gauge to minimize voltage drop and en-
sure that the conductor ampacity complies with local
regulations (i.e. NEC 690.8(D)).
CABLE AND CONNECTOR PROTECTION
• Secure the cables to the mounting system using
UVresistant cable ties. Protect exposed cables from
damage by taking appropriate precautions (e.g. plac-
ing them inside a metallic raceway like EMT conduit).
Avoid exposure to direct sunlight.
• A minimum bending radius of 60mm (2.36 in) is re-
quired when securing the junction box cables to the
racking system.
• Protect exposed connectors from weathering dam-
age by taking appropriate precautions. Avoid expo-
sure to direct sunlight.
• Do not place connectors in locations where water
could easily accumulate.
5.2
GROUNDING
• For grounding requirements in North America, a mod-
ule with exposed conductive parts is considered to
comply with UL 1703 only when it is electrically ground-
ed in accordance with both the instructions presented
below and the requirements of the National Electrical
Code. Any grounding means used with Canadian Solar
Inc. modules should be NRTL certiied to UL 467 and
UL 2703 standards. Please consult our technical ser-
vice team for the formal approval process.
• For grounding requirements in other areas, although
the modules are certiied to Safety Class II, we rec-
ommend them to be grounded and that module in-
stallation should comply with all applicable local
electrical codes and regulations. Grounding connec-
tions should be installed by a qualiied electrician.
Connect module frames together using adequate
grounding cables: we recommend using 414 mm²
(AWG 612) copper wire. Holes provided for this pur-
pose are identiied with a grounding symbol
(IEC617301). All conductive connection junctions
must be irmly ixed.
• Do not drill any extra ground holes for convenience
as this will void the modules warranty.
• All bolts, nuts, lat washers, lock washers and other
relevant hardware should be made of stainless steel,
unless otherwise speciied.
• EDF ENR PWT does not provide grounding hardware.
• The grounding method described below is recom-
mended for EDF ENR PWT.

D84-P06-01 GB R3 21/04/2021 www.photowatt.com
11
• A grounding kit containing an M5 (3/16“) SS cap
bolt, an M5 (3/16“) SS lat washer, an M5 (3/16“) SS
cup washer, and an M5 (3/16“) SS nut (with teeth) is
used to attach copper grounding wire to a pre-drilled
grounding hole on the frame (see image above). The
grounding holes are located at the upper and lower
edges of the long side frame, close to the module
short sides.
• Mounting rail designs should be such to allow easy
access to the grounding holes located on the long
side of the frame, in order to enable the equipment
grounding function when required.
• Place the wire between the lat washer and the cup
washer. Ensure that the cup washer is positioned be-
tween the frame and the wire with the concave side
up to prevent galvanic corrosion. Tighten the bolt
securely using the SS toothed nut. A wrench may be
used to do this. The tightening torque is 37 Nm (2.2-
5.2 ft-lbs).
6.0
MOUNTING INSTRUCTIONS
The applicable regulations pertaining to work
safety, accident prevention and securing the
construction site must be observed. Workers
and third party personnel shall wear or install
fall arrest equipment. Any third party need to be protect-
ed against injuries and damages.
• The mounting design must be certiied by a regis-
tered professional engineer. The mounting design
and procedures must comply with local codes and
requirements from all relevant authorities.
• The loads described in this manual correspond to
test loads. For installations complying with UL 1703
or UL 61730 and IEC 612152:2016, a safety factor of
1.5 should be applied for calculating the equivalent
maximum authorized design loads. Project design
loads depend on construction, applicable stan-
dards, location and local climate. Determination of
the design loads is the responsibility of the racking
suppliers and/or professional engineers. For detailed
information, please follow local structural code or
contact your professional structural engineer.
1. To ix the wire between the
lat washer and cup washer,
place the cup washer
(concave side up) between
the frame and the wire.
2. Then tighten the bolt
using the toothed nut.
• Use appropriate corrosion-proof fastening materials.
All mounting hardware (bolts, spring washers, lat
washers, nuts) should be hot dip galvanized or stain-
less steel.
• Use a torque wrench for installation.
• Do not drill additional holes or modify the module
frame. Doing so will void the warranty.
WHEN CLAMPS ARE USED AS FIXING MATERIAL
• Install and tighten the module clamps to the mount-
ing rails using the torque stated by the mounting hard-
ware manufacturer. System designer and installer are
responsible for load calculations and for proper de-
sign of support structure. It is recommended to use
a torque wrench for installation. Tightening torques
must respectively be within 16~20 Nm (11.8~14.75 ft-
lbs) for M8 x 1.25Grade 8.8 (5/16”-18 Grade B7) gal-
vanized or A270 stainless steel coarse thread bolts,
depending on bolt class. The yield strength of bolt
and nut should not be less than 450 MPa.
• Clamp material should be anodized aluminum alloy
or steel of appropriate grade.
• Clamp positions are of crucial importance for the re-
liability of the installation, the clamp centerline must
only be positioned within the authorized position
ranges indicated below, depending on the conigu-
ration and load.
GROUNDING METHOD:
BOLT + TOOTHED NUT + CUP WASHER

D84-P06-01 GB R3 21/04/2021 www.photowatt.com
12
6.1
MOUNTING METHODS FOR FRAMED BIFACIAL
MODULE BOLTING
• The mechanical load test with these mounting meth-
ods were performed according to IEC 61215.
• Modules should be bolted to support structures through
the mounting holes in the rear frame langes only.
• Each module must be securely fastened at a mini-
mum of 4 points on two opposite sides.
• M8 X 1.25 (5/16”) bolt and nut should be used.
• Plain washer size should be M8 with outer diameter
16 mm.
• The yield strength of bolt and nut should not be less
than 450 MPa.
NOTICE
Suitable bolt length should be chosen based on actual
module frame height. For bifacial module with 30 mm
frame height, our recommended maximum bolt length is
20 mm in order to properly insert the bolts through the
mounting hole. The system designer is responsible to
check that the racking supplier speciied bolt length com-
ply with above requirement and will not aect installation.
• Tightening torques should be within 16~20 Nm
(11.8~14.75 ft-lbs) for M8 (5/16”) coarse thread bolts,
depending on bolt class.
• In areas with heavy wind loads, additional mount-
ing points should be used. The system designer and
the installer are responsible for calculating the load
and ensuring that the support structure meets the
requirements.
• Modules should be bolted at the following hole
locations depending on the coniguration and load:
Mounting method: Bolting

D84-P06-01 GB R3 21/04/2021 www.photowatt.com
13
TABLE 3: APPROVED BOLTING METHODS
Inner four holes
installation
method A
Inner four holes
installation
method B
Middle four holes
installation
method A
Middle four holes
installation
method B
PW72HTCBXF
PW72LHTCBXF / / +5400Pa/-2400Pa +3600Pa/-2400Pa
PW60HTCBXF +5400Pa/-2400Pa +3600Pa/-2400Pa / /
Installation
Method
Module Types
Note: The installation method of bolt is based on the experimental results, “/” means not tested.

D84-P06-01 GB R3 21/04/2021 www.photowatt.com
14
6.2
MOUNTING METHODS FOR FRAMED BIFACIAL
MODULE (CLAMPING)
• The mechanical load test with these mounting meth-
ods were performed according to IEC 61215.
• Each module must be securely fastened at a mini-
mum of four points on two opposite sides. The
clamps should be positioned symmetrically. The
clamps should be positioned according to the autho-
rized position ranges deined in table below. Install
and tighten the module clamps to the mounting rails
using the torque stated by the mounting hardware
manufacturer. M8 X 1.25 (5/16”) bolt and nut are used
for this clamping method. The yield strength of bolt
and nut should not be less than 450MPa.
• Tightening torques should be within 16~20 Nm
(11.8~14.75 ft-lbs) for M8 (5/16”-18 Grade B7) coarse
thread bolts, depending on the bolt class. For the
bolt grade, the technical guideline from the fastener
suppliers should be followed. Dierent recommen-
dations from speciic clamping hardware suppliers
should prevail.
• The system designer and installer are responsible for
load calculations and for proper design of support
structure.
• The mounting rails shall be designed to limit as much
as possible shade on module rear side cells.
• EDF ENR PWT’s warranty may be void in cases where
improper clamps or unsuitable installation methods
are found. When installing inter-modules or end-type
clamps, please take the following measures into ac-
count:
1. Not bend the module frame
2. Not touch or cast shadows on the front glass
3. Not damage the surface of the frame (to the excep-
tion of the clamps with bonding pins)
4. Ensure to overlap the module frame by at least 5 mm
(0.2 in)
5. Overlap in length by at least
a) 80 mm (3.15 in) when 2400 Pa < uplift load ≤ 4000
Pa is required
b) 40 mm (1.57 in) when uplift load ≤ 2400 Pa is re-
quired
6. Ensure the clamp thickness is at least 3 mm (0.12 in)
• Clamp material should be anodized aluminum alloy
or stainless steel.
• Clamp positions are of crucial importance for the
reliability of the installation. The clamp centerlines
must only be positioned within the ranges indicated
in table below, depending on the coniguration and
load. For conigurations where the mounting rails run
parallel to the frame, precautions should be taken to
ensure the bottom lange of the module frame over-
laps the rail by 10 mm (0.4 in).
10 mm

D84-P06-01 GB R3 21/04/2021 www.photowatt.com
15
6.2.1 CLAMP MOUNTING ON LONG SIDE OF FRAME AND RAILS PERPENDICULARLY
TO THE LONG SIDE FRAME
Module Types
Max Mechanical Load (Pa)
+5400/-3600
A Range (mm)
PW60HTCBXF 270380
PW72HTCBXF 410490
PW72LHTCBXF 410490
6.2.2 CLAMP MOUNTING ON LONG SIDE OF FRAME AND RAILS PARALLEL TO THE LONG SIDE FRAME
Module Types
Max Mechanical Load (Pa)
+3800/-3200 +4400/-3600
A1 Range (mm)
PW60HTCBXF 270380 /
PW72HTCBXF 410490 /
PW72LHTCBXF / 410490

D84-P06-01 GB R3 21/04/2021 www.photowatt.com
16
6.3
MOUNTING METHODS FOR FRAMED BIFACIAL
MODULE SINGLEAXIS TRACKER
• The bolts and clamps used in this section should fol-
low the requirements in 6.1 and 6.2.
• Under any conditions the junction box cannot be-
come in contact with the subjacent racking structure.
If any racking structures, especially bearing house,
have to be located under the modules, the distance
H the frame and the racking structure should be at
least 40mm.
TRACKER 1P BOLTING METHOD
• Install and tighten the module clamps to the mount-
ing rails using the torque stated by the mounting
hardware manufacturer. M6 X 1 (1/4”) bolt and nut are
used for this bolting method.
• Tightening torques should be 6~9 Nm (4.5~6.6 ft-lbs)
M6 X 1 (1/4”) coarse thread bolts, depending on bolt
class.
• If your tracker design cannot meet the above dis-
tance requirement, please contact EDF ENR PWT
technical support department in writing for advices.
Module type
Mounting
hole space
(mm)
Fixed mount-
ing hole
location
Plain
washer
outer
diameter
(mm)
Distance
H (mm)
Test load
(Pa)
PW72LHTCBXF A1A3: 400 A1, A2, A3, A4 16 <80 +2400/-
2400

D84-P06-01 GB R3 21/04/2021 www.photowatt.com
17
7.0
MAINTENANCE
• Do not make modiications to any component of the
PV module (diode, junction box, plug connectors or
others).
• Regular maintenance is required to keep modules
clear of snow, bird droppings, seeds, pollen, leaves,
branches, dirt spots, and dust.
• Modules with suicient tilt (at least 15°), generally do
not require cleaning (rain will have a self-cleaning ef-
fect). If the module has become soiled, wash with wa-
ter and a non-abrasive cleaning implement (sponge)
during the cool part of the day. Do not scrape or rub
dry dirt away, as this may cause micro scratches.
• Snow should be removed using a soft brush.
• Periodically inspect the system to check the integrity
of all wiring and supports.
• To protect against electric shock or injury, electrical or
mechanical inspections and maintenance should be
performed by qualiied personnel only.
8.0
MODULE CLEANING GUIDELINES
This manual covers the requirements for the cleaning
procedure of EDF ENR PWT‘s photovoltaic modules. The
purpose of these cleaning guidelines is to provide gener-
al information for cleaning EDF ENR PWT modules. Sys-
tem users and professional installers should read these
guidelines carefully and strictly follow these instructions.
Failure to follow these instructions may result in death,
injury or damage to the photovoltaic modules. Damages
induced by inappropriate cleaning procedures will void
EDF ENR PWT warranty.
SAFETY WARNING
• Cleaning activities create risk of damaging the mod-
ules and array components, as well as increasing the
potential electric shock hazard.
• Cracked or broken modules represent an electric
shock hazard due to leakage currents, and the risk
of shock is increased when modules are wet. Before
cleaning, thoroughly inspect modules for cracks,
damage, and loose connections.
• The voltage and current present in an array during
daylight hours are suicient to cause a lethal electri-
cal shock.
• Ensure that the circuit is disconnected before start-
ing the cleaning procedure as contact with leakage
of electrically active parts can result in injury.
• Ensure that the array has been disconnected to other
active components (such as inverter or combiner box-
es) before starting with the cleaning.
• Wear suitable protection (clothes, insulated gloves,
etc.).
• Do not immerse the module, partially or totally, in
water or any other cleaning solution.
HANDLING NOTICE
• Use a proper cleaning solution and suitable cleaning
equipment.
• Do not use abrasive or electric cleaners on the mod-
ule.
• Particular attention should be taken to avoid the
module backsheet or frame to come in contact with
sharp objects, as scratches may directly aect prod-
uct safety.
• Do not use abrasive cleaners, de-greasers or any un-
authorized chemical substance (e.g. oil, lubricant,
pesticide, etc.) on the module.
• Do not use cleaning corrosive solutions containing
hydroluoric acid, alkali, acetone, or industrial alco-
hol. Only substances explicitly approved by EDF ENR
PWT are allowed to be used for cleaning modules.
• EDF ENR PWT recommends to avoid rotating brush
cleaning methods, as they could create micro-cracks
in the PV modules.
• Dirt must never be scraped or rubbed away when
dry, as this will cause micro-scratches on the glass
surface.
OPERATION PREPARATION
• Noticeable dirt must be rubbed away by gentle
cleaning implement (soft cloth, sponge or brush with
soft bristles).
• Ensure that brushes or agitating tools are not abra-
sive to glass, EPDM, silicone, aluminum, or steel.
• Conduct the cleaning activities avoiding the hottest
hours of the day, in order to avoid thermal stress on
the module.
EDF ENR PWT recommends the use of:
• Water with low mineral content
• Near neutral pH water
• The maximum water pressure recommended is 4
MPa (40 bar)

D84-P06-01 GB R3 21/04/2021 www.photowatt.com
18
CLEANING METHODS
Method A: Compressed Air
EDF ENR PWT recommends cleaning the soft dirt (like
dust) on modules just with air pressure. This technique
can be applied as long as the method is eicient enough
considering the existing conditions.
Method B: Wet cleaning
• If excessive soiling is present on the module surface,
a non-conductive brush, sponge, or other mild agi-
tating method may be used with caution.
• Ensure that any brushes or agitating tools are con-
structed with non-conductive materials to minimize
risk of electric shock and that they are not abrasive
to the glass or the aluminum frame.
• If grease is present, an environmental friendly clean-
ing agent may be used with caution.
This manual suits for next models
2
Table of contents
Other PHOTOWATT Solar Panel manuals
Popular Solar Panel manuals by other brands

Conergy
Conergy PE 245P instruction manual

Korax Solar
Korax Solar KS-90 installation guide

inventux
inventux X Series installation manual

Solglass
Solglass Solartrix 1200-400 Series installation manual

NEO TOOLS
NEO TOOLS 90-143 Original manual

Yingli Solar
Yingli Solar YL265P-29b Installation and user manual

Kyocera
Kyocera KD235GX-LPB datasheet

GRIDFREE
GRIDFREE LIFESTYLE KIT installation manual

fanttik
fanttik EVO SOLAR 100 user manual

Econess Energy
Econess Energy EN125M-72 Series user manual

Panasonic
Panasonic HIT VBHN330SA16 General installation manual

Meyer Burger
Meyer Burger WHITE Installation and operating manual