PI Solo Stove User manual

Pizza Oven Instruction Manual
Must read before use. Failure to
do so can result in serious injury
or death.
Vor Gebrauch unbedingt lesen.
Andernfalls sind schwere
Verletzungen oder Todesfälle
möglich. HIER SCANNEN.
À lire absolument avant toute
utilisation. Le non-respect de
cette consigne peut entraîner des
blessures graves, voire mortelles.
SCANNER ICI.
Leer antes de usar. El no hacerlo
puede resultar en lesiones graves
o muerte. ESCANEE AQUÍ.
Lezen voor gebruik. Het nalaten hiervan kan leiden tot serieuze
verwondingen of de dood. SCAN HIER.
Da leggere prima dell’uso. In caso contrario, possono verificarsi
lesioni gravi o morte. SCANSIONA QUI.
SCAN HERE

0302
INCLUDED PARTS
Pizza Oven
Body
Pizza Stone (2 Halves)
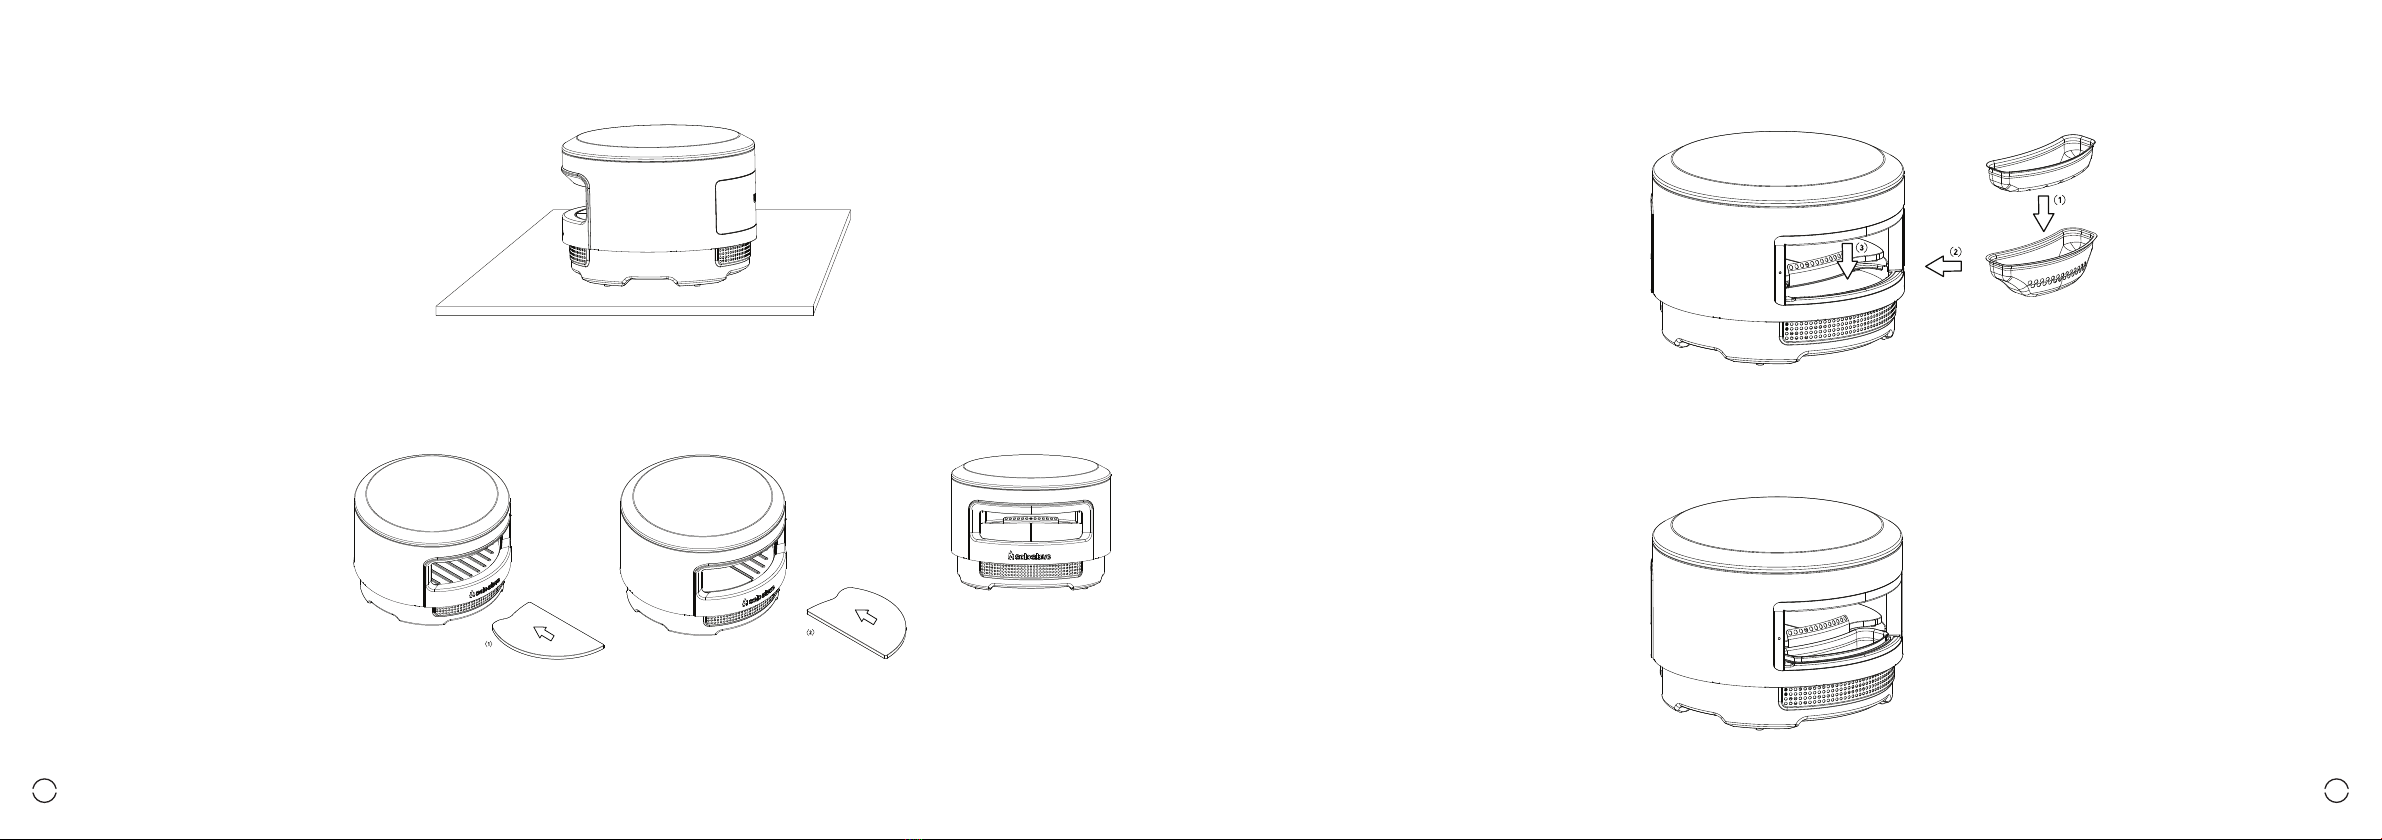
Rear Door Fuel Stoker
Rear Door Handle
Ash PanFuel Grate
IMPORTANT SAFETY
WARNINGS
KEEP THESE INSTRUCTIONS FOR FUTURE USE. DO NOT
DISPOSE OF THIS MANUAL. Read instructions in full
prior to assembling and using the Pizza Oven. Failure to
comply with all provisions and usage guidelines could result
in property damage, serious bodily injury, death, or fire.
• Do NOT use this appliance within 10 feet of combustible materials. Do
NOT store any flammable liquids or pressurized gas tanks not directly
connected to the Pizza Oven within 25 feet of this product.
• WARNING: Pizza Oven surfaces may be hot. Do not touch exterior
surfaces while in use. Use heat resistant gloves when using the Pizza
Oven. KEEP AWAY FROM CHILDREN AND PETS. Never leave the Oven
unattended while in use or until the Pizza Oven has completely cooled.
• Do NOT use on plastic tables or portable tables that are not designed to
accommodate cooking appliances.
• Do NOT use on tables with coverings of any kind, including plastic and
fabric tablecloths.
• Use ONLY on a level, stable, heat resistant surface.
• Do NOT move the Pizza Oven while in use.
• Do NOT use on boats, floating docks, or recreational vehicles.
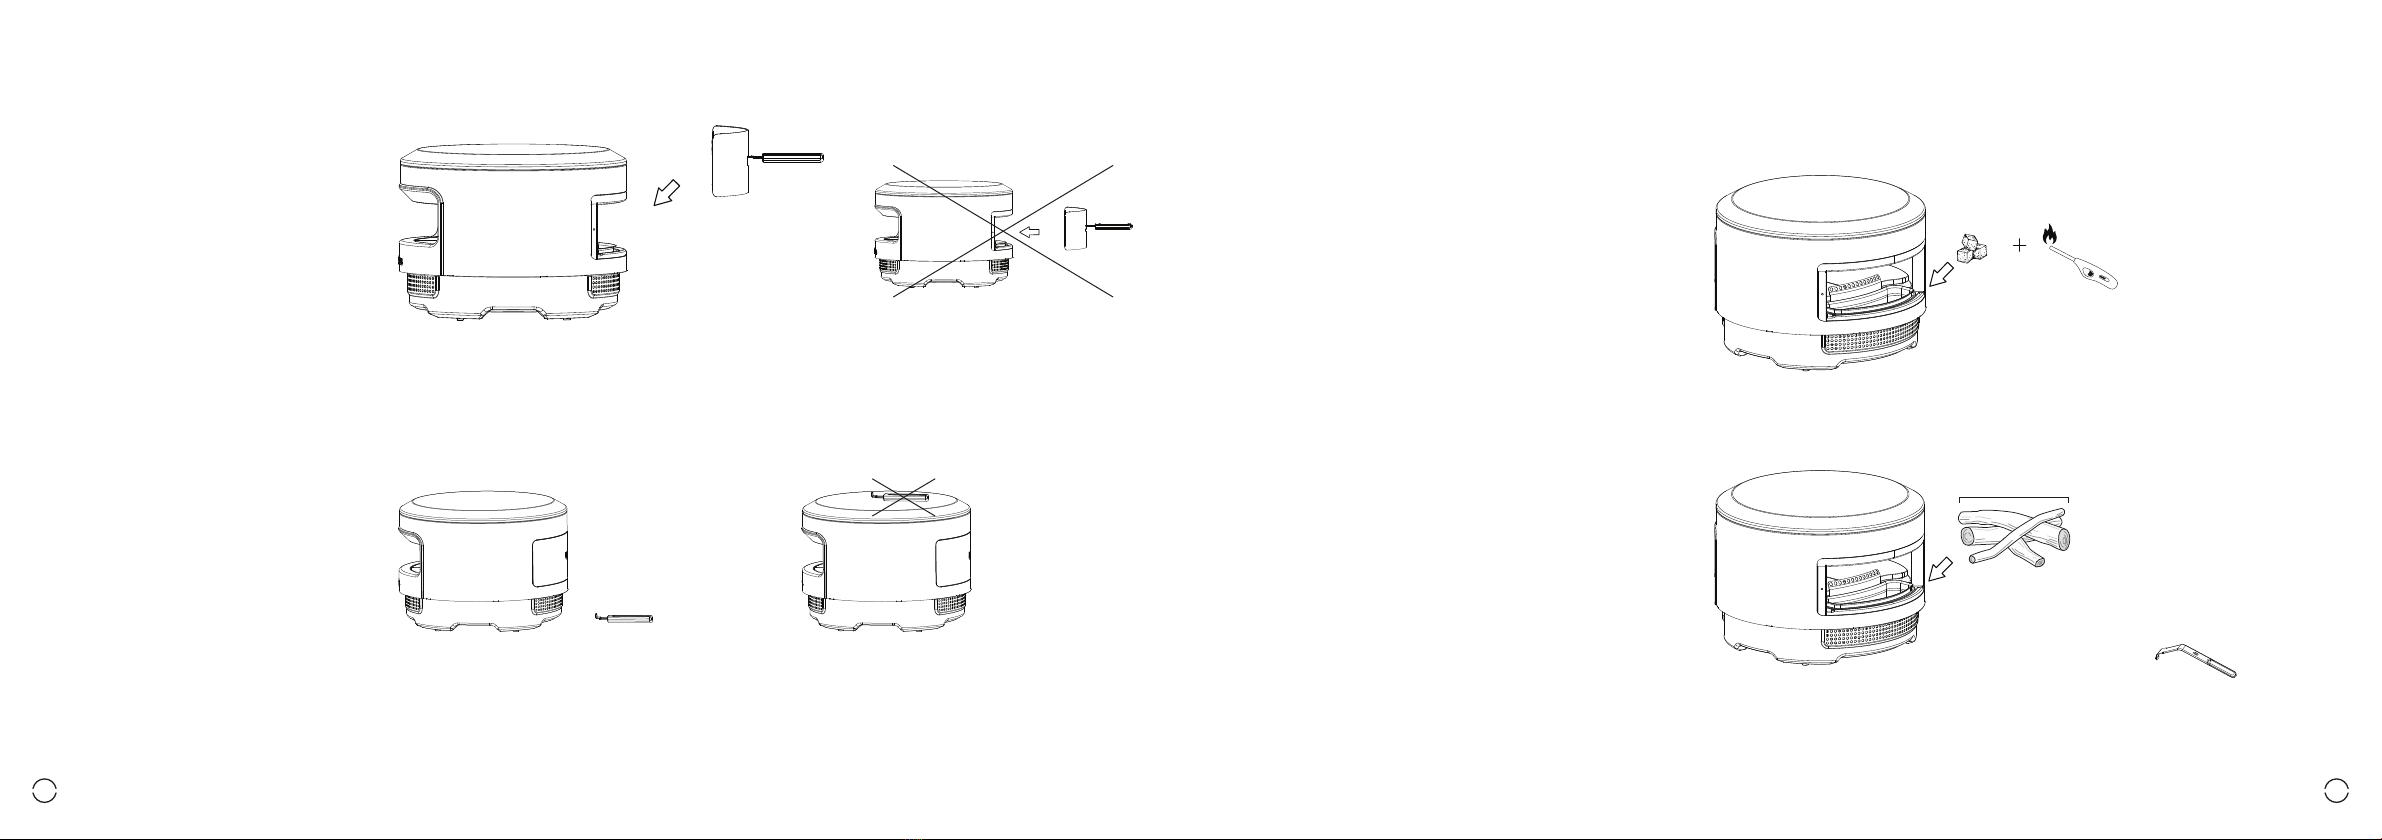
• Use only kiln-dried hardwoods fuels.
• Do NOT use other fuels or fuels with additives.
• Do NOT use wood pellets.
• Do NOT overfill fuel grate or attempt to remove ash pan or fuel grate while
in use.
• Do NOT use chemicals or accelerants to light. Use only natural food safe
paraffin-based fire starters.
• Rear door will be hot during use. Do NOT set doors on surfaces that can be
damaged by heat.
• Always use detachable handle to lift and move doors.
• Do NOT burn wood in the Pizza Oven and attempt to use the Pizza Oven
Gas Burner at the same time. Serious Bodily Injury or Property Damage
could result.
• If using the Pizza Oven Gas Burner, the ash pan and fuel grate area must be
completely cool and cleaned of any ashes prior to installing and using the
Gas Burner.
• Do NOT cover the Pizza Oven until the Pizza Oven has completely cooled
and all ashes have been properly cleaned out and disposed of.
• Do not use at night without sufficient lighting surrounding the Pizza Oven.
Inspect surrounding areas for potential trip hazards. Do NOT use electrical
cords near the Pizza Oven.
• Inspect your Pizza Oven before every use. Altered, damaged, or missing
parts may cause bodily injury or property damage.
WARNING! FOR OUTDOOR USE ONLY!
Carbon Monoxide is a colorless, odorless gas that can kill. It is released
during the combustion process of organic fuels and normally dissipates
in open air, outdoor environments. Do NOT use the Pizza Oven inside
a structure, tent, vehicle, under covered patios, awnings, near open
windows, in close proximity to indoor areas, or in tightly fenced spaces
that may concentrate this gas and lead to Carbon Monoxide poisoning.
WARNING! FIRE HAZARD!
DISPOSE OF ASHES PROPERLY! Ashes should be placed into a metal
container with a sealed metal lid. Ashes and embers can maintain heat
and combustion even after several hours. Handle with care.
• Do NOT dump ashes within 25 feet of combustable materials, into
plastic garbage bags or into any combustable containers.
• Do NOT store ashes in any enclosed area
• Do NOT dump or move ashes in windy conditions
• Do NOT attempt to remoce the Ash Pan or Ash Pan Grate while the
oven is in use or until ashes have cooled completely.
• Review all local ordinances, outdoor fire guidelines, and burn ban
notices prior to using the Pizza Oven.
WARNING! SURFACES WILL BE HOT!
Use caution when operating the Pizza Oven. Outer surfaces will be
HOT and should NOT be touched.
• Use heat resistant gloves at all times and use detachable handles when
lifting and removing.
• Flames can occasionally reach outside of the Pizza Oven’s front
opening , rear door, and lower rear air inlets. Follow all spacing and
placement guidelines in these instructions and keep children and pets
away. DO NOT LEAVE THE PIZZA OVEN UNATTENDED.
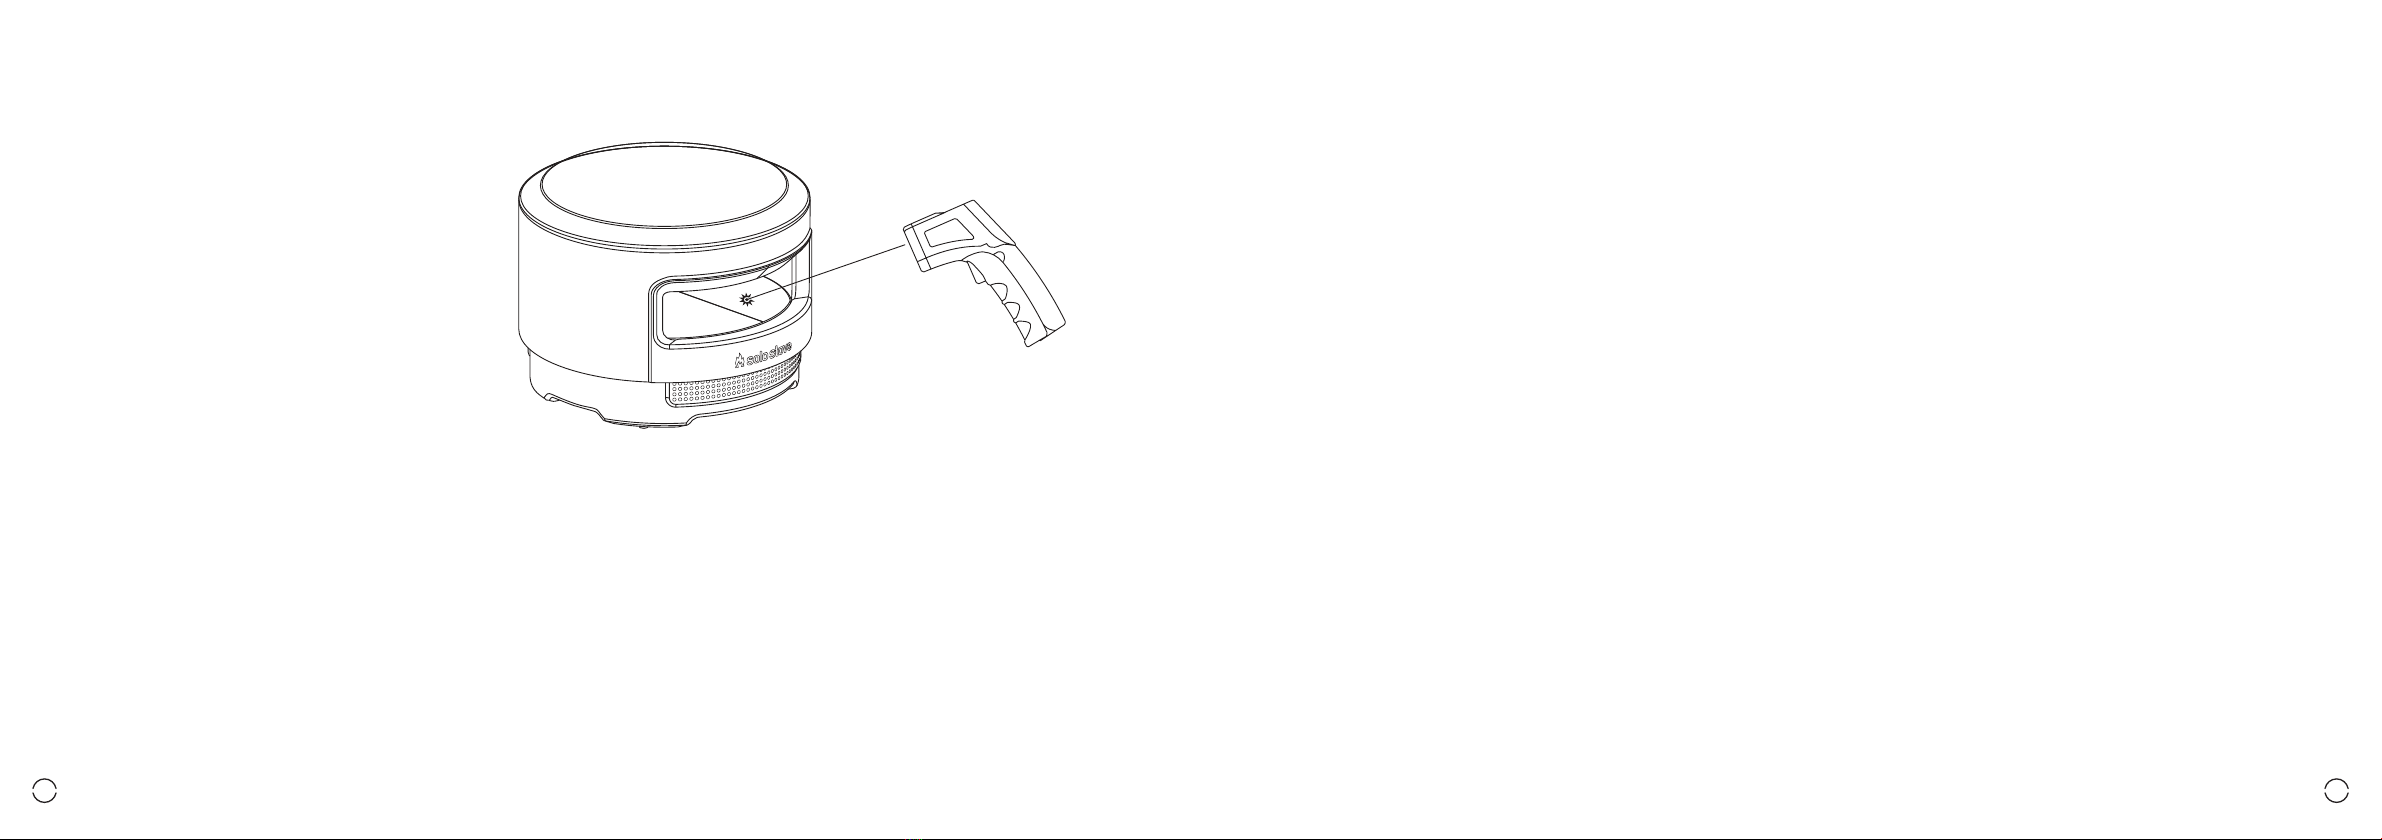
• Keep hands and face away from pizza oven openings. Interior air and
surface can reach 250-500˚C
• Do not use the Pizza Oven as a heater
When operated in a safe and responsible manner your Solo Stove Pi Pizza
Oven will provide years of enjoyment and oven fresh pizza for your family
and friends. Ensure these instructions are read often and understood by all
individuals using the Pizza Oven.
When removing items from the box, take extra care to
unwrap each component and inspect them for damage.
Scan for easy 3D instructions
Download the BILT app before you begin
BEFORE YOU BEGIN

0504
ASSEMBLY
Wood-Firing
01 - Place Pi on a Safe, Sturdy Surface
02 - Install Pizza Stone Halves
Insert one pizza stone half through
the front opening of the oven body,
matching the orientation shown
below. Once inside the oven, move
the pizza stone half completely to
the side to give room for the second
half. Each pizza stone half should lay
flat on the metal support tray and will
not rest on top of each other when
installed correctly.
03 - Install Ash Pan and Fuel Grate
First, insert the fuel grate into the ash pan.
When the fuel grate is completely nested
inside the ash pan, place the entire unit inside
the rear opening of the oven body as shown.
When installed correctly the
ash pan and fuel grate will
align, and will not stick up
above the lower door jamb.
Stone halves
installed correctly
Before assembly, remove all items from the box, carefully
unwrap, and inspect for damage.

0706
04 - Rear Door
The rear door can be quickly placed or
removed using the detachable handle.
To install the rear door, attach the handle
and lower the door into the rear opening
at a slight angle until the edges of the
door are flush with the oven body.
The rear door handle is designed to be used only when moving the door and will
not stay in the door handle recess when let go. The rear door should remain closed
as much as possible during use to minimize heat loss. Store the rear door in a safe
place in between uses.
DO NOT set or store the handle directly on top of the oven, unless using the Pi
Silicone Mat.
CAUTION! Always inspect the rear door
after installation to ensure it rests flush
with the outside of the oven body. If the
door is damaged or does not rest flush,
do not use the Pizza Oven. Serious injury
or risk of exposure to flame could occur
while operating a damaged Pi Pizza Oven.
Contact Solo Stove Customer Support
for assistance.
LIGHTING & OPERATING
INSTRUCTIONS
Lighting
01 - Access The Fuel Grate
Remove the rear door to access the fuel grate.
Place 2-3 natural fire starters in even spacing at the
bottom of the fuel grate, then light the starters.
02 - Add Wood
Place 4-6 pieces of kiln-dried wood on top of the
starters and allow them to catch fire.
For best results, wood pieces should be
approximately 4-5 inches long with 1-1.5 inches in
diameter. Smaller pieces will burn too quickly, while
larger pieces will smoke and take longer to catch fire.
CORRECT
CORRECT
INCORRECT
INCORRECT
4-5 inches
Use the fuel stoker to
break up spent ashes and
distribute coals evenly
across the fuel grate.

0908
03 - Preheat
Once the fire is sustained, replace the rear door. Let
the oven preheat for 15 minutes, or until the pizza
stone reaches approximately 650°F. Use an infrared
thermometer to measure the very center of the pizza
stone.
Keep your Pi at optimum temperatures by adding 1-2
pieces of wood every 5 minutes. Temperature and
refueling intervals may vary depending on the size of
your wood.
Start with adding the minimum amount and increase
as needed.
General Use
For every use, inspect the four rubber feet on the bottom of the oven.
If any are missing or damaged, do not use the Pizza Oven. Contact Solo
Stove for replacement parts.
With normal use, the ash pan will allow for up to 2-3 hours of use before
it becomes full. The Pizza Oven must cool completely before a full ash
pan can be emptied.
• Dispose of ashes responsibly, preferably into a metal can. Ashes and
embers can maintain heat and flammability even after several hours.
• Do not dump ashes within 25 feet of combustible materials, into plastic
garbage bags, or into any combustible containers.
• Do not empty ashes in windy conditions.
• Do not attempt to remove the fuel grate or ash pan while the Pizza
Oven is in use.
Rear door may be hot when in use. Use only the detachable handle to
remove and install the door.
• Rear door should be set in an upright position when removed from the
oven and when not in use.
• Only set the rear door on surfaces that are heat tolerant. Do NOT set
on plastic surfaces.
• Do NOT set doors on the ground, near children or pets, or where they
would be susceptible to damage.
• Handle rear door with care. Hard impacts can damage or bend the
door which will affect how it functions. Damaged doors should not be
used. Contact Solo Stove for replacement parts.
~650˚F

1110
CARE
Pizza Oven Body Pizza Stone Halves
Discoloration
Cooking with wood will produce varying amounts of smoke. This smoke
will cause some discoloration above the front opening. The dark residue
that forms on the surface is normal and can be cleaned once the Pizza
Oven has cooled.
The oven body is 304 stainless steel, a strong and corrosion-resistant
steel that will slowly discolor and patina over time. This is normal and
should not be construed as a defect. This process is accelerated by heat,
which is why different areas of the Pizza Oven will patina or discolor
differently than others. This discoloration is both on and in the surface of
the steel, and it is not something that can be completely cleaned off.
Cleaning
Dirt, residue, and debris can be cleaned off using warm soapy water
applied to a clean, lint-free towel. Never spray cleaning solutions directly
on the Pizza Oven. Dampen the towel first, then clean in the direction of
the brushed grain.
• Do not use abrasive cleaners or scouring pads to clean the oven body,
as these could scratch the stainless steel surface.
The oven interior can be cleaned in the same way you would run a self-
cleaning cycle of a standard oven. Fire it up on high heat to burn off any
crumbs or residue. Once the oven has completely cooled, brush away
the debris. You can also wipe down the metal surfaces with a damp cloth.
Care
• Do not drop the oven or place items directly on top of the oven, unless
using the Pi Silicone Mat.
• Do not store items inside the oven.
Discoloration
The pizza stone is made from Cordierite, a porous material commonly
used for cooking stones. This type of material will age the more it is used
and will naturally discolor in areas over time.
Cooking
When cooking, a light amount of semolina, cornmeal, or flour can be used
to help prevent food from sticking. Loose cornmeal will burn off over
time and can be brushed to the sides in between cooking and removed
when the Pizza Oven has cooled.
The pizza stone halves are reversible, and each side will last up to 1-3
years with normal use. Over time, the pores of the pizza stone will
accumulate food residue, which will affect how the food tastes and how
well the stone transfers heat to foods.
Use genuine Solo Stove replacement stones when needed.
• Do NOT place frozen or extremely cold foods on the pizza stone.
• Do NOT drop the pizza stone. Breakage may occur.
• Do NOT use a damaged or chipped pizza stone.
Cleaning
Do not attempt to clean the pizza stone while it is still hot. Allow it to
cool before conducting any routine cleanings.
Occasionally remove and brush off the pizza stone. Burnt on materials
should be removed with a stiff nylon brush or plastic scraper.
In extreme cases, medium grit (100-120) sandpaper can be used to
remove stubborn surface deposits. Then, wipe down with a clean, lightly
damp cloth.
• Do NOT use metal scrapers as they may damage the stone.
• Do NOT use soap or chemicals on the pizza stone or submerge it in
water. The pizza stone will absorb these which will affect how your food
tastes. Prevent excessive moisture from contacting the stone as it may
cause the stone to crack when heated.
Grease Fires
Do not put fatty foods or oils directly onto the pizza stone. Fatty foods
or oils will create build-up and could cause unpleasant smells, excessive
smoke, or lead to a grease fire.
If a fire does occur, carefully remove all foods from the Pizza Oven
and allow flames to subside. Call the Fire Department if the flames do
not extinguish within 15 seconds or are reaching outside of the oven
openings.
• Do NOT use water to put out fires caused by fatty foods or oils as it
may cause the fire to spread.
Solo Stove does not accept any responsibility, legal or otherwise, for the
incidental or consequential damage to property or persons resulting
from the misuse of this product. Solo Stove shall in no event be liable
for any special, indirect, consequential, or other damages of any nature
whatsoever in excess of the original purchase price.

v1.0
Table of contents
Popular Kitchen Appliance manuals by other brands

Cater Chef
Cater Chef PROFI line TOP 220 Installation - use - maintenance

Silvercrest
Silvercrest SSM 200 A1 operating instructions

Silvercrest
Silvercrest SFW 350 D3 operating instructions

Silvercrest
Silvercrest SDG 800 A1 operating instructions

gourmetmaxx
gourmetmaxx Push n Ready operating instructions

Silvercrest
Silvercrest SPM 2000 B2 operating instructions

Goldmedal
Goldmedal Gay 90 Whiz Bang instruction manual

Range Master
Range Master Elise 100 Induction User's guide & installation instructions

German pool
German pool CKY-286 operating instructions

Proficook
Proficook PC-HM 1026 instruction manual

V-ZUG
V-ZUG CombiSteamer V4000 operating instructions

New Air
New Air AWR-290DB-B owner's manual