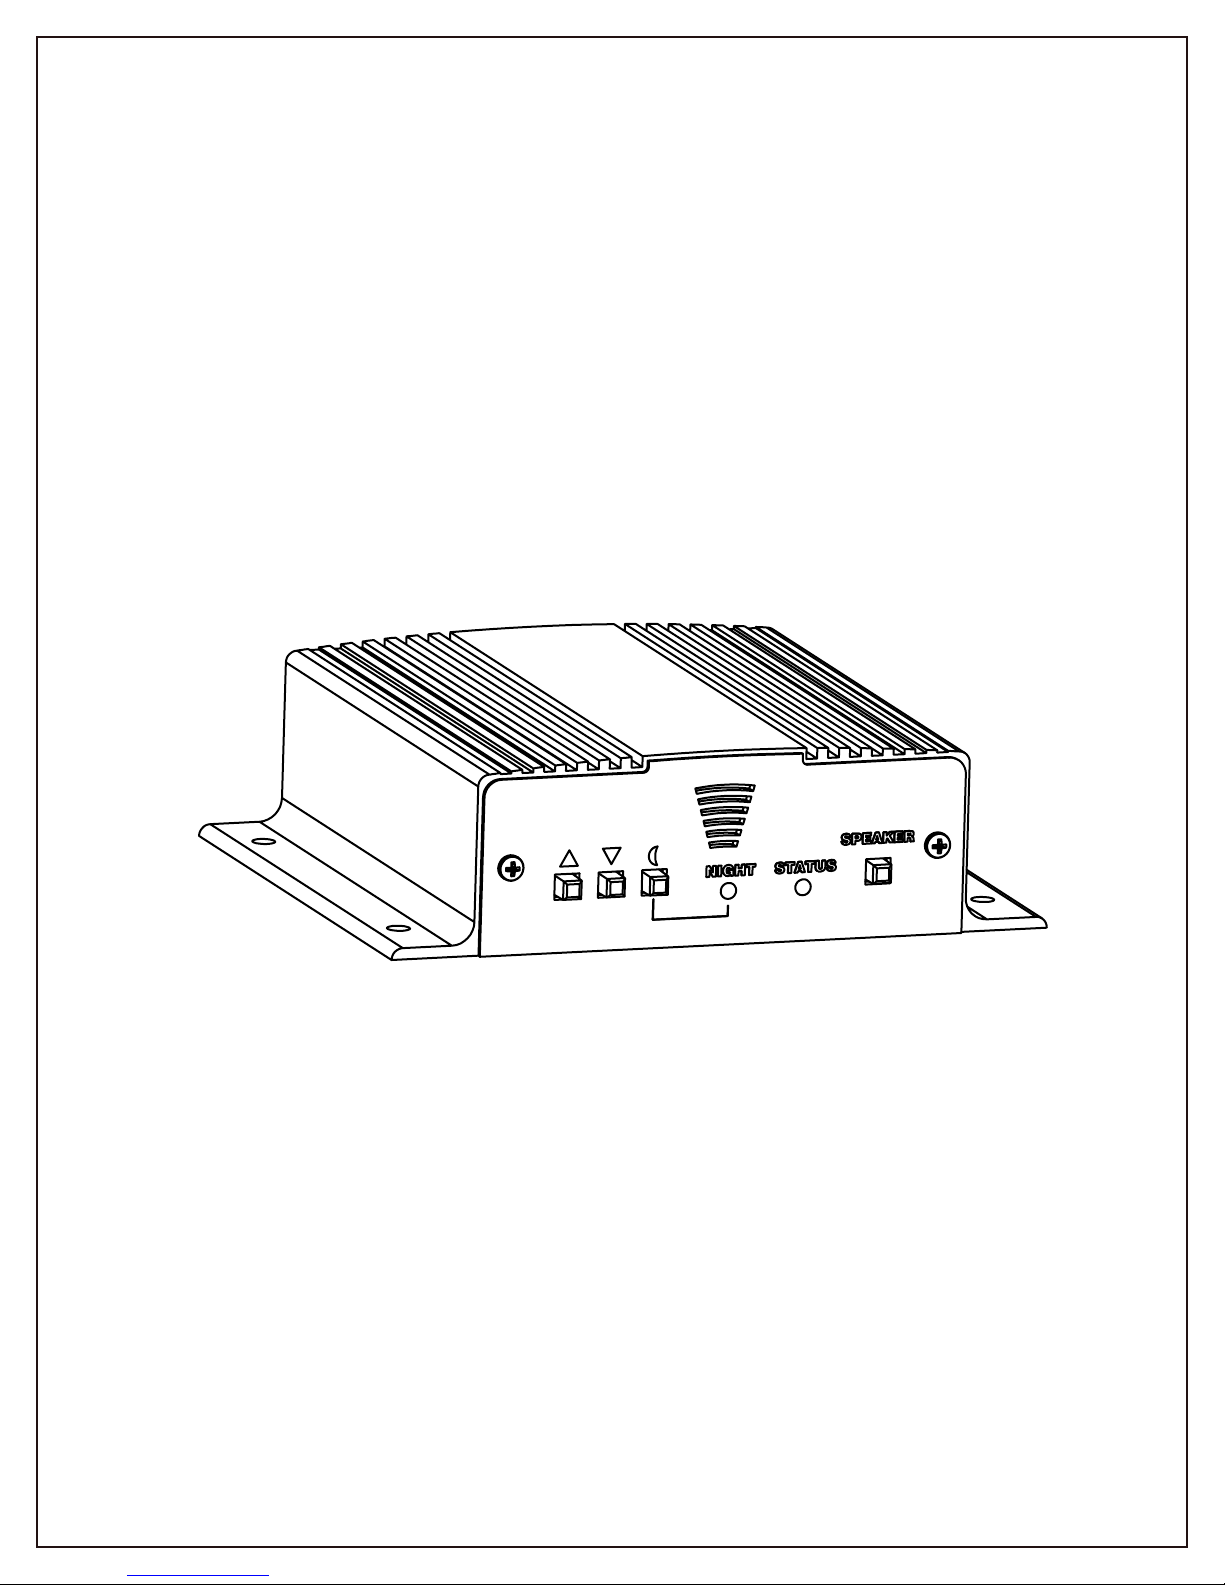
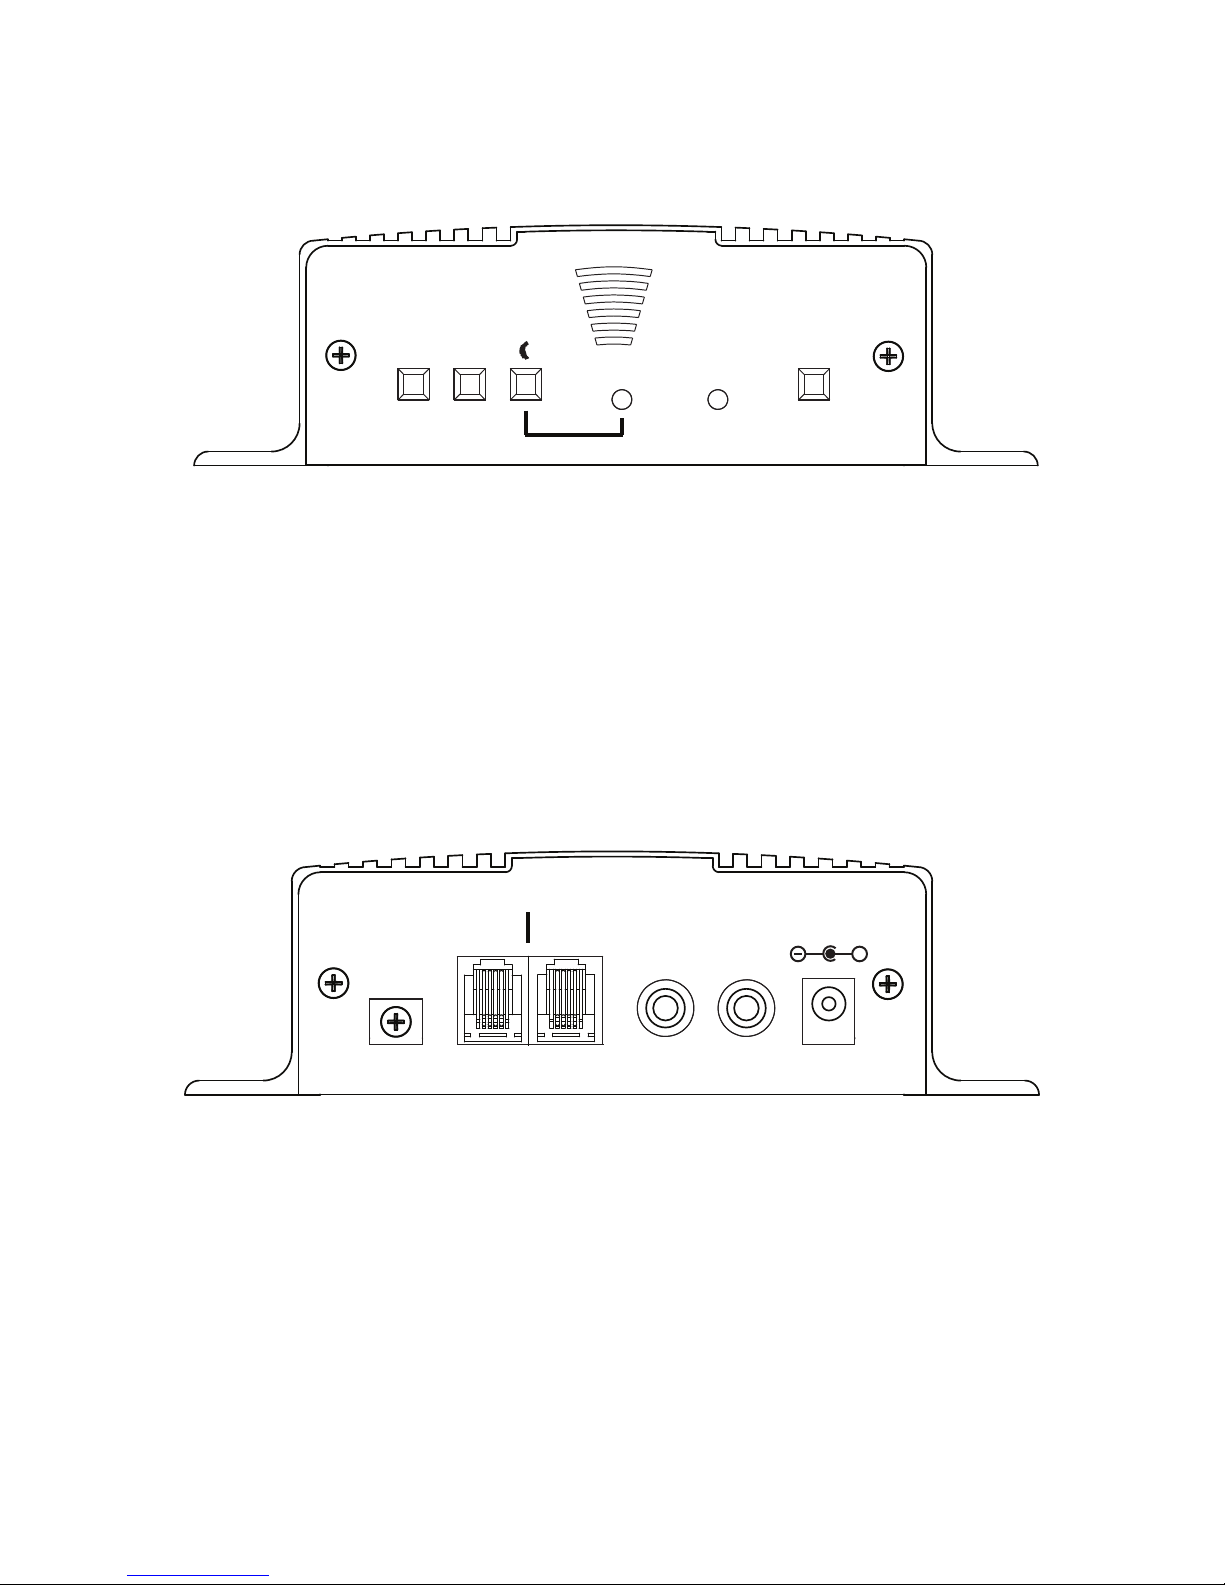
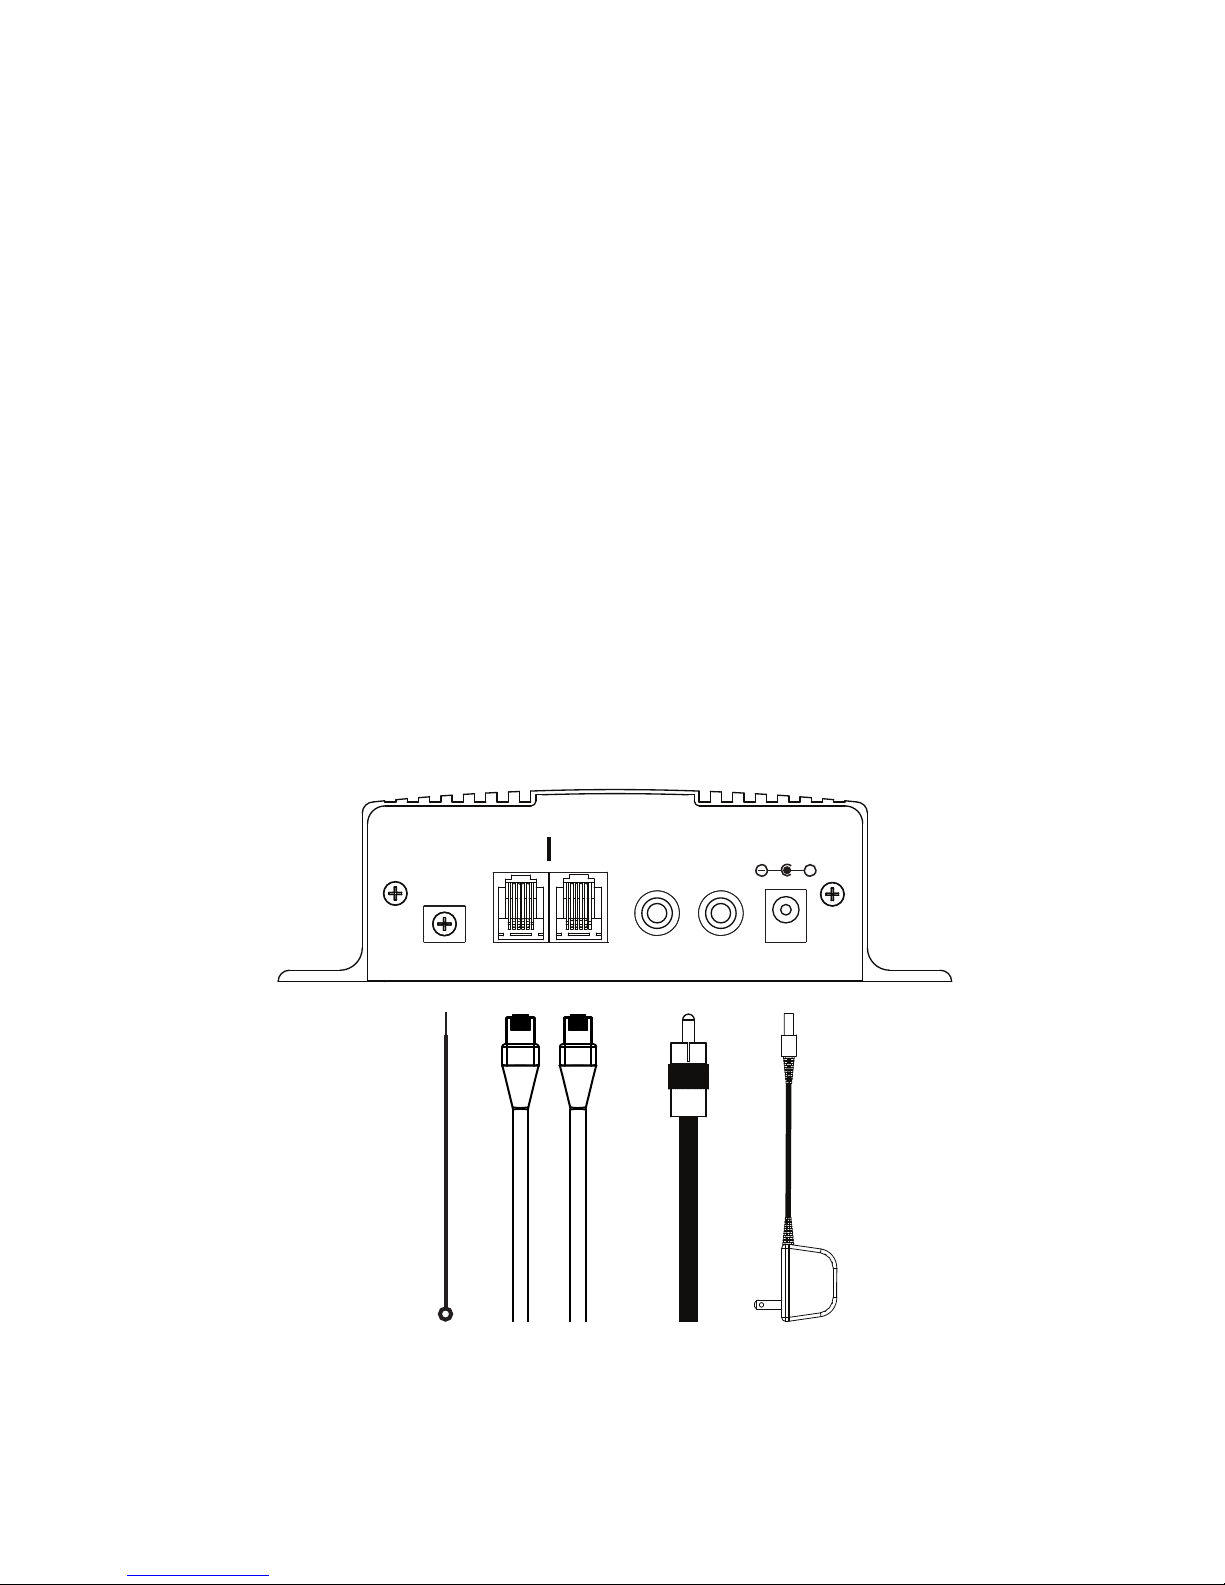
PICA Product Development TELink 700a Instruction Manual

TELink 700a/700an
Installation & User Manual

Index:
Introduction ........................................................................................................................
TELink Layout Summary..................................................................................................
Installation .......................................................................................................................
Operation..........................................................................................................................
Troubleshooting ................................................................................................................
Warranty & FCC ....................................................................................................................
2
3
4 - 5
6
6
7
Introduction:
The TELink is a professional-quality telephone-loadable digital audio playback device designed to
provide a continuous-play audio source for message-on-hold applications. The TELink comes standard
with 32 minutes of non-volatile high-density ash memory and offers a wealth of standard features
including fax-line sharing, voice-line sharing and distinctive ring compatibility. A night answer model
is also available to answer the phone after business hours and play a separate night message for callers.
Unpacking and Inspection:
Before you begin installation, unpack and verify you have all the correct parts.
(1) TELink
(1) 12VDC @ 500mA power supply
(1) Instruction manual
(1) RCA to RCA cable
(1) RJ-14 Cord
(1) Surge protector grounding cable
(1) 1/8˝ Adapter
(2) Wall mount screws
(4) Rubber feet
If you are missing any of these parts STOP and call your dealer.
Important Notes:
The grounding cable supplied must be connected from the SURGE GND terminal on the side of the unit to a
known good ground. Failure to do so will VOID the warranty of this product.
This unit MUST BE be installed directly to the incoming telephone line with no other telephone equipment
connected prior to the LINE IN connection on the rear of the unit. This includes phones, faxes, credit card
terminals, alarm systems, etc.
2

3
TELink Layout Summary:
Front of Unit
VOLUME UP & DOWN SWITCH - Used to control the 8Ω and 600Ω output level of the stored messages.
NIGHT SWITCH - This switch manually turns the NIGHT MODE to either ON, OFF or Scheduled.
NIGHT LED - Indicates units NIGHT ANSWER status.
STATUS LED - Indicates units operational STATUS.
SPEAKER - The SPEAKER switch can be turned ON and OFF to monitor audio playback. The switch has no
effect on the audio output connections on the rear of the unit. Switch should normally be kept OFF.
Rear of Unit
SURGE GND - Connects to the buildings electrical ground.
LINE IN - Connects to the incoming telephone line.
LINE OUT - Connects to phone or fax.
8Ω and 600Ω OUTPUT - This jack connects to the INPUT of the phone systems MOH port or PA system.
Depending upon the systems impedance use either the 8Ω or 600Ω jack - DO NOT USE BOTH!
12VDC - This is where the supplied 12VDC @ 500mA power pack is connected.
NIGHT
SPEAKER
STATUS
▲ ▼
SURGE
GND
LINE
IN
600Ω
MADE IN USA
8Ω
12VDC
500mA
+
OUTPUT
LINE
OUT

4
Installation:
The TELink should be installed using the following steps:
Step 1: Wall or shelf mount the unit. Screws and rubber feet are supplied in the accessory kit.
Step 2: If connecting to an amplier make sure it is turned OFF for this part of the installation.
Step 3: Connect the supplied grounding wire from the SURGE GND terminal to the buildings electrical ground.
Step 4: Connect a RCA cable (supplied in the accessory kit) to the OUTPUT jack on the rear of the unit. Depending
upon the required impedance use either the 8Ω or 600Ω output RCA jack. Connect the other side to the MOH port
on the phone system, PA system or speaker.
Step 5: Connect the incoming line to the LINE IN then connect the LINE OUT to a PHONE, FAX or KSU.
Step 6: Attach the included power pack to a wall or power strip receptacle, then attach the other end to the jack on
the rear of the unit labeled 12VDC.
Step 7: If any ampliers were turned OFF during installation then turn them back ON now.
Step 8: Adjust the volume level (while on hold) using up and down VOLUME buttons on the front of the unit.
Depending upon the application either call into the phone system and be placed on hold OR listen to the PA
systems speakers to ne tune volume. If volume controls are locked then the servicing dealer may need to assist
with this step.
Wiring Diagram
SURGE
GND
LINE
IN
600Ω
MADE IN USA
8Ω
12VDC
500mA
+
OUTPUT
LINE
OUT
Incoming Telco Line
Phone, Fax or KSU
To MOH or PA System
(Use 8Ω or 600Ω)
Building Ground

5
Installation (Optional Features):
Fax Share:
The Fax Share feature allows the TELink to share a phone line with a fax machine, saving the expense of having
to install a separate line. In a Fax Share installation, the TELink only answers calls from the servicing dealer and
does not interfere with incoming or outgoing fax transmissions. The TELink MUST BE SET to answer on two or
more rings than what the FAX is set to answer on. For example: If the fax machine is set to answer on two rings,
then the TELink should be set to answer on four rings. For the Fax Share option to work correctly the fax machine
must be the device that answers the line - not the TELink. Fax Share cannot be used together with Night Answer.
Night Answer:
The Night Answer feature provides the capability to store a separate night answer message in addition to the
standard MOH message. When the Night Answer feature is activated the TELink will answer incoming calls and
play the informational Night Answer message to the caller. After the night message has played then the caller will
be disconnected automatically and unit will be ready for next call.
Two Night Answer modes are available:
Scheduled - The Night Answer message can be scheduled by the servicing dealer to turn on and off automatically
once per day, on a seven-day calendar. Sample schedule: Night Answer turns OFF at 9am and ON at 5pm
Monday-Friday, with no ON or OFF time scheduled for Saturday and Sunday. Under this schedule, Night Answer
is active during non-business hours (5pm-9am) and all weekend long.
Manual (Not Recommended) - Night Answer can be turned ON or OFF on demand by pressing the NIGHT button
on the front panel. If a Night Answer schedule is present, this will override it. If you manually turn Night Answer
ON or OFF, it will remain in that state until you cancel it by pressing the NIGHT button again.
IMPORTANT: If Night Answer is turned ON manually, you must remember to turn it OFF when you want calls
to ring through normally. Until Night Answer is turned OFF, the TELink will continue to answer calls, play the
Night Answer message, then hang up. DO NOT forget to turn Night Answer OFF at the desired time.
When using Night Answer, it is extremely important that the TELink is installed on the rst phone number that
the phone system answers on. Because this line is likely to be the most heavily used, the servicing dealer may
encounter difculty (busy line) when trying to call the unit. Therefore, it is recommended that the initial installation
and subsequent downloads be scheduled during times when the line is not likely to be in use (during non-business
hours).
The NIGHT LED on the front of the TELink indicates the current ON/OFF status of the Night Answer feature:
NIGHT LED Indication
ON Night Answer ON (Manual Mode)
OFF Night Answer OFF (Manual Mode)
BLINKING SLOW Night Answer OFF (Scheduled Mode)
BLINKING FAST Night Answer ON (Scheduled Mode)

Operation:
After installation is complete, a download may be required. Check the STATUS LED on the front panel.
During communications sessions between the TELink and the servicing dealer, the STATUS LED will BLINK
FAST and the phone line becomes unavailable for incoming and outgoing calls (no dial tone will be present).
After a successful download the STATUS LED remains on SOLID.
If there is no on-hold audio, verify all connections against the installation procedure used and try again. If there
is still no on-hold audio, contact your servicing dealer.
Troubleshooting:
Problem Possible Reason
Status LED - OFF Power pack not plugged in or on a switched outlet
Status LED - BLINKING SLOW No audio on unit
Status LED - BLINKING FAST Unit in communication mode
New audio being downloaded
MOH message not playing Check volume output level by adjusting the VOLUME
Check OUTPUT connection from unit to phone or PA system
Try switching between the 8Ω and 600Ω OUTPUT connections
Popping audio File was encoded using too high of a bit-rate
File incompatible with unit
File audio starting too close to beginning of le
Distorted audio Check to make sure volume is not too high
Try switching between the 8Ω and 600Ω OUTPUT connections
File incompatible with unit
TELink does not answer/update Check to make sure telephone line is connected to LINE IN
Check to make sure line is operation with normal phone
Verify NO OTHER DEVICES are connected prior to the TELink
Line Connected to TELink not working The TELink may be in communication mode - Check STATUS
LED.
6
STATUS LED Indication
ON Normal Operation - Audio Playing
BLINKING SLOW No Audio
BLINKING FAST Communications Mode - Loading Audio

7
Limited Warranty
TERMS: PICA Product Development, LLC warrants to the original purchaser (“Buyer”) that the Product sold is free from defects in
material and workmanship at the time of purchase. The warranty period begins at the time of Product’s original purchase by the rst
end-user. The warranty applies for ve (5) year from the original date of purchase, or as long as the product is owned by the original
purchaser, whichever comes rst. Included in the warranty are parts and labor. Buyer must provide written notice to PICA Product
Development, LLC of any defective part or conditions within the warranty period. If the defect is not the result of improper use,
service, maintenance or installation, and if the equipment has not been otherwise damaged or modied after shipment, PICA Product
Development, LLC or its authorized representative shall either replace or repair the defective Product at PICA Product Development,
LLC’s option. No credit shall be allowed for work performed by Buyer or unauthorized parties. Out-of-warranty repairs are invoiced
at the current PICA Product Development, LLC hourly rate plus the cost of parts, shipping and handling. In the event that the product
serial number is missing or has been tampered with in any way, the foregoing warranty is void and without effect and PICA Product
Development, LLC shall have no liability whatsoever on account of defects to such product.
LIMITATIONS: Except as stated above, there are no warranties, express or implied, that extend beyond the specications for the
product. PICA Product Development, LLC expressly disclaims any warranty, express or implied, that equipment sold hereunder is
of merchantable quality or that it can be used, or is t for any particular purpose. Buyer purchases and accepts equipment solely on
the basis of the warranty here in above expressed. Under no circumstances shall PICA Product Development, LLC be liable by virtue
of this warranty or otherwise for any special indirect, secondary or consequential damages to any person or property arising out of
the use or inability to use the product.
REPAIRING OR REPLACING PRODUCT: Buyer may obtain the repair or replacement of any eligible part or equipment
covered under this warranty through a PICA Product Development, LLC dealer only. Buyer is responsible for all shipping and
handling charges in connection with the performance of this warranty. Products returned to PICA Product Development, LLC must
be securely packaged to prevent damage in transit, freight prepaid, and insured for replacement value. A return authorization number
assigned by PICA Product Development, LLC must be clearly marked on the outside of the shipping container. Proof of purchase
must accompany shipment. For additional RMA process details go to picapd.com/our-products.
COPYRIGHT NOTICE: Unauthorized or unlicensed use of copyrighted audio content is illegal and PICA Product Development,
LLC, Inc. takes no responsibility for such action by the user of this equipment.
FCC Part 15 : This equipment has been tested and found to comply within the limits for a Class A digital device, pursuant to Part
15 of the FCC rules. These limits are designed to provide reasonable protection against harmful interference when the equipment is
operated in a commercial environment. This equipment generates, uses and can radiate radio frequency energy and, if not installed
and used in accordance with the instruction manual, may cause harmful interference to radio communications. Operation of the
equipment in a residential area is likely to cause harmful interference in which case the user will be required to correct interference at
his own expense. In order to maintain compliance with FCC regulations shielded cables must be used with this equipment. Operation
with non-approved equipment or unshielded cables is likely to result in interference to radio & television reception.
Changes or modications not expressly approved by PICA Product Development, LLC could void the users’ authority to operate the
equipment.
IC ES 003 : This Class A digital apparatus complies with Canadian ICES-003 C et appareil numérique de la classe A est conform e
à la norme NMB-003 du Canada.
CE CONFORMITY : The PICA Product Development, LLC TELink conforms with the following standards, in accordance with
the EU Safety, EMC Emissions, & EMC Immunities : EN 60950-1:2001, EN 55022:1998 for Class A, EN 55024:1998 + A1:2001 +
A2:2003, EN 61000-4-2:1995 + A1:1998, EN 61000-4-3:1995, EN 61000-4-4:1995, EN 61000-4-5:1995, EN 61000-4-6:1996, EN
61000-5-11:1994.

PICA Product Development, LLC
4 Ash Street Extension - Unit 1
Derry, NH 03038
picapd.com
Rev. 1/17
Copyright © 1984 - 2017 by PICA Product Development, LLC
This manual suits for next models
1
Table of contents
Popular Telephone System manuals by other brands

Toshiba
Toshiba Strata AirLink DK16 Installation and maintenance manual

NEC
NEC 1090030 - DSX Systems PHONE SuperDisp Phone... Hardware manual

Aria Technologies
Aria Technologies Aria-24/A ipe installation manual

NEC
NEC SL1000 Features and specifications manual

GE
GE 25982EE2 user guide

Siemens
Siemens HiPath 3000 SMG Administrator's manual