Pinty HM01-08VR User manual

Crazy Fit Massager
Thank you for purchasing the Crazy Fit Massager HM01-08VR
Please read this manual carefully to ensure optimum performance and safety.

• Use this massager only according to the instructions providedin this manual. Do
not use it for any purpose other than exercise.
• To prevent damage, do not place this product on a woodpaneled floor. Do not
shift or drag the unit over any surfacethat is vulnerable to scratching or staining.
• Do not use this unit within 30 minutes before or after a meal.
• This unit is intended for use by one individual at a time. Do notallow more than
one person to simultaneously step on itsplatform. Damage and / or injury may
result.
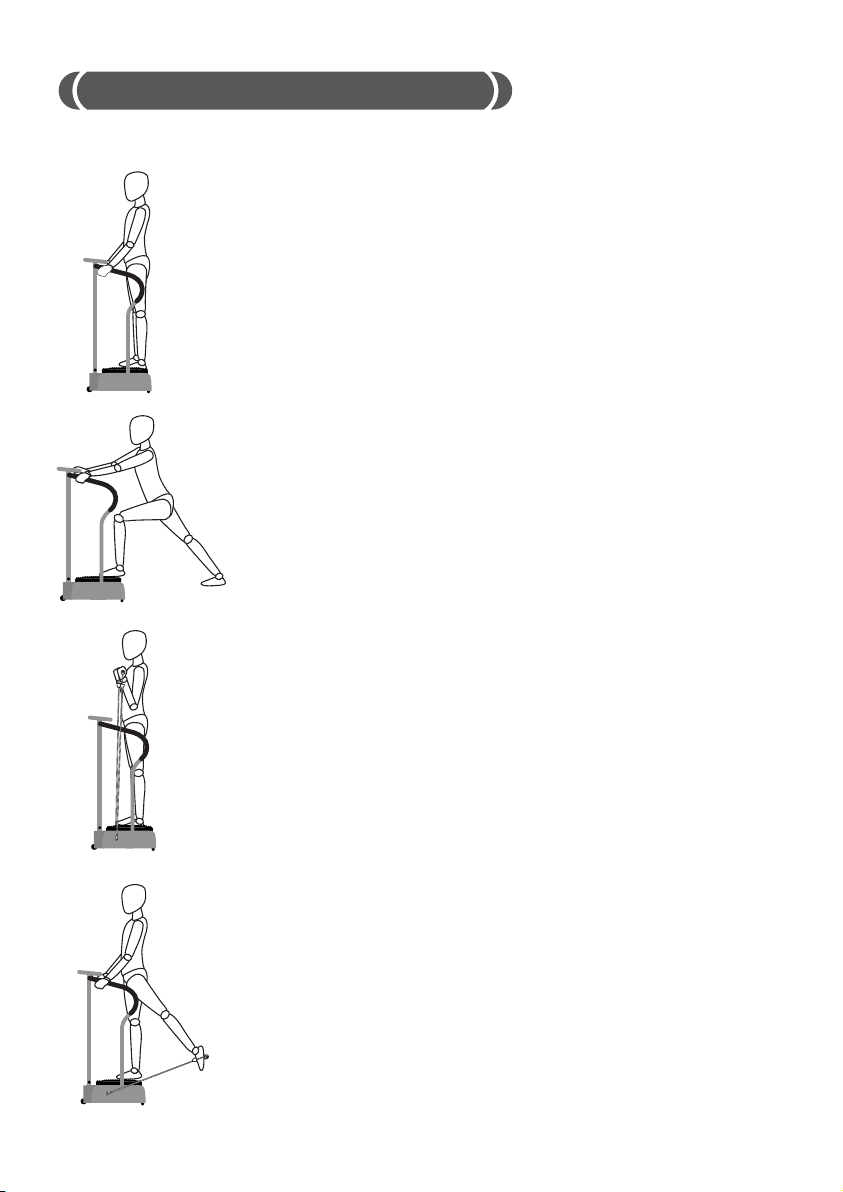
• Grip the armrests securely before stepping onto the platform.
Use these armrests to help retain your balance while themassager is turned on.
• Before starting any massage program, make sure that thevibration speed that
you have set is one that your body cantolerate. Inappropriately high vibration
speeds may causeinjury to the body.
• Make sure that you leave enough space between your feetwhile standing on the
vibration platform. Feet should beshoulder-width apart.
• Never touch or operate this unit with wet or humid hands.Electric shock or
malfunction may result.
• Never attempt to cram sharp or rigid objects, such as a knife orspoon, into any
crevices on the unit. Do not attempt to insertyour fingers into any spaces around
the platform.
• If you experience any discomfort, stop use immediately andconsult your doctor.
• Do not exert any excessive force against the unit. Injury ormalfunction may
result.
• The maximum recommended usage time for this massager is15 minutes for
each position. Muscle cramps may result fromexcessive use.
• To avoid the risk of fire or electric shock, shut down the unit andunplug its
power cord from the wall outlet after each use.
• Do not touch or handle the power pug with wet hands. Electricshock may occur.

When disconnecting the power plug from the wall outlet, grip the plug itself,
rather than tugging on the cord.
• Do not crush the power cord with heavy objects.
Stop using the unit if any of the following conditions appear. Turn offpower
immediately, disconnect the power plug from the wall outlet, andcontact an
authorized repairman:
• The unit is exposed to water, or does not function properly
• The leather cover has been ripped or torn, exposing the mechanicalparts within
• A thunderstorm occurs.
• The cord has been cut or torn, resulting in electric leakage.
Individuals undergoing any of the following conditions should consult their
doctors before using this unit:
• Heart disease
• Stroke
• Scoliosis
• Bone fractures or joint dislocations
• Knee or hip implants
• Pregnancy
• Cancer or other long-term illnesses
• Blood clots
• Tumors
• Recent infections
• Recent operative wounds
• Pregnancy (for women)
• Severe migraines
WARNING
Precautions During Use

Part Names
• Allen Wrench
• M6x14 hexagonal screws (11)
• M6x20 hexagonal screws (2) • screws (2)
• Base Plates (3)
• Audio Line (1)
Armrest
Control Panel
Stand
Footplate
Resistance Bands
Step Plate

Setup Installation
STEP 1
Before installation, check the parts
and accessories. Insert the upper
part of stand into the lower part.
STEP 2
Please Use 2xM6*14 hexagonal screw
and 2 base plates with 5#Allen Wrench
to lock the back tube.
Then Please Use 1xM6*14 hexagonal
screw and 1 base plates with 5#Allen
Wrench to lock the front tube.
STEP 3
Connect the 2 cords.
STEP 4
Then insert the lower end of the stand
into the rectangular hole.

STEP 5
Use the Allen wrench and two
M6x20 hexagonal screws to fasten.
STEP 6
Place the bottom ends of the armrest into
the casing holes into the right and left sides
of the aluminum casing. Making sure that
the screw holes are all aligned in a straight
one, press down on the entire armrest.
STEP 7
Use the Allen wrench and two M6*14
hexagonal screws to fasten.
STEP 8
Connect the upper ends of the
armrest with the bottom ends. Use
the Allen wrench and M6*14 hexago-
nal screws to fasten.

STEP 9
Use the Allen wrench and M6*14
hexagonal screws to fasten.
STEP 10
Installation of the main parts are
finished.
STEP 11
Use hand to move the metal parts
(with hole) at the right and left sides
to the outside, connect the holes
with the resistance bands.
STEP 12
Please use allen wrench to lock this
cup holder into the tube by Cross
recessed screw.
Installation completed. Set the entire
unit back upright. Plug one end of
the power cord into the back of the
unit’s casing, next to the power
switch.

Setup Installation
Power key:
Mode key:
Adjust your desired time and speed during operation.Manual mode:
Time key:
Calorie key:
Speed Up key: Press to increase speed of vibration.
Slow Down key: Press to decrease speed of vibration.
TIME
MODE
POWER CALORIE
SPEED
UP
SPEED
DOWN
Press this key to start operation.
Press this key again to turn off.
Press this key for Automatic or
Manual Mode.
Press to adjust your exercise time
from 1 to 15 minues.
Press to track calories consumed
during your exercise.
Time Display
Calorie Display
Speed Display
MP3

1. Connect the power plug to an electrical outlet. Flip the power switch on the
back end of the unit’s casing. To turn on the unit, press the key. Pressing this
key a second time will put the unit in its “standby” mode.
2. Step onto the unit’s step plate. The following will appear on the control panel:
Time display: 01
Calorie Display: --
Speed Display: 01
Mode light off
This indicates the unit is in its manual mode, with a preset time of one minute
and the lowest preset speed of Grade 1.
If you don’t press any other key within one minute, vibration will begin, using
these settings. In this mode, press the or keys to adjust your vibration
speed.
3. Press the mode key, to select Manual - P1 - P2 - P3 - P4.
4.Press the key to begin tracking the calories consumed during your workout.
“00” will appear on the display, and increase in number until“99” is reached.
5. To select an automatic vibration program, first enter the Automatic mode by
pressing the key.
The default setting for any automatic program is 10 minutes.
6: Description of 4 automatic vibration programs:
P1: The speed changed base on 30seconds per time as below:
10—20—30—40—50—60—70—60—50—40—30—20—Repeat。
P2: The speed changed base on 30seconds per time as below:
5—15—25—35—45—55—65—75—Repeat。
P3: The speed changed base on 30seconds per time as below:
20—50—80—Repeat
P4: The speed changed base on 30seconds per time as below:
10—60—30--80—Repeat。
7.To play music, use the audio Line in the accessory bag to connect the MP3 port
with your mobile phone or other devices.
Operating Instructions

Additional Exercises
LUNGES
Stand with both feet on the platform. Grip its
handles with your hands. Place one foot on the
center of the platform and shift your weight onto
one foot. Extend the other foot backward until it
rests on the floor. Keeping the toes of both feet
pointed toward the platform, lean forward and hold.
Repeat this exercise with your other foot.
BASIC
Stand with both feet on the platform. Grip its
handles with your hands. Balance yourself as the
platform moves.
BICEP CURLS
Stand with both feet on the platform. Grip the
handle of one armband in each hand, with your
palms facing up. Start with arms at your sides.
Bend the elbows and slowly curl hands up toward
your shoulders. Lower and repeat.
REAR LEG RAISES
Stand with both feet on the platform. Grip its
handles with your hands. Hook the handle of one
armband around the center of one foot. Shift your
weight onto the foot still on the platform and raise
the other foot backward until you feel the muscles
in your glutes, hamstrings, and calves all tighten.
Lower your foot and repeat. Repeat this exercise
with your other foot.

Additional Exercises
Troubleshooting
VIBRATION TWIST
PROBLEM
POSSIBLE CAUSE SOLUTION
Shut off the unit, and try
again when your power
supply recovers its full
voltage.
Set the power switch to the
“ON” position.
Insert the power plug into
an electrical outlet.
The power plug is notPrograms will not start
connected to a power outlet
The power switch is in the
OFF position
The electrical voltage in
your power supply is low.
Vibration does not reach
the speed that you specified
Vibration does not reach
your desired intensity
Place your feet onto the circular center of the step
plate, while keeping your knees slightly bent. For
support, hold on to the armrests with your hands.
While keeping your footsoles in their fixed positions
on the plate, twist your feet from side to side.

• Before daily cleaning, be sure to switch the unit off and disconnect the power
plug from the electrical outlet.
• Never use alcohol or other harsh chemicals to clean the unit.
• To clean the power switch and the circumference of the control panel, use a
cloth that is soft and dry, rather than wet.
• Do not allow liquids to seep into any crevice on the unit.
• If the power cord becomes damaged, do not attempt to replace it on your own.
Instead, contact the manufacturer directly for a suitable replacement.
Product Name: Crazy Fit Massager
Rated Power: 2000W
Rated Voltage: 110V
Rated Frequency: 60 HZ
User Max Weight: 120 KGS
Product Maintenance
Specifications
Table of contents
Popular Massager manuals by other brands

Panasonic
Panasonic EP1017 - MASSAGE LOUNGER operating instructions

JML
JML Shiatsu Deluxe instruction manual

Human Touch
Human Touch feel better Cirqlation HT-1355 Use & care manual

Sharper Image
Sharper Image 205087 user manual

HoMedics
HoMedics PA5H instruction manual

BLACKROLL
BLACKROLL FASCIA GUN instruction manual