Pioneer Athletics STARLINER V6 User manual

INSTRUCTION MANUAL & PARTS LISTING
STARLINER V6
Featuring Pioneer’s Exclusive “Plug & Stripe” Technology
800-877-1500
www.pioneerathletics.com
®

CALL OUR CUSTOMER SERVICE REPS
FROM 8:00am - 4:30pm (EST) 800-877-1500
With any questions you may have concerning the care, assembly,
operation, or maintenance of this product. Before you call be sure that
unsatisfactory operation is not due to inadequate care or cleaning,
abuse, or neglect. This may save you time and money. See our warranty
for specic coverage.
IF YOU SHIP THE PRODUCT
PRIOR AUTHORIZATION MUST BE RECEIVED
BEFORE RETURN
Carefully pack unit and send it prepaid and adequately insured. Attach a
postage-afxed letter, detailing the complaint, to the outside of the carton.
BE SURE TO SHOW RETURN AUTHORIZATION CODE
NUMBER ON OUTSIDE OF ENVELOPE.
Warranty will not cover repair where normal use has exhausted the life
of the part. Line stripers, like all mechanical devices, need periodic parts
replacement and service to perform well. It should be remembered that
the service life of any equipment is dependent upon the care it receives
and the conditions under which it has been operated.
FOR REPAIRS INCLUDING WARRANTY REPAIRS:
Call 800-877-1500 for repair cost estimates,
and full service information.
INCLUDE RETURN AUTHORIZATION CODE NUMBER
BEFORE SENDING YOUR UNIT.
SEND YOUR UNIT WITH FREIGHT PREPAID TO:
PIONEER ATHLETICS
4529 Industrial Parkway
Cleveland, Ohio 44135

TABLE OF CONTENTS
THE STARLINER™
OPERATION & CARE
IDENTIFYING PROBLEMS & PARTS
Before You Use Your Striper
Charging and Battery Operations
1-3
1
4
7
8
8
5-6
9-10
11
Striping
Cleaning
Striping Tips
How to Store
Parts List & Parts Explosion Drawings
Trouble Shooting the StarLiner
Limited Warranty
Upon receipt of the StarLiner, please immediately remove and
inspect the striper for any damage and/or missing parts. If
any damage is seen, please contact the delivering company
and Pioneer Customer Service immediately. Pioneer Customer
Service can be reached at 800-877-1500 between the hours
of 8 a.m. and 4:30 p.m. EST.

CONGRATULATIONS ON THE PURCHASE OF YOUR
NEW STARLINER.
INSIDE THE BOX, YOU WILL FIND:
• StarLiner Electric Striping Machine
• Charger
• Side Spray Box with Hose
• Star P.H.D. Ultra-Friendly Cleaner
Charging and Battery Operation
The charger should be plugged into a working outlet. The light on the
charger will appear green when plugged in. When the charger is connected
to the battery, the light will turn red. If the light does not turn red, check
the fuse and wire connections. The battery should remain charging,
uninterrupted, until the light changes to green. Once the light changes to
green, unplug the battery and unplug the charger from the wall.
1
Envelope Containing:
• Clean-out Hose
• Striping Tips
• Paint Connector Plug
• Operation Manual

Handle Setup
Loosen the wing nuts located at mid-handle. Remove the lower
wing nuts and bolts from StarLiner frame. Straighten the handle and
tighten the mid-handle wing nuts. Align the lower bolt holes on the
handle and frame. Reattach the bolts and wing nuts.
Setup and Operation of the Side Spray Box
Located on the side of the StarLiner is a winged bolt. Loosen the bolt
and extend the spray arm. The side spray box will have a winged bolt
and hose attached. Remove the wing nut and align the threaded stud
and alignment pin in the slot of the spray arm. Reattach the wing nut.
To change the line width, raise or lower the spray box.
Caution: Always support the spray box with your hand when adjusting
the height or sliding the spray arm in and out. Failure to do so may
cause damage to the spray box or spray arm.
2

Caution: Do not leave the battery connected when not in use. This
will drain the battery.
Paint line connection
Connect the spray box paint line by pushing the white quick-connect
onto the male connector on the side of the StarLiner. You will hear an
audible click when a positive connection is made. Be sure the paint
hose does not interfere with or become pinched by the tire or any
moving parts. To disconnect, press the metal thumb tab on the white
quick-connect. The connector should pop off from the male connector.
Connecting the Battery
Loosen the thumb screw on the front cover inside the StarLiner and lift
the battery cover. Unwrap the battery packaging. Secure the battery
connector to the connection on the circuit board. Close the battery
cover and re-install the thumb screw.
Caution: Do not operate the StarLiner without all covers properly in
place and secured. Failure to do so could result in damage to the
electronic components or paint box.
3

YOU ARE NOW READY TO TEST THE OPERATION OF
YOUR STARLINER.
We recommend trying the StarLiner with water before using paint.
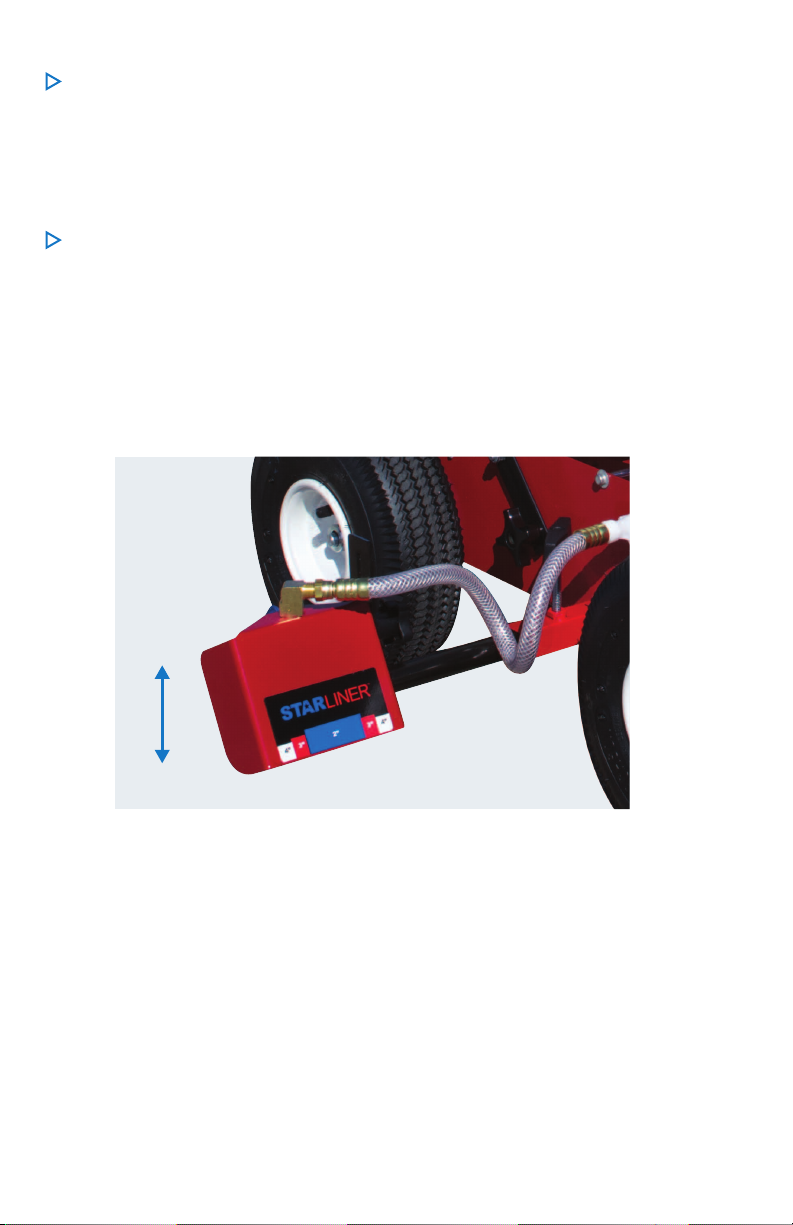
Connect the clean-out hose to the quick connect on the StarLiner. You will
hear an audible click when the hose is connected properly. After connecting,
place the clean-out hose in a bottle lled with water. Turn the switch on the
handle to the “ON” position. The pump should draw the water from the bottle.
Move the StarLiner in a forward direction to check the line width. Turn the
switch to the “OFF” position to stop the ow of water. Water typically sprays
1/3 farther than paint. Adjust your line width accordingly. You can also change
tips to achieve different line widths. Walking speed plays the largest part in
how far you can paint with one box of paint.
When you are ready to use the paint, disconnect the clean-out hose
by pressing the button on the machine side of the hose. The Clean-out
hose should pop off.
Follow the paint preparation instructions on the StarLine paint carton:
CAUTION: PIONEER STARLINE PAINT IS SPECIFICALLY DESIGNED TO
WORK WITH THE STARLINER. ANY OTHER PAINT USED WITH THIS
MACHINE MAY RESULT IN POOR LINE PERFORMANCE, CLOGGING,
AND/OR PUMP DAMAGE. THIS MAY VOID ANY AND ALL WARRANTIES
ASSOCIATED WITH THE STARLINER.
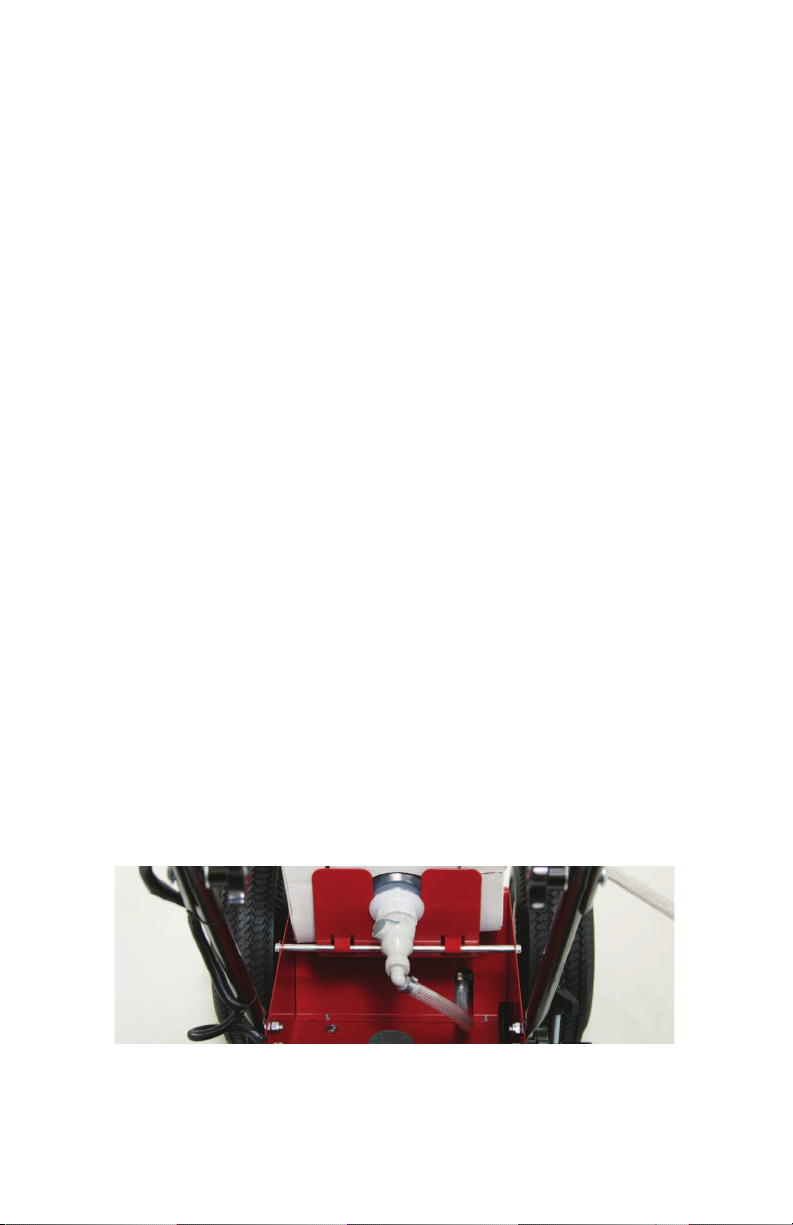
Insert the StarLine paint carton onto the StarLiner plate assembly. The
plastic lip of the paint bag should slide through the plate-slot. This will
hold the bag in place while connecting. Support the box and connect the
StarLiner paint connector with the StarLine paint. You will hear an audible
click when the proper connection is made.
Once secure, lower the StarLine box to the battery cover. You are now
ready to begin striping. We recommend practicing in an off area so
you can get accustomed to the operation of all switches and to select
the tip that best suits your needs.
4

ITEM PART DESCRIPTION
1 1000 Switch(Handlebar)
2 1003 Wheel
3 SCB Circuit Board
4 1005 Battery
-- 1021 Battery Cable with Fuse
-- 1024 3 Amp Fuse
5 1513 Elbow - Male x Female
6 1011 Spray Box Assembly
-- 1008 Nozzle Check Body
-- 0114P Nozzle Cap
-- 0115P Nozzle Screen (Plastic)
ITEM PART DESCRIPTION
7 1035 Slide Arm Assembly
8 1046 Hose Panel to Spray Box (16”)
9 1092 Panel Mount Connector
10 1018 Hose Container to Pump (14”)
-- 1001 Pump
-- 1030 Hose Pump to Panel (10”)
-- 1050 Battery Charger
-- 1009 Container Paint Plug
-- 1013 Clean-out Hose Assembly
-- 1033 Hand Hose with Wand (6’)
-- PHDUFQ P.H.D. UF Cleaner (Qt.)
-- STARP1 Star P.H.D. Cleaner (Gal.)
PART TIP DESCRIPTION
0134 5003 3” to 4-1/2” wide line
1574 6503 4” to 6” wide line
1577 6504 4” to 6” wide line
(heavier application of paint)
1576 8003 5” to 7” wide line
PARTS LIST:
StarLiner V6
Spray Tips
Optional Spray
Wand Assembly
(Item 1033)
5

6
1
2
34
8
9
10
5
6 7
PARTS LIST:
StarLiner V6

CLEANOUT OF THE STARLINER:
The StarLiner is shipped with a clean-out hose and a gallon of Star P.H.D.
cleaner. Once you are nished striping, it is recommended that you ush the
StarLiner free of paint. Failure to do so may cause damage to your StarLiner.
IMPORTANT: DO NOT EXPOSE THE COMPONENT BOX TO WATER.
DO NOT HOSE DOWN THIS MACHINE, AS IT IS ELECTRICAL AND
MAY CAUSE PERMANENT DAMAGE.
If flushing with the bottle, insert the clean-out hose into the StarLiner
connect. You will hear an audible click when properly connected.
Place the hose into the bottle of cleaning solution and turn the
StarLiner “On” and “Off” several times. This will help get all of the
loose paint out. When the solution comes out clear from the tip, the
hoses are properly cleaned. Remove and clean the spray nozzle tip
and screen. Finally, clean the hose connections for the StarLine paint
box and StarLiner.
If ushing with a box of Star P.H.D., simply attach the cleaner in
the same manner as connecting a box of StarLine paint.
Caution: Do not use wire or any other rigid object to clean the nozzle tip,
as this may cause damage. This will result in poor spray performance.
7

Striping Tips
• When striping, it is recommended to have the StarLiner in motion
before turning it on. This will eliminate the possibility of having a large
“blob” of paint on the grass at the beginning of your line.
• Always test in an off area to be sure you are familiar with all functions
of the StarLiner.
• For a sharp cut off, place a piece of cardboard at the end of the line.
• Clean or replace the nozzle tip and screen after every use.
• Do not run your pump dry. This will greatly add wear and tear to your
pump and shorten its life.
• When transporting the StarLiner in a vehicle, disconnect the StarLine
paint box and battery. This will help you avoid accidental paint
discharge.
• When folding the handle, be cautious to not pinch any wires.
How to Store
1. Flush the StarLiner thoroughly.
2. Clean off all loose paint.
3. Remove hoses and dry completely.
4. Store StarLiner in a heated building if possible.
5. Remove the battery and charge once a month when not in use.
8

Battery
With a fully charged battery:
• Place voltmeter probes on battery terminals – red probe to positive
terminal, black probe to negative terminal.
• Reading should be 12v to 13v.
• If volts drop at rapid rate, the battery is no longer good.
• If the reading does not drop below 12v, the battery is still good.
Battery Charger
The light of a charger plugged into an outlet, but not connected to the battery
appears green. When the charger is rst connected to the battery, the light
should change from green to red. It will remain red while the battery charges,
and will turn green when the battery is fully charged. If the light is not present
after you plug it in, the charger is defective. The charger continues to charge
the battery after the light turns to green. Do not leave the charger plugged in
for long periods of inactive use.
Handle Switch
The wires on the side of the handle sometimes get caught when the handle
is not carefully folded. Be sure to check the wires for damage. The wires
must not be exposed or cut in half. If the wires show signs of damage,
they will need to be cut and reattached. To check the switch, disconnect
the battery and ip the switch to the off position. Check for continuity by
sticking probes into the back crimps on the blue wire and white wire. The
meter should read zero. With the probes in the same location, toggle the
switch to the “on” position. If continuity is present, the switch is good.
If the StarLiner will not start:
• Make sure the battery is
charged.
• Check the fuse.
• Make sure the tip is not
clogged.
The Spray pattern is too
narrow or wide:
• Adjust the nozzle assembly
up or down.
• Re-shake the paint box to be sure
it is properly mixed.
• Replace screen or nozzle, it may
have become clogged or worn
beyond use.
TROUBLESHOOTING:
9

Fuse
THERE ARE SEVERAL WAYS THE FUSE CAN BLOW, INCLUDING:
• The wires are attached in reverse. This means that the fuse wire is
attached to the black terminal on the battery.
• An overheated or seized pump.
• Damaged or cut wires touching the positive to the negative.
• A faulty circuit board.
Pump
Problems with the pump may be caused by:
• The pressure switch screw on the pump is not turned all the way in.
• Clogging from poorly shaken, expired or frozen paint.
• Overheating or seizing.
Circuit Board
Caution: Prior to testing or replacing the circuit board, it’s important
to rst rule out any other potential problems or issues.
To check for a burned-out or defective circuit board, perform a visual
check, looking for burnt or damaged wires. If this does not produce an
answer, you will need a voltmeter to properly test the circuit board.
• With a fully charged battery, connect the voltmeter to the harnesses
between the circuit board and pump. Place the red probe on the red
wire and black probe to the black wire.
• When the battery is disconnected, the reading should be 0.0v.
• When the battery is connected and the toggle switch is in the “Off”
position, the reading should be between 5.3v and 5.9v. If the reading
is 0.0v, the circuit board or the wiring between the battery and circuit
board may be defective.
• If the toggle switch is in the “On” position, the reading should be
between 12v and 13v.
10

LIMITED WARRANTY
For a period of six months from date of purchase, PIONEER MANUFACTURING
COMPANY will replace for the original PURCHASERS, any part or parts*
of the StarLiner, found upon examination by a PIONEER FACTORY-trained
representative, to be defective in material or workmanship or both; this is the
exclusive remedy. This warranty is pro-rated as to cover 100% of the cost of
materials, parts and labor for the rst six months. The customer is responsible
for all remaining costs. The customer may elect to return the entire unit to
the factory at his expense for repair. Or he may, at his expense, return the
defective part for factory inspection AND replacement. In no case will PIONEER
MANUFACTURING authorize outside repair on any unit nor will PIONEER
MANUFACTURING reimburse any customer for unauthorized work. Prior
to returning any part or machine, the CUSTOMER must obtain a RETURN
MATERIAL AUTHORIZATION CODE. Call toll free 800-877-1500. This warranty
gives the customer specic legal rights as well as other rights which may vary
by state. There are no WARRANTIES which extend beyond the face hereof and
the warranties set forth above are in lieu of all other warranties, EXPRESS or
implied, including any and all implied warranties of merchantability or tness for a
particular purpose, and any other obligation or liability on the part of PIONEER.
PIONEER SHALL IN NO EVENT BE RESPONSIBLE OR LIABLE TO THE OWNER
OR ANY THIRD PARTY FOR INDIRECT, SPECIAL OR CONSEQUENTIAL
DAMAGES WHETHER ARISING FROM DEFICIENCIES IN THE DESIGN,
MANUFACTURE, LABELING OR OPERATION OF THE STARLINER OR FROM
ANY OTHER CAUSE WHATSOEVER AND WHETHER BASED ON TORT,
CONTRACT, WARRANTY, STRICT LIABILITY OR OTHERWISE. IN ANY EVENT,
PIONEER MANUFACTURING COMPANY INC.’S RESPONSIBILITY IS LIMITED
TO THE COST OF THE PRODUCT ITSELF.
No representative employee, agent of Pioneer, or any other person has any
authority to assume for Pioneer any additional or other liability or responsibility,
other than as described above, in connection with the STARLINER. Either direct or
indirect acceptance of this limited warranty constitutes approval of, and agreement
with, all of its terms and conditions by the owner. This limited warranty becomes
effective only when all invoices for the STARLINER have been paid in full.
* The battery, battery charger and pump are covered exclusively by the
manufacturer’s warranty–for 3 months.
11
Rev: 5/22/13

• Ready-to-use paint comes in a self-
sealing container. Just “Plug” paint
container into paint line and “Stripe”
• Brilliant white lines featuring Pioneer’s
Halogen® 2000 Optical Brighteners
• Stack-able container size makes for easy
storage and striping
• Each container is designed to do one
regulation soccer eld
• Also available in yellow, orange,
red and blue
Football & Soccer Fields • Walkways • Campsites • Band Practice Area
Tracks • Golf Courses • Volleyball Courts • Baseball Fields • Bicycle Paths
Grass & Clay Tennis Courts • Grass Parking Areas • Any grass or paved area
Up to 2,000 linear feet
of four inch line
2.5 Gallon Carton
Featuring Pioneer’s Exclusive “Plug & Stripe” Technology
FEATURES
APPLICATIONS
Coverage (undiluted):
Packaging:
ATHLETIC FIELD MARKING PAINT
P: 800-877-1500
F: 800-877-1511
www.pioneerathletics.com 4529 Industrial Parkway
Cleveland, OH, 44135
Table of contents
Other Pioneer Athletics Construction Equipment manuals
Popular Construction Equipment manuals by other brands

Greenlee
Greenlee 855GX instruction manual

Komatsu
Komatsu Avance Loader WA900-3 Operation & maintenance manual

probst
probst TAS-UNI-468 operating instructions

Auto Crane
Auto Crane NEXSTAR HC-14 owner's manual

Komatsu
Komatsu D155AX-5 Operation & maintenance manual

Broderson
Broderson IC-600-A Operation and maintenance manual