Pioneer Eclipse PE310AS User manual

Subtitle
Title
We help you shine.™
A company of the Group
Walk-Behind Autoscrubber
PE310AS


In this Operation Manual you will find three statements that you must read and observe to ensure
safe operation of this machine.
DANGER! indicates that the possibility of severe bodily injury or death can occur if
DANGER! statements are ignored. Read and observe all DANGER! statements included
in the Operation Manual and attached to the machine.
WARNING! indicates that the possibility of bodily injury to the operator and other people can
occur if WARNING! statements are ignored. Read and observe all WARNING! statements
included in the Operation Manual and attached to the machine.
CAUTION! indicates that the possibility of damage to the machine or other property can
occur if CAUTION! statements are ignored. Read and observe all CAUTION! statements
included in the Operation Manual and attached to the machine.
FOR YOUR SAFETY
Do not store or use gasoline or other flammable vapors and liquids in the
vicinity of this or any other appliance.
Record This Important Information
Date of Purchase
Purchased From
Address
City State Zip
Phone Contact
Machine Model
Machine Serial Number
Important Phone Numbers
Medical Emergency
Police
Fire Department


Contents:
Technical Specifications......................................................2
Safety Precautions..............................................................3
Operator Responsibility..........................................4
Operator Ear Sound Pressure Level....................4
Hand-Arm Vibration Test........................................4
Machine Preparation...........................................................5
Unpacking the Machine..........................................5
Transporting the Machine.......................................5
Installing the Batteries............................................5
Machine Components.........................................................6
Controls and Instruments.......................................6
Main Key Switch....................................................7
Vacuum Switch.......................................................7
Traction Breaker.....................................................7
Pad Motor Switch...................................................7
Battery Level Indicator............................................7
Traction Forward Lever..........................................7
Parking Brake.........................................................7
Squeegee Lift Lever...............................................7
Recovery Tank Clean Out......................................7
Recovery Tank Drain Hose.....................................7
Pad/Brush Pedal....................................................7
Solution Adjustment Lever.....................................7
Solution Tank Drain Hose.......................................7
Solution Tank Fill....................................................7
Recovery Tank Access...........................................7
How the Machine Works....................................................8
Battery Charging....................................................8
Preparing the Machine...........................................8
Filling Solution Tank...............................................8
Squeegee Adjustment............................................8
Pad/Brush Installation & Removal..........................9
Pad Pressure Adjustment......................................9
Scrubbing....................................................9
Draining & Cleaning Recovery Tank.....................10
Handle Adjustment...............................................10
Maintenance...............................................................10
Squeegee Blade Replacement............................10
Battery Maintenance.............................................10
Vacuum Motor Maintenance................................10
Scheduled Maintenance.......................................10
Machine Troubleshooting..................................................12
Parts Manual & Warranty...................................................13
Electrical Schematic.............................................14
Tank & Cover Assembly........................................16
Pad Drive Assembly ............................................18
Drive Wheel Assembly ........................................20
Squeegee Assembly.............................................22
Handle Assembly..................................................24
Manufacturer’s Warranty.................................................26
1

Technical Specifications:
2
Description Specication
Length 39.4” (100 cm)
Width (Splash Skirt) 21.7” (55 cm)
Height 41.7” (106 cm)
Number of Pads 1
Pad Driver Diameter 20” (50 cm)**
Pad Pressure 44-88 lbs. (20-40 kg)
Squeegee Width 29” (74 cm)
Solution Tank Capacity 12 Gal. (45 L)
Recovery Tank Capacity 12 Gal. (45 L)
Weight (w/o Batteries) 201 lbs. (91 kg)
Weight (w/ Lead Acid Batteries) 308 lbs. (140 kg)
Weight (w/ Sealed Batteries) 330 lbs. (150 kg)
Battery Compartment Size (LxWxH) 12.2” x 13.8” x 10.2” (310mm x 350mm x 260 mm)
Voltage 24 VDC
Power Source 12 VDC 110Ah Battery (Qty. 2)
Pad Drive Gearmotor 370W / 17A
Traction Motor 110W / 8A
Vacuum Motor 550W / 22A
Pad Lift Control Manual (Pedal)
Squeegee Lift Control Manual (Lever)
Forward Speed 0-2.2 mph (0-3.5 km/h)
Maximum Slope 3%
Scrubbing Performance 18,800 ft
2
/h (1750 m
2
/h)
Noise Level 72 dBA
**Note: Due to variations commonly found in pad dimensions, APEC recommends the use of 19” pads
with this machine rather than 20” pads, even though some 20” pads will work on the machine.

3
Safety Precautions
Anyone operating the machine should read the
following carefully and be informed of potentially
dangerous operating conditions. Operators should
be familiar with the location and use of all safety
devices on the machine. Do not use the machine if
it is not in proper operating condition, and report
any damage or operation faults immediately.
DANGER! This machine has parts including the pad holder or
brush assembly that can cause severe injury if these parts are
contacted while they are moving. DO NOT allow any part of
the body or clothing to come in contact with these parts while
they are moving. DO NOT try to change the pad or brush
while the machine is running. DO NOT allow other people to
come near the machine while it is in operation. DO NOT allow
the machine to run unattended. DO NOT leave the machine in
a place where unauthorized or untrained personnel could use
the machine. DO NOT run the machine with the pad or brush
off center, damaged or missing. DO NOT operate the machine
if the machine has loose parts.
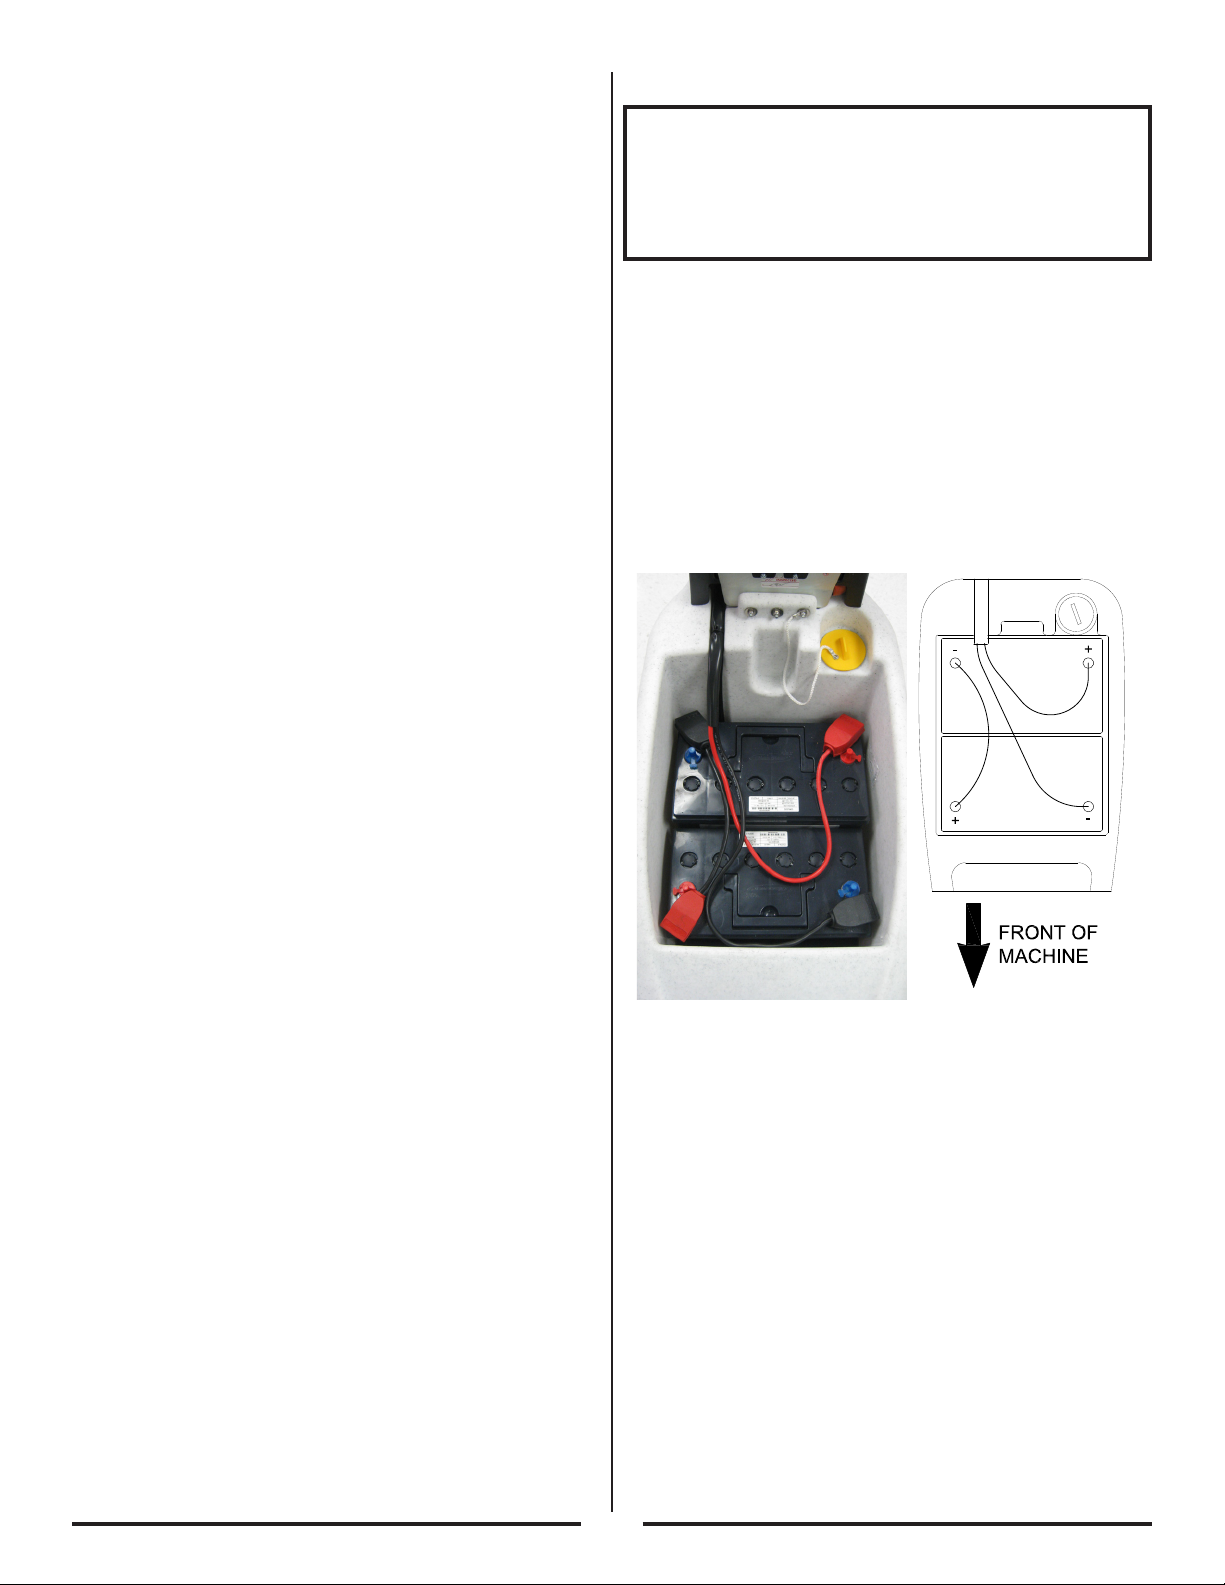
WARNING! Batteries emit hydrogen gas. Explosion or fire can
result. Keep sparks and open flame away. Keep covers open
when charging. DO NOT smoke around batteries. Avoid skin
contact with the acid contained in the batteries. Never allow
metal objects to lay across battery tops.
WARNING! Operate from the rear of the machine only.
WARNING! Inspect pad holders and or brushes regularly. A
fractured pad holder and or brush may result in pad fragments
causing injury.
WARNING! Use caution when driving the machine on a ramp or
incline. DO NOT turn the machine or leave it unattended on a
ramp or incline.
WARNING! Store machine inside. Keep the electrical
components of the machine dry. DO NOT pressure wash
machine.
WARNING! Modifications or alterations to this machine can lead
to personal injury or damage to the machine. DO NOT make
unauthorized modifications or alterations to this machine.
Amano Pioneer Eclipse assumes no liabilities for injury
or damage resulting from an unauthorized modification or
alteration to the machine. Any unauthorized modification or
alteration to this machine voids all warranties.
WARNING! The motors and motor controller become hot
enough while the machine is in operation, and for a long time
after the machine is shut off, to cause severe burns. DO NOT
touch these parts of the machine until they have cooled.
WARNING! Injury can occur to the eyes and body while using
the machine. Safety goggles, safety shoes, and safety clothing
are recommended while operating the machine.
WARNING! Machine vibration may cause tingling or numbness
in the fingers or hands. Gloves are recommended to reduce
machine vibration. If tingling or numbness persists, shut off
the machine. If the vibration is caused by loose parts, adjust or
tighten these parts before using the machine again.
WARNING! DO NOT use this machine to scrub on an incline.
This machine is designed to scrub on a flat level floor.
CAUTION! Before starting machine ensure all safety devices
are in place and functioning properly. DO NOT operate this
machine unless all covers, skirts and guards are properly
installed.
CAUTION! DO NOT use this machine to vacuum inflammable,
toxic, and/or corrosive liquids and powders.
CAUTION! DO NOT operate machine unless trained and
authorized. DO NOT operate machine unless you have read
and understand the operation manual. DO NOT operate
machine in flammable or explosive areas.
CAUTION! When using machine, go slowly on inclines or
slippery surfaces. Use care when operating machine in
reverse.
CAUTION! Follow all manufacturers instructions on chemical
product containers when handling, mixing, or using chemical
products.
CAUTION! When servicing machine, stay clear of moving parts.
DO NOT wear loose clothing when working on machine. Block
machine wheels before raising or jacking up machine. Use
hoist stands that will support the weight of the machine. Wear
eye and ear protection when using pressurized air or water.
Disconnect battery connections before servicing machine. Use
only replacement parts supplied by Amano Pioneer Eclipse or
an Amano Pioneer Eclipse Authorized Distributor or Service
Center.
CAUTION! When loading or unloading machine onto or off a
truck or trailer, turn machine OFF. Only use a truck or trailer
that will support the weight of the machine to transport. DO
NOT push the machine onto or off a truck or trailer unless the
load height is 15 in (380mm) or less from the ground. Block
machine wheels when transporting. Tie the machine down
securely to truck or trailer when transporting.
CAUTION! When draining liquids from the machine, follow all
local and federal waste disposal standards.

4
This Machine is Manufactured for
Commercial use only.
This machine is designed and manufactured for indoor use
on hard floor surfaces. Amano Pioneer Eclipse does not
recommend use of this machine in any environment other than
an indoor environment. This battery powered floor machine is
designed and manufactured for commercial floor cleaning only.
This machine is designed to clean most modern types of floors
including composition tile, stone, marble, terrazzo, and resilient
floor covering, and some coated wood floors.
Operator Responsibility
The operator is responsible for performing the recommended
daily maintenance and checkups of the machine to keep it in
good working condition. The operator must inform the service
mechanic or supervisor when recommended maintenance
procedures are required as prescribed in the MAINTENANCE
section of this manual.
Read this manual carefully before operating this machine.
FOR SAFETY: Do not operate machine before reading and
understanding the operation manual.
Check the machine for shipping damage.
Keep your machine regularly maintained by following the
maintenance information in this manual. We recommend
taking advantage of a service contract from your Amano
Pioneer Eclipse Authorized Distributor or Service Center.
Order parts and supplies only from an Authorized Amano
Pioneer Eclipse Distributor. Use the parts illustration section of
your manual when ordering parts.
During and after operation, perform the recommended daily
and hourly procedures outlined in the Maintenance Chart.
Test for Operator-Ear Sound Pressure
Level
Amano Pioneer Eclipse measures and rates the operator-ear
sound pressure level for hand-guided floor treatment and floor
cleaning machines for industrial use. All tests are performed in
accordance with European Machinery Directive (2006/42/EC).
Outdoor test area consists of a flat open space free from
effects of signboards, buildings or hillsides for at least 15m
(50ft) from the center of the test surface. Indoor tests are
conducted in a semi-anechoic or sound deadening room.
The test surface is a single sheet of floor covering at
least 1m (3.3ft) wider and longer than the equipment
being tested. In order to not affect the sound reading, the
observer taking readings is at least 2m (6.6ft) from the
equipment being tested, or standing directly behind the
operator.
All machines are tested while stationary and centered
on the test surface. With the traction drive in neutral
(where applicable) the test is conducted with the machine
at maximum engine or motor speed as specified by the
manufacturer.
The operator is located in the normal operating position
with the microphone or meter supported independent of the
machine, 1, 68m (66in) above the test surface, 25cm (10in)
to the right and left centerline of the operators position, an
20cm (8in) to the rear most point of the handle, with the
handle in the most forward position.
The sound level meter is observed for a minimum of
five seconds or until a stabilized reading is obtain. The
maximum repeatable sound level observed during the test
at each microphone position is recorded and documented.
Test for Hand-Arm Vibration at the Grip
Surface of Hand-Guided Machinery
Amano Pioneer Eclipse measures and rates the vibration at
the machine-hand contact surface of hand-guided machines
that are provided with handles in accordance with European
Machinery Directive (2006/42/EC).
The test area consists of a flat open floor area that allows
the machine to be operated normally
The transducer is mounted firmly at a point halfway along
the length of the handle where the handle would normally
be held.
Machines are tested while stationary, with all mechanisms
necessary for the equipment to perform its intended
functions engaged and the traction drive in neutral (if
applicable). The machine will be tested at maximum engine
or motor speed as specified by the manufacturer of the
subject machine.
The measurements are recorded from the dominant axis.

Machine Preparation
Unpacking the Machine
Unpack the machine with caution. The machine is
shipped boxed on a wooden pallet. To unpack machine:
1. Cut and remove bands holding the box to the pallet.
2. Remove staples attaching the box to the platform at
the bottom edge of the box.
3. With two people, one at either end of the box, lift box
straight up and off machine.
4. Remove any loose or miscellaneous items that are
not strapped to the pallet.
5. Cut and remove bands securing the machine to the
pallet.
6. Carefully take the machine off of the pallet by means
of a wooden or metallic ramp.
7. Cut and remove bands securing the batteries (if
applicable) from the pallet.
8. Open the battery cover and remove any components
that may be inside the battery compartment.
9. Check machine for any damage that may have
occurred during transport.
10. Read carefully the contents of this operators manual.
11. Install the batteries (See the “Installing Batteries”
section).
Transporting the Machine
When shipping the machine, make sure the batteries are
disconnected. It is recommended that the batteries be
removed from the machine during transport. Remove
the splash skirt, pad/brush, and squeegee before
loading to prevent damage to these components. Secure
the machine to the transporting vehicle so that it does
not move during transport. Always engage the parking
brake while the machine is being transported. For a
longer transport, it is recommended to pack the machine
in its original box, with the batteries removed.
To repack the machine, refer to the “Unpacking the
Machine” section, using the original packing materials
and container.
Installing Batteries
Check the batteries for any damage prior to installation.
Make sure there are no cracks or other external
damage.
1. Disconnect the battery plug from the back of the
machine.
2. Lift up the battery cover to access the battery
compartment.
3. Place the batteries in the battery compartment as
shown.
4. Clean the battery terminals and battery cables. Apply
a film of dielectric grease to terminals.
DANGER! Incorrect connection of batteries can
cause an explosion and/or serious injury.
5. Connect the batteries as shown in the battery
connection diagram.
Note: Red Cables are (+) Positive & Black Cables
are (-) Negative.
6. Double check the battery connections.
7. Connect the battery plug at the back of the machine
to the machine.
5
PROPOSITION 65 WARNING
Battery posts, terminals, and related accessories
contain lead and lead compounds, chemicals
known to the State of California to cause cancer and
reproductive harm. Wash hands after handling.

6
Machine Components
Controls and Instruments
Main Key
Switch Battery
Level
Indicator
Vacuum
Switch
Pad Motor
Switch
Parking
Brake
Traction
Forward
Lever
Traction
Breaker
Solution
Adjustment
Lever
Pad / Brush
Lift Pedal
Squeegee
Lift Lever
Recovery Tank
Clean Out
Solution Tank
Drain Hose
Recovery Tank
Drain Hose
Solution
Tank Fill
Recovery
Tank Access
Recovery
Tank
Solution
Tank
Parking
Brake
Latch

7
Machine Components
Main Key Switch
Turns the machine on and off.
Vacuum Switch
Turns on the vacuum motor on and off.
Traction Breaker
Over current protection for the traction motor. This is a
7A breaker. If the traction forward lever is pressed and
the machine does not traverse, turn the machine off and
press the breaker to reset.
Pad Motor Switch
Turns the pad drive motor on and off. This switch also
opens the solenoid valve to allow solution to flow to the
pad. The solenoid valve will close when the switch is
turned off.
Battery Level Indicator
Displays the charge level of the battery. There are three
lights and the top green light indicates the battery is fully
charged. The bottom red light indicates the battery pack
needs to be recharged. Stop using the machine when
the red light is illuminated to prevent damage to the
machine.
Traction Forward Lever
Pulling back on the traction forward lever will make the
machine move forward. The further you pull back the
faster the machine will traverse. This machine does
not have reverse. If you need the machine to back-up,
release the traction forward lever and pull the machine
backwards. If the squeegee is in the lowered position,
you will need to raise the squeegee before pulling the
machine backwards.
Parking Brake
The parking brake will prevent the machine from moving
while not in use or being transported. The parking brake
should be engaged when the machine is not in use or
left unattended. Always disengage the parking brake
while in use to prevent damage to the drive components.
Engage the parking brake by pulling back on the brake
lever and push the red latch into one of the notches. To
release the parking brake, pull on the brake lever and
the red latch will automatically release.
Squeegee Lift Lever
This lever will manually lift and lower the squeegee
assembly. To lower the squeegee, pick up on the lever
and rotate it towards the right side of the machine.
Allow the lever to fall and the squeegee will rest on the
floor. When you need to lift the squeegee, pick up on
the lever and rotate towards the center of the machine.
Place the lift lever in the notch of the lever catch plate
and allow it to rest in place.
Recovery Tank Clean Out
When the recovery tank needs to be thoroughly cleaned
or there is an obstruction at the drain hose, removing
the recovery tank clean out cap will provide access
to the inside of the recovery tank. Always be sure to
reinstall and tighten the clean out cap before using the
machine.
Recovery Tank Drain Hose
This drain hose will allow you to drain the dirty water
out of the recovery tank. Always be sure to reinstall the
drain plug in the end of the hose after draining.
Pad / Brush Pedal
The foot pedal will raise and lower the pad drive
assembly. To lower the pad drive assembly, using
your foot, press down on the pedal and slightly rotate
toward the center of the machine. Once the pedal is in
the channel, slowly lower the pad drive assembly until
it rests on the floor. To raise the pad drive assembly,
using your foot, press down on the pedal and rotate the
pedal outward until it is captured in the lift guide bracket.
Solution Adjustment Lever
This lever adjusts the amount of solution being put on
the floor while the pad is turning. Raising the lever all
the way up is the maximum amount of solution flow.
Pushing the lever all the way down will shut off flow of
solution.
Solution Tank Drain Hose
Unthread the cap on the end of the hose and drain any
remaining solution in the solution tank. The clear hose
also serves as an liquid level gauge to determine how
much solution is left in the solution tank.
Solution Tank Fill
Remove the fill cap and add solution and cleaner to the
solution tank.
Recovery Tank Access
Remove the cap to gain access to the inside of the
recovery tank. Use this access to rinse the recovery tank
after it has been drained.

8
How the Machine Works
Battery Charging
To charge the batteries, first drive the machine to a flat,
dry, well-ventilated area. Turn the machine off. Raise
the battery cover and leave open while the batteries are
charging. If using lead acid batteries, check the water
level in all the battery cells. If the level is low, add just
enough distilled water to cover the plates. **DO NOT
OVERFILL**
Only use the supplied or a battery charger approved by
Amano Pioneer Eclipse to charge the batteries. Using
the wrong charger can damage the batteries and void
any warranty.
WARNING! Batteries emit hydrogen gas when
charging. Explosion or fire can result. Keep
sparks and open flame away when charging.
CAUTION! Wear protective gloves and goggles
when handling batteries or battery cables. Avoid
contact with battery acid.
Unplug the battery cable from the machine plug at the
back of the machine and connect it to the charging cable
of the battery charger. Then plug the charger cord into
a wall socket. The battery charger will initialize and start
the charging cycle.
Note: DO NOT connect the charger to the
connector on the machine. This will not charge
the batteries and could damage the electrical
components of the machine.
When the charge cycle is complete, unplug the charger
from the wall socket. Disconnect the charger cable
from the battery connector. Reconnect the battery
cable to the machine plug, making sure there is a good
connection and it is pushed in completely.
Preparing the Machine
After charging, detach the battery charger plug from the
battery connector. Then connect the battery connector
plug to the machine plug. Close the battery cover. Turn
on the main key switch to operate the machine.
Filling Solution Tank
Before every scrubbing operation, remove the solution
tank fill cap and fill the solution tank with the right
quantity of water and cleaner. When filling the solution
tank, you can use the clear drain hose, at the back of
the machine, to see the fluid level in the tank.
For a proper cleaning of the floor, it is important to
choose the appropriate cleaner solution. Your Amano
Pioneer Eclipse Authorized Distributor can recommend
the appropriate Amano Pioneer Eclipse cleaner for your
particular needs. Please note that using a chemical
agent that is too-strong can compromise the long life
of your machine. It is important to use a low-sudsing
detergent solution, or an anti-foaming additive, in order
not to damage the vacuum motor.
Squeegee Adjustment
The squeegee must be properly adjusted in order to
dry the floor. For the best results, adjust the squeegee
until the rear blade contacts the floor with an angle of
approximately 45-60 degrees to the floor. Lower the
squeegee to the floor using the squeegee raise lever
and push the machine slightly forward. If the angle
needs to be adjusted, use the squeegee adjustment
knob to adjust the angle of the squeegee. Note that after
each adjustment, the machine must be pushed forward
in order to see the angle change.
If there is poor squeegee performance, check the
following:
Obstructions in the vacuum hose, inlets, filters, and
squeegee itself.
Vacuum motor operation.
All recovery tank inspection openings are closed.

9
Pad/Brush Installation & Removal
It is very important to use the appropriate pad or brush
when scrubbing a floor. Failure to do so could result in
damage to the floor finish and/or the floor. Your Amano
Pioneer Eclipse Authorized Distributor can recommend
the appropriate pad/brush for your particular needs.
Note: It is not necessary to remove the splash skirt
to install or remove the pad holder/brush.
1. If you are using a pad, place the appropriate pad
onto the pad holder and press firmly. Be sure the
pad is centered on the pad holder and not offset.
2. Place the pad holder/brush on the floor with the pad
or bristles touching the floor.
3. Place the front of the machine over the pad holder/
brush so that the pad drive motor is over the center
of the pad holder/brush.
4. Press down on the pad/brush lift pedal to lower the
pad driver motor down onto the center of the pad
holder/brush.
5. Using the pad motor switch, turn on the pad drive
motor. The pad holder/brush will automatically attach
to the pad drive motor.
6. To remove the pad holder, turn the pad motor switch
off and raise the pad drive motor using the pad/brush
lift pedal.
7. With the pad/brush off of the floor, turn on the pad
motor switch. After a few seconds, turn the switch off
and the pad/brush will drop to the floor.
Pad Pressure Adjustment
The amount of pressure being applied to the pad/brush
is adjustable. The machine has three pad pressure
settings: 44 lbs (20 kg); 66 lbs (30 kg); & 88 lbs (40 kg).
To adjust the pad pressure, lower the pad drive
assembly to the floor and remove the splash skirt. Using
the tab on the adjustment arm, pull outward and raise or
the lower the adjustment arm to the desired position. Be
sure the location tab of the adjustment arm is properly
seated before using the machine. The lowest pad
pressure setting is in the top tab location and highest
pad pressure is in the lowest tab location.
Scrubbing
1. Use the pad/brush lift pedal to lower the pad driver to
the floor.
2. Press the pad motor switch and use the traction
forward lever to start moving forward. DO NOT stay
in one place because it will damage the floor.
3. Immediately use the solution adjustment lever to
apply solution to the floor and adjust accordingly.
4. Lower the squeegee using the squeegee lift lever
and press the vacuum switch.
5. Adjust the solution flow so that the floor is covered
completely with solution, but without any excess that
could generate splashes or trails at the ends of the
squeegee.
6. To end scrubbing, turn off the pad drive motor and
raise the pad driver using the pad/brush lift pedal.
7. After all of the solution is collected, raise the
squeegee and turn the vacuum motor off.
If the floor is very dirty or difficult to clean, a double
scrub operation is recommended. On the initial pass,
scrub with the solution flow on, but do not lower the
squeegee or turn on the vacuum motor. Make a second
pass, continuing to scrub, with the vacuum motor on and
the squeegee lowered.

Draining & Cleaning Recovery Tank
When the recovery tank is full or at the end of every
scrubbing operation, empty the dirty water from the
recovery tank using the drain hose on the back of the
machine. Always rinse and clean the recovery tank after
each use. It is important to remove the recovery tank
clean out cap and thoroughly clean the tank at least
once a week.
Handle Adjustment
The height of the operators handle can be raised and
lowered. Locate the knob on the underside of the
operators handle and loosen. Place the operators
handle in the desired location and tighten the knob.
Maintenance
Before conducting any maintenance procedures, remove
the key from the main key switch and disconnect the
battery cable from the machine.
Squeegee Blade Replacement
The squeegee blades should be replaced when the
contact edges become worn. To replace the blades,
remove the squeegee from the machine.
Remove the wing nuts that retain the front band.
Replace the old squeegee blade with a new blade.
Reinstall the front band and retain with the wing nuts.
Loosen the clamp on the rear band and remove the
rear band from the squeegee. The rear squeegee blade
can be flipped and rotated, providing four wear edges.
If necessary, replace the old blade with a new rear
squeegee blade and retain with the band.
Battery Maintenance
The batteries are deep cycle 12 volt batteries. The
lifetime of the batteries is limited by the number of
charges the batteries receive. To get the most life from
the batteries, charge them when the battery indicator
light is red. Use only the supplied battery charger to
charge the batteries.
Periodically clean the top surface of the batteries and
the terminals, and check for loose connections. Use
a strong solution of baking soda and water. Brush the
solution sparingly over the battery tops, terminals, and
cable clamps. DO NOT ALLOW ANY BAKING SODA
SOLUTION TO ENTER THE BATTERIES! Use a wire
brush to clean the terminal posts and cable connectors.
After cleaning, apply a coating of clear battery post
protectant to the terminals and the cable connectors.
Keep the tops of the batteries clean and dry.
To prevent a possible short circuit, keep all metallic
objects off the top of the batteries. Replace any worn or
damaged wires.
Lead Acid Batteries
Never add acid to the batteries, only distilled water.
Always keep the battery caps on, except when adding
water or taking hydrometer readings. Check the
electrolyte level in each battery cell before and after
charging, and after every 50 hours of operation. Do not
charge the batteries unless the fluid is slightly above the
battery plates. If needed, add just enough distilled water
to cover the plates.
NEVER add acid to the batteries. DO NOT overfill
Measuring the specific gravity, using a hydrometer, is a
way to determine the charge level and condition of the
batteries. If one or more of the battery cells test lower
than the other battery cell (0.050 or more), the cell is
damaged, shorted, or is about to fail.
Sealed batteries no maintenance is required.
10

11
Scheduled Maintenance
Daily Weekly Monthly Every 6
Months Annually
Empty and rinse the recovery tank
Check the vacuum motor filter
Check for loose or lost fasteners
Inspect hoses and connections
Inspect pad holder / brush
Check the squeegee blades
Check the suction hoses and squeegee
Inspect battery water level (Lead Acid only)
Thoroughly clean the recovery tank
Check the solution tank filter
Check wiring for fray or cut
Check the scrub deck linkage
Check the squeegee linkage and cable
Inspect drive belt
Replace drive belt
Check safety systems
Check the carbon brushes of motors
Check the electrical system
Check the brake system
Interval
As Required
These items must be performed with the proper tools and training. Contact an Amano Pioneer Eclipse
Factory Certified Technician unless you have the proper equipment and mechanical proficiency.
Operation
Vacuum Motor Maintenance
The vacuum motor must be checked and cleaned. The
carbon brushes should be checked every six months
and replaced if necessary. To check the vacuum
motor, remove the key from the main key switch and
disconnect the battery cable from the machine. At the
rear of the control panel, loosen the single screw (1) on
the bottom of the control panel. Raise the control panel
up, giving access to the vacuum motor.
Unhook the retaining strap (2) and disconnect the
cable plug (3) going to the motor. The motor can now
be removed for service and cleaning. While the motor
is removed, also thoroughly clean this area and the
foam filters (4) above and behind the motor. Replace if
necessary.
Remove, check, and clean the gasket (5) on the front of
the motor. Visually check the motor fan for damage and
make sure it is clean. Check the carbon brushes (6) by
removing the plastic cap and then remove the screws
that hold the plastic housings. If they are severely worn
or damaged, replace if necessary.
6
2
3
1
5
4
4

12
Problem Possible Cause Solution
Battery plug is not connected Plug the battery plug to the machine.
Check for a loose battery connection.
Check batteries are wired together correctly via the battery connection diagram.
Battery voltage is too low Charge the battery using the appropriate charger.
Key switch failure Check key switch is functioning and wiring to the key switch is correct.
Failed Fuse Check the fuse.
Scrub switch off Turn on the scrub switch.
Scrub switch failure Check the scrub switch is functioning and wiring is correct. Replace if necessary.
Battery voltage is too low Charge the battery using the appropriate charger.
Carbon brushes are worn Check the carbon brushes, replace if necessary.
Bad wiring connection Check the wiring going to the motor for a bad or loose connection.
Vacuum switch off Turn on the vacuum switch.
Recovery tank full Empty and rinse the recovery tank.
Float valve is stuck Clean debris or dirt from the float valve.
Vacuum switch failure Check the vacuum switch is functioning and wiring is correct. Replace if necessary.
Battery voltage is too low Charge the battery using the appropriate charger.
Vacuum motor carbon brushes are worn Check the carbon brushes, replace if necessary.
Bad wiring connection Check the wiring going to the motor for a bad or loose connection.
Solution tank empty Fill solution tank.
Solution flow lever adjusted too low or off Lift up on the solution flow lever to increase flow.
Solution tank filter blocked/clogged Clean solution tank filter.
Solenoid stuck/plugged Clean solenoid.
Solenoid failure Check the solenoid is functioning and wiring is correct. Replace if necessary.
Solution vavle broken or out of adjustment Check valve and linkage.
Air leak Check recovery tank access lid; drain hose plug; recovery tank clean out.
Worn squeegee blades Rotate or replace squeegee blades.
Squeegee out of adjustment Adjust squeegee.
Vacuum hose blocked Flush and clean the vacuum hose.
Squeegee dirty / blocked Clean squeegee and remove any debris.
Vacuum motor filter clogged Clean vacuum motor filter.
Vacuum hose damaged / disconnected Reconnect vacuum hose to squeegee; replace hose if damaged.
Recovery tank full Empty and rinse the recovery tank.
Pad / brush worn down Replace pad / brush.
Using the wrong pad / cleaner Use chemical product and pad / brush recommended by an APEC distributor.
Pad pressure adjusted to low Increase pad pressure. (See "Adjust Pad Pressure" section)
Pad / brush is dirty Remove debris from pad / brush. Replace pad / brush if necessary.
Parking brake is engaged Disengage the parking brake
Traction breaker has tripped Reset traction breaker.
Using the traction motor with the parking brake engaged.
Check the drive assembly for damaged, loose, or missing parts.
Traction motor carbon brushes are worn Check the carbon brushes, replace if necessary.
Drive belt is broke / worn Replace drive belt.
Drive assembly is damaged Check the drive assembly for damaged, loose, or missing parts.
Bearings are worn Replace drive wheel bearings.
Using the wrong battery charger Use the correct 24V battery charger recommended by an APEC distributor.
Charger plugged incorrectly to machine Plug the charger to the battery "pigtail" cable.
Batterys are too weak / old Replace batteries.
Machine will not turn on
Pad Motor will not start
Vacuum motor does not
start
Incorrect battery connection
Machine will not move
forward
Traction breaker repeatedly tripps
Solution flow inadequate
or no solution flow
Machine trails water; has
poor or no water pickup
Machine exhibits poor
scrubbing performance
Battery will not charge
Machine Troubleshooting

13
PE310AS
Parts Manual
Notes:
________________________________________________
________________________________________________
________________________________________________
________________________________________________
________________________________________________
________________________________________________
________________________________________________
________________________________________________
________________________________________________
________________________________________________
________________________________________________
________________________________________________
________________________________________________
________________________________________________
________________________________________________
________________________________________________
________________________________________________
________________________________________________
________________________________________________
________________________________________________
________________________________________________
________________________________________________
________________________________________________

Electrical Schematic
14
14
DE LUXE - PIONEER TAV. 6

Electrical Schematic (continued)
15
Item Ref. No. Description Qty
1 IN064 SWITCH, KEY 1
2 IN067 SWITCH, LIGHTED 2
3 PY602 INDICATOR, BATTERY 1
4 PY612 POTENTIOMETER 1
5 IN009 MICRO SWITCH 1
6 SL015 RELAY, 24V 1
7 PY234 DIODE 1
8 MI195 SHEATH, RED 1
9 PY125 CONTROLLER 1
10 SL001 SOLENOID, 24V 2
11 PY460 DIODE, SUPPRESSOR 2
12 GL022 SWITCH, FLOAT 1
13 MI287 HOLDER, CABLE 1
14 PY289 FUSE, 75A 1
15 HAP8026 CONNECTOR, SY120 1
16 PY613 CABLE, BATTERY, NEGATIVE 1
17 PY614 CABLE, BATTERY, POSITIVE 1
18A MP276600 BATTERY, 12V, SCS150, TROJAN 2
18B MP382500 BATTERY, 12V, SEALED, 100AH 2
Item Ref. No. Description Qty
19 PY001 CABLE, BATTERY 1
20 PY350 TERMINAL, 4 POLE, FEMALE 1
21 PY351 TERMINAL, 4 POLE, MALE 1
22 MO205 MOTOR, TRACTION, 100W, 24V 1
23 MO212 GEARMOTOR 1
24 PY030 PLUG, MOTOR, FEMALE 1
25 PY031 PLUG, MOTOR, MALE 1
26 MO180 MOTOR, VACUUM, 24V 1
27 PY615 CABLE, POSITIVE 1
28 PY616 CABLE, NEGATIVE 1
29 PY603 BREAKER, CIRCUIT, 7A 1
30 PY214 DIODE 1
31 RB015 VALVE, SOLENOID 1
32A MP278300 CHARGER, BATTERY, 24V (NOT SHOWN) 1
32B MP278301 CHARGER, SEALED, 24V (NOT SHOWN) 1
33 MP289100 FUSE, 6.3A, CHARGER (NOT SHOWN) 1

Tanks & Cover Assembly
16
4
DE LUXE - PIONEER TAV. 1
Table of contents
Other Pioneer Eclipse Scrubber manuals