Pitney Bowes DM Series Instructions for use

AC Power Adapter
USB Cable
DM Series Wi-Fi Connection Device Quick Install
Important:The Wi-Fi Connection Device is a multi-function unit. To enable meter connection, it is used in ‘Client’ mode. These
instructions only cover setup of the Client Mode. Pitney Bowes does not support use of this device in any other operating mode.
1 Initial Setup
A. Connect Wi-Fi Connection Device to PC/Mac
AW31692 Rev E 10/2016
For configuration of the Wi-Fi Connection Device, you can use any PC
or Mac that has a web browser installed.
Important: During the device setup, the PC/Mac must not be
connected to any network. If you normally use a wired
connection,unplug the network cable. If you normally use Wi-Fi, turn
Wi-Fi off while setting up the device.
Ensure your PC/Mac is turned on and is at the normal ‘desktop’.
Connect the device to power. You can either use the USB cable and
supplied power adapter, or you can plug the USB cable directly into a
powered USB port on your PC/Mac.
B. Enter Client Mode Set-up
Connect the supplied network
cable between the device and a
network port on your PC/Mac.
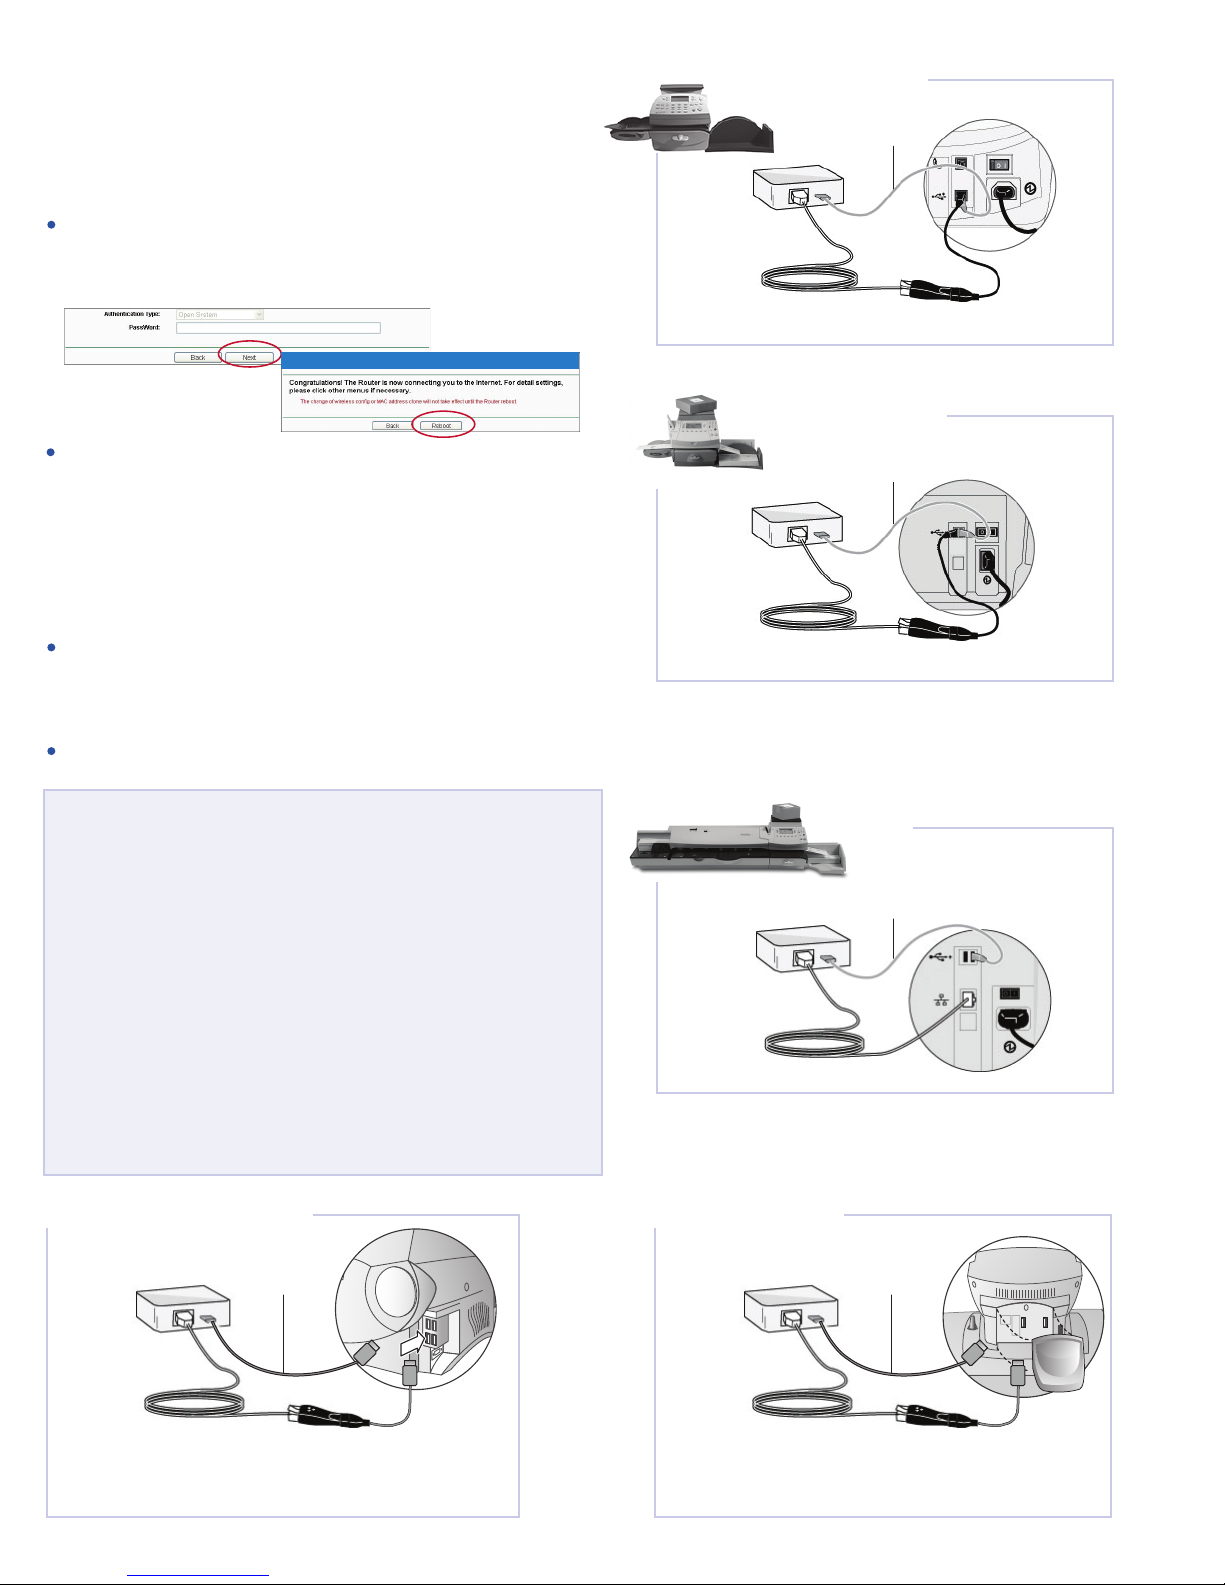
C. Configure the Client Mode
When the Wireless Client screen appears, make the appropriate
settings for your wireless network:
SSID - Enter the SSID
that you want to access.
If you are unsure of this,
see ‘Survey’ below.
Survey - Click this button to search for and list the Access Points
available. Find the SSID of the Access Point you want to access,
and click Connect in the corresponding row. The target network’s SSID
will be automatically filled into the corresponding box.
MAC of AP - Enter the MAC address of the Access Point that you want
to access.
Region - Select your region from the pull-down list. This field specifies
the region where the wireless function of the device can
be used. It may be illegal to use the wireless function of the device
in a region other than one of those specified in this field. If your country
or region is not listed, please contact your local government agency for
assistance.
Security Options - This option should be chosen to match the security
configuration of the Access Point you want to access.
WEP Key Index - This option should only be chosen if the key type
is WEP (ASCII) or WEP (HEX). It indicates the index of the WEP
key.
Ethernet Cable
USB Cable Quick Setup- Wireless Client
At the login prompt, enter username admin and password admin and
click OK.
Note: If the login screen does not appear, it means that your
Web-browser has been set to a proxy. Go to your internet settings and
turn the proxy off temporarily while you setup the device.
When the device setup
screen appears, select
the Client mode and
click Next.
After a successful
login, you can use the
Quick Setup menu to
quickly configure your
device. Click Next.
Quick Setup
Quick Setup - Working Mode
AP List
Launch your PC/Mac’s web browser.
If the front of the device
is blue and has the TP-LINK
logo use this address:
http://tplinklogin.net
If the front of the device
is white and has the Pitney Bowes
logo use this address:
http://pitneyboweslogin.net
Your Wi-Fi Connection Device is a small unit that allows you to connect your SendPro 300 and DM Series mailing machine wirelessly to the Pitney
Bowes Data Center. For all models except the DM475 and SendPro 300, it is used in conjunction with the Constant Connection LAN adapter (Item
Code 771-8). Refer to the Constant Connection Kit Installation instructions to set up the LAN adapter before setting up the Wi-Fi Connection device
for those models.

DM800-DM900 Series
Wi-Fi
Connection
Device
Ethernet Cable
DM475
Wi-Fi
Connection
Device
USB Cable
supplying power*
Rear Panel of
Mailing Machine
*Power can also be provided using the AC adapter, if preferred.
Ethernet Cable
AW31692 Rev E 10/2016
2 Connect to the Mailing Machine
A. Disconnect from PC
The device can now be disconnected from your PC/Mac as it has now
been configured for your chosen Wi-Fi network.
B. Connect to your Mailing Machine
Use the following relevant diagram below to connect the device to
your mailing machine.
NOTES:
When connecting the device, always ensure power to the mailing
machine is turned off or disconnected.
The devices USB port is only used for power and is not used for any
data. The device can receive power through its USB port in three
ways:
1. Via the included AC power adapter attached to the USB cable.
2. Directly through the USB cable from an available port on the
mailing machine (no AC power adapter). Do not disconnect a current
peripheral to attach this device.
3. Via an attached, self-powered, USB hub such as the one sold by
Pitney Bowes (no AC power adapter).
The SendPro 300 and DM475 mailing machine incorporate an
Ethernet socket that allows direct connection to the device. All other
Pitney Bowes mailing machines use a LAN Adapter to allow Ethernet
connection to their USB ports.
Authentication Type - This option should only be chosen if the key
type is WEP (ASCII) or WEP (HEX). It indicates the authorization
type of the Root Access Point.
PassWord - If the Access Point you are connecting to needs a
password, enter it here.
Click the Next button and the Finish page appears. Click the
Reboot button to make your wireless configuration take effect and
finish the Quick Setup.
The device is now setup for your chosen wireless network.
Continue with Step 2, Connect to the Mailing Machine, to connect the
device to your Pitney Bowes mailing machine. Wi-Fi
Connection
Device
Rear Panel of
Mailing Machine
*Power can also be provided using the AC adapter, if preferred.
Ethernet Cable
LAN Adapter
USB Cable
supplying power*
DM300c/DM400c Series
Quick Setup - Finish
Wi-Fi
Connection
Device
Rear Panel of
Mailing Machine
*Power can also be provided using the AC adapter, if preferred.
Ethernet Cable
LAN Adapter
USB Cable
supplying power*
DM125/DM225 Series
LAN Adapter
USB Cable
supplying power
Lift docking station cable cover off the rear of the control panel by
pulling up on the bottom cable opening. Insert the USB cable and LAN
adapter cable into rectangular USB ports on the back of your machine.
Reinstall the docking station cover.
DM500, DM550, DM800i Series
Wi-Fi
Connection
Device
Ethernet Cable
LAN Adapter
USB Cable
supplying power
Insert the USB cable into one of the rectangular USB ports on
the side of your machine.

Reset
LED
Reset button
The device can be reset to its factory default settings. With the device
powered on, use a pin to press and hold the Reset button for about 5
seconds until the LED flashes quickly rather than its normal slow
flashing. Release the button and wait for the device to reboot to its
factory default settings.
DM1000-DM1100
Wi-Fi
Connection
Device
Ethernet Cable
USB Cable
supplying power
AW31692 Rev E 10/2016
Troubleshooting
My Mailing Machine will not connect to the Data Center
Check that other PC/Mac’s on the wireless network can access
the Internet. If they cannot, there is a connection problem not
associated with the device.
Ensure your PC/Mac is not connected to any network and connect
the device to it as described in Step 1 of this guide. Test if the
PC/Mac can access the internet using the device as its access
point to the wireless network.
If it can connect: The device is setup OK and there may be a
problem with your mailing machine or the Pitney Bowes online
services availability. Try again a little later. If the problem persists,
contact Pitney Bowes. (Contact details are given in a separate
document supplied with your mailing machine).
If it does not connect: The device is not accessing your wireless
network. Reset the device as described in the previous section
and set it up again as described in Step 1 of this guide.
I cannot access the device using my PC/Mac
Ensure your PC/Mac is not connected to any network and connect
the device to it as described in Step 1 of this guide. The device is
accessed using the address http://pitneyboweslogin.net or
http://tplinklogin.net typed into your web browser per step 1B.
The device default login details are Username: admin and
Password: admin.
If you still cannot access the device, reset it as described in the
previous section of this guide. You can then use the default
username and password.
Raise the main cover of the DM1000™ to access the I/O board.
Route the USB cable and LAN adapter cable through the cable trough and insert the rectangular end of
USB cable into one of the USB ports as shown.
SendPro 300
Wi-Fi Connection
Device
Ethernet Cable
AC power
adapter
LAN Adapter
Use only the AC Power Adapter for power on SendPro 300.
Other manuals for DM Series
3
Table of contents