Pittasoft Pitta300 User manual

IP NETWORK CAMERA
PITTA 300 SERIES
Pitta300/Pitta300R/Pitta300D/Pitta300DR
user manual
Ver 2.00


Contents
Chapter 1. Getting Ready
Before Using This User Manual ................................2
Pitta 300 Overview ...................................................3
Checking the Pitta 300 Package Content .................4
Checking the main body of the Pitta 300 ..................5
Installing the Pitta 300 ..............................................7
Installing the Software ............................................10
Chapter 2. Pitta IP Utility and Pitta Web View
Pitta IP Utility guide .................................................12
Changing IP address ..............................................13
Pitta WebView Log-in .............................................15
Pitta WebView Live View Page ...............................16
Pitta WebView-Setup Menu ....................................18
Chapter 3. Appendix
DDNS & Router Port Forwarding ............................27
Troubleshooting ......................................................28
Specication ...........................................................29
Dimension ...............................................................31
@
e
T
@
e
T
@
e
T

2PITTASOFT
Getting Ready
@
e
T
Before Using This User Manual
Thanks for purchasing our Pitta 300 series IP Network Camera. This is a user manual for
H.264 IP Network Camera and the product mentioned here designates the H.264 IP
Network Camera. Please go through the manual before installation and use of the camera.
This manual along with the software and hardware explained here is protected by
copyright law
.
xRead through all printed documentation and ensure that your system is compatible for
your product.
xPittasoft will continue to add new functions and enhancements and apply new
technologies to this product. Any information and specications contained in this manual
can be changed without prior notice to users.
xThe screenshots and gures presented in this manual may differ from the actual
appearances of the product.
❚❚Conventions
Icon Name Meaning
]Caution Indicates that the accompanying function may not operate or be
disabled.
✎Note Indicates a tip or supplementary description to help you operate the
accompanying function.

3
PITTASOFT
Getting Ready
@
e
T
Pitta 300 Overview
The Pitta 300 series are high-tech IP Network Cameras that use H.264 codec technology to
achieve high compression rates and clear picture quality by allowing for high frame rates to
be transmitted through the network. By using the network, remote connection, monitoring,
and control are possible from any location for simple use. The Pitta 300 series IP Network
Camera guarantees performance and safety while offering various solutions through internet
integration.
❚❚Specifications
High quality H.264 video
H.264 enables excellent image quality at signicantly reduced network bandwidth and
storage.
Support WDR (Wide Dynamic Range)
Built-in progressive CMOS image sensor and support better image in backlight
environment than normal sensor. (Pitta 300R/300DR supports only)
Motion Detection
Intelligent Motion Detection analyzes for any motion in the scene. The reliable
functionality is built into the camera and client software. Using the client software, user
can set up motion detection to trigger video recording and e-mail alerts. Particular area
in the scene could be included or excluded for the motion detection.
Auto correction of lens distortion
Pitta 300 series client software automatically correct distorted images and can deliver
near perfect images.
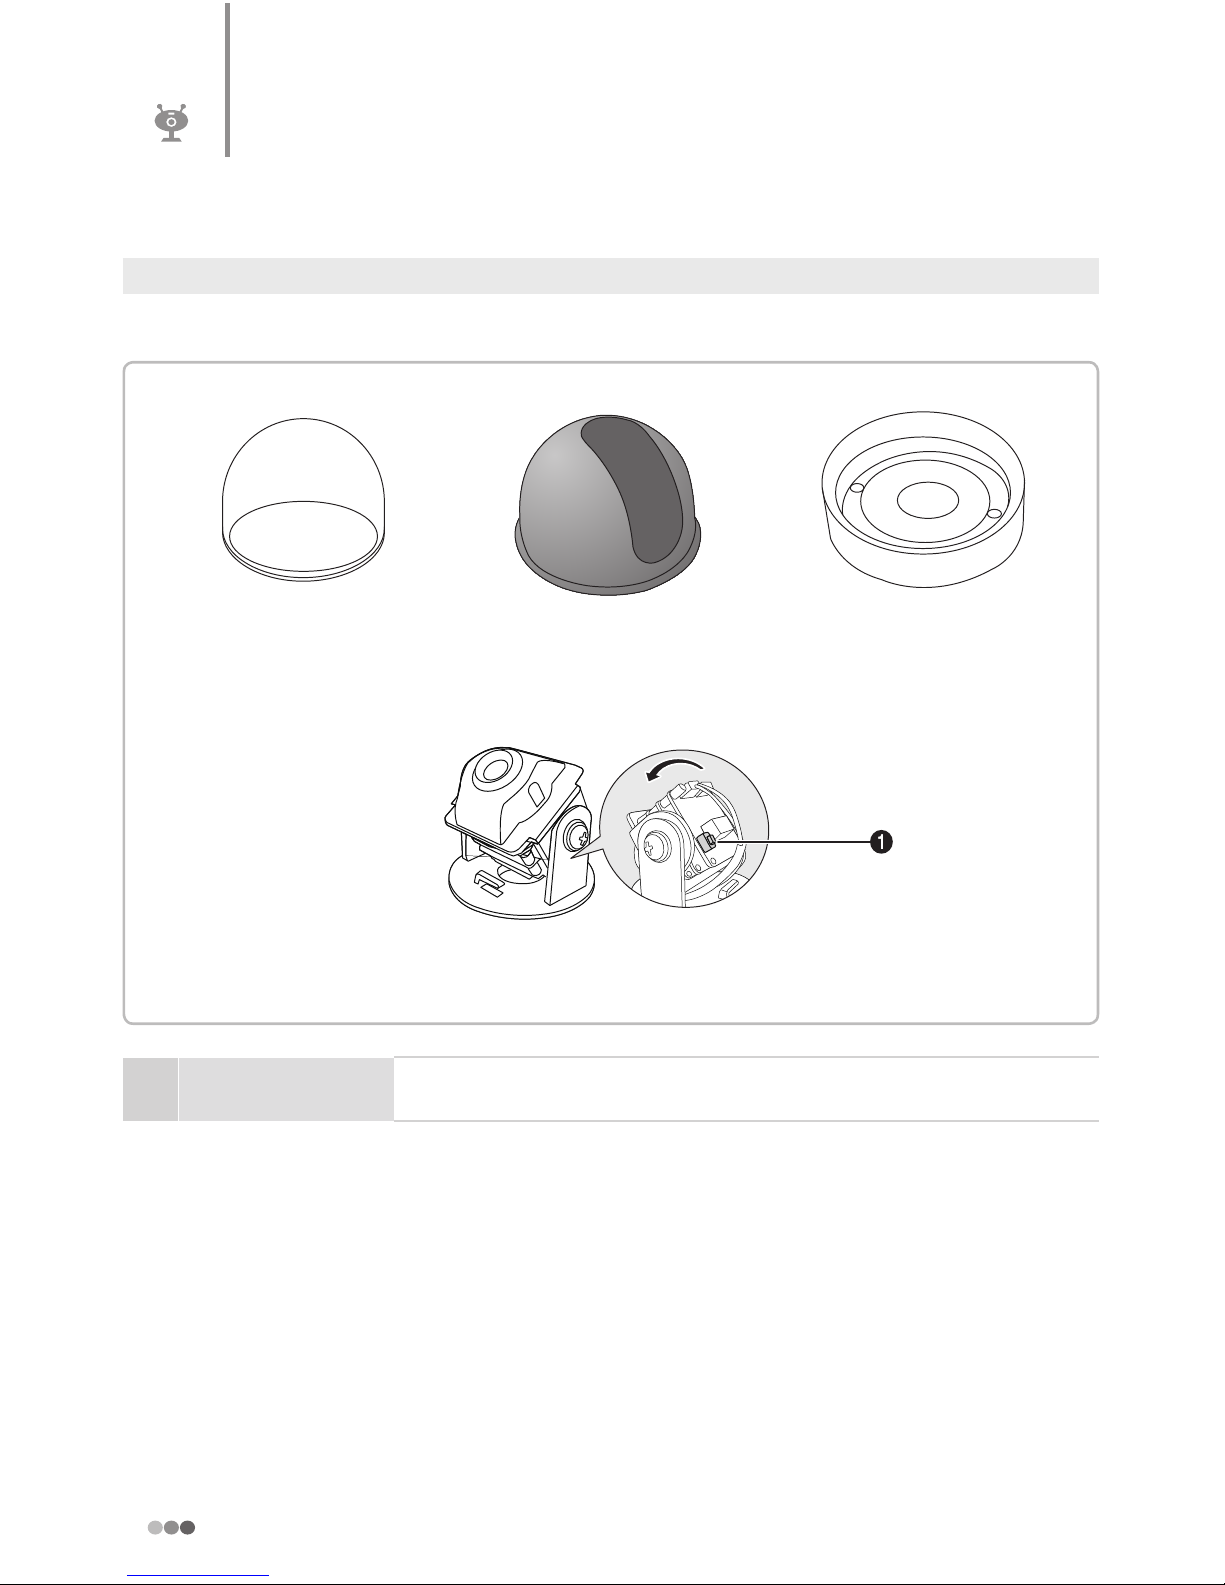
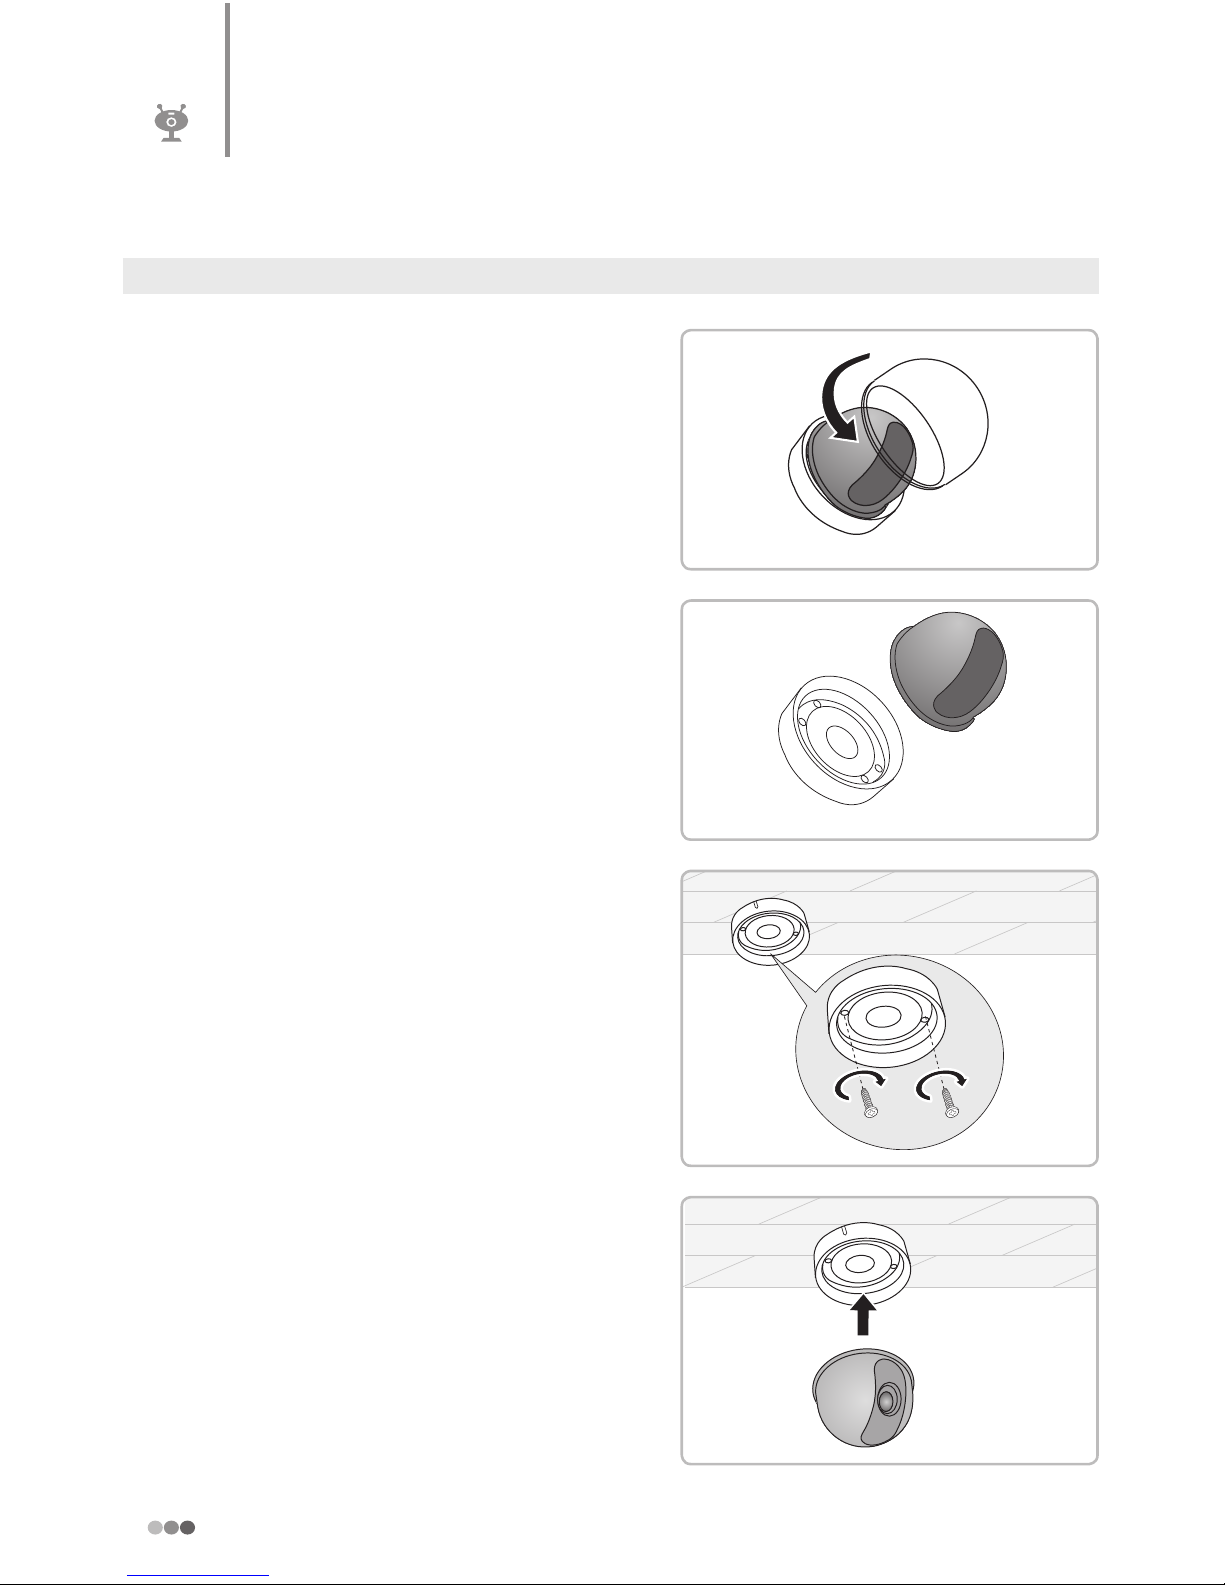
Compact size & ultra-light weight
Pitta 300 series are compact design and require minimum space for the installation and
reduced weight allows exible mounting.

4PITTASOFT
Getting Ready
@
e
T
Checking the Pitta 300 Package Content
Check the product and the accompanied accessories contained in the product package.
xIf there is any problem with the accessories, contact your local product distributor.
xThe accompanied accessories can be changed without prior notice.
Pitta 300/300R Pitta 300D/300DR
Stand (Pitta 300/300R) Screw
AC adaptor User manual
Installation CD (Pitta View, IP Utility)
Pitta 300/300R: 6ea
Pitta 300D/300DR: 2ea

5
PITTASOFT
Getting Ready
@
e
T
Checking the main body of the Pitta 300
❚❚Pitta❚300/300R
✎✎The gures presented may differ from the actual appearances of the product.
1Front LED Red: Booting Orange: Starting
Green: Operating Red blinking: Firmware upgrading
2DC IN DC 5V / 1.0A power terminal.
3LAN Connect the 10/100 Mbps Ethernet cable. Make sure that use RJ-45
connector. Supports PoE (IEEE 802.3af)
4DATA Data Terminal
5POWER LED LED is blinking when power is on.
6NETWORK LED LED is blinking when network is connected.
7RESET Press the reset button for 3 seconds then all the settings will be changed
to initial settings.
POWER
NETWORK
RESET
234

6PITTASOFT
❚❚Pitta❚300D/300DR
✎✎The gures presented may differ from the actual appearances of the product.
1RESET Press the reset button for 3 seconds then all the settings will be changed
to initial settings.
Checking the main body of the Pitta 300
Getting Ready
Dome Cover Shield Case Lock Holder
PCB Bracket

7
PITTASOFT
Getting Ready
@
e
T
Installing the Pitta 300
❚❚Pitta❚300/300R
1
Connect the camera to the stand.
2
Place a camera stand at the intended place.
✎✎Make sure that the LAN cable and power must
be gured at the intended place.
3
Connect the LAN cable to the [LAN] port.
✎✎Use a cross cable for a direct connection
between the PC and the camera only. Use direct
LAN cable for using a router or switch hub.
4
Connect the AC adaptor to the [DC] terminal.
✎✎Use the provided AC adaptor.
5
Make sure that POWER LED and NETWORK
LED is on.
6
Adjust the camera angle.

8PITTASOFT
Getting Ready
Installing the Pitta 300
❚❚Pitta❚300D/300DR
1
Turn the dome cover counterclockwise and
detach it.
2
Detach the shield case.
3
Position the lock holder in the desired location.
4
Assemble the shield case.

9
PITTASOFT
5
Adjust the camera angle.
6
Assemble the dome cover.
7
Connect the LAN cable to the [LAN] port.
✎✎Use a cross cable for a direct connection
between the PC and the camera only. Use direct
LAN cable for using a router or switch hub.
8
Connect the AC adaptor to the [DC] terminal.
✎✎Use the provided AC adaptor.

10 PITTASOFT
Getting Ready
@
e
T
Installing the Software
Install the Pitta IP Utility and Pitta View software.
1
Insert the installation CD into the CD drive. Double-click the 'Setup.exe' le on the CD.
✎✎You can download this le from Pittasoft homepage (www.pittasoft.com).
2
Follow the instructions on the installation program to complete.
3
Check the Pitta IP Utility and Pitta View icon is created.
4
Double click the shortcut icon to start the software.

11
PITTASOFT
❚❚System❚requirement
CPU Intel Pentium4 2.0Ghz or higher
RAM Minimum 1GB (Recommanded 2GB)
Network Ethernet
Graphic Card
1024X768, 24bit color
128MB RAM (Recommanded 256MB higher)
DirectX 9.0 or newer support, Direct Draw Overlay Support
HDD Type E-IDE, SATA, SCSI, SAS
HDD Space Minimum 80GB Free
O/S Windows XP SP2, Windows Vista
❚❚Re-installation
If reinstallation is needed, current software has to be uninstalled.
1
To uninstall the software, click on uninstall button in;
[Start] → [All programs] → Pittasoft → Uninstall
2
Re-install the software.
xPitta IP Utility
This software is for assigning IP address to many cameras at once. (See chapter 2)
xPitta View
This software is the multi-channel network video recorder.
(See Pitta View user manual)

12 PITTASOFT
@
e
T
Pitta IP Utility and Pitta Web View
Pitta IP Utility guide
Use Pitta IP Utility to change or verify the IP address of the camera.
❚❚Pitta❚IP❚Utility❚menu
Menu Features
File Exit Close the Pitta IP Utility.
View
Toolbar Shortcut buttons.
Status Bar Displays current status 4.
Home Page Go to Pitta WebView home page.
Properties ✎✎This feature is an additional plan.
Refresh Refresh the camera list.
Tools
Assign IP address to
the selected device Change IP address.
Assign IP address
using serial number Change IP address by serial number.
Test IP address Testing for the selected camera.
Help About PittaIPUtility Displays Pitta IP Utility information.
3Camera List
4Status bar
1Menu 2Toolbar (Shortcut)

13
PITTASOFT
Pitta IP Utility and Pitta Web View
@
e
T
Changing IP address
❚❚Change❚IP❚address❚by❚selecting❚camera
1
Start Pitta IP Utility.
Select the camera whose IP address needs to
be changed.
2
Click button.
'Assign IP address', pop-up window appears.
3
Enter User ID and Password.
✎✎Default initial values of administrator's ID and
Password are admin/admin. You can change
ID, Password in Pitta WebView. (T✎page 19)
4
Assign the IP address.
xObtain an IP address automatically(DHCP): Use this to assign the IP address of the
camera automatically.
xUse the following IP address: Use this to assign the IP address of the camera
manually.
5
Press 'Assign' button
6
Press button to refresh the camera list.

14 PITTASOFT
Changing IP address
Pitta IP Utility and Pitta Web View
❚❚Change❚IP❚address❚by❚serial❚number
1
Start Pitta IP Utility
2
Click button. 'Assign IP address', pop-up
window appears.
3
Enter User ID, Password, Serial Number.
✎✎Default initial values of administrator's ID and
Password are admin/admin. You can change
ID, Password in Pitta WebView. (T✎page 19)
✎✎Camera Serial Number is located in the back of
the product.
4
Set equal to
4
~
6
step page 13.
✎✎Factory default setting is the DHCP mode : IP address will be automatically assigned.
✎✎If you use Pitta IP Utility with cross cable connection, you must assign the static IP. Please do
not use DHCP option with cross cable.
✎✎Pitta 300 series software applications work with Windows XP SP2 and Windows Vista on
Internet Explorer 5.0 or later.
✎✎This application can be used if the camera is physically connected in the same Subnet only.
Otherwise, access the camera using Pitta WebView by directly connecting the camera to the
PC using a cross cable and then change the IP address in the Pitta WebView Network
Settings. (T✎page 19)
✎✎IP setting using DHCP could take up to maximum 10 minutes.

15
PITTASOFT
Pitta IP Utility and Pitta Web View
@
e
T
Pitta WebView Log-in
Pitta WebView is the role of each camera's homepage. Set the camera or live view is
possible through the internet.
1
Connect to the camera's homepage.
xMethod 1: To open Login page, enter IP
address in the address bar of your web
browser and press Enter.
xMethod 2: Select the camera and press the
button in Pitta IP Utility.
- Double-click on the camera or click the
mouse right button and choose 'Home Page'
then you can go to the login page.
- Select the 'View → Home page' from Menu
bar then you can go to the login page.
2
Enter user ID and Password and press 'Log in'
button.
xDefault initial values of administrator's ID and
Password are admin/admin
xIf you login to Live View at rst time, a yellow
bar will appear at the top of the screen.
Please click on the yellow bar and continue
to install the 'PTAMME_X ActiveX Control
Module'.
✎] If you have accessed by administrator account,
you may change the password of administrator to
ensure the security of the system. (T✎page 19)
✎] In this case, the access by the Guest should
be approved by the administrator. (T✎page 19)

16 PITTASOFT
@
e
T
Pitta IP Utility and Pitta Web View
Pitta WebView Live View Page
❚❚LiveView
Press button. This is the live view mode.
NO. Item Features
1Address You can check the IP address of the camera.
2Homepage shortcut Open Pittasoft homepage.
3Live view Live view screen.
4Current Time Displays current time. Time can be set in Setup page. (T✎page 25)
5 Save the image in JPEG or BMP.
6Full screen.
7 Play and Stop.
1
3
7 6 5
2
4

17
PITTASOFT
❚❚Setup
Press button.
Basic setting page.
✎✎For more information, see page 18~26.
❚❚Help
Press button
Pitta WebView help page.
✎✎Press the 'Help' button on the setup page to get
help and tips for the current page.
❚❚Logout
Press button. You can use this to logout.

18 PITTASOFT
@
e
T
Pitta IP Utility and Pitta Web View
Pitta WebView-Setup Menu
❚❚Basic
Camera Name Camera Name for assigning a name to the camera. Available to use up to 64
letters.
Resolution VGA(640X480)/CIF(352X288)/QVGA(320X240)/QCIF(176X144)
Rotation Use this to rotate the display by 180°.
x
Night Mode Use this to get the better video quality in dark places.
Video Quality Use this to choose video display quality.
x
Frame Rate
Use this to set the number of frames to be transmitted from the camera per
second.
x
Motion Detection Enable the Motion Detection. Default is enabled. For more information, see
page 22.
Other manuals for Pitta300
1
This manual suits for next models
3
Table of contents