Pixel Magic hd Mediabox User manual

Owner's guideOwner's guide

2
Safety Information
Important Safety Instructions
1. Read these instructions.
2. Keep these instructions.
3. Heed all warnings.
4. Follow all instructions.
5. Do not use this apparatus near water.
6. Clean only with a dry cloth.
7. Do not block any ventilation openings. Install in accordance with the manufacturer’s instructions.
8. Do not install near any heat sources such as radiators, heat registers, stoves, or other apparatus (including
amplifiers) that produce heat.
9. Do not expose this appliance to dripping or splashing water and no object filled with liquids (such as vases)
should be placed on this appliance.
10. Do not interfere with the safety aspects of the polarized or grounding-type plug. A polarized plug has two
blades with one wider than the other. A grounding type plug has two blades and a third grounding prong.
The wide blade or the third prong is provided for your safety. If the provided plug does not fit into your outlet,
consult an electrician for replacement of the obsolete outlet.
11. Protect the power cord from being walked on or pinched particularly at plugs and the point where they exit
from the apparatus.
12. Only use attachments/accessories specified by the manufacturer.
13. Unplug this apparatus during lightning storms or when unused for long periods of time.
14. Refer all servicing to qualified service personnel. Servicing is required when the apparatus has been damaged
in any way, such as if the power-supply cord or plug has been damaged, liquid has been spilled, objects have
fallen into the apparatus, the apparatus has been exposed to rain or moisture, does not operate normally, or
has been dropped.

3
Additional Safety Instructions
• To ensure maximum performance, please read this manual carefully. Keep it in a safe place for future reference
• Install this unit in a cool, dry, clean place - away from windows, heat sources, sources of excessive vibration,
dust, moisture and cold. Avoid sources of humming (transformers, motors). To prevent fire or electrical shock,
do not expose the unit to rain or water
• Do not force connection wires. When moving the unit, first disconnect the power plug and the wires connected
to other equipment. Never pull on the wires themselves
• The openings on the unit cover assure proper ventilation of the unit. If these openings are obstructed, the
temperature inside the unit will rise rapidly. Therefore, avoid placing objects against these openings, and install
the unit in a well-ventilated area to prevent fire and damage
• Be sure to allow a space of at least 30 cm behind, 20 cm on both sides and 10 cm above the top panel of the
unit to prevent fire and damage
• Digital signals generated by this unit may interfere with other equipment such as tuners, receivers or TVs. Move
this unit further away from such equipment if interference is observed
• Do not attempt to clean the unit with chemical solvents; this might damage the finish. Use a clean, dry cloth
• Be sure to read section 10: Troubleshooting regarding common operating errors before concluding that the unit
is faulty
• When not planning to use this unit for long periods of time, disconnect the AC power plug from the wall outlet
• To prevent lightning damage, disconnect the AC power plug when there is an electrical storm
• Grounding or polarization - Precautions should be taken so that the grounding or polarization of an appliance is
not defeated
• This unit is not disconnected from the AC power source as long as it is connected to the wall outlet, even if this
unit itself is turned off. This state is called the standby mode. In this mode, this unit is designed to consume a
small amount of power

4
Thank you for purchasing HD MediaBox. An exciting new world of High-Definition images and audiophile-quality
audio is now at your fingertips
Viewers can appreciate impressive resolution, dynamic contrast and vivid colors, bringing cinematic excitement and
pleasure into the home.
HD MediaBox provides the missing link between your HDTV, hi-fi, and computer network. Now, from the comfort of
your living room, you can play the movies, music, and photos stored on your computers through your TV and hi-fi.
We are confident your new player will both enhance and become integral to your home entertainment system.
Please contact your HD MediaBox retailer immediately if any of the above items are missing.
Before starting, please check the following items were included
in your package:
1. HD MediaBox High-Definition Media Player with base attached
2. Auto-Voltage Mains Transformer
3. Power Cord fitted with the correct plug for your region’s domestic power
supply
4. HD MediaBox Remote Control with 2 AAA batteries
5. VGA to 3 female RCA (Component Video) conversion cable
6. Composite A/V 3-in-1 Cable (RCA connectors)
7. USB cable
8. A Philips screwdriver and 4 screws for HDD fitting
9. This Owner’s Guide, hard copy or CDROM
Welcome

5
Table of Contents
Safety Information 2
Important Safety Instructions 2
Additional Safety Instructions 3
Welcome 4
1. About HD Mediabox 7
1.1 Introducing HD MediaBox 7
1.2 Features & Functions of HD MediaBox 7
1.2.1 General 7
1.2.2 Video Playback 8
1.2.3 Audio Playback 8
1.2.4 Photo Display 9
1.3 An Introduction to High-Definition 9
1.3.1 HD Format Notation 10
1.3.2 Interlaced and Progressive 10
1.4 Supported Formats 10
1.4.1 A Brief Overview of Video Formats 10
1.4.2 A Brief Overview of Audio Formats 12
1.4.3 A Brief Overview of Photo Formats 13
2. Familiarizing Yourself with HD MediaBox 14
2.1 HD MediaBox Case and Stand 14
2.2 HD MediaBox Front Panel 14
2.3 HD MediaBox Rear Panel 15
2.4 HD MediaBox Remote Control 16
3. Getting Started 19
3.1 Connecting Power 19
3.2 Fitting the Remote Control Batteries 19
3.3 Adding an Internal Hard Disk Drive (Optional) 20
3.3.1 Fitting an Internal HDD 20
3.3.2 Initializing and Formatting an Internal HDD 22
4. Connections 26
4.1 Video Connections 26
4.1.1 High Definition Connections 26
4.1.2 Standard Definition Connections 27
4.2 Audio Connections 28
4.3 Computer Connections 30
4.3.1 Transferring Files to an Internally Fitted HDD 30
4.3.2 Connecting External USB Devices 31
4.3.3 Network Streaming 31
4.3.3.1 How to Share Folders on Windows XP 32
4.3.4 Infra Red Distribution 33
5 HD MediaBox Setup 34
5.1 Navigation of the Setup Menus 34
5.2 Audio Setup 35
5.2.1 SPDIF Out 36

6
5.3 Video Setup 36
5.3.1 Active Output 37
5.3.2 HDMI 37
5.3.3 SD Modes 38
5.3.4 HD RGB 39
5.3.5 HD YPbPr 39
5.4 System Setup 40
5.4.1 TV Refresh Rate 40
5.4.2 TV Shape 41
5.4.3 Subtitle Encoding 41
5.4.4 Slideshow 42
5.4.5 IP Setting (Internet Protocol Setting) 42
5.4.5.1 How to Input a Static IP Address 43
5.4.6 Save Profile 43
5.4.7 Software 44
6. File Browsing Mode 45
6.1 Familiarizing Yourself with File Browsing Mode 45
6.2 Navigating File Browsing Mode 47
7. Media Playing Mode 48
7.1 Info Screen 48
7.2 Repeat 49
7.3 Zoom 49
7.4 Time Search and Jump 49
7.5 Image Adjustments 50
7.5.1 Brightness 51
7.5.2 Contrast 51
7.5.3 Saturation 51
7.5.4 Vertical Position 51
7.5.5 Aspect Ratio 51
7.5.6 Subtitle Delay 51
7.6 Playlists and Slideshows 52
7.7 Subtitles 53
7.8 Other Active Remote Control Keys 53
8. DVD Playing Mode 54
8.1 Menu Navigation 54
8.2 Info Screen 55
8.3 Repeat 56
8.4 A-B Repeat 56
9. Upgrading Firmware 57
9.1 Firmware Version Check 57
9.2 Downloading and Transferring the New Firmware 57
9.3 Updating HD MediaBox 58
10. Troubleshooting 60
10.1 Changing Video Output Without an Image 61
10.2 Recovery from Firmware Corruption 62
Support & Warranty Information 63
Product Support 63
Product Warranty 63

7
1. About HD Mediabox
1.1 Introducing HD MediaBox
HD MediaBox is a High-Definition HDD (hard disk drive) media player, providing instant access to High-Definition
video, digital music, digital photos and DVD files either from its internal hard disk drive (HDD), your personal
computer*, USB HDD or Network Attached Storage box*.
HD MediaBox supports output resolutions of up to 1080p enabling you to set your HD media free from the
constraints of your monitor. Use any VGA, component video, DVI or HDMI equipped display device - Flat panel
displays, projectors or HDTVs.
For movies, TV shows, camcorder footage and more, HD MediaBox supports all popular formats including MPEG
1/2/4, WMV9, DivX™ and XviD, as well as DVD .ISO and .VOB files. Output everything through the digital HDMI™
connection and you can go digital all the way to your screen!
As well as supporting HD files, HD MediaBox will also up-scale and deinterlace your existing standard definition
files to match the resolution of your display.
HD MediaBox is designed with high quality audio playback in mind. Equipped with 24-bit/192KHz audio DAC from
Analog Devices Inc, low noise Op Amps from Burr-Brown® (famous for their clean output and ultra-low distortion
characteristics) and our own specially developed timing circuitry, the HD MediaBox can act as a high end hi-fi
jukebox, storing thousands of CDs!
The Audiophile Edition (MB200) adds a low jitter TCXO (temperature compensated crystal oscillator) to dramatically
improve spaciousness, clarity, impact, and purity; providing the highest quality audio playback available in any
network media player.
Digital optical, coax, and analogue connectors are all provided to deliver this high fidelity audio into any home
theater or stereo system.
Included with HD MediaBox is a backlit Remote Control so you can keep the lights low. Combined with the small
size and fanless operation, you get a high-powered box that's also easy to live with.
* Some high bitrate HD video files may not play smoothly across the network.
1.2 Features & Functions of HD MediaBox
1.2.1 General
User-friendly On Screen Display (OSD). Allows easy navigation using the included Remote Control. All player
settings are easily accessible and browsing your files across the network is a cinch. Different media-types are color-
coded and filters can be applied to help with file identification.
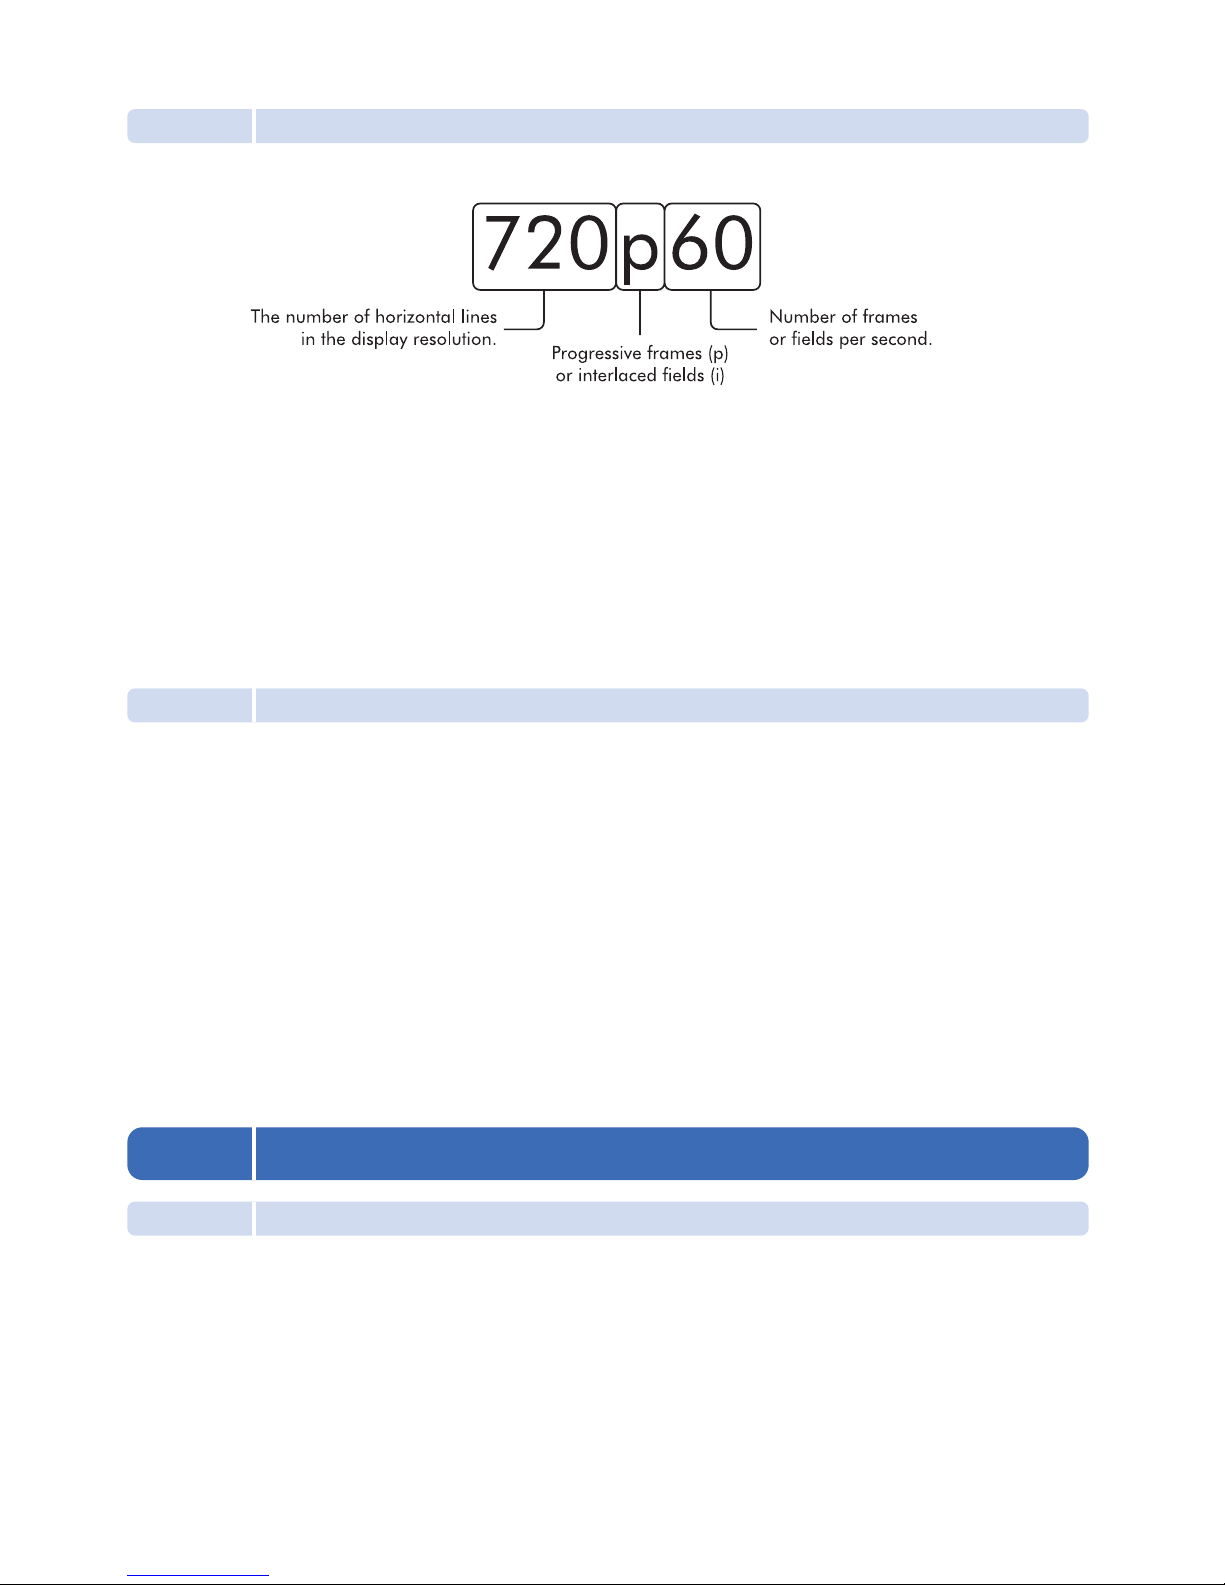
Flexible Output resolutions. HD MediaBox can output at the following popular resolutions.
Digital television standards - 480p, 576p, 720p, 1080i, 1080p
PC standards - VGA, SVGA, XGA, SXGA
Plasma resolutions - 1366x768, 1280x768
NTSC and PAL support. Full support for PAL and NTSC standard definition formats is included. Simply choose
your preferred output in the settings menus (see section 5.4.1).
Internal HDD support. An internal IDE hard disk drive can be fitted inside HD MediaBox (see section 3.3).
Flexible and comprehensive AV outputs. All the popular methods of connection are supported, including HDMI
(v1.1 including embedded audio), Component (YPbPr), VGA, Optical and Coax SPDIF, and more (see section 4).

Connectivity options
USB: HD MediaBox features three USB2.0 ports. Two of these can be used for connecting external “Mass Storage
Devices” which include external USB HDDs, thumbdisks, etc. The other USB port will connect directly to a PC or
NAS to allow files to be placed on an internal HDD (if fitted).
LAN: An RJ45 is provided to place HD MediaBox on your 10/100BASE-T Ethernet network (100BASE-T
recommended). You can now browse shared files and drives on your network which use the SMB protocol (Server
Message Block - commonly used by Microsoft Windows). HD MediaBox can also access NAS (Networked Attached
Storage) drives on your network if present. (see section 4.3.3) Note that you cannot access an internal HDD (if fitted) from your network
- the USB connection is required for this.
File system format support. HD MediaBox can read file systems formatted in either FAT32 or NTFS. NTFS is
recommended, as FAT32 systems are limited to files less than 4GB in size and High Definition video files very
frequently exceed this.
Backlit Remote Control. The included Remote Control is backlit to enable use in a darkened ‘home theater’
environment.
Updateable firmware. You can update the firmware using the OSD of HD MediaBox. Firmware can be updated
from either an internal HDD (if fitted) or an external USB source (a thumbdisk for example). Firmware updates when
available can be downloaded from the Support section of the Pixel Magic website (see section 9).
1.2.2 Video Playback
Playback of Standard and High Definition video files (see section 1.4.1 for supported formats)
Scaling and deinterlacing. This function is performed automatically - all video will be rescaled to match your
chosen Output Resolution (see section 5.3 for how to set). For SD material, inverse telecine for film sources and
motion adaptive deinterlacing for video sources are supported. For HD material, the ‘bob’ method is used.
Example 1: Downscaling and deinterlacing of 1080i to match your 720p display.
Example 2: Upscaling and deinterlacing of standard definition to match your 720p display.
Auto aspect ratio detection. HD MediaBox can auto-detect whether the source material is 16:9 or 4:3, displaying
the video correctly to match the selected aspect ratio of your display.
Video streaming across the network. HD MediaBox can access shared folders and drives on your network using
the SMB protocol. (see section 4.3.3)
External subtitle support. HD MediaBox supports SubRip (.srt) subtitle files. Support for special characters is
also included.
1.2.3 Audio Playback
Playback of popular audio formats (see section 1.4.2).
24bit/192KHz DAC from Analog Devices. The analog audio stereo output of HD MediaBox features a high
performance 24bit/192KHz upsampling DAC from Analog Devices. This increases the resolution of the music,
providing a more detailed and natural sound.
Precision Clock. The Audiophile Edition (MB200) adds a low jitter TCXO (temperature compensated crystal
oscillator) to dramatically improve spaciousness, clarity, impact, and purity.
Playlists supported. Text files containing track information can be saved and played automatically (see section 7.6).
HDMI audio embedding. Audio can be embedded in the HDMI signal. This provides a digital audio signal to your
external DAC (usually included in AV receivers) and reduces cabling.
“Play all” in folder option. All files in a folder can be played in alphabetical order with no pauses.
8

9
1.2.4 Photo Display
Playback of High Resolution photographs. Images of any resolution can be displayed; they will be rescaled to
match your chosen Output Resolution. See section 1.4.3 for supported formats.
Slideshows. HD MediaBox can show all files in a folder alphabetically, or you can create a text file, which lists the
order of the photos to be shown (see section 7.6). The length of time each image will be displayed is also adjustable.
1.3 An Introduction to High-Definition
High-Definition video or HD video generally refers to any video system of higher resolution than standard-definition
(SD). NTSC, PAL and current DVDs are Standard Definition.
HD television (HDTV) resolution usually contains either 1080 or 720 lines of video information. In contrast, regular
digital television and DVDs are 480 lines (like NTSC) or 576 lines (like PAL/SECAM).
High-Definition video generally has an aspect ratio of 16:9 (1.78:1). Standard-definition television (SDTV) has a 4:3
(1.33:1) aspect ratio.
HD signals require a High-Definition television or computer monitor in order to be viewed. Many displays are now
being marketed as “HD-Ready” but not all can show all of the HD video information. In order to get the most out of
HD MediaBox, a display with at least 720 lines is recommended.

10
1.3.1 HD Format Notation
HDTV formats are referred to using a notation describing:
There are 2 main HD resolutions 720 and 1080. Usually (but not always) HD pixels are square, meaning that if the
vertical resolution is 720, to achieve a 16:9 aspect ratio, the horizontal resolution must be 1280. For 1080 the
horizontal resolution is usually 1920. Sometimes, for clarity, the full resolutions are written e.g. 1280x720p60.
Most HDTV systems support some standard resolutions and frame or field rates. The most common are:
480p60, 576p50, 720p50, 720p60, 1080i50, 1080i60
p = Progressive, i = Interlaced
HD MediaBox will initially display in 480p60 as this is THE most commonly supported resolution.
A frame or field rate can also be specified without a resolution. For example 60p means 60 progressive frames per
second and 50i means 50 fields per second.
1.3.2 Interlaced and Progressive
HD formats can be either progressive (p) or interlaced (i). Progressive means each time the image refreshes (60
times a second for NTSC, 50 times a second for PAL) the video signal contains the full resolution. However, with
interlacing, each time it refreshes you only get half the resolution (known as a field) - every odd line one field and
every even line the next. All SD video formats are interlaced, as is DVD.
Obviously progressive scan is the higher quality of the 2 systems, but also has larger file sizes.
However, many modern digital display technologies such as Plasma, LCD and DLP inherently progressive scan i.e.
they have to show all the lines of resolution at the same time. Somewhere in the video chain, some device has to
convert interlaced signals into progressive signals for these displays. This task is called Deinterlacing. Most of these
displays will include the technology to do this, however this is a very complex process and HD MediaBox may do a
better job.
Arguments are common about which looks better - 720p or 1080i? It is common for people to prefer the stability
of 720p for subject matter containing a lot of rapid motion (soccer, basketball or hockey games, for example).
You may want to experiment in your own setup to see which you prefer.
1.4 Supported Formats
1.4.1 A Brief Overview of Video Formats
All standard video formats are compressed. The amount of compression and the data rates of these standards vary
enormously. Often files made available for download, will be highly compressed (in order to save bandwidth),
resulting in a lower image quality.
MPEG-1
MPEG-1 is the designation for a group of audio and video coding standards agreed upon by MPEG (Moving
Picture Experts Group). 1.5Mbit/second data rates and 352x240 resolution are common with later improvements
allowing for up to 4Mbit/second for better quality.

11
MPEG-1 is very common, mainly due to its ability to store an entire film on a single CD. This Video CD format is a
mass-market competitor to VHS in countries where high humidity can quickly degrade magnetic tapes.
MPEG-2
MPEG-2 is the designation for a group of audio and video coding standards agreed upon by MPEG (Moving
Picture Experts Group). MPEG-2 video is not optimized for low bit-rates (less than 1 Mbit/s), but outperforms MPEG-
1 at 3 Mbit/s and above.
MPEG-2 is typically used for standard definition DVDs (maximum average of 9.8 Mbit/s) and television broadcasts
(commonly a lower bit rate than DVD).
Some High-Definition files are also coded using MPEG-2, and higher bit rates do exist.
MPEG-4
MPEG-4 is the designation for a group of audio and video coding standards agreed upon by MPEG (Moving
Picture Experts Group).
In general, MPEG-4 video will look more natural than MPEG-2 at the same bit rate (all else being equal). This has
made it an incredibly popular format for bandwidth-sensitive applications such as online steaming, web downloads
and television broadcasting.
WMV9/WMVHD/VC-1
Windows Media Video (WMV) is a generic name for the set of proprietary streaming video technologies developed
by Microsoft. It is a non-standard version of MPEG-4 Part 2. WMVHD is a new addition to the technology that adds
High Definition resolutions. VC-1 is an informal name for the draft SMPTE standard 421M codec which is a superset
of WMV-9 and WMVHD.
DivX™ and XviD
DivX and XviD uses MPEG-4 Part 2 compression. They are popular because their codecs (software to compress the
video and audio) are made available without charge.
Quality can be as good as MPEG-4, but it is common for already compressed files to be recompressed with these
codecs, resulting in further loss of image quality.
Common file extensions* .avi
Streaming over the 100BASE-T and USB2.0 supported YES
Common file extensions* .wmv .avi
Streaming over the 100BASE-T and USB2.0 supported YES
Common file extensions* .avi .mp4
Streaming over the 100BASE-T and USB2.0 supported YES
Common file extensions .mpg .m2v
Streaming over the 100BASE-T and USB2.0 supported YES
Common file extensions .mpg
Streaming over the 100BASE-T and USB2.0 supported YES

12
DVD .ISO
An ISO image (.iso) is an informal term for a disk image of an ISO 9660 file system. Most CD/DVD authoring utilities
can create these kinds of files. In general these behave exactly as a DVD disc would when put into a DVD player.
DVD .VOB and .IFO
A VOB file (DVD-Video Object) is a file type contained in DVD-Video media. It contains the actual Video, Audio,
Subtitle and Menu contents in stream form. The maximum size of VOB files is 1GB and are therefore found in
multiples, in conjunction with .IFO and .BUP files. An .IFO is a DVD information file that stores information about
Chapters, Subtitles and Audio Tracks. In general, when the VIDEO_TS.IFO file is accessed, it will behave exactly
as a DVD disc would when inserted into a DVD player. VOB files can also be accessed directly.
.TS
This stands for Transport Stream and is an MPEG-2 video stream. It is used by some HDTV broadcasters and is
gaining popularity as a high quality High-Definition file format.
* A file extension on a file (such as .avi) does not mean that the data within that file is compatible with the player. Many file formats use similar file extensions, and
it is not necessarily an indication of what the file encoding format is. HD MediaBox supports many types of file format, but due to encoding differences, not all files
may play. † Some high bitrate HD video files may not play smoothly across the network.
1.4.2 A Brief Overview of Audio Formats
HD MediaBox supports a mixture of both compressed and uncompressed audio formats. Recently, as computer
storage costs have greatly reduced, lossless compression has become increasingly popular among those who can
discern the differences.
MP3
MP3 was developed by the Moving Picture Experts Group (MPEG). The name MP3 stands for MPEG 1 Audio Layer
3 (see section 1.4.1). It is by far the most commonly used compressed audio format. Like most modern ‘lossy’
audio compression, the MP3 process is modeled on the human hearing range. MP3 tries to reduce file size by first
removing sounds from the frequency extremes.
Common file extensions* .mp3
Streaming over the 100BASE-T and USB2.0 supported YES
Common file extensions* .ts .tp
Streaming over the 100BASE-T and USB2.0 supported YES†
Common file extensions* .vob .ifo
Streaming over the 100BASE-T and USB2.0 supported YES
Common file extensions* .iso
Streaming over the 100BASE-T and USB2.0 supported YES

13
AAC (Advanced Audio Coding)
Also called MPEG-2 AAC or MPEG-2 NBC, this audio codec is the logical continuation of the MP3 codec created by
Fraunhofer-Gesellschaft. Due to advances in technology, AAC files encoded at a 96 kbps bit rate sound slightly
better than MP3s encoded at 128 kbps.
The AAC codec entered the mainstream when Apple announced that the iTunes Music Store would sell its digital
music downloads in AAC format. Copy protected AAC files are not supported by this player.
WAV or WAVE
A format developed by Microsoft and IBM for storing high quality, uncompressed audio. WAV became the standard
on PCs, but because of the large file sizes it requires (about 10MB per minute of music), most people convert WAV
files to compressed formats (MP3, WMA, and so on).
WMA
Windows Media Audio is a ‘lossy’ format similar to MP3 and AAC. This is essentially a competing format created
and licensed by Microsoft. Microsoft claims that Windows Media files are even better than MP3 files, and is now
positioned as a competitor to the AAC format.
* A file extension on a file (such as .avi) does not mean that the data within that file is compatible with the player. Many file formats use similar file extensions, and
it is not necessarily an indication of what the file encoding format is. HD MediaBox supports many types of file format, but due to encoding differences, not all files
may play.
1.4.3 A Brief Overview of Photo Formats
JPEG and JPG
JPEG (pronounced jay-peg) is by far the most commonly used method of compression for photographic images.
Although a ‘lossy’ format, most digital cameras are able to save files at a compression level hard to detect. Overly-
compressed files can suffer from artifacts such as ‘blocking’, ‘smearing’ and ‘blurring’. These are similar to those
found in low bit rate DVDs and Video CDs.
BMP
The name is short for bitmap and these files can be saved at various bit-depths. This relates to the number of colours
shown in the image and is commonly saved at 24-bit (referred to as true-color). 24-bit BMP files are lossless but are
much larger in file size than JPEGs. These files are used internally by the Microsoft Windows graphics subsystem (GDI).
GIF
These are very common on the Internet and mostly used for line art and areas of flat colour (logos, buttons and
diagrams for example). GIF files keep edges clearly defined, but JPEG is much better for photographic images
PNG
PNG (Portable Network Graphics) is a lossless compressed bitmap image format. PNG was created to both improve
upon and replace the GIF format with an image file format not requiring a patent license to use. PNG is officially
pronounced "ping" and, like GIFs and BMPs, reduces file size by reducing the number of colours. PNGs can also be
24-bit true-color and maintain all the original image information, similarly to BMPs though, file sizes will be large.
Common file extensions* .wma
Streaming over the 100BASE-T and USB2.0 supported YES
Common file extensions* .wav
Streaming over the 100BASE-T and USB2.0 supported YES
Common file extensions* .aac .m4a
Streaming over the 100BASE-T and USB2.0 supported YES

14
2. Familiarizing Yourself with HD MediaBox
2.1 HD MediaBox Case and Stand
HD MediaBox is fanless by design, and does not require any
additional cooling, even if an internal HDD is fitted. Care should be
taken however, to ensure that HD MediaBox is not placed in very hot
environments or spaces without any airflow.
Cooling holes are included in the HD MediaBox case and attention
should be taken not to cover these holes during operation.
HD MediaBox arrives fitted with a stand for use in the vertical
position. However, HD MediaBox can also be used horizontally
without interfering with operation. This is achieved simply by
removing the included base using a flat blade screwdriver.
To provide adequate ventilation, it is recommended that small rubber
feet are used on the bottom surface.
2.2 HD MediaBox Front Panel
Power indicator
The power status of HD MediaBox is shown by the color of the LED
No light - No mains power
Red - Standby
Green - Running
Play/Pause indicator
This blue LED shows the playback status of HD MediaBox.
No light - No media is playing
Blue constant light - Media is playing
Blue flashing light - Media is paused
Hard disk indicator
This orange LED shows when the internal HDD (if fitted) is being
accessed; either by HD MediaBox or by an external PC via USB. It is
normal for this light to flicker during disk accessing
No light - HDD is not being accessed
Orange light - HDD is being accessed
USB 2.0 indicator
This Blue LED shows when HD MediaBox is accessing an external USB
storage device through one of its 2 USB ports.
No light - External USB storage is not being accessed
Blue light - External USB storage is being accessed
Infra Red (IR) input sensor
This is where HD MediaBox receives its instructions from the Remote
Control. Care should be taken to avoid blocking this area.

15
2.3 HD MediaBox Rear Panel
USB 2.0 to PC
This allows HD MediaBox to be connected to a PC using the included
USB cable. Once connected, the PC will detect the internal HDD (if fitted)
as an external USB Mass Storage Device and files can be managed like
any other HDD (see section 4.3.1).
Infra Red In/Out for room-to-room Remote Control
If HD MediaBox is not placed in sight of the Remote Control, this port
can be used to connect to an IR distribution system (see section 4.3.4).
Composite Video Output
This is the most basic of video connections and is Standard Definition
only.
S-VIDEO Output
S-Video offers a higher quality signal than Composite for compatible
equipment but is Standard Definition only.
Analog Audio Output (left/Right)
All audio on this port has benefited from a 24bit/192KHz upsampling
DAC and can carry Dolby ProLogic and ProLogic II formats (to a
compatible decoder).
Coaxial Digital Audio Output
Optical Digital Audio Output
HDMI (v1.1) Digital A/V Output
The HDMI (High Definition Multimedia Interface) can carry video and
embedded audio, and provides the best quality video and audio output
from HD MediaBox. If you are connecting to a display device that has an
HDMI terminal, this is the recommended option to use. This allows direct transmission of the video information from
HD MediaBox to the display without any digital to analogue conversion. Always use high quality HDMI cables,
especially for longer cable runs.
An HDMI > DVI cable can be used to connect HD MediaBox to a compatible DVI-equipped device.
VGA Output
This port can be configured in the setup menus to output 2 signal formats. These offer superior quality over
Composite and S-Video, and can send High Definition signals to compatible equipment.
• RGBHV (often referred to as VGA)
• YPbPr (often referred to as Component Video)
RJ45 Ethernet Network Connection
Allows HD MediaBox to be connected to a computer network for playing media files stored on shared folders
or network servers. 10 and 100-BASE-T networks are supported; however 100-BASE-T is recommended as the
bandwidth is more suited to common HD MediaBox tasks.
USB 2.0 X 2 for Mass Storage Devices
Allows HD MediaBox to be upgraded using a USB thumbdisk and expanded by attaching external USB drives
for additional media storage.
Power Adapter Input
Please use the 12v auto-sensing unit supplied with HD MediaBox.
Composite
Ext. IR
S-Video
Audio L
Audio R
Digital audio
Optical
Coax
HDMI
RGBHV
or YPbPr
LAN
12V DC
USB PC
2x USB
1
2
3
4
5
6
7
8
9
10
11
12

16
2.4 HD MediaBox Remote Control
Power On/Off
Pressing this key toggles the power of HD MediaBox on/off.
Mute
Pressing this key toggles the audio output of HD MediaBox
on/off.
Alpha/Numeric keys
These keys enter alpha/numeric values in appropriate areas
(e.g. during a Time Search).
In Media Playing Mode, pressing the numeric keys during
playback will access different parts of the file. Pressing 0 will
jump to the start of the file; 1 will jump to a point 10% of the total
playing time; 2 will jump to 20%; 3 will jump to 30%; etc
MEDIA
In File Browsing Mode, pressing this key cycles through the
“Display file type:” options Video/Photo/Music/All
(see section 6.1).
INFO
In Media Playing Mode and DVD playing Mode, pressing this
key displays an info panel displaying information about the file being played (see section 7.1 for Media Playing
Mode and section 8.2 for DVD Playing Mode).
Rewind / Rotate Photo Counter-clockwise
When viewing video, pressing this key rewinds the media being played. Pressing it multiple times will increase the
speed of the rewind. An icon is displayed on the screen, to indicate the current speed. The Play/Pause key must be
pressed to stop rewinding.
When viewing a photo, pressing this key will rotate the image 90 degrees counter-clockwise.
Forward / Play Folder / Rotate Photo Clockwise
In File Browsing Mode, pressing this key plays the media files in the currently highlighted folder.
When viewing video, pressing this key forward winds the media being played. Pressing it multiple times will
increase the speed of the forward wind. An icon is displayed on the screen, to indicate the current speed. The
Play/Pause key must be pressed to stop rewinding.
When viewing a photo, pressing this key will rotate the image 90 degrees clockwise.
Previous
In File Browsing Mode, pressing this key goes back one page of the file list.
In Media Playing Mode, pressing this key plays the previous media file.
In DVD Playing Mode, pressing this key plays the previous chapter.
Next
In File Browsing Mode, pressing this key goes forward one page of the file list.
In Media Playing Mode, pressing this key plays the next* media file.
In DVD Playing Mode, pressing this key plays the next chapter.
* In Media Playing Mode, the sequence of next media file depends on the Repeat Mode setting (see section 7.2 for more information)

17
MENU
In DVD Playing Mode, pressing this key enters the MAIN MENU of the DVD.
TITLE
In DVD Playing Mode, pressing this key enters the TITLE MENU of the DVD (if present).
SUBTITLE
In Media Playing Mode when playing .ts files and in DVD Playing Mode, pressing this key cycles through the
SUBTITLES (if present).
AUDIO
In DVD Playing Mode, pressing this key cycles through the AUDIO TRACKS of the DVD (if more than one).
VOLUME +/-
Pressing this key changes the output volume of HD MediaBox. The default value is 16 and you can leave it at this
setting if you plan to use your amplifier to change the volume.
If a Mini Menu has been activated (e.g. Brightness, Contrast, Profile, Zoom, etc), pressing these keys will adjust the
value of the setting.
PROFILE
Pressing this key will recall a saved profile (see section 5.4.6). Pressing the key multiple times will cycle through
the currently used profile numbers (1-10).
TV Modes
Pressing this key during playback will show the current resolution on the screen.
Pressing a NUMBER key within 5 seconds will change the output resolution as follows:
1. Composite/S-video/Component (from 15pin VGA port) in 480i
2. HD YPbPr component (from 15pin VGA port) 480p
3. HD RGB (from 15pin VGA port) 480p
4. HDMI 480p
5. HDMI 720p
6. HDMI 1080i
To select another resolution, press TV Modes followed by another NUMBER key.
Play/Pause
In File Browsing Mode, pressing this key will play all media files listed in the current folder.
In Media or DVD Playing Modes, pressing this key will toggle between PLAY and PAUSE.
Stop
In Media or DVD Playing Modes, pressing this key will STOP the file (or playlist) and return to File Browsing Mode.
Up/Down/Left/Right
In File Browsing Mode, pressing these keys will move the highlighted item.
In DVD Playing Mode, pressing these keys will navigate the DVD menu screens.
OK
In File Browsing Mode, pressing this key will select the currently highlighted item or open the currently highlighted
folder. In DVD Playing Mode, pressing this key will select the currently highlighted item on DVD menu screens.

18
Up Folder
In File Browsing Mode, pressing this key will navigate up one level to the parent folder.
In Media or DVD Playing Modes, pressing this key will return the Zoom to normal (unzoomed).
Setup
In File Browsing Mode, pressing this key will open the Setup Menu.
In Media or DVD Playing Modes, pressing this key will cycle through the following sliders.
• Brightness
• Contrast
• Saturation
• Vertical Position
• Aspect Ratio
• Subtitle Delay
Use the Volume +/- keys to adjust the values of each slider.
REPEAT
In Media Playing Mode, pressing this key will cycle through the following Repeat Modes:
• Track - repeats the current media file
• All - repeats all the media files in the current folder
• Random - repeats all the media files randomly in the current folder
• Cleared - no repeat
In DVD Playing Mode, pressing this key will cycle through the following Repeat Modes:
• Track - repeats the current chapter
• All - repeats the whole DVD
• Random - repeats all chapters randomly
• Cleared - no repeat
A-B
In DVD Playing Mode:
• Pressing this key once will select point A
• Pressing this key again will select point B
DVD video will loop continuously from point A to point B
ZOOM
In Media and DVD Playing Modes, pressing this key once will enter Zoom Mode and go to Zoom Level 1 (enlarged
video/photo).
Repeatedly pressing the ZOOM key will cycle through the Zoom Levels from 0 to 31.
Once Zoom Mode has been activated you can use VOL+ and VOL- to control the level of zoom.
While in Zoom Mode, pressing the Up Folder Remote Control key returns the zoom level to 0 (off).
When HD MediaBox finishes playing the current file, the zoom level resets to 0 (off), except during a slideshow of
photos, when the zoom level remains unchanged.
ANGLE
In DVD Playing Mode, pressing this key cycles through the viewing ANGLES of the DVD (if present).
SEARCH
In Media and DVD Playing Modes, pressing this key displays a numeric entry box, which allows the media playing
point to be set. Use the Numeric Keys to enter a specific time in hh:mm:ss format (e.g. 2 hours, 17 minutes, 26
seconds would be entered as 02:17:26). When the OK key is pressed, the media file will start playing from the
specified time.

19
3. Getting Started
3.1 Connecting Power
Caution: Use the 12v auto-sensing unit supplied with HD MediaBox. Ensure that the cable provided is suitable
for the power supply in your country. Contact your dealer immediately if you require an alternative power connector.
Connect the standard IEC power cord into the back of the auto-sensing power supply.
Then connect the 12v power connector to the back of HD MediaBox as shown in the diagram.
Plug the power cord into your power outlet and switch on.
You will see a green light on the power supply and a red LED on the front of HD MediaBox to confirm power.
Press the key on the Remote Control to turn HD MediaBox on.
3.2 Fitting the Remote Control Batteries
Turn the Remote Control over
step 1
Remove the battery
compartment cover by
placing your thumb in the indent,
and carefully sliding it backwards.
step 2
Insert 2 AAA
batteries (provided)
in the slots taking special
care to line the positive (+) and
negative (-) ends of the batteries with
the diagram inside the compartment.
Replace the
cover by sliding it
horizontally from the
back of the Remote Control.
It will click firmly into place.
step 3
step 5
step 4
Quickly test your batteries by pressing any key - all the keys should light blue.
step 3
step 2
step 1

20
3.3 Adding an Internal Hard Disk Drive (Optional)
HD MediaBox supports one internally fitted IDE Windows formatted Hard Disk Drive (HDD).
The IDE interface is UATA100 and is backwards compatible with lower speed interfaces. Future IDE interfaces may
also be backwards compatible with HD MediaBox. Please check the manufacturer’s specification for details.
HD MediaBox can read file systems formatted in either FAT32 or NTFS. NTFS is recommended, as FAT32 systems
are limited to files less than 4GB in size and High Definition video files frequently exceed this.
3.3.1 Fitting an Internal HDD
To fit an IDE HDD, follow these simple steps:
A
B C
step 1
Before you start, make sure you have
a) a flat clear space to work on, free of dust,
dirt and moisture
b) a Philips screwdriver (included with HD
MediaBox)
c) the 4 HDD screws (included with HD
MediaBox)
d) a supported IDE HDD
step 4
Carefully hold the edges of the back panel
and slide it out backwards. The internal
circuitry and HDD cage will come out with it.
step 5
Lay the cage on your
workspace with the rear
panel towards you and
the power connector on
the left.
step 6
Take your HDD and
make sure the jumper is
set to either MASTER or
CABLE SELECT.
step 7
continued overleaf
Turn your HDD so that
the base (with screw
holes) is facing up and
the connectors are on
the right.
step 2
Make sure all cables are
disconnected from HD
MediaBox, including the
power supply.
step 3
Remove the 3 screws
shown in the diagram.
Table of contents
Other Pixel Magic Media Player manuals