Pixel Knight TR-332 User manual

Made in China
50705 V10.01
Http:// www.pixelhk.com
PIXEL .INC
En
中文
Knight TR-332
Flashgun E-TTL II Trigger
Product Manual
闪光灯E-TTL同步器

1
En
Contents
Overvise
Cautions before use
Knight TR-332 features
Included items
Compatible device
Knight TR-332 the name of each part
How to use the Knight TR-332
Install the battery
Install the transmitter Knight TR-332TX
Remove Knight TR-332TX from the camera
Install the receiver Knight TR-332RX
03
04
06
08
09
10
12
12
13
14
15
Connect the receiver Knight TR-332RX with the on-top flash 17
Remove the flash from Knight TR-332RX 18

32
EnEn
Overvise
Thank you for purchasing the high-performance PIXEL product
First of all, thank you for purchasing the high-performance PIXEL Knight TR-332 product,
which enables Canon cameras and flash execute high-speed synchronous photography, as
well various creative flash mode functions, it includes the highest performance E-TTL II, E-
TTL, FP and other functions, the maximum shutter synchronization speed up to 1/8000s.
The device supported to set groups(5 groups in total);it also supported to control each
group individually, each group with multiple units, there are total 32 kinds of flash mode.
When using the EOS EXII compatible flash, you can adjust flash's output power through TR-
332TX instead of adjust on flash directly.
Before use this product, you must read and fully understand this manual, then learn to use
the camera to ensure you are familiar with the operation properly. You can easily handle the
operation method and the attentive things through this manual.
How to set Knight TR-332
Connect receiver Knight TR-332RX with the studio lights
Turn on the Knight TR-332 power
Turn on the LCD backlight of Knight TR-332
Knight TR-332 channel setting
20
18
19
19
20
Set the function of Knight TR-332TX 21
Set the Knight TR-332RX function 24
The flashgun operation 25
PIXEL knight TR-332 Specifications 26
st
This manual is current update of 1 Feb, 2010.Please contact to
PIXEL service center for further information, if interesting of the
combining usage with products released after this day.

54
EnEn
FV lock, red-eye reduction, and FP functions.
Knight TR-332RX's setting is more convenient, you just need to set the group as A, B, C,
D or E and each group with multiple units
When use the device with other incompatible E-TTL flashgun, Knight TR-332 will trigger in
manual mode without any setting.
Knight TR-332 is only compatible with EXII series flash, through the transmitter TR-332TX
to control the output power; incompatible flash can fire in the Manual mode.
It supports a variety of shutter speeds, its max up to 1/8000s.
Through the PC socket to control the studio lights and other brands flash with PC interface.
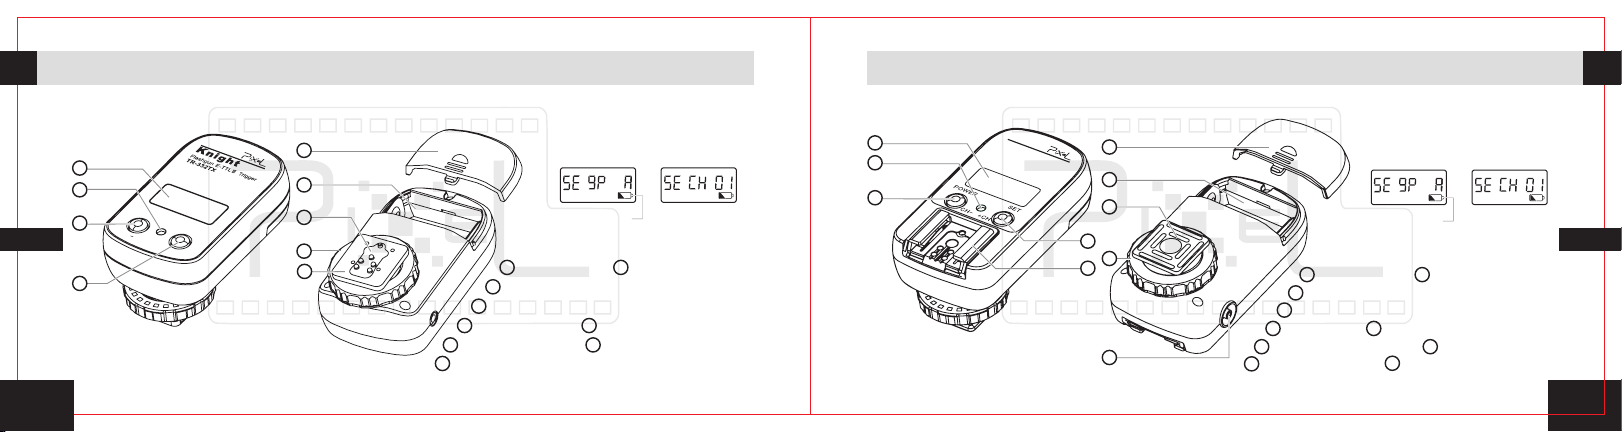
LCD display showed the channel, power, function mode.
Knight TR-332 features
Knight TR-332 uses global free FSK 2.4GHz wireless channel, 15 selectable channels.
Maximum operating distances up to 80M.
There are total 5 groups and 5D camera settings for Knight TR-332, each group with
multiple units, and which can be independently controlled; It's up to 32 difference flash
mode.
Knight supports a variety of camera shooting modes, flash E-TTL II, E-TTL and manual
output modes.
Knight TR-332TX is user friendly product, your just only set the group to OFF, TTL or the
required output parameters(between 1/1 to 1/128). Each step 1/3 to setting, It's divided
into 23 brightness adjustment
When Knight TR-332 is using with the EOS EXII series, It supports TR-332TX to adjust the
flash output power.
Knight TR-332 supported flash's electric zoom function, focal length, ISO, shutter speed,

76
EnEn
Because this product include battery, regarding how to use battery, please operate it
strictly according to related rules, otherwise it may cause explosion, fire or physical injury.
This device complies with Part 15 of the FCC Rules. Operation is subject to the folling two
conditions:(1)this device may not cause harmful interference, and(2)this device must
accept any interference received, including interference that may cause undesired
operation.
Changes or modifications not expressly approved by the party responsible for compliance
could void the user’s authority to operate the equipment.
Cautions before use
Cautions before use
Confirm the camera and flashgun is turned off before install on Knight TR-332.
This product is electronic accessories, maybe due to external environmental factors,
causing the camera can not or unusual work, such a possibility is very small .
The component can't be a strong vibration, or will lead to product failure.
A long time not use. Turn off the transmitter and receiver's power switch and remove the
battery.
The battery can't be installed anti-polarity, otherwise the batteries may leak corrosive
liquids, heat or explosion will occur.
When the Remote cable connect with the device, please do not pull the wires.
Do not store the device in high temperature area, such as a closed car under direct
sunlight, the control panel as well other high-temperature area.
Please keep it dry, do not use wet hand contact with the product, also cannot be immersed
in water or exposed in rain, its may lead to not work properly.
Do not use in flammableo and explosive gas; don't obey this warning may cause an
explosion or fire.

8
En
9
En
Compatible device
The compatible device with Knight TR-332TX
The compatible Canon EOS DSLR camera
The compatible Canon EOS flash
1Dseries, 5Dseries, 7D, 50D, 40D, 30D, 500D, 550D, 450D, 400D, 1000D and so on.
The compatible device with Knight TR-332RX
The compatible Canon flash such as EOS 580EXII, 580EX, 430EXII, 430EX, 270EXII, 220EXII
and various creative mode.
Included items
Please check all included items after open the packing,if missing, please contact dealer.
CR-2 lithium battery( 2pcs) Manual(1pc)
PC+6.3 cable(1pc) Hot shoe protective cover 1( pc)
Knight TR-332TX(1set) Knight TR-332RX(1set)
M
TR-332RX
Kn ig ht
Flashgun E-TTL Trigger
Ⅱ
POWER
+CH
CH
SET
PC+3.5 cable(1pc)

1 11 0
EnEn
Knight TR-332 the name of each part
Receiver Knight TR-332RX
M
TR-332RX
Knight
Flashgun E-TTL TriggerⅡ
1
2
38
7
10
9
6
4
Power/Channel reduce button
3
1LCD display 2LED indicator
Battery compartment
78Hot shoe holder
4Background/Set/Channel increase button
Hot shoe
5Battery hatch
6
9Locking screw
Knight TR-332RX LCD display
Low-voltage signs
set mode set channel
Knight TR-332 the name of each part
Transmitter Knight TR-332TX
POWER
+CH
CH
SET
1
2
4
Knight TR-332TX LCD display
1LCD display
Power/Channel reduce button
3
2LED indicator
Locking screw
8
4Background/Set/Channel increase button
Battery hatch
5Battery compartment
6
7Connecting pin
5
6
7
8
9
3
Hot shoe mount
9
Low-voltage signs
set mode set channel
5
10 PC socket

1 31 2
EnEn
How to use the Knight TR-332
Install the battery Install the transmitter Knight TR-332TX
When the battery power is low, the LCD is displayed as shown,
Knight TR-332 need to replace the battery as soon as possible to
ensure that your normal flash shooting.The transmitter and receiver
of Knight TR-332 are all using a 3V CR-2 lithium battery and the
standby time is more than 100hours. Please follow the steps to
replace the battery if needed:
1. Slide the battery hatch, and open it.
2. In accordance with the figure of the [+] and [-] signs to install the
battery, or contrast the[+]and[-]sign of TR-332 for battery inserting.
3. Close the battery hatch.
For a long time not use Knight TR-332, please turn off power and remove the
battery.
How to use the Knight TR-332
1. Please make sure the camera and transmitter power had been turned off before install
Knight TR-332TX.
2. Loose the locking screw by rotating to right according as picture.
3. Follow the picture to insert the Knight TR-332TX’s hot shoe mount on the camera's hot shoe.
4. Follow the picture to tight the locking screw for locking.
Make sure hold the Knight TR-332TX in place to prevent the products slide from the camera.

1 51 4
EnEn
Remove Knight TR-332TX from the camera Install the receiver Knight TR-332RX
Install receiver Knight TR-332RX on the tripod
1
2
SET
POWE R
Install receiver Knight TR-332RX receiver on the flash bracket
How to use the Knight TR-332 How to use the Knight TR-332
1. Please make sure the camera and Knight TR-332TX power had
been turned off before remove TR-332TX.
2. Loose the locking screw by rotating to right according as the figure.
3. Pull out Knight TR-332TX from the camera.
If Knight TR-332TX can’t pull out from the camera's hot shoe:
Knight TR-332TX’s locking screw is not fully loosed, please loose it, and
gently pulls it from the camera, do not forcibly pull it.
1. Follow the picture to insert the receiver screw nut on the tripod, make it tightly.
2. Follow the picture to install the receiver on the tripod.
1. Loose the locking screw by rotating to right according to picture.
2. Install Knight TR-332RX hot shoe mount to flash bracket according to
picture.
3. Rotate the locking screw to the left for locking tightly according to picture.

1 71 6
EnEn
Install the Knight TR-332RX receiver on the bracket B
Connect the receiver Knight TR-332RX with the on-top flash
1. Loose the locking screw by rotating to right according to the figure.
2. Inserting the TR-332RX to the bracket B according to the picture.
3. Rotate the fixed screw of the bracket B for locking tightly according to the figure.
4. Rotate the locking screw of Knight TR-332RX tightly.
How to use the Knight TR-332 How to use the Knight TR-332
1. Please make sure the flash's power is turned off before install the flash into Knight TR-
332RX, confirm the power of Knight TR-332RX is turned on, and set the function mode and
channel.
Knight TR-332RX does not allow the flash remove or plug in the under power on
mode, the flash must be inserted or pulled out in the off state.
1.Insert the flash and mount into the hot shoe of Knight TR-332RX.
2.Rotate the flash locking switch to the locking position.
Lock the flash in place, please lock the switch by clockwise rotation until to the
mount locking signs.

M
TR-332RX
Knight
Flashgun E-TTL TriggerⅡ
1 91 8
EnEn
Remove the flash from Knight TR-332RX
Connect receiver Knight TR-332RX with the studio lights
Turn on the Knight TR-332 power
Turn on the LCD backlight of Knight TR-332
POWER
+CH
CH
SET
How to use the Knight TR-332 How to use the Knight TR-332
1. Please make sure the flash power is off before remove the flash.
2. Rotate the locking switch to left according to the picture.
3. Pull out the flash from Knight TR-332RX hot shoe mount.
If the flash can't be pulled out from the hot shoe:
The fixed lock of flash was still on Knight TR-332RX accessory shoe. Rotate the
locking switch of flash on the left again, and gently pull out the on-top flash from
the Knight TR-332RX accessory shoe, do not forcibly pull out the flash.
1. Before connect the studio lights, select the appropriate cable in
the accompanying accessories. Insert the Cable PC-side to Knight
TR-332RX receiver's PC socket, and tighten the nut.
2. The other side inserts to the studio light socket, and turn on the
Studio Light power.
1. Turn on the power of Knight TR-332, hold [POWER] button for 2s
then release.
2. If Knight TR-332 power is turned on, hold [POWER] button for 2s
then release, Knight TR-332 will enter to off mode.
The ways to turn on and turn off the transmitter and receiver is the same.
The ways to turn on and turn off the transmitter and receiver’s LCD
backlight is the same.
Turn on the Knight TR-332 power, it is available to open the LCD's
backlight through press [SET].
The backlight will not be close by hand,it will turn off in 4s automatically when
no action on [POWER] and [SET] button.

2 12 0
EnEn
Knight TR-332 channel setting Set the function of Knight TR-332TX
POWER
+CHCH
SET
POWER SET
How to set Knight TR-332 How to set Knight TR-332
1. Turn on the Knight TR-332 power, press[POWER]and[SET]button
2s at same time for communicate channel setting.
2. After pressed the[POWER]and[SET]button, LCD display shown
[ ], “ ”means channel number, and blinks, such as shown,
which means entering to the channel setting mode.
After the installation of the battery, the channel will be[ ]as factory default.
3. When the LCD display shown [ ], press[CH-]or[+CH]button to select the channel,
press[CH-] button to reduce the number, [+CH] to increase the numbers. The channel can be
set from 01-15.
Avoid multiple using Knight TR-332 devices in the same area at the same time. You need to change the
difference channel to avoid mutual interference.
The ways to set transmitter and receiver’s channel is the same.
4. Press the button[POWER]and[SET]again, the mode will be saved and entered to standby
mode in 4s when no any action.
5. Please make sure the receiver and transmitter channel is the same.
1. Make sure your camera has been shut down or under standby mode when set the function.
This product is not compatible the function setting with the camera in working state.
If abnormal phenomenon was found in operating period, you can turn off and on the camera again to re-
start the knight TR-332.
2. After turn on the TR-332TX powe, hold[SET] button for 2s to enter
TR-332TX’s function setting mode.
3. By pressing the[SET]button 2s, LCD display shown [ ]. " "
is blinking, press [SET] key to replace the group. There are total of
the following options: , , , , and .
" , , , , " is a group option, there are total of five groups and 32 combined
mode.
" " is for using the EOS 5D series camera; you need set" " to[ON], other
models camera need set to[OFF].
4. When the [ ] is blinking on the LCD, through the press " "

2 32 2
EnEn
How to set Knight TR-332 How to set Knight TR-332
of [POWER] button to enter the group setting. Each group is supported for independent control.
TTL mode: Flash will be operating with TTL mode. When using the EX series flash, you need to set the
flash as manual mode. Flash mode cannot set through Knight TR-332TX, only the EOS EX II series of
flash can be set up through TR-332TX.
Manual mode: You can set the Knight TR-332TX by the [Manual Output] to control the flash output by
setting the parameters of flash; you can also adjust the flash output ways set by TR-332TX, no need
adjust the flash. This feature is only for EOS EXII flash series; when using the EX series of flash, the
flash's output power can't adjust by TR-332TX.
OFF mode: Knight TR-332TX set the group will not fire the flash, no need to turn off the flash.
When using the incompatible flash or studio light, Knight Device cannot control the flash output. The
5. Press [POWER] button to enter the setting mode, It's available through [POWER] set to down
and [SET] set to up, the TTL mode will be set for each group as ex-factory default.
6. Each group is available to set as following modes: TTL, Manual (1/1-0, 1/1-3, 1/1-7
according to 1 / 3 step for set up, there are total 23 levels) and OFF (Turn off this group output).
flash is only follow the own parameter setting.
The sync shutter speed up to 1/8000s.
7. After 4s without any action or press [POWER] and [SET] together to save the setting to enter
standby mode.
8. When using the 5D camera, you need open the set options of " ",
the LCD display shown [ ]. Set the function you should wait
the device exit or by pressing [POWER] and [SET] at the same time to
exit then use the camera.

2 52 4
EnEn
Set the Knight TR-332RX function The flashgun operation
M
How to set Knight TR-332 How to set Knight TR-332
3. Press[SET] button and hold for 2s to set the TR-332RX group
mode, the LCD will show[ ], the receiver is set group A as ex-
factory default.
4. Slightly press[SET]or[POWER] to enter next group, it can be set 5
groups from A to E.
5. Press[SET]and[POWER]at the same time or wait 4s without any
action to save the setting and exit.
6. It's available to set all the functions only through transmitter
which installed on the camera.
1. When first time to install the batteries in the receiver, LCD will show
[ ], and default as group" ".
2. The first letter " " means the receiver is group A " " means
the communicating channel of the device,15 frequency channels
can be selectable.
,
1. Adjust the flash head after the flash installed
2. Turn on the flash power.
3. Select the flashgun's mode.
4. Make sure the flash or camera light has been lit in the preparation before shooting.

2 6
En
PIXEL knight TR-332 Specifications
Type: Using FSK 2.4GHz wireless remote control system
Operation distance: 80 meters
Channel: 15
Transmitter standby time: 100 hours (using the CR -2 Lithium battery)
Receiver standby time:
100 hours (using the CR-2 Lithium battery)
Dimensions (W×H×D): Transmitter: 38mm ×63mm×31mm
Receiver: 38mm ×66mm×26mm
Weight (with battery): Transmitter: 45g
Receiver: 50 g
Now you can start to use unique high-performance PIXEL product Knight
TR-332; if you have any questions, you can contact the local distributor.
Or visit the website http://www.pixelhk.com.
Table of contents
Other Pixel Remote Control manuals