Planar ContentSmart MP60 User manual

Planar ContentSmart Media Player
MP60 User Manual

Contents
1
Overview ............................................................................................................................................................ 3
1.1 Feature Highlights .............................................................................................................. 3
1.2 Package Contents ............................................................................................................... 4
1.3 Installation ............................................................................................................................. 4
1.3.1
Attach wireless antenna ................................................................................................. 4
1.3.2
Mounting Option: [Attach on the ack of the monitor using Velcro] .......... 5
1.4 Physical View ....................................................................................................................... 5
1.4.1
Physical features (left to right in previous illustration) ....................................... 6
2
Configuring the Player .................................................................................................................................. 7
2.1 System Connections .......................................................................................................... 7
2.2 Basic Settings ........................................................................................................................ 8
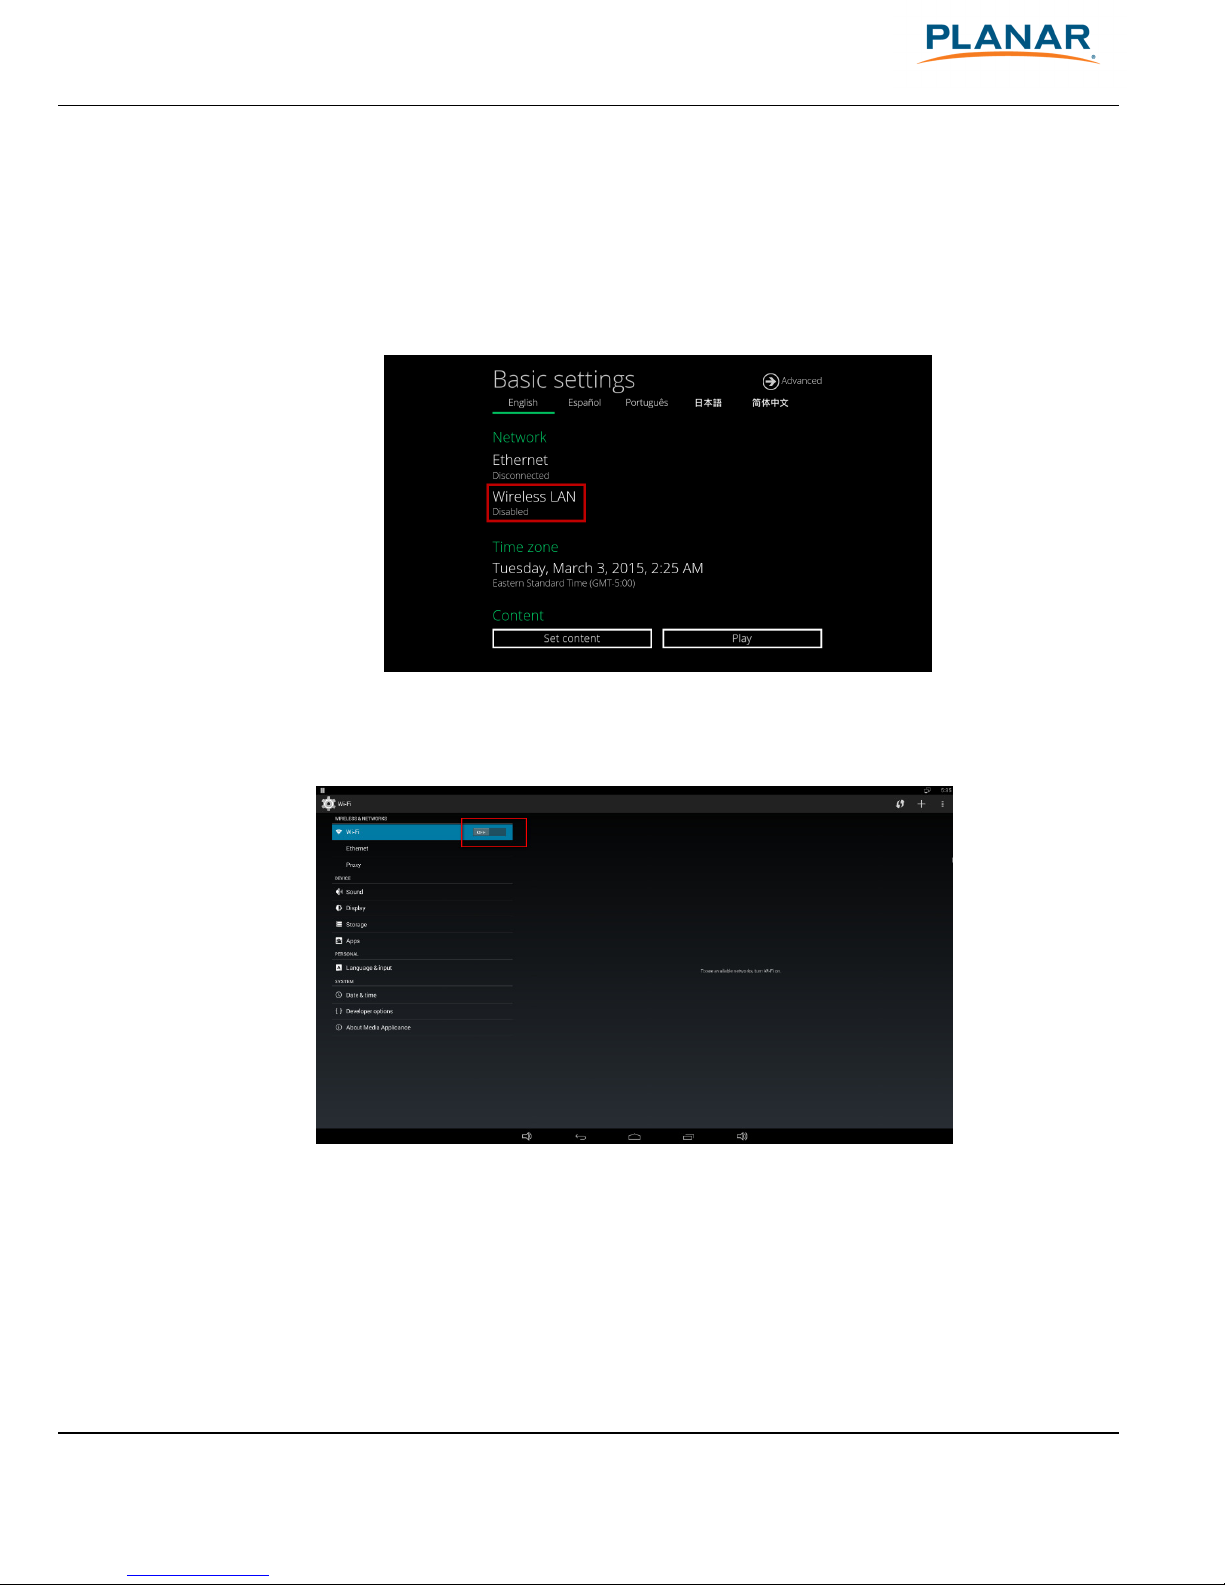
2.3 Connect Player to Your Network ................................................................................... 9
2.3.1
Wireless connection ......................................................................................................... 9
2.3.2
Static IP – manually assign network IP address ................................................... 10
2.3.3
Wired connection ............................................................................................................ 11
2.3.4
Proxy settings ................................................................................................................... 12
2.3.5
Show IP settings .............................................................................................................. 14
2.4 Time Zone Settings ......................................................................................................... 15
2.5 Content Settings .............................................................................................................. 15
2.6 Player Information ........................................................................................................... 18
2.7 Content Configuration – AppStart............................................................................. 19
2.8 Content Configuration – FailSafe ............................................................................... 20
2.9 Content Configuration – EasyPlay ............................................................................. 21
2.10 Display Settings .............................................................................................................. 25
2.11 Sound Settings ................................................................................................................ 28
2.12 Access Configuration – Player Name ...................................................................... 29

Planar ContentSmart MP60 User Manual 2
2.13 Access Configuration – Security ............................................................................... 30
2.14 Scheduling Configuration – Time and Date ......................................................... 31
2.15 Scheduling Configuration – Time Server .............................................................. 31
2.16 Scheduling Configuration – Scheduled Re oot ................................................. 32
2.17 System Configuration - Firmware Update ............................................................ 33
2.18 System Configuration – Expansion Storage ......................................................... 34
2.18.1
Manual Expansion........................................................................................................... 34
2.18.2
Auto Expansion ................................................................................................................ 36
2.19 System Configuration - Factory Reset .................................................................... 37
2.19.1
Using the reset utton .................................................................................................. 37
2.19.2
Using a USB mouse......................................................................................................... 37
2.20 System Configuration – Power Save ....................................................................... 38
2.21 System Configuration – Auto Recovery ................................................................. 39
3
Content Management ................................................................................................................................ 39
4
Authoring in HTML5 .................................................................................................................................... 39
5
Working with SMIL ....................................................................................................................................... 40
5.1 Introduction ....................................................................................................................... 40
5.2 www.a-smil.org for Developers .................................................................................. 40
6
MP60 Specifications ..................................................................................................................................... 40
7
Technical Support......................................................................................................................................... 42
7.1 FAQ ........................................................................................................................................ 42
7.2 Planar Support .................................................................................................................. 45
7.2.1
Ca les and Accessories ................................................................................................. 45
7.2.2
Contact Planar .................................................................................................................. 45

Planar ContentSmart MP60 User Manual 3
1
Overview
This document descri es the hardware operation of the Planar® ContentSmart™ Media Player
MP60, system set-up and frequently asked questions.
1.1
Feature Highlights
The Planar ContentSmart MP60 is a Full HD (1920 x 1080) high definition digital signage media
player featuring and industrial-grade mechanical design, versatile open-standard HTML5 and
SMIL programma ility.
•HDMI-in for custom live content display
•Full HD 1080p hardware decoding of MPEG1/2/4, H.264 and VC-1 media formats
•8GB on- oard flash local storage with MicroSD expansion slot
•Integrated audio and video output via HDMI
•3 USB ports
•Built-in wireless /g/n network
•Support for HTML5 widgets for dynamic content (W3C Widgets standard)
•Industry-leading W3C SMIL support for developers
•Supports full POPAI Screen Media Formats Standards profiles S1 to S12, and E1 to E8
•Multiple 3
rd
party software solution compati ility

Planar ContentSmart MP60 User Manual 4
1.2
Package Contents
NOT INCLUDED: A USB mouse is required for system setup
1.3
Installation
1.3.1
ttach wireless antenna
Attach the wireless antenna as shown elow, then screw antenna clockwise onto the post.
Media Player Unit
HDMI
Ca le
Wi
-
Fi Antenna
Velcro (2 sets)
Power & micro SD card rackets
AC Adapter
(with US power plug)

Planar ContentSmart MP60 User Manual 5
1.3.2
Mounting Option: [ ttach on the back of
the monitor using Velcro]
Separate the Velcro pads and stick on the ottom of player. Stick the other Velcro pads onto the
ack of monitor, then attach the player to it. Use HDMI ca le to connect player and the monitor.
1.4
Physical View

Planar ContentSmart MP60 User Manual 6
1.4.1
Physical features (left to right in
previous illustration)
•Reset utton to perform factory reset
•Micro SD card slot
•3.5mm Audio out
•HDMI 1.4 connector for digital video and audio com ined INPUT
•Micro USB for ADB, Android de ug console port
•3 x USB ports for USB content update and configuration
•Power/Status LED indicator
•Ethernet port for network content update
•RS232 port for display control
•DC input port
•Wireless antenna post
•Kensington lock
•S/PDIF Audio out
•HDMI 1.4 connector for digital video and audio com ined OUTPUT
•VGA out

Planar ContentSmart MP60 User Manual 7
2
Configuring the Player
2.1
System Connections
Connect to a monitor via a HDMI or VGA ca le.
When using an HDMI connection, audio is sent along with video over the HDMI ca le,
so no additional ca les are required.
Attach the AC power adapter to power on the unit. After approximately 15 seconds the ooting
animation will e displayed on screen as shown elow:
The oot-up process takes approximately 40 seconds to complete.
Figure 2.1.1
Figure 2.1.2

Planar ContentSmart MP60 User Manual 8
After oot-up completes, player will stay in Basic settings menu if no content service has een
configured (i.e. first oot-up for rand new unit or after a factory reset).
Note: If you have already sent content to the player, content will play ack
automatically after 15 seconds after oot-up.
2.2
Basic Settings
A USB mouse must e attached to the player to configure settings. If the display has a HID-
compliant touch screen, a USB mouse is not required and all the click action can e replaced y
tap actions.
Figure 2.2.1
Basic settings:
Network
Time zone
Content
Each time the Basic settings menu is entered, play ack will automatically egin after 15 seconds
if content services have een previously set. Auto play ack can e canceled y clicking on the
utton efore the countdown ends.
User is a le to enter Advanced Settings y clicking the Advanced utton.
To enter the menu system at any time during pla back, plug in a USB mouse and
hold the left mouse key in the corner area as shown elow for 10 seconds. If the
player has touch screen, tapping and holding in the corner areas for 10 seconds
will also ring you to the menu.
Please note. Player will ask for password if password has een configured.
Figure 1.2.2

Planar ContentSmart MP60 User Manual 9
2.3
Connect Player to Your Network
2.3.1
Wireless connection
Click the Wireless LAN setting to launch the wireless configuration UI.
Figure 2.3.1
Click the ON/OFF utton as indicated elow to turn ON Wireless interface (network).
Figure 2.3.2
The player will scan for wireless signals near y and availa le access points will e listed.

Planar ContentSmart MP60 User Manual 10
Figure 2.3.3
Click on the network ID to connect. If the network requires authentication, you will e asked to
provide a password.
Figure 2.3.4
2.3.2
Static IP – manually assign network IP
address
1
Check the ox that says "Show advanced options"
Figure 2.3.5

Planar ContentSmart MP60 User Manual 11
Click down arrow to hide key oard if needed.
You can also scroll down/swipe to see the rest of the menu.
2
Under IP settings, change DHCP to Static.
Figure 2.3.6
3
Fill the form and click Connect to complete the setting.
(Scroll down/swipe to see the rest of the menu if needed)
Figure 2.3.7
2.3.3
Wired connection
To use the wired Ethernet connection, connect an Ethernet ca le. Ethernet connection takes
priority over wireless connection.
DHCP – Automatically assign network IP address

Planar ContentSmart MP60 User Manual 12
1
Turn on Ethernet y checking the “Use Ethernet” ox. If using DHCP, no
further action is required.
Figure 2.3.8
Static IP – Manually assign network IP address
1
Click Static IP Settings to configure static IP address.
Figure 2
2.3.4
Proxy settings
1
In Basic settings, click the Advanced utton and the advanced configuration
menu will e launched.

Planar ContentSmart MP60 User Manual 13
Figure 3.10
2
Click Network, then click Advanced.
Figure 2.3.11
3
Proxy setting menu will e launched. Input proxy hostname and port, then
click Done to finish configuration.

Planar ContentSmart MP60 User Manual 14
Figure 2.3.12
2.3.5
Show IP settings
1
In Basic settings, click the Advanced utton and the advanced configuration
menu will e launched.
2
Click Network, then click Show IP.
Figure 2.3.13
3
This feature is to control whether the IP address is displayed in the Basic
settings menu. This is ena led y default. When disa led, asic settings will
display “connected” instead of the assigned IP address.
Figure 2.3.14

Planar ContentSmart MP60 User Manual 15
2.4
Time Zone Settings
1
In Basic Settings, click Time zone.
Figure 2.4.1
2
Choose the correct time zone from the availa le options.
Figure 2.4.2
2.5
Content Settings
1
Click the Set content utton.

Planar ContentSmart MP60 User Manual 16
Figure 2.5.1
2
Input the SMIL/HTML5 content URL and click Set. It will return to Basic
Settings automatically.
Figure 2.5.2
3
The player will check the availa ility of SMIL/HTML5 content URL, with the
Pla utton showing Checking…
The checking action can e canceled y clicking Checking… utton. It will change ack to
Pla .

Planar ContentSmart MP60 User Manual 17
NOTE: It is highly recommended to let the player check the availa ility of the content URL.
Clicking Pla utton with a ad/invalid URL set will cause the player to re oot if the
FailSafe function is not configured.
Figure 2.5.3
4
If the SMIL/HTML5 content URL is availa le, the Pla utton will change to a
15-second countdown and the play ack will start after the countdown. The
countdown can e canceled y clicking the utton.
If it keeps showing Checking… for a long time, go ack to Set content to check if the URL
is correct.
Figure 2.5.4

Planar ContentSmart MP60 User Manual 18
2.6
Player Information
Users can check the player’s asic information including the Health status, Firmware version,
Player ID and storage capacity.
1
Click the Advanced utton and the advanced configuration menu will e
launched.
Figure 2.6.1
2
Click on Information. The definitions of the Health Status are:
Green – Normal. The device is connected to the URL server.
Blue – Local. The device is playing content from the USB drive or SD card.
Gray – Disconnected. The device is disconnected.

Planar ContentSmart MP60 User Manual 19
Figure 2.6.2
2.7
Content Configuration – ppStart
Users can assign the URL and APP for execution right after the system starts up.
1
Click the Advanced utton. (Figure 2.6.1)
2
Click on Content, then click on AppStart.
3
Enter the valid URL of HTML/SMIL in AppStart (Figure 2.7.1). If you already
configured SMIL/HTML5 content URL via ”Set content” (Figure 2.5.2), the URL
would e shown here.
4
The Advanced option is used for 3rd-party App configuration only.
Table of contents
Other Planar Media Player manuals