Playlearn BT180 User manual

Page 1of 4
Product Name: Round Bubble Tube 6’/ 180cm Specification: Required:
Product Code: BT180 Size: H180cm Dia15cm Approximately 27 Litres of Distilled Water
Weight: 16kg without water 38kg weight with water.
Material: Tube: Acrylic Base: Stainless Steel
LED: 12 non –replaceable multi coloured LEDs
Bulb Rating: 12V/ 1W
Input: 230 –240V
Output: 12Vac –1800mA
Contents:
1. Tube
2. Lid
3. Base
4. Air pump
5. 12v adapter
6. Remote Control
8. Plastic Air Tubing
9. Fish
10. Manual Pump
11. Water pipe
WARNING!
•Contains sequences of flashing lights may affect individuals who are susceptible to photosensitive epilepsy or other photosensitivities.
•This item is to be installed by a competent, experienced installer only, assistant of competent adult maybe required when assembling.
•This product is not a toy, to be used under adult supervision only.
Safety Warnings:
•Before you start, please read these instructions carefully and retain for future reference. Check the contents inside the packaging and ensure you
have all the required parts listed and there are no missing parts. If any parts are missing DO NOT attempt to assemble the product.
•Before setting up, ensure the product is not damaged. If any part of the product is damaged, do not attempt to assemble and use.
•Remove all packaging before setup. Do not operate in packaging.
•Do not attempt to hardwire this product to the mains electrical supply. This product does not require to be connected to your mains electrical supply.
It operates using a transformer.
•Only use the transformer supplied with this product and no other transformer must be used.
•This product contains non-replaceable LEDs. If any of the LEDs cease functioning, the whole unit must be disposed of according to your local council
guidelines.
•This is not a toy. Contains small parts, potentially may cause choking hazard. Water pipe and wires could potentially be a risk of strangulation.
•Keep away from heat sources or naked flame, keep away from children and pets during assembly and when not in use.
•Ensure cable is placed such that no trip, entanglement or strangulations hazards are likely to occur.
•Place the tube where it cannot be knocked over. It is recommended to secure the tube to a solid wall with a bubble tube bracket (sold separately)
using correct fasteners for your wall type.
•DO NOT use live fish in this tube.
•DO NOT attempt to move the product when filled with water or when plugged to the mains.
•ALWAYS disconnect from the mains when cleaning or changing the water.
•This product contains moving parts, some noise and vibration is expected.
•Persons (including children) with reduced physical, sensory and mental capacities, or lack of experience and knowledge, MUST BE supervised by a
competent person responsible for their safety.
•Although the unit has been designed for use by people with special needs, however this does NOT mean it is unbreakable. Responsible person MUST
ensure that unit is not hit with anything and that no one pulls or pushes the unit.
Instructions
1) Before you start, please read these instructions carefully and retain for future reference.
2) Carefully unpack the product, remove the contents and lay them out on a cardboard or other protective surface to avoid damage. Ensure all contents
listed are present before setting up.
3) As this product is not required to be hardwired, an adaptor is connected, therefore ensure a plug socket is within reachable distance, without
stretching the wire too much.
4) Place the base on a flat surface in a position where you can access the back of the opening to the base.
5) Unscrew the 3 screws on the plate on the back of the base. Place the round metal disc and screws in a safe place, as this will be required later.
6) Insert the tube (1) into the top of the base, take care not to trap any pipes.
5-6 Agecroft Trading Estate, Langley Road, Salford Manchester M6 6JD
Tel: +44 161 737 5099 Website: www.play-learn.co.uk Help & Support: help@play-learn.co.uk

Page 2of 4
7) Feed the wire of the adapter (5) through the “hole 1” into the base and plug it into silver controller box next to the word “power”.
8) Feed the plastic tubing (8) into “hole 1” and connect to the white/blue plastic tubing inside the base of the tube. Please note the tubing is stiff and will
need a little force to push the pipes together. This is done intentionally to create a firm fit.
9) Attach the double end of the tubing to the 2 prongs coming out the air pump. Push the tubing firmly onto the air pump, the fitting is stiff intentionally.
10) Plug into mains socket the air pump (4) and the 12V adaptor (5)
11) For safety reasons ensure the plugs are at least 1m away from the tube and are always kept dry.
12) Remove the lid to the tube, and fill the tube with water, approximately 10% full, for now.
13) Switch on. Bubbles should start coming out and lights will turn on. If one of the jets is not letting out bubbles or lights are not coming on, please refer
to troubleshooting section.
14) Once you are happy with the flow of bubbles, screw the round disc back onto the base.
15) With an adult assistant, carefully move the entire tube and base together to the desired location. Recommended position would be against a wall.
16) Fill the rest of the tube with water, only fill up to the MAX lined marked on the tube. Add the fish.
17) To increase or decrease the flow of bubbles, the wheel on the pump can be adjusted. Please note the fish will not move with few bubbles.
Please note: If you would like the noise reduced further for this bubble tube, we strongly suggest turning the dial down on the pump till you achieve the
required noise and not using the product with fish. (Fish will not move when pump is set to low).
Remote Control Functions
7
8
Increase/decrease light
brightness
Play/pause any dynamic
colour changing pattern
Turn lights On/Off
Selection of solid colours in
static mode
Cycles through all colours randomly (speed can
be adjusted)
Quick flashes all colours randomly (speed can
be adjusted)

Page 3of 4
To change the battery in the remote, please follow the instructions on the reverse of the remote.
Emptying and Changing Water
Whilst this product has been designed to work well with tap water, the product will need higher maintenance due to algae and the water becoming cloudy. The
water will need changing approximately once every few months. By using distilled water, the water will stay cleaner for longer.
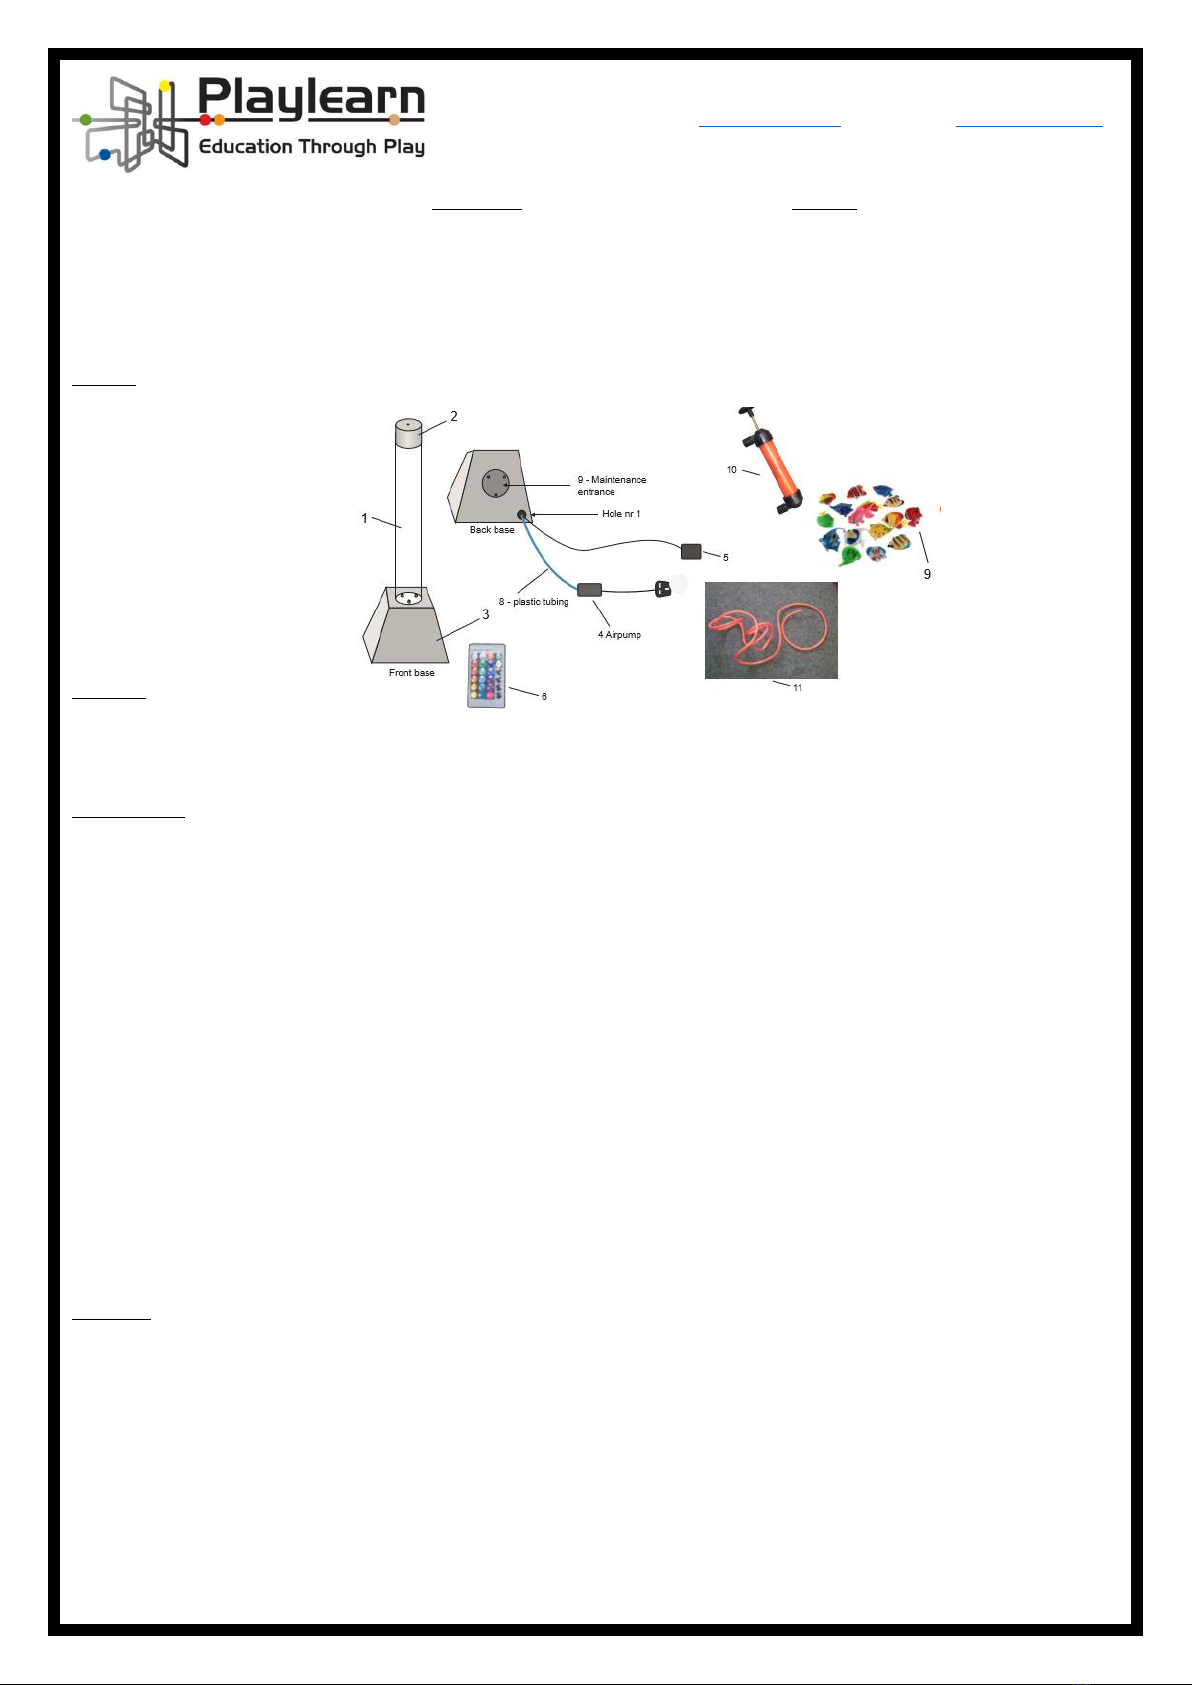
We have provided a manual air pump (10) and a water pipe (11) to aid in emptying your bubble tube. Attach the pump to the pipe and place the other end of a
pipe deep into the tube. Place a large bucket on the floor (or at a lower point than the end of the pipe) and start pumping until the water starts flowing freely.
You can now remove the manual air pump and allow the water to continue flowing. If the water stops, ensure the end of the pipe is lower than the pipe that is
in the tube and use the pump again to start the flow of water. When the water is nearly drained, either drain the rest of the water by removing the valves
(turning them anti-clockwise until they come out) or very carefully tip the water out from the top of the tube. If your water tube has kinks or is twisted then you
can place in a bowl of hot water for around a minute, remove from bowl and pull straight, this will help straighten the tube out.
Troubleshooting
Here at Playlearn we have spent many years developing our bubble feature range to ensure they are trouble free. We want you to completely be satisfied with
your purchase and we invite any questions and concerns you may have. Please e-mail us at sales@play-learn.co.uk or call 0161 737 5099. The product is
delicate and needs maintaining for longevity. Please note the section ‘Distilled Water vs Tap Water’ below. Anytime maintenance is required or the water
needs changing, we recommend 2 persons to do this.
Cracked tube: If for any reason your acrylic tube is cracked please contact Playlearn to discuss the option of receiving a replacement. Do not discard it until the
new one is received as parts may be needed from the cracked panel. We may also require the cracked panel to be returned to us.
No bubbles coming out or bubbles coming out slowly: Is the pump plugged in and switched on? Is the pump making a noise? If there is no sound coming from
the pump, please contact Playlearn. If the pump is making a noise, first check to ensure the white pipes have not been trapped or have any kinks in them.
Remove the pipes attached to the pump and feel with the back of your hand if air is coming out. If air is coming out, reattach pipes and check at the other end to
ensure the pipes leading into the tube are letting out air. If air is coming out of both exits, please refer to the trouble shooting below regarding blocked jets.
Bubbles Coming Out Slowly
At the end of the pump there is a dial (13) please adjust this dial to the flow of bubbles you require. Clockwise for more bubbles, anti-clockwise for less bubbles.
Please note if the pump speed is set to minimum the fish will fail to go up and down. If the pump is set to maximum and bubbles are still coming out slowly,
please follow the guidelines below regarding blocked jets.
Blocked Jets
If all the above fails and the item has been used for some time, it is likely the jets that push the bubbles into the tube have become blocked. This can happen
when using tap water or the water has become cloudy and dirty. Small pieces of debris or algae can become attached to the jets and block the exits. Move the
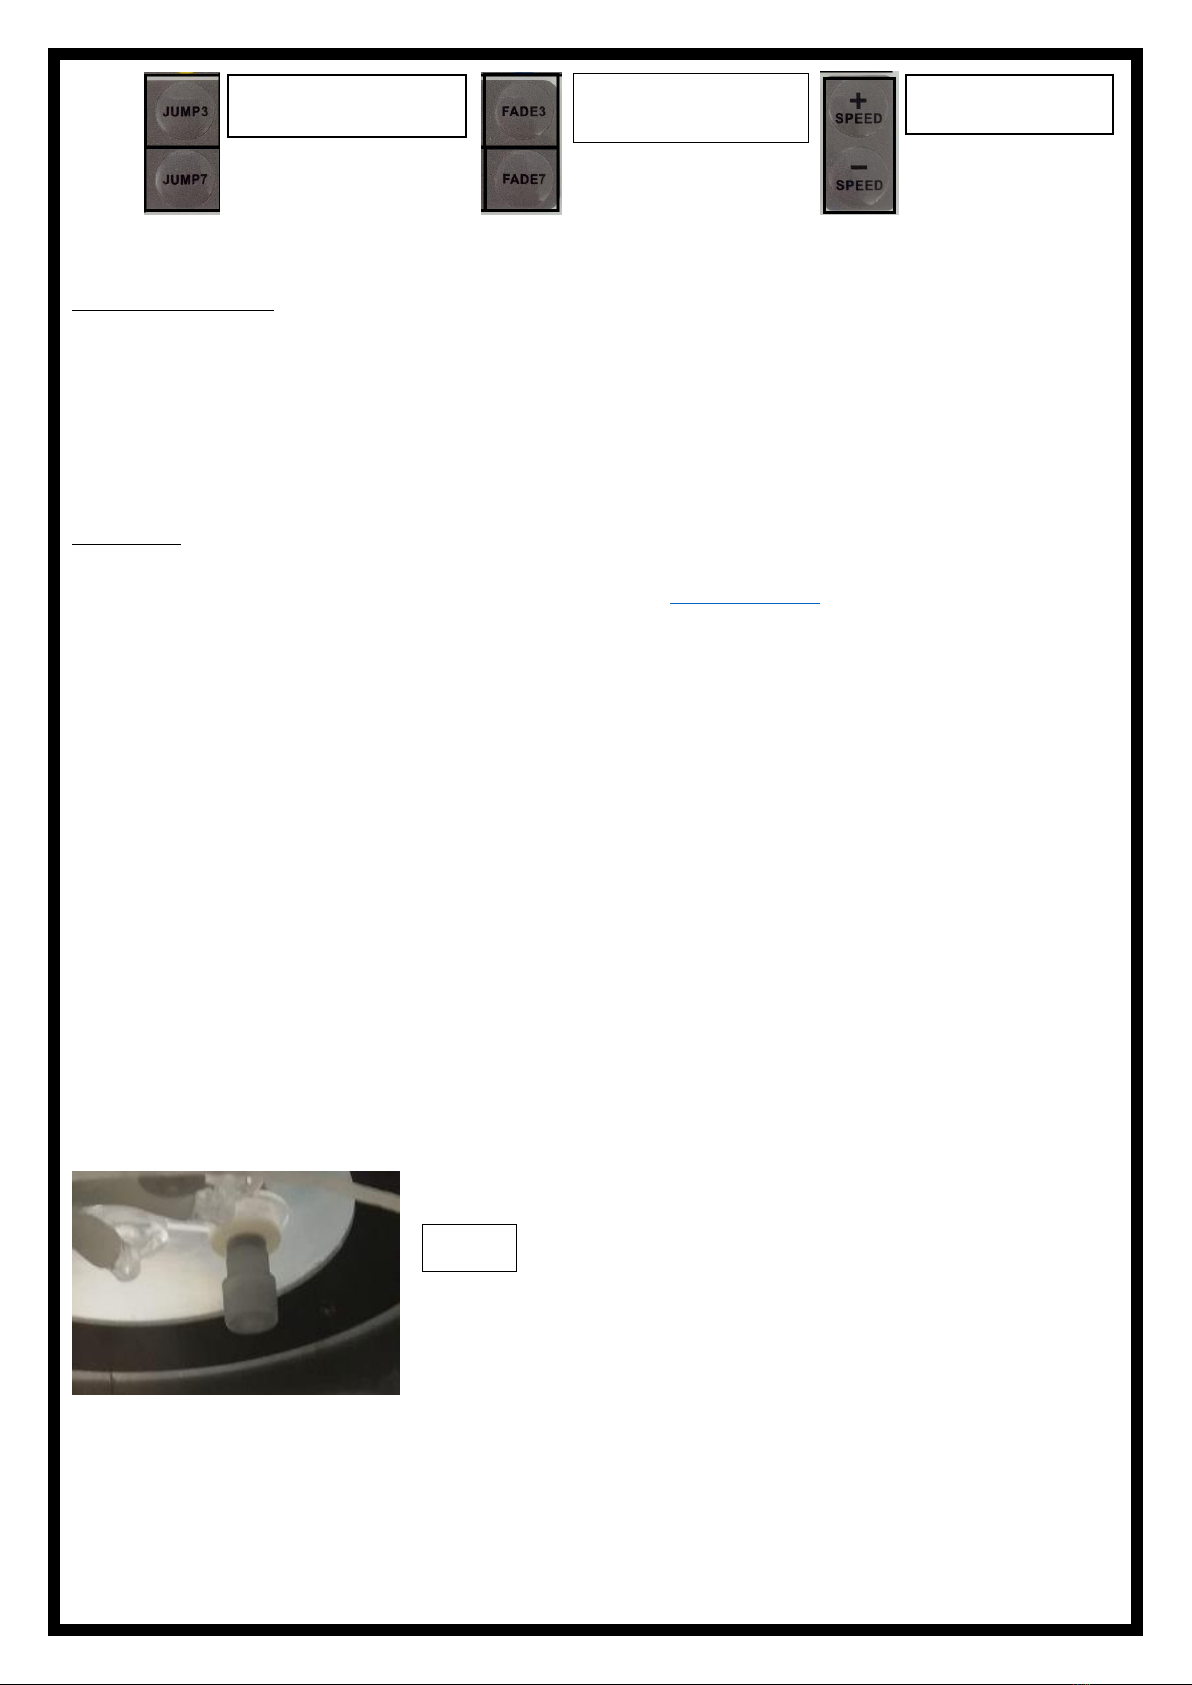
Bubble tube to an area where you can access the back panel and proceed to remove the plate. At the end of the bubble tube (inside the base) you will have
access to 3 plastic screws, these are the valves (photo below) sometimes these can close and stop the bubbles coming through the jets. You can turn the valves
to open and close them.
To unblock the jets you will need to turn all the valves off (anti-clockwise) then turn the first valve on fully leaving it for around one minute, turn this valve off
and do the same with the second and third valve. Now you will need to reset the valves and to do this we need to get an even level of air through each valve at
the same time. Ensure all valves are off, go to your first valve and turn this on (clockwise) just a little, go to the second and turn that on a little, then the third,
go through the sequence again and again, providing an even amount of air flow through each valve until you have reached your required amount of bubbles. If
you turn one valve and it reduces bubbles from another jet, turn that valve back down again.
Remote control not functioning: The remote control is designed to change the light colours and strobing patterns. It will not turn off the bubbles. If the lights
are on but they are not changing with the remote control, try going a little closer to the bubble tube. If it still does not work, please change the battery. If this
fails to fix the problem, contact Playlearn for a replacement remote. If the new remote still does not fix the problem, the controller box may need replacing.
Please contact us for further help.
No light: 1. If the black adapter has been plugged into the white wire inside the base then the lights will not work. Run your finger around the outside of the
silver controller box until you find a hole and plug the black adapter end directly into this hole. 2. Ensure they have not been turned off using the remote. If
they do not come on, touch the adaptor and see if it feels warm. If it is cold, check if it is switched on and it is pushed firmly in the socket. If it still does not work,
contact us for a new adaptor. If the adaptor is warm check the end the wire leading into the silver control box, remove and reinsert it and press the on button on
Valves
Increase/decrease speed
on all dynamic modes
Trio or seven colour fade
(speed can be adjusted)
Trio or seven colour instance
change (speed can be adjusted)

Page 4of 4
the remote control. Check that the connection at the top of the silver controller box and the plastic connector to the lights is secure. If this still does not resolve
the problem, please contact us for a new silver controller box.
Warranty Information
Thank you for choosing our product. All of our products are constructed from the highest quality materials. In the event that we have not achieved our usual
standard of excellence, we will repair or replace, at our discretion, within 12 months from the date of purchase. Valid proof of purchase, with the purchase date
clearly indicated, must be provided. Photos of defective merchandise will also be required to help us evaluate the actual cause of the defect. Please read below
for a detailed description of warranty coverage. Please note, if the product fails in any way, only the part that has failed will be replaced, we will not replace the
entire unit.
Water Damage: Our products are not manufactured to withstand extreme temperatures. Improper storage that allows water to freeze within a product may
cause damage and is considered negligence and is therefore not covered under this warranty. The use of “hard water” and/or caustic cleaners can affect the
paint or other finishes. Failure to keep the unit clean or use of additives/cleaners will also void the warranty. As with any product, all finishes with time will
gradually fade and discolour. The warranty will only cover against severe or complete fading within the first year from date of purchase.
Not Covered Under the Warranty: The limited warranty will NOT cover cases of damages due to 1. Damages caused in transit 2. Inadequate care and/or neglect
3. Environmental and/or natural elements 4. Immersion in water, unless specified 5. Improper Installation/Storage and/or Maintenance. This warranty is void if
the product has been damaged by accident, misuse, negligence, improper installation and/or modifications have occurred. This includes any and/or all defects
arising out of freezing water damage, hard water damage, failure to keep the unit clean and free of harmful additives such as bleach or chlorine, which affects
the paint and/or parts. This warranty also does not cover any additional charges or installation, removal, disposal and/or shipping costs or consequential damage
associated with any warranty claim.
Battery Warnings! Batteries should only be inserted or changed by an adult. Do not use rechargeable batteries. Non-rechargeable batteries are not to be
recharged. Be sure to insert batteries with the correct polarities and always follow the product and battery manufacturers’ instructions. Remove batteries from
product before extended storage. Always remove old or exhausted batteries from the product. The supply terminals are not to be short circuited. Check that the
contact surfaces are clean and bright before installing batteries. Do not bury or burn batteries. Recycle used batteries responsibly. Do not dispose of in
household waste.
Disposal: The “Crossed Wheelie Bin” symbol on the product means that the product is classed as Electrical or Electronic equipment and should not be disposed
with other household or commercial waste at the end of its useful life. The goods must be disposed of according to your local council guidelines.
To avoid the tube being knocked over, it is recommended to secure the tube to a solid wall with a bubble tube bracket (sold separately). Please contact a
representative at Playlearn Ltd 0161 737 5099 for further details.
Please retain this information for future reference.
Table of contents
Other Playlearn Toy manuals
Popular Toy manuals by other brands

marklin
marklin 36790 user manual

TILLIG BAHN
TILLIG BAHN 83391 Assembly instructions

Eduard
Eduard Me 410B quick start guide

MGA Entertainment
MGA Entertainment Moxie Girlz Horse Riding Club Stable manual

Black Horse Model
Black Horse Model dornier DO335 instruction manual

East R/C
East R/C SLEDG instruction manual