Plextor PX-504A User manual

ATAPI DVD+R/RW AND CD-R/RW DRIVE
INSTALLATION AND USERS MANUAL
FEBRUARY 2003
Model PX-504A

Plextor reserves the right to make improvements in the products described in this
manual at any time without prior notice.
Plextor makes no representation or warranties with respect to the contents hereof
and specifically disclaims any implied warranties of merchantability or fitness for
any particular purpose. Further, Plextor Corp. reserves the right to revise this manual
and to make changes in its content without obligation to notify any person or
organization of such revision or change.
This manual is copyrighted, all rights reserved. It may not be copied, photocopied,
translated, or reduced to any electronic medium or machine-readable form without
Plextor’s prior permission.
Manual copyright ©2003 Plextor Corp. First edition, February 2003.
Licenses and Trademarks
Plextor and the Plextor logo are registered trademarks of Plextor Corp. All other licenses and
trademarks are property of their respective owners.
Record Your Serial Number
For future reference, record the serial number and the TLA code (found on your
drive’s label) in the space provided below.
TLA/Firmware Revision Number

FCC NOTICE
This equipment has been tested and found to comply with the limits for a Subpart B digital device,
pursuant to Part 15 of the FCC Rules. These limits are designed to provide reasonable protection against
harmful interference in a residential installation. This equipment generates, uses, and can radiate radio
frequency energy, and, if not installed and used in accordance with the instructions, may cause harmful
interference to radio communications. However, there is no guarantee interference will not occur in a
particular installation. If this equipment causes harmful interference to radio or television reception, which
can be determined by turning the equipment off and on, the user is encouraged to try to correct the
interference by one or more of the following measures:
• Reorient or relocate the receiving antenna.
• Increase the separation between the equipment and receiver.
• Connect the equipment into an outlet on a circuit different from that to which the receiver is
connected.
• Consult the dealer or an experienced radio/TV technician for help.
Any changes or modifications should be approved by the party responsible for compliance of FCC Rules;
otherwise, the user loses authority to operate the equipment.
LASER INFORMATION
These products have been designed and manufactured according to IEC 60825-1 on the Safety of Laser
products. This product comes under “Class 1 Laser Products.”
CAUTION: Use of controls or adjustments or performance of procedures other than those
specified herein may result in hazardous radiation exposure.
A Laser Caution Label is attached on the top of the internal drive model. The label reads:
“CAUTION – CLASS 3B RADIATION WHEN OPEN. AVOID EXPOSURE TO THE BEAM.”
Detail of Laser Caution Labels Top View of Drive Showing Location of Laser
Caution Labels
The laser beam emitted from the optical pickup is invisible. Accordingly:
• Do not open the optical pickup housing.
• Obtain service only from Plextor-authorized personnel.
CAUTION: To disconnect the drive from an electrical current, pull out the power plug.

Ü
G-Vfg.243
VORSICHT: DIE TRENNUNG VOM NETZ ERFOLGT DURCH ZIEHEN DES NETZSTECKERS.
Zur Einhaltung der Funk-Entstörung von nicht selbständig betreibbaren
Hochfrequenzgeräten (periphere Anlagenkomponenten).
Dieses Gerät entspricht als Einzelgerät den Funk-Entstöranforderungen der
Postverfügung Nr. 243/1991.
Wird das Gerät innerhalb einer Anlage zusammen mit anderen Geräten
betrieben, so muss bei Inanspruchnahme der “Allgemeinen (Betriebs-)
genehmigung”nach der BMPT-AmtsblVfg Nr. 243/1991 die gesamte
Anlage folgenden Richtlinien entsprechen:
• Grenzwertklasse B der EN55022
• Auflagen nach §2 der BMPT-AmtsblVfg 243/1991
Dies ist bei der Zusammensetzung einer Anlage (z.B. Computersystem) aus nur einzeln geprüften Geräten
nicht immer erfüllt.

PX-504A Installation and Users Manual v
Table of Contents
1. Getting Started.................................................................................................1
About this Manual..............................................................................................1
Meet Your PX-504A..........................................................................................1
What the PX-504A Does................................................................................1
Features of the PX-504A................................................................................2
Minimum Configuration to Use the PX-504A............................................... 3
What You Can Do with the PX-504A............................................................3
What’s In the Box ..............................................................................................4
Save Your Box!.............................................................................................. 4
PX-504A Drive Features and Controls ..............................................................5
Front Panel.....................................................................................................5
Rear Panel...................................................................................................... 6
About Software.................................................................................................. 7
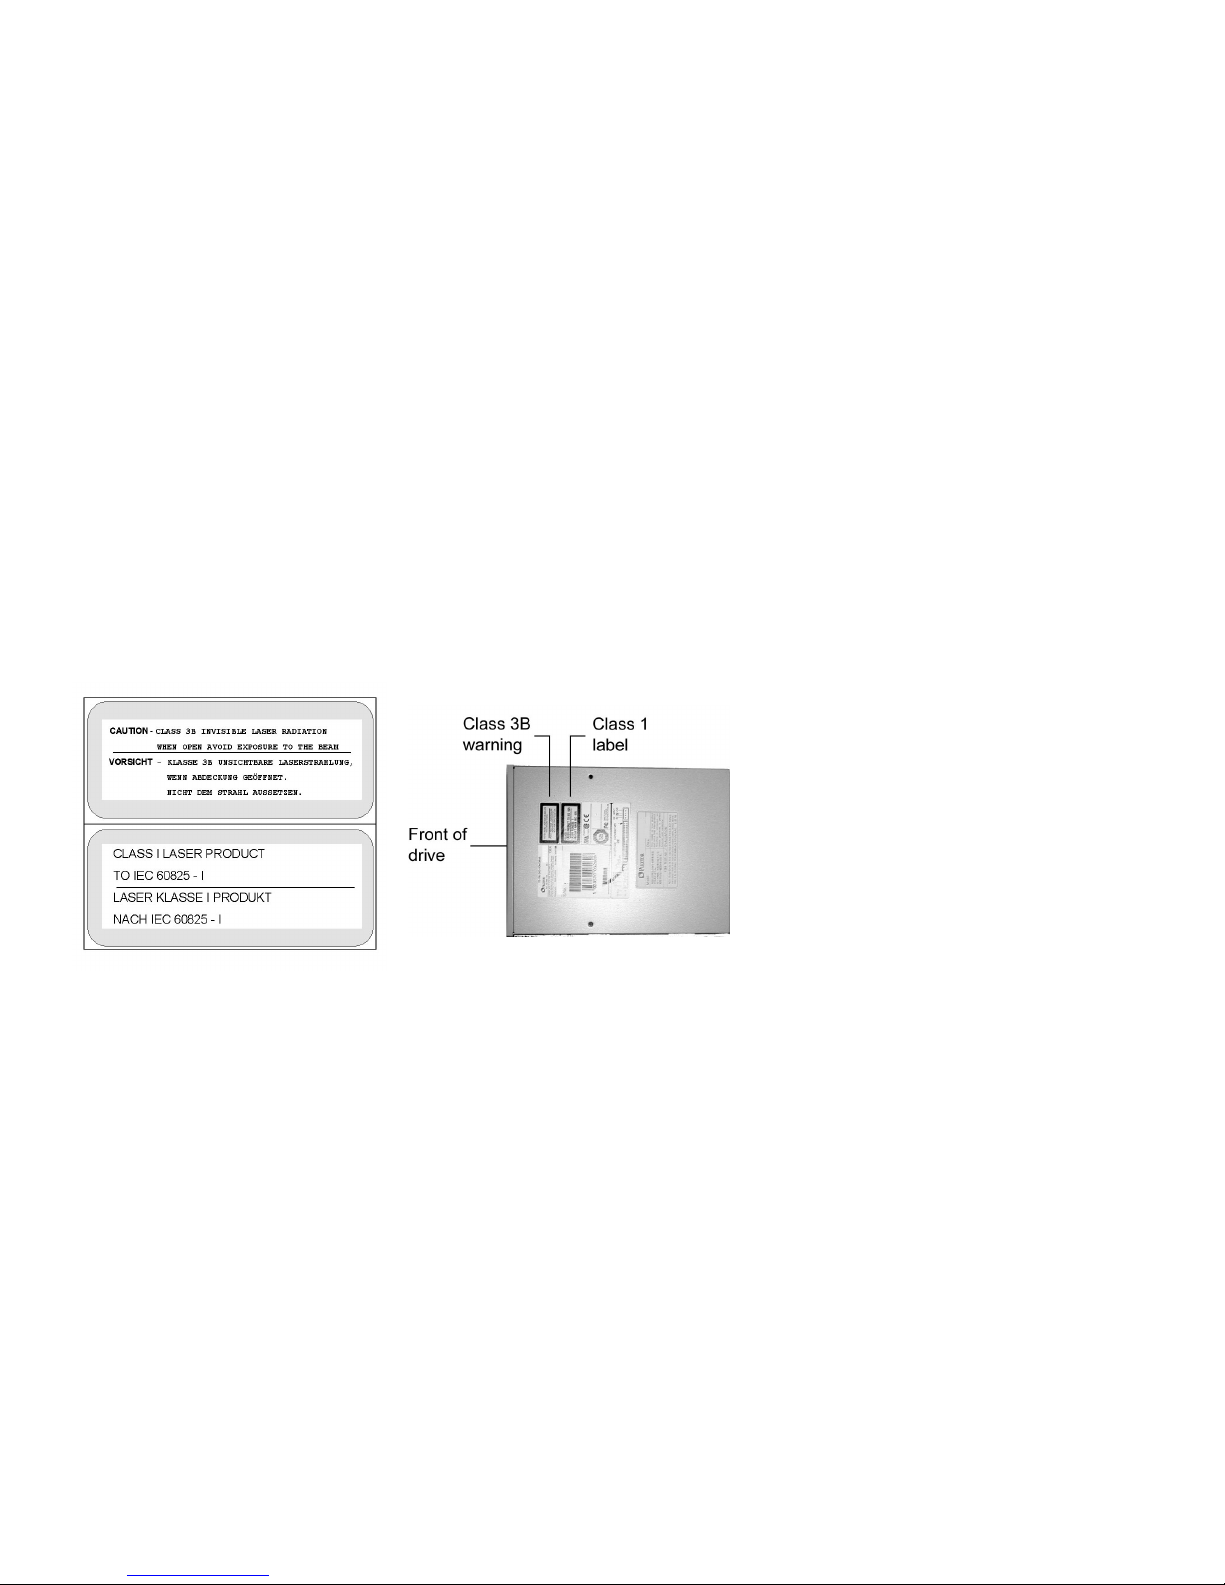
Precautions......................................................................................................... 7
2. Installing Your PX-504A.................................................................................9
QuickStart Installation—For Experienced PC Users Only............................ 9
Open the Computer and Prepare for Installation................................................9
Determine Your Existing IDE Configuration .................................................... 10
Set the Drive’s Mode Jumper............................................................................. 11
Changing the Mode Jumper on Your Internal PX-504A Drive......................11
Select an IDE Configuration..............................................................................12
About Cable Select.............................................................................................15
Identifying Whether Your System Uses Cable Select....................................16
Locating the Master Position on a Cable Select Cable...................................16
Install the PX-504A Drive .................................................................................16
Record the Serial Number..............................................................................16
Mount the Drive in the Computer ..................................................................16
Using Sound Boards and Audio Cables.............................................................21
Choosing and Connecting Audio Cables........................................................21
Make Sure the Drive Is Recognized................................................................... 22
3. Using Your PX-504A .......................................................................................23
What Media to Use ............................................................................................ 23
DVD Media....................................................................................................23
CD-ROM Media ............................................................................................23
Tray Loading and Operation.............................................................................. 24
Handling DVD and CD Media.......................................................................24
Cleaning Discs ...............................................................................................25
Playing DVDs.................................................................................................... 25
Writing to DVD Media ......................................................................................26
Writing to CD-R and CD-RW Media ................................................................26
Advantages of Buffer Underrun Proof Technology...........................................26

Table of Contents
vi PX-504A Installation and Users Manual
4. Maintenance and Troubleshooting.................................................................27
Upgrading Firmware..........................................................................................27
Troubleshooting .................................................................................................27
Appendix A: PX-504A Specifications.................................................................29
Appendix B: Technical Support..........................................................................35
How to Contact Plextor Technical Support........................................................35
Before You E-mail/Log On/FAX/Call for Support............................................36
Returns ...............................................................................................................36
Contacting Plextor’s RMA Department.........................................................37
Packing Your Drive........................................................................................37
Shipping Your Drive to Plextor......................................................................37
Appendix C: Warranty........................................................................................39
If You’re Outside the U.S. or Canada ................................................................40
Index......................................................................................................................41

PX-504A Installation and Users Manual 1
1. Getting Started
Congratulations! Thank you for purchasing the Plextor®PX-504A a reliable, high-
performance recordable DVD and CD writer, rewriter, and player. We appreciate the
confidence you have shown in us. Our goal is to put you—and keep you—on the
leading edge of DVD and CD technology.
About this Manual
Please read this manual carefully and keep it handy for easy reference. Use the
manual for installation, operation and troubleshooting. If your drive needs service,
see your dealer or call Plextor’s Technical Support Department.
In this manual you should find all the information you need to successfully install,
operate and troubleshoot your drive. If you run into a problem that doesn't seem to be
covered, however, please contact us. (See “Appendix B: Technical Support”for the
different ways you can reach us.) You will be connected to our friendly, helpful band
of tech support engineers. What might seem like an uncooperative drive to you could
very well be a 30-second fix to them. But we will never know unless you contact us.
Meet Your PX-504A
The PX-504A is a recordable DVD/CD-ReWritable drive that provides professional
quality DVD and CD performance for writing, rewriting and reading.
What the PX-504A Does
For DVDs, the PX-504A:
• Writes DVD+R (recordable DVD) media at up to 4X speed.
• Writes DVD+RW (re-writable DVD) media at up to 2.4X speed.
• Supports DVD+VR real time editing.
• Reads DVD discs at up to 12X. (Fixed at 2-5X for video.)
• Supports DVD+RW background format.
For CDs, the PX-504A:
• Writes to CD-R (recordable CD) media at up to 16X speed.
• Writes to CD-RW (re-writable CD) media at up to 10X speed.
• Reads all CD-ROM and CD-R data media at a maximum of 40X speed.
• Reads CD-RW and CD-DA (audio) media at up to 32X speed.

Section 1. Getting Started
2PX-504A Installation and Users Manual
Features of the PX-504A
• ATAPI interface: Easily installs in virtually any PC with an E-IDE ATAPI
interface.
• High speed transfers: Supports PIO Mode 4, DMA Mode 2, and Ultra DMA33.
• MMC compliance: Supports the MMC-3 command set.
• Flash memory: Allows upgrading the PX-504A to the latest firmware revision
(available from the Plextor web site) without opening the computer or physically
accessing the drive.
• Black tray: Reduces the effect of optical distortion on the laser beam, enhancing
read quality.
• Plug and Play: Supports Windows Plug and Play.
DVD Features
• Lossless linking: Allows DVD+RW discs to be edited and still play on DVD-
ROM players.
• Wide DVD+R and DVD+RW media compatibility: Compatible with a wide range
of DVD+R and DVD+RW media.
• DVD+VR: Supports DVD+VR format.
• Multiple DVD types: Supports DVD-ROM, DVD-Video, multi-border for
DVD-RW read, multi-session for DVD+R/RW read and write.
• Versatile recording modes: Including sequential write, random access write, disc
at once.
CD-R and CD-RW Features
• Variety of recording modes: Supports track-at-once, disc-at-once, session-at-
once, and multi-session, as well as variable and fixed packet writing.
• Buffer-Underrun-Proof technology: With 2-megabyte buffer, eliminates buffer
underrun errors, so you can safely use your computer for other tasks while you’re
writing to a CD-R or CD-RW disc.
• Wide compatibility: Wide CD-R and CD-RW media compatibility.
• Orange Book compatibility: Compatible with Orange Book, Parts II and III.
• UDF support: UDF file system implemented through packet writing.
• OPC and ROPC: Optimum Power Control and Running Optimum Power
Control, which adjust the laser power for the optimum write strategy.

Section 1. Getting Started
PX-504A Installation and Users Manual 3
Minimum Configuration to Use the PX-504A
• Computer: Pentium III 500-MHz CPU or faster.
• Minimum RAM: 128 MB.
• Hard disk size: To write to a CD in image mode (that is, to write an image of a
CD to your hard disk), you need 1 GB of free space. For a DVD, 6 GB of free
space is recommended. (For more accurate guidelines, see the help files or
documentation for the recording software you’re using.)
• Operating System: Windows XP, Me, 2000, 98, 98SE.
What You Can Do with the PX-504A
Just look at some of the things you can do with your PX-504A:
• Record slide shows or digital video onto DVD+R and DVD+RW discs.
• Play DVD+R, DVD+RW, DVD-R, and DVD-RW discs.
• Record data or audio onto writable or rewritable CD media.
• Play music CDs.
• Save photos and other images on rewritable or writable CDs.
• Create a CD or DVD “sneakernet”to share information with colleagues—just use
software such as Roxio’s DirectCD to drag and drop files onto DVD+R,
DVD+RW, CD-R or CD-RW media, then continue adding files and sharing the
same disc.
• Archive images and video to DVD or CD.
• Master new software programs on DVD or CD.

Section 1. Getting Started
4PX-504A Installation and Users Manual
What’s In the Box
What you find in your Plextor box depends on what the company that sold you the
box put in—or took out—while the Plextor drive was in their possession.
Plextor currently sells its drive in this configuration:
• PX-504A DVD+R/RW and CD-R/RW drive
• 40-pin IDE ribbon cable
• 4 mounting screws
• Extra jumper
• Emergency eject tool
• 1 piece of approved CD-R media
• 1 piece of approved DVD+R media
• Plextor CD with bundled software for writing DVDs and CDs
• PX-504A Installation and Users Guide
If the security sticker on top of your
box is cut, there may be a good
reason: for example, a dealer may
have added other components or
software. Carefully check the
contents to ensure nothing has been
removed. If something is missing,
contact the party from whom you
purchased the box for an explanation.
NOTE: This applies to the Plextor
retail box. Your drive may have been
shipped in a different box with other
contents, depending on whom you
purchased the drive from and what
they included inside the box.
If your drive came pre-installed, some or all of the items above may have been
installed and may not be separately available. See the Plextor web site for locations
to purchase additional or replacement accessories.
Save Your Box!
Be sure to save the box after you have
installed your drive. The box and its
packaging material were designed and
drop tested to ensure your can endure
rough treatment and still arrive in
working order. If you have to ship your
drive back to Plextor, you’ll want to
send it in the original box. (For more
details about returning your drive to
Plextor, see page 36.)

Section 1. Getting Started
PX-504A Installation and Users Manual 5
PX-504A Drive Features and Controls
Before proceeding, become familiar with the controls and features of your Plextor
drive. Match the parts of your drive to the illustrations below.
Front Panel
Figure 1: Front Panel of the PX-504A Drive
• LED indicator: Illuminated green for disc loading, ejecting, initializing, playing,
and writing. Also illuminated green when Buffer Underrun-Proof technology is
operational.
• Tray front door: Attached to tray drawer.
• Headphone jack: Stereo mini-jack for headphones and powered speakers.
• Volume control: Controls volume of headphone jack.
NOTE: The volume control on the front panel of your drive adjusts only the sound
level of the headphone jack. It has no impact on the volume level of the rear panel
audio outputs.
• Emergency eject hole: If the automatic eject button does not work, insert the
emergency eject tool, paper clip, or other thin, rigid object in this hole to eject
tray. Turn OFF power before using this feature.
• Eject button: Push once to eject tray. Push again to insert the tray back into the
PX-504A. To prevent wear on the drive, always use the eject button to insert the
tray.

Section 1. Getting Started
6PX-504A Installation and Users Manual
Rear Panel
Figure 2: Rear Panel of the Internal Drive
• Digital audio output connector: Outputs digital stereo signal. For connecting to
a sound board that supports Sony/Philips Digital Interface (SPDIF) or Digital-In.
• Analog audio output connector: Outputs analog stereo signal. Use to connect to
sound board or audio amplifier. Use standard MPC-3 type, 4-pin connector.
• Mode jumper: Use the mode jumper to select operation as an IDE master or
slave, or for cable select. In general, leave this jumper at its factory setting, which
is master.
• IDE cable connector: Connects to IDE (ATAPI) interface using 40-pin IDE flat
ribbon cable.
• Power connector: Connects to your computer’s power supply to provide
DC +5 volts and +12 volts to the PX-504A.

Section 1. Getting Started
PX-504A Installation and Users Manual 7
About Software
In order to record on DVD+R, DVD+RW, CD-R and CD-RW discs you will need to
have mastering, packet writing, or duplication software installed on your computer
system. If you purchased a retail kit from Plextor, you’ll get software packages that
include such software.
You can use Roxio’s Easy CD Creator DVD Edition to burn both DVDs and CDs.
The software lets you burn and share anything on CD or DVD, including music,
photos, and videos. You can also back up your critical data to a CD or DVD.
One component of Easy CD Creator is DirectCD, which makes the Plextor PX 504A
drive as easy to use as a disk drive. You can drag and drop files, rename files, delete
files, and create new directories right on the recordable CD or DVD disc. You can
even save files directly from your word processing software, spreadsheet, or other
application directly to the disc. DirectCD takes advantage of the PX-504A’s ability
to write small packets of data to the disc, providing fast, uninterrupted data flow and
optimum use of disc space.
For more information about Easy CD Creator, install this application and examine
the help files.
For details on other software packages that are available for writing to DVDs or
CDs, please visit the web sites of the companies whose software you are interested
in, refer to their user’s manuals, or look at the help option within the software. A list
of various software packages that you can use with your Plextor drive can be found
in the Support/Compatibility section of www.plextor.com.
Precautions
Like the rest of your computer system, your PX-504A requires reasonable care in its
installation and use.
• Keep the area around your drive clean from dust, smoke, and other contaminants.
• Do not allow moisture or liquids, including water or cleaning fluids, to touch the
drive. Thinner, benzene, or alcohol-based solvents can mar your drive’s surface.
• Do not drop or jolt the drive.
• Do not attempt to open the drive and service it yourself. Removing the cover may
expose you to harmful electrical voltages or the laser beam. For your safety,
entrust service to Plextor-authorized service personnel only.

Section 1. Getting Started
8PX-504A Installation and Users Manual
• Keep your DVDs and CDs free of dirt or other contaminants, by storing them in
jewel cases. Use only industry-standard discs. Do not insert dirty, warped, poorly
balanced, or cracked discs into the drive.
• Do not clean discs using a circular motion. Instead, using a soft, dry cloth, wipe
gently in a radial motion; start at the center of the disc and proceed to the outer
edge.

PX-504A Installation and Users Manual 9
2. Installing Your PX-504A
This chapter explains how to
physically install your PX-504A in
your computer. The steps you'll need
to do are as follows:
1. Turn OFF your computer system.
2. Set the jumpers for your new
PX-504A drive, if necessary.
3. Mount the drive into an available
drive bay inside the computer
system.
4. Make all necessary cabling
connections: IDE cable, power
cable, and audio cable.
5. Turn your computer system ON.
The following pages give more
details for this procedure.
Open the Computer
and Prepare for
Installation
To determine whether your PX-504A
will be a Master or a Slave, open your
computer and examine the IDE
connections to the motherboard.
To open the computer:
1. Before proceeding, make sure the
power to your computer and any
external peripherals is OFF and
your computer is UNPLUGGED
from its power source.
2. Remove your computer’s cover,
following the directions provided
by your computer’s manufacturer.
Typically, this involves loosening
or removing several screws on the back panel of your computer and sliding off
the cover. See Figure 3 for an example.
QuickStart Installation—For
Experienced PC Users Only
If you’ve installed computer peripherals
before, you’re in luck with the PX-
504A drive. Use this QuickStart
installation to get up and running
quickly.
Typical Scenario 1: You have a PC
with an IDE interface installed, you
have Windows 98, 98SE, Me, XP, or
2000, and you have nothing installed on
the secondary IDE port.
What to do: Leave the PX-504A’s
jumper set to Master, attach it to the
secondary IDE port, and go. Windows
will recognize the drive automatically.
Typical Scenario 2: You have a PC
with an IDE interface installed, you
have Windows 98, 98SE, Me, XP, or
2000, the primary IDE port already has
two devices connected and you have a
CD-ROM installed on the secondary
IDE port.
What to do: Change the CD-ROM to
Slave, leave the PX-504A’s jumper set
to Master and attach the PX-504A to the
secondary IDE port. Windows
recognizes the new drive automatically.
If neither of these situations applies to
you, or you’re not comfortable with
IDE installation, read the rest of this
chapter for more detailed installation
instructions.

Section 2. Installing Your PX-504A
10 PX-504A Installation and Users Manual
Figure 3: Removing a Typical Computer's Cover
Determine Your Existing IDE Configuration
With your computer open, determine the existing IDE configuration. You can do this
by looking at the 40-pin IDE ribbon cable (or cables—there may be two) and seeing
what is connected to them.
One end of the IDE cable is connected to a port on the computer’s motherboard; and
the other end is connected to one or two peripheral devices (such as a hard disk or
CD-ROM drive). If there are two devices, one is configured as Master and the other
the Slave, as indicated by the position of jumpers on the back of the drive.
In the case of the Cable Select bus, both devices must be jumpered as Cable Select.
This configuration requires a special Cable Select cable.
If there are two IDE ports, one is for the primary IDE bus and the other is for the
secondary bus.
Before you install your PX-504A, your computer’s IDE configuration is usually one
of the following:
• Configuration A: Hard disks connected as Master and Slave devices on primary
IDE port; CD-ROM drive connected as the Master device on secondary IDE port.
• Configuration B: Hard disk connected as Master device and DVD or CD-ROM
drive connected as Slave on the primary IDE port; nothing connected to
secondary IDE port.
• Configuration C: Hard disk connected as Master device on primary IDE port;
nothing connected to secondary IDE port.
• Configuration D: System uses special “Cable Select”cables; all devices are
jumpered for Cable Select.

Section 2. Installing Your PX-504A
PX-504A Installation and Users Manual 11
Set the Drive’s Mode Jumper
You specify your drive's Master, Slave, or Cable Select setting before installing it.
You do this by changing the position of a jumper on the mode jumper block at the
rear of the drive.
Your drive ships from our factory with its mode jumper set to operate the PX-504A
as a Master. This will work in most custom system configurations. If your computer
is from a large OEM system manufacturer such as IBM, Hewlett Packard, Gateway
or Compaq, you will need to pay particular attention to whether the computer uses
the Cable Select scheme.
Changing the Mode Jumper on Your Internal PX-504A Drive
The drive arrives from the factory with its mode jumper set to Master. (A function is
ON if the jumper is installed and OFF if the jumper is removed.)
Figure 4: Factory Settings for Mode Jumper at the Rear of the Drive
Changing to a Master, Slave, or Cable Select
The Master/Slave/Cable Select setting for the drive is determined by the mode
jumper. The jumper is placed over one of the sets of mode pins. To change the drive
from Master to Slave or to Cable Select, you must move the jumper.
For example, to change the drive to be a Slave, move the jumper to the right set of
mode pins, leaving the other pins uncovered. To change the drive for Cable Select,
move the jumper to the left set of mode pins.
Note that if any device is jumpered as Cable Select, then both devices connected to
that cable must be jumpered as Cable Select. In addition, the cable you use must be a
special Cable Select cable.

Section 2. Installing Your PX-504A
12 PX-504A Installation and Users Manual
Changing Jumper Settings
• To remove a jumper, pull it off with your fingers or a pair of needle-nose pliers.
• To install a jumper, push it onto the jumper pins.
CAUTION: Ensure power to the drive is OFF before installing or removing a jumper.
Figure 5: Install the Mode Jumper Across Vertical Pairs of Pins
CAUTION: Install the mode jumper across the pins as shown (vertically). Do not
connect one pin switch to another by installing the jumper lengthwise (horizontally).
Doing so could result in damage to the drive.
Select an IDE Configuration
Set the jumper according to the desired configuration, as shown in the tables and
illustrations on the next few pages.
NOTE: For best CD-RW performance, try to connect the PX-504A to the IDE port that
is not connected to the hard disk drive or to a CD-ROM drive. In most cases, this will
be the secondary IDE port.
NOTE: For best results, set the PX-504A to be the Master, if possible.

Section 2. Installing Your PX-504A
PX-504A Installation and Users Manual 13
Before PX-504A Installation How to Install the PX-504A
A Hard disks connected as Master and
Slave devices on primary IDE port;
CD-ROM connected as Master
device on secondary IDE port.
Remove the CD-ROM drive, change
it to Slave, and re-connect it to the
secondary IDE port.
Set the mode jumper to Master, and
connect the PX-504A as Master
device to the secondary IDE port.
NOTE: This configuration can make it very difficult to write from the CD-ROM to
the PX-504A at maximum rated speed using “on-the-fly” copying. System
configuration and performance will make a big difference.
Depending on how fast the CD-ROM drive can stream data to the PX-504A, it
may not be fast enough to keep the buffer full. In this case, the buffer may
become empty and a buffer underrun error may happen. However, because it is
equipped with Buffer Underrun Proof technology, your PX-504A can still make
successful copies if you use software that supports this feature. (All software
shipped with the Plextor PX-504A drive retail kits supports Buffer Underrun
Proof technology.)
If you still have problems writing with this configuration, use the image writing
method (that is, write an image to your hard drive, then write that image onto the
CD-R or CD-RW media), or record at a lower speed for best results. We also
recommend that DMA be enabled on your computer, if your system supports it.
Figure 6. How to Install the PX-504A If Your Computer Is Originally Set Up in
Configuration A

Section 2. Installing Your PX-504A
14 PX-504A Installation and Users Manual
Before PX-504A Installation How to Install the PX-504A
B Hard disk connected as Master
device, and CD-ROM or DVD-ROM
drive connected as Slave on the
primary IDE port; nothing connected
to secondary IDE port.
Set the mode jumper to Master, and
connect the PX-504A as Master to
secondary IDE port.
Figure 7. How to Install the PX-504A If Your Computer Is Originally Set Up in
Configuration B
Before PX-504A Installation How to Install the PX-504A
C Hard disk connected as Master
device on primary IDE port; nothing
connected to secondary IDE port.
Set the mode jumper to Master, and
connect the PX-504A as Master to
secondary IDE port.
Figure 8. How to Install the PX-504A If Your Computer Is Originally Set Up in
Configuration C
Table of contents
Other Plextor DVD Drive manuals

Plextor
Plextor PX-708UF User manual

Plextor
Plextor PX-712 User manual

Plextor
Plextor H/H DVD Writer User manual

Plextor
Plextor PX-504UF User manual

Plextor
Plextor PX-320A User manual

Plextor
Plextor PX-750A User manual

Plextor
Plextor PX-850A User manual

Plextor
Plextor PX-760 User manual

Plextor
Plextor PX-755SA User manual

Plextor
Plextor PX-712UF User manual

Plextor
Plextor PX-740UF User manual

Plextor
Plextor PX-708A User manual

Plextor
Plextor PX-740A User manual

Plextor
Plextor PX-708A User manual

Plextor
Plextor PX-610U User manual

Plextor
Plextor PX-208U User manual

Plextor
Plextor PX-716 User manual

Plextor
Plextor PX-650US User manual

Plextor
Plextor PX-716UF User manual

Plextor
Plextor PX-716AL User manual