Plextor PX-650US User manual

Versatile DVD/CD
Burner
User’s Manual

2
The AC/DC adapter or plug is damaged.(a.)
Liquid has penetrated into the equipment.(b.)
The equipment has been exposed to moisture.(c.)
The equipment has not worked well or you can not get it to work according to the user’s(d.)
manual.
The equipment was dropped and damaged.(e.)
The equipment has obvious signs of damage.(f.)
Sa f e t y No t i c e
Please read these safety instructions carefully.1.
Please keep this User’s Manual for your reference.2.
Please disconnect the equipment from your AC outlet before cleaning.3.
Do not use liquid or sprayed detergent for cleaning.
Use moist sheet or cloth for cleaning.
For pluggable equipment,the socket-outlet shall be installed near the equipment and shall4.
be easily accessible.
Please keep this equipment away from humid areas.5.
Install this equipment on a reliable surface. If the equipment is not on a reliable surface, it6.
may drop and cause injury.
The openings on the enclosure are for air convection. Please protect the equipment from7.
overheating. DO NOT COVER THE OPENINGS.
Make sure the voltage of the power source is appropriate when connecting the equipment8.
to the power outlet.
Place the AC/DC adapter where people will not step or trip on it. Do not place objects over9.
the AC/DC adapter.
All Cautions and Warnings on the equipment should be noted.10.
Use only the designated AC/DC adapter (5V/2A) to avoid damage of the driver.11.
If the equipment is not in use for several days,disconnect the equipment from the power12.
outlets to avoid damage by transient power surges.
Never pour any liquids into the openings, this could cause fire or electrical shock.13.
Never open the equipment.For safety reasons, the equipment should only be opened by14.
qualified service personnel.
If one of the following situations arises, get the equipment checked by a qualified service15.
personnel:
DO NOT LEAVE THIS EQUIPMENT IN AN ENVIRONMENT UNCONDITIONED; STORAGE16.
TEMPERATURE ABOVE 60ºC (140ºF), IT MAY DAMAGE THE EQUIPMENT. The sound pressure
level at the operators position according to IEC704-1:1982 is equal or less than 70dB(A).
CAUTION: CLASS 3B VISIBLE AND INVISIBLE LASER RADIATION WHEN OPEN AND INTERLOCKS17.
DEFEATED. AVOID EXPOSURE TO THE BEAM.
CLASS 1 LASER PRODUCT18.
COMPLIES WITH 21 CFR 1040.10 AND 1040.11 EXCEPT FOR DEVIATIONS PURSUANT TO LASER19.
NOTICE NO.50, DATED JUNE 24,2007

3
English
fcc co m p l i a N c e St a t e m e N t
Note:This equipment has been tested and found to comply with the limits for a Class B digital
device, pursuant to Part 15 of the FCC Rules.These limits are designed to provide reasonable
protection against harmful interference in a residential installation.This equipment generates,
uses,and can radiate radio frequency energy and,if not installed and used in accordance with
the instructions, may cause harmful interference to radio communications. However, there is
no guarantee that interference will not occur in a particular installation. If this equipment does
cause harmful interference to radio or television reception, which can be determined by turning
the equipment off and on, the user is encouraged to try to correct the interference by one of the
following measures:
Reorient or relocate the receiving antenna.-
Increase the separation between the equipment and receiver.-
Connect the equipment into an outlet on a circuit different from that to which the receiver is-
connected.
Consult the dealer or an experienced radio/TV technician for help.-
FCC Caution:To assure continued compliance,(example – use only shielded interface cables
when connecting to computer or peripheral devices).Any changes or modifications not
expressly approved by the party responsible for compliance could void the user’s authority to
operate this equipment.
This device complies with Part 15 of the FCC Rules.Operation is subject to the following two
conditions: (1) this device may not cause harmful interference, and (2) this device must accept
any interference received, including interference that may cause undesired operation.

PRECAUTIONS
4
English
pr e c a u t i o N S
!! Do not attempt to open the drive and service it.
Removing the cover may cause exposure to harmful laser
beams and electrical voltage.
*User is recommended to get service by returning the
defective drive back to the original vendor where the
drive was purchased.
(* for residents in the EU, please contact Plextor directly; visit plextor-digital.com for more information)
Use the original package for transporting the drive or sending back for service.The original•
packing was designed and tested to protect your drive under rough conditions.
Do not put this drive in direct sunlight, on heating units, or near electrical appliances which
•
draw large amounts of current.
Use a soft, dust-free cloth for cleaning your drive.Keep your drive away from moisture or
•
liquids including water, cleaning-fluids, or solvents.
Keep your disc clean.Using a soft, dust-free cloth to clean the surface of the disc before
•
recording will improve the burning data integrity.
Do not drop or jolt the drive.
•
Keep the area around the drive clean from dust, smoke, and other contaminants.•
The copyright law of each country governs the reproduction of copyrighted works.The•
person using the drives may be liable for its use to make unauthorized copies of copyrighted
works.
When connected to PC to make copies of your discs by using a buffer on your Hard disc drive
•
rather than direct using copy on the fly mode.Therefore we recommend the user reserving
sufficient buffer space for creating an image file (at least 650MB for CD; 5GB for DVD; and if
your drive support Double Layer DVD+R or Dual Layer DVD-R writing,then at least 9GB space
is needed).
Disc copy of RW-disc and the memory size of USB drive must be larger than 5GB (single layer)
•
or 9GB (Double layer).
For tablet PC, mobile device,and digital camera, a“USB Mode”menu may appear when it is
•
connected to the drive. Select“Disk Drive”to access data from your device.For details, refer to
the respective device user’s manual.
For iOS devices (iPAD, iPOD, and iPhone), only photo and video files are allowed to be copied.
•

5
co N t e N t S
Safety Notice..................................................................................................................................................................2
FCC Compliance Statement......................................................................................................................................3
Precautions.....................................................................................................................................................................4
Chapter 1: Introduction........................................................................................ 7
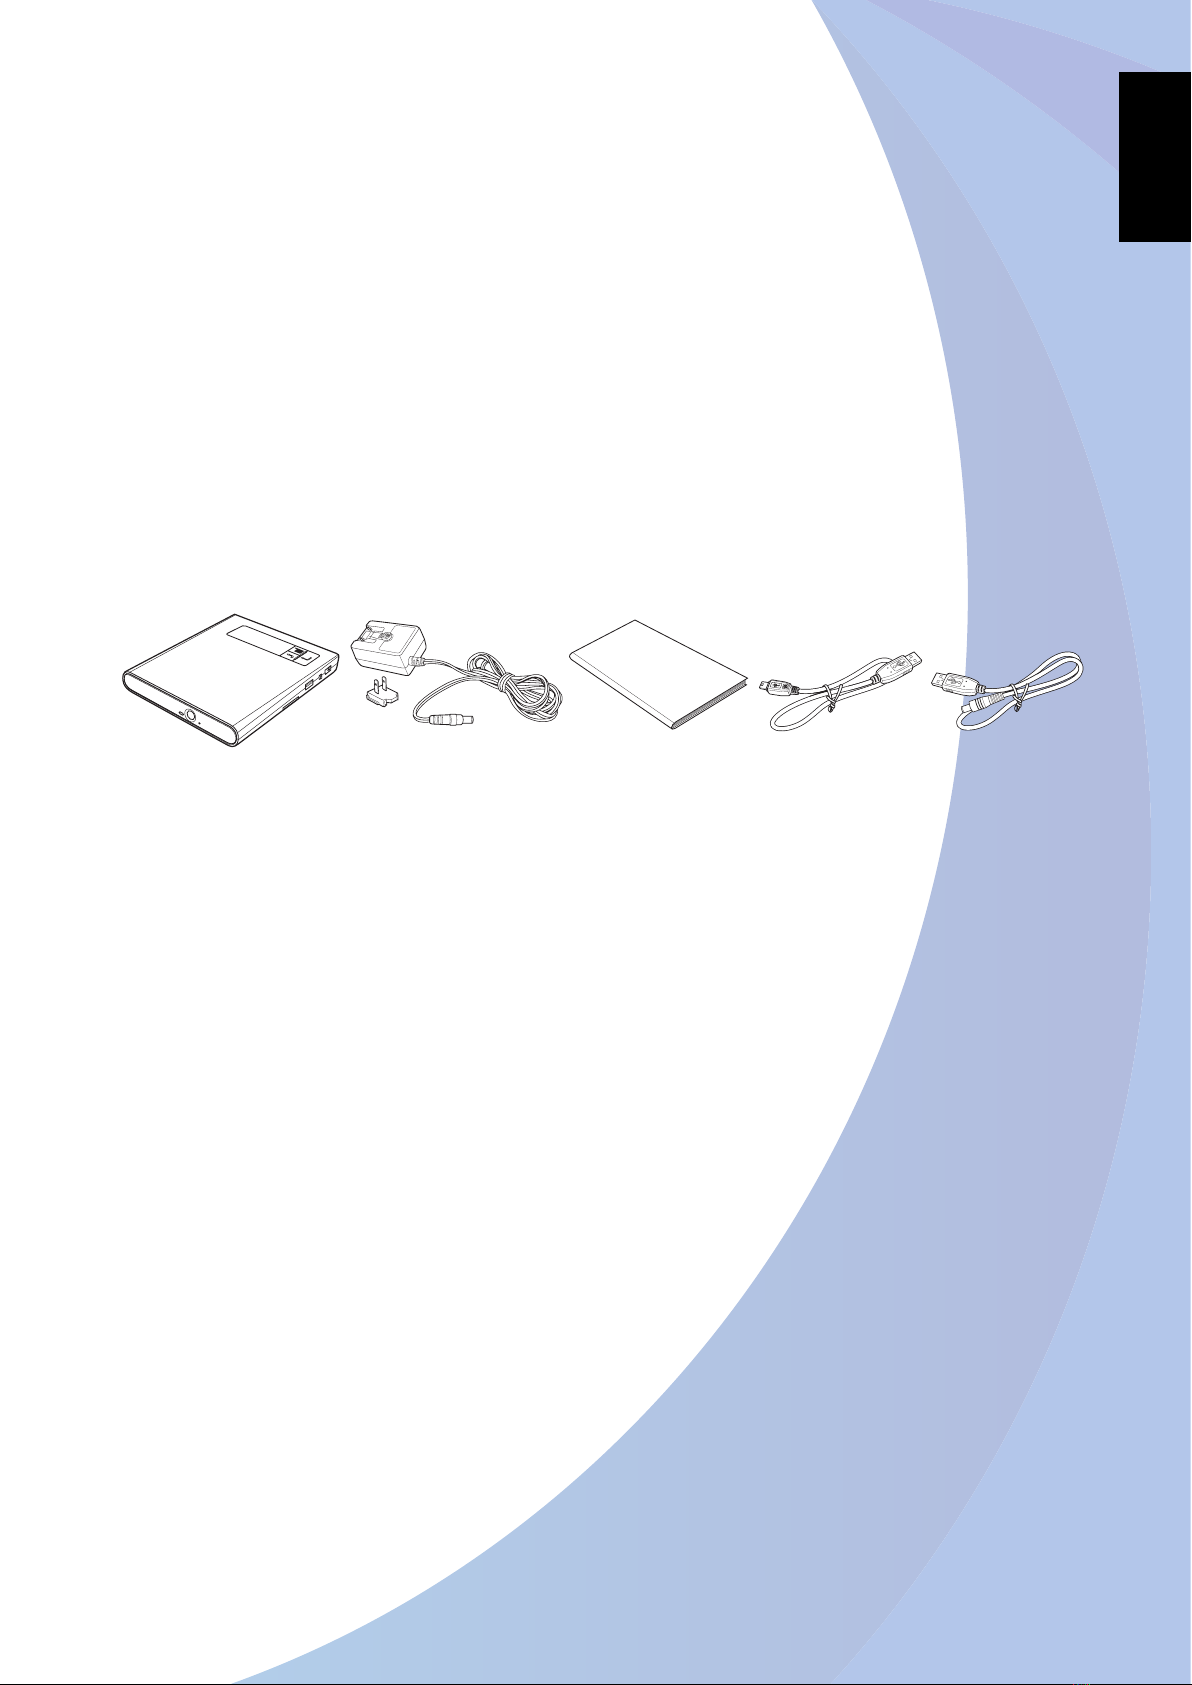
Package Contents.........................................................................................................................................................7
Features ..........................................................................................................................................................................7
Product Overview ........................................................................................................................................................8
Front View .................................................................................................................................................................8
Rear View ...................................................................................................................................................................8
Side View ...................................................................................................................................................................9
Top Panel ...................................................................................................................................................................9
System Architecture................................................................................................................................................. 10
Chapter 2: Getting Started.................................................................................11
Turning On/Off the Drive........................................................................................................................................ 11
Using the Optical Disc Drive (ODD).................................................................................................................... 12
Using the Card Reader............................................................................................................................................. 13
Connecting to Other Device ................................................................................................................................. 14
External ODD Operation Mode ......................................................................................................................14
Connecting the USB Devices........................................................................................................................... 15
Chapter 3: Operation.......................................................................................... 16
Reading Disc ............................................................................................................................................................... 16
Disc to Disc Backup................................................................................................................................................... 16
Data Backup ................................................................................................................................................................ 17
Backup from USB to Disc ..................................................................................................................................17
Backup from Memory Card to Disc ............................................................................................................... 18
Backup from Disc to USB ..................................................................................................................................18
Backup from Memory Card to USB................................................................................................................19
Backup from Audio Disc to USB ..................................................................................................................... 19
Burn Setup ................................................................................................................................................................... 20
Data Verification................................................................................................................................................... 20
Closing Disc ........................................................................................................................................................... 20
Data Source Deletion ......................................................................................................................................... 21

6
File Selection ......................................................................................................................................................... 21
Formatting Storage Media..................................................................................................................................... 22
Format Memory Card......................................................................................................................................... 22
Format USB Device.............................................................................................................................................. 22
Erasing a Re-writable (RW) Disc .....................................................................................................................23
Changing Source....................................................................................................................................................... 23
Viewing Information ................................................................................................................................................ 24
Memory Card Info................................................................................................................................................ 24
USB Device Info..................................................................................................................................................... 24
Disc Info................................................................................................................................................................... 24
Firmware Info......................................................................................................................................................... 25
Updating Firmware................................................................................................................................................... 25
Using as a USB Charger........................................................................................................................................... 26
Chapter 4: Appendix...........................................................................................27
Specifications.............................................................................................................................................................. 27
Supported Source..................................................................................................................................................... 28
Supported File System ............................................................................................................................................ 28
Disc Type for Read/Write Application................................................................................................................ 29
Recommended Media for Write/Rewrite Application.................................................................................. 29
Supported Write/Read Speed............................................................................................................................... 30
Others............................................................................................................................................................................ 30
Troubleshooting ........................................................................................................................................................ 31
Read Problems...................................................................................................................................................... 31
Write Problems..................................................................................................................................................... 32

7
English
Chapter 1: Introduction
This portable slim type DVD-RW drive provides professional-quality DVD and CD performance
for writing, rewriting, and reading.The drive is equipped with buffer underrun technology to
eliminate buffer underrun errors,so you can safely use your notebook for other things while
you are writing to DVD or CD. Besides the standard ODD function when it is connected to your
notebook, it is also designed as a multifunction portable duplicator that allows you to copy data
or make data backup between disc,USB device,and memory card.
Package Contents
Check to ensure that the following items come with your package.
DVD-RW drive AC/DC adapter Quick Start
Guide
USB cable Power cable
Features
When connected to a notebook,the drive is used as an external optical disc drive.•
One-touch copy from USB drive or memory card to CD/DVD disc without PC.•
Supports most digital camera/digital video/memory card formats.•
Supports disc spanning function.•
Supports backup with disc verification and data comparison.•
Equipped with LCD display for user-friendly interface and easy operation.•
Supports SMART-BURN® Smart Monitoring & Adapting Recording Technology for Burning.•
Supports FAT16, FAT32, and NTFS file system.•
Supports USB 2.0 with high speed 480 Mbps.•
Supports Ultra DMA mode 5 transfer mode.•
Read CD-ROM CAV (Constant Angular Velocity) with the maximum 24X speed.•
Write CD-R PCAV (Zone Constant Linear Velocity) with the maximum 24X speed.•
Rewrite CD-RW ZCLV with the maximum 24X speed.•
Read DVD-ROM CAV with the maximum 8X speed.•
Rewrite DVD-RW ZCLV with the maximum 6X speed.•
Rewrite DVD+RW ZCLV with the maximum 8X speed.•
Write DVD-R PCAV and DVD+R PCAV with the maximum 8X speed.•
Write DVD-R9 ZCLV and DVD+R9 ZCLV with the maximum 6X speed.•
Rewrite DVD-RAM PCAV with the maximum 5X speed.•

INTRODUCTION
8
English
Product Overview
Front View
No..Item Description
1LED Indicator Indication of the drive’s operation status.When the LED is
blinking, the drive is reading / writing / rewriting or the disc is
loading.
2Eject Button Push to open the tray.
3Pin Hole Eject If the Eject button fails to work properly, insert a paper clip into
this hole to open the tray.
CAUTION: Turn off power to the drive before performing manual
ejection.
Rear View
No..Item Description
1Mini USB Port Connect to your notebook.
2
13
1

9
English
Side View
No..Item Description
1Card Reader Slot Support memory cards including SD (Secure Digital), SDHC (SD
High Capacity), or MMC (Multi-media Card) cards.
2USB Port
(USB Type A)
Connect USB devices.
3Power Switch Turn the drive on or off.
4DC-IN Jack Connect the AC/DC adapter or Power cable.
Note: For Power cable connection, use only an external 5V/2A DC
power source.
Top Panel
No..Item Description
1LCD Display Display on-screen display message or OSD menu.
2Scroll Button Press to scroll through the menu options.
3OK Button Press to confirm the selection or enter the submenu.
4Exit Button Press to exit the current menu.
1 2 3
4
2 3 41

INTRODUCTION
10
English
System Architecture
The illustration below is an example of the drive connections with related devices.
Notebook
USB devices (including Tablet PC, mobile
phones, digital cameras, USB drive, etc)
Memory cards
(SD/MMC)
Note:
For details on supported USB devices or memory cards,refer to• “Supported Source” on page 28.
If
• you want to use an external DC power source, please use 5V/2A UL listed external DC power source
with L.P.S.
Once power source cannot sustain the power during the burning process,the burning task will fail
•
and so will the disc.
Drive
External 5V/2A DC
power source
Electrical
outlet
Drive
External ODD Operation Mode
Stand-alone Operation Mode
Electrical
outlet
(optional)

11
English
Chapter 2: Getting Started
Turning On/Off the Drive
Connect one end of the AC/DC adapter to the DC-IN jack of the drive.1.
Plug the other end of the AC/DC adapter into an electrical outlet.2.
Note:
The drive may come with different plug head(s) suitable in the country where you purchased it.
To turn on the drive, slide the3. Power switch to the right as shown in the below illustration.
* To turn off the drive,slide the Power switch to the left.
Note:
You can also use an external 5V/2A DC power source (using the Power
cable connection) as an alternative power supply.

Getting Started
12
English
Using the Optical Disc Drive (ODD)
Placing a Disc
Connect the AC/DC adapter and turn on the drive.1.
Press the2. Eject button to eject the tray.
Place the disc on the tray.3.
Close the disc tray.4.
The LED blinks green for few seconds and then turns off, this
indicates that the drive is ready.
Removing a Disc
Press the1. Eject button to eject the tray.
Remove the disc.2.
Close the disc tray.3.

13
English
Manual Ejection
If the Eject button fails to work properly, insert a paper clip
into the Pin Hole Eject to open the tray.
Note:
Be sure that the drive is turned off before performing the manual
ejection.
Using the Card Reader
The card reader supports SD, SDHC, and MMC memory cards.
Inserting a memory card
Connect the AC/DC adapter.1.
Turn on the drive and insert a disc into the tray. Refer to2. “Placing a Disc”on the previous
page.
Insert a memory card into the memory card slot.3.
The drive automatically detects the memory card and a message similar to“4. SD -> DVD+R.
Press to Start”should appear on the LCD display.
To copy the memory card data, refer to“Backup from Memory Card to Disc”on page 18.
Note:
If there is no disc inserted into the drive, an “• SD -> Disc. Insert Disc”message appears on the LCD
display.
The displayed message varies depending on the connected device, current operation,and disc type.
•
Removing a memory card
Pull the memory card out from the slot.

Getting Started
14
English
Connecting to Other Device
External ODD Operation Mode
This drive is specifically designed as an external ODD (optical disk drive) for notebook.
Connect one end of the USB cable to the mini USB port of the drive.1.
Connect the other end of the USB cable to the USB port of your notebook.2.
Connect the AC/DC adapter (optional).3.
Note:
It is not necessary to connect the AC/DC adapter when connecting to PC.
•
If your notebook cannot supply the standard USB2.0 power, you can use the AC/DC•
adapter as the auxiliary power source.
Turn on the drive.A“4. PC MODE”message appears on the LCD display.
To access the disc data, refer to“Reading Disc”on page 16.
Note:
The“PC MODE”message will only appear if you are using the AC/DC adapter when connecting to PC.

15
English
Connecting the USB Devices
Besides external ODD function, you can use this drive as a portable duplicator for data that are
stored on USB devices including USB drive, tablet PC, mobile phone, digital cameras, and etc.
Connect one end of the USB cable to the USB port of the drive.1.
Connect the other end of the USB cable to the USB port of your USB device.2.
For USB drive, simply plug it into the USB port of the drive.
Connect the AC/DC adapter.3.
Turn on the drive and insert a disc into the tray. Refer to4. “Placing a Disc”on page 12.
The drive automatically detects the USB device and a message similar to“5. USB -> DVD+R.
Press to Start”should appear on the LCD display.
To copy the data, refer to“Backup from USB to Disc”on page 17.
Note:
If there is no disc inserted into the drive, a “• USB -> Disc. Insert Disc”message appears on the LCD
display.
The displayed message varies depending on the connected device, current operation,and disc type.
•
For tablet PC, mobile device, and digital camera, a“USB Mode”menu may appear when it is connected•
to the drive. Select “Disk Drive”to access data from your device.For details, refer to the respective
device user’s manual.
Please unlock your mobile device before connecting to PlexEasy through USB.
•
When the drive is connected to smartphone devices,users need to enable“Mass Storage Device (MSD)•
connect mode”and“Auto connecting mode”first before connecting the drive and mobile device using
the USB cable.

OPERATION
16
English
Chapter 3: Operation
Reading Disc
When the drive is connected to your notebook, it works as an external ODD (optical disc drive).
Connect the drive and your notebook using the USB cable.1.
Connect the AC/DC adapter and turn on the drive (optional).2.
Press the3. Eject button to eject the tray and then place the disc on the tray.
Close the disc tray.4.
The computer automatically detects the drive and starts accessing the data.5.
To write to CD or DVD media (recordable or rewritable),you need to install and use a6.
burning software.
Note:
Do not disconnect the USB cable while the drive is reading data.•
The card reader and USB port will not work when connected as ODD to a PC.•
If your notebook cannot supply the standard USB2.0 power, you can use the AC/DC adapter as the•
auxiliary power source.
If the external power bank cannot sustain the power during the disc burning process, both the•
burning process and disc will fail.If user wants to eject the disc,connect the AC/DC adapter and turn
on the drive.Then press the Eject button to get the failed disc.
Disc to Disc Backup
The drive supports direct disc copy without connecting the drive to a computer and without the
use of a burning software.With this feature, you can directly copy a disc to one or more discs.
Note:
A USB drive is required to temporarily save the disc content before copying to the target disc.
Disc Type Required Capacity for USB drive
CD - CD at least 700 MB is needed
DVD - DVD at least 5GB for single layer DVD
DVD - DVD at least 9 GB for double layer DVD
Connect the AC/DC adapter and turn on the drive.1.
Press the2. Eject button to eject the tray and then place the disc that you want to copy on the
tray.
Close the disc tray.3.
Plug in a USB drive to the USB port of the drive.A message similar to“4. USB -> DVD+R. Press
to Start”should appear on the LCD display.
Make sure to use a USB drive with sufficient free space.-

17
English
Press5. > to enter the Function (1. Function) menu.
Select “6. 1. Disc Copy”and press to confirm the selection.
A“7. Disc Copy. Press to Start”message appears on the LCD display. Press to start
copying the disc content into the USB drive.
Note:
The copied disc content is temporarily saved into the USB drive.
When the copying process is complete, the drive automatically ejects and a message similar8.
to“Put Blank DVD+R”should appear on the LCD display.
Remove the disc, and insert an empty disc of the same disc type.9.
Note:
The drive will automatically eject if the new inserted disc is not the same type or it is not an empty
disc.
If the inserted matched the same disc type,the drive will automatically start writing on the10.
new disc.
When the writing process is complete, the drive automatically ejects and an“11. Additional
Copy?”message appears on the LCD display.
To make additional copies, press- and repeat Step 9~11.
To end the process,press- and a“Copy Complete”message appears on the screen.
Note:
The displayed message varies depending on the connected device, current operation,and disc type.•
You can also customize the burning settings before you start burning the disc. Refer to• “Burn Setup”on
page 20.
Data Backup
Backup from USB to Disc
You can copy any data stored on the USB device onto a disc.
Connect the AC/DC adapter and turn on the drive.1.
Press the2. Eject button to eject the tray and then place the disc on the tray.
Close the disc tray.3.
Connect your drive and the USB device by using the USB cable. Refer to4. “Connecting to USB
Devices”on page 15.
The drive automatically detects the device and a message similar to“5. USB -> DVD+R. Press
to Start”should appear on the LCD display.
Press6. to start copying data.
When the writing process is complete, the drive automatically ejects and a“7. Completed”
message appears on the LCD display.
Note:
If there is no disc inserted into the drive, a “• USB -> Disc. Insert Disc”message appears on the LCD
display.

OPERATION
18
English
The displayed message varies depending on the connected device, current operation,and disc type.•
For tablet PC, mobile device, and digital camera, a“USB Mode”menu may appear when it is connected•
to the drive. Select “Disk Drive”to access data from your device.For details, refer to the respective
device user’s manual.
Please unlock your mobile device before connecting to PlexEasy through USB.
•
You can also customize the burning settings before you start burning the disc. Refer to• “Burn Setup”on
page 20.
Backup from Memory Card to Disc
You can copy any data stored on the memory card onto a disc.
Connect the AC/DC adapter and turn on the drive.1.
Press the2. Eject button to eject the tray and then place the disc on the tray.
Close the disc tray.3.
Insert a memory card into the memory card slot.4.
The drive automatically detects the memory card and a message similar to“5. SD -> DVD+R.
Press to Start”should appear on the LCD display.
Press6. to start copying data.
When the writing process is complete, the drive automatically ejects and a“7. Completed”
message appears on the LCD display.
Note:
If there is no disc inserted into the drive, an “• SD -> Disc. Insert Disc”message appears on the LCD
display.
The displayed message varies depending on the connected device, current operation,and disc type.
•
You can also customize the burning settings before you start burning the disc. Refer to• “Burn Setup”on
page 20.
Backup from Disc to USB
You can copy the disc data to a USB storage device.
Connect the AC/DC adapter and turn on the drive.1.
Press the2. Eject button to eject the tray and then place the disc on the tray.
Close the disc tray.3.
Plug in a USB drive to the USB port of the drive.A message similar to“4. USB -> DVD+R. Press
to Start”should appear on the LCD display.
Press5. > to enter the Function (1. Function) menu.
Press6. repeatedly to select“2. Disc -> USB”and press to confirm the selection.
A“7. Disc -> USB.Press to Start”message appears on the LCD display. Press to start
copying data.
When the copying process is complete, the drive automatically ejects and a“8. Completed”
message appears on the LCD display.

19
English
Note:
The displayed message varies depending on the connected device, current operation,and disc type.
Backup from Memory Card to USB
You can copy data stored on the memory card onto a USB device such as a USB drive.
Connect the AC/DC adapter and turn on the drive.1.
Insert a memory card into the memory card slot.2.
Plug in a USB drive to the USB port of the drive.An“3. EasyBurn to Disc.2 Sources Found”
message appears on the screen.
Press4. > to enter the Function (1. Function) menu.
Press5. repeatedly to select“3. SD -> USB” and press to confirm the selection.
An“6. SD -> USB.Press to Start”message appears on the LCD display. Press to start
copying data.
When the copying process is complete, a“7. Completed”message appears on the LCD display.
Note:
The displayed message varies depending on the connected device, current operation,and disc type.
Backup from Audio Disc to USB
You can copy audio files that are stored on the audio CD into a USB device such as a USB drive.
Connect the AC/DC adapter and turn on the drive.1.
Press the2. Eject button to eject the tray and then place an audio disc on the tray.
Close the disc tray.3.
Plug in a USB drive to the USB port of the drive.A“4. USB -> CD-ROM. Press to Start”
message appears on the LCD display.
Press5. > to enter the Function (1. Function) menu.
Press6. repeatedly to select“4. Audio Rip”and press to confirm the selection.
An“7. Audio Rip. Press to Start” message appears on the LCD display. Press to start
copying audio file.
When the decoding process is complete, the drive automatically ejects and a“8. Completed”
message appears on the LCD display.
Note:
The copied audio files are saved as“*.wav”file format.•
The displayed message varies depending on the connected device, current operation,and disc type.•

OPERATION
20
English
Burn Setup
To maximize disc burning quality, we recommend you to configure disc burning settings before
you start writing data on the disc. These settings will be reset every time you turn off the device.
Data Verification
With this feature, the drive will automatically compare data after disc burning is complete to
ensure that the data backup is performed correctly.
Connect the AC/DC adapter and turn on the drive.1.
Press the2. Eject button to eject the tray and then place the disc on the tray.
Close the disc tray.3.
Plug in a USB drive to the USB port of the drive or insert a memory card into the memory4.
card slot.
Press5. repeatedly to select“2. Burn Setup”and press to enter the Burn Setup menu.
Select “6. 1. Data Verify:N”and press to enter the submenu.
To enable data verification, press7. to select“Yes”and press to confirm the selection.
An nicon appears on“Yes”.
Press8. repeatedly to return to the main screen.
Closing Disc
With this feature, you can enable multi-session recording and utilize the entire disc without
wasting any disc space.
Connect the AC/DC adapter and turn on the drive.1.
Press the2. Eject button to eject the tray and then place the disc on the tray.
Close the disc tray.3.
Plug in a USB drive to the USB port of the drive or insert a memory card into the memory4.
card slot.
Press5. repeatedly to select“2. Burn Setup”and press to enter the Burn Setup menu.
Press6. repeatedly to select“2. Close Disc:N”and press to enter the submenu.
To enable multi-session recording, press7. to select“Yes”and press to confirm the
selection. An nicon appears on“Yes”.
Note:
If this feature is disabled, the disc will be closed after disc burning is complete.
Press8. repeatedly to return to the main screen.
Table of contents
Languages:
Other Plextor DVD Drive manuals

Plextor
Plextor PX-740A User manual

Plextor
Plextor PX-208U User manual

Plextor
Plextor PX-708UF User manual

Plextor
Plextor PX-504A User manual

Plextor
Plextor PX-504UF User manual

Plextor
Plextor PX-708A User manual

Plextor
Plextor PX-750A User manual

Plextor
Plextor PX-708A User manual

Plextor
Plextor H/H DVD Writer User manual

Plextor
Plextor PX-716AL User manual

Plextor
Plextor PX-716 User manual

Plextor
Plextor PX-850A User manual

Plextor
Plextor PX-320A User manual

Plextor
Plextor PX-755SA User manual

Plextor
Plextor PX-760 User manual

Plextor
Plextor PX-740UF User manual

Plextor
Plextor PX-716UF User manual

Plextor
Plextor PX-610U User manual

Plextor
Plextor PX-712 User manual

Plextor
Plextor PX-712UF User manual