PLG NEXUS 3 User manual

NEXUS 3
MANUALE D’USO | USER MANUAL
OUTDOOR - SPOTLIGHTS
400gr

2
Professional Lighting Genius s.r.l - Ex Strada Statale 96, NC - 70020 Toritto (Ba) - Phone: (+39) 080 603244 - [email protected] - www.plgenius.com
NEXUS 3
MANUALE D’USO USER MANUAL
ATTENZIONE |WARNING
Sovratensioni provenienti dalla rete elettrica di alimentazione
dell’impianto/apparecchi o di origine elettrostatica (ESD)
provenienti dall’ambiente , possono danneggiare in maniera
irreversibile gli apparecchi a LED. Si consiglia quindi l’installazione
di un dispositivo di protezione dalle sovratensioni sull’impianto
elettrico che attenua l’intensità di questi fenomeni
Overvoltages from the power supply of the system / devices or of
electrostatic origin (ESD) from the environment, can irreversibly
damage the LED luminaires. It is therefore advisable to install a
protective device against overvoltages on the electrical system
which attenuates the intensity of these phenomena
••
Tenere lontano da sostanze chimiche aggressive
•Keep away from aggressive agents
•
Il sistema di connessione deve avere un grado di protezione IP
uguale o superiore al grado di protezione IP del prodotto
•The connection system must be equal to or greater than the IP
rating of the spotlights.
•
•Prima di procedere alla installazione o alla manutenzione del
presente dispositivo è necessario disattivare sempre l’energia
elettrica;
•Before proceeding with the installation or maintenance of this
device, you must always turn off the electricity;
La ditta Professional Lighting Genius declina ogni responsabilità
per danni causati da un proprio prodotto montato in modo non
conforme alle istruzioni.
•The company Professional Lighting Genius assumes no
responsability for damages caused by its own product installed
not in accordance to instructions.
•
La ditta Professional Lighting Genius declina ogni responsabilità
qualora l’installazione non avvenga secondo le norme vigenti;
•The company Professional Lighting Genius disclaims any
liability if the installation is not done according to applicable
regulations;
•
In nessun caso l’apparecchio deve essere ricoperto da materiali
termoisolanti o simili;
•Under no circumstance must this product be covered
•
Modifiche o manomissioni del prodotto possono rendere
l’apparecchio pericoloso e annullano ogni condizione di garanzia;
•Modifications or tampering of the product can make the device
dangerous and will invalidate any warranty condition;
•
Tutte le operazioni di installazione o di manutenzione devono
essere effettuate da personale tecnico specializzato;
•All installation or maintenance must be performed by qualified
personnel;
•
L’impianto va alimentato solo dopo il collegamento;
•The plant should be operated only after connecting;
•
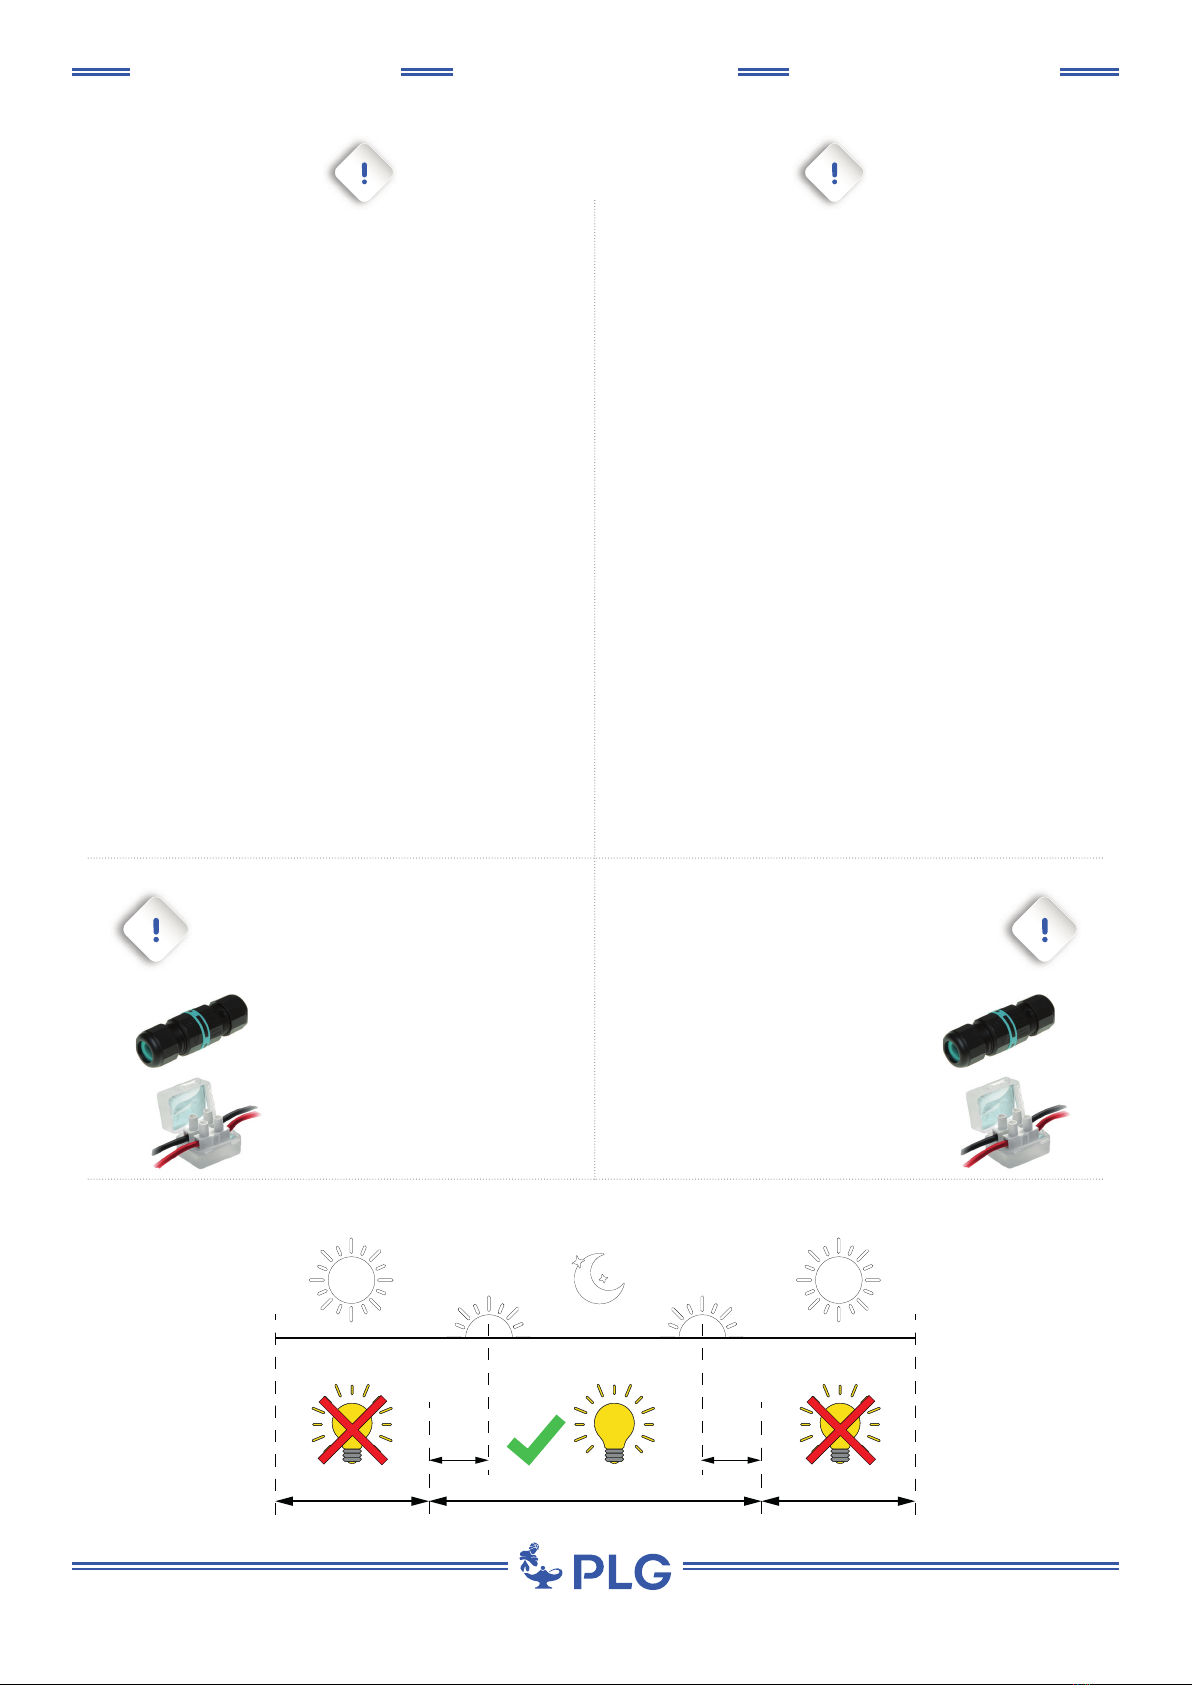
Leggere e conservare le seguenti istruzioni Read and store following instructions
ATTENZIONE
Per evitare infiltrazioni di acqua e la formazione di
condensa utilizzare giunti preriempiti in gel, nastro
autoagglomerante o giunto circolare di connessione
IP68 ( CONET1 ) nell’ effettuare il collegamento.
WARNING
To avoid water infiltrations, carry out the connection
with pre-filled gel joints, self amalgamating scotch
or IP68 circular joint connector ( CONET1 )
CONET1
Giunto circolare di connessione IP68
( venduto separatamente )
CONET1
IP68 circular joint connector
( sold separately )
Giunto preriempito in gel
( venduto separatamente )
Pre-filled gel joints
( sold separately )
30’
min.
30’
min.
PERIODO DI ACCENSIONE GIORNALIERO AMMESSO / ALLOWED DAILY OPERATION PERIOD

3
Professional Lighting Genius s.r.l - Ex Strada Statale 96, NC - 70020 Toritto (Ba) - Phone: (+39) 080 603244 - [email protected] - www.plgenius.com
DATI TECNICI | TECHNICAL DATA
POTENZA MASSIMA / POWER MAX :
6W - 500mA / 9W - 700mA ( RGB )
3 power LEDs
NUMERO DI LED / LED QUANTITY :
70 - 80 - 90 - >90
INDICE RESA CROMATICA / CRI :
10° , 25° , 40° , 60° , 110° , Diff.
OTTICHE DISPONIBILI
AVAILABLE OPTICS :
-20°C +40°C
TEMPERATURA DI UTILIZZO
WORKING TEMPERATURE :
1 - Applique
2 - Su Picchetto / On Stake
3 - Con Cinghia / With Belt
FISSAGGIO / FIXING :
III
CLASSE / CLASS :
400g
PESO / WEIGHT :
IP67
GRADO DI PROTEZIONE IP / IP RATE :
Non incluso / Not included
ALIMENTATORE / DRIVER :
COLORE DEL LED (K)
LED COLOUR (K) :
5500 - 4000 - 3000 - 3000 CRI 90 - 2700 - AMBER - RED - GREEN - BLUE (
6W - 500mA )
RGB - AWB - A WW W ( 9W - 700mA )
Grigio , Nero / Grey , Black
MATERIALE E FINITURA
MATERIAL AND FINISH :
Corpo e flangia in alluminio anodizzato
Body and flange in anodized aluminium
NEXUS 3
MANUALE D’USO USER MANUAL
DIMENSIONI |DIMENSIONS
88
82
64
82
88
64

4
Professional Lighting Genius s.r.l - Ex Strada Statale 96, NC - 70020 Toritto (Ba) - Phone: (+39) 080 603244 - [email protected] - www.plgenius.com
ACCESSORI | ACCESSORIES
NEXUS 3
MANUALE D’USO USER MANUAL
CINTURA PER ALBERI - TREE LIGHT BELT
CINGHIE / BELTS
CODE : BLT01 - BLT02 CODE : PLT01 - PLT02
PIASTRE DI FISSAGGIO / FIXING PLATES
INSTALLAZIONE - INSTALLATION
PICCHETTI INOX / INOX STAKES
CODE : PI001 - PI002 - PI003 CODE : PI004 - PI005
ESTENSIONI / EXTENSIONS

5
Professional Lighting Genius s.r.l - Ex Strada Statale 96, NC - 70020 Toritto (Ba) - Phone: (+39) 080 603244 - [email protected] - www.plgenius.com
L
N
GND +
-
+
-
+
-
+
-
Schema di connessione in serie per versione 350 / 500mA - Connection diagram for 350 / 500mA version
ROSSO
VERDE
BLUE
ROSSO - NERO
VERDE - NERO
BLUE - NERO
ROSSO
VERDE
BLUE
+ +
-
ROSSO - NERO
VERDE - NERO
BLUE - NERO
-
ROSSO
VERDE
BLUE
+
ROSSO - NERO
VERDE - NERO
BLUE - NERO
-
+
-
RGB
POWERBOX
Schema di connessione per versione RGB / Connection diagram for RGB version
L
N
GND
+
-
+
-
Schema di collegamento diretto all’alimentatore / Direct connection diagram to power supply
CONNESSIONI | CONNECTIONS
NEXUS 3
MANUALE D’USO USER MANUAL
ATTENZIONE
I singoli faretti LED vanno collegati in serie, rispettando la polarità.
Alimentare l’impianto solo dopo il collegamento di tutti i faretti.
Prima di procedere verificare il numero minimo e massimo
di leds collegabili all’alimentatore che si utilizza.
WARNING
LED lights must be connected in series, respecting polarities.
The system must be fed only after all the spots have been connected.
Before proceeding please check the minimum and maximum number of leds
that can be powered with the driver you are using.
1Realizzare il cablaggio in assenza di tensione di rete.
Make the wiring in complete absence of line voltage.
2Collegare l’apparecchio all’alimentatore.
Connect the device to the driver.
3Collegare il driver alla rete.
Connect the driver to the electric network.
4Porre la rete sotto tensione.
Energize the network.

6
Professional Lighting Genius s.r.l - Ex Strada Statale 96, NC - 70020 Toritto (Ba) - Phone: (+39) 080 603244 - [email protected] - www.plgenius.com
ISTRUZIONI DI MONTAGGIO | ASSEMBLY INSTRUCTIONS
NEXUS 3
MANUALE D’USO USER MANUAL
Rimuovere il faretto dalla staffa, svitando le due viti di supporto e rimuovendo le rondelle
Bloccare la staffa sulla superficie utilizzando un dispositivo di fissaggio idoneo
Avvitare il faretto alla staffa, inserendo le rondelle tra staffa e corpo. Eseguire il cablaggio elettrico avendo cura di sigillare i cavi
con mezzi adeguati a garantire una tenuta IP67
Remove the spot from the bracket, unscrewing the screws and removing the washers
Fix the bracket to the surface using an approprate device
Screw the spot to the bracket, placing the washers between body and bracket. Make the electrical wiring taking care to seal the
cables with devices suitable for an IP67 rating protection.
1
2
3
1 2 3
4
|
1 - FISSAGGIO AD APPLIQUE 1 - APPLIQUES FIXING SYSTEM
Never connect or disconnect the fixture when the
driver is energized.
Non collegare o scollegare l’apparecchio con
l’alimentatore sotto tensione.
ATTENZIONE - WARNING
Do not cover the device
Non coprire l’apparecchio.
ATTENZIONE - WARNING
Nexus può essere montato sia a soffitto che
a parete o pavimento. È possibile cambiare
l’orientamento del fascio luminoso allentando le
viti laterali.
Nexus can be installed either on the ceiling ,wall
or on the floor. You can change the light beam
direction loosening the lateral screws.
4

7
Professional Lighting Genius s.r.l - Ex Strada Statale 96, NC - 70020 Toritto (Ba) - Phone: (+39) 080 603244 - [email protected] - www.plgenius.com
1
ISTRUZIONI DI MONTAGGIO | ASSEMBLY INSTRUCTIONS
NEXUS 3
MANUALE D’USO USER MANUAL
Rimuovere il faretto dalla staffa, svitando le due viti di
supporto e rimuovendo le rondelle
Fissare la staffa sul picchetto utilizzando vite e dado in dotazione
Piantare il picchetto nel terreno.
Remove the spot from the bracket, unscrewing the
screws and removing the washers
Fix the bracket to the stake using the provided screw and nut
Insert the stake into the ground
2
3
2 3 4
|
1 - FISSAGGIO SU PICCHETTO 1 - FIXING ON STAKE
1
Never connect or disconnect the fixture when the
driver is energized.
Non collegare o scollegare l’apparecchio con
l’alimentatore sotto tensione.
ATTENZIONE - WARNING
Do not cover the device
Non coprire l’apparecchio.
ATTENZIONE - WARNING
5
Avvitare il faretto alla staffa, inserendo le rondelle tra staffa e corpo.
Eseguire il cablaggio elettrico avendo cura di sigillare i cavi con mezzi adeguati a garantire una tenuta IP67
Screw the spot to the bracket, placing the washers between body and bracket.
Make the electrical wiring taking care to seal the cables with devices suitable for an IP67 rating protection.
4
È possibile cambiare l’orientamento del fascio luminoso allentando
le viti laterali.
You can change the light beam direction loosening the lateral
screws.
5
Table of contents
Other PLG Spotlight manuals