Plum Brivis Contour Series User manual

Evaporative Cooling
Operation Manual
Brivis Contour Series, Brivis Promina Series,
Brivis Advance Series, Brivis AD Series

WARNINGS AND IMPORTANT INFORMATION
READ ALL INSTRUCTIONS BEFORE USING THE APPLIANCE.
Failure to carefully read and follow all instructions in this manual can result in equipment malfunction, property damage,
personal injury and/or death.
WARNINGS: WHEN IGNORED, CAN RESULT IN SERIOUS INJURY OR DEATH.
CAUTIONS: WHEN IGNORED, CAN RESULT IN MINOR INJURY OR PRODUCT DAMAGE.
SHALL/MUST/
IMPORTANT: INDICATES A MANDATORY REQUIREMENT OF THIS MANUAL.
SHOULD: INDICATES A RECOMMENDED REQUIREMENT OF THIS MANUAL.
Any deviations from these instructions may, at the discretion of Rinnai, void the warranty. As a result, the
customer and/or installer may be charged a fee for product non-warranty related call outs. Also, note that
failure to comply with these instructions may preclude Rinnai from being able to service the unit.
DISCLAIMER: This document is a guide only. Laws, regulations and industry standards can vary between States and
Territories.
Accordingly, this guide MUST BE read in conjunction with, and subject to, all laws, regulations and industry
standards applicable in the State or Territory in which the products are installed.
You MUST ensure that the installation of the products will comply with those laws, regulations and
standards,andthattheproductsrecommendedtocustomersaretforthepurposeforwhichtheyare
intended.
REGULATORY / INSTALLATION / SAFETY
This appliance SHALL BE installed in accordance with:
Manufacturer’s Installation Instructions.
Current AS/NZS 3000 (electrical codes).
Local Regulations and Municipal Building Codes including local OH&S requirements.
Local water authority regulations
Ductxingregulations,EPAguidelinesandASHB276-2004“AGuidetoGoodPractice”
ALWAYS comply with the following precautions to avoid dangerous situations and to ensure optimum
performance.
This appliance MUST BE installed, maintained and removed by an Authorised Person.
DO NOT place any articles on or against this appliance
DO NOTuseorstoreammablematerialsnearthisappliance
DO NOT spray aerosols in the vicinity of this appliance while it is in operation
DO NOT modify this appliance
This appliance is intended to be permanently connected to the water mains and NOT to be connected by a
hose-set.
If the supply cord is damaged, it MUST BEreplacedbymanufacturer,itsserviceagentorsimilarlyqualied
persons in order to avoid a hazard.
This evaporative cooler is NOTintendedtobeinstalledinaBAL-12.5.to29area.*
This appliance is NOT intended for use by persons (including children) with reduced physical, sensory
ormentalcapabilities,orlackofexperienceandknowledge,unlesstheyhavebeengivensupervisionor
instruction concerning use of the appliance by a person responsible for their safety.
Children should be supervised to ensure that they DO NOT play with the appliance.
*ExceptforADModels.

WARNINGS AND IMPORTANT INFORMATION
MANDATORY INSPECTION PRIOR TO INSTALLATION
Immediately report any damage or discrepancies to your appliance supplier. This appliance has been inspected and tested at
the time of manufacture and packaging, and was released for transportation without known damage. Upon receipt, inspect
theexteriorforevidenceofroughhandlinginshipment.Ensurethattheapplianceislabelledcorrectlyforthegas,electrical
supply, or other services it is intended to be connected to.
For safety and warranty purposes, appliances that may be damaged or incorrect MUST NOT be installed or operated under
any circumstances. No responsibility will be accepted for installation or operation of damaged or incorrect appliances.
Installation of damaged or incorrect appliances may also contravene local regulations.
MODELS COVERED IN THIS MANUAL
Brivis Contour Series L36 L46 L56 L66 L76
Brivis Promina Series P36 P46 P56 P66 P76
Brivis Advance Series F36D F56D F76D
BrivisAdvancePlus* F45DS F66DS F86DS
Brivis AD Series AD66/AD66D AD86/AD86D
Brivis AD BAL Series AD56/AD56D AD66/AD66D AD86
*BrivisContourandBrivisAdvancePlusarettedwithaMotorisedWinter-Seal.
A NOTE ON ILLUSTRATIONS
Theillustrationsusedinthismanualareforexplanatorypurposesonlyandtheshapeofyourunitmayvaryslightlyfrom
that which is shown in this manual.
CLEARANCES
ROOF MOUNTED EVAPORATIVE COOLER POSITIONING
The cooler must be installed in a position that allows for optimal performance and adequate and safe access for
service, as per installation guidelines and any applicable regulations.
Extra service charges may apply for the cost of any equipment or additional labour involved in accessing
the cooler if these guidelines are not met.
Theseextrachargesapplytobothproductwarrantyclaims,generalrepairsandservicemaintenancecalls
REQUIRED CLEARANCES
LowProleUnits(SloppingBase) 1m on three (3) sides (front and two sides)
Traditional Units (Flat Base) 1monallfour(4)sides

Brivis 8 Evap AC OM
INTRODUCTION
Congratulations on your purchase of a Brivis Cooling system. For you to achieve the performance and eciency
expected from your new cooler, please ensure the installer is a qualied trades person, that the installer has
commissioned the unit before you commence operating, and you take the time to read the contents of this manual.
In some Australian States it is mandatory that your cooler installation is issued with a certicate of compliance
to guarantee the installation workmanship�Please check with your installer or the local plumbing authority or
association� The Brivis cooler is covered by the product warranty as outlined in this manual�
HOW DOES YOUR EVAPORATIVE COOLING WORK?
The amount of cooling available from any type of cooling system is dependent on the outside weather conditions�
Your evaporative cooler works best on hot, dry days. It is essential to provide the required amount of ventilation (for
your evaporative cooling system to function properly) by opening windows/doors whenever the cooler is operating�
Air is drawn in through the lter pads resulting in 100% fresh cool air entering the home. The movement of this
cooled air through your home will draw the heat out of the house, so be sure that doors or windows are open to
expel this heat to outside�
Whenever possible start the cooler early to prevent the build up of heat within the house, and on sultry or humid
days your cooler may work better with the fan ONLY running and the pump turned OFF. Stale air, cigarette smoke
and fumes can be quickly cleared and replaced with fresh air by turning the fan to manual mode�
BEFORE OPERATING YOUR EVAPORATIVE COOLER
Make sure enough window and/or door area is open for the unit to work correctly�The following table gives a guide
to the amount of open area required for each model in m2, and also gives suggestions on how to provide this.
Brivis Models Number of average
size windows & doors
(suggestions only)
Highest
Fan
Setting
Lowest
Fan
Setting
Contour
Series
Promina
Series
Advance
Series
Advance
Plus AD Series
L36 P36 F36D One door and a hinged window 1�9 m21�1 m2
L46 P46
P56 F56D F46DS AD56BAL
AD56DBAL
Three sliding windows or one
door & two hinged windows 2�3 m21�4 m2
L56 P66 F66DS AD66/BAL
AD66D/BAL
Four sliding windows or one
door and four hinged windows 2�8 m21�7 m2
L66 P76 F76D Five sliding windows or one
door and ve hinged windows 3�1 m21�9 m2
L76 F86DS AD86
AD86D
Six sliding windows or one door
and six hinged windows 3�4 m22�1 m2
Average ventilation
area provided by
various openings
when fully opened�
NOTE
You can also choose to have these openings only halfway open. However, the opening will only
provide half the amount of ventilation shown and additional ventilation openings would be required.
Door = 1.6m²
Hinged Window = 0.3m²
Sliding Window = 0.7m²
EVAPORATIVE COOLER OPERATION
INTRODUCTION
CongratulationsonyourpurchaseofaBrivisCoolingsystem.Foryoutoachievetheperformanceandeciencyexpected
fromyournewcooler,pleaseensuretheinstallerisaqualiedtradesperson,thattheinstallerhascommissionedtheunit
before you commence operating, and you take the time to read the contents of this manual.
HOW DOES YOUR EVAPORATIVE COOLING WORK?
The amount of cooling available from any type of cooling system is dependent on the outside weather conditions. Your
evaporative cooler works best on hot, dry days. It is essential to provide the required amount of ventilation (for your
evaporative cooling system to function properly) by opening windows/doors whenever the cooler is operating. Air is drawn
inthroughthelterpadsresultingin100%freshcoolairenteringthehome.Themovementofthiscooledairthroughyour
homewilldrawtheheatoutofthehouse,sobesurethatdoorsorwindowsareopentoexpelthisheattooutside.
Whenever possible start the cooler early to prevent the build up of heat within the house, and on sultry or humid days your
cooler may work better with the fan ONLY running and the pump turned OFF. Stale air, cigarette smoke and fumes can be
quickly cleared and replaced with fresh air by turning the fan to manual mode.
BEFORE OPERATING YOUR EVAPORATIVE COOLER
Make sure enough window and/or door area is open for the unit to work correctly. The following table gives a guide to the
amountofopenarearequiredforeachmodelinm2,andalsogivessuggestionsonhowtoprovidethis.
You can also choose to have these openings only halfway open. However, the opening will only provide half the
amount of ventilation shown and additional ventilation openings would be required.
Brivis Models Number of average
size windows & doors
(suggestions only)
Highest
Fan
Setting
Lowest
Fan
Setting
Contour
Series
Promina
Series
Advance
Series
Advance
Plus AD Series
L36 P36 F36D One door and a hinged window 1.9m2 1.1m2
L46 P46
P56 F56D F46DS AD56BAL
AD56DBAL
Three sliding windows or one
door and two hinged windows 2.3m2 1.4m2
L56 P66 F66DS AD66/BAL
AD66D/BAL
Four sliding windows or one
door and four hinged windows 2.8m2 1.7m2
L66 P76 F76D Five sliding windows or one door
andvehingedwindows 3.1m2 1.9m2
L76 F86DS AD86
AD86D
Sixslidingwindowsoronedoor
andsixhingedwindows 3.4m2 2.1m2

Brivis 9 Evap AC OM
To cool your whole house, you need windows and / or doors open throughout the house. If you wish to concentrate
your cooling to a select area, simply concentrate all the required ventilation in the targeted area (see below).
This iIllustration shows the method of getting
effective cooling in desired areas of the home
Evaporative air conditioner on roof
Closed Windows
Open Windows The cooled air flows towards the
points of ventilation, cooling as it
moves through rooms
Concentrated
cooling in this area
NOTE
On hot, windy days, ensure that the windows and /or doors open for ventilation are on the
sheltered side of the house.
THE AIR SMELLS A LITTLE DIFFERENT, WHY?
New Cooling pads can give o a mild odour while they are settling in. This is quite normal, it will dissipate quickly
as the new pad is constantly ushed during use.
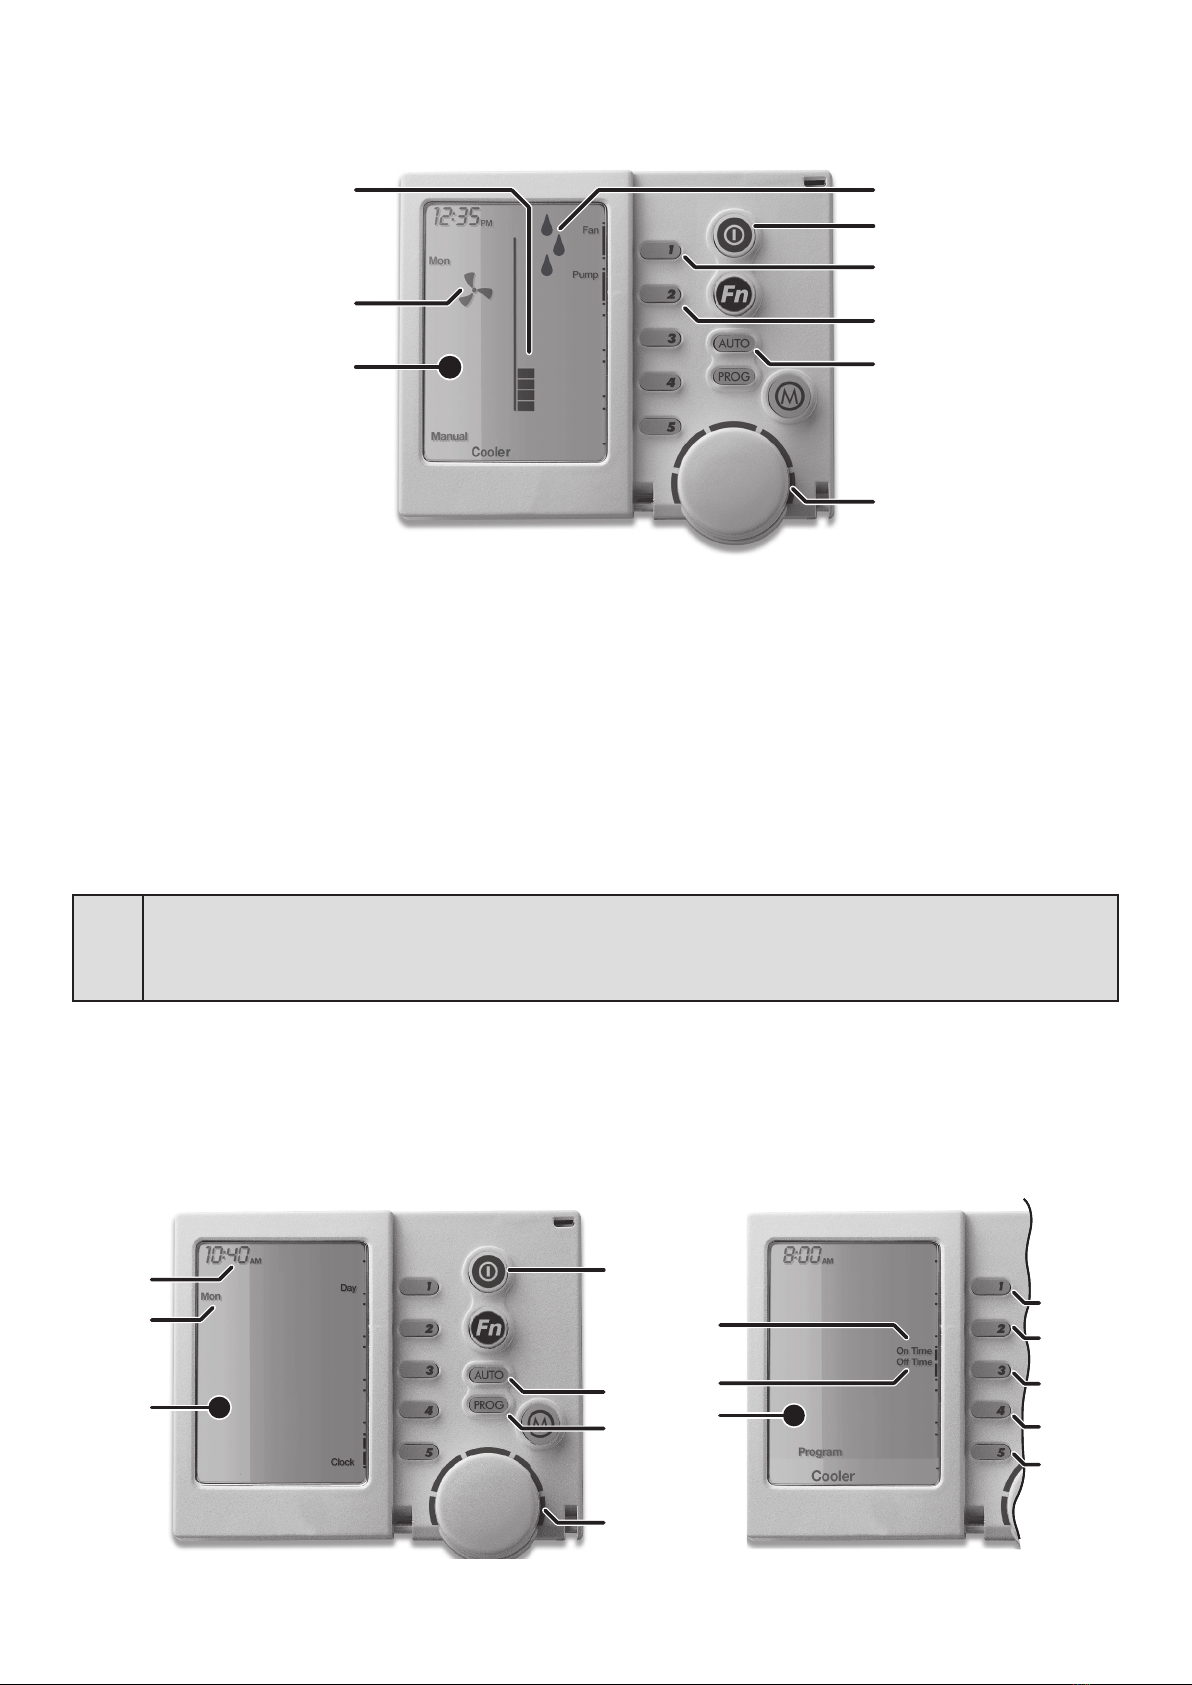
START UP
When the cooling is rst turned ON, there will normally be a delay before the cool air is delivered from the duct
outlets. The delay will vary depending on the model of cooler, but this doesn’t mean the cooler is not operating.
Most models have pre-programmed function times, to allow time to ll the Cooler’s tank with water and/or Pre-wet
the lter pads. Brivis Contour Series models have an additional delay to allow time to open the ServoSeal damper.
The entire process can take up to 8 minutes before cool air is expected from the duct outlets�
SHUT DOWN
On Brivis Advance, Brivis Promina, Brivis Contour and Brivis AD (when tted with optional valve) units, there is
also a delay in emptying the water from the Cooler’s tank for a period after the unit has turned OFF at the end of
use. Brivis Advance, Brivis Promina and Brivis Contour models have an additional pre-programmed tank wash
cycle (ush). This washes the tank with clean water at the end of use. At the same time Brivis Contour models will
also close the motorised ServoSeal damper, which seals the ducting, reducing drafts. The ServoSeal and ush will
occur approx 1 hour after the unit has been turned o.
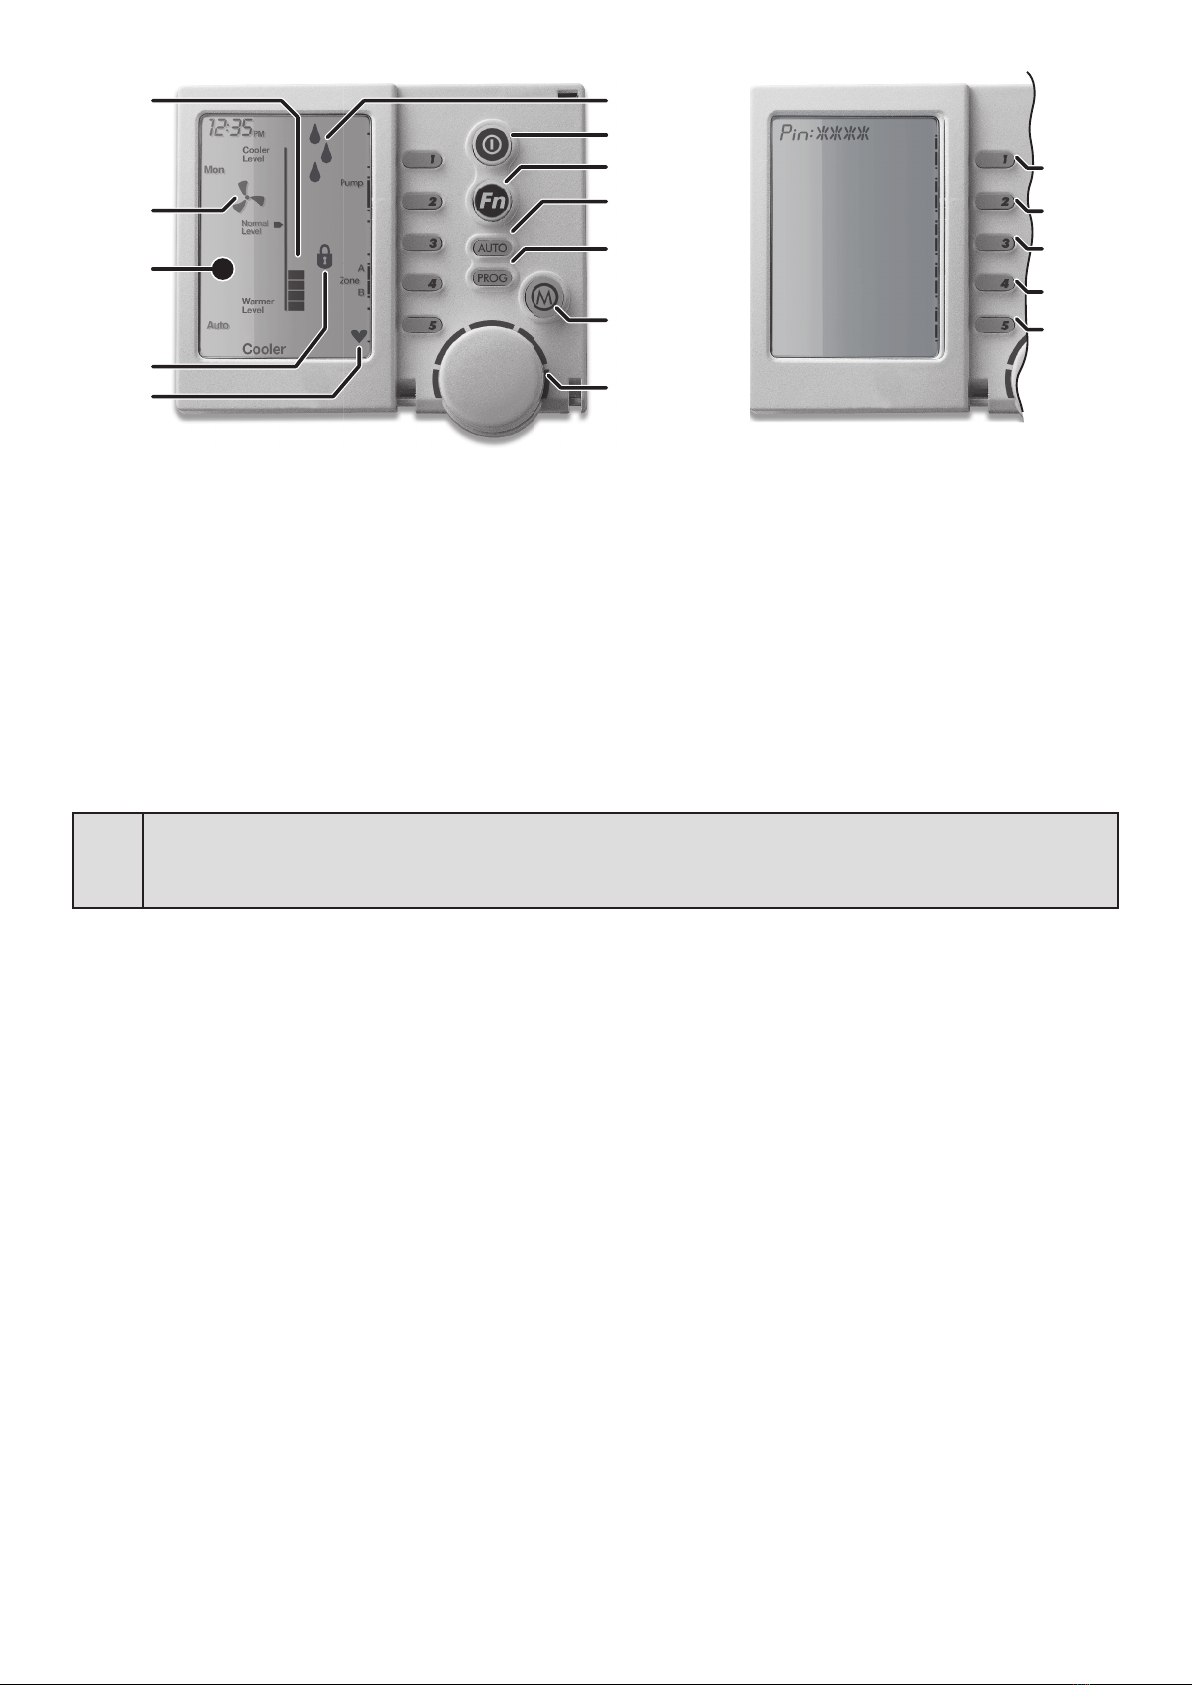
ON HUMID DAYS
On days of high humidity your evaporative cooler works best with the fan on high and perhaps the pump switch
turned o. If moisture is building up on tiled or hard surface areas, ensure that airow from the outlets is directed
across the ceiling rather than down towards the oor. Also ensure that you have enough windows and/or doors
open�
CEILING VENT(S) LOCATION
Vents should be set up so the air is directed across the ceiling. However, they should not be restrictive and the
vents should also be directed to disperse air evenly around the room depending on the location of the vent�
EVAPORATIVE COOLER OPERATION
THE AIR SMELLS A LITTLE DIFFERENT, WHY?
NewCoolingpadscangiveoamildodourwhiletheyaresettlingin.Thisisquitenormal,itwilldissipatequicklyasthenew
padisconstantlyushedduringuse.
START UP
WhenthecoolingisrstturnedON,therewillnormallybeadelaybeforethecoolairisdeliveredfromtheductoutlets.The
delay will vary depending on the model of cooler, but this doesn’t mean the cooler is not operating. Most models have pre-
programmedfunctiontimes,toallowtimetolltheCooler’stankwithwaterand/orPre-wetthelterpads.BrivisContour
Series models have an additional delay to allow time to open the ServoSeal damper. The entire process can take up to 8
minutesbeforecoolairisexpectedfromtheductoutlets.
SHUT DOWN
OnBrivisAdvance,BrivisPromina,BrivisContourandBrivisAD(whenttedwithoptionalvalve)units,thereisalsoadelayin
emptying the water from the Cooler’s tank for a period after the unit has turned OFF at the end of use. Brivis Advance, Brivis
ProminaandBrivisContourmodelshaveanadditionalpre-programmedtankwashcycle(ush).Thiswashesthetankwith
clean water at the end of use. At the same time Brivis Contour models will also close the motorised ServoSeal damper, which
sealstheducting,reducingdrafts.TheServoSealandushwilloccurapprox1houraftertheunithasbeenturnedo.
ON HUMID DAYS
Ondaysofhighhumidityyourevaporativecoolerworksbestwiththefanonhighandperhapsthepumpswitchturnedo.
Ifmoistureisbuildingupontiledorhardsurfaceareas,ensurethatairowfromtheoutletsisdirectedacrosstheceiling
ratherthandowntowardstheoor.Alsoensurethatyouhaveenoughwindowsand/ordoorsopen.
CEILING VENT(S) LOCATION
Vents should be set up so the air is directed across the ceiling. However, they should not be restrictive and the vents should
also be directed to disperse air evenly around the room depending on the location of the vent.
On hot, windy days, ensure that the windows and /or doors open for ventilation are on the sheltered side of the
house.
To cool your whole house, you need windows and / or doors open throughout the house. If you wish to concentrate
your cooling to a select area, simply concentrate all the required ventilation in the targeted area (see below).

Brivis 10 Evap AC OM
ABOUT YOUR BRIVIS NETWORKER WALL CONTROL
The Brivis Networker wall control operates the complete cooling system, communicating key information and
sensing the temperature� It is an important part of the unit and the following text will explain its operation�
1� On/O Button
This is the button to turn the Brivis Networker ON or OFF�
2� Function (Fn) Button
The function button, when used in conjunction with keys 1 & 2 allows the user to perform specialised functions
such as message repeating & Brivis Networker locking� The Fn button also activates the LED backlight�
3� Mode (M) Button
This button is used to set/change the controller PIN�
4� Heartbeat Symbol
A ashing heart icon in the bottom right hand corner indicates that the room temperature is being sensed from
this Brivis Networker�
5� Program (PROG) Button
This button is used to set the Brivis Networkers automatic program�
6� Auto (AUTO) Button
This button allows the user to switch between the Auto Program and the Manual Operation�
7� Rotary Dial
This Dial is used to change the Cooler settings�
8� Variable Keys
The keys numbered 1 to 5 (14 to18) vary their function depending on the program or mode displayed�They
will only have a function if text appears on the screen beside the key & a black rectangular box�(Keys used
for zoning function may also display an arrow)
9� Water Droplets Symbol
The two alternating water droplets indicate that the cooler pump is turned on�
10� Fan Symbol
When the fan is ashing it indicates the unit is in pre-wet mode. When the fan is rotating it indicates the fan
is turned on�
11� Thermometer / Fan Speed Bar
In auto mode the thermometer indicates the set comfort level�In manual mode the thermometer indicates the
set fan speed�
12� Padlock Symbol
The padlock symbol indicates the child proof lock has been set�For more information refer to the section
Locking the Brivis Networker�
13� Digital Display (LCD screen)
Provides you with information about the system�The display shows the current time via a Digital Clock in the
top left corner, the Day of the Week on the left-hand side, and the type of Appliance selected at the bottom.
The display will also show scrolling messages across the top of the screen�The messages usually relate to a
certain action such as cooler Pre-Wet which shows - “Pre-Wetting cooler pads - Please Wait!”
1
9
2
6
5
3
8 - (14,15,16,17,18)
7
4
12
10
13
11
NETWORKER WALL CONTROL OPERATION
ABOUT YOUR BRIVIS NETWORKER WALL CONTROL
The Brivis Networker wall control operates the complete cooling system, communicating key information and
sensingthetemperature.Itisanimportantpartoftheunitandthefollowingtextwillexplainitsoperation.
1. On/O Button
This is the button to turn the Brivis Networker ON or OFF.
2. Function (Fn) Button
Thefunctionbutton,whenusedinconjunctionwithkeys1&2allowstheusertoperformspecialisedfunctions
such as message repeating & Brivis Networker locking. The Fn button also activates the LED backlight.
3. Mode (M) Button
This button is used to set/change the controller PIN.
4. Heartbeat Symbol
Aashinghearticoninthebottomrighthandcornerindicatesthattheroomtemperatureisbeingsensedfrom
this Brivis Networker.
5. Program (PROG) Button
This button is used to set the Brivis Networkers automatic program.
6. Auto (AUTO) Button
This button allows the user to switch between the Auto Program and the Manual Operation.
7. Rotary Dial
This Dial is used to change the Cooler settings.
8. Variable Keys
Thekeysnumbered1to5(14to18)varytheirfunctiondependingontheprogramormodedisplayed.They
willonlyhaveafunctioniftextappearsonthescreenbesidethekey&ablackrectangularbox.(Keysused
for zoning function may also display an arrow)
9. Water Droplets Symbol
The two alternating water droplets indicate that the cooler pump is turned on.
10. Fan Symbol
Whenthefanisashingitindicatestheunitisinpre-wetmode.Whenthefanisrotatingitindicatesthefan
is turned on.
11. Thermometer / Fan Speed Bar
In auto mode the thermometer indicates the set comfort level. In manual mode the thermometer indicates the
set fan speed.
12. Padlock Symbol
The padlock symbol indicates the child proof lock has been set. For more information refer to the section
Locking the Brivis Networker.
13. Digital Display (LCD screen)
Provides you with information about the system. The display shows the current time via a Digital Clock in the
top left corner, the Day of the Week on the left-hand side, and the type of Appliance selected at the bottom.
The display will also show scrolling messages across the top of the screen. The messages usually relate to a
certain action such as cooler Pre-Wet which shows - “Pre-Wetting cooler pads - Please Wait!”

Brivis 11 Evap AC OM
AUTOMATIC PRE-WET
When the Cooler is turned ON, with both the fan and the pump in either Auto or Manual mode, the Cooler will
start a Pre-Wet automatically�The Pre-Wet stage ensures the pads are thoroughly wet before the fan starts�This
prevents warm air being initially blown into your home and contributes to the eective operation and performance
of the Cooler. The Pre-Wet time will vary depending on how long the Cooler has been OFF, and whether it needs
to ll the tank prior to operation. During the Pre-Wet the message “Pre-Wetting cooler pads - Please Wait!” will
scroll across the top of the display�
AUTOMATIC OPERATION
In Auto mode the Brivis Networker automatically turns the pump ON or OFF as required and varies the fan speed
to maintain your selected “comfort level.”
To run the unit in Auto mode, just follow these easy steps:
1� Turn the Brivis Networker on using the ON/OFF button (1)�
2� Press the Auto button (6) until “Auto” appears on the screen.
3� Rotate the Rotary dial (7) to set the comfort level you desire (up to have a cooler comfort level and down to
have a warmer comfort level) the set comfort level (11) is displayed on the LCD screen (13)�
NOTE
It will take approximately 8 minutes for the Cooler to complete the pre-wet before the fan will
turn on. The next time you return to “Auto” these steps will not be necessary because the Brivis
Networker remembers your previous settings.
Benets of using Brivis coolers in Auto mode in preference to Manual mode
• Power and water consumption varies in relation to the chosen comfort level�This comfort level cannot be as
easily maintained in Manual mode�
• In Auto Mode the unit operates only when it is required�
• Enables a set comfort level to be maintained automatically as the outside / inside temperature conditions
change�
• It allows you to pre-set the cooler to turn ON early and not let the house build up heat�
• The outlet airow noise is kept to a minimum, as the fan speed is only as fast as required to maintain the set
comfort level. This slower speed also results in more ecient saturation of the Cooler lter pads, and a cooler
outlet air temperature�
1
6
7
13
11
NETWORKER WALL CONTROL OPERATION
AUTOMATIC PRE-WET
When the Cooler is turned ON, with both the fan and the pump in either Auto or Manual mode, the Cooler will start a Pre-
Wet automatically. The Pre-Wet stage ensures the pads are thoroughly wet before the fan starts. This prevents warm air
beinginitiallyblownintoyourhomeandcontributestotheeectiveoperationandperformanceoftheCooler.ThePre-Wet
timewillvarydependingonhowlongtheCoolerhasbeenOFF,andwhetheritneedstollthetankpriortooperation.
DuringthePre-Wetthemessage“Pre-Wettingcoolerpads-PleaseWait!”willscrollacrossthetopofthedisplay
AUTOMATIC OPERATION
In Auto mode the Brivis Networker automatically turns the pump ON or OFF as required and varies the fan speed to
maintainyourselected“comfortlevel.”
To run the unit in Auto mode, just follow these easy steps:
1. Turn the Brivis Networker on using the ON/OFF button (1).
2. PresstheAutobutton(6)until“Auto”appearsonthescreen.
3. RotatetheRotarydial(7)tosetthecomfortlevelyoudesire(uptohaveacoolercomfortlevelanddowntohavea
warmer comfort level) the set comfort level (11) is displayed on the LCD screen (13)
Benets of using Brivis coolers in Auto mode in preference to Manual mode
• Power and water consumption varies in relation to the chosen comfort level. This comfort level cannot be as easily
maintained in Manual mode.
• In Auto Mode the unit operates only when it is required.
• Enables a set comfort level to be maintained automatically as the outside / inside temperature conditions change.
• It allows you to pre-set the cooler to turn ON early and not let the house build up heat.
• Theoutletairownoiseiskepttoaminimum,asthefanspeedisonlyasfastasrequiredtomaintainthesetcomfort
level.ThisslowerspeedalsoresultsinmoreecientsaturationoftheCoolerlterpads,andacooleroutletair
temperature
Itwilltakeapproximately8minutesfortheCoolertocompletethepre-wetbeforethefanwillturnon.The
nexttimeyoureturnto“Auto”thesestepswillnotbenecessarybecausetheBrivisNetworkerremembersyour
previous settings.

Brivis 12 Evap AC OM
MANUAL OPERATION
Manual operation enables you to control the fan, its speed, and the pump manually.
6
9
1
7
15
14
13
10
11
To run the Cooler in Manual mode, just follow these steps:
1� Turn the Brivis Networker on using the ON/OFF button (1)�
2� Press the Auto button (6) until “MANUAL” appears on the screen.
3� Press Key 1 (14) to turn the fan on (if the fan symbol (10) is not already on the screen)�
4� Press Key 2 (15) to turn the pump on (if the water droplet symbols (9) are not on the screen)�
5� Rotate the Rotary dial (7) to set the fan speed level you desire (up to increase the fan speed and down to
decrease the fan speed)�The set fan speed (11) is displayed on the LCD screen (13)�The message “Pre-
Wetting cooler pads – Please Wait!” will scroll across the display�It will take approximately 8 minutes for
the unit to complete the pre-wet before the fan will turn on�
NOTE
On days of high humidity the fan may be operated without the pump. To turn the pump OFF press
Key 2 (15) and the water droplets (9) will disappear. The next time you return to Manual these
steps will not be necessary because the Brivis Networker remembers your previous settings.
USING THE TIMER
When the Cooler is operating, you can pre-set a time for the Timer to turn the Cooler OFF. Also, when the Cooler
is turned OFF, you can select a time for the Timer to turn it ON automatically. So if you are out for the day you can
set the Cooler to come on and cool the house before you return. Before using the timer function you need to rstly
set the time and day�
5
6
1
7
13
20
19
21
22
13
14
15
16
17
18
NETWORKER WALL CONTROL OPERATION
MANUAL OPERATION
Manual operation enables you to control the fan, its speed, and the pump manually.
To run the Cooler in Manual mode, just follow these steps:
1. Turn the Brivis Networker on using the ON/OFF button (1).
2. PresstheAutobutton(6)until“MANUAL”appearsonthescreen.
3. PressKey1(14)toturnthefanon(ifthefansymbol(10)isnotalreadyonthescreen).
4. PressKey2(15)toturnthepumpon(ifthewaterdropletsymbols(9)arenotonthescreen).
5. RotatetheRotarydial(7)tosetthefanspeedlevelyoudesire(uptoincreasethefanspeedanddowntodecreasethe
fanspeed).Thesetfanspeed(11)isdisplayedontheLCDscreen(13).Themessage“PreWettingcoolerpads–Please
Wait!”willscrollacrossthedisplay.Itwilltakeapproximately8minutesfortheunittocompletethepre-wetbeforethe
fan will turn on
Ondaysofhighhumiditythefanmaybeoperatedwithoutthepump.ToturnthepumpOFFpressKey2(15)
andthewaterdroplets(9)willdisappear.ThenexttimeyoureturntoManualthesestepswillnotbenecessary
because the Brivis Networker remembers your previous settings.
USING THE TIMER
When the Cooler is operating, you can pre-set a time for the Timer to turn the Cooler OFF. Also, when the Cooler is turned
OFF, you can select a time for the Timer to turn it ON automatically. So if you are out for the day you can set the Cooler to
comeonandcoolthehousebeforeyoureturn.Beforeusingthetimerfunctionyouneedtorstlysetthetimeandday.
Brivis 12 Evap AC OM
MANUAL OPERATION
Manual operation enables you to control the fan, its speed, and the pump manually.
6
9
1
7
15
14
13
10
11
To run the Cooler in Manual mode, just follow these steps:
1� Turn the Brivis Networker on using the ON/OFF button (1)�
2� Press the Auto button (6) until “MANUAL” appears on the screen.
3� Press Key 1 (14) to turn the fan on (if the fan symbol (10) is not already on the screen)�
4� Press Key 2 (15) to turn the pump on (if the water droplet symbols (9) are not on the screen)�
5� Rotate the Rotary dial (7) to set the fan speed level you desire (up to increase the fan speed and down to
decrease the fan speed)�The set fan speed (11) is displayed on the LCD screen (13)�The message “Pre-
Wetting cooler pads – Please Wait!” will scroll across the display�It will take approximately 8 minutes for
the unit to complete the pre-wet before the fan will turn on�
NOTE
On days of high humidity the fan may be operated without the pump. To turn the pump OFF press
Key 2 (15) and the water droplets (9) will disappear. The next time you return to Manual these
steps will not be necessary because the Brivis Networker remembers your previous settings.
USING THE TIMER
When the Cooler is operating, you can pre-set a time for the Timer to turn the Cooler OFF. Also, when the Cooler
is turned OFF, you can select a time for the Timer to turn it ON automatically. So if you are out for the day you can
set the Cooler to come on and cool the house before you return. Before using the timer function you need to rstly
set the time and day�
5
6
1
7
13
20
19
21
22
13
14
15
16
17
18
NETWORKER WALL CONTROL OPERATION

SETTING THE TIME & DAY
1. Ensure the Networker is turned OFF using the ON/OFF button (1).
2. PressKey5(18-Clock)andthescreenwilldisplaythemessage“Clocksettingmode”,andthentheDigitalClock(19)will
ash.
3. UsetheRotaryDial(7)toselecttherighttime.
4. PressKey1(14-Day)untilthecorrectdayappearse.g.Mon(20).
SETTING THE COOLER TO TURN ITSELF ON
1. PressthePROGbutton(5)andthedisplaywillashONTIMEandthewordPROGRAM.
2. UsetheRotaryDial(7)tosettheONTIME(i.e.thetimeyouwanttheCoolertocomeON).
3. You can change the settings the cooler will run at here.
When in Manual mode, use the Rotary Dial (7) to adjust the fan speed and press Key 2 (15) to turn the pump ON or OFF. When in
Auto mode, use the Rotary Dial (7) to adjust the comfort level.
4. PressKey3(16-OnTime/OTime)toactivatetheTimer.
SETTING THE COOLER TO TURN ITSELF OFF
1. Ensure the cooler is turned ON.
2. PressthePROGbutton(5)andthedisplaywillashOFFTIMEandthewordPROGRAM.
3. UsetheRotaryDial(7)tosettheOFFTIME(i.e.thetimeyouwanttheCoolertoturnOFF).
4. PressKey3(16-OnTime/OTime)toactivatetheTimer.
5. PressthePROG(5)buttontoexitandsaveyoursetting.
CHECKING YOUR TIMER SETTINGS
Once Timer settings are made you can review or cancel them in a number of methods:
TheLCDscreen(13)displaysOnTime(21)andorOTime(22)toshowthatthesetimershavebeenpre-set.
If you want to check what you’ve done
PressthePROGbutton(5)andthepre-settimewillash.Youcannowmakeadjustmentstoyoursettingsifrequired.
If you change your mind and want to cancel the function
PresstheKey3(16-OnTime/OTime)andthiswillcancelthefunction.
To exit this setting program
PresseithertheON/OFFbutton(1)orthePROGbutton(5).TheBrivisNetworkerremembersthelastsettingandthenext
time you select the Timer it will go to that same setting.
If the pump is going to be used, adequate ventilation (openings) need to be provided to prevent condensation
build up.
If you have dual Brivis Networkers installed, only the Master control has the ability to set the clock time. The
Mastercontrolcanbeidentiedbytheword“clock”besideKey5(18),whiletheBrivisNetworkersareintheo
position
TheLCDscreen(13)displayedOnTime(21)toshowthatanOntimerisset.TocanceltheTimerpressKey3(16).
TheLCDscreen(13)displayedOTime(22)toshowthatanOtimerisset.TocanceltheTimerpressKey3(16).

Brivis 14 Evap AC OM
Press either the ON/OFF button (1) or the PROG button (5)�The Brivis Networker remembers the last setting
and the next time you select the Timer it will go to that same setting�
1
9
2
6
5
3
7
4
12
10
13
11
14
15
16
17
18
CODED MESSAGES
While the Brivis Networker is operating your system, it is also monitoring and controlling every aspect of the
system's performance. If anything unusual occurs, the Brivis Networker will display an error message.
• A message (23) stating "Cooler Fault - E01 Code #?? For assistance call 1300 555 545" will scroll across the
top of the screen� Note that the message will vary depending on the problem�
• Whenever such a message appears, it is a good idea to write it down before doing anything else. This code
contains information that will enable Brivis to deal quickly and easily with anything that requires their attention�
With many of them you will be asked to contact Brivis Service and pass on the message, the model and the
type of appliance�
MESSAGE REPEATING
Push the FUNCTION button (2) then Key 1 (14) immediately after to repeat a message�
NOTE
If no message repeats it means either the button combination was incorrect or the event has
passed. Typical messages displayed advise of some appliance operations such as - “Pre-Wetting
cooler pads - Please Wait!”.
SERVICE NOTIFICATION MESSAGE
When the operating hours logged for an appliance reach a predetermined duration, the spanner symbol
ashes once per second on the networker and a message displays, such as:
Fan run hours indicate it is time for a service call - For assistance call 1300 555 545
A service call may be booked�
RESETTING
If something has interrupted the units operation, the word Reset (26) may appear beside Key 4 (17) while a
message is scrolling� Press Key 4 (17) to re-start the Cooler�
If the Cooler does not resume normal operation, or the error message re-appears, contact Brivis Service.
If the Cooler is still operating but the Brivis Networker is showing an error message try pushing the Key 4 (17) to
clear the fault� If the fault persists contact Brivis Service�
If the Cooler is not operating and any other error message appears, contact Brivis Service.
NETWORKER WALL CONTROL OPERATION
CODED MESSAGES
While the Brivis Networker is operating your system, it is also monitoring and controlling every aspect of the system’s
performance. If anything unusual occurs, the Brivis Networker will display an error message.
• Amessage(23)stating“CoolerFault-E01Code#??Forassistancecall1300555545”willscrollacrossthetopofthe
screen. Note that the message will vary depending on the problem.
• Whenever such a message appears, it is a good idea to write it down before doing anything else. This code contains
information that will enable Brivis to deal quickly and easily with anything that requires their attention.
MESSAGE REPEATING
PushtheFUNCTIONbutton(2)thenKey1(14)immediatelyaftertorepeatamessage.
SERVICE NOTIFICATION MESSAGE
Whentheoperatinghoursloggedforanappliancereachapredeterminedduration,thespannersymbolashesonceper
second on the networker and a message displays, such as:
Fanrunhoursindicateitistimeforaservicecall-Forassistancecall1300555545
A service call may be booked.
RESETTING
Ifsomethinghasinterruptedtheunitsoperation,thewordReset(26)mayappearbesideKey4(17)whileamessageis
scrolling.PressKey4(17)tore-starttheCooler.
If the Cooler does not resume normal operation, or the error message re-appears, contact Brivis Service.
IftheCoolerisstilloperatingbuttheBrivisNetworkerisshowinganerrormessagetrypushingtheKey4(17)toclearthe
fault. If the fault persists contact Brivis Service.
If the Cooler is not operating and any other error message appears, contact Brivis Service.
If no message repeats it means either the button combination was incorrect or the event has passed. Typical
messagesdisplayedadviseofsomeapplianceoperationssuchas-“Pre-Wettingcoolerpads-PleaseWait!”.

LOCKING THE BRIVIS NETWORKER
To prevent any unwanted alterations being made to the coolers settings, the Brivis Networker can be locked via a
4-digitPINcode.InthecaseofdualBrivisNetworkers,ifoneislockedtheotherisalsolocked.
AashingPadlockicon(12)indicatesthattheBrivisNetworkerislocked
To Unlock the Brivis Networker
1. PresstheFUNCTIONbutton(2),followedimmediatelybyKey2(15).
Thescreenwillthendisplay“EnterYourPINnumbertounlockthesystem”.
2. Enter your current user PIN to lock the Brivis Networker.
Thescreenwillnowdisplay“Systemunlocked!”
3. IfanincorrectnumberisenteredpresstheAUTOkey(6)toclearalldigits,thenre-enteryouruserPIN.
IfaninvalidPINisentered,themessage“InvalidPINentered-Tryagain”willscrollacrossthescreen.Theuser
hasthreeattemptsatenteringavalidPIN.Onthethirdfailedattemptthemessage“InvalidPINentered!”willbe
displayed. At this point the Brivis Networker will abort the PIN entry screen, and return to its original state. You will
then need to repeat the process.
Setting the PIN
1. PresstheFUNCTIONbutton(2),followedimmediatelybyKey2(15).Thescreenwillthendisplay“EnterYourPIN
numbertolockthesystem”.
DO NOT ENTER NUMBERS AT THIS STAGE AND CONTINUE TO THE NEXT STEP.
2. PushtheMODEbutton(3).Thescreenwillnowdisplay“UserPINreset–EntermasterPIN”.
DO NOT ENTER NUMBERS AT THIS STAGE AND CONTINUE TO THE NEXT STEP.
3. PushtheMODEbutton(3).Thescreenwillnowdisplaythemessage“UserPINnumber1alteration-EntercurrentPIN”.
IfthisisthersttimeforsettingthePIN,thecurrentPINwillbe“1111”.
If the PIN has been previously altered then enter your current PIN.
Thescreenwillthendisplaythemessage,“EnterthenewPIN”.
4. Enteryournew4-digitPINnumberusingacombinationofKeys1to5(14to18).
Thescreenwillnowdisplay,“RepeattheentryofthenewPIN”.
Providingthatyoure-enterthenewPINcorrectly,thescreenwillnowdisplay“ValidPIN–PINaltered”.
5. IfanincorrectnumberisenteredpresstheAUTOkey(6)toclearalldigits,thenre-enteryouruserPIN.
6. Toexitthisareaatanytime,justpushtheON/OFFkey(1).
To Lock the Brivis Networker
1. PresstheFUNCTIONbutton(2),followedimmediatelybyKey2(15).
Thescreenwillthendisplay“EnterYourPINnumbertolockthesystem”.
2. Enter your current user PIN to lock the Brivis Networker.
Thescreenwillnowdisplay“Systemlockedout!”
3. IfanincorrectnumberisenteredpresstheAUTOkey(6)toclearalldigits,thenre-enteryouruserPIN.
If dual Brivis Networkers are installed, the user PIN codes can only be set at the Master Brivis Networker. The Slave
Brivis Networker can only lock and unlock the system and cannot access the PIN codes.

ZONING
SomesystemsmayincludemultipleCoolerswitheachoperatinginadierentzonearea.Zonekeys(28)willappearonthe
screenandthesewillhavebeensetupandexplainedbytheinstallerwhererequired.
Thesezonescanbeoperatedineither“Manual”or“Auto”modesusingtheZonekeys-Keys4&5(17&18).
Two Zone keys will appear if you have three or four zones and only one Zone key will appear if you have one or two.
DUAL BRIVIS NETWORKER OPERATION
It is possible to have two Brivis Networkers connected to the system. The two Brivis Networkers will operate together, one
willbeconguredasaMasterandtheotherasaSlave,andthesettingsfortheCoolerwillbecommononbothcontrollers.
ThebenetofhavingtwocontrollersistheconvenienceofmakingadjustmentstotheCoolersettingsateitherlocation.
WhenanadjustmentismadeononeoftheBrivisNetworkersitisimmediatelyreectedontheotherBrivisNetworker.
Likewise locking one of the Brivis Networkers also locks the other Brivis Networker. The system can be unlocked at either
Brivis Networker.
Brivis 16 Evap AC OM
1
9
2
6
5
3
7
4
12
10
13
11
14
15
16
17
18
29
28
ZONING
Some systems may include multiple Coolers with each operating in a dierent zone area. Zone keys (28) will
appear on the screen and these will have been set up and explained by the installer where required�
These zones can be operated in either “Manual” or “Auto” modes using the Zone keys - Keys 4 & 5 (17 &18).
Two Zone keys will appear if you have three or four zones and only one Zone key will appear if you have one or
two�
DUAL BRIVIS NETWORKER OPERATION
It is possible to have two Brivis Networkers connected to the system�The two Brivis Networkers will operate
together, one will be congured as a Master and the other as a Slave, and the settings for the Cooler will be
common on both controllers. The benet of having two controllers is the convenience of making adjustments to the
Cooler settings at either location�
When an adjustment is made on one of the Brivis Networkers it is immediately reected on the other Brivis
Networker�
Likewise locking one of the Brivis Networkers also locks the other Brivis Networker�The system can be unlocked
at either Brivis Networker�
NOTE
In Auto mode, only the Master Brivis Networker will sense the comfort level within the house.
Only the Master Brivis Networker has the ability to set the clock time. Look for the word Clock (30)
beside Key 5 (18), while both the Brivis Networkers are in the o position.
BATTERIES
The Brivis Networker requires no batteries. If the Brivis Networker has no screen, check your 240 volt power
supply (at the Cooler) or check the thermostat cable�
30
18
Please note: This
picture displays the
lid closed. To reveal
more keys ip down
the lid from the top
right hand corner.
NETWORKER WALL CONTROL OPERATION
Brivis 16 Evap AC OM
1
9
2
6
5
3
7
4
12
10
13
11
14
15
16
17
18
29
28
ZONING
Some systems may include multiple Coolers with each operating in a dierent zone area. Zone keys (28) will
appear on the screen and these will have been set up and explained by the installer where required�
These zones can be operated in either “Manual” or “Auto” modes using the Zone keys - Keys 4 & 5 (17 &18).
Two Zone keys will appear if you have three or four zones and only one Zone key will appear if you have one or
two�
DUAL BRIVIS NETWORKER OPERATION
It is possible to have two Brivis Networkers connected to the system�The two Brivis Networkers will operate
together, one will be congured as a Master and the other as a Slave, and the settings for the Cooler will be
common on both controllers. The benet of having two controllers is the convenience of making adjustments to the
Cooler settings at either location�
When an adjustment is made on one of the Brivis Networkers it is immediately reected on the other Brivis
Networker�
Likewise locking one of the Brivis Networkers also locks the other Brivis Networker�The system can be unlocked
at either Brivis Networker�
NOTE
In Auto mode, only the Master Brivis Networker will sense the comfort level within the house.
Only the Master Brivis Networker has the ability to set the clock time. Look for the word Clock (30)
beside Key 5 (18), while both the Brivis Networkers are in the o position.
BATTERIES
The Brivis Networker requires no batteries. If the Brivis Networker has no screen, check your 240 volt power
supply (at the Cooler) or check the thermostat cable�
30
18
Please note:
This
picture displays the
lid closed. To reveal
more keys ip down
the lid from the top
right hand corner.
NETWORKER WALL CONTROL OPERATION
In Auto mode, only the Master Brivis Networker will sense the comfort level within the house. Only the Master
BrivisNetworkerhastheabilitytosettheclocktime.LookforthewordClock(30)besideKey5(18),whileboththe
BrivisNetworkersareintheoposition.
BATTERIES
TheBrivisNetworkerrequiresnobatteries.IftheBrivisNetworkerhasnoscreen,checkyour240voltpowersupply(atthe
Cooler) or check the thermostat cable.

CARE & MAINTENANCE
The unit is not cooling very well
• Check the water supply tap is turned on at the Cooler
• Check the pump has been selected on the wall control.
• Checksucientdoorand/orwindowshavebeenopened.Refertoexhaustrequirementscoveredin“BeforeOperating
Your Evaporative Cooler.
There is no air coming out of some vents
• Contact our service department to place a service call.
There is moisture on my tiles
• Checktheventsaredirectingairowacrosstheceilingandnottowardstheoor.Ifitishumidturnthepumpo.
• Checksucientdoorand/orwindowshavebeenopened.Refertoexhaustrequirementscoveredin“BeforeOperating
YourEvaporativeCooler”
The padlock is appearing on the screen
• Thisindicatesthatthechildprooflockhasbeenactivated.Refertothesectionon“ToUnlocktheBrivisNetworker”
SERVICE MAINTENANCE - ANNUAL CLEAN & SANITISE
Your ducted evaporative cooler should be cleaned and sanitised annually after the date of installation. Please contact us on
(03)8360-9622or[email protected]12-monthsafterinstallationtobookintheservice.
Failure to do so during the product warranty period may void your warranty. This periodic service and maintenance will
prolongtheusefullifeoftheunit,andhelpkeepitrunningsafelyandatoptimumeciency.

FAQ
Q. How often should the cooler be serviced?
A.Brivisrecommendthecoolerisservicedevery2yearsataminimumtoensureitoperatesatpeakeciency
Q. What is done in a service?
A. Our comprehensive service plan designed to maintain your cooler includes.
• Checklterpadmaterialforholesordeterioration.Thepadswilldeteriorateovertimeandlosetheirwater
• absorption ability. Replace pads as required.
• Clean the tank and internal surfaces.
• Cleanthelterpadsandushwithwater.
• Withthelterpadsinposition,switchONthepowersupplyisolatingswitchandoperatetheunit.
• Ensurethepumpisoperating,andvisuallycheckthepadsexternallyforevenwaterdistribution.
• Ensure the water inlet is operating correctly.
• Ensurethewatersystemisoperatingtotheminimumandmaximumwaterlevels.
• Checkthatthewatersupplypressureissucienttollthetankwithintheallottedtime.
• Checkthefanoperates,andvariesspeedbetweentheminimumandmaximumsettingontheWallControl.
• Check and lubricate all moving parts.
• On Brivis Contour Series and some Advance Series models, ensure the ServoSeal damper mechanism is opening and
closing correctly.
Please note that to maintain your warranty, the above servicing needs to be conducted by an authorised person
trained in the service of Brivis Coolers.
Q. I own a Brivis AD cooler - Why is water continually running while the unit is on?
A.AllBrivisADmodelsusethe“bleedo”methodfortankwaterqualitycontrol.This“bleedo”willcontinuallyridthecooler
of any salt or sediments and allow for the tank to be continually topped up with clean water.
Q. I own a Brivis Advance or Brivis Promina cooler - Why does the unit dump water periodically during operation?
A.BrivisAdvanceandBrivisProminacoolersusethe“RunningRefresh”methodfortankwaterqualitycontrol.This“Running
Refresh”ensuresthatthesaltorsedimentsaccumulatinginthecoolerdonotexceedanacceptablelevelbyperiodically
ushingthetankwhilethecoolerisoperating.
Q. The air smells a little dierent. Why?
A.NewCoolingpadscangiveoamildodourwhiletheyaresettlingin.Thisisquitenormal,itwilldissipatequicklyasthe
newpadisconstantlyushedduringuse.Itmayalsobeindicatingthattheunitrequiresaservice.
Q. How much water does my evaporative cooler use?
A. The amount of water an evaporative cooler uses is dependant on the evaporation rate of the coolers pads. The more
waterthecoolercanevaporateforagivenconditionandairow,themorecoolingpotentialthecoolerhas.
The evaporation rate varies depending on the current weather conditions, the size of the cooler, the speed of the coolers fan
orthevelocityoftheairthroughthepads,andtheconditionandtypeofthelterpadmaterial.
In addition to the cooler evaporating water, water is also displaced to maintain the water quality within the cooler so that the
coolers pads and other components do not deteriorate prematurely.

FAQ
Q. Can I run the system when I am not home?
A. Evaporative cooling relies on doors and/or windows being open so you can run it when you are not home, provided you
have the required ventilation openings
Q. How much water does the tank of my cooler hold?
Model Tank Capacity (litres)
Brivis Contour Series L36,L46,L56,L66,L76 12
Brivis Promina P36,P46,P56,P66,P76 12
Brivis Advance Series F36D,F56D,F76D 15
Brivis Advance Plus F46D,F66D,F86D 15
Brivis AD AD56BAL,AD56DBAL,AD66/BAL,AD66D/BAL,AD86/D 32
Q. How many doors and windows should I have open?
A. Refer to the section on openings required. The table gives a guide to the amount of opening area required for each model
inm2,andalsogivessuggestionsonhowtoprovidethis.
Q. Why is there condensation and moisture on my tiles?
A.Makesuretheventsaredirectedacrosstheroomandnottowardstheoor.Makesuresucientdoorsandwindowsare
open.Refertothesectiononopeningsrequired.Ifitisahumiddayturnthepumpo.
Q. There is no air coming out of some of the vents
A.Itishighlyprobablethatthisisaninstallationissue.Pleasecontactyourinstallerintherstinstance.
Q. Can I run heating through the same ductwork as my evaporative cooler?
A.No,thedieringtechnologybetweenductedheatingandevaporativecoolingdoesn’tallowtheunitstosharethesame
ductwork.Also,evaporativecoolingrequireslargerductworkforairow.
Q. How far should my cooler be away from sanitary vents?
A.Theunitshouldbeatleasta5metreradiusawayfromasanitaryoutlet.
Q. How cool is cool?
A. The degree of cooling available from any type of air conditioning, is dependent on the outside weather conditions. Your
Evaporative Cooler works best on hot, dry days. After all, that’s when you require the most relief.
Q. Should the unit have its own circuit in the meter box?
A.Yes,werecommendthepowersocketiswiredbacktothemeterboxonadedicatedpowercircuit.
Q. Should water be coming out of my evaporative cooler during operation?
A.BrivisAdvanceandBrivisProminaSeriesmodelswillcompleteaushserviceapproximatelyevery20cyclesofthepumps
operation.Thismeansyouwillseetheunitdumpthewateroutoftheoverowpipe.
BrivisContourSeriesmodelswillnotdumpanywaterduringoperationastheyarettedwithanAquaSavewhichoperates
to keep the water clean.
BrivisADmodelswillhaveasmallcontinuousowfromthedrainoutlet.

Q. Why doesn’t my evaporative cooler turn on when the current time and room temperature is displayed yet the
word ‘COOLER’ is not?
A. Your evaporative cooler has lost communication with your Networker wall controller, a service call is required.
Q. We have a unit with a Brivis Networker Wall Controller. How is the LED screen backlight activated without
changing any setting? Is there one key to press that activates the backlight without aecting the current controller
function?
A. The LED backlit screen can be activated by pressing the Function key (Fn button).

Brivis 26 Evap AC OM
TERMS OF WARRANTY – AUSTRALIA
Rinnai Australia Pty. Ltd. ABN 74 005 138 769, 100 Atlantic Drive, Keysborough VIC 3173.
NOTICE TO CONSUMERS UNDER AUSTRALIAN CONSUMER LAW
Our goods and services come with guarantees that cannot be excluded under the Australian Consumer Law�
For a major failure with a good, you are entitled to a replacement or refund and compensation for any other
reasonable foreseeable loss or damage. If the failure does not amount to a major failure and if the goods fail
to be of acceptable quality, you are also entitled to have the goods repaired or replaced.
For a major failure with the service, you are entitled to cancel your service contract with us and obtain a refund
for the unused portion, or to compensation for its reduced value. You are also entitled to be compensated for
any other reasonably foreseeable loss or damage. If the failure does not amount to a major failure you are
entitled to have problems with the service rectied in a reasonable time and, if this is not done, to cancel your
contract and obtain a refund for the unused portion of the contract�
The benets provided by this Warranty are in addition to any other rights and remedies available to a consumer
under the Australian Consumer Law and any other law which may apply to the goods and or services�
1 DEFINITIONS
The terms listed below shall have the following meanings:
1 “Authorised Service Representative” means an independent service contractor authorised by Rinnai or
Rinnai service personnel�
2 “Rinnai” means Rinnai Australia Pty Ltd (ABN 74 005 138 769) and any related company�
3 “Certicate(s) of Compliance” means certicate(s) issued by licensed personnel (including plumbers,
refrigeration mechanics, electricians or other relevant tradespeople) to certify that any prescribed works comply
with applicable regulatory requirements�
4 “Certicate(s) of Occupancy” means certicate(s) issued by the local government authority (or similar
organisation) which certies that a home can be occupied.
5 “Installation Site” means the site at which the Product is originally installed�
6 “Normal Business Hours” means 8:30am to 5:00pm Monday to Friday, excluding public holidays.
7 “Operating/Installation Instructions” means the user manual or other documentation which provides
detailed instructions on the proper operation and maintenance of the Product�
8 “Other Applications” means any Product used for purposes other than Residential & Light Commercial
Applications. Other Applications may include but are not limited to factory, IT/Server room, telephone exchange,
processing area (e.g. bakery, kitchen, warehouse, swimming pool, agricultural facilities such as a nursery).
Any Product which has been installed, for whatever purpose, as a retrot component to an existing system, will
also be classed as being part of an “Other Application” regardless of the purpose of use of the existing system
into which such product has been installed�
9 “Purchaser” means the end user of the Product, the person named as owner in the Warranty certicate, the
holder of the Proof of Purchase or the holder of a property transfer document where the Product is included
as part of the chattels�
10 “Product” means the equipment purchased by the Purchaser and described in Section 2 of this document�
11 “Proof of Purchase”
means a Tax Invoice or Receipt in respect of the Product. In the case of new constructions,
a Certicate of Occupancy or a Certicate of Compliance that details the date of installation or commissioning
will suce.
12 “Qualied Installer” means the qualied installation contractor who is responsible for performing the
installation work in the manner prescribed by local and statutory regulations, including compliance with any
relevant and to Rinnai specications, including Australian Standards.
13 “Residential & Light Commercial Applications” means any Product for use in residential or light commercial
applications where
a) the Product is solely used for the purpose of human comfort; and
b) the ambient temperature of the space the Product is intended to heat or cool is inuenced solely or
primarily by natural exterior weather conditions rather than by man-made or mechanical heat sources�
Examples of Residential & Light Commercial Applications include, homes, oces, hotels, apartments,
nursing homes, hospitals, health care premises, shopping centres, and retail stores.
WARRANTY

Brivis 27 Evap AC OM
2 TERMS OF WARRANTY
2�1
Subject to the Terms of Warranty set out in this document, eective from the date of purchase by the Purchaser,
the Product is warranted to be free from defects in materials & factory workmanship for the period set out in
table below:
PRODUCT GROUPS PARTS LABOUR
Residential and Light Commercial
Evaporative Coolers & Ducted Gas Heaters (excluding
Compact Classic Series)
5 Years
*Extended 4
Years Option
5 Years
*Extended 4
Years Option
Ducted Gas Heaters - Compact Classic Series 3 Years 3 Years
Refrigerated Airconditioning Products 5 Years 5 Years
Ducted Gas Heaters - Heat Exchangers and Burners
Evaporative Coolers - Structural components only 10 Years N/A
Portable Air conditioning 2 Years N/A
Wi-Fi Devices 1 Year 1 Year
Other Applications All Product Groups 2 Years 1 Year
After Market Spare Parts 1 Year N/A
*Extended Warranty Option
Up to 4 year extended warranty (in addition to the standard warranty period listed above)
applies on selected products when you opt in to the Rinnai Service Advantage program�
This program has terms and conditions, including the requirement for scheduled servicing
of the product by Rinnai�
To participate in the program you must register your product online at: www�rinnai�com�au/
support-resources/ warranty-registration/ within the rst 12 months of the product being
installed�
2�2 Rinnai will determine in its sole discretion, which classication the Product ts into and the corresponding
Warranty that shall apply�
2�3 An Authorised Service Representative will repair or replace, at its option, the Product or any part of the
Product that its examination shows to be defective�The repair or replacement shall be performed during
Normal Business Hours by an Authorised Service Representative�Repair by persons other than an Authorised
Service Representatives may void the Warranty�
2�4 Alternatively to clause 2.3 above, Rinnai can at its discretion elect to pay you an amount equivalent to the cost
of repairing or replacing the Product�
2�5 If Rinnai provides you with either the replacement costs or replacement product, ownership of the original
Product shall immediately transfer to Rinnai�
2�6 Rinnai is responsible for reasonable costs associated with legitimate warranty claims, including call-out of an
Authorised Service Representative to inspect the Product� Rinnai is not responsible for:
a) costs for tradespeople engaged by you that are not Rinnai Authorised Service Representatives�
b) any costs, including call out costs for a Rinnai Authorised Service Representatives, associated with a
Product which is determined upon inspection not to be covered by this warranty�
2�7 Rinnai will reimburse any reasonable costs associated with making a legitimate warranty claim against Rinnai
which are not otherwise specied above.
2�8 The Warranty of the Product requires that, in addition to all other conditions, the Purchaser conducts regular
and/or preventative maintenance as may be specied by the Operating/Installation Instructions or otherwise
directed by Rinnai and required by the level of usage and the usage environment, including the use of
correct and uncontaminated refrigerants and lubricants. Refrigeration, plumbing and electrical works must be
undertaken by licensed personnel�
2�9 Where a Product or failed component is replaced under warranty, the time remaining on the original Product
warranty period will continue to apply and the replacement product or part will be subject to the original
warranty period only�
WARRANTY

Brivis 28 Evap AC OM
3 CONDITIONS OF WARRANTY
3�1 The Purchaser may only obtain the benet of the Warranty if the Purchaser:
a) maintains and has the Product serviced in accordance with the instructions set out in the service section
of the relevant Service or Owner’s Manual;
b) complies with clause "7 Purchaser’s Responsibilities" on page 29;
c) noties Rinnai within 30 days of a defect occurring or, in the case of a latent defect, becoming apparent,
that a claim is being made under this Warranty; and
d) provides, in support of the claim made under this Warranty, a Proof of Purchase.
3�2 This document (and any statutory consumer guarantees) represents the only Warranty given by Rinnai in
respect of the Product. No other person or organisation is authorised to oer any alternative warranty on
behalf of Rinnai�
3�3 If the date of purchase cannot be established to Rinnai’s satisfaction, the date shall be deemed to be 2
months after the date of manufacture or the date of sale by Rinnai, whichever is the latter.
3�4 This warranty applies to Products which are manufactured on or after the date of publication of this warranty
but before the next date of publication of this warranty�
4 EXCLUSIONS
4�1 This Warranty does NOT cover:
a) damage, problems or failure resulting from improper operation and/or inadequate maintenance by the
Purchaser (refer Purchaser’s Responsibilities section below);
b) damage, problems or failure resulting from improper or faulty installation. The Product must be installed
by a Qualied Installer in accordance with applicable regulations. Where applicable, Certicate(s)
of Compliance must be obtained by the purchaser from the Qualied Installer and presented to the
Authorised Service Representative;
c) damage, problems or failure caused by factors external to the Product including, but not limited to, faulty
or poor external electrical wiring, incorrect or faulty power supply, voltage uctuations, over voltage
transients or electromagnetic interference, inadequate or faulty gas, drainage services, or water services,
including water pressure, and non-potable water;
d) damage, problems or failure caused by acts of God, re, wind, lightning, ood, storm, hail storm fallout,
vandalism, earthquake, war, civil insurrection, misuse, abuse, negligence, accident, pests, animals, pets,
vermin, insects, spiders/bugs or entry of foreign objects or matter into the Product such as dirt, debris,
soot or moisture;
e) damage, problems or failure caused by environmental conditions including, but not limited to, excessive
moisture, salt or other corrosive substances or atmospheric conditions;
f) Product which has been installed in a portable or mobile building, structure or application including, but
not limited to, a caravan, boat or trailer;
g) Product which has been re-installed at a location other than the original site;
h) any consumable item supplied with the Product including, but not limited to, an air lter, battery, fan belt,
igniter or cooler pad;
i) installation of third-party components that may be attached to the Product. These include, but are
not limited to, control wiring, ducting, return air lter(s) grille, register, diuser, zone motors, controls/
thermostats, pipe work and fabricated or added components. These items remain solely the responsibility
of the Qualied Installer;
j) installations where electrics/electronics may be subjected to moisture/chemicals (e.g. swimming pools
or nurseries);
k) any repair, which is needed as a result of an accident, misuse, abuse or negligence;
l) Product that is utilised in an environment (indoor and outdoor) outside its specied operating range; and
m) fair wear and tear to the Product�
n) On-site labour warranty on portable (non-xed installation) Products – In respect of such Products the
Purchaser must return the Product to the supplier for repair or replacement)�
WARRANTY

Brivis 29 Evap AC OM
5 LIMITATIONS
5�1 Third parties are often involved in providing advice to consumers about the climate control solutions best
suited to the consumer’s needs. Any advice or recommendations given by such parties, including advice
about Product tness for purpose and overall system design, sizing and application are not the responsibility
of Rinnai. This includes but is not limited to the heat load calculations, airow and system balancing.
5�2 This Warranty does not apply to any Product installed at an Installation Site which is outside Australia�
5�3 Except where inconsistent with the purchaser’s statutory rights and the rights given by this Warranty, all
liabilities of Rinnai for any direct, special, indirect or consequential loss or damage, any damage or expense
for personal injury or any loss or destruction of property, arising directly or indirectly from the use or inability
to use the Product or any of its parts and/or servicing the Product, are expressly excluded.
6 TRAVEL, TRANSPORT & ACCESS COSTS
6�1 The Purchaser must pay freight charges, in-transit insurance expenses and travelling costs for repairs/
replacements under this Warranty, that are required to be performed 50km from the nearest Rinnai branch or
Authorised Service Representative�
6�2 Subject to clause 6.3, Rinnai will pay freight charges, in-transit insurance expenses and travelling costs for
repairs/replacements that are required to be performed less than 50km from the nearest Rinnai branch or
Authorised Service Representative, subject to the following:
a) Rinnai will arrange for such repairs/replacements and make any payment directly to the third party to
provide the freight, in-transit insurance or travel services; or
b) if Rinnai considers appropriate, it will authorise the Purchaser in writing to pay for the relevant freight
charges, in-transit insurance expenses or travelling costs and then, upon provision by the Purchaser to
Rinnai of a tax invoice showing those costs have been incurred, reimburse the Purchaser for such costs
which are within the terms of the authorisation. If the Purchaser pays for the relevant freight charges,
in-transit insurance expenses or travelling costs without written authorisation from Rinnai, Rinnai will not
reimburse the Purchaser for such costs�
6�3 The Purchaser must pay all costs and expenses in respect of:
a) any service call out fee if the Product is not accessible for service
b) making the Product accessible for service, for example, restricted access or working at heights, or the
labour cost for an additional person due to OHS requirements�
c) providing a safe working environment for installation, service, maintenance or repair of the Product;
d) any surcharge applicable in respect of supplying replacement parts outside Normal Business Hours; and
e) any other costs and expenses in relation to claiming the Warranty that is not covered by clause 6�2�
7 PURCHASER’S RESPONSIBILITIES
7�1 The Purchaser must operate and maintain the Product in accordance with the Operating Instructions and
service maintenance schedule, including conducting an appropriate number of services to the unit during the
Warranty period, based on usage and the usage environment including but not limited to;
a) regularly cleaning the air lter(s) and replacing them where necessary;
b) replacing expired batteries or other consumables as required;
c) ensuring that the condensate drain is kept clean and clear of obstructions�
HOW TO MAKE A WARRANTY CLAIM:
If you wish to make a warranty claim in respect of any Portable Product, please return it to the place of purchase,
or if that is not possible, contact Rinnai to enquire about alternative arrangements.
If you wish to make a warranty claim in respect of any xed Product, please contact Rinnai on the details set out
below to make arrangements for an Authorised Service Representative to inspect the product�
As per clause 2.6 of the Terms and Conditions of Warranty, purchasers are responsible for the costs of any repair
and/or call out fee where, on inspection, the alleged defect is found by Rinnai’s Authorised Service Representative
not to be covered by this warranty or any statutory consumer guarantee applicable to the Product�
The Terms and Conditions of Warranty contain important information about your rights and obligations under this
warranty� Please read them fully and carefully before making a claim�
WARRANTY
This manual suits for next models
30
Table of contents
Popular Air Cleaner manuals by other brands

GPS
GPS GPS-iRIB-18 Installation, operation & maintenance manual

XPower
XPower X-2000 Series owner's manual

Germguardian
Germguardian GEM GUARDIAN GG1000 Use and care instructions

M Confort
M Confort E3500S user manual

Air free
Air free P1000 instruction manual

Plasma Made
Plasma Made AAC37170 Installation and user manual