Plymold Cebra Wall Style User manual

Revised06/24/19
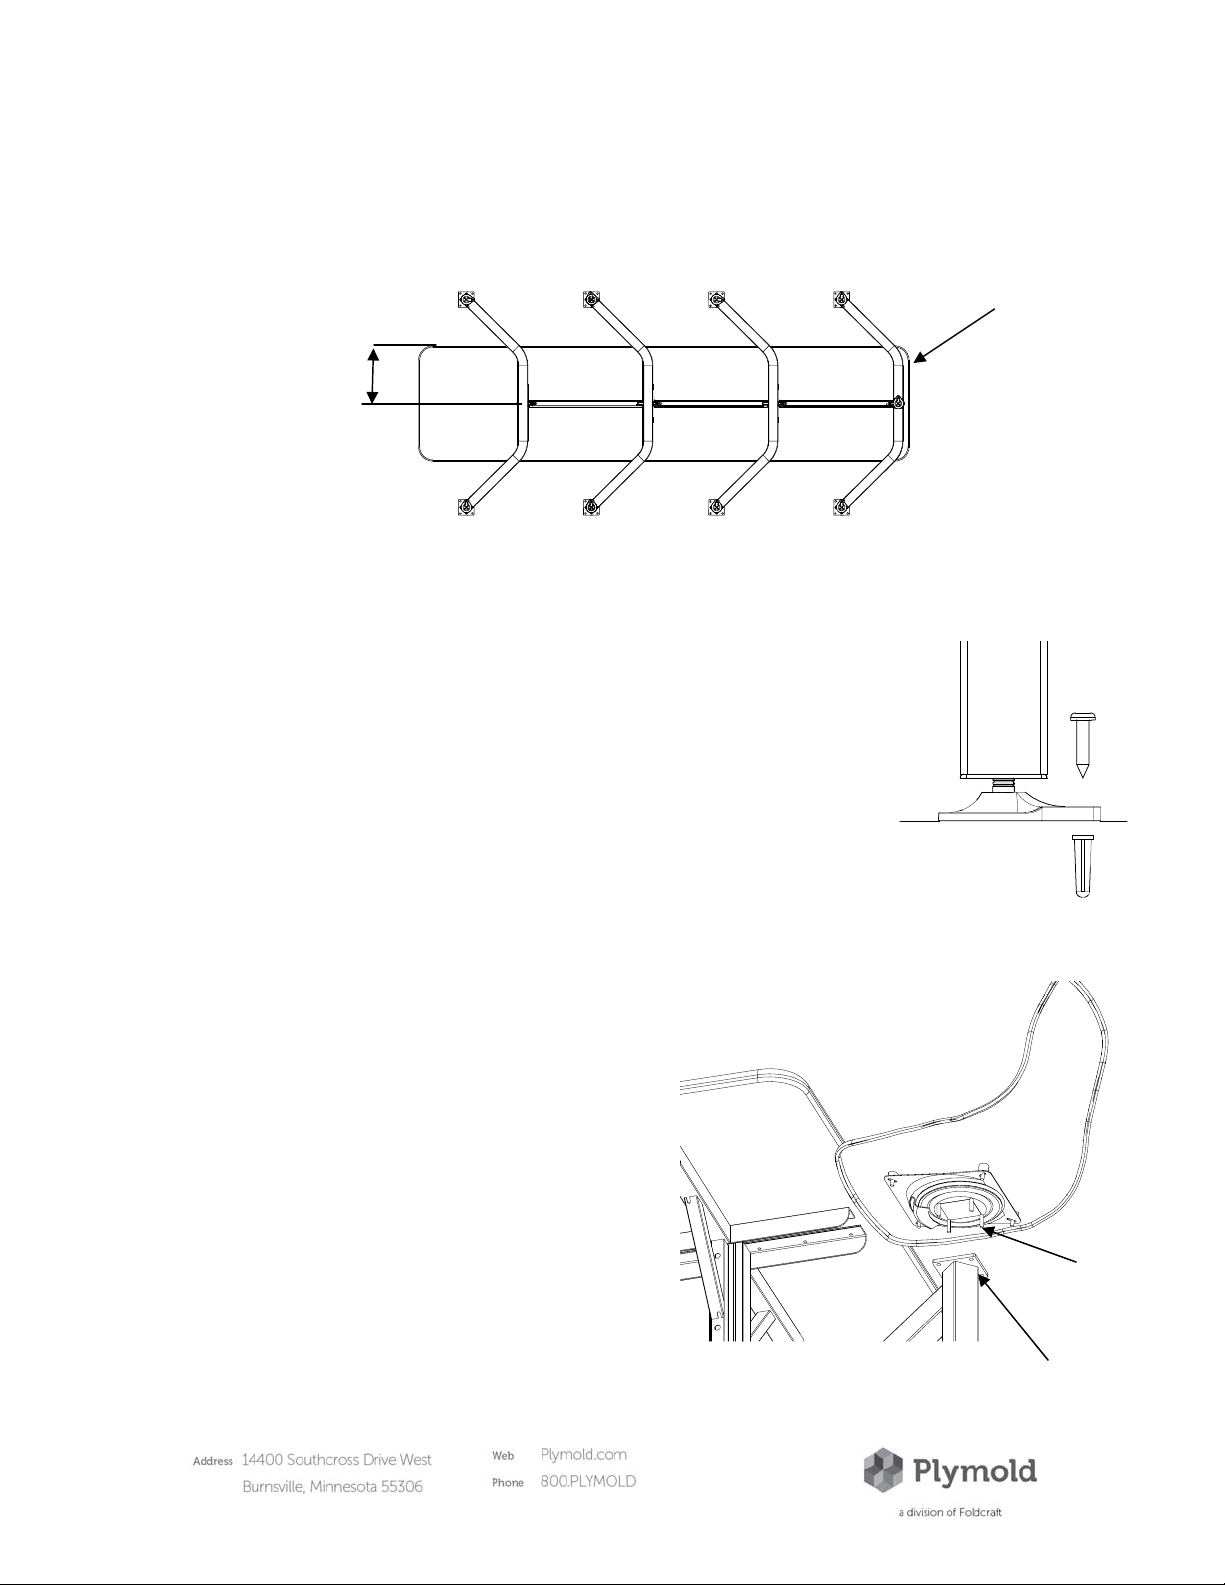
CebraWallStyle
Clusterframes
Z000000081

CebraWallStyleFramesPage2of5
UnpackingYourShipment
Unpackandidenfyeachcomponentin
eachboxthatyoureceived.
Components
Frame—3Leg
Coupling
#10x1”ScrewTeardropGlide
PlascFloorAcornNut3/8‐16
Hardware
HexHeadCap
Screw3/8‐16x4.5
HexHeadCap
Screw3/8‐16x3.5
ToolsRequired
PencilorMarkerScrewGunw/#2PhillipsBitScrewDriverHammerDrillw/1/4”MasonryBit
LevelTapeMeasure
7/16”,9/16”SocketandOpenendWrench
Frame—2Leg

CebraWallStyleFramesPage3of5
Assembly
Step1:GlideAssembly
a.Assembleteardropthread‐inglideintotheinsert,
ontheboomofeachofthelegs.
Step2:FrameAssembly(4SeatWallStyle)
a.Startwitha3legframealignupperholesinframewithholesincoupling.Using(2)3/8”‐16x3.5hexheadcapscrew
andacornnut,assemblethethreelegsecontothecoupling.(fig.1)
b.Nowgraba2legframeandaligntheupperholeswiththeotherendofthecoupling.Using(2)3/8”‐16x3.5hex
headcapscrewandacornnut,assemblethetwolegsecontothecoupling.(fig.1)
fig.2
Finished
Assembly
fig.1
31/2”Cap
Screw
AcornNut
2LegFrame
3LegFrame
Step3FrameAssembly(6SeatWallStyle)
a.Startwitha3legframealignupperholesinframewithholesincoupling.Using(2)3/8”‐16x3.5hexheadcap
screwandacornnut,assemblethethreelegsecontothecoupling.(fig.3)
b.Nowgraba2legframealongwitha2ndcoupling.Aligntheupperholeswiththeotherendofthecoupling.Using
(2)3/8”‐16x4.5hexheadcapscrewandacornnut,assemblethe2legsecontothetwocouplings.(fig.3)
c.Grab1more2LegSupport.Alignholesincouplingwithholesinvercalsupportsofyour2legframe.Using
3/8”‐16x3.5hexheadcapscrewandacornnut,assemblethecouplingandlegtogether.(fig.3)

CebraWallStyleFramesPage4of5
Assembly
fig.4
Finished
Assembly
31/2”Bolt
AcornNut
AcornNut
41/2”Bolt
31/2”Bolt
2Leg
2Leg
3Leg
fig.3
Step4FrameAssembly(8SeatWallStyle)
a.Startwitha3legframealignupperholesinframewithholesincoupling.Using(2)3/8”‐16x3.5hexheadcapscrew
andacornnut,assemblethethreelegsecontothecoupling.(fig.3)
b.Nowgraba2legframealongwitha2ndcoupling.Aligntheupperholeswiththeotherendofthecoupling.Using
(2)3/8”‐16x4.5hexheadcapscrewandacornnut,assemblethe2legsecontothetwocouplings.(fig.3)(Repeat
thisstepa2ndme)
c.Grab1more2LegSupport.Alignholesincouplingwithholesinvercalsupportsofyour2legframe.Using3/8”‐
16x3.5hexheadcapscrewandacornnut,assemblethecouplingandlegtogether.(fig.3)
fig.6
Finished
Assembly
31/2”Bolt
Acorn
Nut
AcornNut
41/2”Bolt
31/2”Bolt
2Leg
2Leg
3Leg
fig.5
2Leg
CebraWallStyleFramesPage5of5
Assembly
Step5:FasteningTableTops
a.PlaceTableAsshownforyourdesiredunit.Aachto
frameusing#10x1”panheadscrewsthroughanglebrack‐
etsattopofframes.
1/2Top
Width
Tabletooverhangbackface
offrame1”.(Oponalto
haveframeflush.)
Step6:FastenGlidestoFloor
a.Rotateglidestopointthemounngholetowardsthecenterofthebooth.
b.Withapencil,marktheholelocaononthefloorusingtheholesintheglide.
c.Turntheglideaway90degreesfromitscurrentposiontoexposethemarkonthe
floor.
d.Usingahammerdrillanda1/4”masonrybit,drilla11/4”deepholeonthepencil
mark.
e.Placeaplascanchorintheholeandthenrotateglidebacksotheholelinesupwith
theplascanchorinthefloor.
f.Inserta#10x1.0”screwthroughtheholeintheglideandsecureintotheplasc
anchor.
Note:Framesmustbeanchoredtothefloortomaintainstabilityandprevent
personalinjury.
Step8:Clean
a.Cleanandprotecttopunlreadyforuse.
Step7:AachChairHeads
a.Align4,1/4”threadedstudsonchairheadwiththe4holes
intheplateonthetopofeachleg.
b.Fastenthechairheadtotheframeusing1/4”Washerand
1/4‐20nylocnut.(Notethishardwareissuppliedwiththe
chairhead)
Threaded
Studs
PlateHoles
Table of contents
Other Plymold Indoor Furnishing manuals


Popular Indoor Furnishing manuals by other brands

Regency
Regency LWMS3015 Assembly instructions

Furniture of America
Furniture of America CM7751C Assembly instructions

Safavieh Furniture
Safavieh Furniture Estella CNS5731 manual

PLACES OF STYLE
PLACES OF STYLE Ovalfuss Assembly instruction

Trasman
Trasman 1138 Bo1 Assembly manual

Costway
Costway JV10856 manual


