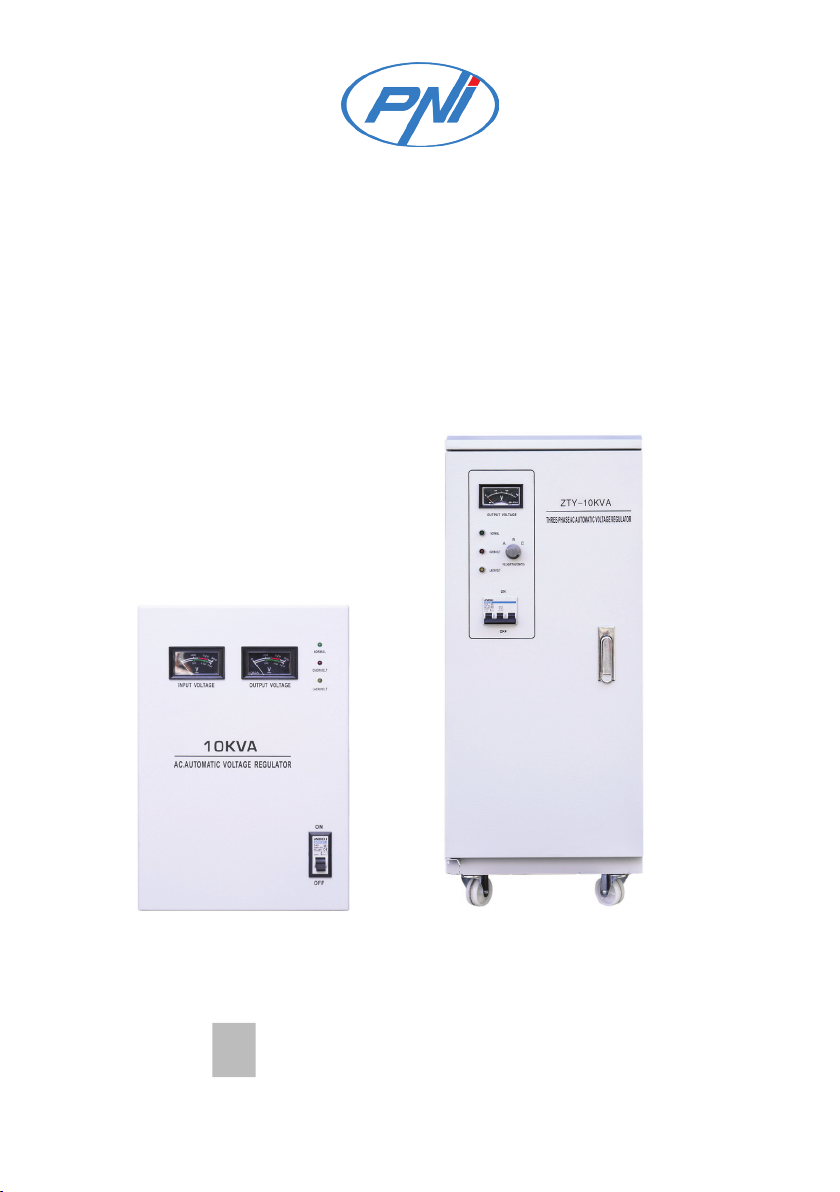
PNI SVM-10K User manual

PNI SVM10K/ PNI SVT10K
Three-phase voltage stabilizer / Stabilizator de tensiune trifazat
EN User manual ......................................................... 3
RO Manual de utilizare ............................................. 13


3User manual
English
Introduction
The voltage stabilizers PNI SVM-10K and PNI SVT-10K are designed to
stabilize the output voltage. When the input voltage from the electrical network
fluctuates, the voltage stabilizer will automatically adjust the voltage as close as
possible to the preset value.
These stabilizers have high capacity, high eciency, no waveform distortion
and automatic voltage regulation, so that the connected devices can work
correctly.
PNI servomotor voltagestabilizers havea widerangeofapplications.Depending
on their capacity, they can connect: electromechanical equipment, industrial
equipment, air conditioners, televisions, household appliances, electric tools,
refrigerators and, in general, electronics that need stable voltage.
Structure
The voltage stabilizer includes a phase compensation transformer,
a phase adjustment transformer, an isolation transformer, a
contact system with electric brush, housing and control panel.
The case is closed, with good heat dissipation. The control panel is easy to read
with precise indications.
Operating principle
Three-phase power compensation voltage stabilizers are composed of a three-
phase compensating transformer, three-phase regulating transformer, voltage
detection unit (TUV), servo motor control unit and protection circuit.
The electrical operation scheme is presented in Fig. 1.

User manual 4
English
Fig 1. Electrical operation diagram of the voltage stabilizer with automatic
compensation:
The primary winding of the TUV regulation transformer is connected in the
form of a Y. It is connected to the output terminal of the voltage stabilizer. The
secondary winding is connected with the primary winding of the compensation
transformer (TB).
The operating principle of the compensation transformer TB can be found in
Fig 2.
Fig 2. Scheme of the single-phase compensation circuit:
The impedance drop of the compensation transformer is calculated as follows:
Uao= Uai+ Uac
Ui = A-phase Input voltage of the voltage stabilizer
Uao = A-phase Output voltage iof the voltage stabilizer
Uac = A-phase Compensation voltage of the voltage stabilizer
The principle is: When the voltage of phase A increases by ΔUai, ΔUac of the
compensation voltage Uac will change accordingly; and when Uac is equal to

5User manual
English
Uai, the output voltage in phase A Uao is kept constant. Phases B and C follow
the same principle.
Voltage stabilization procedure
When the unit that measures the input voltage detects a variation outside
the preset range, it will send a signal to the control unit that will activate the
servomotor. The secondary voltage transformer will change the polarity and
magnitude of the compensation voltage and control the output voltage within
the preset range.
Basic components
Compensation transformer
When the polarity and magnitude of the voltage increase on the primary coil,
the secondary coil, which is connected in series with the load loop, will produce
a compensating voltage with the necessary changes.
Regulation transformer
The regulating transformer is a three-phase transformer that will automatically
regulate the secondary voltage. It has three electric brushes that slide
symmetrically and automatically. Using a chain to drive the electric brush to
slide along the cylindrical solenoid of the transformer, the servo motor adjusts
the secondary voltage accordingly so that the compensation voltage is kept
constant.
Servo motor control circuit
The servomotor has two control modes: manual and automatic, which can be
selected using a switch.
In manual operation, press the voltage increase button if you want to increase
the output voltage and press the voltage decrease button if you want to reduce
the output voltage, so as to set the required output voltage. In the manual
version, the voltage stabilizer does not work automatically.

User manual 6
English
When the automatic option is selected, the voltage increase/decrease can be
automatically detected by the detection unit and the required voltage will be
set.
Detection and adjustment unit of the three-phase voltage stabilizer
The control transformer detects the voltage from the output terminal of the
voltage stabilizer.
When the voltage is between the preset upper and lower limits, all the contacts
of the control relays are in the “OFF” position.
When the voltage exceeds the upper reference limit, the control relay and the
contact relay will activate.
The servo motor works to adjust the compensation voltage and to stabilize the
output voltage. In other words, when the output voltage exceeds the allowed
value (set voltage range), the voltage detection unit will send a command to
adjust the output voltage until it reaches the set value. The nominal voltage is
regulated by the stabilizer potentiometer.
Three-phase protection circuit
The QA automatic switch protects the circuit from overload and short circuit.
The limit switches OLSI and QLS2 form the current protection circuit. When
the electric brush touches the solenoid, the voltage regulation relay will be
disconnected from the power source, stopping the servo motor, thus protecting
the circuit.
The normally closed contact of the relay is closed while the over and under
voltage protection circuit is in normal operation. When the signal voltage
exceeds the set value or falls below the set value, the normally closed contact
of the relay will be activated, the circuit will be interrupted and the automatic
compensation system will not work. The set value of the overvoltage is
approximately 420V, and the set value of the undervoltage is 320V.
Phase sequence error protection circuit or lost phase
When one of the phases of the three-phase power supply is mismatched or the
phase is lost, the light indicator of the phase sequence protector will be o, and
the whole device will be in automatic protection state.

7User manual
English
The stabilizer has two control boards, named A and B. If there is a malfunction
on control board A during operation, the switch to control board B can be
activated manually, which will work instead of the board. A.
Single-phase voltage stabilizer detection and adjustment unit
The operating principle of the detection and adjustment unit of the single-
phase voltage stabilizer is the same as the three-phase voltage stabilizer.
The QA automatic switch protects the circuit from overvoltage and short
circuit. The automatic voltage compensation system is set with overcurrent
protection.
When the electric brush hits the limit switch, the normally closed contact will
be interrupted and the servo motor will stop.
When the overvoltage protection circuit is in normal working condition, the
normally closed contact of the control relay is closed. When the voltage
exceeds the set value, the normally closed contact of the control relay will be
interrupted and the control circuit together with the automatic compensation
system will stop working.
Operating conditions
Voltage stabilizers are only used indoors, taking into account the following
requirements:
• Operating temperature: -26°C ~ +80°C
• Altitude: < 1000 m above sea level
• Humidity: ≤ 90%
• There must be no gases, vapors, chemicals or explosive substances, excess
dust, excess humidity in the work space.
• The surface on which the stabilizer is installed must be flat, without
vibrations.
• For installation under special conditions, ask for specialist advice.

User manual 8
English
Technical specifications
Model PNI SVM-10K PNI SVT-10K
AC input
Voltage range 277 V ~ 433 V
Frequency 50 / 60 Hz
Phase Three-phase + N + G
AC ouput
tension 380 V / 400V
Precision voltage
regulation ≤ ±3 %
Wave form Sine wave
Eciency ≥ 96%
Capacity 10KVA
Maximum load 8000W
Current 34.8A
Power factor 0.8
Distortion No wave form distortion
Overload protection 433 V ±5 V
Undervoltage
protection 316 V ±5 V
Other protections Start-up delay, mechanical error, overcurrent,
short circuit, overtemperature
Other
Working temperature -26°C ~ +80°C
Altitude < 1000 m above sea level
Humidity ≤ 90%
Dimensions 410 x 240 x 370 mm 310 x 345 x 720 mm
Maintenance
To ensure operation in optimal conditions for a long period of time, follow the
following instructions:

9User manual
English
• do not block the ventilation slots of the stabilizer
• periodically clean the stabilizer housing of dust
• check the input and output cables if they are correctly connected and if
they are in good condition
• check that the stabilizer does not have condensation on the housing.
Troubleshooting
In case of improper operation of the voltage stabilizer, before calling a specialized
service center, check the following:
• check the power cable of the stabilizer and the power cable of the device
connected to the stabilizer.
• check the starting power of the device connected to the stabilizer. It is
recommended that this does not exceed 80% of the nominal power of the
stabilizer. If it exceeds this threshold for a long time, it is recommended to
increase the ventilation capacity of the stabilizer.
• If there is a power failure while the stabilizer and the consumers are working,
after the power returns, gradually connect the consumers.
Installation and connection
The three-phase wires A, B and C of the power supply must be drawn from the
lower part of the case through the current transformer and connected to the
terminals of the air switch in the case.
Each connection terminal marked “output voltage” must be connected to the
load. The type of connection wire is at the user’s choice depending on the load.
In general, it should be the same as the input cables.
The gauge of the grounding wire must be according to the specifications of
the local power supply authority. The earthing cable must be connected to the
head of the pillar marked with “earthing cable”. The resistance of the earthing
cable should be less than 0.42.
Grounding examination
It is important that the troubleshooter carefully checks the connection wires,

User manual 10
English
so as to ensure the reliable operation of the voltage stabilizer. The details are
as follows:
• Check the main loop connection wire to see if it is properly connected
and if the universal switch connection wires are in position. Tighten well if
it gets weak.
• Check the contact wires of all types of electrical devices behind the panel,
such as the voltmeter, ammeter, switch and see if they are connected
correctly. Tighten well if they get weak.
• Check the circuit board to see if the connecting wires of each point are
connected correctly. You should tighten them if they are loose.
• Check the servomotor on the voltage regulator and see if the connection
wire of the limit switch is in order. You should tighten it if it is weak.
• Check the control circuit board and power switch C45, which controls the
power supply to the electric motor in the control box, and see if they are
closed.
Electrical operation and troubleshooting
1. Move the “Manual/Automatic” switch to the “Manual” position.
2. Move the knife switch to the “Voltage Stabilization” position; the voltage
of the stabilizer is in the state of zero load.
3. Turn on the power supply, close the QA switch, and at this moment, the
light indicator of the three-phase power source on the panel will light up.
The input voltage is displayed.
4. Press the “Voltage Stabilization” button, and after 5-15 seconds, the delay
relay will be closed, which causes the output contactor to be electrified
and closed. The green light for “Voltage Stabilization” is on. Then, press
the “Voltage Step-up” or “Voltage Step-down” button, and the output
voltmeter indicator will increase or decrease accordingly; thus completing
the manual voltage adjustment test.
Note:
If the voltage stabilizer cannot start and the indicator LEDs of the phase
sequence protector are not lit after pressing the “Voltage stabilization” button,
it means that the phase sequence is connected incorrectly. To fix this problem,
you must first turn o the power supply and then change either of the two
wires.
After pressing the “Voltage stabilization” button, the voltage stabilizer will have

11 User manual
English
output voltage. If the input voltage is at the upper limit, the output voltage will
also be at the upper limit and will exceed the overvoltage protection value. At
this point, you should set the “Manual/Automatic” switch to the “Automatic”
position.
Press the “Voltage stabilization” button and monitor the reading on the
voltmeter until the voltage stabilizes at 380V, then follow the next step.
Inthe“Voltage Step-up” and“Voltage Step-down”stages, youcantroubleshoot
the stabilizer and automatically stabilize it at the required voltage.
Set the “Manual/Automatic” switch to “Manual” and press the “Voltage
Step-up” button until the voltage value reaches ~400V. Change the switch
to “Automatic” and the output voltage will drop to ~380V. This is the voltage
rise test.
Set the “Manual/Automatic” switch to “Manual” and press the “Voltage Step-
down” button until the voltage value reaches ~360V. Move the switch to
“Automatic” and the output voltage will increase to ~380V. This is the voltage
drop test.
The automatic voltage stabilization test is completed when the two tests
mentioned above are successfully performed.
Move the knife switch to “Mains Supply”, close the QA switch and you can get
the “Mains Supply” output.
Load operation
During debugging, the load must be added step by step; you should take strict
precautions against overloading.
It is strongly recommended that the load of the voltage stabilizer does not
exceed 80% of the nominal value; stabilizing eciency and reliability are the
highest at this point. If the load is constantly on the upper side, you should
increase the cooling system.
If a malfunction occurs when the stabilizer is operating with a high load, it is best
to increase the load step by step when the power is restored. You should take
precautions against starting several high power electric motors at the same
time, otherwise the high electric current will damage the voltage stabilizer
.

User manual 12
English
Daily maintenance
Regularly check the working condition of the voltage stabilizer. Also check
the temperature rise in the compensation transformer and the regulation
transformer to see if:
1. They are normal.
2. The load exceeds the nominal value.
3. The input voltage exceeds the specified limit.
4. The adjustment system and the gears (including the gear chains and the
reduction housing) work normally.
5. Any of the 6 carbon brushes came o.
6. The carbon brushes are at the same level and the same line.
It is suggested that maintenance be done every three months, which includes
the following:
1. Remove dust and dirt from the voltage stabilizer components.
2. Check the components and replace them if they are damaged.
3. Check the decelerator of the adjustment system and the chain gear to
see if they are working normally. You should keep the chains lubricated
and correct the chain tension; replace damaged brush strips. Clean the
regulator coil with carbon tetrachloride and cotton.

Manual de utilizare
Romana
13
Introducere
Stabilizatoarele de tensiune PNI SVM-10K si PNI SVT-10K sunt proiectate
pentru a stabiliza tensiunea de iesire. Cand tensiunea de intrare de la reteaua
electrica fluctueaza, stabilizatorul de tensiune va regla automat tensiunea cat
mai aproape de valoarea presetata.
Aceste stabilizatoare au capacitate mare, eficienta ridicata, fara distorsiune
a formei de unda si reglare automata a tensiunii, astfel incat dispozitivele
conectate sa poata functiona corect.
Stabilizatoarele de tensiune cu servomotor PNI au o gama larga de aplicatii.
In functie de capacitatea lor, se pot conecta: echipamente electromecanice,
echipamente industriale, aparate de aer conditionat, televizoare, electrocasnice,
scule electrice, frigidere si, in general, electronice care au nevoie de tensiunea
stabila.
Structura
Stabilizatorul de tensiune include un transformator de compensare a fazei, un
transformator de reglare a fazei, un transformator de izolatie, un sistem de
contact cu perie electrica, carcasa si panou de control.
Carcasa este de tip inchis, cu o buna disipare a caldurii. Panoul de control este
usor de citit cu indicatii precise.
Principiu de functionare
Stabilizatoarele de tensiune trifazice de compensare a energiei electrice sunt
alcatuite dintr-un transformator compensator trifazat, transformator de
reglare trifazat, unitate de detectare a tensiunii (TUV), unitate de control a
servomotorului si circuit de protectie.
Schema de functionare electrica este prezentata in Fig 1.

Manual de utilizare
Romana
14
Fig 1. Schema de functionare electrica a stabilizatorului de tensiune cu
compensare automata:
Bobinajul primar al transformatorului de reglare TUV este conectat in forma
de Y. El este conectat la borna de iesire a stabilizatorului de tensiune. Bobinajul
secundar este conectat cu bobinajul primar al transformatorului de compensare
(TB).
Principiul de functionare al transformatorului de compensare TB poate fi gasit
in Fig 2.
Fig 2. Schema circuitului de compensare monofazat:
Scaderea impedantei transformatorului de compensare se calculeaza dupa cum
urmeaza: Uao= Uai+ Uac
Ui = Tensiunea de intrare in faza A a stabilizatorului de tensiune
Uao = Tensiunea de iesire in faza A a stabilizatorului de tensiune
Uac = Tensiunea de compensare a fazei A a stabilizatorului de tensiune
Principiul este: Cand tensiunea fazei A creste cu ΔUai, ΔUac a tensiunii de
compensare Uac se va modifica in mod corespunzator; iar cand Uac este egal

Manual de utilizare
Romana
15
cu Uai, tensiunea de iesire in faza A Uao este mentinuta constanta. Fazele B si
C urmeaza acelasi principiu.
Procedura de stabilizare a tensiunii
Cand unitatea care masoara tensiunea de intrare detecteaza o variatie in afara
intervalului presetat, va trimite un semnal care unitatea de control care va activa
servomotorul. Transformatorul de tensiune secundara va schimba polaritatea
si magnitudinea tensiunii de compensatie si va controla tensiunea de iesire in
intervalul presetat.
Componente de baza
Transformator compensator
Cand polaritatea si magnitudinea tensiunii cresc pe bobina primara, bobina
secundara, care este conectata in serie cu bucla de sarcina, va produce tensiune
de compensare cu modificarile necesare.
Transformator de reglare
Transformatorul de reglare este un transformator trifazat care va regla automat
tensiunea secundara. Are trei perii electrice care aluneca simetric si automat.
Folosind un lant pentru a antrena peria electrica sa alunece de-a lungul
solenoidului cilindric al transformatorului, servomotorul regleaza tensiunea
secundara in mod corespunzator, astfel incat tensiunea de compensare sa fie
mentinuta constanta.
Circuitul de control al servomotorului
Servomotorul are doua moduri de control: manual si automat, care pot fi
selectate folosind un comutator.
La operarea manuala, apasati butonul de crestere a tensiunii daca doriti sa
cresteti tensiunea de iesire si apasati butonul de reducere a tensiunii daca doriti
sa reduceti tensiunea de iesire, astfel incat sa setati tensiunea de iesire necesara.
La varianta manuala, stabilizatorul de tensiune nu functioneaza automat.

Manual de utilizare
Romana
16
Cand este selectata optiunea automata, cresterea/scaderea tensiunii poate fi
detectata automat de unitatea de detectare si va fi setata tensiunea necesara.
Unitate de detectare si reglare a stabilizatorului de tensiune trifazat
Transformatorul de control detecteaza tensiunea de la borna de iesire a
stabilizatorului de tensiune.
Cand tensiunea este intre limita superioara si limita inferioara presetate, toate
contactele releelor de comanda sunt in pozitia „OPRIT”.
Cand tensiunea depaseste limita superioara de referinta, releul de control si
releul de contact se vor activa.
Servomotorul functioneaza pentru a regla tensiunea de compensare si pentru
a stabiliza tensiunea de iesire. Cu alte cuvinte, atunci cand tensiunea de iesire
depaseste valoarea permisa (intervalul de tensiune setat), unitatea de detectare
a tensiunii va trimite o comanda de reglare a tensiunii de iesire pana cand aceasta
ajunge la valoarea setata. Tensiunea nominala este reglata de potentiometrul
stabilizatorului.
Circuit de protectie trifazat
Comutatorul automat QA protejeaza circuitul de suprasarcina si scurtcircuit.
Intrerupatoarele de limita OLSI si QLS2 formeaza circuitul de protectie a
curentului. Cand peria electrica atinge solenoidul, releul de reglare a tensiunii
va fi deconectat de la sursa de alimentare, oprind servomotorul, protejand
astfel circuitul.
Contactul normal inchis al releului este inchis in timp ce circuitul de protectie
la supra si sub tensiune este in stare normala de functionare. Cand tensiunea
semnalului depaseste valoarea setata sau scade sub valoarea setata, contactul
normal inchis al releului va fi activat, circuitul va fi intrerupt si sistemul de
compensare automata nu va functiona. Valoarea setata a supratensiunii este de
aproximativ 420 V, iar valoarea setata a subtensiunii este de 320V.
Circuit de protectie eroare secventa faza sau faza pierduta
Cand una dintre fazele sursei de alimentare trifazate este nepotrivita sau se
pierde faza, indicatorul luminos al protectorului secventei de faze va fi stins, iar
intregul dispozitiv va fi in stare de protectie automata.

Manual de utilizare
Romana
17
Stabilizatorul are doua placi de comanda, denumite A si B. Daca exista vreo
defectiune pe tabloul de comanda A in timpul functionarii, se poate activa
manual comutatorul spre placa de comanda B, care va functiona in locul placii.
A.
Unitate de detectare si reglare a stabilizatorului de tensiune monofazat
Principiul de functionare al unitatii de detectare si reglare a stabilizatorului de
tensiune monofazat este acelasi cu stabilizatorul de tensiune trifazat.
Comutatorul automat QA protejeaza circuitul de supratensiune si scurtcircuit.
Sistemul automat de compensare a tensiunii este setat cu protectie la
supracurent.
Cand peria electrica loveste comutatorul de limita, contactul normal inchis va
fi intrerupt, iar servomotorul se va opri.
Candcircuitulde protectie la supratensiuneeste in starenormaladefunctionare,
contactul normal inchis al releului de comanda este inchis. Cand tensiunea
depaseste valoarea setata, contactul normal inchis al releului de control va fi
intrerupt si circuitul de control impreuna cu sistemul de compensare automata
va inceta sa functioneze.
Conditii de operare
Stabilizatoarele de tensiune se folosesc doar la interior, tinand cont de
urmatoarele cerinte:
• Temperatura de operare: -26°C ~ +80°C
• Altitudine: < 1000 m deasupra nivelului marii
• Umiditate: ≤ 90%
• In spatiul de lucru nu trebuie sa fie gaze, vapori, substante chimice sau
substante explozive, praf in exces, umiditate in exces.
• Suprafata pe care se instaleaza stabilizatorul trebuie sa fie plana, fara vibratii.
• Pentru instalarea in conditii speciale, cereti consultanta de specialitate.

Manual de utilizare
Romana
18
Specificatii tehnice
Model PNI SVM-10K PNI SVT-10K
Intrare AC
Interval tensiune 277 V ~ 433 V
Frecventa 50 / 60 Hz
Faza Trifazat + N + G
Iesire AC
Tensiune 380 V / 400V
Precizie reglare tensiune ≤ ±3 %
Forma unda Sinusoida
Eficienta ≥ 96%
Capacitate 10KVA
Sarcina maxima 8000W
Curent 34.8A
Factor de putere 0.8
Distorsiune Fara distorsiune a undei
Protectie la suprasarcina 433 V ±5 V
Protectie la subtensiune 316 V ±5 V
Alte protectii Intarziere la pornire, eroare mecanica,
supracurent, scurtcircuit, supratemperatura
Altele
Temperatura de lucru -26°C ~ +80°C
Altitudine < 1000 m deasupra nivelului marii
Umiditate ≤ 90%
Dimensiuni 410 x 240 x 370 mm 310 x 345 x 720 mm
Intretinere
Pentru a asigura o functionare in conditii optime pentru o perioada de timp
indelungata, respectati urmatoarele instructiuni:
• nu blocati fantele de aerisire ale stabilizatorului
• curatati periodic de praf carcasa stabilizatorului

Manual de utilizare
Romana
19
• verificati cablurile de intrare si iesire daca sunt corect conectate si daca
sunt in stare buna
• verificati ca stabilizatorul sa nu aiba condens pe carcasa.
Probleme si solutii
In caz de functionare necorespunzatoare a stabilizatorului de tensiune, inainte
de a apela la un centru service specializat, verificati urmatoarele:
• verificati cablul de alimentare al stabilizatorului si cablul de alimentare al
dispozitivului conectat la stabilizator.
• verificati puterea de pornire a dispozitivului conectat la stabilizator. Este
recomandat ca aceasta sa nu depaseasca 80% din puterea nominala
a stabilizatorului. Daca depaseste acest prag timp indelungat, este
recomandat sa mariti capacitatea de ventilare a stabilizatorului.
• Daca are loc o cadere de curent in timp ce stabilizatorul si consumatorii
sunt in lucru, dupa revenirea curentului, conectati treptat consumatorii.
Instalare si conectare
Firele trifazate A, B si C ale sursei de alimentare trebuie sa fie trase din partea
inferioara a carcasei prin transformatorul de curent si conectate la bornele
comutatorului de aer din carcasa.
Fiecare terminal de conectare marcat cu „tensiune de iesire” trebuie conectat
la sarcina. Tipul firului de conectare este la alegerea utilizatorului in functie de
sarcina. In general, ar trebui sa fie la fel ca si cablurile de intrare.
Ecartamentul firului de impamantare trebuie sa fie conform specificatiilor
autoritatii locale de alimentare cu energie. Cablul de impamantare trebuie
conectat la capul pilonului marcat cu „cablu impamantare”. Rezistenta cablului
de impamantare ar trebui sa fie mai mica de 0,42.
Examinarea impamantarii
Este important ca persoana care depaneaza sa verifice cu atentie firele de
conectare, astfel incat sa asigure functionarea fiabila a stabilizatorului de
tensiune. Detaliile sunt urmatoarele:

Manual de utilizare
Romana
20
• Verificati firul de conectare al buclei principale pentru a vedea daca este
corect conectat si daca firele de conectare ale intrerupatorului universal
sunt pe pozitie. Strangeti bine daca se slabeste.
• Verificati firele de contact ale tuturor tipurilor de dispozitive electrice din
spatele panoului, cum ar fi voltmetrul, ampermetrul, comutatorul si vedeti
daca sunt conectate corect. Strangeti bine daca se slabesc.
• Verificati placa de circuit pentru a vedea daca firele de conectare ale
fiecarui punct sunt conectate corect. Ar trebui sa le strangeti daca sunt
slabite.
• Verificati servomotorul de pe regulatorul de tensiune si vedeti daca firul de
conectare al comutatorului de limita este in ordine. Ar trebui sa-l strangeti
daca este slabit.
• Verificati placa de circuit de control si comutatorul de alimentare C45,
care controleaza alimentarea cu energie a motorului electric din cutia de
control si vedeti daca sunt inchise.
Functionare electrica si depanare
1. Mutati comutatorul „Manual/Automatic” pe pozitia „Manual”.
2. Mutati comutatorul cu cutit in pozitia „Stabilizare tensiune”; tensiunea
stabilizatorului este in stare de sarcina zero.
3. Porniti sursa de alimentare, inchideti comutatorul QA, iar in acest moment,
indicatorul luminos al sursei electrice trifazate de pe panou se va aprinde.
Se afiseaza tesniunea de intrare.
4. Apasati butonul „Stabilizare tensiune”, iar dupa 5-15 secunde, releul de
intarziere va fi inchis, ceea ce face ca contactorul de iesire sa fie electrificat
si inchis. Lumina verde pentru „Stabilizarea tensiunii” este aprinsa. Apoi,
apasati butonul “Voltage Step-up” sau “Voltage Step-down”, iar indicatorul
voltmetrului de iesire va creste sau scade in consecinta; completand astfel
testul de reglare manuala a tensiunii.
Nota:
Daca stabilizatorul de tensiune nu poate porni si LED-uri indicatoare ale
protectorului pentru secventa fazelor nu sunt aprinse dupa apasarea butonului
„Stabilizare tensiune”, inseamna ca secventa fazelor este conectata gresit.
Pentru a remedia aceasat problema, trebuie mai intai sa opriti sursa de
alimentare si apoi sa schimbati oricare dintre cele doua fire de conductie.
Dupa apasarea butonului „Stabilizare tensiune”, stabilizatorul de tensiune va
This manual suits for next models
1
Table of contents
Languages:
Popular Industrial Equipment manuals by other brands

Cognex
Cognex In-Sight 3800 Series Reference manual

Larson Electronics
Larson Electronics Megatower RNT-WCDE-11-PLM50-6X500LTL-LED Operation manual

Afag
Afag aflex 150 Original operating manual

Graco
Graco Reactor H-25 Series Operation

ABB
ABB HT842533 Operation manual

Grundfos
Grundfos Control DDD instructions

Sumitomo Drive Technologies
Sumitomo Drive Technologies Cyclo 6000 Operation and maintenance manual

Spirax Sarco
Spirax Sarco CP30 Installation and maintenance instructions

Nexen
Nexen AIR CHAMP 5HP-E Series user manual

Siemens
Siemens SIMATIC S7-1500R/H Equipment manual

Vestil
Vestil SPB-P-72 instruction manual

Ransburg
Ransburg AEROBELL 268 A13657 Service manual