PNI CT35 User manual

Termostat inteligent PNI CT35
fara fir cu WiFi, controlat prin Internet pentru centrale
termice
Wireless smart thermostat PNI CT35
Internet controlled for central heating
Manual de utilizare / User manual
RO Manual de utilizare..................................... 2
EN User manual............................................... 8
BG Ръководство за употреба.........................
DE Benutzerhandbuch.....................................
ES Manual de usuario.....................................
FR Manuel de l’Utilisateur................................
HU Használati utasítás....................................
NL Handleiding................................................
PL Instrukcja obsługi.......................................

RO
2
Manual de utilizare Termostat inteligent PNI CT35
ATENTIONARI SPECIALE
Deoarece produsul trebuie conectat la o retea de alimentare cu energie electrica 230 V si la un echipament
de incalzire , instalarea trebuie facuta doar de catre personal calicat, pentru a evita defectarea iremediabila
a produsului, si/sau a echipamentelor de incalzire la care se conecteaza, defecte care nu fac obiectul
garantiei.
Va recomandam ca pentru congurarea initiala a echipamentului sa apelati la personal calicat, cu
experienta in domeniu, pentru intelegerea corecta a termenilor si procedurilor tehnice detaliate in acest
manual.
Utilizarea produsului este facila, atat unitatea centrala mobila cat si aplicatia de smartphone avand o
interfata intuitiva si usor de congurat si setat.
Pentru accesarea / monitorizarea / controlul produsului de la distanta de pe smartphone, este necesara
prezenta unei surse de internet ( router cu retea wireless pe frecventa 2.4 Ghz) in incinta in care este montat
termostatul.
INFORMATII GENERALE
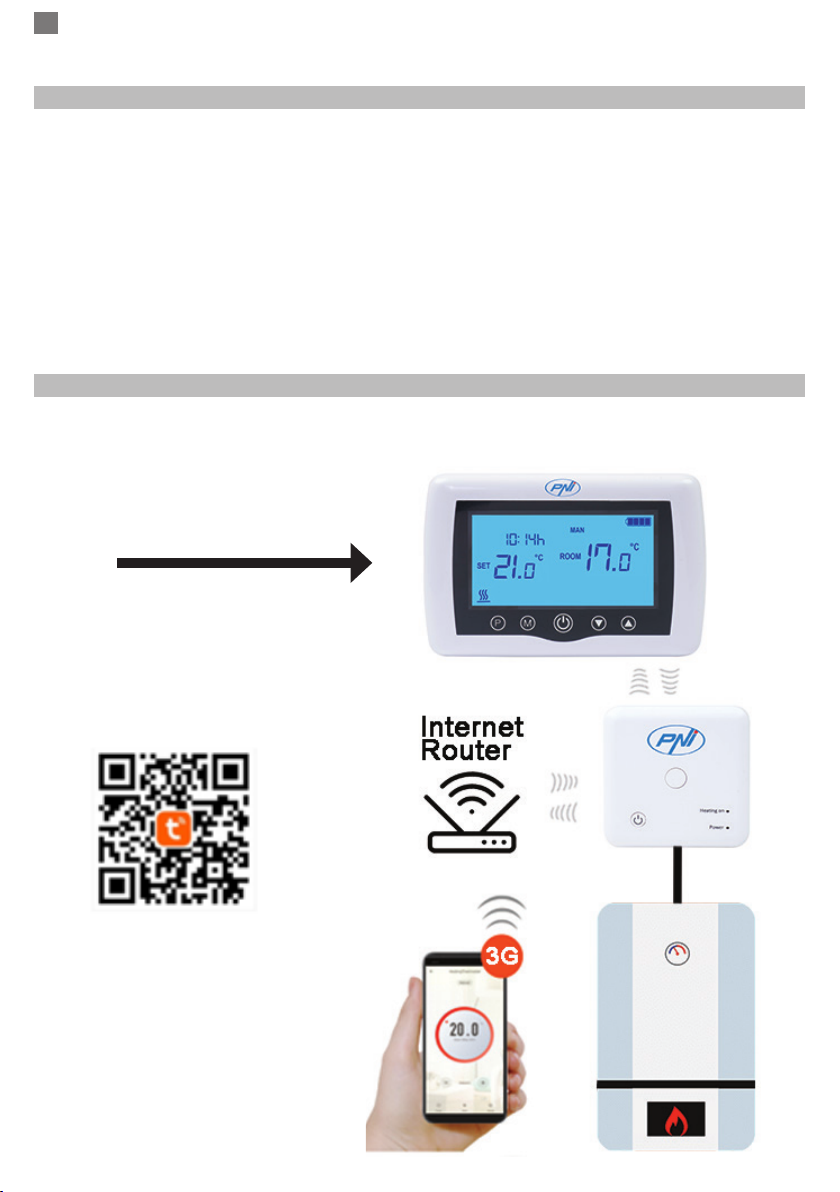
Termostatul inteligent PNI CT35 a fost dezvoltat pentru a oferi clientilor un plus de confort zi de zi in
spatiile de locuit, la birou sau in alte incinte oferind posibilitatea de a monitoriza si porni / opri sistemele
de incalzire e automat programat pe perioade orare in ecare zi a saptamanii, e manual de la distanta,
oricand si de oriunde prin intermediul Internetului si a aplicatiei dedicate pentru Smartphone cu Android
sau iOS.
Mod de functionare si comunicare:
Aplicatia dedicata se numeste
TuyaSmart si poate descarcata
e din Magazin Play / App Store,
e prin scanarea cu telefonul
mobil a codului QR :
Produsul contine:
- unitate centrala cu ecran iluminat
- Unitate receptor/releu comanda
- Accesorii montaj perete / masa
- Manual de utilizare

RO
3
DETALII TEHNICE / SPECIFICATII
- Alimentare unitate centrala: 2 baterii AAA
- Alimentare unitate receptor: 230VAC 50/60Hz
- Tip comanda unitate receptor : releu NO/NC (normal deschis/) fara potential ( neenergizat)
- Parametri de functionare releu: maxim 250 V, maxim 10 Amperi (rezistiv), Curent AC/DC
- Compatibil cu toate centralele termice prevazute cu intrare termostat compatibil cu releu NO fara potential.
- Plaja temperatura reglabila/setabila : 5 - 35°C ( cu pas de 0.5°C )
- Temperatura masurabila/asabila: 0 - 50°C
- Unitate de masura temperatura : doar grade °Celsius
- Umiditate acceptata: 85% fara condens in aer
- Iluminare ecran : Da
- Senzor temperatura: NTC 10K, 3950ohms at 25°C
- Precizie senzor: ± 0.5°C ( reglabila prin calibrare senzor cu pas de 0.5°C )
- Grad de protectie: IP30
- Carcasa : ABS cu standard anti-incendiu UL94-5
- Conectivitate WiFi: 802.11 b/g/n ( 2.4 GHz) ; parola WPA2 ( TKIP si AES)
- Conectivitate RF intre unitati : 868 MHz
- Compatibilitate aplicatie Smartphone: minim iOS 9 / minim Android 4.2
DESCRIERE UNITATE CENTRALA
DESCRIERE UNITATE RECEPTOR
Buton Pornit/Oprit
Buton imperechere
Incalzire pornita ( LED 1)
Indicator alimentare( LED 2)
Ziua saptamanii
Ora
Temperatura setata
Pictograma incalzire
Indicator baterie
Temperatura curenta
Perioada programata
Buton programare
Selectare moduri
Buton On/O Temperatura si setare parametri

RO
4
INSTRUCTIUNI SI ATENTIONARI LA PRIMA UTILIZARE:
1. Sistemul vine cu unitatile centrala si receptor imperecheate din fabrica. La instalare mai este
necesara doar legarea / Imperecherea unitatii receptor cu Router-ul Wireless din apropiere.
2. La prima punere in functiune termostatul / Unitatea receptor semnaleaza prin LED-ul 1 =
“clipeste rar” ca este necesara conectarea acesteia la router-ul wireless cu acces la internet.
3. Introduceti 2 baterii AAA alcaline ( nu sunt incluse) in unitatea centrala si porniti unitatea
apasand butonul ON/OFF ( Pornit/Oprit). Pe ecran apar setarile conform descrierii de mai sus.
4. Conectati unitatea receptor la o sursa de alimentare 230 V ( doar personal calicat ). Asigurati-
va ca functioneaza corect, testand/vericand stare leduri si pornind/oprind unitatea - butonul On/Off .
I. IMPERECHERE/LEGARE TERMOSTAT LA INTERNET PRIN WIRELESS CU APLICATIA DE MOBIL
1. Conectati telefonul mobil smartphone la reteaua wireless de internet cu frecventa de 2.4 Ghz din
apropiere. Activati locatia GPS pe smartphone daca nu este activata. Pentru o congurare rapida asigurati-
va ca atat telefonul cat si termostatul si receptorul se aa cat mai aproape ( 1-3 m).
ATENTIE: Vericati si asigurati-va ca aveti disponibila o retea Wireless pe frecventa de 2.4 Ghz si ca ati
conectat telefonul la aceasta. Router-ele si telefoanele de generatie noua vin echipate si cu reteaua wireless
de 5 Ghz activata iar dispozitivele se conecteaza automat pe aceasta frecventa. Termostatul nu poate
conectat la reteaua wireless de 5 Ghz deoarece el functioneaza doar pe frecventa wireless de 2.4 Ghz.
Pentru congurarea router-ului si a retelei wireless de 2.4 Ghz apelati la un specialist.
2. Descarcati aplicatia “TuyaSmart” din Google Play sau App Store, apoi instalati si inregistrati un cont nou:
Apasati butonul “Sign Up“ si urmati instructiunile de pe ecran.
3. Adaugati dispozitivul apasand butonul + in coltul din dreapta sus.
4. Apasati pe “All Devices” ( Toate echipamentele ) si accesati categoria “Small Home Appliances” .
5. Gasiti “Heater” sau “Thermostat” din lista si selectati. Urmati pasii de pe ecran, vericati numele retelei
Wireless si introduceti parola retelei Wireless cu acces la internet la care este conectat si telefonul. Daca
nu va apare automat reteaua wireless, vericati daca aveti Locatia GPS activata, si daca aveti telefonul
conectat la o retea wireless pe frecventa de 2.4 Ghz.
6. Apasati lung butonul imperechere de pe receptor pentru a intra in modul de conectare/legare Wi, pana
cand LED-ul 1 va clipi rapid. ( LED-ul 1 clipeste rar, semn ca nu este legat la internet Wi)
7. Apasati casuta “Conrm indicator rapidly blink” pe telefon.
8. Asteptati un moment pana la nalizarea conexiunii. LED-ul de pe receptor nu va mai clipi. In acest
moment conectarea la Internet prin Wireless este reusita.
Daca LED-ul continua sa clipeasca incet, conexiunea nu a reusit, incercati din nou de la pasul 1.
PRIMA UTILIZARE A TERMOSTATULUI
1. Cu ecranul pornit, din unitatea centrala modicati temperatura setata mai sus sau mai jos decat
temperatura masurata si asata din camera.
2. In maxim 90 de secunde unitatea centrala trimite comanda catre unitatea receptor, care conrma prin
aprinderea/stingerea LED-ului 1 si in mod sonor sonor printr-un “click“, adica actionarea releului din interior.
3. Din aplicatia de telefon “TuyaSmart“ ( asigurati-va ca dispozitivul apare online dupa congurarea la
internet) si apasati pe dispozitiv pentru a-l accesa. Folosind butoanele “+“ si “-“ modicati temperatura setata
mai sus sau mai jos decat temperatura masurata si asata din camera .
4. In maxim 90 de secunde aplicatia trimite comanda prin internet catre unitatea receptor, care conrma
prin aprinderea/stingerea LED-ului 1, si in mod sonor printr-un “click“, adica actionarea releului din interior.
Aproape simultan se va modica si temperatura asata pe unitatea centrala conform comenzii.
Daca modicarea nu are loc dupa 90 - 180 secunde ( 2 minute ) vericati din nou daca ati modicat
temperatura mai sus/jos decat cea existenta in camera si asata, si /sau vericati daca dispozitivul este
online.
II. IMPERECHERE UNITATE CENTRALA CU UNITATEA RECEPTOR
Executati aceasta procedura doar daca este absolut necesar: daca dupa ce unitatea receptor a fost
imperecheata la router-ul wireless, Ecranul nu primeste timp de 5-10 minute comenzile transmise de la
aplicatia de mobil( unitatile vin deja imperecheate din fabrica).
1. Apasati lung butonul de imperechere cod de pe receptor pana cand LED-ul 1 clipeste rapid.

RO
5
2. Cu ecranul inchis ( apasati butonul On/Off) apasati lung butonul M de pe unitatea centrala pana apare pe
ecran un cod din 4 cifre si inca 3 simboluri. Apasati imediat butonul “sageata sus” pentru imperechere.
3. Led-ul 1 clipeste rar si asteptati cateva clipe, pana LED-ul 1 nu mai clipeste. Imperecherea este nalizata.
4. Opriti si porniti unitatea centrala, si testati functionalitatea modicand temperatura setata mai mare/mica
decat pragul temperaturii citite.
III. STERGETI/ANULATI TOATE IMPERECHERILE
Pe unitatea receptor apasati si tineti apasat butoanele de imperechere si Pornit/Oprit timp de 5 secunde,
pana cand LED1 si LED2 se aprind. Eliberati butoanele.
Apoi se sting, ceea ce inseamna ca toate imperecherile au fost eliminate.
IV. SEMNAL SLAB SAU PIERDUT
In cazul pierderii / deconectarii semnalului RF ( intre receptor si unitate centrala) si WIFI, LED-ul 2 va clipi
incet.
Apropiati unitatile una de alta, si unitatea receptor de router-ul WiFi si vericati din nou stare dispozitive.
Daca in cateva minute functionarea nu revine la normal, stergeti toate imperecherile si executati procedurile
de imperechere ale receptorului cu unitatea centrala, si apoi cu routerul wireless ( cu aplicatia de mobil).
SETARE ORA DATA
Cu ecranul deschis apasati lung butonul M timp de 5-6 secunde, pana clipeste ora pe ecran.
Veti vedea evidentiat ora 00:00 pe ecran. Setati minutele cu butoanele sus si jos.
Continuati cu o apasare pe butonul M.
Setati ora cu butoanele in sus si in jos.
Continuati cu o apasare pe butonul M.
Selectati ziua cu butoanele sus si jos.
Continuati cu o apasare pe butonul M.
Salvati setarile apasand butonul ON / OFF sau asteptati aproximativ 15 secunde.
FUNCTIE DETECTIE GEAM DESCHIS
Cand modul de detectie “geam deschis“ este activat in setarile avansate, sistemul va opri automat
incalzirea daca se inregistreaza o scadere brusca a temperaturii (2° C in 15 minute in mod implicit). Aceasta
functie este utila cand se deschide o usa/fereastra( aerisire de exemplu) fara sa se opreasca incalzirea.
Aparatul va reveni la modul de functionare anterior dupa 30 de minute, iar pictograma “OP” va dispare de pe
ecran. Orice alta apasare de buton in perioada de 30 de minute va opri functia, aducand sistemul la modul
anterior/programat de functionare.
ALTE FUNCTII DISPONIBILE IN APLICATIE
In aplicatia “TuyaSmart“ aveti disponibile urmatoarele functii:
- Asare temperatura masurata si temperatura programata / dorita / setata de utilizator;
- Asare Stare Incalzire: Apare textul “Heating“ cand caldura este pornita;
- 3 moduri de lucru: Manual, Eco ( economic) si Automat ( conform programarii zilnice)
- Blocare taste termostat , pentru a opri tastarea accidentala: Activati functia Seetings/Child Lock
- Programare zilnica ( 7 zile) cu 4 perioade orare in ecare zi;
- Programare temporizata
CONFIGURARE PROGRAME ZILNICE
Aceasta congurare poate facuta si din aplicatia de smartphone, procedura pe care o recomandam.
Cu ecranul aprins apasati lung butonul P ( 6-7 secunde) pentru a intra in setarile de PROGRAM. Zilele
saptamanii sunt xate de Luni pana Duminica (1 ~ 7), ecare zi are 4 perioade de timp (1 ~ 4). Fiecare
apasare a butonului P poate efectuata in setarea urmatoare.
1). Apasati P si tineti apasat timp de 3 secunde, asajul “ora“ clipeste, schimbati valoarea cu ajutorul
butoanelor + si -.

RO
6
2) Apasati butonul P, temperatura clipeste, modica temperatura cu cea dorita prin butoanele + si -.
3). Apasati butonul P pentru perioada urmatoare.
4). Repetati in mod similar setarile pentru celelalte zile si perioade.
Perioada 1 2 3 4
Ora Temp Ora Temp Ora Temp Ora Temp
12345 (Luni-Vin) 7:00 22°C 8:30 19°C 17:00 22°C 22:00 19°C
6 (Sambata) 8:00 22°C 8:30 22°C 17:00 22°C 22:00 19°C
7 (Duminica) 8:00 22°C 8:30 22°C 17:00 22°C 22:00 19°C
SETARI AVANSATE PARAMETRI
Opriti termostatul apasand butonul On/Off ( Pornit/Oprit) . Cu ecranul stins apasati simultan butoanele
si pentru setare avansata parametri. Apasati M pentru a neviga in meniu si sagetile sus/jos pentru a
modica valorile.
MENIU Descriere Plaja valori Valoare implicita
01 Calibrare temperatura senzor intern -8°C ~ 8°C 0°C
02 Setare limita maxima temp. 5°C ~ 35°C 35°C
03 Setare limita minima temp. 5°C ~ 35°C 5°C
05 Temperatura protectie inghet 5°C ~ 15°C 5°C
09 Histerezis (Deadzone - cu pas 0.5°C ) 0.5°C ~ 3°C 0°C (Oprit)
11 Functie blocare taste ( copii) 1: Pornit 0: Oprit 0
12 Functie detectie geam deschis - OWD 1: Pornit 0: Oprit 0
13 OWD - Timp detectie 2 ~ 30 minute 15 minute
14 OWD - Scadere temperatura
( in timpul de detectie)
2,3,4 °C 2°C
15 OWD - Timp Intarziere
( revenire la setare/program anterior)
10 ~ 60 minute 30 minute
17 Revenire la setarile din fabrica 0 : Nu 0
1: Da, si apasati Butonul
On/Off ( Pornit Oprit) timp
de 5 secunde pana se
restarteaza termostatul.
Versiune Software 5055-02
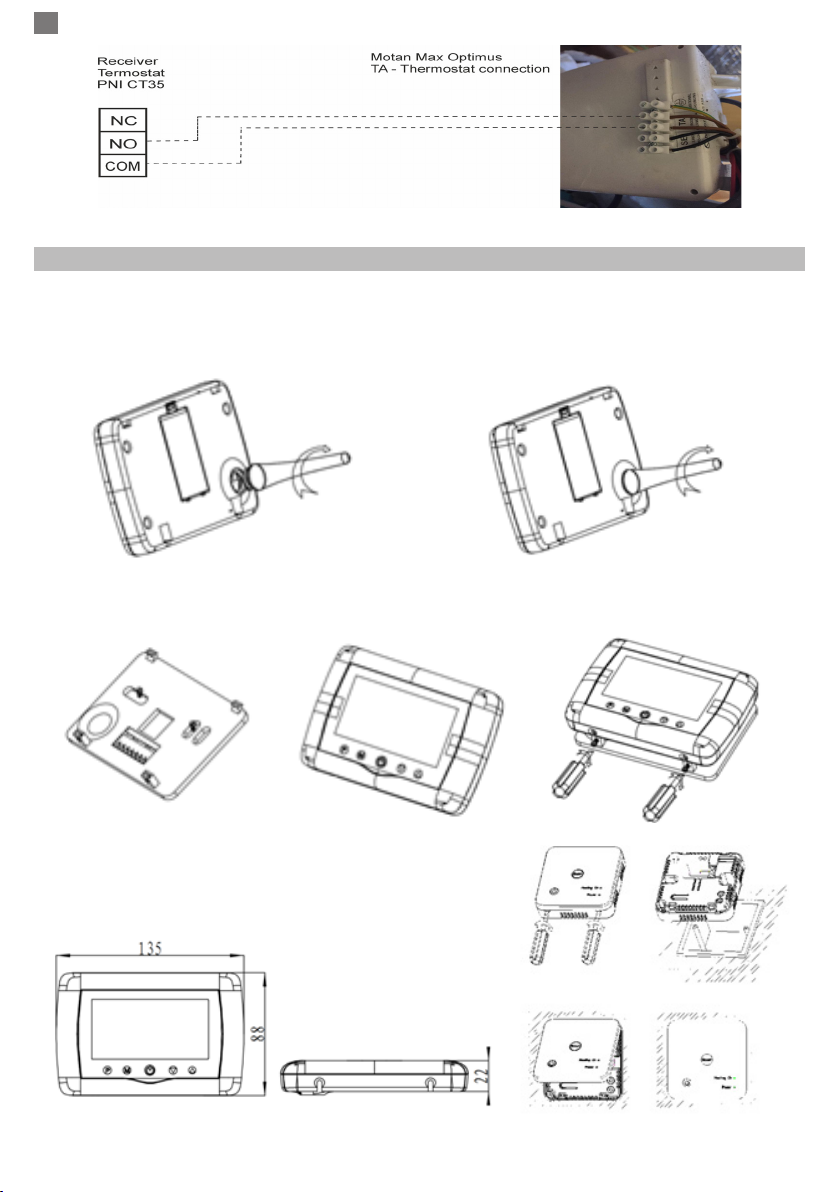
DIAGRAMA CONEXIUNI UNITATE RECEPTOR
Operatiunea de conectare a unitatii receptor la o sursa de alimentare 230V si la o centrala termica se
executa doar de catre personal calicat, si doar consultarea in prealabil a documentatiilor termostatului si
centralei termice.
Unitatea receptor are o comanda de tip releu ( NO si NC / Normal Deschis si Normal Inchis) fara potential
( neenergizat ) ce executa inchiderea unui circuit de comanda cu un curent maxim de 10 A, si o tensiune
maxima de 250 V AC / DC. Regasiti exemple de conectare cu anumite modele de centrale termice la
sfarsitul manualului.

RO
7
EXEMPLE DE CONECTARE CU CENTRALE TERMICE - THERMOSTAT PNI CT35*
*Instalarea trebuie facuta obligatoriu doar de catre instalator autorizat si doar dupa consultarea manualelor,
si vericarea conexiunilor si compatibilitatea acestora.
1. Ariston CLAS EVO SYSTEM
2. Ferroli DivaCondens 24/28
3. Vaillant Ecotec Pure
4. Motan Max Optimus

RO
8
INSTALARE FIZICA SI DIMENSIUNI
Unitatea centrala poate montata in 2 moduri:
1. Pe masa sau pe o zona plana cu suportul alb prezent in colet:
2. Pe perete cu suportul de perete inclus:

EN
9
Wireless smart thermostat PNI CT35 User Manual
WARNINGS
Because the product must be connected to a 230 VAC power supply and to a heating appliance,
installation should only be carried out by qualied personnel to avoid irreparable damage to the product and /
or the heaters that are connected , defects not covered by warranty.
We recommend that you have qualied personnel with experience in this eld, for initial setup of the
equipment in order to understand correctly the technical terms and procedures detailed in this manual.
After installation and connecting, the product is easy to use both mobile unit and smartphone controll with
an intuitive and easy to congure interface.
To access / monitor / control the product remotely from your smartphone, it is necessary to have an
internet source (a 2.4 GHz Wi Internet router is required) close to where thermostat is installed.
GENERAL INFORMATION
The smart thermostat PNI CT35 has been developed to provide customers extra day-to-day comfort in
their homes, in the ofce or other premises, offering the ability to monitor and turn on or off heating systems
either automatically scheduled for every day of week, either remotely, anytime and anywhere via the Internet
with dedicated app for Android or iOS Smartphone.
Mode of operation and communication:
Dedicated app name is TuyaSmart
and can be downloaded
either from the Googel Play /
App Store, either by scanning
with your smartphone the QR
code below:
Package content:
- Main unit with illuminated screen
- Receiver / relay command unit
- Wall / table mount accessories
- User manual

EN
10
TECHNICAL DETAILS / SPECIFICATIONS
- Main unit power supply: 2 AAA batteries
- Receiver power supply: 230VAC 50 / 60Hz
- Receiver unit command type: NO Relay (normally open) 10 Amps max not energized / dry contact
- Relay parameters: 250 V max, 10 Amps max (rezistiv), AC/DC curent
- Set point range temperature: 5 - 35°C ( 0.5 °C step )
- Measurable ambient temperature: 0 - 50°C
- Temperature measurement unit: only o Celsius degrees
- Acceptable humidity: 85% no condensation
- Screen illumination: white light
- Temperature sensor: NTC 10K, 3950ohms at 25°C
- Sensor accuracy: ± 0.5 °C (adjustable by 0.5 °C step sensor calibration)
- Protection degree: IP30
- Housing: ABS with UL94-5 re retardant plastic standard
- WiFi connectivity: 802.11 b / g / n (2.4 GHz); WPA2 (TKIP and AES)
- RF frequency connectivity between units: 868 MHz
- Smartphone Compatibility: Minimum iOS 9 / minimum Android 4.2
MAIN UNIT DESCRIPTION
Weekday
Clock
Set Temp.
Heating Icon
Battery indicator
Room Temp. Display
Programmable Period
Prg. Button
Modes select
On/O Button Temp. and parameters settings
RECEIVER DESCRIPTION
On/O Button
Code pairing Button
Heating On Indicator ( LED 1)
Power Indicator ( LED 2)

EN
11
FIRST USE WARNINGS AND INSTRUCTIONS
1. The system comes with main unit and receiver paired from factory. Before use, you only need to
pair the receiver unit with the nearby Wireless Router.
2. At rst start, the thermostat / receiver unit signals by LED 1 = “ slow blinks” that means it is
necessary to connect unit to the wireless router with Internet access.
3. Insert 2 AAA alkaline batteries (not included) into the main unit and turn it on by pressing the
ON / OFF button. The settings appear as shown in above description.
4. Connect the receiver unit to a 230 VAC power supply (only qualied personnel). Make sure it
works properly by testing / checking the LED status and turning unit On/Off by dedicated button.
I. PAIRING THERMOSTAT WITH MOBILE APP AND WIRELESS INTERNET ROUTER
1. Connect your smartphone to the 2.4 Ghz wireless Internet router nearby. For a quick setup make sure
both phone, thermostat receiver and wireless router are as close as possible (1-3 m).
WARNING: Check and make sure that you have a 2.4 Ghz Wireless network available and that you have
connected the phone to it. The new generation routers and phones are also equipped with the 5 Ghz
wireless network activated and the devices connect automatically on this frequency. The thermostat cannot
be connected to the 5 Ghz wireless network because it only works on the 2.4 Ghz wireless frequency. To
congure the router and the 2.4 Ghz wireless network, call a specialist.
1. Download “TuyaSmart” app from Google Play or App Store, andd install and register a new account: Press
the “Sign Up“ button and follow on-screen instructions.
2. Add device by pressing the + button in the top right corner.
3. Press “All Devices” and access the Small Home Appliances category.
4. Find “Thermostat” or “Heater” from list and select. Follow the on-screen steps, check the name of the
Wi network and enter the password of the Wi network with internet access to which the phone is also
connected. If the wireless network does not appear automatically, check if you have GPS Location enabled,
and if you have your phone connected to a 2.4 Ghz wireless network. Restart procedure.
5. Long press the pairing button on the receiver to enter Wi pairing mode until LED 1 blinks quickly. (before
this, LED 1 blinks slow, sign that thermostat is not paired with wi internet router)
6. Tap the “Conrm indicator ash blink” on your phone.
7. Wait a few moments until pairing is complete. The LED 1 on the receiver will stop blinking and turn off. At
this point, connection to the Internet via Wirelessrouter is successful, and the Thermostat icon will appear in
Smartphone app.
If the LED continues to blink slowly, the connection failed, try again from step 1.
FIRST USAGE OF THERMOSTAT
1. With main unit screen ON, change the temperature bigger or smaller then measured temperature from
screen.
2. In a maximum 90 seconds, the main unit sends a command to receiver unit, which conrms by turning on /
off LED 1, and by a “click”, that is heard from inside relay.
3. From TuyaSmart app (make sure the device appears online after conguring internetpairing ) tap on the
device to access it. Using the “+” and “-” buttons, change the temperature bigger or smaller then measured
temperature from screen.
4. In 90 seconds or more, the application sends command through internet to thermostat receiver unit,
which conrms by turning on / off LED 1, and with a “click” sound from inside relay. The temperature will
change on the main unit screen.
If there is no change after 90 - 180 seconds (2 minutes), check again if you have changed the temperature
to bigger / smaller than current temperature displayed and check if the device is online.
II. PAIR MAIN UNIT WITH RECEIVER UNIT
Perform this procedure only if it is absolutely necessary: if you have problems controlling main unit settings
from smartphone app, after pairing receiver with wireless router ( the screen does not receive commands for
5 - 10 minutes from mobile app).
1. Press and hold the pairing button on receiver until LED 1 ashes quickly.

EN
12
2. With main unit screen closed (press the On / Off button), long press the M button on the main unit until a
4-digit code and three more symbols appear on screen. Press the “up arrow” button immediately for pairing.
3. LED 1 blinks slowly; wait for a few moments until LED 1 stops ashing and closes. The pairing is
completed.
4. Switch off and on the main unit, and test functions by changing temperature higher / lower than the actual
temperature from thermostat screen.
III. DELETE CLEAR ALL PAIRING
On receiver unit press and hold both pairing and On/Off buttons for 5 seconds until LED1 and LED2 turn
on. Release buttons.
Then LED 1 turns off, which means that all pairing have been cleared.
IV. SIGNAL LOST OR WEAK
In case the RF and WIFI signal lost/disconnected, LED 2 will icker slowly.
Move units closer to each other and the WiFi router and check the status of the devices again.
If within a few minutes the operation does not return to normal, delete all pairing and perform the pairing
procedures of receiver, main unit, and the wireless router (with the mobile application) again.
HOUR/DATE SETTING
With main unit screen On, press and hold the M button for 5-6 seconds until the hour on the screen blinks.
You will see highlighted 00:00 on the screen. Set the minutes with the up and down buttons.
Continue pressing the M button.
Set the time with the up and down buttons.
Continue pressing the M button.
Select the day with the up and down buttons.
Continue pressing the M button.
Save the settings by pressing the ON / OFF button or wait about 15 seconds.
OPEN WINDOW DETECTION FUNCTION
When the “open window” detection mode is activated in advanced settings, the system will automatically
switch off heating if a sudden decrease in temperature (2°C in 15 minutes by default) occurs. This function is
useful when opening a door / window (eg ventilation) without stopping the heating.
The thermostat will return to previous working mode after 30 minutes, and the “OP” icon will disappear from
the screen. Press any button and thermostat will exit OWD function, during the heating off period.
OTHER FEATURES AVAILABLE IN YOUR SMARTPHONE APPLICATION
In TuyaSmart app you have the following features available:
- Measured temperature and programmed / set temperature by user;
- Heating Status: The “Heating” text appears on screen when the heat is on;
- 3 working modes: manual, Eco (economical) and automatic (according to daily schedule)
- Child lock function- Thermostat keyboard lock to stop accidental push of buttons
- Daily schedule (7 days) with 4 hour zones every day;
- Scheduled temperature timing
SET UP DAILY PROGRAMS
This setup n can also be done from smartphone app, wich we recommend.
With the on-screen display, press and hold the P button (6-7 seconds) to enter the PROGRAM settings. Days

EN
13
of the week are xed from Monday to Sunday (1 ~ 7), each day has 4 time periods (1 ~ 4). Each press of the
P button can be performed in the next setting.
1). Press P and hold for 3 seconds, the “hour” display ashes, change the value with the + and - buttons.
2) Press the P button, the temperature blinks, change the desired temperature with the + and - buttons.
3). Press the P button for the next time.
4). Repeat the settings for the other days and periods similarly.
Period 1 2 3 4
Hour Temp Hour Temp Hour Temp Hour Temp
12345 (Mon-Fri) 7:00 22°C 8:30 19°C 17:00 22°C 22:00 19°C
6 (Sat.) 8:00 22°C 8:30 22°C 17:00 22°C 22:00 19°C
7 (Sun.) 8:00 22°C 8:30 22°C 17:00 22°C 22:00 19°C
ADVANCED PARAMETER SETTINGS
Turn the thermostat screen Off by pressing the On / Off button. With screen Off, press and hold in the
same time and buttond for parameters settings. Pres M to navigate and arrows to change value.
MENU Description Range Defalt value
01 Temp. calibration for internal sensor -8°C ~ 8°C 0°C
02 Set Point Max. 5°C ~ 35°C 35°C
03 Set Point Min. 5°C ~ 35°C 5°C
05 Frost Protection Temp. 5°C ~ 15°C 5°C
09 Histerezis ( Deadzone - 0.5°C step) 0.5°C ~ 3°C 0°C(Off)
11 Child lock function 1: ON 0: Off 0
12 Open window detect function-OWD 1: ON 0: Off 0
13 OWD - Detect time 2 ~ 30 minutes 15 minutes
14 OWD - Drop temp. select ( within
detect time)
2,3,4 °C 2°C
15 OWD - Delay time select
(Return to previous working status)
10 ~ 60 minutes 30 minutes
17 Factory reset 0 : No 0
1: Yes, and then press
On/off button for 5s,wait
until thermostat restart.
Software Version 5055-02
RECEIVER WIRING DIAGRAM
The operation of connecting the receiver unit with 230 V power supply and central heating system must be
performed only by qualied personnel and only after consulting the thermostat and boiler documentation.
The receiver unit has a relay command (NO and NC / Normal Open and Normal Closed) without potential
(non-energized/dry contact) which executes the closing of a control circuit with a maximum current of 10 A,
and a maximum voltage of 250 V AC / DC. Find examples of connection with certain models of boilers at the
end of the manual.

EN
14
GAS BOILERS CONNECTION EXAMPLES - THERMOSTAT PNI CT35*
* The installation must be done only by the authorized installer and only after consulting installation manuals,
and checking the connections and their compatibility.
1. Ariston CLAS EVO SYSTEM
2. Ferroli DivaCondens 24/28
3. Vaillant Ecotec Pure
4. Motan Max Optimus

EN
15
INSTALLATION AND DIMENSIONS
The main and receiver unit can be mounted in 2 ways:
1. Table or at surface area with the white holder inside package:
2. On the wall with wall holder:

BG
16
Безжичен интелигентен термостат PNI CT35 Ръководство на потребителя
ПРЕДУПРЕЖДЕНИЯ
Тъй като продуктът трябва да бъде свързан към 230 VAC захранване и към нагревателен уред,
монтажът трябва да се извършва само от квалифициран персонал, за да се избегнат непоправими
щети на продукта и / или нагревателите, които са свързани, дефекти, които не са покрити от
гаранцията.
Препоръчваме да имате квалифициран персонал с опит в тази област за първоначална настройка
на оборудването, за да разберете правилно техническите условия и процедури, описани в това
ръководство.
След инсталирането и свързването продуктът е лесен за използване както на мобилен модул, така
и на смартфон за управление с интуитивен и лесен за конфигуриране интерфейс.
За достъп до / наблюдение / управление на продукта от вашия смартфон е необходимо да
имате интернет източник (необходим е 2,4 GHz Wi-Fi рутер за интернет) близо до мястото, където е
инсталиран термостатът.
ГЛАВНА ИНФОРМАЦИЯ
Интелигентният термостат PNI CT35 е разработен, за да осигури на клиентите допълнителен
ежедневен комфорт в домовете им, в офиса или други помещения, предлагайки възможност за
наблюдение и включване или изключване на отоплителни системи, или автоматично планирани за
всеки ден от седмицата, или отдалечено, по всяко време и навсякъде чрез Интернет със специално
приложение за Android или iOS смартфон.
Mode of operation and communication:
Dedicated app name is TuyaSmart
and can be downloaded
either from the Googel Play /
App Store, either by scanning
with your smartphone the QR
code below:
Package content:
- Main unit with illuminated screen
- Receiver / relay command unit
- Wall / table mount accessories
- User manual

BG
17
ТЕХНИЧЕСКИ ПОДРОБНОСТИ / СПЕЦИФИКАЦИИ
- Захранване на основното устройство: 2 батерии AAA
- Захранване на приемника: 230VAC 50 / 60Hz
- Тип команда на приемника: NO Реле (нормално отворено) 10 ампера макс
- Релейни параметри: 250 V макс., 10 ампера макс. (Resistiv), AC / DC curent
- Температура на зададената точка: 5 - 35 ° C (стъпка от 0,5 ° C)
- Измерима околна температура: 0 - 50 ° C
- Единица за измерване на температурата: само o градуса по Целзий
- Допустима влажност: 85% без конденз
- Осветяване на екрана: бяла светлина
- Температурен сензор: NTC 10K, 3950ohms при 25 ° C
- Точност на сензора: ± 0,5 ° C (регулируема чрез стъпково калибриране на сензора 0,5 ° C)
- Степен на защита: IP30
- Корпус: ABS с UL94-5 огнезащитна пластмаса стандарт
- WiFi свързаност: 802.11 b / g / n (2.4 GHz); WPA2 (TKIP и AES)
- RF честотна свързаност между устройствата: 868 MHz
- Съвместимост със смартфон: Минимум iOS 9 / минимум Android 4.2
ОПИСАНИЕ НА ОСНОВНАТА ЕДИНИЦА
ОПИСАНИЕ НА ПРИЕМНИКА

BG
18
ПЪРВО ИЗПОЛЗВАЙТЕ ПРЕДУПРЕЖДЕНИЯ И ИНСТРУКЦИИ
1. Системата се доставя с основно устройство и приемник, сдвоени фабрично. Преди
употреба трябва само да сдвоите приемника с близкия безжичен рутер.
2. При първо стартиране термостатът / приемникът сигнализира чрез светодиод 1 = „бавно
мига“, което означава, че е необходимо да свържете устройството към безжичния рутер с
достъп до Интернет.
3. Поставете 2 алкални батерии AAA (не са включени) в основното устройство и го
включете, като натиснете бутона ON / OFF. Настройките се показват, както е показано в горното
описание.
4. Свържете приемника към захранване 230 VAC (само квалифициран персонал). Уверете
се, че работи правилно, като тествате / проверявате състоянието на светодиода и включвате /
изключвате модула чрез специален бутон.
I. СДВОЯВАНЕ НА ТЕРМОСТАТ С МОБИЛНО ПРИЛОЖЕНИЕ И БЕЗЖИЧЕН ИНТЕРНЕТ РУТЕР
1. Свържете вашия смартфон с 2,4 Ghz безжичен интернет рутер наблизо. За бърза настройка се
уверете, че телефонът, приемникът на термостата и безжичният рутер са възможно най-близо (1-3 м).
ПРЕДУПРЕЖДЕНИЕ: Проверете и се уверете, че разполагате с 2,4 Ghz безжична мрежа и дали
сте свързали телефона към нея. Рутерите и телефоните от ново поколение също са оборудвани
с активирана безжична мрежа от 5 Ghz и устройствата се свързват автоматично на тази честота.
Термостатът не може да бъде свързан към 5 Ghz безжична мрежа, защото работи само на безжична
честота 2,4 Ghz. За да конфигурирате рутера и 2,4 Ghz безжична мрежа, обадете се на специалист.
1. Изтеглете приложението „TuyaSmart“ от Google Play или App Store и инсталирайте и регистрирайте
нов акаунт: Натиснете бутона „Регистрация“ и следвайте инструкциите на екрана.
2. Добавете устройство, като натиснете бутона + в горния десен ъгъл.
3. Натиснете „Всички устройства“ и отворете категорията „Малки домакински уреди“.
4. Намерете „Термостат“ или „Нагревател“ от списъка и изберете. Следвайте стъпките на екрана,
проверете името на Wi мрежата и въведете паролата на Wi мрежата с достъп до интернет, към
която е свързан и телефонът. Ако безжичната мрежа не се показва автоматично, проверете дали сте
активирали GPS местоположение и дали телефонът ви е свързан към безжична мрежа с честота 2,4
Ghz. Процедура за рестартиране.
5. Продължително натискане на бутона за сдвояване на приемника, за да влезете в режим на Wi
сдвояване, докато LED 1 премигва бързо. (преди това LED 1 мига бавно, подписва, че термостатът не
е сдвоен с wi интернет рутер)
6. Докоснете „Потвърждаване на мигането на индикатора за мигане“ на телефона си.
7. Изчакайте няколко минути, докато сдвояването завърши. Светодиодът 1 на приемника ще спре да
мига и ще се изключи. В този момент връзката с интернет чрез Wirelessrouter е успешна и иконата на
термостата ще се появи в приложението Smartphone.
Ако светодиодът продължава да мига бавно, връзката е неуспешна, опитайте отново от стъпка 1.
ПЪРВО ПОЛЗВАНЕ НА ТЕРМОСТАТА
1. При включен екран на основния модул променете температурата по-голяма или по-малка от
измерената температура от екрана.
2. След максимум 90 секунди основното устройство изпраща команда към приемника, което
потвърждава чрез включване / изключване на светодиода 1 и чрез „щракване“, което се чува от
вътрешното реле.
3. От приложението TuyaSmart (уверете се, че устройството се показва онлайн след конфигуриране на
интернет сдвояване) докоснете устройството, за да получите достъп до него. С помощта на бутоните
„+“ и „-“ променете температурата по-голяма или по-малка от измерената температура от екрана.
4. За 90 секунди или повече, приложението изпраща команда през интернет към приемника на
термостата, което потвърждава чрез включване / изключване на LED 1 и със звук „щракване“ от
вътрешното реле. Температурата ще се промени на екрана на основното устройство.
Ако няма промяна след 90 - 180 секунди (2 минути), проверете отново дали сте променили
температурата на по-голяма / по-малка от текущата показана температура и проверете дали
устройството е онлайн.

BG
19
II. СДВОЯВАНЕ ОСНОВНО УСТРОЙСТВО С ПРИЕМНИК
Извършете тази процедура само ако е абсолютно необходимо: ако имате проблеми с управлението на
настройките на основното устройство от приложението за смартфон, след сдвояване на приемника с
безжичния рутер (екранът не получава команди за 5 - 10 минути от мобилното приложение).
1. Натиснете и задръжте бутона за сдвояване на приемника, докато светодиодът 1 мига бързо.
2. При затворен екран на основното устройство (натиснете бутона On / Off), дълго натискайте бутона
M на основното устройство, докато на екрана се появят 4-цифрен код и още три символа. Натиснете
бутона „стрелка нагоре“ незабавно за сдвояване.
3. LED 1 мига бавно; изчакайте няколко минути, докато светодиод 1 спре да мига и се затвори.
Сдвояването е завършено.
4. Изключете и включете основното устройство и тествайте функциите, като промените температурата
по-висока / по-ниска от действителната температура от екрана на термостата.
III. ИЗТРИЙ ИЗЧИСТИ ВСИЧКИ СДВОЯВАНИЯ
На приемника натиснете и задръжте бутоните за сдвояване и за включване / изключване за 5
секунди, докато LED1 и LED2 се включат. Бутони за освобождаване.
След това светодиод 1 се изключва, което означава, че всички сдвоявания са изчистени.
IV. ИЗГУБЕН ИЛИ СЛАБ СИГНАЛ
В случай, че RF и WIFI сигналът се загуби / прекъсне, светодиодът 2 ще мига бавно.
Преместете единиците по-близо един до друг и WiFi рутера и проверете отново състоянието на
устройствата.
Ако в рамките на няколко минути операцията не се нормализира, изтрийте всички сдвоявания и
изпълнете процедурите за сдвояване на приемника, основното устройство и безжичния рутер (с
мобилното приложение) отново.
НАСТРОЙКА НА ЧАС / ДАТА
При включен екран на основното устройство натиснете и задръжте бутона M за 5-6 секунди, докато
часът на екрана премигне.
Ще видите подчертано 00:00 на екрана. Задайте минутите с бутоните нагоре и надолу.
Продължете да натискате бутона M.
Задайте часа с бутоните нагоре и надолу.
Продължете да натискате бутона M.
Изберете деня с бутоните нагоре и надолу.
Продължете да натискате бутона M.
Запазете настройките, като натиснете бутона ON / OFF или изчакайте около 15 секунди.
ФУНКЦИЯ ЗА ОТКРИВАНЕ НА ОТВОРЕН ПРОЗОРЕЦ
When the “open window” detection mode is activated in advanced settings, the system will automatically
switch off heating if a sudden decrease in temperature (2°C in 15 minutes by default) occurs. This function is
useful when opening a door / window (eg ventilation) without stopping the heating.
The thermostat will return to previous working mode after 30 minutes, and the “OP” icon will disappear from
the screen. Press any button and thermostat will exit OWD function, during the heating off period.
ДРУГИ ФУНКЦИИ, НАЛИЧНИ ВЪВ ВАШЕТО ПРИЛОЖЕНИЕ ЗА СМАРТФОН
В приложението TuyaSmart имате следните функции:
- Измерена температура и програмирана / зададена температура от потребителя;
- Статус на отопление: Текстът „Отопление“ се появява на екрана, когато отоплението е включено;
- 3 режима на работа: ръчен, еко (икономичен) и автоматичен (според дневния график)
- Функция за заключване за деца - Заключване на клавиатурата на термостат за спиране на случайно
натискане на бутоните

BG
20
- Дневен график (7 дни) с 4 часови зони всеки ден;
- Планирано синхронизиране на температурата
НАСТРОЙТЕ ЕЖЕДНЕВНИ ПРОГРАМИ
Тази настройка може да се извърши и от приложението за смартфон, което препоръчваме.
С екранния дисплей натиснете и задръжте бутона P (6-7 секунди), за да влезете в настройките на
ПРОГРАМА. Дните от седмицата са фиксирани от понеделник до неделя (1 ~ 7), всеки ден има 4
времеви периода (1 ~ 4). Всяко натискане на бутона P може да се извърши в следващата настройка.
1). Натиснете P и задръжте за 3 секунди, дисплеят “час” мига, променете стойността с бутоните + и -.
2) Натиснете бутона P, температурата мига, променете желаната температура с бутоните + и -.
3). Натиснете бутона P за следващия път.
4). Повторете настройките за останалите дни и периоди по подобен начин.
Период 1 2 3 4
Час Темп Час Темп Час Темп Час Темп
12345 (Mon-Fri) 7:00 22°C 8:30 19°C 17:00 22°C 22:00 19°C
6 (Sat.) 8:00 22°C 8:30 22°C 17:00 22°C 22:00 19°C
7 (Sun.) 8:00 22°C 8:30 22°C 17:00 22°C 22:00 19°C
РАЗШИРЕНИ НАСТРОЙКИ НА ПАРАМЕТРИТЕ
Изключете екрана на термостата, като натиснете бутона за включване / изключване. При изключен
екран натиснете и задръжте едновременно и бутон за настройки на параметри. Натиснете
M за навигация и стрелки за промяна на стойността.
МЕНЮ Описание Обхват Стойност по
подразбиране
01 Темп. калибриране за вътрешен
сензор
-8°C ~ 8°C 0°C
02 Зададена точка Макс. 5°C ~ 35°C 35°C
03 Зададена точка Мин. 5°C ~ 35°C 5°C
05 Температура на защита от
замръзване.
5°C ~ 15°C 5°C
09 Histerezis (Deadzone - стъпка 0,5 ° C) 0.5°C ~ 3°C 0°C(Off)
11 Child lock function 1: ON 0: Off 0
12 Функция за откриване на отворен
прозорец - OWD
1: ON 0: Off 0
13 OWD - Време за откриване 2 ~ 30 минути 15 минути
14 OWD - Темп. изберете (в рамките на
времето за откриване)
2,3,4 °C 2°C
15 OWD - Избор на времето за забавяне
(Връщане към предишното работно
състояние)
10 ~ 60 минути 30 минути
17 Фабрично нулиране 0 : No 0
1: Да, и след това
натиснете бутона за
включване / изключване
за 5 секунди, изчакайте,
докато термостатът се
рестартира.
Other manuals for CT35
1
Table of contents
Languages:
Other PNI Thermostat manuals