PNI CT36 PRO User manual

PNI CT36 PRO

English .................... 3
Български ............. 22
Deutsch .................. 45
Español ................... 67
Français .................. 88
Magyar ................... 109
Italiano .................... 129
Nederlands ............. 150
Polski ....................... 171
Romana ................... 192
Contents

3User manual
Special warnings
• Since this thermostat must be connected to a 230V
network and to heating equipment, the installation must
only be performed by qualified personnel.
• Also, we recommend that the initial configuration of the
thermostat be performed only by qualified personnel able to
implement the technical procedures detailed in this manual.
• To control the thermostat remotely from the mobile phone,
it is necessary to connect the thermostat to a 2.4 GHz
wireless network. The thermostat does not support 5GHz
networks.
• The thermostat is compatible with all boilers equipped with
an input for thermostats with a potential-free NO relay.
Technical specifications
Central unit power supply 2 AAA 1.5V alkaline batteries
Receiver unit power supply 230VAC 50/60Hz
Memory EEPROM

User manual 4
Receiver unit control type
NO (normally open)/NC
(normally closed) relay
without potential (not
energized)
Relay operating parameters Max. 250 V, max. 10A
(resistive), Current AC/DC
Set temperature range 5 - 35°C, step 0.5°C
Measured temperature range 0 - 50°C, step 0.1°C
Hysteresis 0.1°C
Temperature measuring unit Celsius degrees
Operating humidity Max. 85% no condensation
WiFi frequency 2.4 GHz
WiFi transmission power 100mW
RF frequency 868 MHz
RF transmission power <25mW

5User manual
The main unit
1
2
3
4
5
6
15 16 17
18
7
8
9
10
11
12
13
14
1 2 3 4 5 6 7
18:00
4
°C
°C
1
Day of the week
1 (Monday) - 7
(Sunday)
10 Wireless signal indicator
2Clock 11 Cooling system is On
3The set temperature 12 Heating system is On
4Active heating mode 13 The room temperature
5Active cooling mode 14 Active program number

User manual 6
6Eco mode active 15
Eco, Manual,
Programmed mode
selection
7Manual mode active 16 Heating, Cooling mode
selection
8Programmed mode
active 17 Thermostat On/O
9Battery indicator 18
Up and Down arrow for
setting temperature and
parameters
The receiver unit
1
2
3
4
1 - Pairing button 3 - Power indicator

7User manual
2 - Heating on indicator 4 - On/o button
Instructions and warnings for the first use
Note: The system comes with the two units paired from the
factory. During installation, it is only necessary to connect the
receiver unit to the wireless router in the house.
• Insert 2 AAA alkaline batteries (not included) into the
central unit and turn on the unit by pressing the on/o
button.
• On the screen of the central unit, the network indicator
blinks, to indicate that the thermostat is not connected to
the Internet.
• Connect the receiver unit to a 230V power supply (the
operation must be performed by qualified personnel only).
• Make sure the thermostat is working properly by turning the
two units on/o and checking the status of the LEDs.
The Tuya Smart app
Note 1: Due to the numerous updates of the Tuya Smart
application, it is possible that the images and information described
in this manual are dierent from the version you have installed.

User manual 8
Note 2: For a quick configuration, make sure that the phone and
the thermostat are as close as possible to each other (1-3 m).
1. Connect the mobile phone to a 2.4 GHz wireless network
and activate the GPS location on your phone.
Warning: Make sure that you have connected the phone to the
wireless network on the 2.4 GHz frequency. New generation
routers and phones are also equipped with the 5 GHz wireless
network, but the PNI thermostat does not support this frequency.
2. Download the Tuya Smart application from the App Store or
Google Play or scan the QR code below:
3. Open the Tuya Smart application and press the + button or
“Add device” to add the thermostat to the application.
4. In the following interface, select the “Small Home
Appliances” - “Thermostat (Wi-Fi)” option.
5. Select the WiFi network and add the network password.
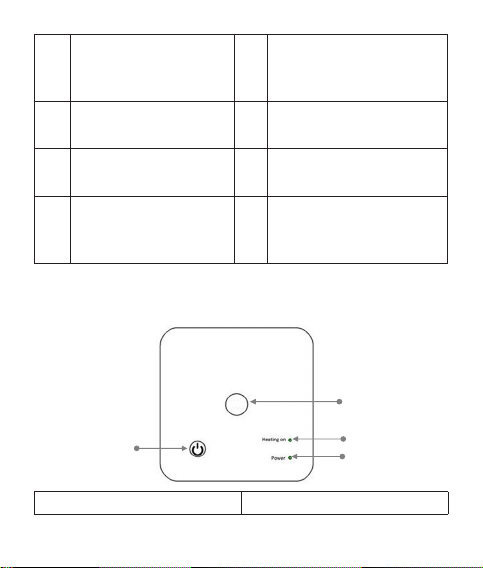
6. Long press the pairing button on the receiver unit until the
“Heating on” LED blinks quickly.

9User manual
7. In the application, press “Next” and confirm that the LED
indicator on the product blinks quickly.
8. The application will start scanning nearby devices.
9. After your thermostat has been identified, press “Done” to
complete the procedure.
10. The LED on the receiver will stop blinking. At this moment,
the wireless internet connection is successful. If the LED
continues to blink slowly, the connection failed, repeat the
procedure.

User manual 10
Functions available in the application
The following functions are available in the Tuya Smart application:
• Display the set temperature and the measured temperature.
• Heating/cooling status: the icon appears when the
heating system is on and the icon when the cooling
system is on.
• Operation mode selection: Manual, Eco and Programmed

11 User manual
• Advanced settings:
For the two operation modes, Heat and Cold, the following
settings are available: Daily program setting (maximum
4 periods), Child protection (Keypad lock), Anti-freeze
protection, Open window protection, Temperature
calibration, Setting Dead Zone (Hysteresis), Temperature
report.

User manual 12
Temperature control from the thermostat
Press the Up and Down keys on the central unit to set the desired
temperature.
Heating mode:
• If the set temperature (SET) is higher than the temperature
in the room (ROOM), the central unit will send a command
to the receiver unit in a maximum of 90 seconds. The
“Heating on” LED on the receiver unit will light up and a
click will be heard indicating the activation of the internal
relay. The icon (the heating system is on) appears on the
screen of the central unit.
• If the set temperature (SET) is lower than the temperature
in the room (ROOM), the central unit will send a command
to the receiver unit in a maximum of 90 seconds. The
“Heating on” LED on the receiver unit will go out and a click
will be heard indicating the activation of the internal relay.
The icon disappears from the screen.
Cooling mode:
• If the set temperature (SET) is lower than the temperature
in the room (ROOM), the central unit will send a command
to the receiver unit in a maximum of 90 seconds. The
“Heating on” LED on the receiver unit will light up and a

13 User manual
click will be heard indicating the activation of the internal
relay. The icon (the cooling system is on) appears on the
screen of the central unit.
• If the set temperature (SET) is higher than the temperature
in the room (ROOM), the central unit will send a command
to the receiver unit in a maximum of 90 seconds. The
“Heating on” LED on the receiver unit will go out and a click
will be heard indicating the activation of the internal relay.
The icon disappears from the screen.
Temperature control from the Tuya Smart application
1. Open the Tuya Smart application and in the list of devices
added to the application, click on the thermostat.
2. From the settings menu, select the cooling (Cold) or heating
(Heat) mode.
3. In the thermostat control interface, press the “-” and “+”
buttons to set the desired temperature.
4. In a maximum of 90 seconds, the application sends the
command via the Internet to the receiver unit, which
confirms by turning on/o the “Heating on” LED and audibly
with a click, which means the activation of the internal relay.
In a short time, the temperature (SET) displayed on the
screen of the central unit will also be updated.

User manual 14
Note: If the temperature on the screen of the central unit does
not update within a maximum of 2 minutes, check again in the
application the status of the thermostat (Online or Oine) and
the set temperature.
Pairing the two units
Warning: The two units come paired from the factory. Perform
this procedure only if absolutely necessary.
If the thermostat appears Oine in the application, the signal
icon is missing from the screen, the “Heating on” LED on the
receiver unit is o and the units do not communicate with each
other, perform the pairing procedure below:
1. Long press the pairing button on the receiver unit until the
“Heating on” LED flashes rapidly.
2. Turn o the screen of the central unit by pressing the on/
o button.
3. When the screen is o, press and hold the M button on the
central unit until a 4-digit code appears on the screen.
4. Immediately press the up arrow button to pair with the
receiver unit.
5. The “Heating on” LED blinks rarely and then goes out.

15 User manual
6. The icon blinks for a few seconds, after which it remains
on the screen, confirming that the pairing is complete.
7. Test the functionality by changing the set temperature
(SET) and watch the triggering of the relay in the receiver
unit.
Delete pairing
1. Turn o the receiver unit by briefly pressing the on/o
button. The two LEDs will turn o.
2. With the receiver o, press and hold the pairing and on/o
buttons at the same time until the two LEDs light up at once.
Release the buttons.
3. The “Power” LED stays lit, and the “Heating on” LED
flashes rarely.
4. The icon disappears from the screen of the central unit.
Warning: first pair the two units and then add the thermostat to
the Tuya Smart application.
Lost or weak signal
In case of RF signal loss between the receiver unit and the central
unit, the icon will disappear from the screen.

User manual 16
If the receiver unit is disconnected from the wireless, the “Heating
on” LED will blink rarely.
Recommendations:
• Change the batteries of the central unit if necessary.
• Bring the units closer to each other and the receiver unit to
the WiFi router and check the status of the devices again.
• If in a few minutes the operation does not return to normal
and the “Heating on” LED continues to blink rarely, delete
and perform the pairing procedures again: first of the central
unit with the receiver unit and then the pairing with the
wireless router (through the application mobile).
Set the time and the day of the week
1. With the screen on, long press the M button for 5-6
seconds. Only the time remains displayed on the screen, and
the minute indicator flashes.
2. Press the Up and Down keys until you reach the desired
value. Press the M key to confirm.
3. The hour indicator blinks. Press the Up and Down keys until
you reach the desired value. Press the M key to confirm.
4. The indicator corresponding to the day of the week, 1
(Monday) - 7 (Sunday) will flash. Press the Up and Down

17 User manual
keys until you reach the desired value. Press the M key to
confirm.
5. The screen returns to normal display mode.
Open window detection
When the open window detection function is activated by the
application, the system will automatically stop the heating if a
sudden drop in temperature is registered (2°C in 15 minutes by
default). The “open window” icon appears on the screen, and the
set temperature (SET) becomes 5°C.
This function is useful when opening a window (for ventilation, for
example) without stopping the heating.
The thermostat will return to the previous operating mode after
30 minutes, and the “open window” icon will disappear from the
screen.
Any other button press within 30 minutes will stop the function,
bringing the system to the previous mode of operation.
Daily program configuration via the thermostat
Note: The configuration of the daily program can also be done
through the Tuya Smart application, the procedure that, for ease
of execution, we recommend.

User manual 18
With the screen on, long press the P button (6-7 seconds) to enter
the PROGRAM settings. The days of the week are marked from 1
(Monday) to 7 (Sunday). Each day has 4 time periods (1 ~ 4). Each
press of the P button leads to the next setting.
1. Long press the P button. The minute indicator flashes.
Change the value using the Up and Down buttons.
2. Press the P button. The hour indicator flashes. Change the
value using the Up and Down buttons.
3. Press the P button. The indicator for the set temperature
(SET) flashes. Change the value using the Up and Down
buttons.
4. Press the P button for the next period.
5. Repeat the steps for the other days and periods.
Example of temperature programming for days:
Day h°Ch°Ch°Ch°C
1-5 7:00 22°C8:30 19°C17:00 22°C22:00 19°C
68:00 22°C8:30 22°C17:00 22°C22:00 19°C
78:00 22°C8:30 22°C17:00 22°C22:00 19°C
Advanced settings
1. Turn o the central unit by pressing the on/o button.

19 User manual
2. With the screen o, press and hold the M and Up buttons
simultaneously.
3. Press the M button to navigate through the menu and the
Up and Down arrows to change the Options.
4. Press the on/o button to exit the menu.
Menu Description Options Default
01
Internal sensor
temperature
calibration
-8°C ~ 8°C (step
0.1°C) 0°C
02 Setting the maximum
set temperature limit 5°C ~ 35°C35°C
03 Setting the minimum
set temperature limit 5°C ~ 35°C 5°C
05 Frost protection
temperature 5°C ~ 15°C 5°C
09 Hysteresis
(Deadzone)
0.1°C ~ 6°C
(step 0.1°C) 0.1°C
11 Key lock function
1: On
(Long press
the M key for
5 seconds to
unlock the keys)
0: O
0

User manual 20
12 Open window
detection - OWD
On
O 0
13 OWD - Detection
time 2 ~ 30 minutes 15 minutes
14
OWD - Temperature
drop (during
detection)
2,3,4 °C 2°C
15
OWD - Time Delay
(return to previous
setting/program) 10 ~ 60 minutes 30 minutes
17 Return to factory
settings
0: No
1: Yes
Long press the
on/o button for
5 seconds until
the thermostat
restarts.
0
Software version 5055-02
Receiver unit connection diagram
Warning: Connecting the receiver unit to a 230 V power supply
Table of contents
Languages:
Other PNI Thermostat manuals
Popular Thermostat manuals by other brands

Mira
Mira Advance Low Pressure Standard installation guide

Honeywell
Honeywell T7460A installation instructions

Honeywell
Honeywell THE ROUND Y460A2003 installation manual

HVAC Controls
HVAC Controls T32-VNP installation manual

Hyco
Hyco PT01 Product instruction manual

nilan
nilan CTS 700 Installation and Maintenance