PNI CT36 User manual

Termostat inteligent PNI CT36
fara fir cu WiFi, control prin Internet pentru centrale
termice
Wireless smart thermostat PNI CT36
Internet controlled for central heating
Manual de utilizare / User manual
RO Manual de utilizare..................................... 2
EN User manual............................................... 8

RO
2
ATENTIONARI SPECIALE
Deoarece produsul trebuie conectat la o retea de alimentare cu energie electrica 230 V si la un echipament
de incalzire , instalarea trebuie facuta doar de catre personal calicat, pentru a evita defectarea iremediabila
a produsului, si/sau a echipamentelor de incalzire la care se conecteaza, defecte care nu fac obiectul
garantiei.
Va recomandam ca pentru instalarea si congurarea initiala a echipamentului sa apelati la personal
calicat, cu experienta in domeniu, pentru intelegerea corecta a termenilor si procedurilor tehnice detaliate in
acest manual.
Utilizarea produsului este facila, atat unitatea termostat mobila cat si aplicatia de smartphone avand o
interfata intuitiva si usor de congurat si setat.
Pentru accesarea / monitorizarea / controlul produsului de la distanta de pe smartphone, este necesara
prezenta unei surse de internet ( router WiFi ) in incinta in care este montat termostatul.
INFORMATII GENERALE
Termostatul inteligent PNI CT36 a fost dezvoltat pentru a oferi clientilor un plus de confort zi de zi in
spatiile de locuit, la birou sau in alte incinte oferind posibilitatea de a monitoriza si porni / opri sistemele
de incalzire e automat programat pe perioade orare in ecare zi a saptamanii, e manual de la distanta,
oricand si de oriunde prin intermediul Internetului si a aplicatiei dedicate pentru Smartphone cu Android
sau iOS.
Mod de functionare si comunicare:
Aplicatia dedicata se numeste
TuyaSmart (sau SmartLife) si poate
descarcata e din Magazin Play /
App Store, e prin scanarea cu
telefonul mobil a codului QR :
Produsul contine:
- unitate centrala cu ecran iluminat
- Unitate receptor/releu comanda
- Accesorii montaj perete / masa
- Manual de utilizare

RO
3
DETALII TEHNICE / SPECIFICATII
- Alimentare unitate centrala: 2 baterii AAA
- Alimentare unitate receptor: 230VAC 50/60Hz
- Tip comanda unitate receptor : releu NO/NC (normal deschis/) fara potential ( neenergizat)
- Parametri de functionare releu: maxim 250 V, maxim 10 Amperi (rezistiv), Curent AC/DC
- Compatibil cu toate centralele termice prevazute cu intrare termostat compatibil cu releu NO fara potential.
- Plaja temperatura reglabila/setabila : 5 - 35°C cu pas de 0.5°C
- Temperatura masurabila/asabila: 0 - 50°C cu pas de 0.1°C
- Unitate de masura temperatura : doar grade °Celsius
- Umiditate acceptata: maxim 85% fara condens in aer
- Iluminare ecran : Da
- Senzor temperatura: NTC 10K, 3950ohms at 25°C
- Precizie senzor: ± 0.1°C ( calibrare senzor cu pas de 0.5°C )
- Grad de protectie: IP30
- Carcasa : ABS cu standard anti-incendiu UL94-5
- Conectivitate WiFi: 802.11 b/g/n ( 2.4 GHz) ; parola WPA2 ( TKIP si AES)
- Conectivitate RF intre unitati : 868 MHz
- Compatibilitate aplicatie Smartphone: minim iOS 9 / minim Android 4.2
DESCRIERE UNITATE CENTRALA
DESCRIERE UNITATE RECEPTOR
Ziua saptamanii
Ora
Temperatura setata Pictograma incalzire
Indicator semnal radio
Temperatura curenta
Perioada programata
Buton programare
Selectare moduri
Buton On/O Setare temperatura si parametri
Indicator OWD
Buton Pornit/Oprit
Buton imperechere
Incalzire pornita ( LED 1)
Indicator alimentare( LED 2)

RO
4
INSTRUCTIUNI SI ATENTIONARI LA PRIMA UTILIZARE:
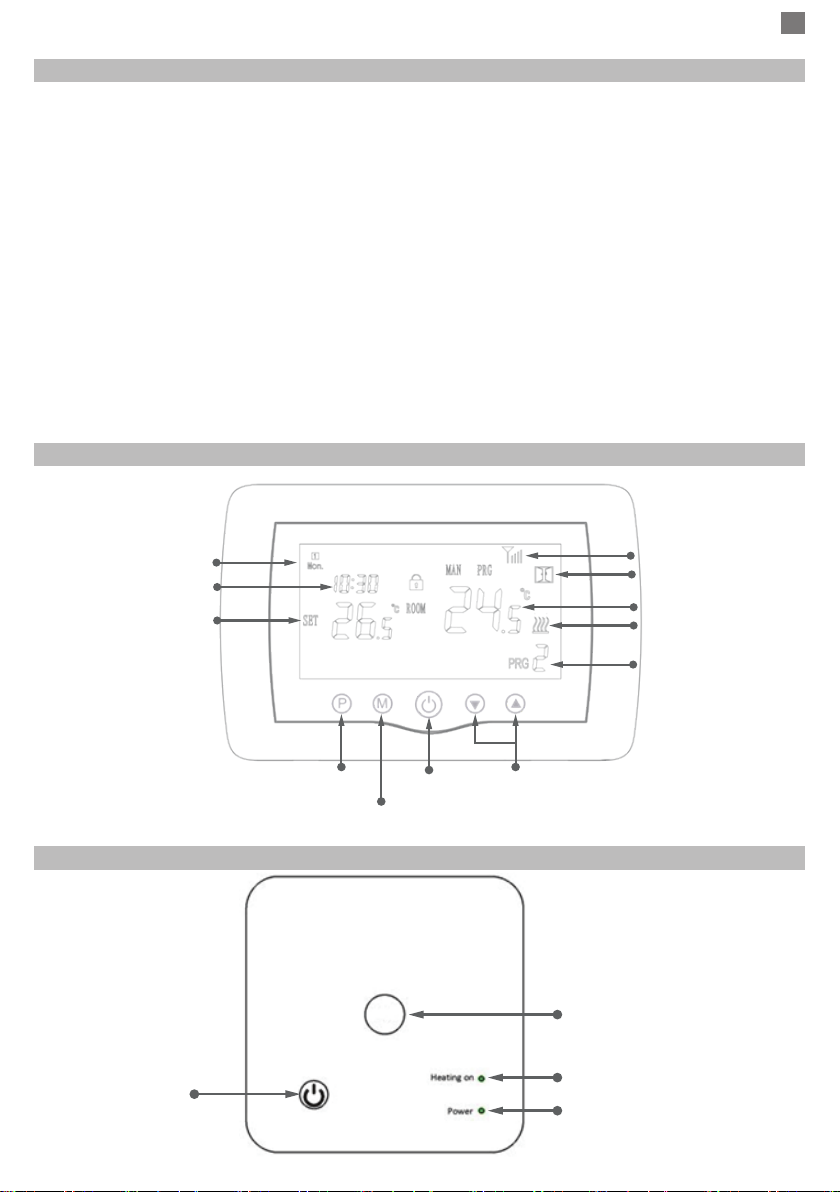
1. Sistemul vine cu unitatile termostat si receptor imperecheate din fabrica. La instalare mai este
necesara doar legarea / imperecherea unitatii receptor cu Router-ul Wireless din apropiere.
2. La prima punere in functiune termostatul / Unitatea receptor semnaleaza luminos prin LED =
“clipeste rar” ca este necesara conectarea acesteia la router-ul wireless cu acces la internet.
3. Introduceti 2 baterii AAA alcaline ( nu sunt incluse) in unitatile centrale si porniti unitatile
apasand butonul ON/OFF ( Pornit/Oprit). Pe ecran apar setarile conform descrierii de mai jos.
4. Conectati unitatea receptor la o sursa de alimentare 230 V ( doar personal calicat ). Asigurati-
va ca functioneaza corect, testand/vericand starea ledului.
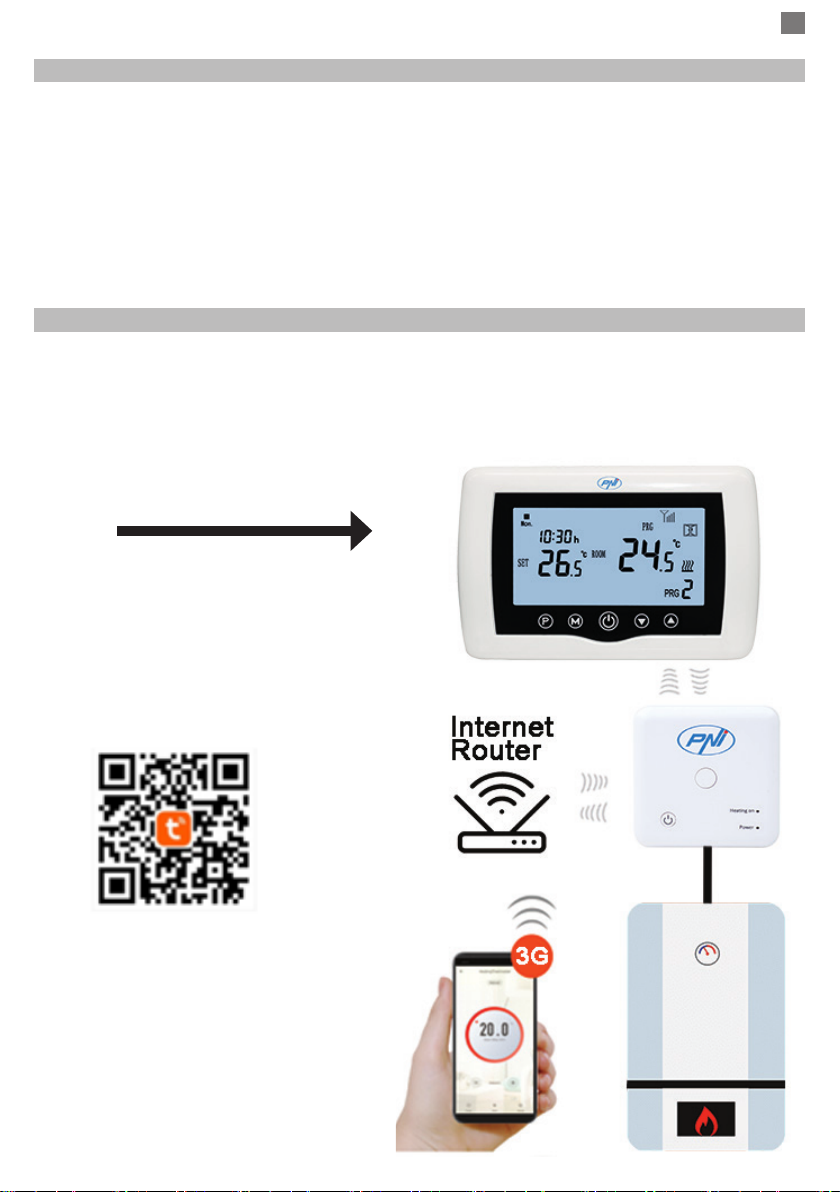
I. IMPERECHERE/LEGARE TERMOSTAT LA INTERNET PRIN WIRELESS CU APLICATIA DE MOBIL
1. Conectati telefonul mobil smartphone la reteaua wireless de internet din apropiere. Activati Locatia
GPS pe smartphone daca nu este activata. Pentru o congurare rapida asigurati-va ca atat telefonul cat si
termostatul si receptorul se aa cat mai aproape ( 1-3 m).
1. Descarcati aplicatia “TuyaSmart” din Google Play sau App Store, apoi instalati si inregistrati un cont nou.
2. Adaugati dispozitivul apasand butonul + in coltul din dreapta sus.
3. Apasati pe “All Devices” ( Toate echipamentele ) si accesati categoria Small Home Appliances.
4. Gasiti “Thermostat” sau “Heater” din lista si selectati. Urmati pasii de pe ecran, vericati numele retelei
Wireless si introduceti parola retelei Wireless cu acces la internet la care este conectat si telefonul.
5. Apasati lung butonul imperechere de pe receptor pentru a intra in modul de conectare/legare Wi, pana
cand LED-ul 1 va clipi rapid. ( LED-ul 1 clipeste rar, semn ca nu este legat la internet Wi)
6. Apasati casuta “Conrm indicator rapidly blink” pe telefon.
7. Asteptati un moment pana la nalizarea conexiunii. LED-ul de pe receptor nu va mai clipi - ramane aprins.
In acest moment conectarea la Internet prin Wireless este reusita si termostatul apare in lista de dispozitive
in aplicatie.
Daca LED-ul continua sa clipeasca incet, conexiunea nu a reusit, incercati din nou de la pasul 1.
PRIMA UTILIZARE A TERMOSTATULUI
1. Cu ecranul pornit, din unitatea termostat modicati temperatura setata mai sus sau mai jos decat
temperatura masurata si asata din camera.
2. In maxim 90 de secunde unitatea termostat trimite comanda catre unitatea receptor, care conrma prin
aprinderea/stingerea LED-ului 1 si in mod sonor sonor printr-un “click“, adica actionarea releului din interior.
Vizual pe ecran veti constata aprinderea/stingerea pictogramei de incalzire.
3. Din aplicatia de telefon “TuyaSmart“ ( asigurati-va ca dispozitivul apare online dupa congurarea la
internet) si apasati pe unul din cele 2 termostate pentru a-l accesa. Folosind butoanele “+“ sau “-“ pentru a
modica temperatura dorita mai sus sau mai jos decat temperatura masurata in camera si asata pe ecran.
4. In maxim 90 de secunde aplicatia trimite comanda prin internet catre termostat/receptor care conrma in
mod sonor printr-un “click“(adica actionarea releului din interior), si vizual prin aprinderea/stingerea LED-ului
1, dupa care apare/dispare si pe ecran pictograma de incalzire. Simultan se va modica si temperatura
asata pe unitatea termostat conform comenzii.
Daca modicarea nu are loc dupa 90 - 180 secunde ( 2 minute ) vericati din nou:
- daca ati modicat temperatura mai sus/jos decat cea existenta in camera si asata;
- daca dispozitivul este online in aplicatie ( Online - Culoare intensa; Ofine - Culoare stearsa si mesaj de
dispozitiv “Ofine”).
- daca termostatul este conectat la receptor - vericati stare indicator semnal radio.
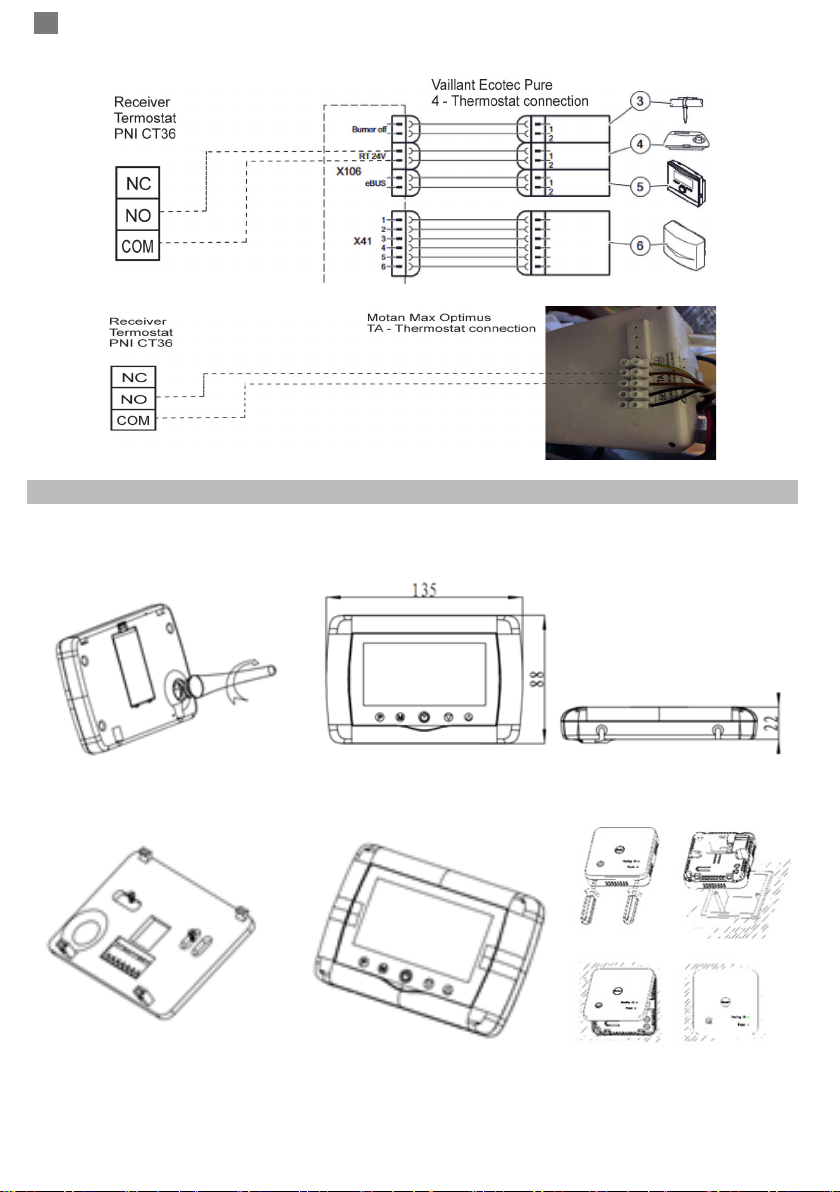
II. IMPERECHERE UNITATE TERMOSTAT CU UNITATEA RECEPTOR
ATENTIE: Daca unitatea receptor este conectata la Router/Internet puteti trece la acest pas doar daca este
absolut necesar(constatati lipsa comunicarii) deoarece cele 2 unitati vin imperecheate din fabrica.
Daca unitatea receptor nu este conectata la Router/Internet este obligatoriu sa executati intai conectarea ei
la Router/internet cu ajutorul aplicatiei de mobil.
Executati aceasta procedura doar daca este absolut necesar: daca legarea unitatii receptor la router-ul
wireless a fost reusita dar unitatea termostat nu primeste/trimite timp de 5-10 minute comenzile trimise/

RO
5
primite catre/de la la aplicatia de mobil iar pictograma lipseste de pe ecran .
1. Apasati lung butonul de imperechere cod de pe receptor pana cand LED-ul 1 clipeste rapid.
2. Cu ecranul inchis ( apasati butonul On/Off) apasati lung butonul M de pe unitatea centrala pana apare pe
ecran un cod din 4 cifre. Apasati imediat butonul “sageata sus” pentru imperechere.
3. Led-ul 1 clipeste rar, asteptati cateva clipe pana LED-ul 1 nu mai clipeste. Pictograma clipeste cateva
clipe dupa care ramane pe ecran conrmand ca imperecherea este nalizata.
Imperecherea este nalizata.
4. Opriti si porniti unitatea centrala, si testati functionalitatea modicand temperatura setata mai mare/mica
decat pragul temperaturii citite.
III. STERGETI/ANULATI TOATE IMPERECHERILE
Pe unitatea receptor apasati si tineti apasat butoanele de imperechere si Pornit/Oprit timp de 5 secunde,
pana cand LED1 si LED2 se aprind. Eliberati butoanele.
Apoi se sting, ceea ce inseamna ca toate imperecherile au fost eliminate.
IV. SEMNAL SLAB SAU PIERDUT
In cazul pierderii / deconectarii semnalului RF ( intre receptor si unitate termostat pictograma va
disparea de pe ecran ( sau va clipi rar).
In cazul deconectarii de la reteaua Wi ( Internet) Ledul de pe unitatea receptor va clipi rar.
Apropiati unitatile una de alta, si unitatea receptor de router-ul WiFi si vericati din nou starea dispozitivelor.
Daca in cateva minute functionarea nu revine la normal executati procedurile de imperechere ale
receptorului cu unitatile termostat si apoi cu routerul wireless ( cu ajutorul aplicatiei de mobil).
SETARE ORA DATA
Cu ecranul deschis apasati lung butonul M timp de 5-6 secunde, pana clipeste ora pe ecran.
Veti vedea evidentiat ora 00:00 pe ecran. Setati minutele cu butoanele sus si jos.
Continuati cu o apasare pe butonul M. Setati ora cu butoanele in sus si in jos.
Continuati cu o apasare pe butonul M. Selectati ziua cu butoanele sus si jos.
Continuati cu o apasare pe butonul M.
Salvati setarile apasand butonul ON / OFF sau asteptati aproximativ 15 secunde.
FUNCTIE DETECTIE GEAM DESCHIS
Cand modul de detectie “geam deschis“ ( OWD) este activat in setarile avansate, sistemul va opri automat
incalzirea daca se inregistreaza o scadere brusca a temperaturii (2° C in 15 minute in mod implicit) iar pe
ecran va aparea simbolul dedicat. Aceasta functie este utila cand se deschide o usa/fereastra( aerisire de
exemplu) fara sa se opreasca incalzirea.
Aparatul va reveni la modul de functionare anterior dupa 30 de minute, iar simbolul va disparea de pe ecran.
Orice alta apasare de buton in perioada de 30 de minute va opri functia, aducand sistemul la modul anterior/
programat de functionare.
ALTE FUNCTII DISPONIBILE IN APLICATIE
In aplicatia “TuyaSmart“ aveti disponibile urmatoarele functii:
- Asare temperatura masurata si temperatura programata / dorita / setata de utilizator;
- Asare Stare Incalzire: Apare textul “Heating“ cand caldura este pornita;
- 3 moduri de lucru: Manual, Eco ( economic) si Automat ( conform programarii zilnice)
- Blocare taste termostat , pentru a opri tastarea accidentala: Activati functia Seetings/Child Lock
- Programare zilnica ( 7 zile) cu 4 perioade orare in ecare zi;
- Programare temporizata

RO
6
CONFIGURARE PROGRAME ZILNICE
Aceasta congurare poate facuta si din aplicatia de smartphone, procedura pe care o recomandam.
De pe unitatea termostat cu ecranul aprins apasati lung butonul P ( 6-7 secunde) pentru a intra in setarile
de PROGRAM. Zilele saptamanii sunt xate de Luni pana Duminica (1 ~ 7), ecare zi are 4 perioade de timp
(1 ~ 4). Fiecare apasare a butonului P poate efectuata in setarea urmatoare.
1). Apasati P si tineti apasat timp de 3 secunde, asajul “ora“ clipeste, schimbati valoarea cu ajutorul
butoanelor + si -.
2) Apasati butonul P, temperatura clipeste, modica temperatura cu cea dorita prin butoanele + si -.
3). Apasati butonul P pentru perioada urmatoare.
4). Repetati in mod similar setarile pentru celelalte zile si perioade.
Perioada 1 2 3 4
Ora Temp Ora Temp Ora Temp Ora Temp
12345 (Luni-Vin) 7:00 22°C 8:30 19°C 17:00 22°C 22:00 19°C
6 (Sambata) 8:00 22°C 8:30 22°C 17:00 22°C 22:00 19°C
7 (Duminica) 8:00 22°C 8:30 22°C 17:00 22°C 22:00 19°C
SETARI AVANSATE PARAMETRI
Opriti termostatul apasand butonul On/Off ( Pornit/Oprit) . Cu ecranul stins apasati simultan butoanele
si pentru setare avansata parametri.
MENIU Descriere Plaja valori Valoare implicita
01 Calibrare temperatura senzor intern -8°C ~ 8°C 0°C
02 Setare limita maxima temp. 5°C ~ 35°C 35°C
03 Setare limita minima temp. 5°C ~ 35°C 5°C
05 Temperatura protectie inghet 5°C ~ 15°C 5°C
09 Histerezis (Deadzone - cu pas 0.1°C ) 0.2°C ~ 3°C 0°C (Oprit)
11 Functie protectie copii 1: Pornit 0: Oprit 0
12 Functie detectie geam deschis - OWD 1: Pornit 0: Oprit 0
13 OWD - Timp detectie 2 ~ 30 minute 15 minute
14 OWD - Scadere temperatura
( in timpul de detectie)
2,3,4 °C 2°C
15 OWD - Timp Intarziere
( revenire la setare/program anterior)
10 ~ 60 minute 30 minute
17 Revenire la setarile din fabrica 0 : Nu 0
1: Da, si apasati Butonul
On/Off ( Pornit Oprit) timp
de 5 secunde pana se
restarteaza termostatul.
Versiune Software 5055-02
DIAGRAMA CONEXIUNI UNITATE RECEPTOR
Operatiunea de conectare a unitatii receptor la o sursa de alimentare 230V si la o centrala termica se
executa doar de catre personal calicat, si doar consultarea in prealabil a documentatiilor termostatului si

RO
7
centralei termice.
Unitatea receptor are doua comenzi de tip releu ( NO si NC / Normal Deschis si Normal Inchis) fara
potential ( neenergizat ) ce executa inchiderea unui circuit de comanda cu un curent maxim de 10 A, si
o tensiune acceptata maxima de 250 V AC / DC. Regasiti exemple de conectare cu anumite modele de
centrale termice la sfarsitul manualului.
EXEMPLE DE CONECTARE CU CENTRALE TERMICE - THERMOSTAT PNI CT36*
*Instalarea trebuie facuta obligatoriu doar de catre instalator autorizat si doar dupa consultarea manualelor,
si vericarea conexiunilor si compatibilitatea acestora.
1. Ariston CLAS EVO , ONE
2. Ferroli DivaCondens 24/28

RO
8
3. Vaillant Ecotec Pure
4. Motan Max Optimus
INSTALARE FIZICA SI DIMENSIUNI
Unitatea termostat poate montata in 2 moduri:
1. Pe masa sau pe o zona plana cu suportul alb prezent in colet:
2. Pe perete cu suportul de perete inclus:

EN
9
WARNINGS
Because the product must be connected to a 230 VAC power supply and to a heating appliance,
installation should only be carried out by qualied personnel to avoid irreparable damage to the product and /
or the heaters that are connected , defects not covered by warranty.
We recommend that you have qualied personnel with experience in this eld, for initial setup of the
equipment in order to understand correctly the technical terms and procedures detailed in this manual.
After installation and conguration, the product is easy to use both mobile unit and smartphone controll
with an intuitive and easy to congure interface.
To access / monitor / control the product remotely from your smartphone, it is necessary to have an
internet source (WiFi router) close to where thermostat is installed.
GENERAL INFORMATIONS
The PNI CT36 smart thermostat has been developed to provide customers extra day-to-day comfort in
their homes, in the ofce or other premises, offering the ability to monitor and turn on or off heating systems
either automatically scheduled for every day of week, either remotely, anytime and anywhere via the Internet
with dedicated app for Android or iOS Smartphone.
Mode of operation and communication:
Dedicated app name is TuyaSmart
and can be downloaded either
from the Googel Play / App Store,
either by scanning with your
smartphone the QR
code below :
Package content:
- Main unit with illuminated screen
- Receiver / 2 relay command unit
- Wall / table mount accessories
- User manual

EN
10
TECHNICAL DETAILS / SPECIFICATIONS
- Main unit power supply: 2 AAA batteries
- Receiver power supply: 230VAC 50 / 60Hz
- Receiver unit command type: NO Relay (normally open) 10 Amps max not energized / dry contact
- Relay parameters: 250 V max, 10 Amps max (rezistiv), AC/DC curent
- Set point range temperature: 5 - 35°C ( 0.5°C step)
- Measurable ambient temperature: 0 - 50°C ( 0.1°C step)
- Temperature measurement unit: only o Celsius degrees
- Acceptable humidity: 85% no condensation
- Screen illumination: white light
- Temperature sensor: NTC 10K, 3950ohms at 25°C
- Sensor accuracy: ± 0.1 °C (0.5 °C step sensor calibration)
- Protection degree: IP30
- Housing: ABS with UL94-5 re retardant plastic standard
- WiFi connectivity: 802.11 b / g / n (2.4 GHz); WPA2 (TKIP and AES)
- RF frequency connectivity between units: 868 MHz
- Smartphone Compatibility: Minimum iOS 9 / minimum Android 4.2
MAIN UNIT DESCRIPTION
RECEIVER DESCRIPTION
Weekday
Clock
Set. Temperature Heating Icon
Wireless signal
Room Temperature
Programable Period
PRG. Button
Modes Select
On/O Button Temperature and parameter settings
OWD Icon
On/O Button
Code pairing Button
Heating On Indicator ( LED 1)
Power Indicator ( LED 2)

EN
11
FIRST USE WARNINGS AND INSTRUCTIONS
1. The system comes with main unit and receiver paired from factory. Before use, you only need to
pair the receiver unit with the nearby Wireless Router.
2. At rst start, the thermostat / receiver unit signals by LED 1 = “ slow blinks” that means it is
necessary to connect unit to the wireless router with Internet access.
3. Insert 2 AAA alkaline batteries (not included) into the main unit and turn it on by pressing the
ON / OFF button. The settings appear as shown in above description.
4. Connect the receiver unit to a 230 VAC power supply (only qualied personnel). Make sure it
works properly by testing / checking the LED status and turning unit On/Off by dedicated button.
I. PAIRING THERMOSTAT WITH MOBILE APP AND WIRELESS INTERNET ROUTER
1. Connect your smartphone to wireless Internet router nearby and activate GPS Location ( if not active).
For a quick setup make sure that phone, thermostat receiver and wireless router are as close as possible
(1-3 m).
1. Download “TuyaSmart” app from Google Play or App Store, andd install and register a new account.
2. Add device by pressing the + button in the top right corner.
3. Press “All Devices” and access the Small Home Appliances category.
4. Find “Heater” or “Thermostat” from list and select.Follow the on-screen steps, check the name of the
Wi network and enter the password of the Wi network with internet access to which the phone is also
connected.
5. Long press the pairing button on the receiver to enter Wi pairing mode until LED 1 blinks quickly. (before
this, LED 1 blinks slow, sign that thermostat is not paired with wi internet router).
6. Tap the “Conrm indicator ash blink” on your phone.
7. Wait a few moments until pairing is complete. The LED 1 on the receiver will stop blinking and turn off. At
this point, connection to the Internet via Wirelessrouter is successful and the Thermostat icon will appear in
Smartphone app.
If the LED continues to blink slowly, the connection failed, try again from step 1
FIRST USAGE OF THERMOSTAT
1. With screen On, from thermostat main unit change the set temperature higher or lower than the measured
and displayed temperature.
2. In maximum 90 seconds the thermostat unit sends the command to receiver unit, which conrms audibly
with a “click” (the relay from inside) and visually on-screen by turning on/off the heating icon.
3. From the phone application “TuyaSmart” (make sure that the device appears online after setting up the
internet) tap the thermostat to access it. Using the “+” and “-” buttons change the temperature higher or lower
than measured and displayed temperature on screen.
4. In maximum 90 seconds the application sends the command via internet to the receiver unit, which
conrms audibly with a “click”( the relay inside) after which the heating icon appears / disappears on screen.
Simultaneously, the temperature displayed on the thermostat unit will change according to the command.
If the change does not take after 90 - 180 seconds (2 minutes) check again:
- if you have changed the temperature higher / lower than the measured one in the room and displayed;
- if the device is online in the application (Online - Intense color; Ofine - faded color and “Ofine” message).
- if the thermostat is connected to the receiver - check the status of the radio signal indicator, and the status
of the thermostat in the mobile application (Online or Ofine).
II. PAIR MAIN UNIT WITH RECEIVER UNIT
ATTENTION: If the receiver unit is connected to the Router / Internet you can go to this step only if it is
absolutely necessary (notice the lack of communication) because the 2 units come paired from the factory.
If the receiver unit is not connected to the Router / Internet, it is mandatory to rst connect it to the Router /
Internet using the mobile application.
Perform this procedure only if absolutely necessary: if the connection of the receiver unit to the wireless
router was successful but the thermostat unit does not receive / send for 5-10 minutes the commands sent /

EN
12
received to / from the mobile application and the icon is missing from screen.
1. Press and hold the code pairing button on the receiver until LED 1 ashes quickly.
2. With the screen closed (press the On / Off button), press and hold the M button on the center unit until a
4-digit code appears on the screen. Immediately press the “up arrow” button for pairing.
3. LED 1 ashes slowly, wait a few moments until LED 1 no longer ashes. The icon ashes for a few
moments after which it remains on the screen conrming that the pairing is completed.
4. Turn the central unit off and on, and test the functionality by changing the set temperature higher / lower
than the showed temperature.
III. DELETE CLEAR ALL PAIRING
On receiver unit press and hold both pairing and On/Off buttons for 5 seconds until LED1 and LED2 turn
on. Release buttons.
Then LED 1 turns off, which means that all pairing have been cleared.
IV. SIGNAL LOST OR WEAK
In case of loss / disconnection of the RF signal (between the receiver and the thermostat unit, the icon
will disappear from the screen (or blink rarely).
In case of disconnection from the Wi network (Internet) The LED on the receiver unit will ash rarely.
Move the units closer to each other, and the receiver unit to the WiFi router and check the status of the
devices again.
If in a few minutes the operation does not return to normal, perform the pairing procedures of the receiver
with the thermostat units and then with the wireless router (with the help of the mobile application).
HOUR/DATE SETTING
With main unit screen On, press and hold the M button for 5-6 seconds until the hour on the screen blinks.
You will see highlighted 00:00 on the screen. Set the minutes with the up and down buttons.
Continue pressing the M button.
Set the time with the up and down buttons.
Continue pressing the M button.
Select the day with the up and down buttons.
Continue pressing the M button.
Save the settings by pressing the ON / OFF button or wait about 15 seconds.
OPEN WINDOW DETECTION FUNCTION
When the “open window” detection mode is activated in advanced settings, the system will automatically
switch off heating if a sudden decrease in temperature (2°C in 15 minutes by default) occurs. This function is
useful when opening a door / window (eg ventilation) without stopping the heating.
The thermostat will return to previous working mode after 30 minutes, and the “OP” icon will disappear from
the screen. Press any button and thermostat will exit OWD function, during the heating off period.
OTHER FEATURES AVAILABLE IN YOUR SMARTPHONE APPLICATION
In TuyaSmart app you have the following features available:
- Measured temperature and programmed / set temperature by user;
- Heating Status: The “Heating” text appears on screen when the heat is on;
- 3 working modes: manual, Eco (economical) and automatic (according to daily schedule)
- Child lock function- Thermostat keyboard lock to stop accidental push of buttons
- Daily schedule (7 days) with 4 hour zones every day;
- Scheduled temperature timing

EN
13
SET UP DAILY PROGRAMS
This setup n can also be done from smartphone app, wich we recommend.
With the on-screen display, press and hold the P button (6-7 seconds) to enter the PROGRAM settings. Days
of the week are xed from Monday to Sunday (1 ~ 7), each day has 4 time periods (1 ~ 4). Each press of the
P button can be performed in the next setting.
1). Press P and hold for 3 seconds, the “hour” display ashes, change the value with the + and - buttons.
2) Press the P button, the temperature blinks, change the desired temperature with the + and - buttons.
3). Press the P button for the next time.
4). Repeat the settings for the other days and periods similarly.
Period 1 2 3 4
Hour Temp Hour Temp Hour Temp Hour Temp
12345 (Mon-Fri) 7:00 22°C 8:30 19°C 17:00 22°C 22:00 19°C
6 (Sat.) 8:00 22°C 8:30 22°C 17:00 22°C 22:00 19°C
7 (Sun.) 8:00 22°C 8:30 22°C 17:00 22°C 22:00 19°C
ADVANCED PARAMETER SETTINGS
Turn the thermostat screen Off by pressing the On / Off button. With screen Off, press and hold in the
same time and buttond for parameters settings.
MENU Description Plaja valori Valoare implicita
01 Temp. calibration for internal sensor -8°C ~ 8°C 0°C
02 Set Point Max. 5°C ~ 35°C 35°C
03 Set Point Min. 5°C ~ 35°C 5°C
05 Frost Protection Temp. 5°C ~ 15°C 5°C
09 Histerezis ( Deadzone - 0.1°C step) 0.2°C ~ 3°C 0°C (Off)
11 Child protection 1: ON 0: Off 0
12 Open window detect function-OWD 1: ON 0: Off 0
13 OWD - Detect time 2 ~ 30 minutes 15 minutes
14 OWD - Drop temp. select ( within
detect time)
2,3,4 °C 2°C
15 OWD - Delay time select
(Return to previous working status)
10 ~ 60 minutes 30 minutes
17 Factory reset 0 : No 0
1: Yes, and then press
On/off button for 5s, wait
until thermostat restart.
Software Version 5055-02
RECEIVER WIRING DIAGRAM
The operation of connecting the receiver unit with 230 V power supply and central heating system must be
performed only by qualied personnel and only after consulting the thermostat and boiler documentation.
The receiver unit has a relay type controls (NO and NC / Normal Open and Normal Closed) without
potential (non-energized) that executes the closing of a control circuit with a maximum current of 10 A, and

EN
14
a maximum accepted voltage of 250 V AC / DC . Find examples of connections with certain models of Gas
boiler Systems at the end of the user manual.
CONNECTION EXAMPLES WITH GAS BOILER SYSTEMS- THERMOSTAT PNI CT36*
* The installation must be done only by authorized installer and only after consulting the user manuals, and
checking the connections and their compatibility.
1. Ariston CLAS EVO , ONE
2. Ferroli DivaCondens 24/28

EN
15
3. Vaillant Ecotec Pure
4. Motan Max Optimus
INSTALLATION AND DIMENSIONS
The main and receiver unit can be mounted in 2 ways:
1. Table or at surface area with the white holder inside package:
2. On the wall with wall holder plate:

EN
16
BG:
Опростена декларация за съответствие на ЕС
SC ONLINESHOP SRL декларира, че Интелигентен термостат PNI CT36 спазва директивата EMC 2014/30/EU и LVD 2014/35/EU и RED
2014/53/UE. Пълният текст на ЕС декларацията за съответствие е достъпен на следния интернет адрес:
https://www.mypni.eu/products/7068/download/certications
EN:
EU Simplied Declaration of Conformity
SC ONLINESHOP SRL declares that Smart thermostat PNI CT36 complies with the Directive EMC 2014/30/EU and RED 2014/53/UE and LVD
2014/35/EU. The full text of the EU declaration of conformity is available at the following Internet address:
https://www.mypni.eu/products/7068/download/certications
DE:
Vereinfachte EU- Konformitätserklärung
SC ONLINESHOP SRL erklärt, dass das Intelligenter Thermostat PNI CT36 der Richtlinie EMC 2014/30/EU entspricht, Richtlinie RED
2014/53/UE entspricht und Richtlinie LVD 2014/35/EU entspricht . Sie nden den ganzen Text der EU-Konformitätserklärung an der folgenden
Internetadresse:
https://www.mypni.eu/products/7068/download/certications
ES:
Declaración UE de conformidad simplicada
SC ONLINESHOP SRL declara que el Termostato inteligente PNI CT36 cumple con la Directiva EMC 2014/30/EU, la Directiva RED 2014/53/
EU y la Directiva LVD 2014/35/EU. El texto completo de la declaración de conformidad de la UE está disponible en la siguiente dirección de
Internet:
https://www.mypni.eu/products/7068/download/certications
FR
Déclaration de conformité simpliée de l’UE
SC ONLINESHOP SRL déclare que Thermostat intelligent PNI CT36 est conforme à la directive EMC 2014/30/EU, RED 2014/53/UE et LVD
2014/35/EU. Le texte complet de la déclaration de conformité UE est disponible à l’adresse Internet suivante:
https://www.mypni.eu/products/7068/download/certications
HU:
Egyszerűsített EU Megfelelési Közlemény
SC ONLINESHOP SRL kijelenti azt, hogy a Intelligens termosztát PNI CT36 megfelel az EMC 2014/30/EU, RED 2014/53/UE és LVD 2014/35/
EU irányelvnek. Az EU-megfelelőségi nyilatkozat teljes szövege a következő internetes címen érhető el:
https://www.mypni.eu/products/7068/download/certications
IT:
Dichiarazione UE di conformità semplicata
SC ONLINESHOP SRL dichiara che il Termostato intelligente PNI CT36 è conforme alla direttiva EMC 2014/30/UE, alla direttiva RED
2014/53/UE e alla direttiva LVD 2014/35/EU. Il testo completo della dichiarazione di conformità europea è disponibile al seguente indirizzo
Internet:
https://www.mypni.eu/products/7068/download/certications
PL:
Uproszczona deklaracja zgodności UE
SC ONLINESHOP SRL oświadcza, że Inteligentny termostat PNI CT36 jest zgodny z dyrektywą EMC 2014/30/EU, RED 2014/53/UE i LVD
2014/35/EU. Pełny tekst deklaracji zgodności UE dostępny jest pod następującym adresem internetowym:
https://www.mypni.eu/products/7068/download/certications
RO:
Declaratie UE de conformitate simplicata
SC ONLINESHOP SRL declara ca Termostat inteligent PNI CT36 este in conformitate cu Directiva EMC 2014/30/EU, Directiva RED 2014/53/
UE si Directiva LVD 2014/35/EU. Textul integral al declaratiei UE de conformitate este disponibil la urmatoarea adresa de internet:
https://www.mypni.eu/products/7555/download/certications
Other manuals for CT36
1
Table of contents
Languages:
Other PNI Thermostat manuals
Popular Thermostat manuals by other brands

Honeywell
Honeywell T8011F owner's guide

Carrier
Carrier NUI 33AW-CS2 User and installation manual

Emerson
Emerson 1F85U-22PR Installation and operating instructions

Vimar
Vimar CLIMARADIO Instruction handbook

Honeywell
Honeywell RTHL2410 series operating manual

White Rogers
White Rogers 1F80ST-0471 Installation and operating instructions