PNI CT400 User manual

RO Manual de utilizare..................................... 3
EN User manual............................................... 11
BG Ръководство за употреба......................... 19
DE Benutzerhandbuch..................................... 27
ES Manual de usuario..................................... 35
FR Manuel de l’Utilisateur................................ 43
HU Használati utasítás.................................... 51
IT Manuale d’uso........................................... 59
NL Handleiding................................................ 67
PL Instrukcja obsługi....................................... 75
Termostat inteligent PNI CT400
fara fir cu WiFi, control 2 zone prin Internet pentru
centrale termice, pompe, electrovalve
Wireless smart thermostat PNI CT400
Internet controlled for 2 zones central heating, pumps,
electro valve


EN
3
WARNINGS
Because the product must be connected to a 230 VACpower supply and to a heating appliance, installation
should only be carried out by qualied personnel to avoid irreparable damage to the product and / or the
heaters thatare connected , defects not covered by warranty.
We recommend that you have qualied personnel with experience in this eld, for initial setup of the equipment
in order to understand correctly the technical terms and procedures detailed in this manual.
After installation and conguration, the product is easy to use both mobile unit and smartphone controll with an
intuitive and easy to congure interface.
To access / monitor / control the product remotely from your smartphone, it is necessary to have an internet
source (WiFi router) close to where thermostat is installed.
GENERAL INFORMATIONS
The PNI CT400 smart thermostat has been developed to provide customers extra day-to-day comfort in their
homes, in the oce or other premises, oering the ability to monitor and turn on or o heating systems either
automatically scheduled for every day of week, eitherremotely, anytime and anywhere via the Internet with
dedicated app for Android or iOS Smartphone for two distinctive zones hydraulically separated by pumps,
solenoid valves or or even separate heating boilers.
Mode of operation and communication:
Dedicated app name is TuyaSmart
and can be downloadedeither
from the Googel Play /App Store,
either by scanningwith your
smartphone the QR
code below:
Package content:
- 2 x Main unit with illuminated screen
- Receiver / 2 relay command unit
- Wall / table mount accessories
- User manual

EN
4
TECHNICAL DETAILS / SPECIFICATIONS
- Main unit power supply: 2 AAA batteries
- Receiver power supply: 230VAC 50 / 60Hz
- Receiver unit command type: 2 x NO/NC Relay (normal open/close)not energized / dry contact
- Relay parameters: 250 V max, 10 Amps max (rezistiv), AC/DC curent
- Set point range temperature: 5 - 35°C (0.5°C step)
- Measurable ambient temperature: 0 - 50°C (0.1°C step)
- Temperature measurement unit: only o Celsius degrees
- Acceptable humidity: 85% no condensation
- Screen illumination: white light
- Temperature sensor: NTC 10K, 3950ohms at 25°C
- Sensor accuracy: ± 0.1 °C (0.5 °C step sensor calibration)
- Protection degree: IP30
- Housing: ABS with UL94-5 re retardant plastic standard
- WiFi connectivity: 802.11 b / g / n (2.4 GHz); WPA2 (TKIP and AES)
- RF frequency connectivity between units: 868 MHz
- Smartphone Compatibility: Minimum iOS 9 / minimum Android 4.2
MAIN UNIT DESCRIPTION
RECEIVER DESCRIPTION
Pairing Button
Multifunctional LED
Weekday
Clock
Set. Temperature Heating Icon
Wireless signal
Room Temperature
Programable Period
PRG. Button
Modes Select
On/O Button Temperature and parameter settings
OWD Icon

EN
5
FIRST USE WARNINGS AND INSTRUCTIONS
1. The system comes with main unit andreceiver paired from factory. Before use, you only need to pair the
receiver unitwith the nearby Wireless Router.
2. At rst start, the thermostat / receiver unit signals by LED 1 = “ slow blinks” that means it is necessary to
connect unit to the wireless router with Internet access.
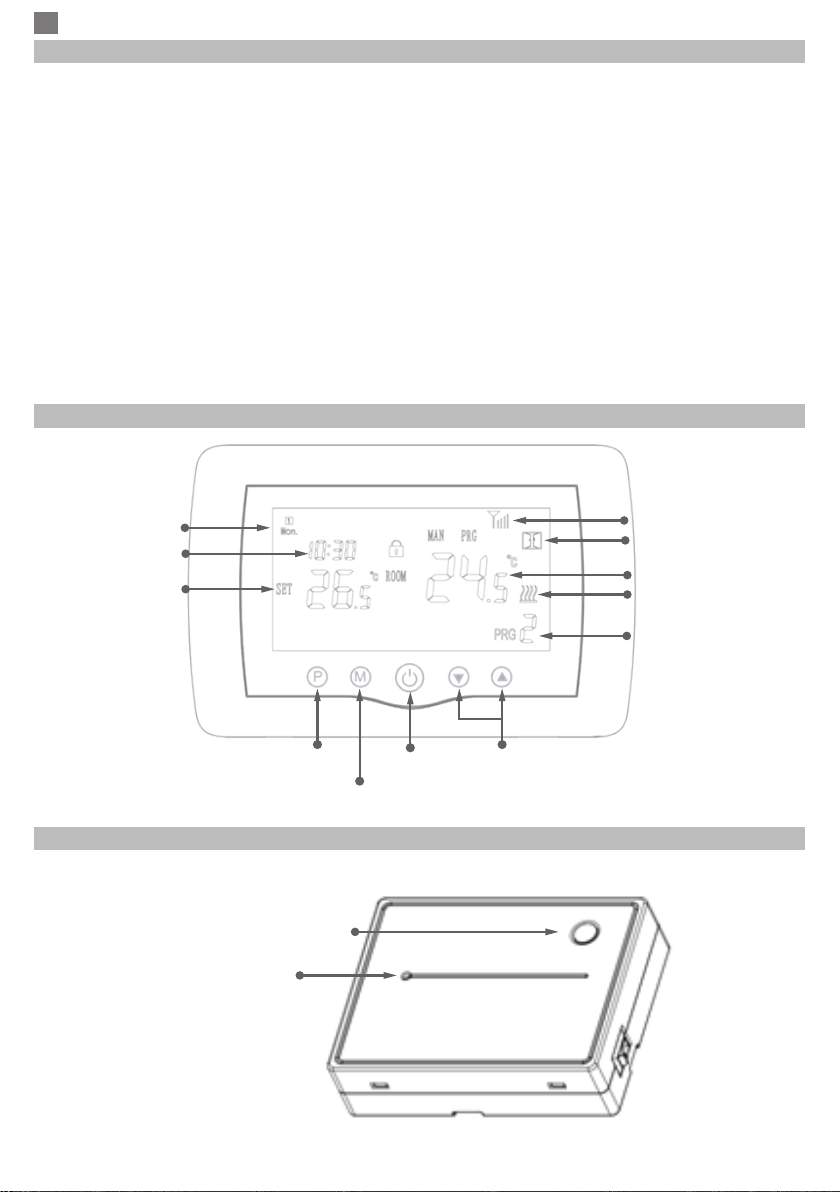
3. Insert 2 AAA alkaline batteries (not included) into the main unit and turn it on by pressing the ON / OFF
button. The settings appear as shown in above description.
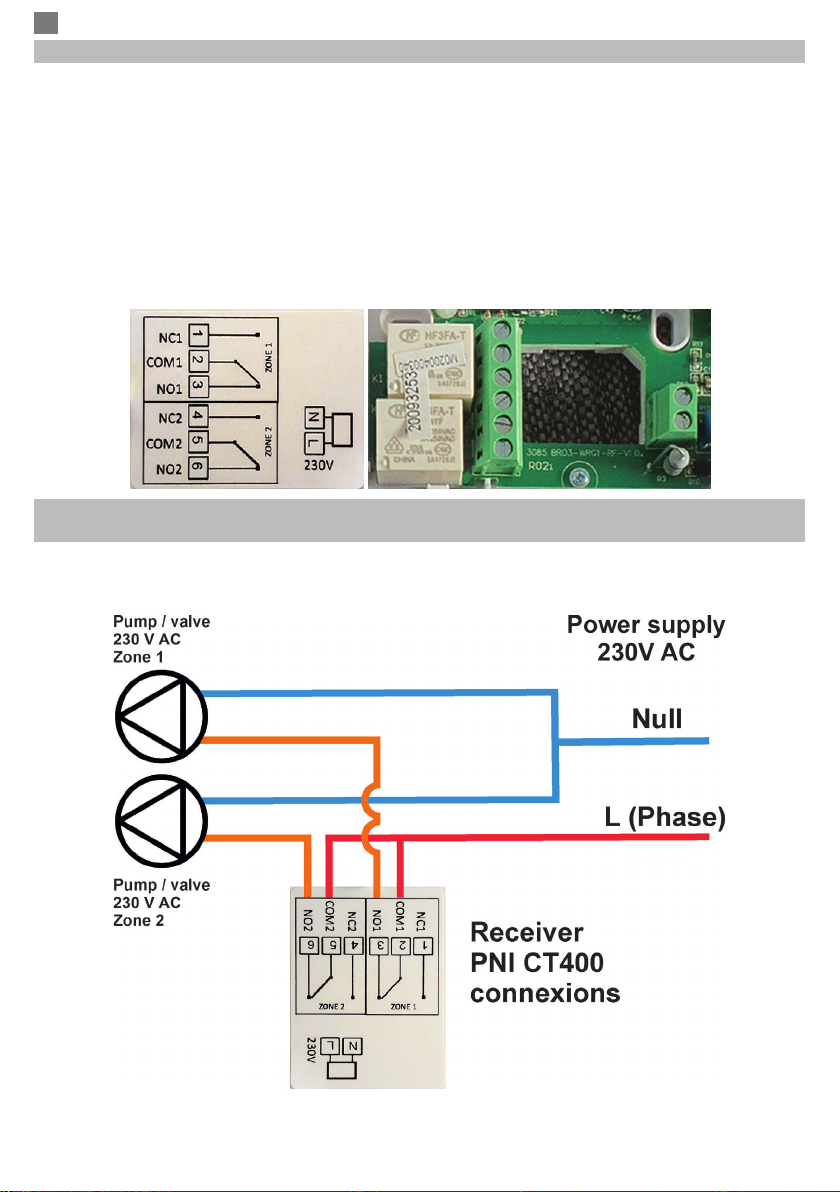
4. Connect the receiver unit to a 230 VAC power supply (only qualied personnel). Make sure it works properly
by testing / checking the LED status and turning unit On/O by dedicated button.
I. PAIRING THERMOSTAT WITHMOBILE APP AND WIRELESS INTERNET ROUTER
1. Connect your smartphone to the nearby wireless internet network. Activate GPS location on your smartphone
if it is not activated. For a quick setup, make sure that both the phone, thermostat and receiver are as close
as possible (1-3 m).
2. Download “TuyaSmart” application from Google Play or App Store and install and register a new account.
3. Add device by pressing the + button in the upper right corner.
4. Click on “All Devices” and access the Small Home Appliances category.
5. Find “Thermostat” or “Heater” in the list and select. Follow the on-screen steps, check the name of the Wi
network and enter the password of the Wi network with internet access to which the phone is also connected.
6. Press and hold the pairing button on the receiver to enter theWi pairing / connection modeuntil the LED
ashes quickly. (LED 1 ashes rarely, a sign that it is not connected to Wi internet network)
7. Click the “Conrm indicator rapidly blink” box on the phone.
8. Wait for the countdown displayed on screen until connection is completed. The LED on the receiver will
not ash and will remain lit continuously. At this moment the connection to the Internet through the Wireless
Router is successful.
9. The receiver unit (gateway) will appear in the application together with the 2 thermostat units.
If the LED continues to ash slowly, the connection failed, try again from step 1.
If only the Gateway receiver unit appears in the application, in exceptional cases go to chapter II “Pairing the
thermostat unit with the receiver unit”.
FIRST USAGE OFTHERMOSTAT
WARNING: Each display unit will control a single output from the receiver unit corresponding to the zone that
is monitored by the respective unit.
1. With screen On, from thermostat unit change the set temperature higher or lower than the measured and
displayed temperature.
2. In maximum 90 seconds the thermostat unit sends the command to receiver unit, which conrms audibly
with a “click” (the relay from inside) and visually on-screen by turning on/o the heating icon.
3. From the phone application “TuyaSmart” (make sure that the device appears online after setting up the
internet) and press one of the 2 thermostats to access it. Using the “+” and “-” buttons or the round cursorchange
the temperature higher or lower than measured temperature from room and displayed on the screen.
4. In maximum 90 seconds the application sends the command via internet to the receiver unit, which conrms
audibly with a “click”,(the relay inside) after which the heating icon appears / disappears on the screen.
Simultaneously, the temperature displayed on the thermostat unit will change according to the command.
If the change does not take after 90 - 180 seconds (2 minutes) check again:
- if you have changed the temperature higher / lower than the measured one in the room and displayed;
- if the device is online in the application (Online - Intense color; Oine - faded color and “Oine”message).
- if the thermostat is connected to the receiver - check the status of the radio signal indicator, and the status of
the thermostat in the mobile application (Online or Oine).
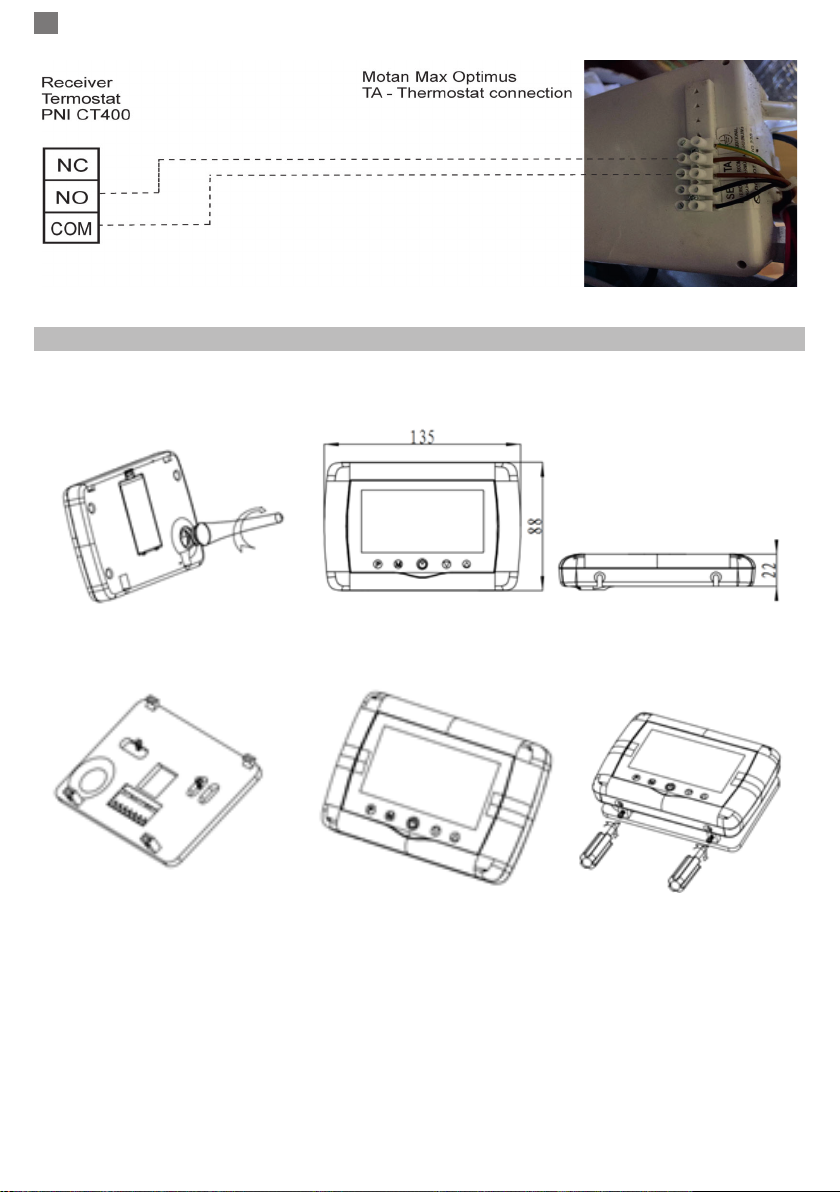
II. PAIR MAIN UNIT WITH RECEIVER UNIT
WARNING:
If the receiver unit is connected to the Router / Internet you can proceed to this step only if it is absolutely
necessary (note the lack of communication) because the 2 units come paired from the factory.
If the receiver unit is not connected to the Router / Internet, it is mandatory to rst connect it to the Router /

EN
6
Internet using the mobile application.
Perform this procedure only if absolutely necessary: if the connection of the receiver unit to the wireless router
was successful but the thermostat unit does not receive / send for 5-10 minutes the commands sent / received
to / from the mobile application and the icon is missing from screen.
1. Press and hold the code pairing button on the receiver until the LED ashes quickly.
2. With the screen closed (press the On / O button) press and hold the M button on the thermostat unit until
a 4-digit code and “Radio signal indicator” appear on the screen. Immediately press the “up arrow” button for
pairing.
3. The LED ashes slowly for a few moments after which it stays on. Icon ashes for a few moments after
which it remains on, on the screen conrming that the pairing is completed.
4. Turn the thermostat unit on and o and test the functionality by changing the set temperature higher / lower
than the current temperature displayed on the screen.
III. LED DESCRIPTION
LED continuously lit - The receiver unit is connected to the Router / Internet via wireless.
LED ashes quickly - pairing with the Thermostat Unit or the Internet Router.
LED ashes slowly - Thermostat / receiver is not connected to internet.
IV. SIGNAL LOST OR WEAK
In case of loss / disconnection of the RF signal (between the receiver and the thermostat unit) the icon will
disappear from the screen (or blink rarely).
In case of disconnection from the Wi network (Internet) The LED on the receiver unit will ash rarely.
Move the units closer to each other, and the receiver unit to WiFi router and check the status of the devices
again.
If in a few minutes the operation does not return to normal, perform the pairing procedures of the receiver to
internet Router (with app) and with thermostat unit afterwards.
HOUR/DATE SETTING
With main unitscreen On, press and hold the M button for 5-6 seconds until the hour on the screen blinks.
You will see highlighted 0:00 on the screen. Set the minutes with the up and down buttons.
Continue pressing the M button.
Set the time with the up and down buttons.
Continue pressing the M button.
Select the day with the up and down buttons.
Continue pressing the M button.
Save the settings by pressing the ON / OFF button or wait about 15 seconds.
OPEN WINDOW DETECTION FUNCTION
When the “open window detection” mode is activated in advanced settings, the system will automatically
switch o heating if a sudden decrease in temperature (2°C in 15 minutes by default) occurs. This function is
useful when opening a door / window (eg ventilation) without stopping the heating.
The thermostat will return to previous working mode after 30 minutes, and the “OP” icon will disappear from the
screen. Press any button and thermostat will exit OWD function during the heating o period.
OTHER FEATURES AVAILABLE IN YOUR SMARTPHONE APPLICATION
In “TuyaSmart” application you have the following functions available:
- Display the measured temperature and the temperature programmed / desired / set by the user;
- Heating Status Display: The text “Heating on” appears in the upper left when the heat is on;
- 3 working modes: Manual, Eco (economical) and Automatic (according to daily programming)
- Lock thermostat keys to stop accidental typing: Activate the Seetings / Child Lock function
- Daily scheduling (7 days) with 4 time periods each day;

EN
7
- Timed programming (Schedule)
- Temperature correction - allows the correction of the read temperature compared to another standard
thermometer.
- Set maximum temperature limit / Set minimum temperature limit
- Frost protection
SET UP DAILY PROGRAMS
This setupcan also be done from smartphone app, wich we recommend.
With the on-screen display, press and hold the P button (6-7 seconds) to enter the PROGRAM settings. Days
of the week are xed from Monday to Sunday (1 ~ 7), each day has 4 time periods (1 ~ 4). Each press of the
P button can be performed in the next setting.
1). Press P and hold for 3 seconds, the “hour” display ashes, change the value with the + and - buttons.
2) Press the P button, the temperature blinks, change the desired temperature with the + and - buttons.
3). Press the P button for the next time.
4). Repeat the settings for the other days and periods similarly.
Period 1 2 3 4
Hour Temp Hour Temp Hour Temp Hour Temp
12345 (Mon-Fri) 7:00 22°C 8:30 19°C 17:00 22°C 22:00 19°C
6 (Sat.) 8:00 22°C 8:30 22°C 17:00 22°C 22:00 19°C
7 (Sun.) 8:00 22°C 8:30 22°C 17:00 22°C 22:00 19°C
ADVANCED PARAMETER SETTINGS
Turn the thermostat screen O by pressing the On / O button. With screen O, press and hold in the same
time and button for parameters settings.
MENU Description Values Default
01 Temp. calibration for internal sensor -8°C ~ 8°C (step 0.1°C) 0°C
02 Set Point Max. 5°C ~ 35°C 35°C
03 Set Point Min. 5°C ~ 35°C 5°C
05 Frost Protection Temp. 5°C ~ 15°C 5°C
09 Histerezis (Deadzone - 0.1°C step) 0.2°C ~ 3°C 0.5°C
11 Child protection 1: ON: O 0
12 Open window detect function-OWD 1: ON: O 0
13 OWD - Detect time 2 ~ 30 minutes 15 minutes
14 OWD - Drop temp. select (within
detect time)
2,3,4 °C 2°C
15 OWD - Delay time select
(Return to previous working status)
10 ~ 60 minutes 30 minutes
17 Factory reset 0 : No 0
1: Yes, and then press
On/o button for 5s, wait
until thermostat restart.
Software Version 5055-02

EN
8
RECEIVER WIRING DIAGRAM
The operation of connecting the receiver unit with 230 V power supply andcentral heating system must be
performed only by qualied personnel and only after consulting the thermostat andboiler documentation.
The receiver unit has two relay type controls (COM-NO-NC / Normal Open and Normal Closed) without
potential (non-energized). Each relayexecutes the closing/openingof a control circuit with a maximum current
of 10 A, and maximum voltage of 250 V AC / DC .
So if the heating system is designed with 2 hydraulically separated zones with 2 pumps / solenoid valves
or even 2 boilers, you can separately control the heating of each zone (pumps / solenoid valves / boilers)
separately with the help of this thermostat with 2 monitoring / control units. Find examples of connection
with pumps / solenoid valves or certain models of thermal power plants thermal power plants at the end of
the manual. Find examples of connections with certain models of Gas boiler Systems at the end of the user
manual.
EXAMPLE OF DIAGRAM CONNECTION OF PNI CT400 THERMOSTAT WITH 2 PUMPS /
SOLENOID VALVES WITH 230V AC SUPPLY *
* The installation must be done only by the authorized installer and only after consulting the manuals, and
checking the connections and their compatibility.

EN
9
CONNECTION EXAMPLES WITH GAS BOILER SYSTEMS- THERMOSTAT PNI CT400 *
* The installation must be done only by authorized installer and only after consulting the user manuals, and
checking the connections and their compatibility.
In this case each relay will control one of the two gas boiler system dedicated for one of the 2 zones.
1. Ariston CLAS EVO SYSTEM
2. Ferroli DivaCondens 24/28
3. Vaillant Ecotec Pure

EN
10
4. Motan Max Optimus
INSTALLATION AND DIMENSIONS
The main and receiverunit can be mounted in 2 ways:
1. Table or at surface area with the white holder inside package:
2. On the wall with wall holder:

BG
11
ПРЕДУПРЕЖДЕНИЯ
Тъй като продуктът трябва да бъде свързан към 230 VAC захранване и към нагревателен уред,
монтажът трябва да се извършва само от квалифициран персонал, за да се избегнат непоправими
щети на продукта и / или нагревателите, които са свързани, дефекти, които не са покрити от гаранцията.
Препоръчваме да имате квалифициран персонал с опит в тази област за първоначална настройка
на оборудването, за да разберете правилно техническите условия и процедури, описани в това
ръководство.
След инсталирането и свързването продуктът е лесен за използване както на мобилен модул, така и на
смартфон за управление с интуитивен и лесен за конфигуриране интерфейс.
За достъп до / наблюдение / управление на продукта от вашия смартфон е необходимо да имате
интернет източник (необходим е 2,4 GHz Wi-Fi рутер за интернет) близо до мястото, където е инсталиран
термостатът.
ГЛАВНА ИНФОРМАЦИЯ
Интелигентният термостат PNI CT36 е разработен, за да осигури на клиентите допълнителен ежедневен
комфорт в домовете им, в офиса или други помещения, предлагайки възможност за наблюдение и
включване или изключване на отоплителни системи, или автоматично планирани за всеки ден от
седмицата, или отдалечено, по всяко време и навсякъде чрез Интернет със специално приложение за
Android или iOS смартфон.
Начин на работа и комуникация:
Името на специалното приложение е
Tuya Smart и може да бъде изтеглено
от Google Play / App Store, или чрез
сканиране с вашия смартфон на
QR кода по-долу:
Съдържание на пакета:
- Основен модул със светещ екран
- Приемник / реле командно устройство
- Аксесоари за монтаж на стена / маса
- Ръководство за употреба

BG
12
ТЕХНИЧЕСКИ ПОДРОБНОСТИ / СПЕЦИФИКАЦИИ
- Захранване на основното устройство: 2 батерии AAA
- Захранване на приемника: 230VAC 50 / 60Hz
- Тип на командата на приемника: NO / NC реле (нормално отворено /) сух контакт (без захранване)
- Релейни работни параметри: максимум 250 V, максимум 10 ампера (резистивен), AC / DC ток
- Съвместим с всички газови нагреватели с вход за термостат, съвместим с NO реле (сух контакт).
- Регулируем / регулируем температурен диапазон: 5 - 35 °C (стъпка от 0,5 °C)
- Измерима / видима температура: 0 - 50 °C (стъпка 0,1 °C)
- Единица за измерване на температурата: само градуси ° по Целзий
- Приемана влажност: максимум 85% без конденз във въздуха
- Осветление на екрана: Да
- Температурен сензор: NTC 10K, 3950ohms при 25 °C
- Точност на сензора: ± 0,1 °C (калибриране на сензора с стъпка от 0,5 °C)
- Степен на защита: IP30
- Корпус: ABS с пожар стандарт UL94-5
- WiFi честота: 2.4GHz
- Мощност на WiFi излъчване: 100mW
- RF свързаност между устройствата: 868 MHz
- Мощност на радиочестотно излъчване: <25mW
- Съвместимост на приложенията за смартфони: минимум iOS 9 / минимум Android 4.2
ОПИСАНИЕ НА ОСНОВНАТА ЕДИНИЦА
Делничен ден
Часовник
Комплект.
Температура Икона за отопление
Безжичен сигнал
Стайна температура
Програмируем период
PRG. Бутон
Изберете режими
Бутон ВКЛ
/ ИЗКЛ
Настройки за температура и параметри
Икона OWD
ОПИСАНИЕ НА ПРИЕМНИКА
Pairing Button
Multifunctional LED

BG
13
ПЪРВО ИЗПОЛЗВАЙТЕ ПРЕДУПРЕЖДЕНИЯ И ИНСТРУКЦИИ
1. Системата се доставя с основно устройство и приемник, сдвоени фабрично. Преди употреба
трябва само да сдвоите приемника с близкия безжичен рутер.
2. При първо стартиране термостатът / приемникът сигнализира чрез светодиод 1 = „бавно
мига“, което означава, че е необходимо да свържете устройството към безжичния рутер с
достъп до Интернет.
3. Поставете 2 алкални батерии AAA (не са включени) в основното устройство и го включете,
като натиснете бутона ON / OFF. Настройките се показват, както е показано в горното описание.
4. Свържете приемника към захранване 230 VAC (само квалифициран персонал). Уверете се,
че работи правилно, като тествате / проверявате състоянието на светодиода и включвате /
изключвате модула чрез специален бутон.
I. СДВОЯВАНЕ НА ТЕРМОСТАТ С МОБИЛНО ПРИЛОЖЕНИЕ И БЕЗЖИЧЕН ИНТЕРНЕТ РУТЕР
1. Свържете вашия смартфон с 2,4 Ghz безжичен интернет рутер наблизо. За бърза настройка се
уверете, че телефонът, приемникът на термостата и безжичният рутер са възможно най-близо (1-3 м).
ПРЕДУПРЕЖДЕНИЕ: Проверете и се уверете, че разполагате с 2,4 Ghz безжична мрежа и дали
сте свързали телефона към нея. Рутерите и телефоните от ново поколение също са оборудвани с
активирана безжична мрежа от 5 Ghz и устройствата се свързват автоматично на тази честота.
Термостатът не може да бъде свързан към 5 Ghz безжична мрежа, защото работи само на безжична
честота 2,4 Ghz. За да конфигурирате рутера и 2,4 Ghz безжична мрежа, обадете се на специалист.
1. Изтеглете приложението „TuyaSmart“ от Google Play или App Store и инсталирайте и регистрирайте
нов акаунт: Натиснете бутона „Регистрация“ и следвайте инструкциите на екрана.
2. Добавете устройство, като натиснете бутона + в горния десен ъгъл.
3. Натиснете „Всички устройства“ и отворете категорията „Малки домакински уреди“.
4. Намерете „Термостат“ или „Нагревател“ от списъка и изберете. Следвайте стъпките на екрана,
проверете името на Wi мрежата и въведете паролата на Wi мрежата с достъп до интернет, към
която е свързан и телефонът. Ако безжичната мрежа не се показва автоматично, проверете дали сте
активирали GPS местоположение и дали телефонът ви е свързан към безжична мрежа с честота 2,4
Ghz. Процедура за рестартиране.
5. Продължително натискане на бутона за сдвояване на приемника, за да влезете в режим на Wi
сдвояване, докато LED 1 премигва бързо. (преди това LED 1 мига бавно, подписва, че термостатът не
е сдвоен с wi интернет рутер)
6. Докоснете „Потвърждаване на мигането на индикатора за мигане“ на телефона си.
7. Изчакайте няколко минути, докато сдвояването завърши. Светодиодът 1 на приемника ще спре да
мига и ще се изключи. В този момент връзката с интернет чрез Wirelessrouter е успешна и иконата на
термостата ще се появи в приложението Smartphone.
Ако светодиодът продължава да мига бавно, връзката е неуспешна, опитайте отново от стъпка 1.
ПЪРВО ПОЛЗВАНЕ НА ТЕРМОСТАТА
1. При включен екран на основния модул променете температурата по-голяма или по-малка от
измерената температура от екрана.
2. След максимум 90 секунди основното устройство изпраща команда към приемника, което потвърждава
чрез включване / изключване на светодиода 1 и чрез „щракване“, което се чува от вътрешното реле.
3. От приложението TuyaSmart (уверете се, че устройството се показва онлайн след конфигуриране на
интернет сдвояване) докоснете устройството, за да получите достъп до него. С помощта на бутоните „+“
и „-“ променете температурата по-голяма или по-малка от измерената температура от екрана.
4. За 90 секунди или повече, приложението изпраща команда през интернет към приемника на
термостата, което потвърждава чрез включване / изключване на LED 1 и със звук „щракване“ от
вътрешното реле. Температурата ще се промени на екрана на основното устройство.
Ако няма промяна след 90 - 180 секунди (2 минути), проверете отново дали сте променили температурата
на по-голяма / по-малка от текущата показана температура и проверете дали устройството е онлайн.
II. СДВОЯВАНЕ ОСНОВНО УСТРОЙСТВО С ПРИЕМНИК
Извършете тази процедура само ако е абсолютно необходимо и установете, че: ако след 10 минути

BG
14
успешно сдвояване с безжичния рутер устройството се появи офлайн в приложението / иконата на
сигнала липсва на екрана / LED 1 на приемника е изключен и устройствата не общуват помежду си.
1. Натиснете и задръжте бутона за сдвояване на приемника, докато светодиодът 1 мига бързо.
2. При затворен екран на основното устройство (натиснете бутона On / O), дълго натискайте бутона
M на основното устройство, докато на екрана се появят 4-цифрен код и още три символа. Натиснете
бутона „стрелка нагоре“ незабавно за сдвояване.
3. LED 1 мига бавно; изчакайте няколко минути, докато светодиод 1 спре да мига и се затвори. Иконата
за сигнал иконата за сигнал мига няколко минути, след което остава на екрана, потвърждавайки, че
сдвояването е завършено.
4. Изключете и включете основното устройство и тествайте функциите, като промените температурата
по-висока / по-ниска от действителната температура от екрана на термостата.
III. ИЗТРИЙ ИЗЧИСТИ ВСИЧКИ СДВОЯВАНИЯ
На приемника натиснете и задръжте бутоните за сдвояване и за включване / изключване за 5 секунди,
докато LED1 и LED2 се включат. Бутони за освобождаване.
След това светодиод 1 се изключва, което означава, че всички сдвоявания са изчистени.
IV. ИЗГУБЕН ИЛИ СЛАБ СИГНАЛ
В случай на загуба / прекъсване на радиочестотния сигнал (между приемника и централното устройство)
иконата на сигнала на екрана ще изчезне.
Когато приемното устройство е изключено от безжичната мрежа, светодиодът 1 ще мига бавно.
Проверете и сменете батериите, ако е необходимо.
Преместете единиците по-близо един до друг и WiFi рутера и проверете отново състоянието на
устройствата.
Ако в рамките на няколко минути операцията не се нормализира, изтрийте всички сдвоявания и
изпълнете отново процедурите за сдвояване на приемника с основното устройство и след това на
приемника с безжичен рутер (с мобилното приложение).
НАСТРОЙКА НА ЧАС / ДАТА
При включен екран на основното устройство натиснете и задръжте бутона M за 5-6 секунди, докато
часът на екрана премигне.
Ще видите подчертано 0:00 на екрана. Задайте минутите с бутоните нагоре и надолу.
Продължете да натискате бутона M.
Задайте часа с бутоните нагоре и надолу.
Продължете да натискате бутона M.
Изберете деня с бутоните нагоре и надолу.
Продължете да натискате бутона M.
Запазете настройките, като натиснете бутона ON / OFF или изчакайте около 15 секунди.
ФУНКЦИЯ ЗА ОТКРИВАНЕ НА ОТВОРЕН ПРОЗОРЕЦ
When the “open window” detection mode is activated in advanced settings, the system will automatically
switch o heating if a sudden decrease in temperature (2°C in 15 minutes by default) occurs. This function is
useful when opening a door / window (eg ventilation) without stopping the heating.
The thermostat will return to previous working mode after 30 minutes, and the “OP” icon will disappear from the
screen. Press any button and thermostat will exit OWD function, during the heating o period.
ДРУГИ ФУНКЦИИ, НАЛИЧНИ ВЪВ ВАШЕТО ПРИЛОЖЕНИЕ ЗА СМАРТФОН
В приложението TuyaSmart имате следните функции:
- Измерена температура и програмирана / зададена температура от потребителя;
- Статус на отопление: Текстът „Отопление“ се появява на екрана, когато отоплението е включено;
- 3 режима на работа: ръчен, еко (икономичен) и автоматичен (според дневния график)
- Функция за заключване за деца - Заключване на клавиатурата на термостат за спиране на случайно
натискане на бутоните

BG
15
- Дневен график (7 дни) с 4 часови зони всеки ден;
- Планирано синхронизиране на температурата
НАСТРОЙТЕ ЕЖЕДНЕВНИ ПРОГРАМИ
Тази настройка може да се извърши и от приложението за смартфон, което препоръчваме.
С екранния дисплей натиснете и задръжте бутона P (6-7 секунди), за да влезете в настройките на
ПРОГРАМА. Дните от седмицата са фиксирани от понеделник до неделя (1 ~ 7), всеки ден има 4
времеви периода (1 ~ 4). Всяко натискане на бутона P може да се извърши в следващата настройка.
1). Натиснете P и задръжте за 3 секунди, дисплеят “час” мига, променете стойността с бутоните + и -.
2) Натиснете бутона P, температурата мига, променете желаната температура с бутоните + и -.
3). Натиснете бутона P за следващия път.
4). Повторете настройките за останалите дни и периоди по подобен начин.
Период 1 2 3 4
Час Темп Час Темп Час Темп Час Темп
12345 (Mon-Fri) 7:00 22°C 8:30 19°C 17:00 22°C 22:00 19°C
6 (Sat.) 8:00 22°C 8:30 22°C 17:00 22°C 22:00 19°C
7 (Sun.) 8:00 22°C 8:30 22°C 17:00 22°C 22:00 19°C
РАЗШИРЕНИ НАСТРОЙКИ НА ПАРАМЕТРИТЕ
Изключете екрана на термостата, като натиснете бутона за включване / изключване. При изключен
екран натиснете и задръжте едновременно и бутон за настройки на параметри. Натиснете
M за навигация и стрелки за промяна на стойността. Натиснете бутона ON / OFF, за да излезете от
менюто.
МЕНЮ Описание Обхват Стойност по
подразбиране
01 Темп. калибриране за вътрешен
сензор
-8°C ~ 8°C (стъпка 0,1°C) 0°C
02 Зададена точка Макс. 5°C ~ 35°C 35°C
03 Зададена точка Мин. 5°C ~ 35°C 5°C
05 Температура на защита от
замръзване.
5°C ~ 15°C 5°C
09 Histerezis (Deadzone - стъпка 0,1°C) 0.2°C ~ 6°C 0.5°C
11 Child lock function 1: ON: O 0
12 Функция за откриване на отворен
прозорец - OWD
1: ON: O 0
13 OWD - Време за откриване 2 ~ 30 минути 15 минути
14 OWD - Темп. изберете (в рамките на
времето за откриване)
2,3,4 °C 2°C
15 OWD - Избор на времето за забавяне
(Връщане към предишното работно
състояние)
10 ~ 60 минути 30 минути

BG
16
17 Фабрично нулиране : No 0
1: Да, и след това
натиснете бутона за
включване / изключване
за 5 секунди, изчакайте,
докато термостатът се
рестартира.
Софтуерна версия 5055-02
СХЕМА НА СВЪРЗВАНЕ НА ПРИЕМНИКА
Операцията по свързване на приемния блок с 230 V захранване и система за централно отопление
трябва да се извършва само от квалифициран персонал и само след консултация с документацията на
термостата и котела.
Приемникът има релейна команда (NO и NC / Нормално отворено и Нормално затворено)без потенциал
(без захранване / сух контакт), която изпълнява затварянето на управляваща верига с максимален ток
10 A и максимално напрежение 250 V AC / DC. Намерете примери за свързване с определени модели
котли в края на ръководството.
GAS КОТЛИ ПРИМЕРИ ЗА СВЪРЗВАНЕ - ТЕРМОСТАТ PNI CT36 *
* Инсталацията трябва да се извършва само от оторизиран инсталатор и само след консултация с
ръководствата за инсталация и проверка на връзките и тяхната съвместимост.

BG
17
1. Ariston CLAS EVO SYSTEM
2. Ferroli DivaCondens 24/28
3. Vaillant Ecotec Pure
4. Motan Max Optimus
МОНТАЖ И РАЗМЕРИ
Основният и приемният блок могат да бъдат монтирани по 2 начина:

BG
18
1. Маса или плоска повърхност с бял държач вътре в опаковката:
2. На стената със стенен държач:

DE
19
WARNUNGEN
Da das Produkt an eine 230-VAC-Stromversorgung und an ein Heizgerät angeschlossen werden muss, sollte
die Installation nur von qualiziertem Personal durchgeführt werden, um irreparable Schäden am Produkt und
/ oder den angeschlossenen Heizgeräten zu vermeiden. Mängel, die nicht durch die Garantie abgedeckt sind.
Wir empfehlen, dass Sie qualiziertes Personal mit Erfahrung auf diesem Gebiet für die Erstinstallation des
Geräts haben, um die in diesem Handbuch beschriebenen technischen Begrie und Verfahren korrekt zu
verstehen.
Nach der Installation und dem Anschließen ist das Produkt sowohl für die mobile Einheit als auch für die
Smartphone-Steuerung mit einer intuitiven und einfach zu kongurierenden Benutzeroberäche einfach zu
bedienen.
Für den Fernzugri / die Überwachung / Steuerung des Produkts von Ihrem Smartphone aus ist eine
Internetquelle (ein 2,4-GHz-WLAN-Internetrouter ist erforderlich) in der Nähe des installierten Thermostats
erforderlich.
ALLGEMEINE INFORMATION
Der intelligente Thermostat PNI CT36 wurde entwickelt, um Kunden zusätzlichen Alltagskomfort in ihren
Häusern, im Büro oder in anderen Räumlichkeiten zu bieten. Er bietet die Möglichkeit, Heizsysteme zu
überwachen und ein- oder auszuschalten, die entweder automatisch für jeden Wochentag geplant sind.
Entweder aus der Ferne, jederzeit und überall über das Internet mit einer speziellen App für Android- oder
iOS-Smartphones.
Funktionsweise und Kommunikation:
Der Name der dedizierten App lautet
Tuya Smart und kann entweder aus dem
Google Play / App Store heruntergeladen
werden, indem Sie den folgenden QR-Code
mit Ihrem Smartphone scannen:
Paket Inhalt:
- Hauptgerät mit beleuchtetem Bildschirm
- Empfänger- / Relais-Befehlseinheit
- Zubehör für Wand- / Tischhalterung
- Benutzerhandbuch

DE
20
TECHNISCHE DETAILS / SPEZIFIKATIONEN
- Stromversorgung des Hauptgeräts: 2 AAA-Batterien
- Netzteil des Empfängers: 230VAC 50 / 60Hz
- Befehlstyp der Empfängereinheit: NO / NC-Relais (normalerweise oen /) Trockenkontakt (nicht erregt)
- Relaisbetriebsparameter: maximal 250 V, maximal 10 Ampere (ohmsch), AC / DC-Strom
- Kompatibel mit allen Gasheizgeräten mit Thermostateingang kompatibel mit NO-Relais (Trockenkontakt).
- Einstellbarer / einstellbarer Temperaturbereich: 5 - 35 °C (0,5 °C Schritt)
- Messbare / anzeigbare Temperatur: 0 - 50 °C (0,1 °C Schritt)
- Maßeinheit: nur Grad Celsius
- Akzeptierte Luftfeuchtigkeit: maximal 85% keine Kondensation in der Luft
- Bildschirmleuchte: Ja
- Temperatursensor: NTC 10K, 3950 Ohm bei 25 °C.
- Sensorgenauigkeit: ± 0,1 °C (Sensorkalibrierung mit 0,5 °C Abstand)
- Schutzart: IP30
- Gehäuse: ABS mit Brandschutznorm UL94-5
- WLAN-Frequenz: 2,4 GHz
- WiFi-Emissionsleistung: 100mW
- HF-Konnektivität zwischen Geräten: 868 MHz
- HF-Emissionsleistung: <25mW
- Kompatibilität mit Smartphone-Anwendungen: mindestens iOS 9 / mindestens Android 4.2
BESCHREIBUNG DER HAUPTEINHEIT
Wochentag
Uhr
Einstellen. Temperatur Heizungssymbol
Drahtloses Signal
Zimmertemperatur
Programmierbarer
Zeitraum
PRG. Taste
Modi auswählen
An / aus
Schalter
Temperatur- und Parametereinstellungen
OWD-Symbol
RECEIVER DESCRIPTION
Pairing Button
Multifunctional LED
Other manuals for CT400
1
Table of contents
Languages:
Other PNI Thermostat manuals
Popular Thermostat manuals by other brands

Honeywell
Honeywell TH9320WFV installation guide

Salus
Salus FT100 Features list

Sinope
Sinope TH1123WF installation guide

HomeMatic
HomeMatic HmIP-eTRV-B-UK Mounting instruction and operating manual

Hans Grohe
Hans Grohe Ecostat 1001 SL Instructions for use/assembly instructions

Carrier
Carrier Debonair 33CS250-RC owner's manual

Horstmann
Horstmann CentaurPlus C17-ZW User operating instructions

DEVI
DEVI DEVIreg 610 installation guide

Siemens
Siemens RCR114.1 quick guide

Danfoss
Danfoss ECL Comfort 210 installation guide

Honeywell Home
Honeywell Home TB7100A1000 MultiPRO installation instructions

Amuheat
Amuheat AT8V2 Operational guide