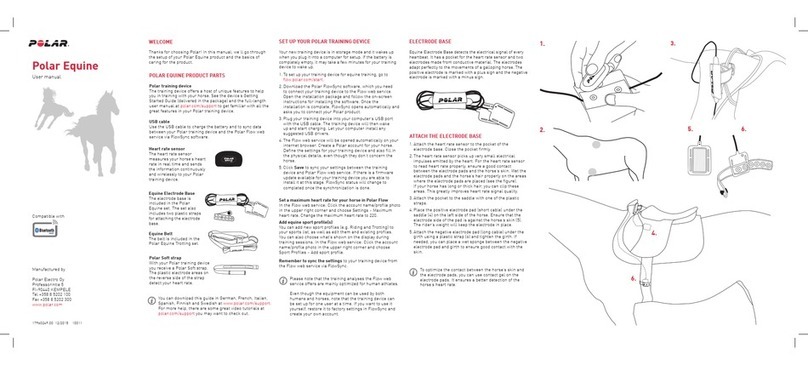
Polar Electro Equine RS800CX User manual

POLAR EQUINE
RS800CX
Getting Started Guide

CONTENTS
1. INTRODUCTION.................. 3
2. CONTENTS OF THE SET ......... 4
3. BUTTON FUNCTIONS ............ 6
4. STARTING THE TRAINING
COMPUTER ...................... 7
5. ATTACHING THE ELECTRODE
BASE............................. 8
6. ATTACHING THE BELT........... 11
7. USING THE G5 GPS SENSOR.... 14
8. PAIRING SENSORS WITH THE
TRAINING COMPUTER........... 18
9. START TRAINING
RECORDING ..................... 19
10. TROUBLESHOOTING............. 21
11. IMPORTANT INFORMATION ..... 22
Care and Maintenance........... 22
Service.......................... 23
Guarantee....................... 23
Disclaimer....................... 27

1. INTRODUCTION
The Polar RS800CX Equine is the most complete training system for horses available. It
is developed from the RS800CX training system for people. Read the full user manual
carefully to use all system features fully. If you just bought this training system and
want to try it immediately, this getting started guide is what you need!
Download the full user manual and this getting started guide in other languages from the CD
(available in English, German, French, Italian, Spanish, Finnish and Swedish). The latest version
of the full user manual and this getting started guide can be downloaded at
www.polar.com/support.
For video tutorials, go to http://www.polar.com/en/polar_community/videos.
ENGLISH 3

2. CONTENTS OF THE SET
1. RS800CX training computer receives,
displays and records all the data measured
by the heart rate sensor and the G5 GPS
sensor.
2. Heart rate sensor measures the horse’s heart
rate in real time and sends this information
continuously and wirelessly to the training
computer.
3. Equine Electrode Base detects the electrical
signal of every heart beat. It has a pocket for
the heart rate sensor and two electrodes. The
positive electrode is marked with a plus sign
and the negative electrode is marked with a
minus sign. Instead of the Electrode Base,
the Polar Equine Science set (#93046677)
includes the Equine Belt. For more
information, see chapter 6. Attaching the
Belt.
4. Two Plastic straps for attaching the electrode
base.
4 ENGLISH

5. G5 GPS sensor measures speed and distance
in real time. The user manual for G5 GPS
sensor can be downloaded at
www.polar.com/support. The G5 GPS sensor
is included only in the Polar Equine
RS800CX GPS set (#93046674).
6. IRDA USB adapter uses infrared connection
to transfer the recorded data from the
training computer to the PC.
7. CD-ROM: Includes the ProTrainer 5 Equine
edition software that displays a training log,
graphs, tables and reports on your PC to
further analyse the data recorded during
training. The CD-ROM also includes a
complete user manual to help you make the
most out of your training computer.
ENGLISH 5

3. BUTTON FUNCTIONS
•UP/DOWN: Scroll through menus
and adjust values.
•OK: Enter a menu, confirm a
selection and start the exercise.
•STOP: Exit a menu, return to the
previous display, leave settings
unchanged, cancel selections,
pause and stop the exercise.
•LIGHT: Press once and the
backlight is activated for 5
seconds when you press any other
button. You can also lock the
buttons by pressing and holding
the LIGHT button for two seconds.
6 ENGLISH

4. STARTING THE TRAINING COMPUTER
By default, the RS800CX training
computer is switched off to save the
battery. Press OK twice to activate it.
Select the language and press OK to
confirm. Then customize the basic
settings. To adjust the data, use UP or
DOWN and accept with OK.
You must enter the basic settings, even
though they don’t concern the horse. If
you don't enter the basic settings, the
RS800CX training computer will remind
you to set them before every exercise.
1. Time: Select 12h or 24h and set the
local time.
2. Date: Set today’s date, dd=day,
mm=month, yy=year.
3. Units: Select metric (kg/cm/km) or
imperial (lb/ft/mi) units.
4. Weight: Enter your weight.
5. Height: Enter your height.
6. Birthday: Enter your date of birth,
dd=day, mm=month, yy=year.
7. Sex: Select Male or Female.
8. Settings OK? is displayed. Select
Yes to accept and save the settings.
Select No if settings are incorrect and
need to be changed. Press STOP to
return to the data you want to change.
ENGLISH 7

5. ATTACHING THE ELECTRODE BASE
1. Attach the heart rate sensor to the pocket of the electrode
base. Close the pocket firmly.
2. The heart rate sensor picks up very small electrical
impulses emitted by the heart. For the heart rate sensor to
read the heart rate properly, ensure a good contact
between the electrode pads and the horse’s skin.
Wet the electrode pads and the horse's hair properly from
the areas where the electrode pads are placed (see the
figure). If your horse has long or thick hair, you can clip
those areas. This greatly improves the heart rate signal
quality.
To optimize the contact between the horse's skin and the
electrode pads, you can use contact gel on the electrode
pads. It ensures a better detection of the horse’s heart rate.
8 ENGLISH

See the images on this and the following page.
3. Attach the pocket to the saddle with one of the
plastic straps (3).
4. Place the positive electrode pad (short cable) under
the saddle (4) on the left side of the horse. Ensure
that the electrode side of the pad is against the
horse's skin (5). The rider’s weight will keep the
electrode in place.
5. Attach the negative electrode pad (long cable) under
the girth using a plastic strap (6) and tighten the
girth. If needed, you can place a wet sponge
between the negative electrode pad and girth to
ensure good contact with the skin.
For video tutorial, go to
http://www.polar.com/en/polar_community/videos.
See the training computer's user manual for instructions
on displaying the horse's heart rate and recording a
training session. The user manual can be downloaded at
www.polar.com/support.
ENGLISH 9

10 ENGLISH

6. ATTACHING THE BELT
Polar Equine Belt is included in the
RS800CX Science set (#93046677)
1. Belt: The plastic electrode areas
(A, B) on the reverse side of the
belt detect heart rate. The
pocket (C) protects the heart rate
sensor from shocks and
scratches and prevent it from
falling off the belt.
2. H3 heart rate sensor: The H3
heart rate sensor sends the heart
rate signal to the training
computer.
For video tutorials, go to
http://www.polar.com/en/polar_community/videos.
ENGLISH 11

1. For the heart rate sensor to read the heart rate properly, ensure
a good contact between the plastic electrode areas and the
horse’s skin. Wet the belt properly, for example in a bucket of
water (1).
2. Also wet the horse’s hair from the areas where the electrodes of
the belt are placed (2). If your horse has long or thick hair, you
can clip it from those areas where the electrodes are placed.
This will greatly improve the heart rate signal quality.
3. Attach the heart rate sensor to the pocket (3). Close the pocket
firmly.
12 ENGLISH

4. Place the belt as indicated (4), with the heart rate
sensor pocket on the left side of the horse. By
doing so, you ensure the electrodes of the belt
being in the right position.
5. Using contact gel on the electrodes of the belt is
recommended. It ensures a better detection of the
horse’s heart rate. The gel should be placed on
the electrodes areas on the reverse side of the
belt.
The range of the heart rate sensor is over 10 m,
therefore you can follow your horse's heart rate also
when lunging.
For video tutorial, go to
http://www.polar.com/en/polar_community/videos.
See the training computer user manual for instructions
on displaying the horse's heart rate and recording a
training session. The user manual can be downloaded
at www.polar.com/support.
ENGLISH 13

7. USING THE G5 GPS SENSOR
The G5 GPS sensor is included only in the
Polar Equine RS800CX GPS set. For
complete instructions on using the G5
GPS sensor, download the user manual
from the CD or at
www.polar.com/support.
Using Polar G5
1. To turn G5 on, press the power key for
one second and release. Both LEDs
flash twice in green to indicate the
activation.
2. The GPS signal LED flashes in red as
G5 searches for satellite signals. To
catch satellite signals, go outdoors
and away from tall buildings and
trees. In good conditions, acquiring
satellite signals for the first time
typically takes 30-60 seconds. G5
finds the signals faster if you keep it
immobile during the search.
3. The GPS signal LED flashes in green
when the signals are found and your
location is determined. Your G5 is now
ready for action.
4. To turn G5 off, press the power key for
one second. The power switches off
automatically if G5 cannot locate
satellite signals or the location does
not change for 60 minutes.
14 ENGLISH

Wearing the GPS Clip
1. Position the G5 with “POLAR” logo
upright above the clip and snap it in
place (1).
2. Attach the clip to your clothing, for
example on your waistband or belt, on
the same side of your body as the arm in
which you are wearing your training
computer (2.).
Check that the clip is attached
securely to keep it from falling off
accidentally.
Place the G5 upright, so that the “POLAR” logo is facing upwards, enabling the GPS
signal to be as clear as possible.
Attaching the G5 in the clip away from your body, to your backpack for example, can cause
breaks in the signals between the training computer, the G5 and the satellite reception.
Therefore, the GPS information in the training data can become inaccurate.
ENGLISH 15

3. To remove the G5 from the clip (3): Hold
the clip by the side edges with the
“POLAR” logo facing you. Snap the G5
out of the clip by pushing it with your
other hand.
Alternatively, you can carry the G5 GPS sensor in an armband, which is available as an
accessory.
16 ENGLISH

Wearing the Armband*
1. Encase the G5 into the armband
pocket the USB port against the
bottom of the pocket. Check that
the LEDs and the power key are
visible through the window.
2. Pull the pocket's upper edge over
the G5 (picture 3). G5 is
securely positioned when the
pocket's upper edge covers the
top of it (picture 4).
3. Place the G5 and the training
computer on the same arm.
Position the armband around
your upper arm or forearm and
fasten (pictures 5 and 6). Make
sure that the "POLAR" logo on
the armband is in an upright
position.
*The armband is not included in the set, it is available as an accessory.
ENGLISH 17

8. PAIRING SENSORS WITH THE TRAINING
COMPUTER
If you purchase a new Polar G5 GPS
Sensor or heart rate sensor, or Equine
speed kit sensor, it must be paired to
your training computer. For instructions
on pairing G5 GPS sensor or speed sensor
W.I.N.D., see Feature Settings in the full
user manual of the training computer. For
instructions on pairing the heart rate
sensor, see Using a New Heart rate
Sensor. Please note that pairing may be
referred to as teaching in the user
manual.
If you purchased the sensor and training
computer together, as a set, the sensor is
already paired to the training computer.
In this case, you will only need to
activate the sensor in your training
computer. For more information, see
Feature Settings in the user manual.
18 ENGLISH

9. START TRAINING RECORDING
1. Start the heart rate measurement by
pressing OK. Within five to ten
seconds, the horse's heart rate
appears on the display.
2. Press OK to start recording the
exercise.
3. You can view three lines of exercise
information simultaneously in the
RS800CX training computer. Press
UP or DOWN to change the view. The
name of the display appears for a few
seconds. The name indicates the
information on the lowest row.
You can customize the RS800CX
display to view the information you
need the most during training, either
by using the training computer or the
ProTrainer 5 software. The information
available depends on the features that
are activated. For instructions, see the
full user manual at
www.polar.com/support.
You can also zoom the display. Press
and hold UP to zoom into the upper
row, and DOWN to zoom into the
middle row. Return to the normal
display by pressing and holding the
buttons again.
ENGLISH 19

4. To stop the exercise, press STOP
twice. The RS800CX returns to the
time display.
To view detailed information on the
exercise session, select File.
• The Exercise Log lists a
maximum of 99 exercise files.
• The Weekly summary displays
summaries for the past 16 weeks.
•Totals include cumulative values
recorded during training sessions.
• In the Delete menu, you can
delete exercise files.
For a deeper analysis, transfer the
data to Polar ProTrainer 5. The
software offers you different options to
analyze the data with. For
instructions, download the full user
manual from the CD or at
www.polar.com/support.
You can also transfer the data to
polarpersonaltrainer.com web service by
using the WebLink sofware. Download the
software from Downloads at
www.polar.com/support.
For more detailed information on using
the RS800CX training computer,
download the full user manual from the
CD or at www.polar.com/support.
20 ENGLISH
Table of contents
Other Polar Electro Pet Care Product manuals