manuals.online logo
Brands
  1. Home
  2. •
  3. Brands
  4. •
  5. Polygroup
  6. •
  7. Artificial Pine Tree
  8. •
  9. Polygroup Caribbean Tree User manual

Polygroup Caribbean Tree User manual

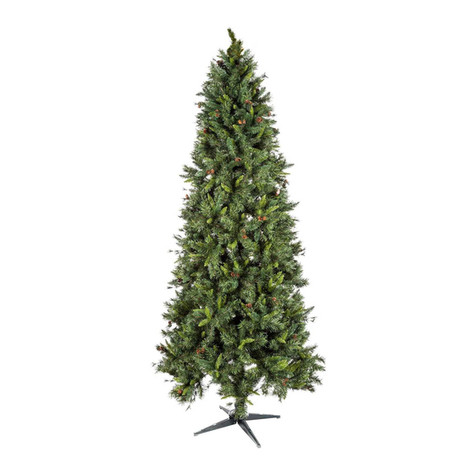
Caribbean Tree
Model: TG76M2ACRC00; 131188
a.
READ AND FOLLOW ALL
SAFETY INSTRUCTIONS.
b. Do not use seasonal products outdoors unless marked suitable
for indoor and outdoor use.When products are used in
outdoor applications, connect the product to a Ground Fault
Circuit Interrupting (GFCI) outlet. If one is not provided, contact
a qualified electrician for proper installation.
c. This seasonal product is not intended for permanent
installation or use.
d. Do not mount or place the product near gas or electric heaters,
fireplaces, candles, or other similar sources of heat.
e. Do not secure the wiring of the product with staples or nails, or
place on sharp hooks or nails.
f. Do not let lamps rest on the supply cord or on any wire.
g. Unplug the product when leaving the house, when retiring for
the night, or if left unattended.
h. This is an electric product and not a toy! To avoid risk of fire,
burns, personal injury and electric shock it should not be
played with or placed where small children can reach it.
i. Do not use this product for other than its intended use.
j. Do not hang ornaments or other objects from cord, wire, or
light string.
k. Do not close doors or windows on the product or extensions
cords as this may damage the wire insulation.
l. Do not cover the product with cloth, paper, or any material that
is not a part of the product when in use.
m.This product has a polarized plug (one blade is wider than the
other) as a feature to reduce the risk of electric shock.This plug
will fit in a polarized outlet only one way. If the plug does not
fit fully in the outlet, reverse the plug. If it still does not fit,
contact a qualified electrician. Do not use with an extension
cord unless plug can be fully inserted. Do not alter or replace
the plug.
n. This product is equipped with push-in type lamps. Do not twist
lamps.
o. This product employs overload protection (fuse). A blown
fuse indicates an overload or short-circuit situation.If the fuse
blows, unplug the product from the outlet. Also unplug any
additional strings or products that may be attached to the
product. Replace the fuse as per the user servicing instruc
tions (follow product marking for proper fuse rating) and
check the product.
Package Contents
Pre-Assembly
Part
A
B
C
D
Description
Tree top, tag 3
Tree center, tag 2
Tree bottom, tag 1
Tree stand
Quantity
1
1
1
1
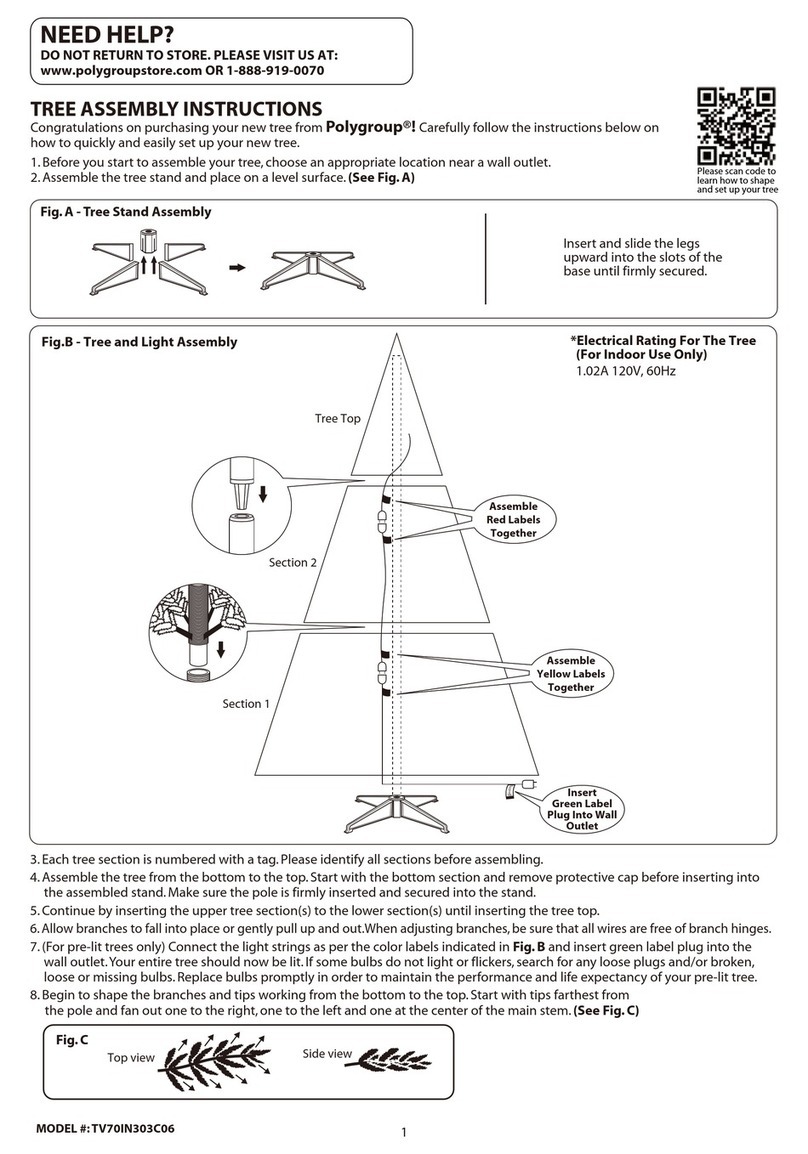
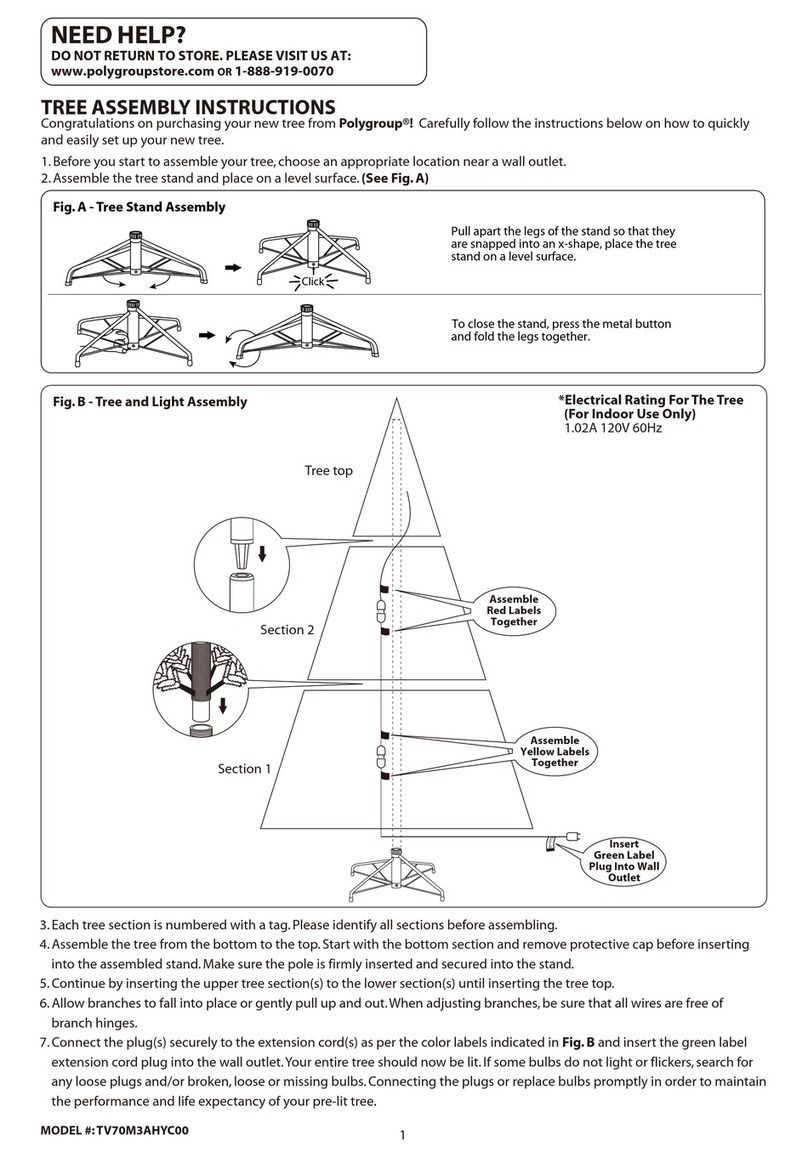
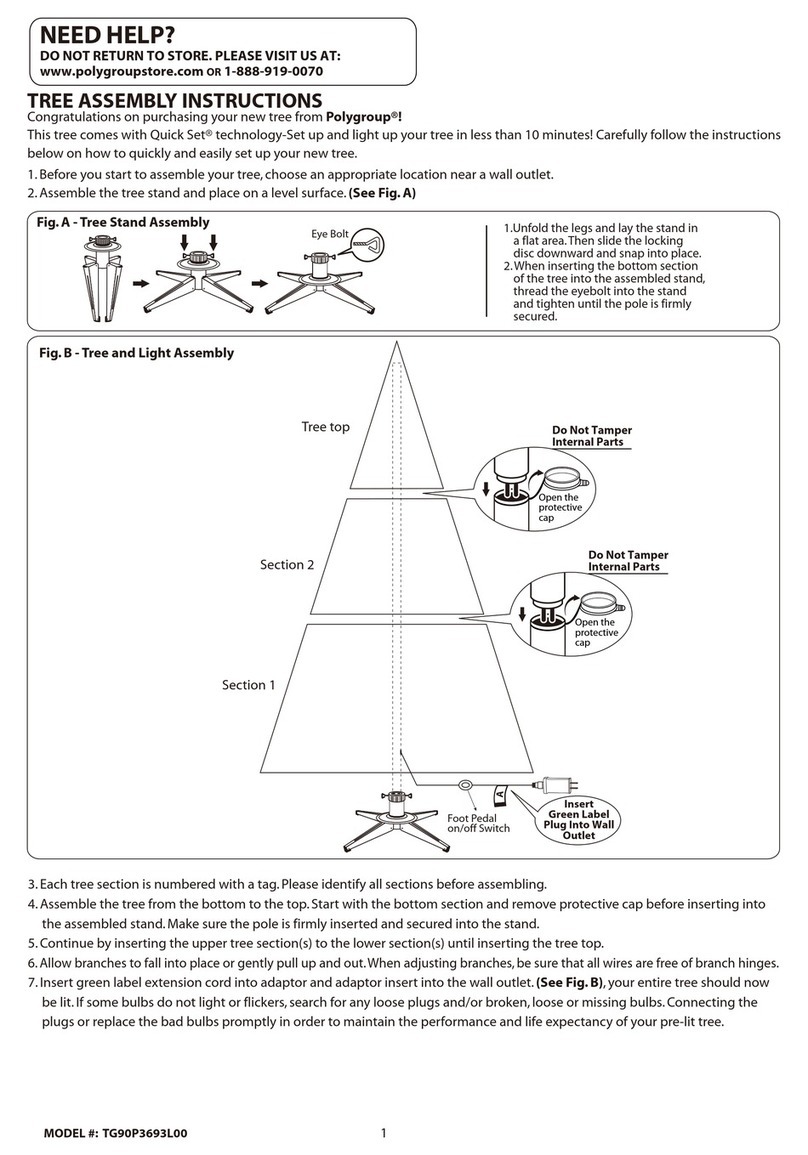
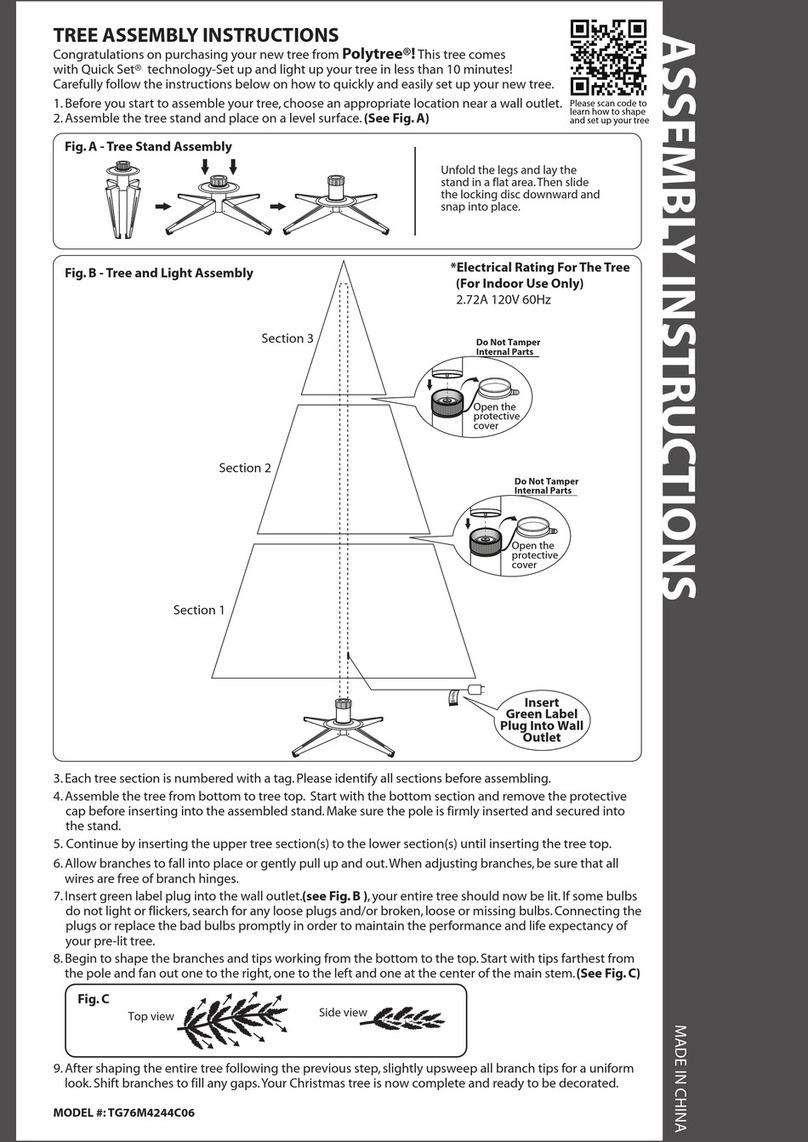
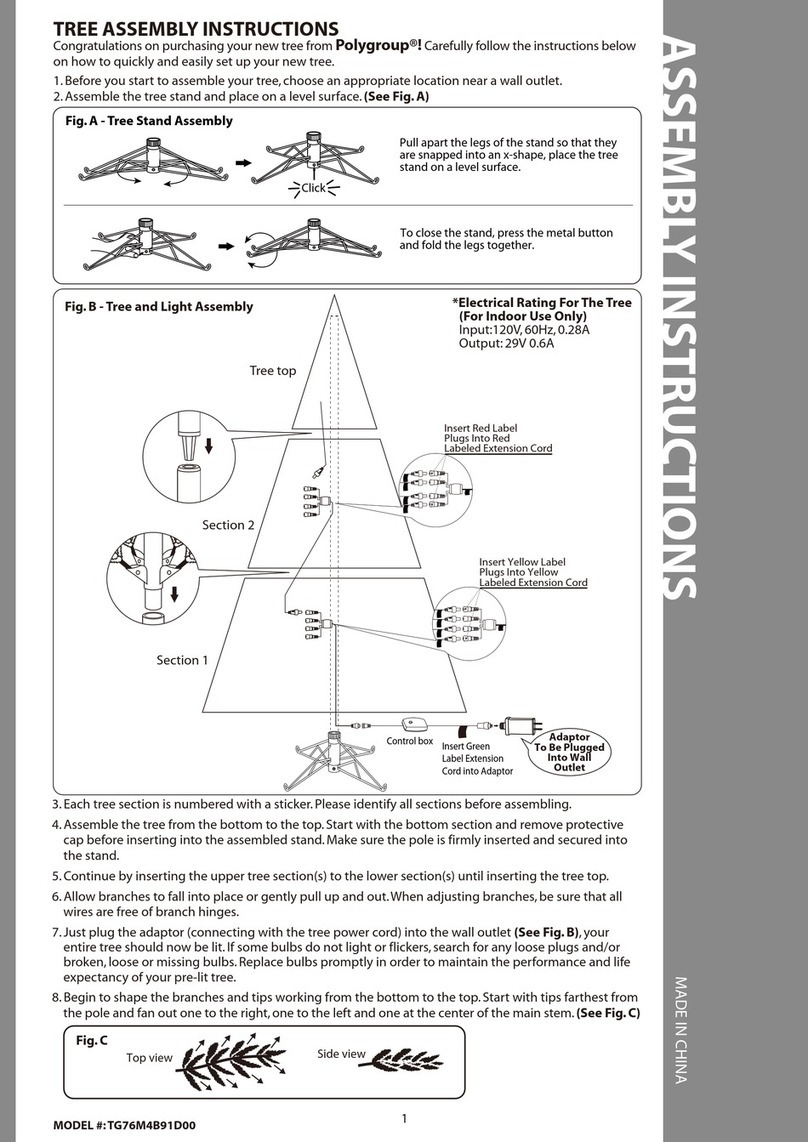
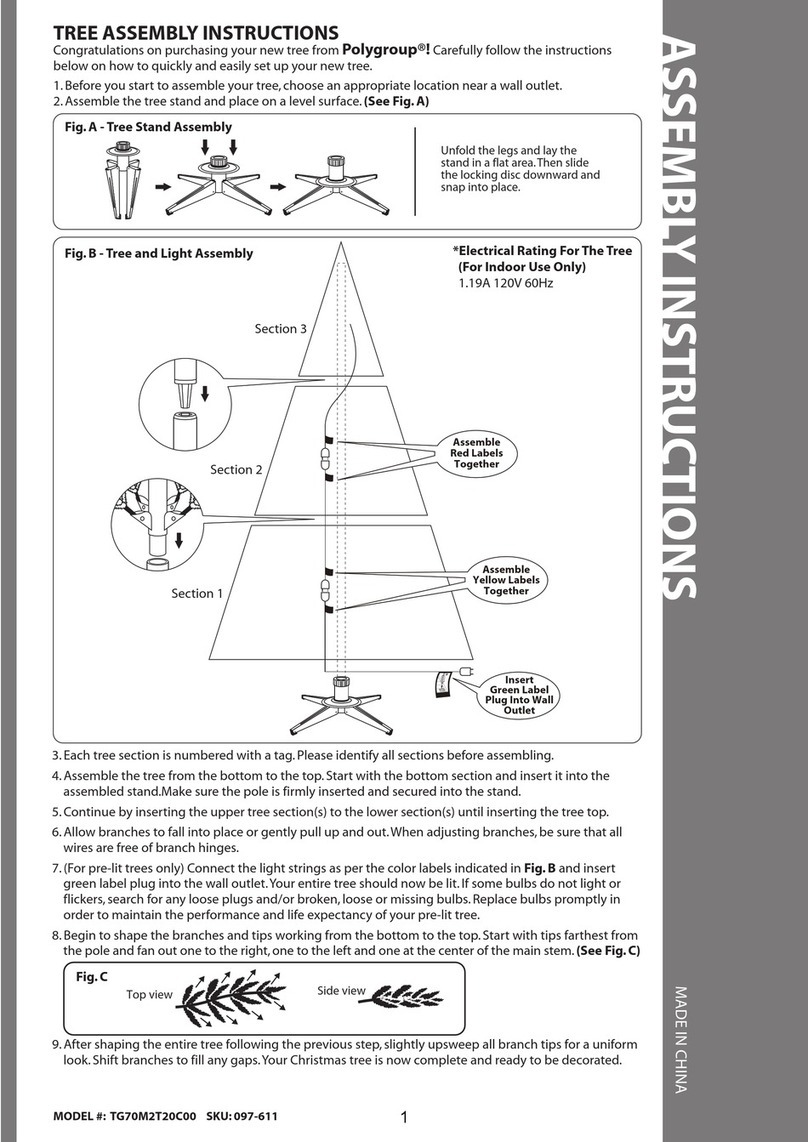
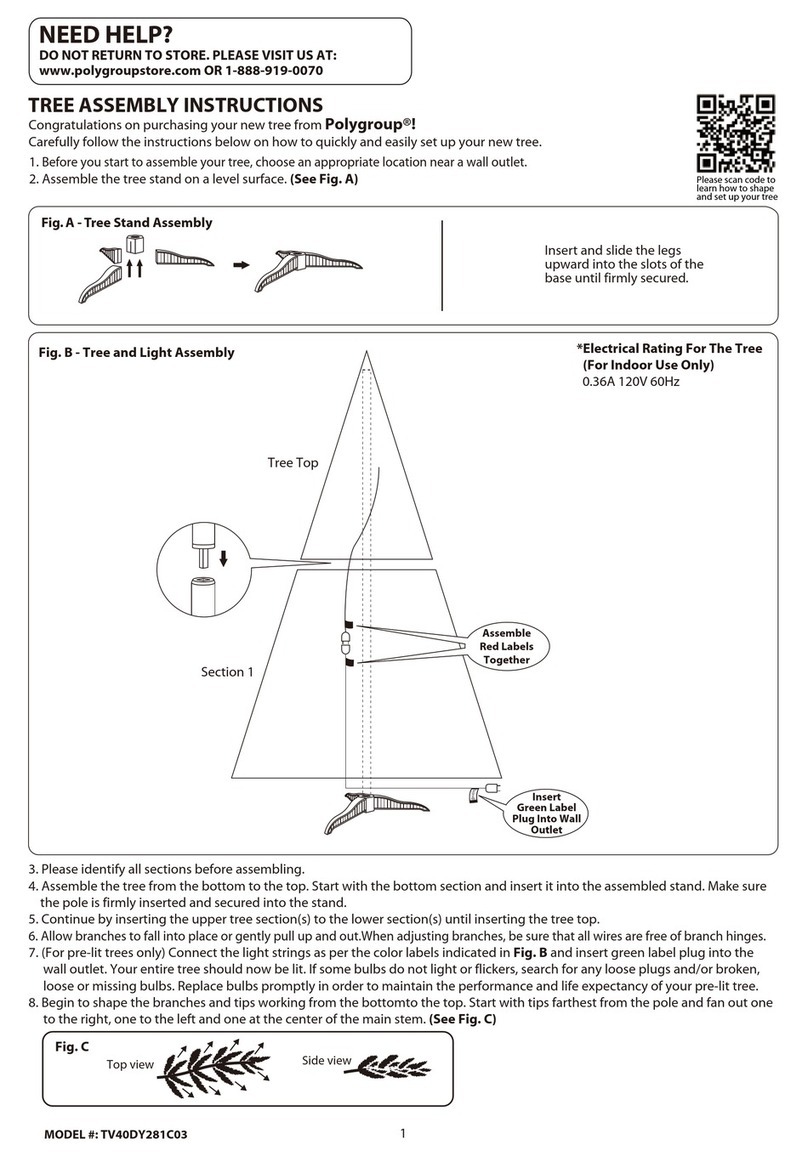
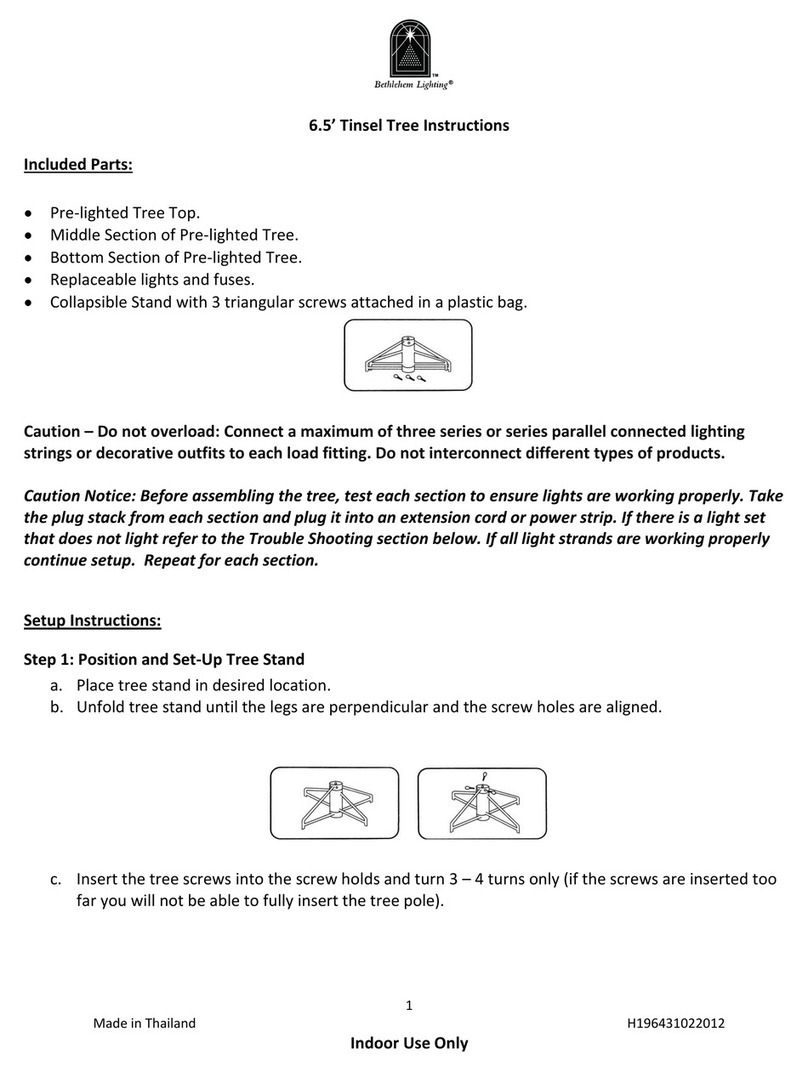
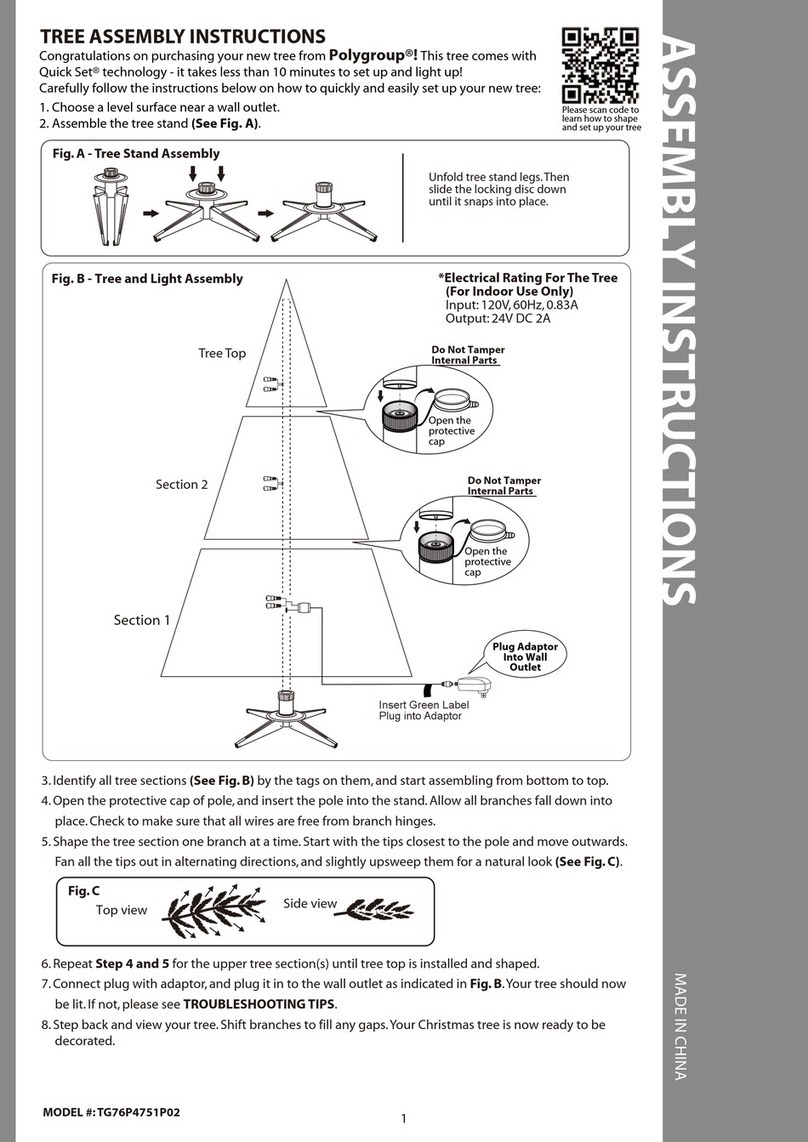
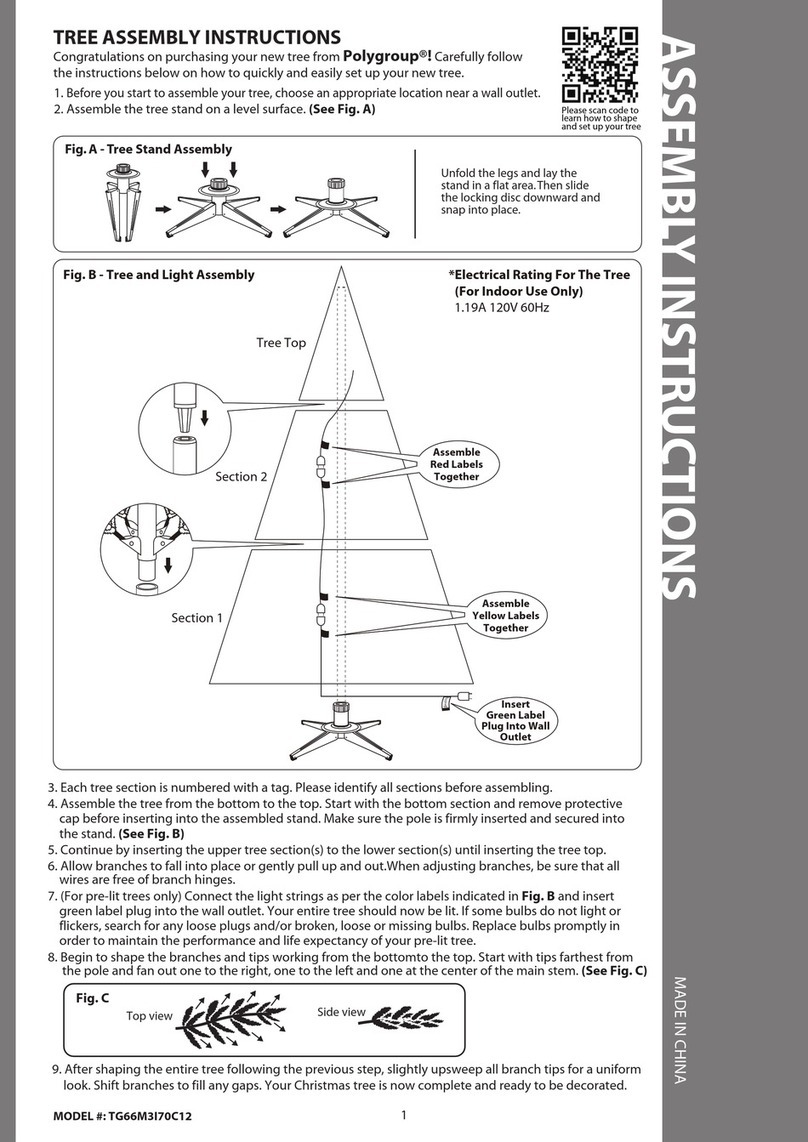
Assembling the tree stand
Assembly
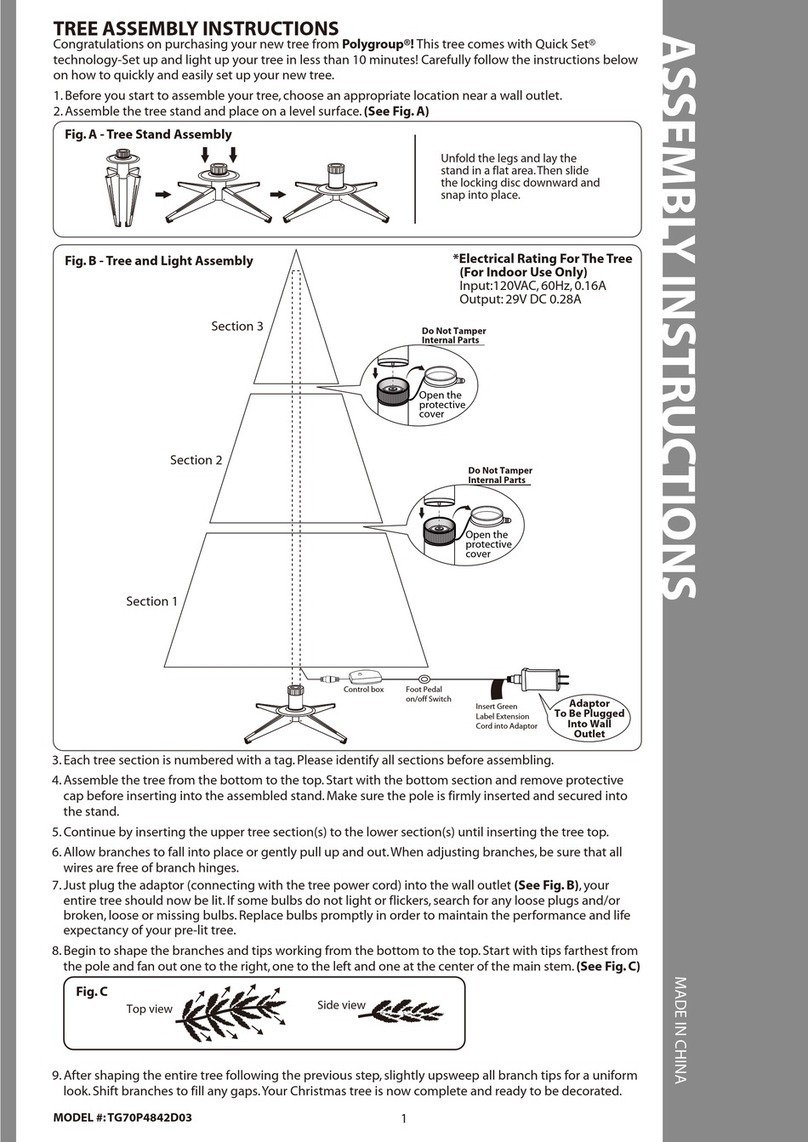
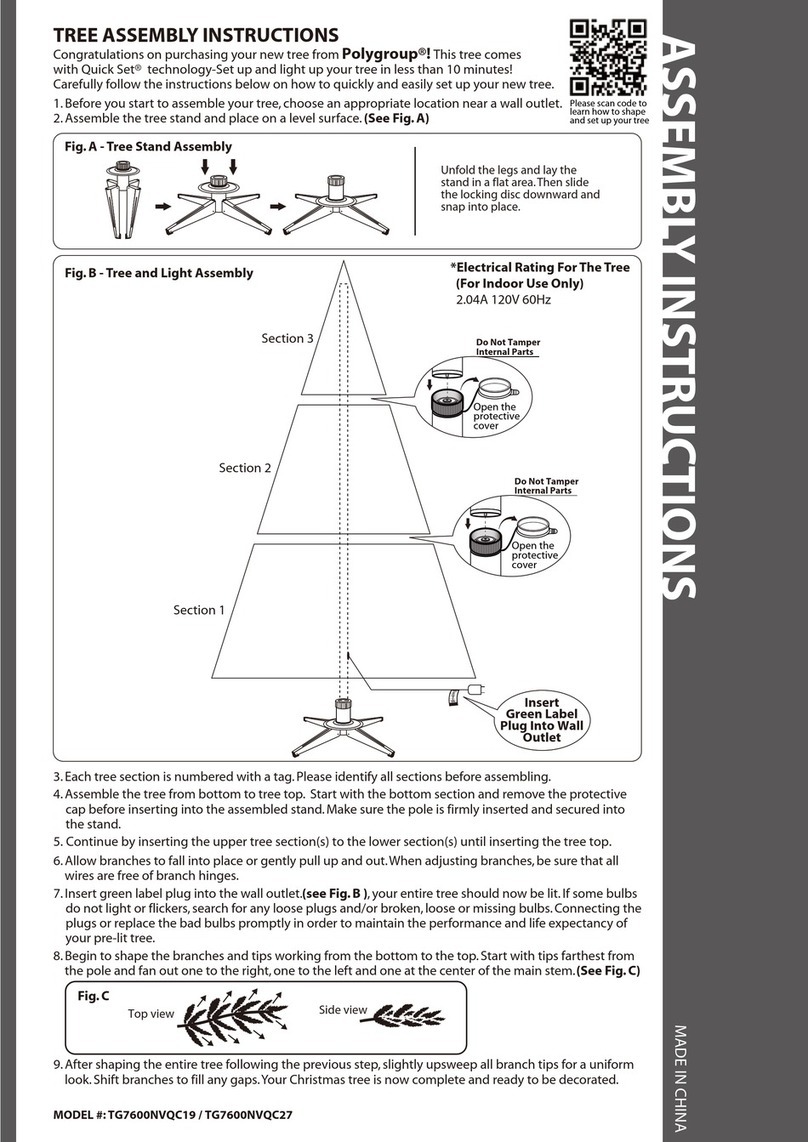
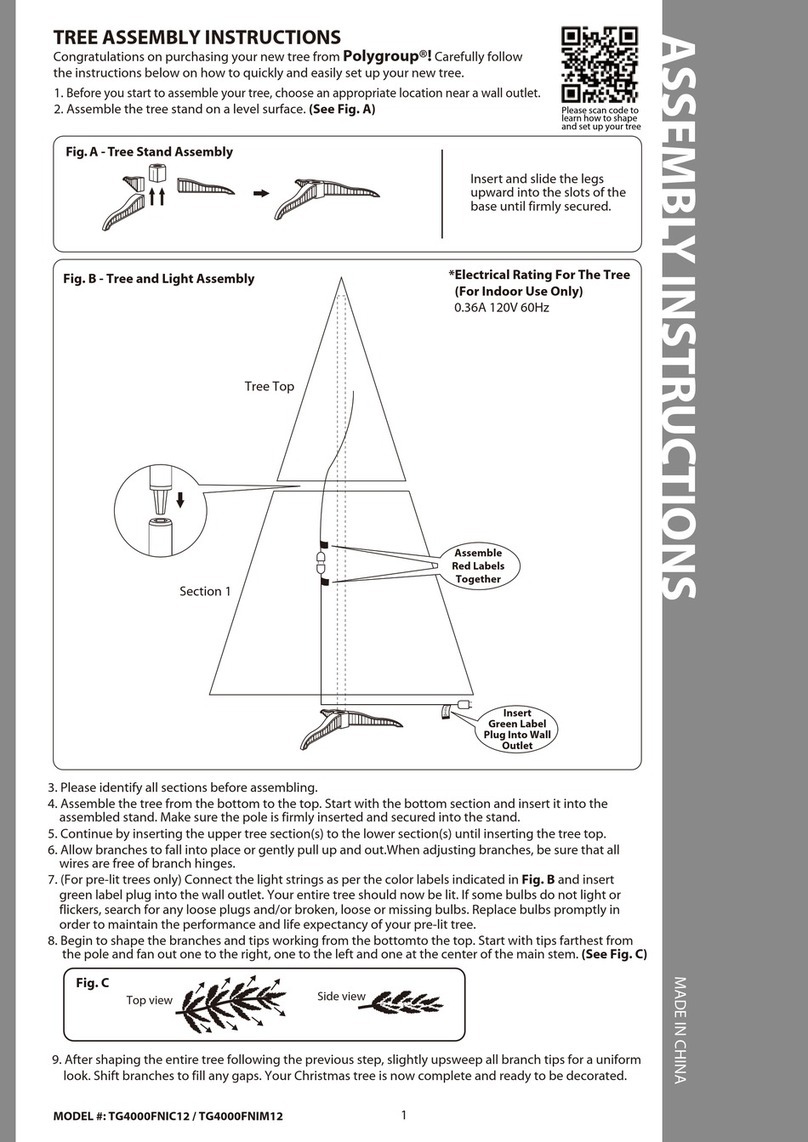
Step 1.
Choose a location near a wall outlet.
Step 2.
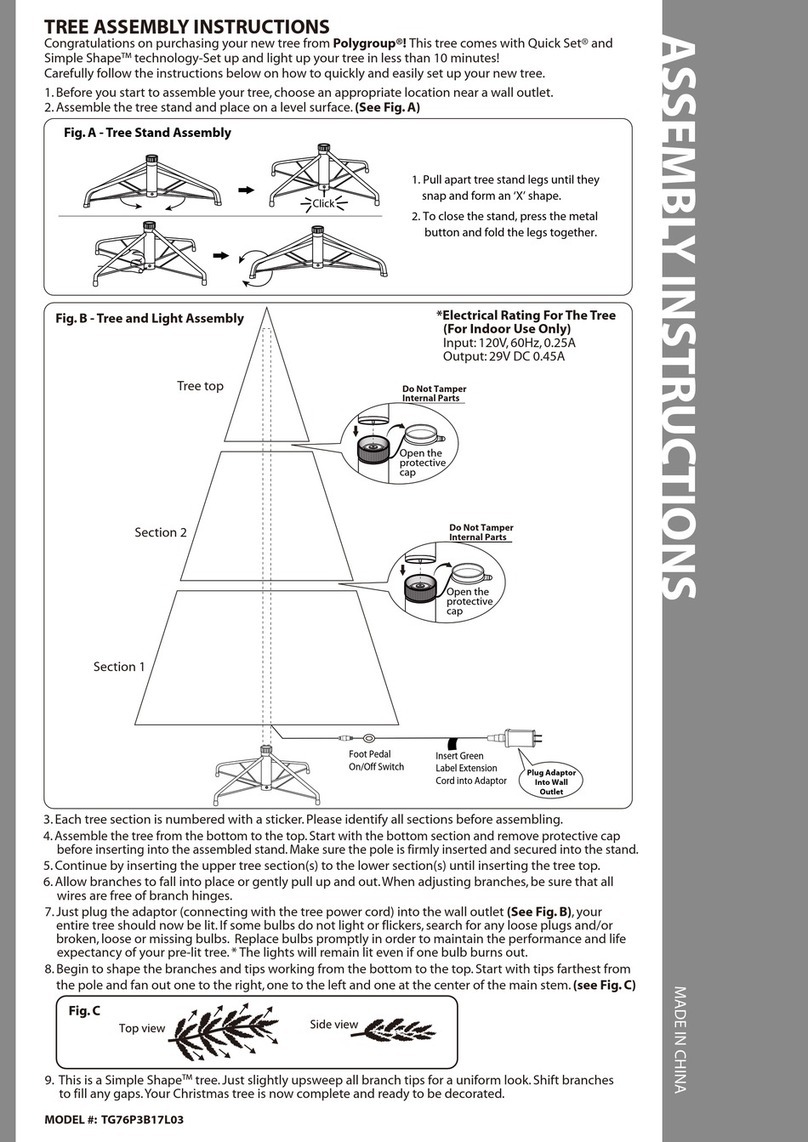
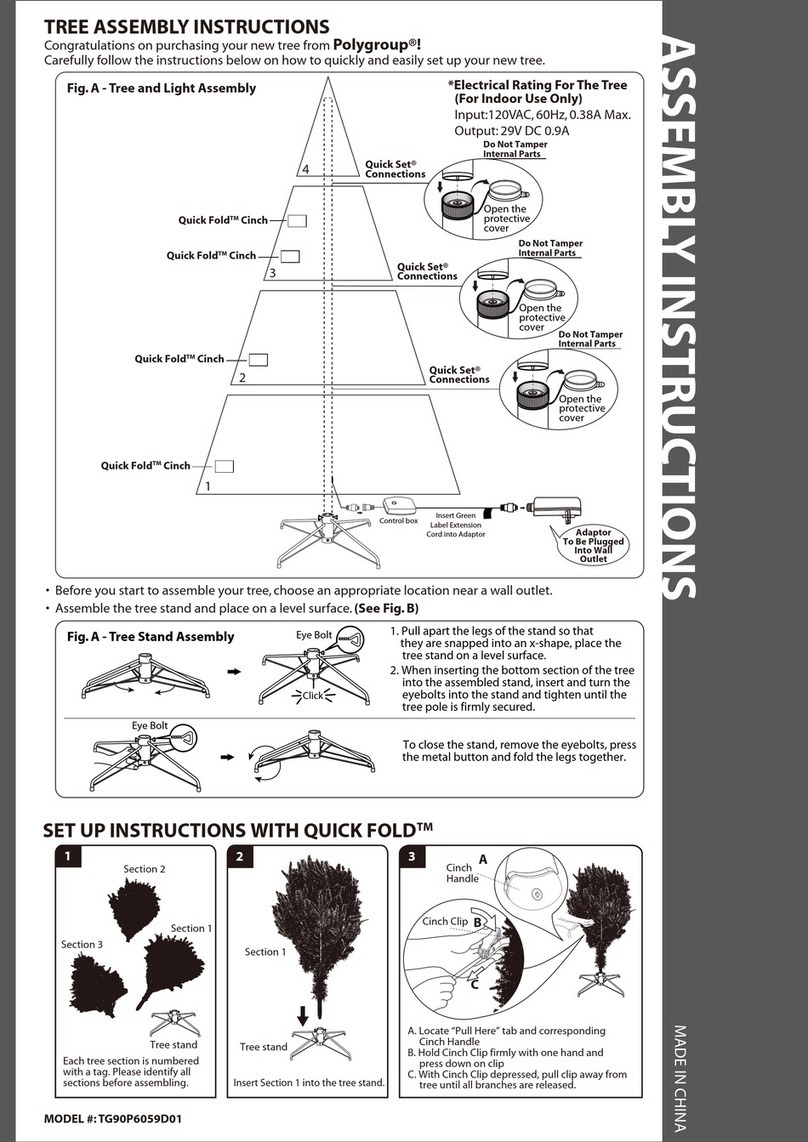
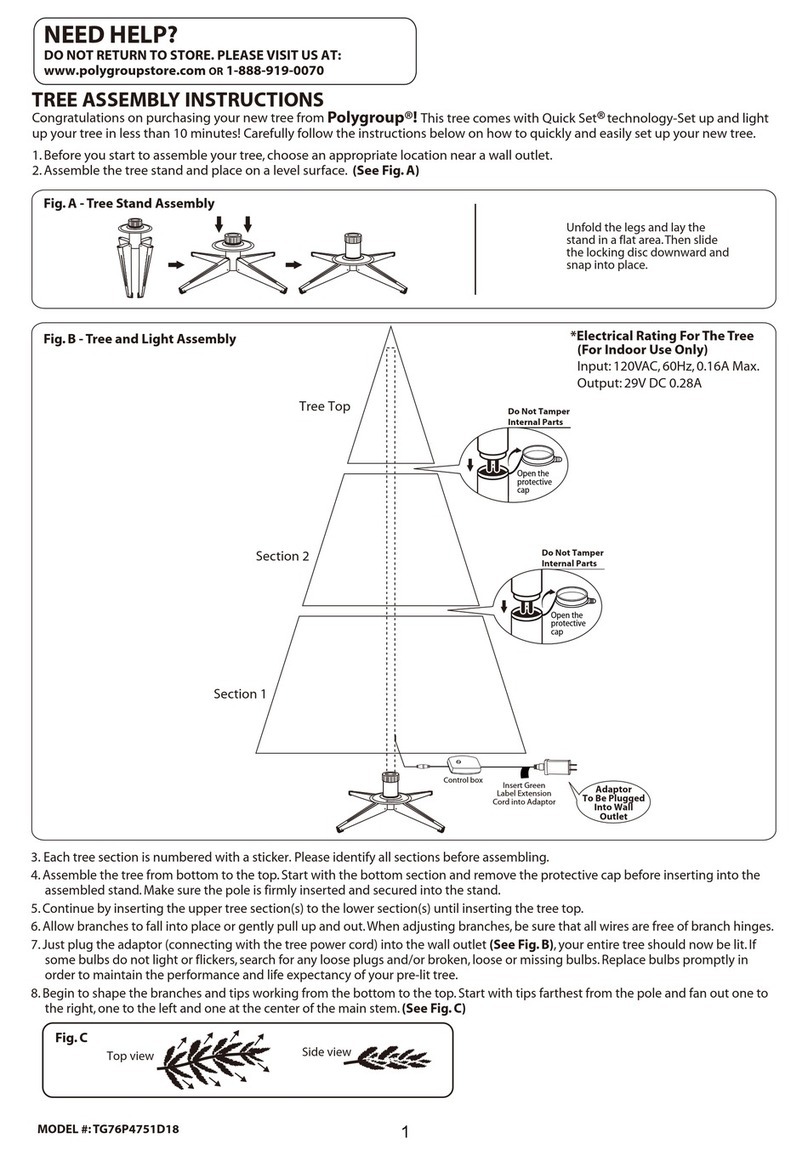
Unfold the legs of the tree stand (D) and lay the stand on
the floor.
Step 3.
Slide the locking disk of the tree stand (D) down until it
snaps into place.
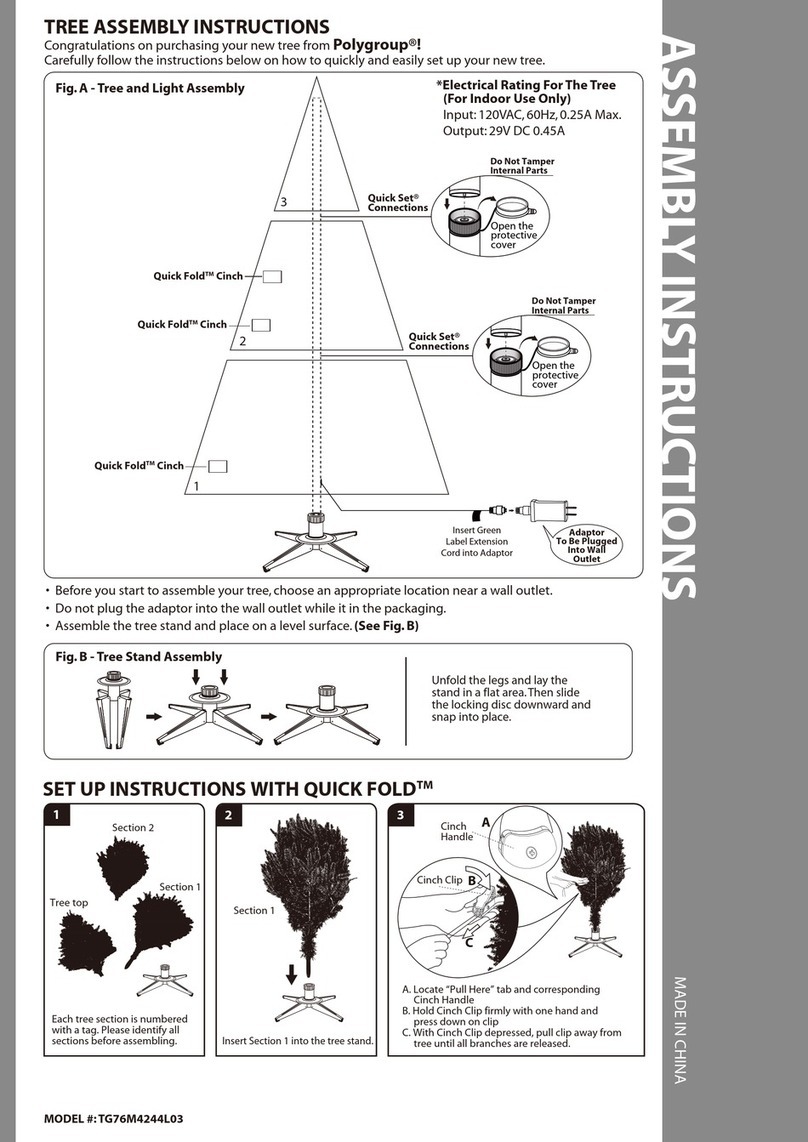
This tree assmebles with Quick Set® technology
---Set up and light up your tree in less than 10
minutes!
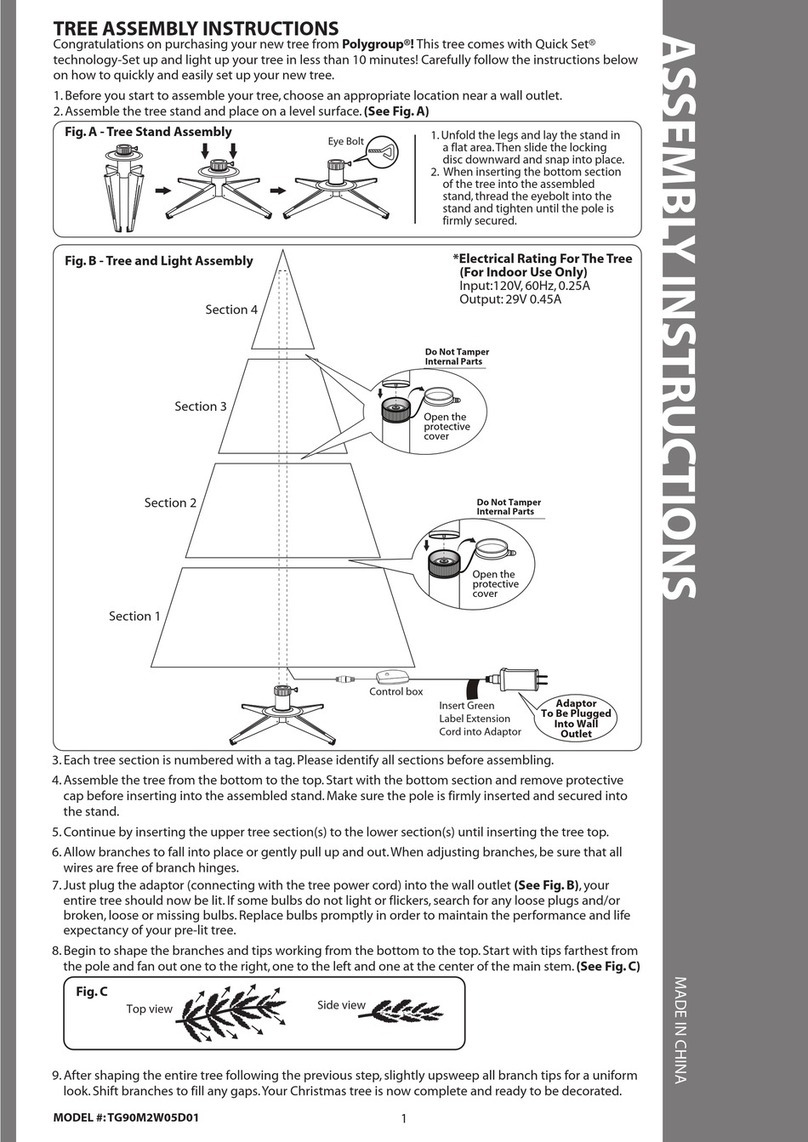
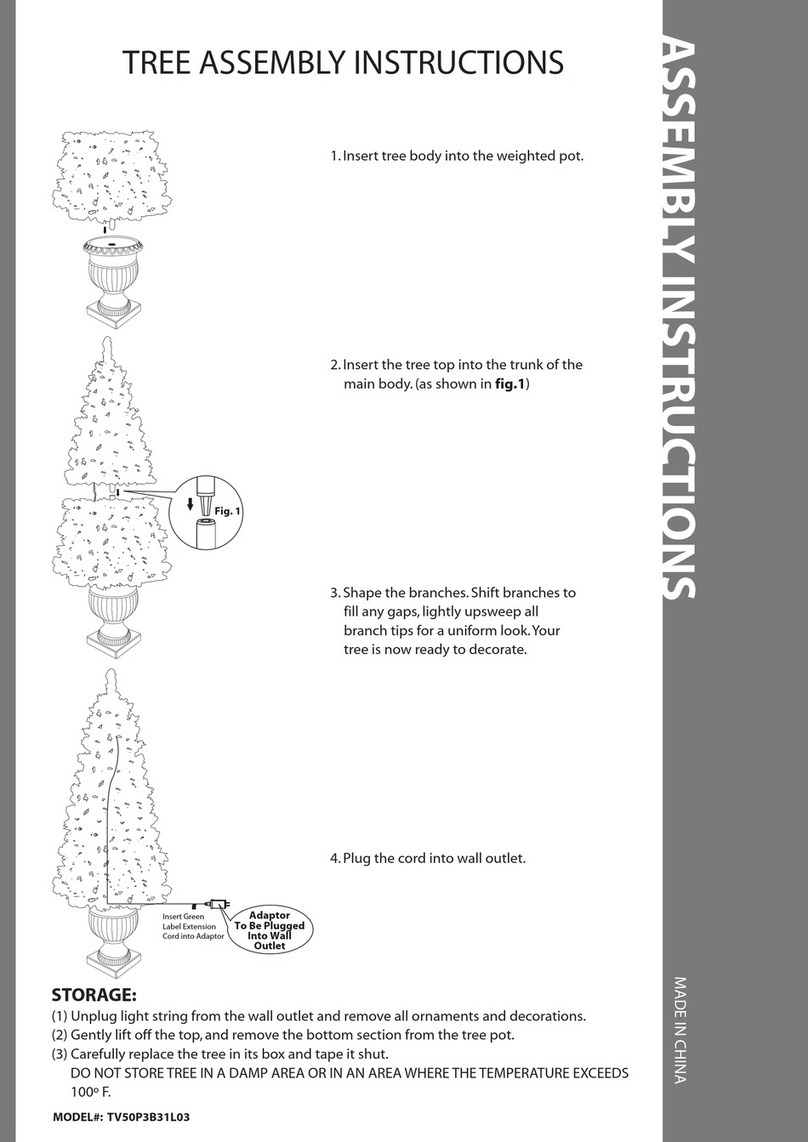
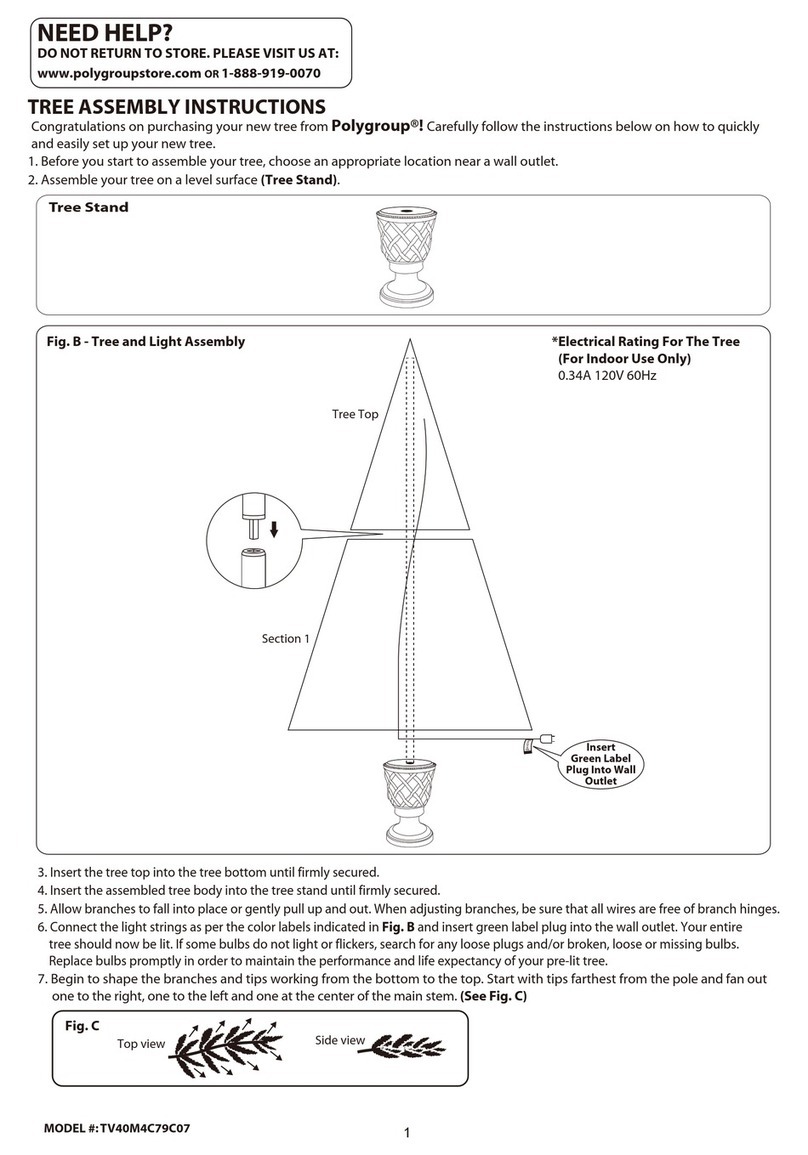
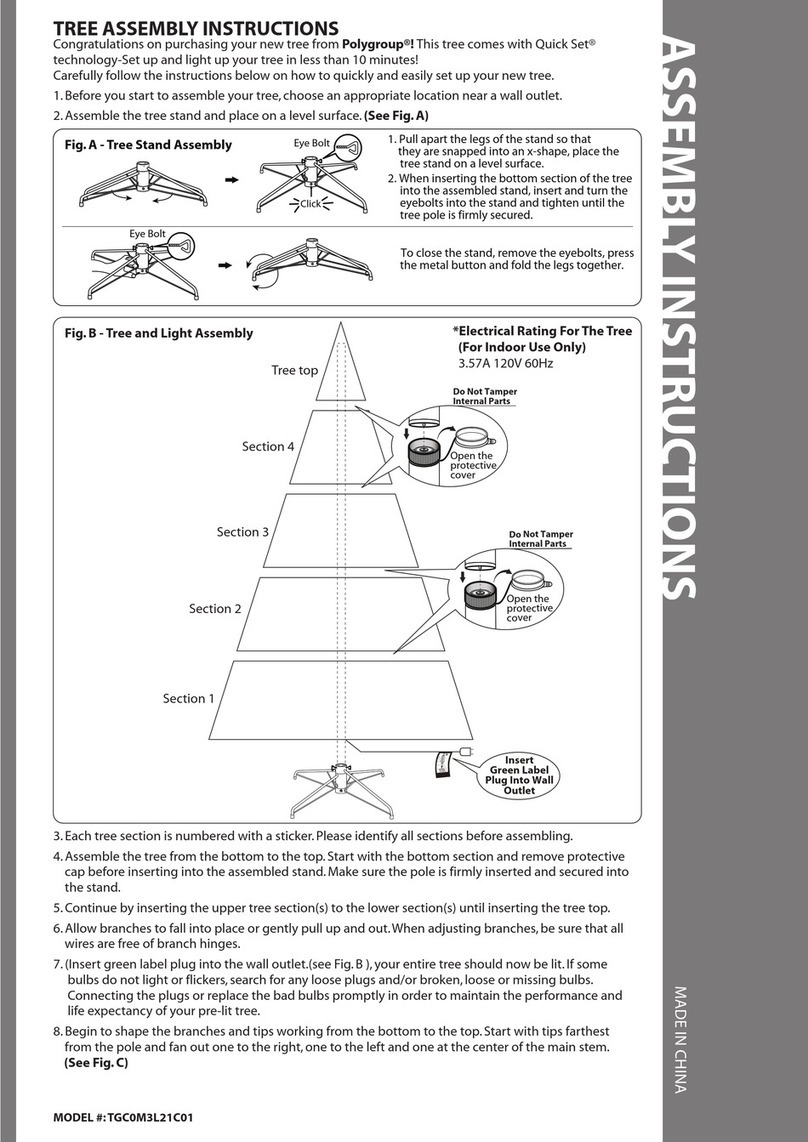
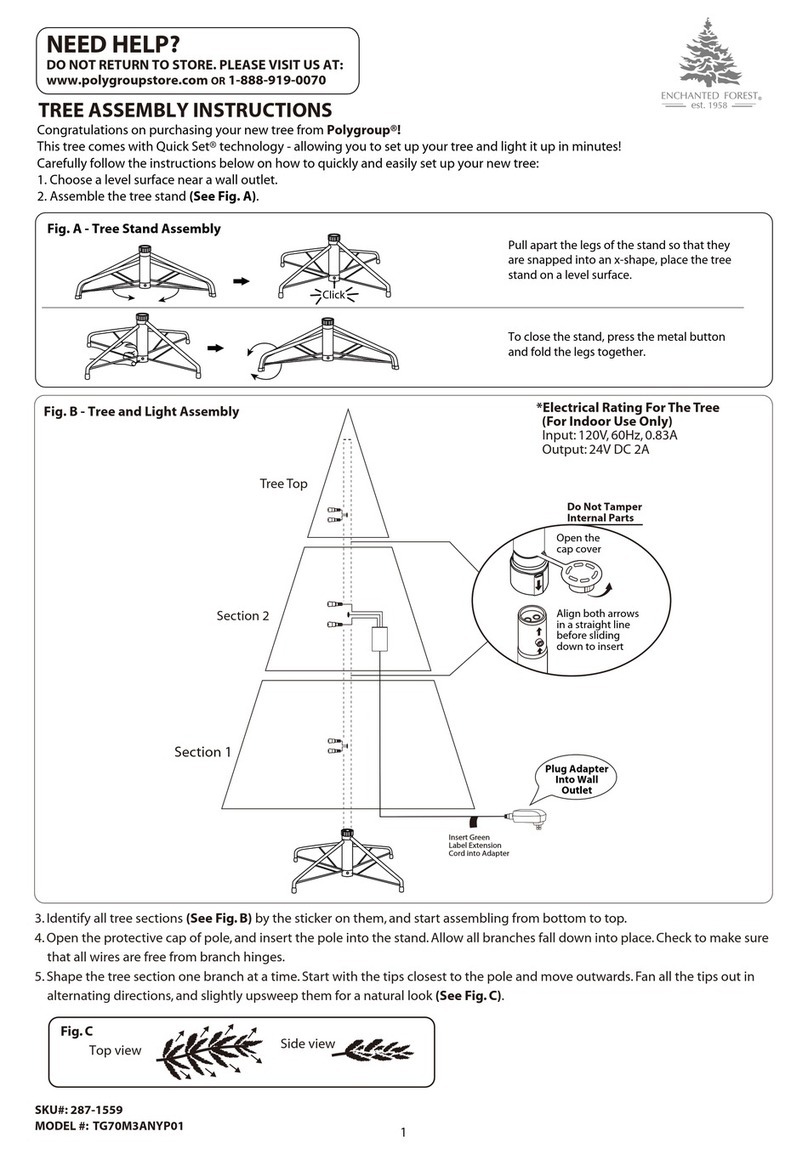
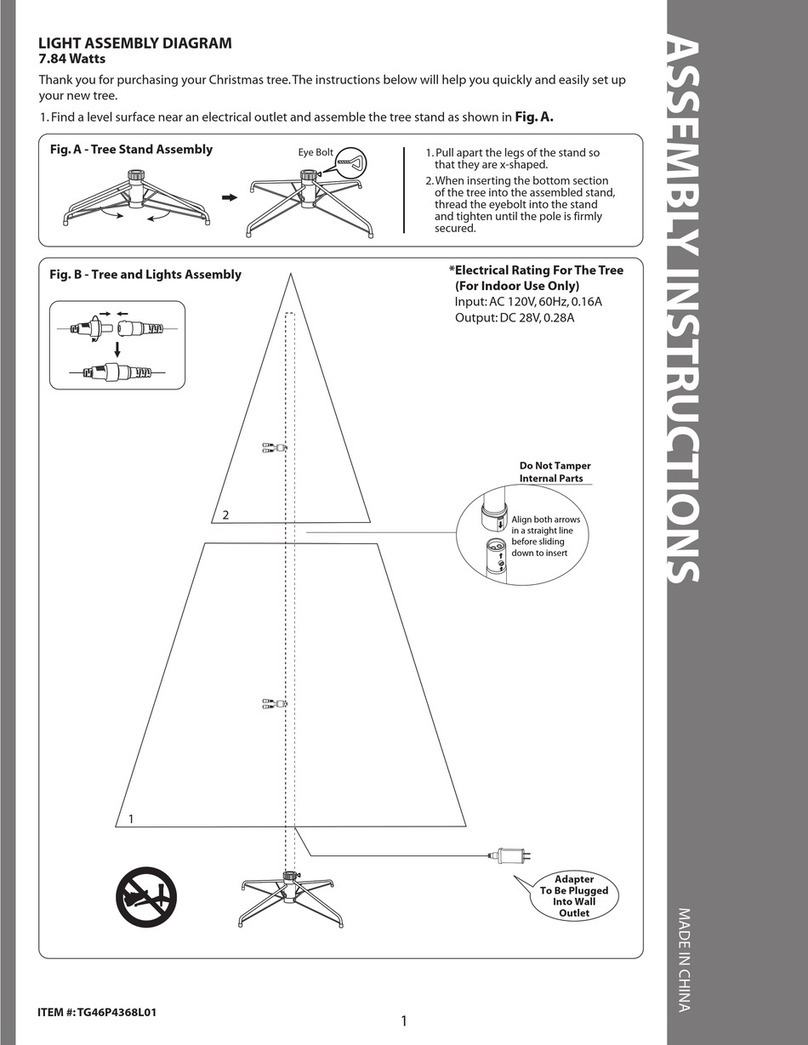
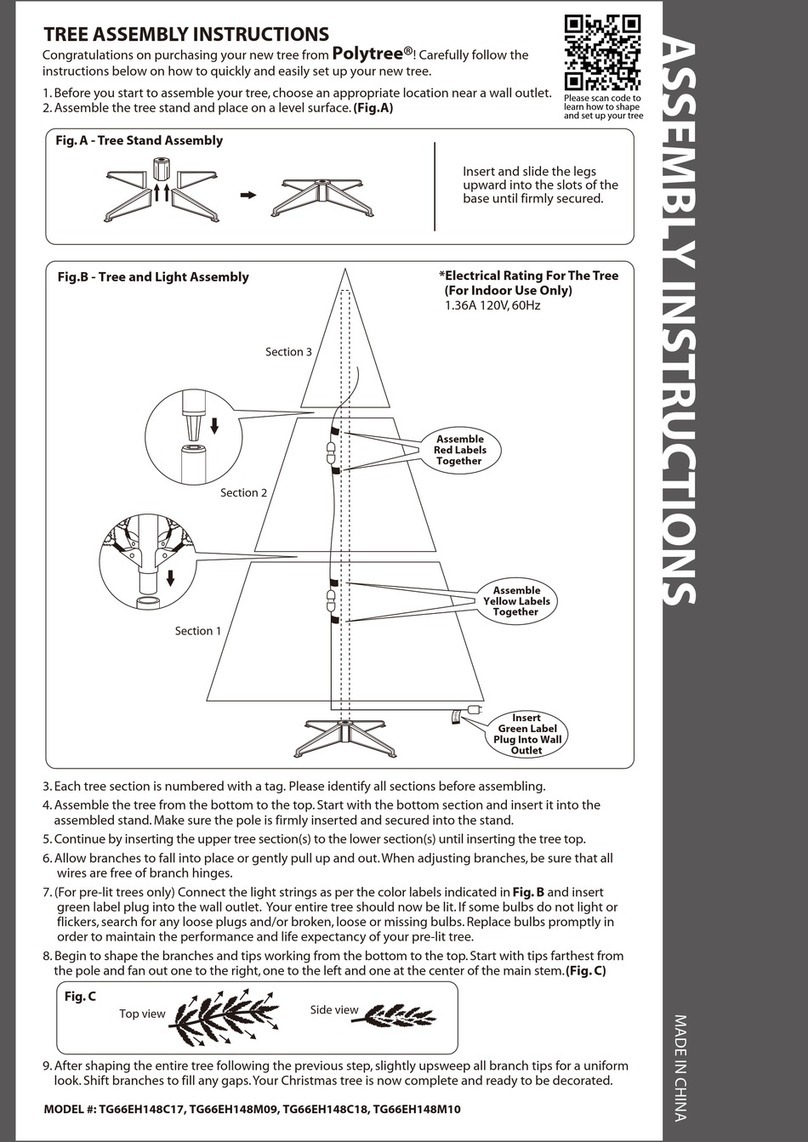
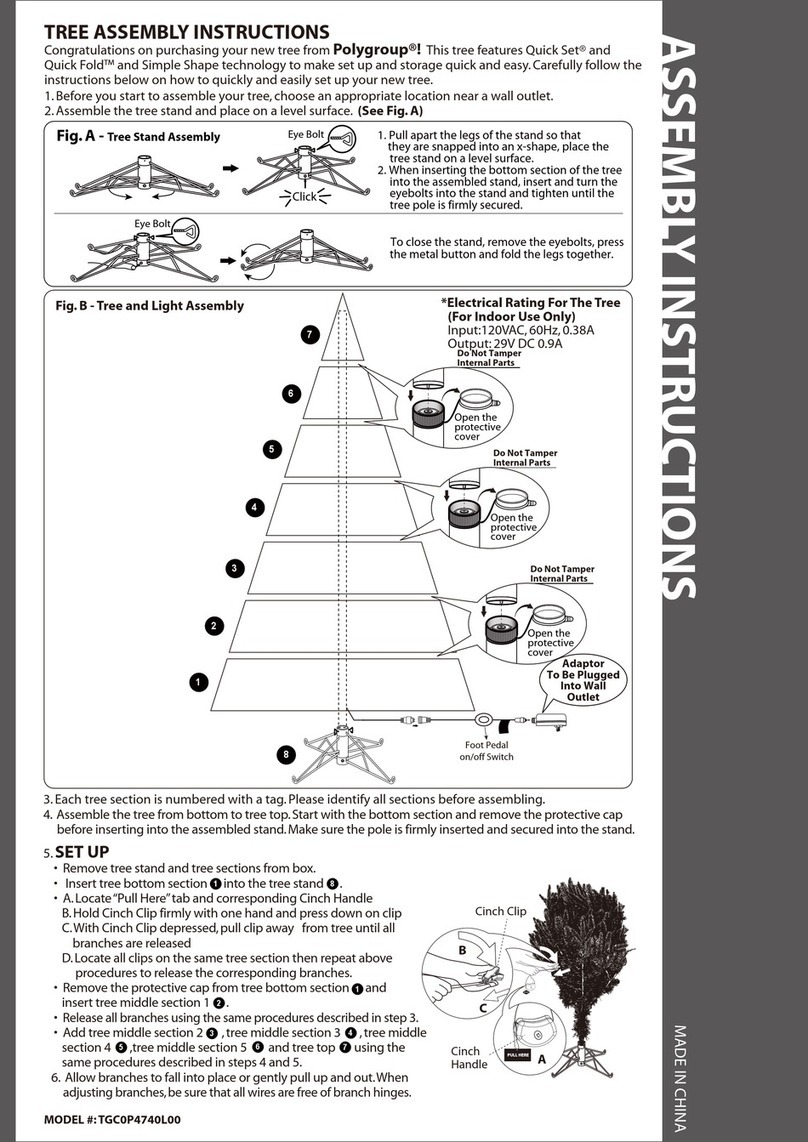
Step 1. Remove the protective caps from the tree bottom (C) and
insert the pole into the tree stand (D).
Step 2. Remove the protective caps from the tree center (B) and
insert the pole into the tree bottom (C) .
Step 3. Insert the tree top (A) into the tree center (B).
Step 4. Shape the branches to your preference by working from the
bottom to the top. When adjusting branches, ensure that all
wires are free of branch hinges.
Step 5. Insert the green label extension cord plug into the wall
outlet. All your lights should now be lit.
Step 6. When finished shaping the branches, slightly upsweep all
branch tips for a uniform look.
Assembling the tree
Safety Information
IMPORTANT SAFETY
INSTRUCTIONS
When using electrical products, basic precautions should always be
followed, including the following:
The supply cord cannot be replaced. If the cord is damaged
the appliance should be scrapped.
Imported by: SERVICIOS HOME DEPOT, S. DE R.L. DE C.V.
Ricardo Margain 605. Santa Engracia, San Pedro Garza García,
Nuevo León, México, C.P. 66267 Phone 01 800 004 6633
Electrical ratings: 120 V~60 Hz 142.8 W
p. Read and follow all instructions that are on the product or
provide with the product.
q.
SAVE THESE INSTRUCTIONS
Top view Side view

Operation
Turning on the tree
Maintenance
Spare parts
Repairing Loose Hinges
NOTE: If some bulbs do not light or flicker, search for any loose
plugs and/or broken, loose, or missing bulbs. Replace bulbs
promptly with the replacement bulbs provided in order to
maintain the performance and life expectancy of your tree.
Step 1. Connect the light strings of the tree together and plug the
power cord into a wall outlet.
Step 2. If the tree comes with a foot pedal, step on the On/Off
button.
This tree package includes hinge pins, washers, bulbs, and fuses for
any replacement or repair that you need to perform on your tree. If
extra parts are needed, contact the Customer Service Team at 01
800 004 6633
Use and Care Instructions
1. Before using or reusing, inspect product carefully. Discard any
products that have cut, damaged or frayed wire insulation or
cords, cracks in the lampholders or enclosures, loose connections,
or exposed copper wire.
2. Before disassembling the tree, unplug the tree and remove all
ornaments and decorations.
3. Gently lift the tree top straight up to remove from the center
section and fold all branches towards the pole.
4. Repeat this step for the center and bottom tree sections.
Step 1. Place the branch into the slot of the bracket.
Step 2. Insert a new hinge pin through the holes of the bracket and

secure with a washer.
Tree top
Section 2
Section 1
Insert
Green Label
Plug Into Wall
Outlet
Caribbean Tree
Model: TG76M2ACRC00; 131188
Troubleshooting
Problem Solution
The tree
does not
light
Ensure that all tree sections are plugged into each
other and that the tree is plugged into the wall.If
your tree came with a foot pedal, step on the
On/Off button.
Check for blown fuses at the light string and power
cord plugs. Replace as needed with the replacement
fuses provided.
Check for loose, broken, or missing bulbs and
replace as needed with the replacement bulbs
provided
NOTE: The appliance is not to be used by persons (including
children) with reduced physical, sensory or metal capabilities, or
lack of experience and knowledge, unless they have been given
supervision or instruction Children should be supervised to ensure
that they do not play with the appliance.
CAUTION and in essence the following:To reduce risk of fire and
electric shock: Disconnect the decorative item from the power
source before performing any maintenance or cleaning.
Do not hang ornaments or other objects to the cord, cable or
lighting chain.
For indoor use only.Do not utilize the decorative item outdoors.
a) Grasp plug and remove from the receptacle or other outlet
device. Do not unplug by pulling on cord.
b) Open fuse cover. Slide open fuse access cover on top of
attachment plug towards blades.
c) Remove fuse carefully.
d) Risk of fire. Power cord replace fuse only with 5 Amp,125 Volt.
e) Close fuse cover. Slide closed the fuse access cover on top of
attachment plug.
f) Risk of fire.Do not replace attachment plug. Contains a safety
device (fuse) that should not be removed. Discard product if the
attachment plug is damaged.
SPARE FUSE
User servicing instructions
Fuse replacement
5. When storing the product, carefully remove the product from
wherever it is placed, including tree, branches, or bushes, to avoid
any undue strain or stress on the product conductors, onnections,
and wires. Cover the protective cap on the
poles to avoid damaging the internal parts.
6.When not in use, store neatly in a cool,
dry location protected from sunlight.
7. Keep out of reach of pets and children.
S100
S100
S50
S50
S50
Do Not Tamper
Internal Parts
Open the
protective
cap
Do Not Tamper
Internal Parts
Open the
protective
cap

This manual suits for next models

2

Other Polygroup Artificial Pine Tree manuals

Polygroup TG80P2762D00 User manual

Polygroup

Polygroup TG80P2762D00 User manual

Polygroup TV50M4G26C01 User manual

Polygroup

Polygroup TV50M4G26C01 User manual

Polygroup Ashland TG76M4G64D02 User manual

Polygroup

Polygroup Ashland TG76M4G64D02 User manual

Polygroup 124331170 User manual

Polygroup

Polygroup 124331170 User manual

Polygroup EZ Connect Color Blast TG66P4826P00 User manual

Polygroup

Polygroup EZ Connect Color Blast TG66P4826P00 User manual

Polygroup TG90P2657D21 User manual

Polygroup

Polygroup TG90P2657D21 User manual

Polygroup TGC000NY1C00 User manual

Polygroup

Polygroup TGC000NY1C00 User manual

Polygroup TG76M2I41L01 User manual

Polygroup

Polygroup TG76M2I41L01 User manual

Polygroup Home Heritage TV22M3M26L02 User manual

Polygroup

Polygroup Home Heritage TV22M3M26L02 User manual

Polygroup TG66GY039D00 User manual

Polygroup

Polygroup TG66GY039D00 User manual

Polygroup TGA0M3ABSC01 User manual

Polygroup

Polygroup TGA0M3ABSC01 User manual

Polygroup Home Heritage TG70CH119P00 User manual

Polygroup

Polygroup Home Heritage TG70CH119P00 User manual

Polygroup TM3000NSQM00 User manual

Polygroup

Polygroup TM3000NSQM00 User manual

Polygroup TG90P3B17L01 User manual

Polygroup

Polygroup TG90P3B17L01 User manual

Polygroup TV70M2389C23 User manual

Polygroup

Polygroup TV70M2389C23 User manual

Polygroup TG76P5433D01 User manual

Polygroup

Polygroup TG76P5433D01 User manual

Polygroup TG70M4839C12 User manual

Polygroup

Polygroup TG70M4839C12 User manual

Polygroup TGC0P3499C17 User manual

Polygroup

Polygroup TGC0P3499C17 User manual

Polygroup TG70P4474C00 User manual

Polygroup

Polygroup TG70P4474C00 User manual

Polygroup TG7600NVQC03 User manual

Polygroup

Polygroup TG7600NVQC03 User manual

Polygroup TG90P4826D01 User manual

Polygroup

Polygroup TG90P4826D01 User manual

Polygroup TV46M4H56C07 User manual

Polygroup

Polygroup TV46M4H56C07 User manual

Polygroup TG76M4A25C06 User manual

Polygroup

Polygroup TG76M4A25C06 User manual

Polygroup TG76P4617P05 User manual

Polygroup

Polygroup TG76P4617P05 User manual

Popular Artificial Pine Tree manuals by other brands

LIVARNO home 380905 2101 Operation and safety notes

LIVARNO home

LIVARNO home 380905 2101 Operation and safety notes

Clas Ohlson MJG53094A-70L quick start guide

Clas Ohlson

Clas Ohlson MJG53094A-70L quick start guide

Mon Sapin Woody MSW1000 manual

Mon Sapin Woody

Mon Sapin Woody MSW1000 manual

Darice TG76P3E55D01 Assembly instructions

Darice

Darice TG76P3E55D01 Assembly instructions

Home Accents Holiday TG76P2621L06 manual

Home Accents Holiday

Home Accents Holiday TG76P2621L06 manual

Home Accents Holiday TG76M3P08D27 quick start guide

Home Accents Holiday

Home Accents Holiday TG76M3P08D27 quick start guide

Home Accents Holiday TG76M5311L08 manual

Home Accents Holiday

Home Accents Holiday TG76M5311L08 manual

Home Accents Holiday TG90M3C03L02 quick start guide

Home Accents Holiday

Home Accents Holiday TG90M3C03L02 quick start guide

SMUKEE OW-240191 manual

SMUKEE

SMUKEE OW-240191 manual

hayneedle EWB003 Assembly instructions

hayneedle

hayneedle EWB003 Assembly instructions

festilight SPLENDID 70215-9 manual

festilight

festilight SPLENDID 70215-9 manual

Polytree TG90M6010C08 Assembly instructions

Polytree

Polytree TG90M6010C08 Assembly instructions

Williams-Sonoma TG6600WN7D00 Assembly instructions

Williams-Sonoma

Williams-Sonoma TG6600WN7D00 Assembly instructions

Home Accents Holiday 301575510 quick start guide

Home Accents Holiday

Home Accents Holiday 301575510 quick start guide

Home Accents Holiday TG66M3W89D11 quick start guide

Home Accents Holiday

Home Accents Holiday TG66M3W89D11 quick start guide

Home Accents Holiday 1000047798 Assembly instructions

Home Accents Holiday

Home Accents Holiday 1000047798 Assembly instructions

Martha Stewart Living TG76P3945D01 quick start guide

Martha Stewart Living

Martha Stewart Living TG76P3945D01 quick start guide

NOMA 151-2737-6 instruction manual

NOMA

NOMA 151-2737-6 instruction manual

manuals.online logo
manuals.online logoBrands
  • About & Mission
  • Contact us
  • Privacy Policy
  • Terms and Conditions

Copyright 2025 Manuals.Online. All Rights Reserved.