PondXpert Flowmaster PXFM03500 User manual

Flowmaster
Solids Handling Filter Pond Pump
Model
Power
Rating
Max Flow
Max.
Head
Dimension
LWH mm
Outlet Size
mm
Hosetail
Supplied mm
PXFM03500
42w
3500 LPH
2.5m
267x223x132
25
20/25/32/40
PXFM04500
75w
4500 LPH
3.5m
267x223x132
25
20/25/32/40
PXFM05000
100w
5000 LPH
4.0m
267x223x132
25
20/25/32/40
All pumps can handle solids up to 5mm and come complete with 10m electrical cable.
All pumps have a rated voltage of 220-240V, 50Hz
Introduction
Congratulations on the purchase of your pondXpert pond pump. Used correctly your pond
pump will provide years of reliable service. This pump is designed to run 24/7 pushing
water through to a waterfall and/or filter system.
Your pump must always be immersed in fresh water before it is switched on.
General safety Instructions
Read and observe all of the instructions clearly before installing, connecting and operating
the pump.
Make sure the pump is securely and correctly installed before switching on.
Always disconnect the pump when not in use and when carrying out maintenance.
Always disconnect all equipment in the pond before starting to handle, maintain, repair or
install any pond equipment.

The appliance is not intended for use by persons (including children) with reduced physical,
sensory or mental capabilities, or lack of experience and knowledge, unless they have been
given supervision or instruction concerning use of the appliance by a person responsible for
their safety.
Children should be supervised to ensure that they do not play with the appliance.
For safety reasons, servicing or repair of this item should only be carried out by pondXpert.
Never hang or carry the pump by the power cord.
Do not operate the pump with a damaged cord or plug. The supply cord of the appliance
cannot be replaced.
If the electrical cord is damaged the product should be scrapped.
Safety and Electrical Connections
This unit is designed for outdoor use only. It is waterproof and should be situated safely
under the pond water. Ideally the pump should be situated at the bottom of the pond as this
is where fish waste and debris collects. Take care to ensure that you can easily lift your
pump out of the water for routine maintenance. If this is necessary do not pick your pump up
by the electrical cable but by the main body/ cage of the pump.
Always disconnect all equipment in the pond before starting to handle, maintain, repair or
install any pond equipment.
The pump is electrically operated so great care must be taken during installation and
operation. The following electrical and safety guidelines must be carefully followed.
Each pump is supplied with a 10 metre length of 3 core electrical cable which is
permanently connected to the pump.
The termination to the mains supply should be permanent, inside a dry weatherproof
enclosure, through a double pole switched fused spur with a minimum contact gap of 3mm –
(disconnected) to BS 3676 –and fitted with a 3 or 5 amp fuse.
Exposed cable runs should be sensibly positioned, and protected if necessary by armoured
conduit.
A 10mA or 30mA Residual Current Circuit Breaker (RCD) MUST be fitted to the mains
supply.
The wires in the mains electrical lead are coloured in accordance with the
following code:
BLUE –Neutral (marked with an “N” in most terminal connections)
BROWN –LIVE (marked with an “L” in most terminal connections)
GREEN/YELLOW –EARTH (marked “E” or in most terminal connections)
1st January 2005 revised Building Regulations for England and Wales
Installing this product in the garden is classified as ‘notifiable’. The Regulations
now require you to tell your local authority building control department that you
intend to install this product before installation. Your local authority will let you
know how you can get your installation approved

Permanent installations to the mains supply (hard wiring) must comply with the regulations
of the local electricity authority which may stipulate the use of metal or plastic conduit to
protect the cable.
If in any doubt about wiring to the mains supply contact a qualified electrician or your local
electricity authority.
Protect from frost. In cold winter weather (when fish are inactive and algae growth ceases)
the unit may be switched off. It should then be drained of water, removed (if possible) from
its installation and stored in a dry, frost-protected area.
Directions for use
Remove fountain secondary strainer cage (3500/4500 models Only)
Flowmaster 3500 & 4500 ship with twin strainer cages. (The 5000 model is too powerful
and would rapidly block a second strainer if fitted).This allows the filter pump to be used as
a fountain pump (fountainhead set required –supplied with certain models). To run the
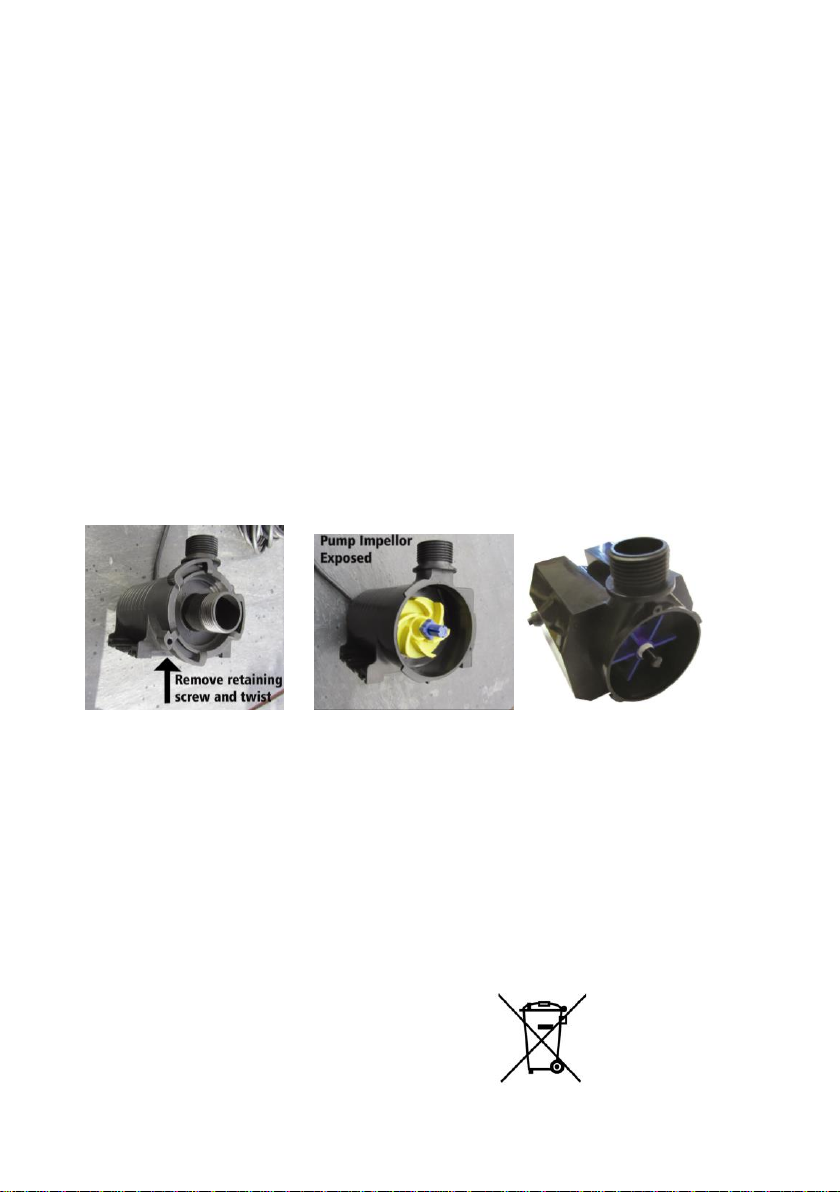
pump as a filter pump the secondary fine strainer cage needs to be removed to allow solids
to pass through to the impellor. If the secondary strainer is not removed then larger debris
will not be transferred to the filter (if installed) and your pump will block with sludge more
frequently. Here is a guide showing how to achieve this:
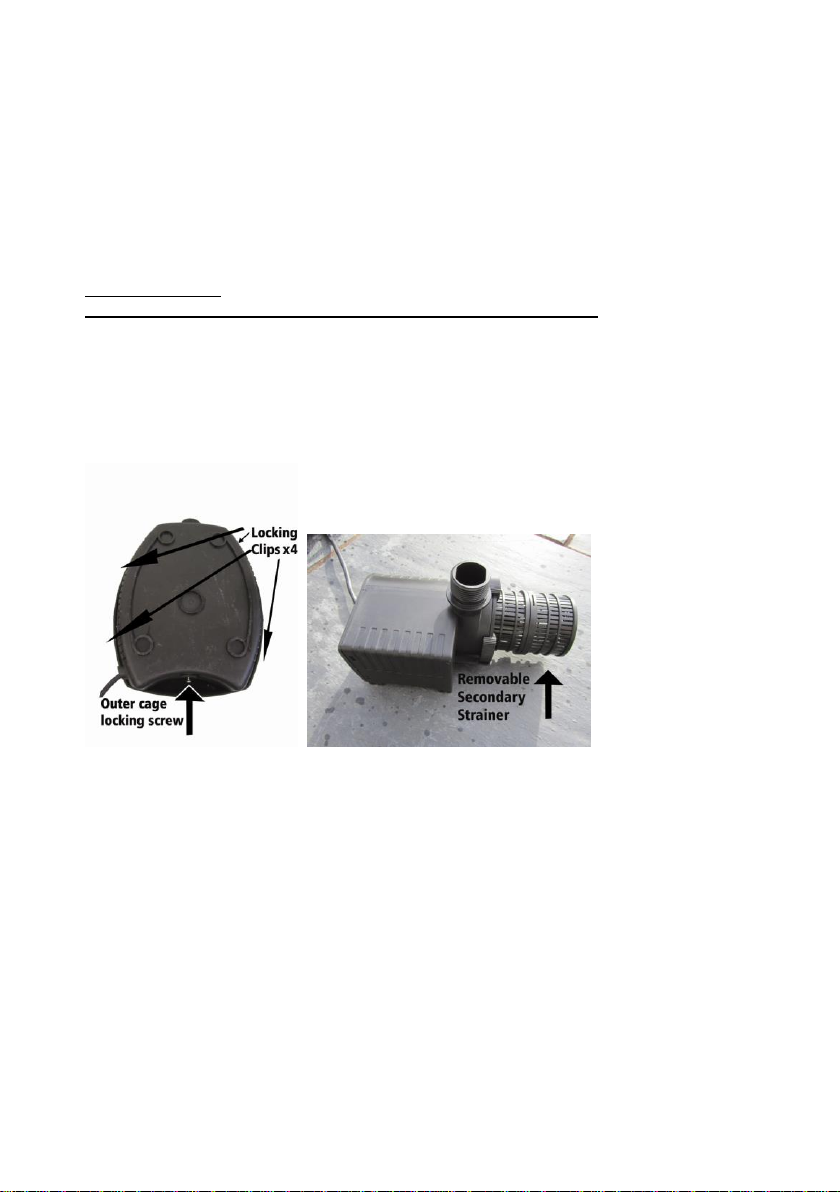
Fig 1 Accessing Pump 2, Twist off secondary strainer (keep safe)
First locate the outer strainer cage locking bolt at the bottom rear of the unit (see fig 1).
Unscrew and keep safe then the four plastic locking clips can be released by carefully
pressing down with a screwdriver (see fig 1). Once the pump itself can be accessed the
secondary strainer can simply twisted off (and kept safe for future use). Then simply re-
assemble the pump following the steps above in reverse order.
Installation
Once installed the pond water will flow through the pump as the pump’s impellor draws in
water. It is always best to position your pump at the opposite end to where the water returns
to the pond to provide maximum circulation.
Your pond is supplied with a hosetail. This should be screwed into the threaded pump inlet.
Pond hose size 20-40mm (3/4” to 11/2”) can be attached to the inlet hosetail. Cut the inlet
hose to the size appropriate to the size of hose you are using. Then connect the hose from
your pump to your filter system or position it where you want the water to return. Ensure a
watertight seal by the use of hose clips.

Maintenance
Your pump performance will be reduced if the water intake is restricted in any way.
Occasionally large solids may block the holes in the filter cage surrounding the pump –
these should be carefully wiped away.
A clogged or dirty intake will put a strain on the motor and greatly reduce its performance.
If the area where the pump is stood is very dirty, raising its position slightly will assist flow.
To clean the pump more thoroughly first disconnect the pump from the electricity supply
and carefully remove the pump from the pond.
For quick cleaning your pump has a inlet at the front of the strainer cage through which a
garden hose can be used to flush out any waste.
To clean the pump more thoroughly you will need to remove the impellor housing and
impellor (to remove the external strainer cage see fig1). Locate and unscrew the impellor
housing security screw as shown in fig 3, this plate can then be twisted off to reveal the
impellor itself (fig 4). Remove any dirt/debris using clean water and a small brush and
reassemble.
Fig 3 Fig 4, 3500/4500 Impellor 5000 Impellor
Limited Warranty
This product is guaranteed for a period of 12 months (excluding rotor/impellor assembly)
from the date of purchase for material or manufacturing defects. The guarantee covers the
substitution of defective parts. However, the guarantee is considered null and void in the
case of improper use, improper handling or negligence on the part of the buyer. If your
pondXpert pump fails please take it back to the retail outlet from where it was purchased.
You will be required to take your receipt/proof of purchase with you. This does not affect
your statutory rights.
PondXpert
A3 Bentley Avenue
Billingham
TS23 4BU
UK
01642 370898 www.pondxpert.co.uk
Your appliance
contains valuable
materials which can
be recovered or
recycled. Leave it at
a local civic waste
collection point.
This manual suits for next models
2
Table of contents
Other PondXpert Pond Pump manuals
Popular Pond Pump manuals by other brands

Hozelock Cyprio
Hozelock Cyprio EasyClear 6000 Installation and operating instructions

Clarke
Clarke SSP3 Operating & maintenance instructions

Profi-pumpe
Profi-pumpe OASIS 200-3 LI+LED operating instructions

Anjon
Anjon Monsoon Series owner's manual

ubbink
ubbink Elimax Series manual

Angelo Decor
Angelo Decor Pond Building AD40251 instructions