Popal DP C07.CAN User manual

Enjoy
the
ride
User manual
Gebruikershandleiding
DP C07

1
BF-UM-C-DP C07-EN November 2019
USER MANUAL FOR DISPLAY
CONTENT
7.1 Important Notice
7.2 Introduction of Display 2
7.3 Product Description 3
7.3.1 Specifications 3
7.3.2 Functions Overview 3
7.4 Display 4
7.5 Key Definition 4
7.6 Normal Operation 5
7.6.1 Switching the System ON/OFF 5
7.6.2 Selection of Support Levels 5
7.6.3 Selection mode 5
7.6.4 Headlights / backlighting 6
7.6.5 Walk Assistance 6
7.6.6 Battery capacity indication 6
7.7 Settings 7
7.7.1 Setting 7
7.7.2 View Information 8
7.8 Error Code Definition 12
7 USER MANUAL FOR
DP C07.CAN
Care for your battery!
Our batteries are of high quality, but be aware,
even very good batteries are vulnerable when
long live cycle and to protect it against fatal deep
discharging.
of power during your ride
keep the charging level at 30%-70%
For more tips and tricks or information regarding
warranties and terms and conditions please visit:
popal.com/klantenservice
Zorg goed voor je accu!
accu kan kwetsbaar zijn bij onjuist gebruik.
en ter voorkoming van onherstelbare schade
door diepteontlading:
schakel het system uit
houd de acculading tussen de 30% en 70%
acculading
Voor meer tips, informatie over garantie
popal.com/klantenservice
can count on, and will never leave you out in the cold.
the journey itself. The journey is where you can enjoy
your favourite music, appreciate conversation or simply
see the beauty around you. In short, moments that are
make sure you are able to rely on our bikes. No excuses
here: we always make the best bicycles, for the best
prices, with the care and love that our riders deserve.
Ready for your journey.
Fietsen waar je op kunt rekenen en die je niet in de kou
laten staan. Het gaat bij ons niet om de snelste tijd, maar
om de reis. Een reis waarin je kunt genieten van muziek,
een gesprek of het mooie uitzicht. Kortom, momenten
die belangrijk zijn. En juist daarom moet je op onze
concessies: met aandacht en liefde maken we altijd de
Klaar voor jouw reis.

2BF-UM-C-DP C07-EN November 2019
7.2 INTRODUCTION OF DISPLAY
• Model: DP C07.CAN BUS
•The housing material is PC and Acrylic, and
the button material is made of silicone.
•The label marking is as follows:
Note: Please keep the QR code label attached
to the display cable. The information from the
Label is used for a later possible software
update.
7.1 IMPORTANT NOTICE
• If the error information from the display
cannot be corrected according to the inst-
ructions, please contact your retailer.
•The product is designed to be waterproof. It
is highly recommended to avoid submerging
the display under water.
• Do not clean the display with a steam jet,
high-pressure cleaner or water hose.
• Please use this product with care.
• Do not use thinners or other solvents to
clean the display. Such substances can
damage the surfaces.
•Warranty is not included due to wear and
normal use and aging.
3
BF-UM-C-DP C07-EN November 2019
USER MANUAL FOR DISPLAY
7.3 PRODUCT DESCRIPTION
7.3.1 Specifications
• Operating temperature: -20℃~45℃
•Storage temperature: -20℃~50℃
•Waterproof: IP65
• Bearing humidity: 30%-70% RH
7.3.2 Functional Overview
• Speed display (including speed in real time
(SPEED), top speed (MAXS) and average
speed (AVG), switching between km and
miles)
• Battery capacity indicator
• Automatic sensors explanation of the light-
ing system
• Brightness setting for backlight
• Indication of performance support
•Walk assistance
• Kilometer stand (including single-trip dis-
tance, total distance)
• Display for the remaining distance.(Depends
on your riding style)
• Motor output power indicator
• Energy consumption indicator CALORIES
(Note: If the display has this function)
• Error messages view
• Service

4BF-UM-C-DP C07-EN November 2019
7.4 DISPLAY
1
7
8
9
12
3
65
4
2
10
11
1Display of battery capacity in real time.
2Kilometer stand, Daily kilometers (TRIP) -
Total kilometers (TOTAL).
3The display shows this symbol, if the
light is on.
4Walking assistance .
5Service: please see the service section.
6Menu.
7Speed unit.
8Digital speed display.
9Speed mode , top speed (MAXS) - Average
speed (AVG).
10 Error indicator .
11 Data: Display data, which corresponds to the
current mode.
12 Support level
7.5 KEY DEFINITION
Light On/Off
System On/Off
OK/Enter
Up
Down
5
BF-UM-C-DP C07-EN November 2019
USER MANUAL FOR DISPLAY
7.6 NORMAL OPERATION
7.6.1 Switching the System ON/OFF
Press and hold (>2S) on the display to turn on the system. Press and hold (>2S) again to
turn off the system.
If the "automatic shutdown time" is set to 5 minutes (it can be set with the "Auto Off" function, See
"Auto Off"), the display will automatically be turned off within the desired time when it is not in
operation.
7.6.2 Selection of Support Levels
When the display is turned on, press (<0.5S) the or button to switch to the support level, the
lowest level is 1, the highest level is 5. When the system is switched on, the support level starts in
level 1. There is no support at level null.
7.6.3 Selection mode
Briefly press (<0.5s) the button to see the different trip modes. Trip: daily kilometers (TRIP) - to-
tal kilometers (TOTAL) - Maximum speed (MAXS) - Average speed (AVG) - Remaining distance
(RANGE) - Output power (W) - Energy consumption (C (only with torque sensor fitted)).

6BF-UM-C-DP C07-EN November 2019
7.6.4 Headlights / backlighting
Hold (>2S) the button to activate the
headlight and the display backlight.
Hold (>2S) the button again to turn
off the headlight and the display backlight.
The brightness of the backlight can be set
in the display settings "Brightness". (If the
display /Pedelec is switched on in a dark
environment, the display backlight/head-
light will automatically be switched on. If
the display backlight/headlight has been
manually switched off, the automatic sensor
function is deactivated. You can only turn
on the light manually after switching on the
system again.)
7.6.5 Walk Assistance
The Walk assistance can only be activated
with a standing pedelec.
Activation: Briefly press (<0.5S) the
button until to level null, and then press
(<0.5s) the button, the symbol is
displayed. Now hold down the button
and the Walk assistance will activate. The
symbol will flashes and the pedelec
moves approx. 4.5 km/h. After releasing the
button, the motor stops automatically and
switches back to level null (if no any option
be activated in 5 second). If no speed signal
is detected, it shows 2.5km/h.
7.6.6 Battery capacity indication
The battery capacity is showed in ten bars.
Each full bar represents a remaining capacity
of the battery in a percentage, if the frame
of indicator blinks that means to charge. (as
shown in the figure below):
Bars Charge in Percentage
10 ≥90%
9 80%≤C<90%
8 70%≤C<80%
7 60%≤C<70%
6 50%≤C<60%
5 40%≤C<50%
4 30%≤C<40%
3 20%≤C<30%
2 10%≤C<20%
1 5%≤C<10%
Blinking C≤5%
7
BF-UM-C-DP C07-EN November 2019
USER MANUAL FOR DISPLAY
7.7 SETTINGS
After the display is turned on, quickly press
(<0.3S) the button twice to access the
“MENU” interface. pressing the or
button, you can select and reset the options.
Then press (<0.3S) the button twice to
confirm your selected option and to return
to the main screen. If no button is pressed
within 10 seconds in “MENU” interface, the
display will automatically return to the main
screen and no data will be saved.
7.7.1 Setting
7.7.1.1 Reset mileage
When the system is on, quickly press
(<0.3S) the button twice to access the
“MENU” interface and “tC” appears on the
display (as shown below). Now using the
or button, choose between “y”(YES) or
“n”(NO). If choose “y”, the Daily kilometers
(TRIP), Maximum speed (MAX) and Average
speed (AVG) will be reset.
Once you have chosen your desired selec-
tion, press (<0.3S) the button twice to
save and return to the main screen, or you
can press (<0.3S) the button once to
save and enter next item "Selection of unit
in km/Miles".
NOTE: If the daily kilometers accumulate
99999km, the daily kilometers will be reset auto-
matically.
7.7.1.2 Selection of unit in km/Miles
When the system is on, quickly press
(<0.3S) the button twice to access
the “MENU” interface, repetitively press the
button until the “S7” appears on the
display (as shown below). Now using the
or button, choose between “km/h”
or “mile/h”.
Once you have chosen your desired selec-
tion, press (<0.3S) the button twice
to save and return to the main screen,
or you can press (<0.3S) the button
once to save and enter next item "Set light
sensitivity".
7.7.1.3 Set light sensitivity
When the system is on, quickly press
(<0.3S) the button twice to access
the “MENU” interface, repetitively press
the button until the “bL0” appears
on the display (as shown below). And then
press to increase or to reduce (light
sensitivity for 0-5). Chose 0 means turn off
the light sensitivity.
Once you have chosen your desired selec-
tion, press (<0.3S) the button twice
to save and return to the main screen, or
you can press (<0.3S) the button once
to save and enter next item "Set display
brightness".

8BF-UM-C-DP C07-EN November 2019
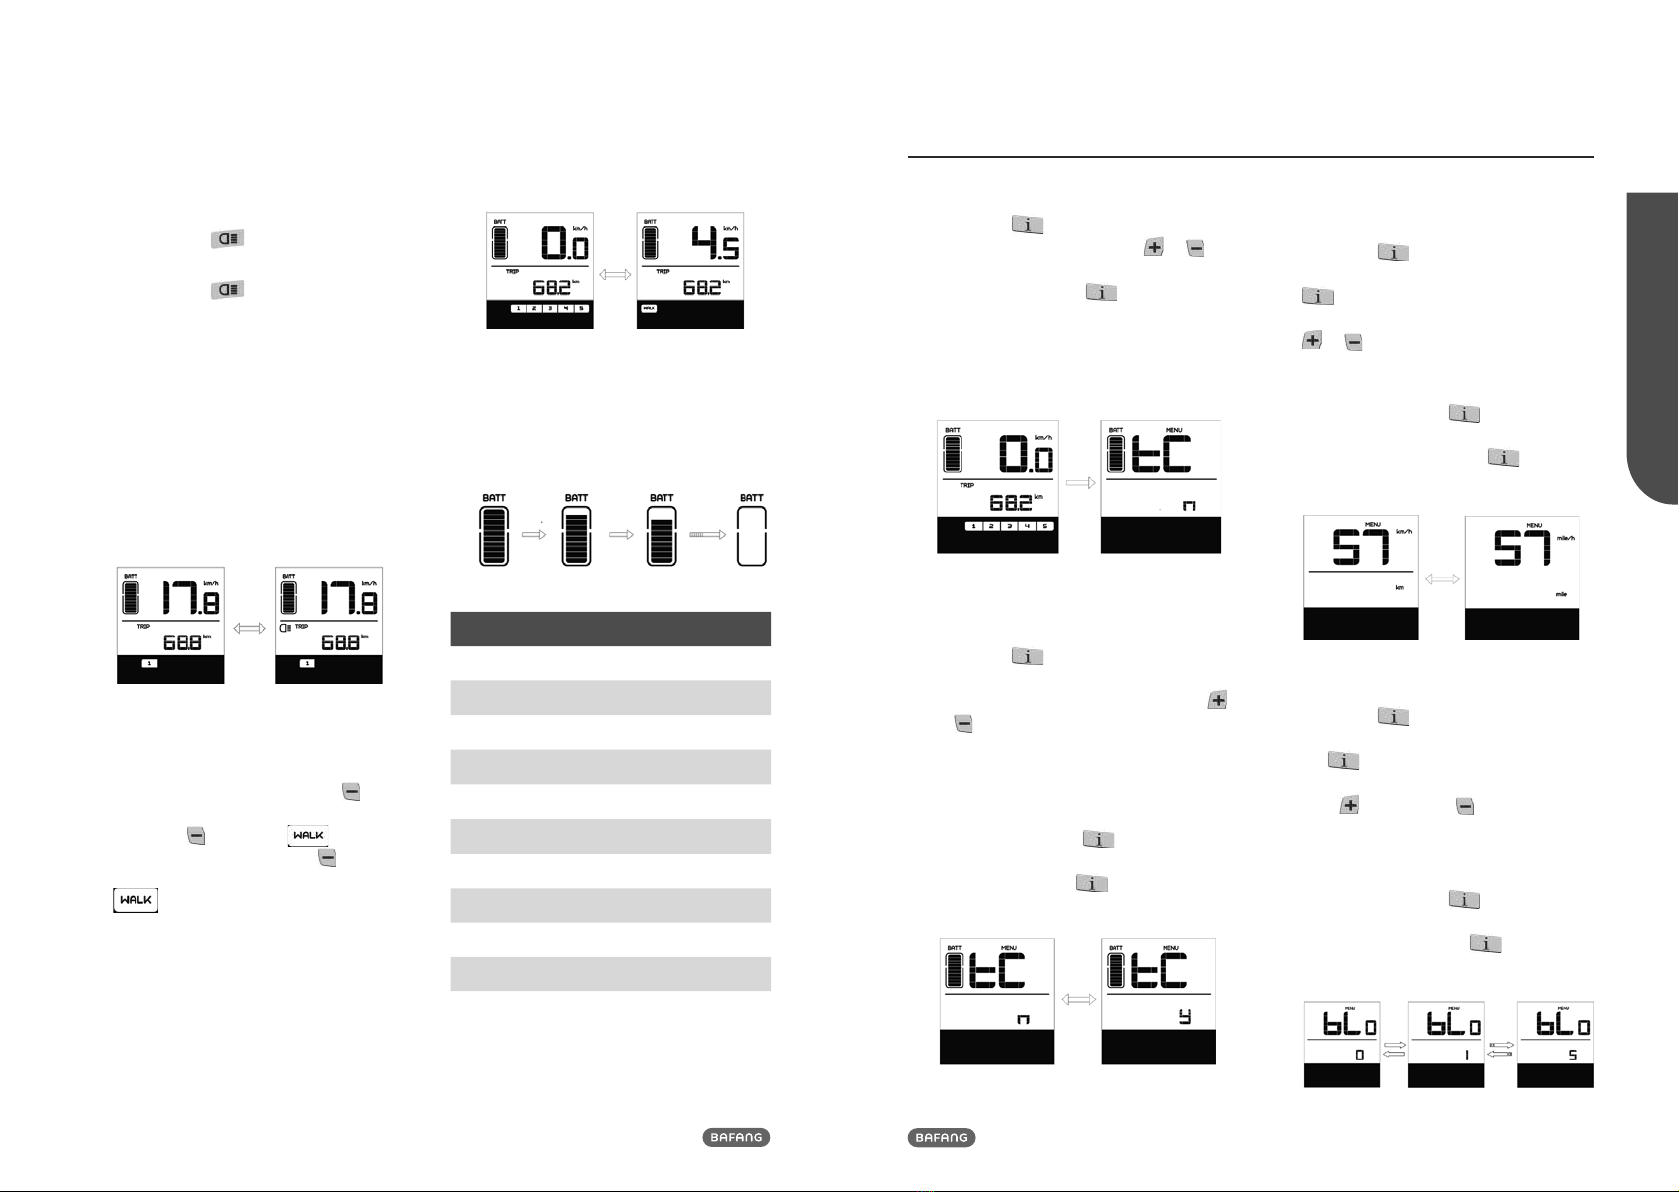
7.7.1.4 Set display brightness
When the system is on, quickly press
(<0.3S) the button twice to access
the “MENU” interface, repetitively press the
button until the “bL1” appears on the
display (as shown below). And then press
to increase or to reduce (brightness
for 1-5).
Once you have chosen your desired selec-
tion, press (<0.3S) the button twice to
save and return to the main screen, or you
can press (<0.3S) the button once to
save and enter next item "Set Auto Off".
7.7.1.5 Set Auto Off
When the system is on, quickly press
(<0.3S) the button twice to access
the “MENU” interface, repetitively press the
button until the “OFF” appears on the
display (as shown below). And then press
to increase or to reduce (brightness
for 1-9minute).
Once you have chosen your desired selec-
tion, press (<0.3S) the button twice to
save and return to the main screen, or you
can press (<0.3S) the button once to
save and enter next item "Service Tip".
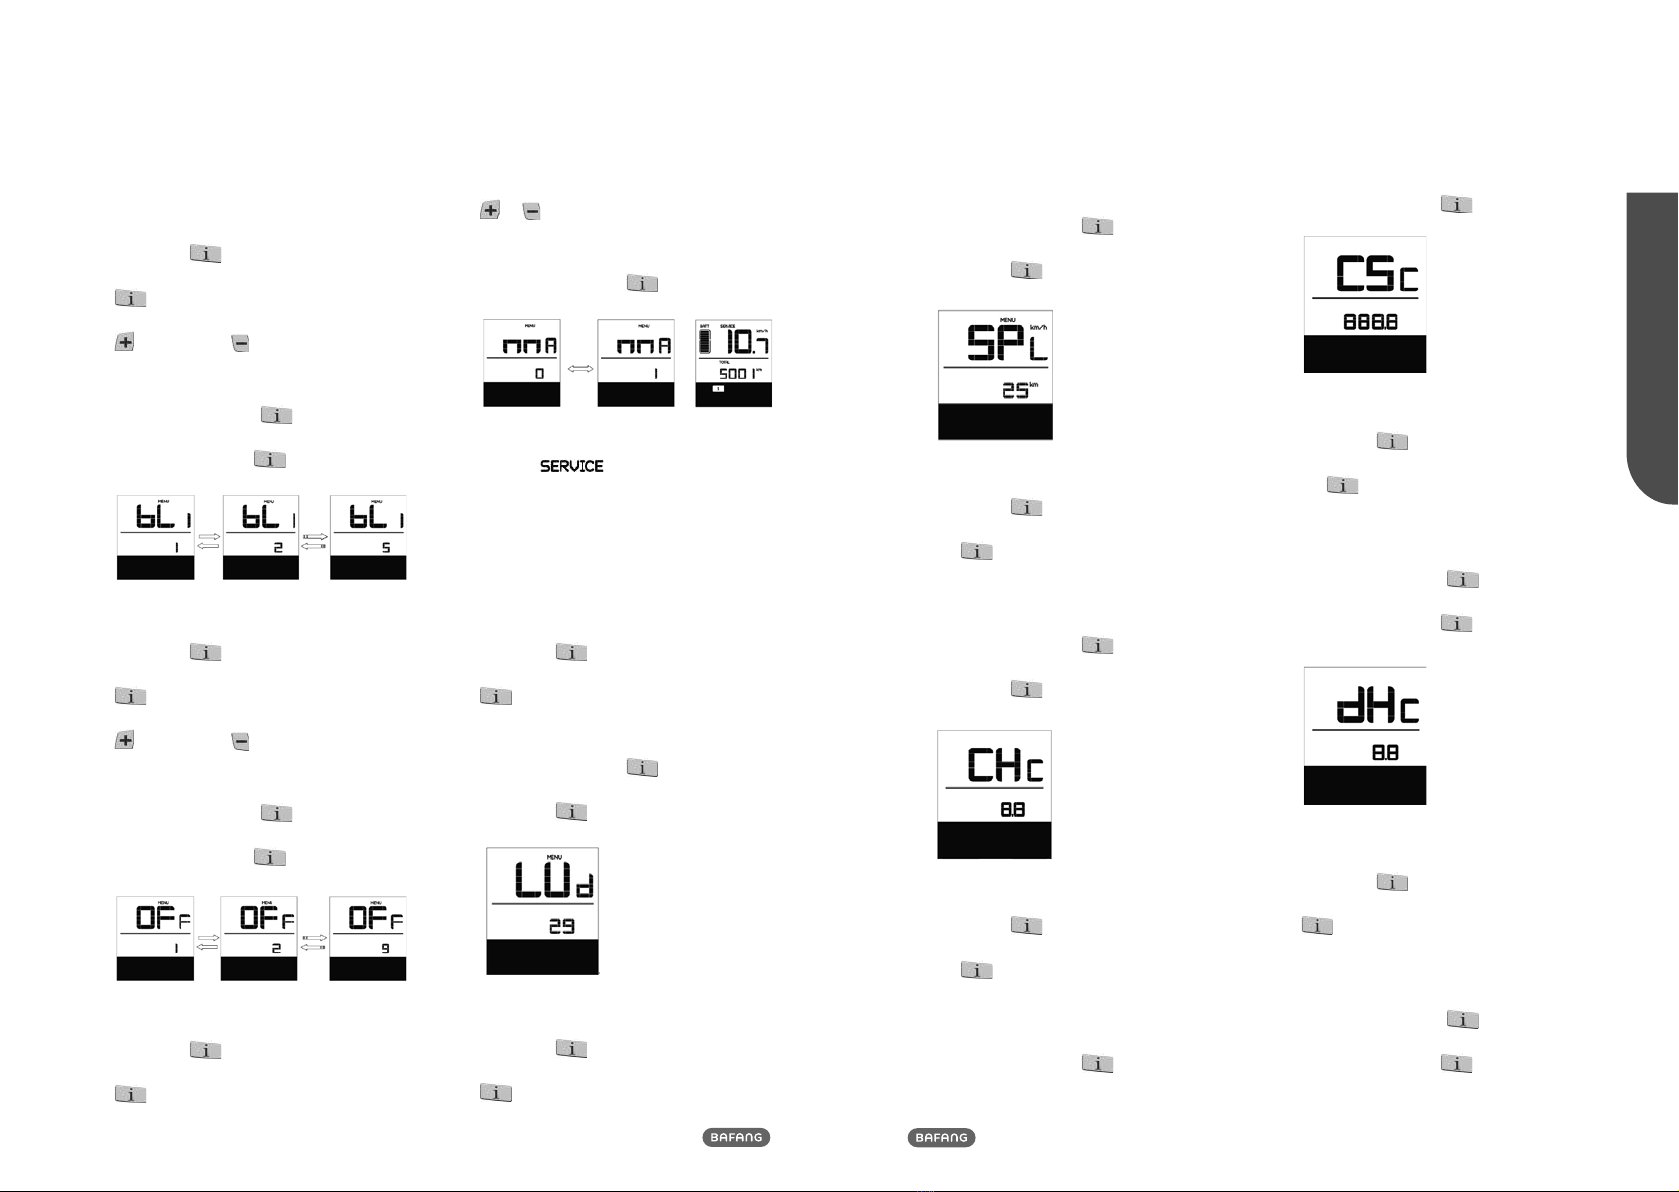
7.7.1.6 Service Tip
When the system is on, quickly press
(<0.3S) the button twice to access
the “MENU” interface, repetitively press the
button until the “nnA” appears on the
display (as shown below). And then press
or to choose between “0” or “1”.
Chose 0 means turn off the notification.
Once you have chosen your desired selec-
tion, press (<0.3S) the button twice to
save and return to the main screen.
NOTE: If the “Service" function switch on, every
5000 km (the mileage of more than 5000 km) the
indicator " " is displayed every time at
switch on.
7.7.2 View Information
All data in this item cannot be changed, only to
be viewed.
7.7.2.1 Wheel Size
When the system is on, quickly press
(<0.3S) the button twice to access
the “MENU” interface, repetitively press the
button until the “LUd” appears on the
display (as shown below).
Once you have viewed your desired informa-
tion, press (<0.3S) the button twice to
return to the main screen, or you can press
(<0.3S) the button once to enter next
item "Speed Limit".
7.7.2.2 Speed Limit
When the system is on, quickly press
(<0.3S) the button twice to access
the “MENU” interface, repetitively press the
button until the “SPL” appears on the
display (as shown below).
9
BF-UM-C-DP C07-EN November 2019
USER MANUAL FOR DISPLAY
Once you have viewed your desired informa-
tion, press (<0.3S) the button twice to
return to the main screen, or you can press
(<0.3S) the button once to enter next
item "Controller hardware info".
7.7.2.3 Controller hardware info
When the system is on, quickly press
(<0.3S) the button twice to access
the “MENU” interface, repetitively press
the button until the “CHc (Controller
Hardware check)” appears on the display (as
shown below).
Once you have viewed your desired informa-
tion, press (<0.3S) the button twice to
return to the main screen, or you can press
(<0.3S) the button once to enter next
item "Controller software info".
7.7.2.4 Controller software info
When the system is on, quickly press
(<0.3S) the button twice to access
the “MENU” interface, repetitively press
the button until the “CSc (Controller
Software check)” appears on the display (as
shown below).
Once you have viewed your desired informa-
tion, press (<0.3S) the button twice to
save and return to the main screen, or you
can press (<0.3S) the button once to
enter next item "Display hardware info".
7.7.2.5 Display hardware info
When the system is on, quickly press
(<0.3S) the button twice to access
the “MENU” interface, repetitively press
the button until the “dHc (Display
Hardware check)” appears on the display (as
shown below).
Once you have viewed your desired informa-
tion, press (<0.3S) the button twice to
save and return to the main screen, or you
can press (<0.3S) the button once to
enter next item "Display software info".
7.7.2.6 Display software info
When the system is on, quickly press
(<0.3S) the button twice to access
the “MENU” interface, repetitively press the
button until the “dSc (Display Software
check)” appears on the display (as shown
below).
Once you have viewed your desired informa-
tion, press (<0.3S) the button twice to
save and return to the main screen, or you
can press (<0.3S) the button once to
enter next item "BMS hardware info".

10 BF-UM-C-DP C07-EN November 2019
7.7.2.7 BMS hardware info
When the system is on, quickly press
(<0.3S) the button twice to access
the “MENU” interface, repetitively press the
button until the “bHc (BMS Hardware
check)” appears on the display (as shown
below).
Once you have viewed your desired informa-
tion, press (<0.3S) the button twice to
save and return to the main screen, or you
can press (<0.3S) the button once to
enter next item "BMS software info".
7.7.2.8 BMS software info
When the system is on, quickly press
(<0.3S) the button twice to access
the “MENU” interface, repetitively press the
button until the “dSc (Display Software
check)” appears on the display (as shown
below).
Once you have viewed your desired informa-
tion, press (<0.3S) the button twice to
save and return to the main screen, or you
can press (<0.3S) the button once to
enter next item "Sensor hardware info".
7.7.2.9 Sensor hardware info
When the system is on, quickly press
(<0.3S) the button twice to access
the “MENU” interface, repetitively press
the button until the “SHc (Sensor
Hardware check)” appears on the display (as
shown below).
Once you have viewed your desired informa-
tion, press (<0.3S) the button twice to
save and return to the main screen, or you
can press (<0.3S) the button once to
enter next item "Sensor software info".
NOTE: This information is not displayed, if there
are no torque sensor in the drive system.
7.7.2.10 Sensor software info
When the system is on, quickly press
(<0.3S) the button twice to access
the “MENU” interface, repetitively press the
button until the “SSc (Sensor Software
check)” appears on the display (as shown
below).
Once you have viewed your desired informa-
tion, press (<0.3S) the button twice to
save and return to the main screen, or you
can press (<0.3S) the button once to
enter next item "Battery info".
11
BF-UM-C-DP C07-EN November 2019
USER MANUAL FOR DISPLAY
NOTE: This information is not displayed,
if there are no torque sensor in the drive
system.
7.7.2.11Battery Information
When the system is on, quickly press
(<0.3S) the button twice to access
the “MENU” interface, repetitively press the
button until the “b01” appears on the
display (as shown below). You can briefly
press (0.3s) to view all information of
the battery.
Once you have viewed your desired informa-
tion, press (<0.3S) the button twice to
save and return to the main screen, or you
can press (<0.3S) the button once to
enter next item "Message of Error Code".
Content Explanation
b01 Current temperature (°C)
b04 Voltage (V)
b06 Discharge (A)
b07 Remaining Capacity (A/h)
b08 Total Capacity (A/h)
Content Explanation
b09 Relative SOC (%)
b10 Absolute SOC (%)
b11 Charging cycles (number)
b12 Maximum not charging time (Hr)
b13 Recently not charging time (Hr)
d00 Number of battery cell
d01 Voltage of cell 1 (m/V)
d02 Voltage of cell 2 (m/V)
dn Voltage of cell n (m/V)
NOTE: If no data is detected, "--" is displayed.
7.7.2.12 Message of Error Code
When the system is on, quickly press
(<0.3S) the button twice to access
the “MENU” interface, repetitively press the
button until the “E00” appears on the
display (as shown below). You can briefly
press (0.3s) to view last ten Error Code
“EO0” to “EO9”. Error code "00" means that
there is no error.
Once you have viewed your desired informa-
tion, press (<0.3S) the button twice to
save and return to the main screen.

12 BF-UM-C-DP C07-EN November 2019
7.8 ERROR CODE DEFINITION
The display can show the errors of a pedelec. If an error is detected, the wrench icon
appears on the display and one of the following error codes will be displayed.
Note: Please read the description of the error code carefully. If you see the error code, restart the
system first. If the problem is not resolved, please contact your dealer.
Error Declaration Troubleshooting
04 The throttle is not back in its correct
position.
Check the throttle can adjust back into its
correct position, if the situation does not
improve, please change to a new throttle.(only
with this function)
05 The throttle has fault.
1. Check the connector of throttle whether
they are correctly connected.
2. Disconnect the throttle, If the problem still
occurs, please contact your retailer.
(only with this function)
07 Overvoltage protection
1. Remove the battery.
2. Re-Insert the battery.
3. If the problem persists, please contact your
retailer.
08 Error with the hall sensor signal
inside the motor Please contact your retailer.
09 Error with the Engine phase’s Please contact your retailer.
10
The temperature inside the engine
has reached its maximum protection
value
1. Turn off the system and allow the Pedelec
to cool down.
2. If the problem persists, please contact your
retailer.
11 The temperature sensor inside the
motor has an error Please contact your retailer.
12 Error with the current sensor in the
controller Please contact your retailer.
13 Error with the temperature sensor
inside of the battery Please contact your retailer.
13
BF-UM-C-DP C07-EN November 2019
USER MANUAL FOR DISPLAY
Error Declaration Troubleshooting
14
The protection temperature inside
the controller has reached its maxi-
mum protection value
1. Turn off the system and let the pedelec cool
down.
2. If the problem persists, please contact your
retailer.
15 Error with the temperature sensor
inside the controller Please contact your retailer.
21 Speed sensor Error
1. Restart the system
2. Check that the magnet attached to the
spoke is aligned with the speed sensor and
that the distance is between 10 mm and 20
mm.
3. Check that the speed sensor connector is
connected correctly.
4. If the error persists, please contact your
retailer.
25 Torque signal Error
1. Check that all connections are connected
correctly.
2. If the error persists, please contact your
retailer.
26 Speed signal of the torque sensor has
an error
1.Check the connector from the speed sensor
to make sure it is connected correctly.
2.Check the speed sensor for signs of damage.
3.If the problem persists, please contact your
retailer.
27 Overcurrent from controller Please contact your retailer.
30 Communication problem
1. Check all connections are correctly con-
nected.
2. If the error persists, please contact your
retailer.
33 Brake signal has an error
(If brake sensors are fitted)
1. Check all connectors.
2. If the error continues to occur, please con-
tact your retailer.

14 BF-UM-C-DP C07-EN November 2019
Error Declaration Troubleshooting
35 Detection circuit for 15V has an error Please contact your retailer.
36 Detection circuit on the keypad has
an error Please contact your retailer.
37 WDT circuit is faulty Please contact your retailer.
41 Total voltage from the battery is too
high Please contact your retailer.
42 Total voltage from the battery is too
low Please contact your retailer.
43 Total power from the battery cells is
too high Please contact your retailer.
44 Voltage of the single cell is too high Please contact your retailer.
45 Temperature from the battery is too
high Please contact your retailer.
46 The temperature of the battery is
too low Please contact your retailer.
47 SOC of the battery is too high Please contact your retailer.
48 SOC of the battery is too low Please contact your retailer.
61 Switching detection defect Please contact your retailer. (only with this
function)
62 Electronic derailleur cannot release. Please contact your retailer. (only with this
function)
71 Electronic lock is jammed Please contact your retailer. (only with this
function)
81 Bluetooth module has an error Please contact your retailer. (only with this
function)
1
BF-UM-C-DP C07-NL November 2019
GEBRUIKERSHANDLEIDING VOOR DISPLAY
INHOUD
7.1 Belangrijke Mededeling
7.2 Inleiding van Display 2
7.3 Productomschrijving 3
7.3.1 Specificaties 3
7.3.2 Functioneel Overzicht 3
7.4 Display 4
7.5 Knop Definitie 4
7.6 Normale Werking 5
7.6.1 Systeem Inschakelen / Uitschakelen 5
7.6.2 Selectie van Ondersteuningsniveaus 5
7.6.3 Selectie Modus 5
7.6.4 Koplamp / Achterlicht 6
7.6.5 Loophulp 6
7.6.6 Indicator voor Accucapaciteit 6
7.7 Instellingen 7
7.7.1 Display Instellingen 7
7.7.2 Informatie Bekijken 8
7.8 Foutcode Definities 12
7 GEBRUIKERSHANDLEIDING VOOR
DP C07.CAN

2BF-UM-C-DP C07-NL November 2019
7.2 INLEIDING VAN DISPLAY
• Model: DP C07.CAN BUS
• De behuizing is gemaakt van PC en acryl en
de knoppen zijn gemaakt van siliconen.
• De markering op het label ziet er als volgt
uit:
Opmerking: Bewaar het label met de QR-code
dat op de displaykabel zit. De informatie op het
label kan later mogelijk worden gebruikt om de
software bij te werken.
7.1 BELANGRIJKE MEDEDELING
• Neem contact op met uw leverancier als de
foutinformatie op het display niet volgens de
instructies kan worden gecorrigeerd.
• Het product is ontworpen om waterdicht
te zijn. Het wordt sterk aanbevolen om te
voorkomen dat het display onder water
komt te staan.
• Reinig het display niet met een stoom- ,
hogedrukreiniger of waterslang.
• Gebruik dit product met zorg.
• Gebruik geen verdunners of andere oplos-
middelen om het scherm schoon te maken.
Dergelijke stoffen kunnen de oppervlakken
beschadigen.
• Slijtage delen zijn niet inbegrepen vanwege
normaal gebruik en veroudering.
3
BF-UM-C-DP C07-NL November 2019
GEBRUIKERSHANDLEIDING VOOR DISPLAY
7.3 PRODUCTOMSCHRIJVING
7.3.1 Specificaties
• Bedrijfstemperatuur: -20℃~45℃
• Opslag temperatuur: -20℃~50℃
•Waterbestendig: IP65
•Luchtvochtigheid: 30%-70% RH
7.3.2 Functioneel Overzicht
• Snelheidsweergave (inclusief realtime
snelheid (SPEED), topsnelheid (MAXS) en
gemiddelde snelheid (AVG), schakelen tussen
km en mijl)
• Schakelen tussen km en mijl
• Indicator voor accucapaciteit
• Automatische sensoren voor verlichtingssys-
teem
• Helderheidsinstelling voor achtergrondver-
lichting
• Indicator voor ondersteuningsniveau
•Loopassistentie
• Kilometerstand (inclusief enkele reisafstand,
totale afstand)
•Weergave van de resterende actieradius
(afhankelijk van uw rijstijl)
• Indicator voor motorvermogen
• Indicator voor energieverbruik in calorieën
(opmerking: als het display over deze functie
beschikt)
•Weergave foutmeldingen
• Onderhoud

4BF-UM-C-DP C07-NL November 2019
7.4 DISPLAY
1
7
8
9
12
3
65
4
2
10
11
1Realtimeweergave van accucapaciteit.
2Kilometerstand, dagelijks aantal kilometers
(TRIP) - totaal aantal kilometers (TOTAL).
3Het display toont dit symbool als de
verlichting is ingeschakeld.
4Loophulp .
5Onderhoud: zie de paragraaf 'Onderhoud'.
6Menu.
7Snelheidseenheid.
8Digitale snelheidsweergave.
9Snelheidsmodus, topsnelheid (MAXS) - ge-
middelde snelheid (AVG).
10 Foutindicator .
11 Eenheidsindicator.
12 Ondersteuningsniveau.
7.5 KNOP DEFINITIE
Verlichting
Systeem aan / uit
OK/Enter
Omhoog
Omlaag
5
BF-UM-C-DP C07-NL November 2019
GEBRUIKERSHANDLEIDING VOOR DISPLAY
7.6 NORMALE WERKING
7.6.1 Systeem Inschakelen / Uitschakelen
Houd ingedrukt op het display om het systeem in te schakelen. Houd nogmaals ingedrukt
om het systeem uit te schakelen.
Als de "automatische uitschakeltijd" is ingesteld op 5 minuten (kan worden ingesteld met de
"Automatisch uitschakelen instellen" -functie Zie "Automatisch uitschakelen instellen"), wordt
het display automatisch uitgeschakeld binnen de gewenste tijd wanneer het niet in werking is.Als
de wachtwoordfunctie is ingeschakeld, moet u het juiste wachtwoord invoeren om naar het basis
scherm te gaan.
7.6.2 Selectie van Ondersteuningsniveaus
Druk wanneer het display is ingeschakeld kort op of om het ondersteuningsniveau te
wijzigen. Het laagste niveau is 1, het hoogste niveau is 5. Wanneer het systeem is ingeschakeld, is
het ondersteuningsniveau standaard ingesteld op niveau 1. Er is geen ondersteuning wanneer het
ondersteuningsniveau is ingesteld op niveau 0.
7.6.3 Selectie Modus
Druk kort op om de verschillende reismodi te bekijken. Reis: dagelijks aantal kilometers (TRIP) -
totaal aantal kilometers (TOTAL) - maximale snelheid (MAXS) - gemiddelde snelheid (AVG) - rester-
ende actieradius (RANGE) - uitgangsvermogen (W) - energieverbruik (C (alleen met gemonteerde
koppelsensor)).

6BF-UM-C-DP C07-NL November 2019
7.6.4 Koplamp / Achterlicht
Houd ingedrukt om de koplamp en
het achterlicht in te schakelen.
Houd nogmaals ingedrukt om de ko-
plamp en het achterlicht uit te schakelen. De
helderheid van het achterlicht kan worden
ingesteld in de Instellingen onder 'Helder-
heid'. Als het display/de pedelec in een
donkere omgeving is ingeschakeld, wordt
de achtergrondverlichting van het display/
koplamp automatisch ingeschakeld. Als
de achtergrondverlichting van het display/
koplamp handmatig is uitgeschakeld, is de
automatische sensorfunctie gedeactiveerd.
U kunt de verlichting alleen handmatig
inschakelen. Na het opnieuw inschakelen
van het systeem.
7.6.5 Loophulp
U kunt loophulp alleen activeren met een
staande pedelec.
Activeren: Druk kort op totdat niveau 0 is
ingesteld. Druk vervolgens kort op , het
symbool wordt weergegeven. Houd
vervolgens ingedrukt om de loophulp-
functie te activeren. Het symbool
knippert en de pedelec beweegt zich voort
met een snelheid van ca. 6 km/u. Nadat u
de knop loslaat, stopt de motor automatisch
en schakelt de pedelec terug naar niveau 0
(indien er binnen 5 seconden geen andere
optie wordt geactiveerd).
Als er geen snelheidssignaal wordt gedetect-
eerd, toont het display 2,5km/u.
7.6.6 Indicator voor Accucapaciteit
De accucapaciteit wordt weergegeven met
tien balkjes. Elk vol streepje vertegenwoor-
digt een resterend percentage accucapacite-
it. Als het frame van de indicator knippert,
geeft dit aan dat de accu leeg is (zoals
weergegeven in de onderstaande tabel):
Balkjes Capaciteitsbereik
10 ≥90%
9 80%≤C<90%
8 70%≤C<80%
7 60%≤C<70%
6 50%≤C<60%
5 40%≤C<50%
4 30%≤C<40%
3 20%≤C<30%
2 10%≤C<20%
1 5%≤C<10%
Knippert C≤5%
7
BF-UM-C-DP C07-NL November 2019
GEBRUIKERSHANDLEIDING VOOR DISPLAY
7.7 INSTELLINGEN
Druk nadat het display is ingeschakeld
twee keer kort op om het 'MENU' te
openen. U kunt nu op of drukken om
opties te selecteren en opnieuw in te stellen.
Druk vervolgens twee keer kort op
om de geselecteerde optie te bevestigen en
terug te keren naar het hoofdscherm. Als
er gedurende 10 seconden geen knoppen
worden ingedrukt in het 'MENU', dan keert
het display automatisch terug naar het
hoofdscherm en worden er geen gegevens
opgeslagen.
7.7.1 Display Instellingen
7.7.1.1 Kilometerstand resetten
Druk wanneer het systeem is ingeschakeld
twee keer kort op om het 'MENU' te
openen, de melding 'tC' verschijnt op het
display (zoals hieronder afgebeeld). Gebruik
nu of om 'y' of 'n' te selecteren. Als
u 'y' selecteert, worden het dagelijks aantal
kilometers (TRIP) - de maximale snelheid
(MAX) en gemiddelde snelheid (AVG)
gereset.
Zodra u uw keuze hebt gemaakt, drukt u
twee keer kort op om uw keuze op te
slaan en terug te keren naar het hoofd-
scherm of kunt u eenmaal kort op
drukken om uw keuze op te slaan en naar
het volgende item 'Selecties in km / mijl' te
gaan.
OPMERKING: Als het dagelijks aantal kilometers
99999 km bereikt, wordt deze waarde automatisch
gereset.
7.7.1.2 Selecties in km / mijl
Druk wanneer het systeem is ingeschakeld
twee keer kort op om het 'MENU' te
openen. Druk herhaaldelijk op tot 'S7'
op het display verschijnt (zoals hieronder af-
gebeeld). Gebruik nu of om te kiezen
uit 'km/h' (km/u) of 'mile/h' (mijl/u).
Zodra u uw keuze hebt gemaakt, drukt
u twee keer kort op om uw keuze
op te slaan en terug te keren naar het
hoofdscherm of kunt u eenmaal kort op
drukken om uw keuze op te slaan en
naar het volgende item 'Lichtgevoeligheid
instellen' te gaan.
7.7.1.3 Lichtgevoeligheid instellen
Druk wanneer het systeem is ingeschakeld
twee keer kort op om het 'MENU' te
openen. Druk herhaaldelijk op tot 'bL0'
op het display verschijnt (zoals hieronder
afgebeeld). Druk vervolgens op om de
waarde te verhogen of verlagen (de
lichtgevoeligheid kan worden ingesteld op
0-5). Selecteer 0 om de lichtgevoeligheid uit
te schakelen.

8BF-UM-C-DP C07-NL November 2019
Zodra u uw keuze hebt gemaakt, drukt u
twee keer kort op om uw keuze op te
slaan en terug te keren naar het hoofd-
scherm of kunt u eenmaal kort op
drukken om uw keuze op te slaan en naar
het volgende item 'Automatisch uitschakelen
instellen' te gaan.
7.7.1.4 Displayhelderheid instellen
Druk wanneer het systeem is ingeschakeld
twee keer kort op om het 'MENU' te
openen. Druk herhaaldelijk op tot 'bL1'
op het display verschijnt (zoals hieronder
afgebeeld). Druk vervolgens op om de
waarde te verhogen of verlagen (de
helderheid kan worden ingesteld op 1-5).
Zodra u uw keuze hebt gemaakt, drukt u
twee keer kort op om uw keuze op te
slaan en terug te keren naar het hoofd-
scherm of kunt u eenmaal kort op
drukken om uw keuze op te slaan en naar
het volgende item 'Displayhelderheid' te
gaan.
7.7.1.5 Automatisch uitschakelen instellen
Druk wanneer het systeem is ingeschakeld
twee keer kort op om het 'MENU'
te openen. Druk herhaaldelijk op tot
'OFF' (uit) op het display verschijnt (zoals hi-
eronder afgebeeld). Druk vervolgens op
om de waarde te verhogen of verlagen
(de waarde kan worden ingesteld op 1-9
minuten).
Zodra u uw keuze hebt gemaakt, drukt u
twee keer kort op om uw keuze op te
slaan en terug te keren naar het hoofd-
scherm of kunt u eenmaal kort op
drukken om uw keuze op te slaan en naar
het volgende item 'Onderhoudstip' te gaan.
7.7.1.6 Onderhoudstip
Druk wanneer het systeem is ingeschakeld
twee keer kort op om het 'MENU'
te openen. Druk herhaaldelijk op tot
'nnA' op het display verschijnt (zoals hiero-
nder afgebeeld). Druk vervolgens op of
om te kiezen uit '0' en '1'. Selecteer 0
om de melding uit te schakelen.
Zodra u uw keuze hebt gemaakt, drukt u
twee keer kort op om uw keuze op te
slaan en terug te keren naar het hoofd-
scherm.
OPMERKING: Als de onderhoudsfunctie is
ingeschakeld, wordt de indicator ' '
elke 5000 km (kilometerstand hoger dan 5000 km)
weergegeven bij het inschakelen.
7.7.2 Informatie Bekijken
Alle gegevens onder dit item kunnen niet
worden gewijzigd en kunnen alleen worden
bekeken.
7.7.2.1 Wielomtrek
Druk wanneer het systeem is ingeschakeld
twee keer kort op om het 'MENU'
te openen. Druk herhaaldelijk op tot
'LUd' op het display verschijnt (zoals hiero-
nder afgebeeld).
Zodra u de gewenste informatie hebt
bekeken, drukt u twee keer kort op om
uw keuze op te slaan en terug te keren naar
het hoofdscherm of kunt u eenmaal kort op
drukken om naar het volgende item
'Snelheidslimiet' te gaan.
9
BF-UM-C-DP C07-NL November 2019
GEBRUIKERSHANDLEIDING VOOR DISPLAY
7.7.2.2 Snelheidslimiet
Druk wanneer het systeem is ingeschakeld
twee keer kort op om het 'MENU' te
openen. Druk herhaaldelijk op tot 'SPL'
op het display verschijnt (zoals hieronder
afgebeeld).
Zodra u de gewenste informatie hebt
bekeken, drukt u twee keer kort op om
uw keuze op te slaan en terug te keren naar
het hoofdscherm of kunt u eenmaal kort op
drukken om naar het volgende item
'Controller hardwareinformatie' te gaan.
7.7.2.3 Controller hardwareinformatie
Druk wanneer het systeem is ingeschakeld
twee keer kort op om het 'MENU' te
openen. Druk herhaaldelijk op tot 'CHc
(Controller Hardware check)' op het display
verschijnt (zoals hieronder afgebeeld).
Zodra u de gewenste informatie hebt
bekeken, drukt u twee keer kort op om
uw keuze op te slaan en terug te keren naar
het hoofdscherm of kunt u eenmaal kort op
drukken om naar het volgende item
'Controller softwareinformatie' te gaan.
7.7.2.4 Controller softwareinformatie
Druk wanneer het systeem is ingeschakeld
twee keer kort op om het 'MENU' te
openen. Druk herhaaldelijk op tot 'CSc
(Controller Software check)' op het display
verschijnt (zoals hieronder afgebeeld).
Zodra u de gewenste informatie hebt
bekeken, drukt u twee keer kort op om
uw keuze op te slaan en terug te keren naar
het hoofdscherm of kunt u eenmaal kort op
drukken om naar het volgende item
'Display hardwareinformatie' te gaan.
7.7.2.5 Display hardwareinformatie
Druk wanneer het systeem is ingeschakeld
twee keer kort op om het 'MENU' te
openen. Druk herhaaldelijk op tot 'dHc
(Display Hardware check)' op het display
verschijnt (zoals hieronder afgebeeld).
Zodra u de gewenste informatie hebt
bekeken, drukt u twee keer kort op om
uw keuze op te slaan en terug te keren naar
het hoofdscherm of kunt u eenmaal kort op
drukken om naar het volgende item
'Display softwareinformatie' te gaan.
7.7.2.6 Display softwareinformatie
Druk wanneer het systeem is ingeschakeld
twee keer kort op om het 'MENU' te
openen. Druk herhaaldelijk op tot 'dSc
(Display Software check)' op het display
verschijnt (zoals hieronder afgebeeld).

10 BF-UM-C-DP C07-NL November 2019
Zodra u de gewenste informatie hebt
bekeken, drukt u twee keer kort op om
uw keuze op te slaan en terug te keren naar
het hoofdscherm of kunt u eenmaal kort op
drukken om naar het volgende item
'BMS hardwareinformatie' te gaan.
7.7.2.7 BMS hardwareinformatie
Druk wanneer het systeem is ingeschakeld
twee keer kort op om het 'MENU'
te openen. Druk herhaaldelijk op tot
'bHc (BMS Hardware check)' op het display
verschijnt (zoals hieronder afgebeeld).
Zodra u de gewenste informatie hebt
bekeken, drukt u twee keer kort op om
uw keuze op te slaan en terug te keren naar
het hoofdscherm of kunt u eenmaal kort op
drukken om naar het volgende item
'BMS softwareinformatie' te gaan.
7.7.2.8 BMS softwareinformatie
Druk wanneer het systeem is ingeschakeld
twee keer kort op om het 'MENU'
te openen. Druk herhaaldelijk op tot
'bSc (BMS Software check)' op het display
verschijnt (zoals hieronder afgebeeld).
Zodra u de gewenste informatie hebt
bekeken, drukt u twee keer kort op om
uw keuze op te slaan en terug te keren naar
het hoofdscherm of kunt u eenmaal kort op
drukken om naar het volgende item
'Sensor hardwareinformatie' te gaan.
7.7.2.9 Sensor hardwareinformatie
Druk wanneer het systeem is ingeschakeld
twee keer kort op om het 'MENU' te
openen. Druk herhaaldelijk op tot 'SHc
(Sensor Hardware check)' op het display
verschijnt (zoals hieronder afgebeeld).
Zodra u de gewenste informatie hebt
bekeken, drukt u twee keer kort op om
uw keuze op te slaan en terug te keren naar
het hoofdscherm of kunt u eenmaal kort op
drukken om naar het volgende item
'Sensor softwareinformatie' te gaan.
OPMERKING: Deze informatie wordt niet weerge-
geven indien er geen koppelsensor aanwezig is in
het aandrijfsysteem.
7.7.2.10 Sensor softwareinformatie
Druk wanneer het systeem is ingeschakeld
twee keer kort op om het 'MENU'
te openen. Druk herhaaldelijk op tot
'SSc (Sensor Software check)' op het display
verschijnt (zoals hieronder afgebeeld).
Zodra u de gewenste informatie hebt
bekeken, drukt u twee keer kort op om
uw keuze op te slaan en terug te keren naar
het hoofdscherm of kunt u eenmaal kort op
drukken om naar het volgende item
'Accu informatie' te gaan.
11
BF-UM-C-DP C07-NL November 2019
GEBRUIKERSHANDLEIDING VOOR DISPLAY
OPMERKING: Deze informatie wordt niet weerge-
geven indien er geen koppelsensor aanwezig is in
het aandrijfsysteem.
7.7.2.11 Accu informatie
Druk wanneer het systeem is ingeschakeld
twee keer kort op om het 'MENU'
te openen. Druk herhaaldelijk op
tot 'b01' op het display verschijnt (zoals
hieronder afgebeeld). U kunt kort op
drukken om alle informatie over de accu te
bekijken.
Zodra u de gewenste informatie hebt
bekeken, drukt u twee keer kort op om
uw keuze op te slaan en terug te keren naar
het hoofdscherm of kunt u eenmaal kort op
drukken om naar het volgende item
'Foutcodes' te gaan.
Bericht Uitleg
b01 Huidige temperatuur (°C)
b04 Totale spanning (V)
b06 Gemiddelde stroom (A)
b07 Resterende capaciteit (A/h)
b08 Volledige laadcapaciteit (A/h)
b09 Relatieve laadtoestand (%)
b10 Absolute laadtoestand (%)
Bericht Uitleg
b11 Cycli (aantal)
b12 Maximale tijd niet opgeladen
(Uur)
b13 Recente tijd niet opgeladen (Uur)
d00 Aantal accucellen
d01 Spanning van cel 1 (m/V)
d02 Spanning van cel 2 (m/V)
dn Spanning van cel n (m/V)
OPMERKING: Als er geen gegevens worden gedetect-
eerd, wordt '--' weergegeven.
7.7.2.12Foutcodes
Druk wanneer het systeem is ingeschakeld
twee keer kort op om het 'MENU' te
openen. Druk herhaaldelijk op tot 'E00'
op het display verschijnt (zoals hieronder
afgebeeld). U kunt kort op drukken
om de laatste tien foutcodes 'EO0' tot 'EO9'
te bekijken. The foutcode '00' geeft aan dat
er geen fout is.
Zodra u alle gewenste informatie hebt
bekeken, druk u twee keer kort op om
terug te keren naar het hoofdscherm.

12 BF-UM-C-DP C07-NL November 2019
7.8 FOUTCODE DEFINITIES
Het display kan de fouten van een pedelec weergeven. Als een fout wordt gedetecteerd,
verschijnt het moersleutelpictogram op het display en wordt een van de volgende
foutcodes weergegeven.
Opmerking: lees de beschrijving van de foutcode zorgvuldig. Als u de foutcode ziet, start u het
systeem eerst opnieuw. Neem contact op met uw dealer als het probleem niet is opgelost.
Foutcode Verklaring Probleemoplossen
04 De gashendel gaat niet terug in de
juiste positie.
Controleer of de gashendel terug in de juiste
positie gaat, als de situatie niet verbetert,
monteer dan een nieuwe gashendel.
(enkel als deze functie aanwezig is)
05 Gashendel fout.
1. Controleer de stekker of kabel van de
gashendel of ze goed zijn bevestigd
2. Koppel de gashendel los, als het probleem
nog steeds optreedt neem contact op met uw
verkoper.
(enkel als deze functie aanwezig is)
07 Overspannings beveiliging.
1. Verwijder de batterij.
2. Plaats de batterij opnieuw.
3. Neem contact op met uw verkoper als het
probleem zich blijft voordoen.
08 Fout met het hall-sensorsignaal in de
motor. Neem contact op met uw verkoper.
09 Fout met de motorfases. Neem contact op met uw verkoper.
10
De temperatuur in de motor heeft
zijn maximale beschermingswaarde
bereikt.
1. Schakel het systeem uit en laat de Pedelec
afkoelen.
2. Neem contact op met uw verkoper als het
probleem zich blijft voordoen.
11 De temperatuursensor in de motor
heeft een fout. Neem contact op met uw verkoper.
12 Fout met de current sensor in de
controller. Neem contact op met uw verkoper.
13 Fout met de temperatuursensor in
de batterij. Neem contact op met uw verkoper.
13
BF-UM-C-DP C07-NL November 2019
GEBRUIKERSHANDLEIDING VOOR DISPLAY
Foutcode Verklaring Probleemoplossen
14
De beveiligingstemperatuur in de
controller heeft zijn maximale bes-
chermingswaarde bereikt.
1. Schakel het systeem uit en laat de Pedelec
afkoelen.
2. Neem contact op met uw verkoper als het
probleem zich blijft voordoen.
15 Fout met de temperatuursensor in de
controller. Neem contact op met uw verkoper.
21 Snelheidssensor fout.
1. Start het systeem opnieuw op
2. Controleer of de magneet op de spaak is
uitgelijnd met de snelheidssensor en dat de
afstand tussen 10 mm en 20 mm ligt.
3. Controleer of de connector van de snel-
heidssensor correct is aangesloten.
4. Neem contact op met uw verkoper als het
probleem zich blijft voordoen.
25 Torque signaal fout.
1. Controleer of alle verbindingen correct zijn
aangesloten.
2. Neem contact op met uw verkoper als het
probleem zich blijft voordoen.
26 Snelheidssignaal van de torque sen-
sor heeft een fout.
1. Controleer de connector van de snelheids-
sensor om te controleren of deze correct is
aangesloten.
2. Controleer de sensor op tekenen van
schade.
3. Neem contact op met uw verkoper als het
probleem zich blijft voordoen.
27 Over current, stroom, van controller. Neem contact op met uw verkoper.
30 Communicatie probleem.
1. Controleer of alle verbindingen correct zijn
aangesloten.
2. Neem contact op met uw verkoper als het
probleem zich blijft voordoen.

14 BF-UM-C-DP C07-NL November 2019
Foutcode Verklaring Probleemoplossen
33 Remsignaal heeft een fout.
(Als remsensoren zijn gemonteerd)
1. Controleer alle connectoren.
2. Neem contact op met uw verkoper als het
probleem zich blijft voordoen.
35 Detectiecircuit voor 15V heeft een
fout. Neem contact op met uw verkoper.
36 Detectiecircuit op het bediening-
spaneel heeft een fout. Neem contact op met uw verkoper.
37 WDT-circuit is defect. Neem contact op met uw verkoper.
41 De totale spanning van de batterij is
te hoog. Neem contact op met uw verkoper.
42 De totale spanning van de batterij is
te laag. Neem contact op met uw verkoper.
43 Het totale vermogen van de batterij-
cellen is te hoog. Neem contact op met uw verkoper.
44 De spanning van de enkele cel is te
hoog. Neem contact op met uw verkoper.
45 De temperatuur van de batterij is te
hoog. Neem contact op met uw verkoper.
46 De temperatuur van de batterij is te
laag. Neem contact op met uw verkoper.
47 De SOC van de batterij is te hoog. Neem contact op met uw verkoper.
48 De SOC van de batterij is te laag. Neem contact op met uw verkoper.
61 Schakel detectie defect. Neem contact op met uw verkoper. (alleen
met deze functie)
62 Elektronische derailleur kan niet
vrijkomen.
Neem contact op met uw verkoper. (alleen
met deze functie)
71 Elektronisch slot is vastgelopen. Neem contact op met uw verkoper. (alleen
met deze functie)
81 Bluetooth-module heeft een fout. Neem contact op met uw verkoper. (alleen
met deze functie)
Popal is een merk van PMG
© 2020 PMG
Popal
service@pmobility.com
Huub van Doorneweg 2
5151 DT Drunen
+31 (0) 416 205 205

popal.com
Table of contents
Languages:
Other Popal Bicycle Accessories manuals