Porter&Charles SEO 60 User manual

2
Congratulations on the purchase of your
Porter&Charles
appliance.
We are sure it will provide many years of great cooking experience.
You may find that it has different features and characteristics to your last
appliance.
It is essential you read this operation manual thoroughly to fully
understand all of the various functions and operations. Experiment with
your cooking and take advantage of the features your new appliance offers.
This manual should be retained for future reference. Should ownership of
the appliance be transferred, please ensure that the manual is also passed
onto the new owner.
Contents
A - Installation check and warnings Page 3 - 6
B - Using the appliance for the first time Page 7 - 8
C - Electronic Programmer Operation Page 8 -13
D- Cooking modes and instructions Page 14 -21
E- Cleaning and maintenance Page 22 -27
F- Trouble shooting guide Page 27
G- Installation instructions Page 28 -35
H- Electrical wiring diagrams and instructions Page 36 -38
I- Warranty Page 39

3
A - Installation check and warnings
WARNING
This appliance is not intended for use by persons (including children) with reduced
physical,sensory or mental capabilities, or lack of experience and knowledge, unless they
have been given supervision or instruction concerning use of the appliance by a person
responsible for their safety.
Children should be supervised to ensure that they do not play with the appliance.
WARNING
During use the appliance becomes hot.Care should be taken to avoid touching heating elements
inside the oven.
IMPORTANT:
Please ensure that the oven cavity, venting and wiring is as specified in the relevant
section G/H of this manual.
A licensed electrician with relevant qualifications must perform electrical work when installing or
servicing the appliance. The supply cable and fuse rating must be suitable for the appliance. You
must never repair or replace any part of the appliance unless specifically recommended in the
operation manual.
Ventilation opening must not be covered or obstructed in any way.
DO NOT use aluminum foil on the base of ovens
The use of foil on the base of the oven to avoid spillage and improve cleaning is not
recommended. The bottom element is concealed under the base of the oven liner (not exposed).
Foil or dishes with reflective qualities must never be placed on the base of the oven during
cooking as the concentration of direct and reflected heat will damage the enamel surface.
Damage resulting from such use is not covered under the provisions of the warranty.
Initial heat up
Some smoke and smell may be noticed during the initial heat up cycle. This should quickly
dissipate.
If abnormal levels of smoke are observed (i.e.: it is not food that is burning), have the appliance
thoroughly checked.
Don’t use the appliance as a space heater
The appliance must never be used for warming or heating the surrounding room. Combustible
materials must never be placed on or near the appliance.
Do not leave children alone
Children must not be left unsupervised in the area where the appliance is in use. Children must
never be allowed to sit or stand on any part of the appliance.
Wear proper apparel when using the appliance

4
Loose fitting, hanging or highly flammable garments (such as synthetics) should never be worn
while using the appliance.
Use only dry pot holders
Moist or damp pot holders on hot surfaces may result in burns from steam. Do not allow pot
holder to touch hot heating elements. Do not use a towel or bulky cloth when handling hot
cooking utensils in the appliance.
Oven compartments must never be used for storage
Items, particularly flammable materials, must never be stored in an oven or near surface units.
Do not use water on grease fires
Fires or flame should be smothered using flameproof material or extinguished using a dry
chemical or other suitable fire retardant.
Accessories
Your appliance should come equipped with the following items.
Single Oven – SEO 60, SEO 76, SEO 90
•1 x pair of Retractable Slide Runners fitted to upper position and capable of being moved
to any selected position as required
•1 x Deep Enameled Roasting Pan with dual height reversible Grill Rack insert – ready for
sliding into side rack positions or fitting onto Retractable Slide Runners
•2 x Wire Oven Shelves that can be fitted into Retractable Slide Runners or for sliding into
side rack positions
•Note: Additional Retractable Slide Runners are available as an optional extra and can be
fitted at any time
•Note: Additional oven shelves and pans are available as optional extras.
Double Oven – DEO 60, DEO 76
•Note Upper Oven as per Single Oven above
Lower Oven
•1 x pair of Retractable Slide Runners to accommodate Enameled Grill Pan or Wire
shelves
•1 x Deep Enameled Roasting Pan with dual height reversible Grill Rack insert
•2 x Wire Oven shelf that can be fitted onto Retractable Slide Runners or for sliding into
side rack positions
The oven shelf support consist of 6 positions. Always remember to position the racks
before to
warm up the oven, and remove all the shelves and dip pan before cleaning operations.
The slides runners can be position in any of the 6 rails

5
How to place correctly the oven shelves and dip pan
1
2
3
4
5
6
Oven 60/76cm.

6
Oven 90cm.
The retractable slide runners can operate on shelf positions 2 to 6.
The wire shelves can be inserted at any shelf position, or on the retractable slide
runner.
The roasting pan can be inserted on shelf positions 1, 2, 3, 4 and 5. It can be
used with the
retractable slide runners for shelf position 6, but cannot be used with the slide
runners for shelf
position 4.
When inserting the wire shelf, the riser should be positioned upwards at the rear
of the oven.
The grooves at the sides of the shelves, toward the rear provide an anti-slide
stability for the
oven shelves when extended.
The retractable slide runners can be inserted on any shelf position by clipping or
unclipping
them between the upper and lower rail of each shelf position.

7
B- Using the appliance for the first time
After installation remove all notification labels (not identification or warning labels) and packaging
materials. After cleaning make sure cleaned surfaces are thoroughly rinsed and wiped dry using a
clean, soft cloth.
NOTE: oven will not operate unless time clock is set
The clock will require setting when you first turn on the power (or following a power failure).
At the power on the timer shows the clock flashing and is increased by one unit every minute.
The oven does not work and need to adjust the time.
Burning in
Before cooking in the appliance an initial pre-heating is required to burn off the fine oil film used to
protect the elements for shipping. The first time you heat up the oven (or grill) the oil will be given
off as smoke, which is perfectly normal.
Select a cooking mode and set the oven temperature to 180°C. With the oven door closed, leave
for approximately 5 minutes.
Repeat the above step for each cooking mode.
After completing the above make sure all controls are turned off. The oven is now ready for
cooking and grilling.
NOTE:
On oven start up or possibly at other times, due to electricity supply deviations – the
programmer may freeze on a function – if this occurs we recommend that, after checking
other solutions without success, it is recommended that power supply be disconnected to
the appliance and allow it to be in this position for some minutes before reconnecting.
This may have a result of clearing the frozen position allowing you to reset the
programmer for normal operation.
Cooling Fan
The Ovens are provided with a cooling fan motor to reduce the heat around the oven. The fan
motor is activated, independently from oven temperature, at the start of cooking program.
When you end the cooking program, a period of observation starts, during which the cooling fan
is kept on if the temperature is over 50°C
This safeguards both the oven and the adjoining cupboards from the possibility of temperature
damage.

8
Safety Thermostat
Your oven is fitted with an over temperature sensor that will automatically shut down your oven
for a period if it is deemed to be overheating- this sensor is fitted to the rear wall of the oven,
inside the outer case – it will only activate in extreme circumstances and is provided as protection
to the appliance and the adjoining furnishings. If activated it will shut down the appliance for a
short time and will automatically reset allowing normal operations – you should consult your
service technician if the problem re-occurs.
TOUCH-CONTROL KEYS
The “touch-control” keys shell be operated by the fingers ( just touching the key ).
When using touch controls it is best to use the ball of your finger rather than the tip.
C - Electronic Programmer Operation
2 8765431
1-2 temperature
setting 3 Oven
On-off 4-5Time
setting 6 programmer
functions selection 7-8 oven function
selection
Timer functions
display
Oven functions
display
Temperature
display

9
PROG.
TIMERTEMP.
Lit = semi-automatic or
automatic cooking programmed
Flashing =semi-automatic or
Automatic cooking completed
SYMBOL
DIGITS
- day andOven switched on: Time of
selected function (alternating)
- dayOven switched off: Time of
Lit = operation of heating
Elements(cooking Functions)
Flashing =semi-automatic
or automatic cooking
completed
SYMBOL
Lit = minute minder in
operation
Flashing =countdown
Completed by the minute
minder
SYMBOL
ON/OFF
SYMBOL
To decrease the numbers
on thedisplay
SYMBOL
To increase the numbers
on thedisplay
SYMBOL
Programmer functions - Progressive selection
(each time the key is touched)
SYMBOL
Timer
Timeofday
NORMAL
STATUS
1st Timer
Selected function
andthan
timeof day
NORMAL STATUS
1st
2nd
3rd
OVEN SWITCHED ONOVEN SWITCHED OFF
Duration of a
cooking program
Stop time of a
cooking program

10
1 - DISPLAY
Clock display
With 4 digits, generally represents durations, hours, and info messages. It comprise 3
symbols representing operative conditions of times.
Pot symbol
If switched on, indicates a working cooking function, even if in manual mode. If flashing, it
indicates the end of a temporized cooking. During delayed start period, it stays switched
off, and then it switched on during effective cooking
Auto symbol
Normally it is switched off. If on indicates a temporized cooking is selected ( the oven is
not in manual mode), and the pot symbol is on. If flashing together with the pot symbol, it
indicates the end of a temporized cooking. During duration setting step, it flashes to
distinguish from minute minder.
Bell symbol
Normally switched off. If is on indicates the minute minder active. If flashing indicates that
the cooking operation is completed.
Cooking program display
It visually shows the selected heating elements in the cooking program.
The oven light is always on during cooking operations. During delayed cooking, it stay
switched off to indicate that visually represented cooking is not working.
With the “Fan symbol”, in the case that cooking is of ventilated type, an animation is
showed, composed of spades in fast succession rotating.
During delayed cooking animation is suspended
and 4 spades switched on are showed ( ventilation selected not working at the moment)
Temperature display
It shows the selected temperature and is equipped with both graphic symbol and
progress bar to display a visual thermometer.
2.1 The clock
will require setting when you first turn on the power (or following a power failure).
At the power on the timer shows the clock flashing and is increased by one unit every minute.
The oven does not work and need to adjust the time.
2.2 Setting the time
The clock setting is only allowed with the oven on stand-by.
Touch and hold button 6 more then 4 sec to set the correct time. Initially set the hours using
buttons 4 and 5, and after waiting 4 sec you can set the minutes. The 6 button allows you to
pass each other between the two settings.

11
2.3 Switching the oven ON / OFF
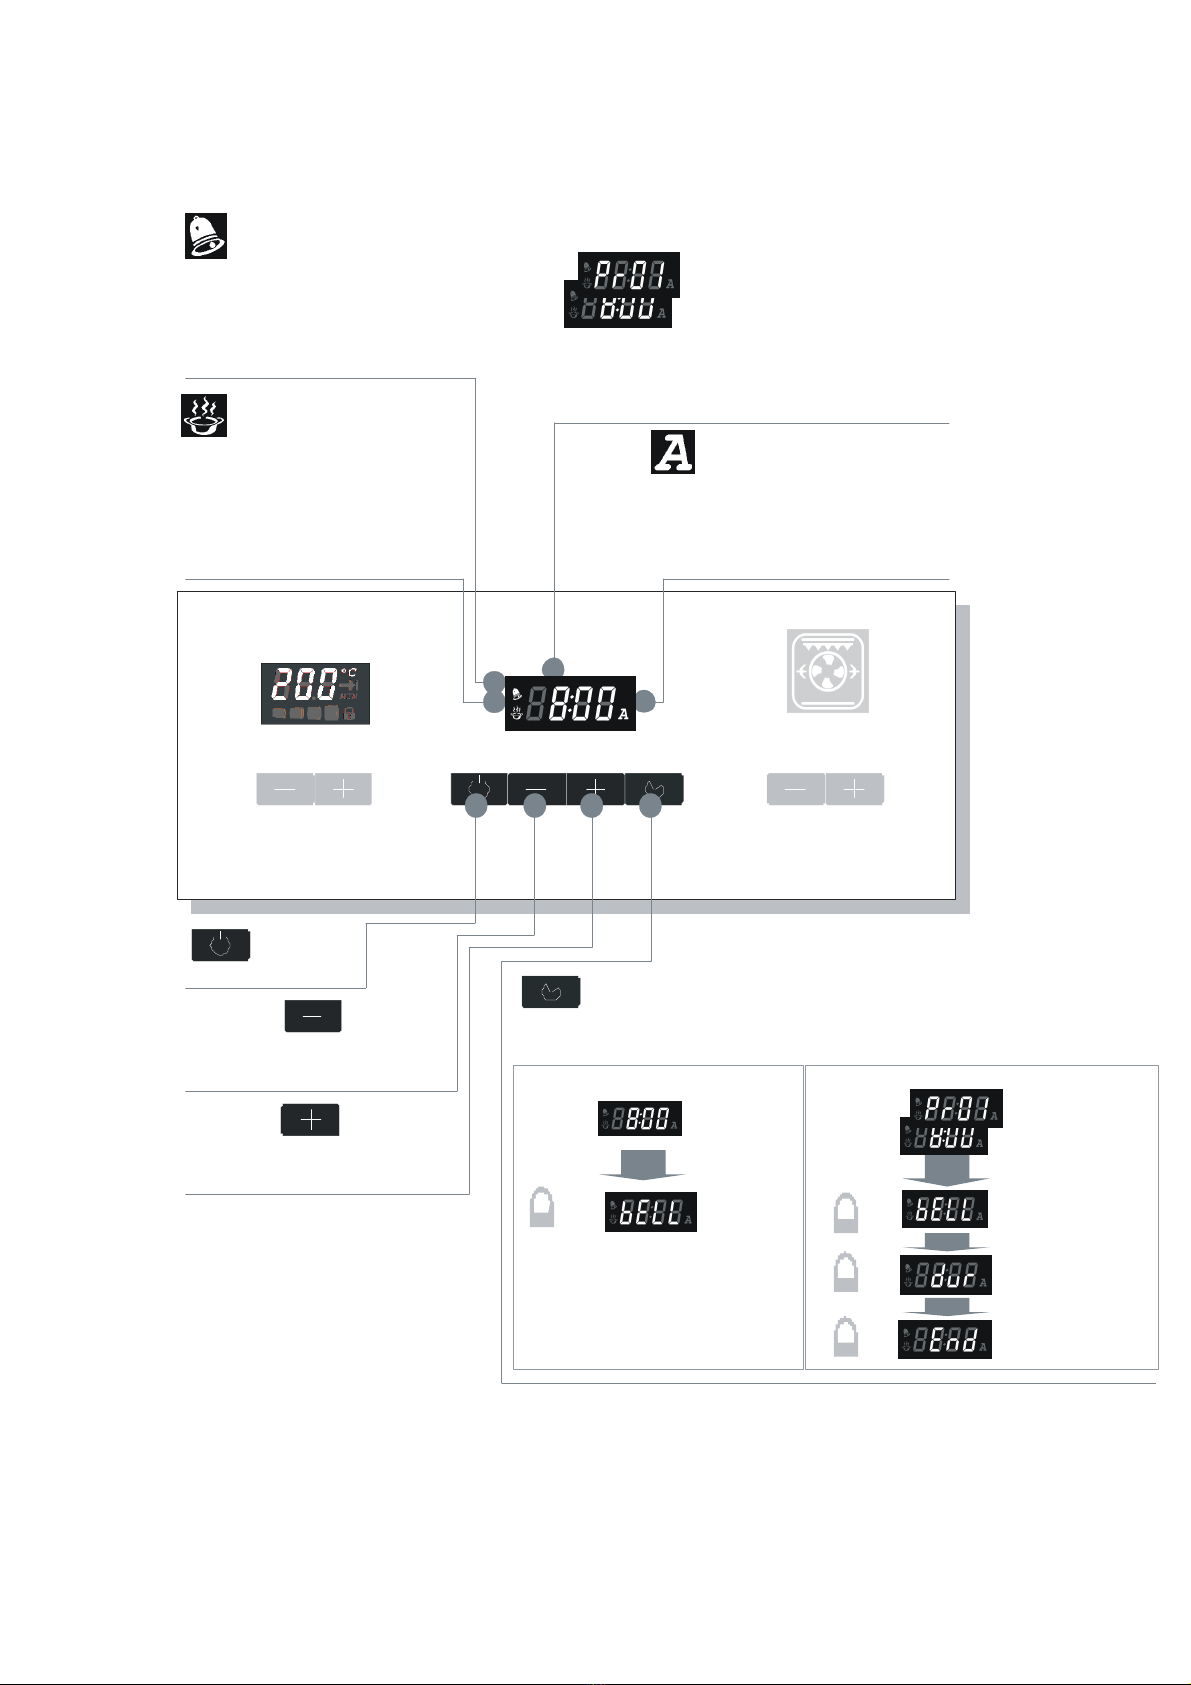
Touch and release the button 3, the timer display shows “On”
After two sec the oven light and the program display are on. If after one minute a cooking
program is not activated, the oven light switches OFF and the oven goes in off position and
the display shows “OFF”
During cooking, to turn off the oven, touch and release the button 3
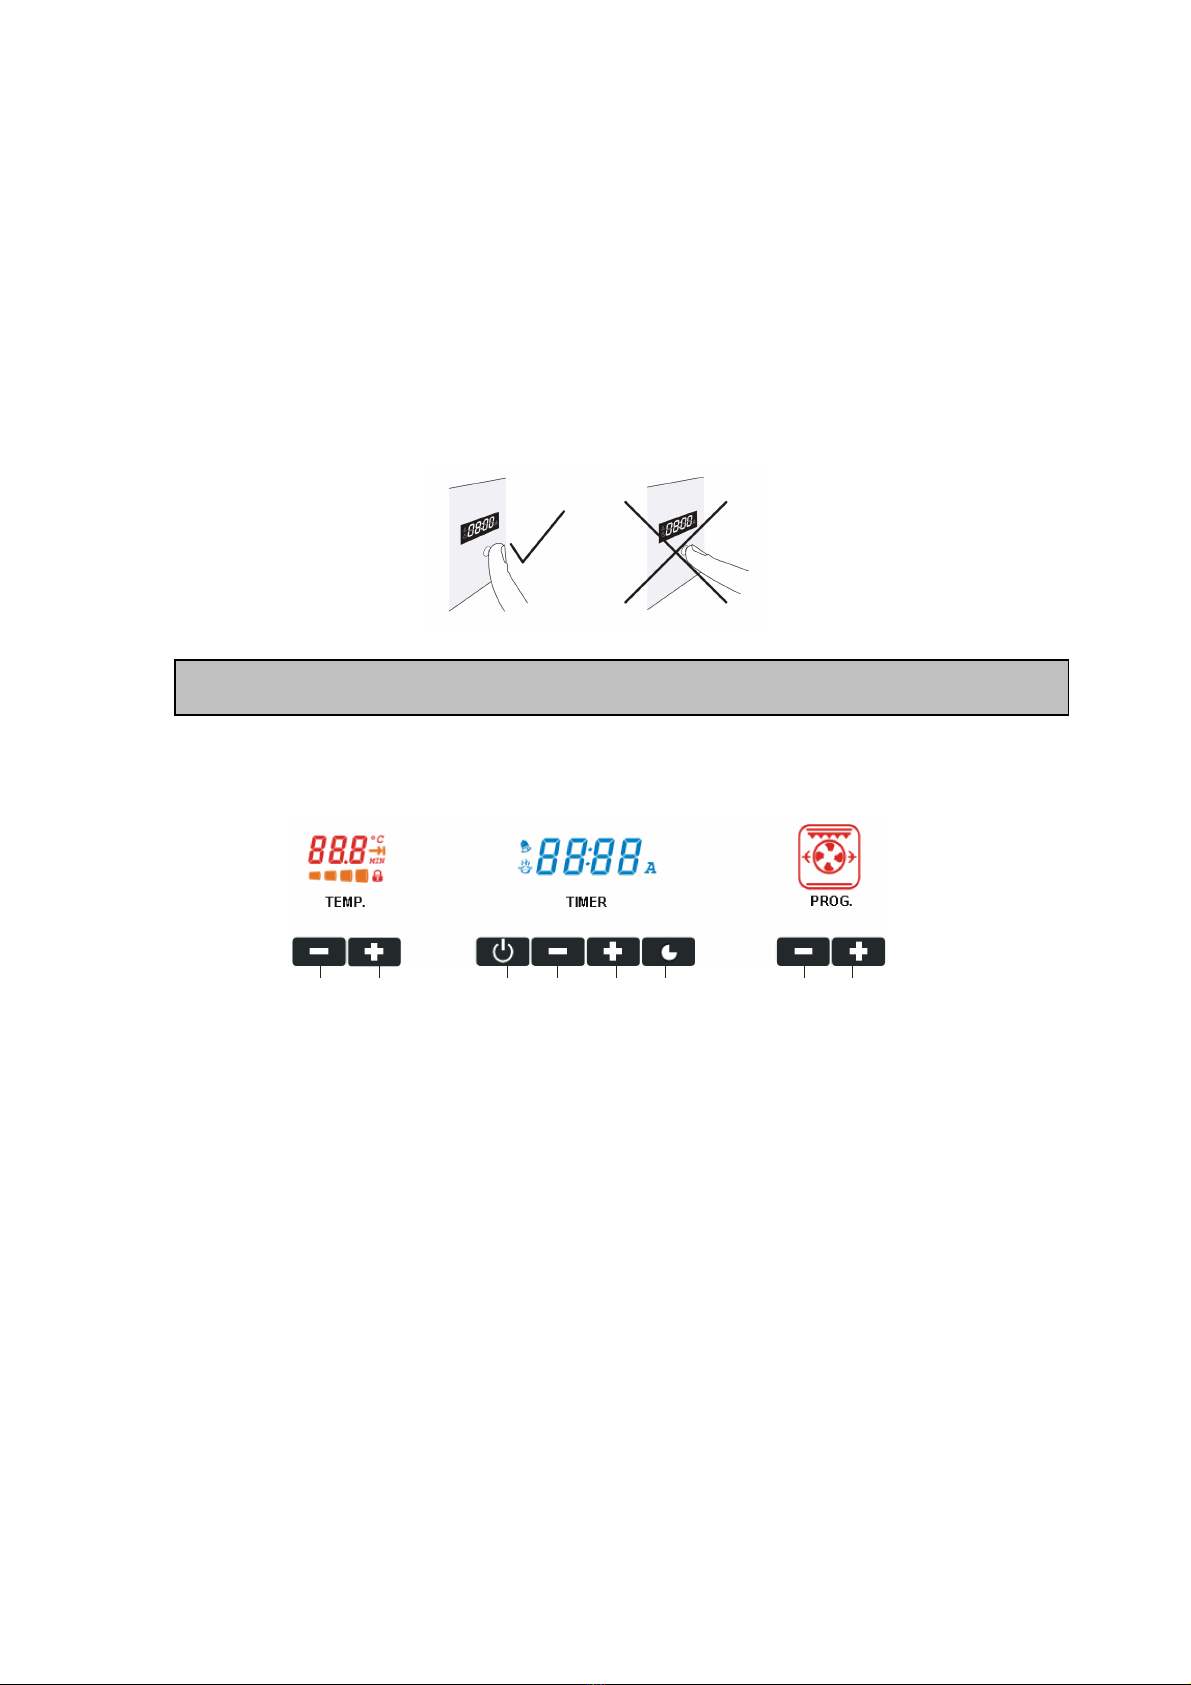
If ”Children Care” function is selected, the button release must take place at least after 2 sec.,
to protect accidental shutdowns. If “Children Care” is not active, the release may be
instantaneous.
Turning off the oven is actually two sec. after the appearance of the message “OFF”: if the
button is pressed accidentally , simply press it again to “undo” the effect.
WARNING - IMPORTANT NOTE
Do not turn the oven off if you have set it for automatic or semi-automatic cooking.
This operation will cancel the programmed cooking. Only the timer ( minute minder)
operates in the “stand-by” condition.
CHILDLOCK SAFETY ( ON SOME MODELS )
To activate the Childlock option touch the “ ” key and hold until the clock/programmer display
shows “n--0” and then “On”.
Then the time of the day appears again. The temperature display shows “ ”.
When the Childlock option has been selected it is only possible to show programmes.
In this setting it is not possible to change the oven cooking programme (cooking function,
temperature) and the time selected for a semi-automatic or automatic cooking: if touching the
relative keys “n--0” appears on the central display. If the oven is turned off (stand-by mode) it is
only possible to operate the timer. To deactivate the “Childlock” option touch the “ ” key and
hold until the clock/programmer display shows “n--0” and then “OFF”.
Then the time of the day appears again. On the temperature display the “ ” symbol goes out.
IMPORTANT: If the oven has been switched OFF (stand-by mode) with the Childlock
option selected it is possible to turn ON the oven only after having deactivated the
Childlock
.
3.1 Minute minder
This function does not interact with the loads, and is always available regardless the
status of the oven. Pressing the button 6 the bell symbol is lighted.
Set the time with the buttons 4 and 5, up to a maximum of 180 minutes, after 4 sec. the
information is accepted and the bell remains lit.
Pressing the button 6 after changing the value brings back to a timer clock mode,
accepting the value you just changed.
When the time elapsed, a tone sounds combined with the symbol bell flashes. To end
both signals simply press any button.
During minute minder setting step, it is possible to cancel the current value by
pressing the button 3.

12
3.2 Manual cooking
Switch on the oven as per the paragraph 2.3. Select the oven function, the oven
temperature is suggested by default, can be changed by pressing buttons 1 and 2
3.3 Automatic cooking modes (Based on setting the duration “DUR”)
Use automatic cooking to automatically turn the oven on, cook, and then turn the oven
off.
1. Check the clock shows the correct time.
2. Select the function and temperature. The oven will come on.
3. Decide how long the food will take to cook.
4. Select “dur” (duration) on the clock/programmer display by using the “ ” key and
then, with “90’”flashing on the central display, touch “ ” or “ ” keys to set the
time in minutes (maximum 180 minutes - 3 hours). To reset the cooking time touch the
“ ” key.
5. Decide the time you would like the oven to turn off; select “End” on the
clock/programmer display by using the “ ” key and then, with the time flashing on
the central display, touch the “ ” or “ ” keys to set the end of cooking time
(touch “ ” key to change between hours and minutes).
If there is time to wait before cooking starts, “A” will show in the clock /programmer
display and the oven will switch off but is now set for automatic cooking.
If you are already at home to turn the oven on and only want the oven to turn off
automatically, start cooking as normal, then follow step 4 or step 5 to set a time to stop
the oven.
When automatic cooking starts, “ ” will be displayed and the oven will turn on.
– To see the remaining cook time, follow step 4 up to display “dur” (duration).
– To see the set stop time, follow step 5 up to display “End”.
– To cancel automatic or semi-automatic cooking at any time see chapter “CANCELLING
A SET PROGRAMME”.
When the stop time is reached the timer will beep, “A” and “ ” will flash:
– Touch any key to stop the beeping.
– The oven will turn off on the “OVEN LIGHT” function.
– Turn OFF the oven as indicated in the “TURNING THE OVEN ON AND OFF” chapter.
Attention: after a power failure any automatic or semi-automatic programme is
cancelled. Turn off the oven manually.
During an automatic or semi-automatic cooking programme it is possible to
change the cooking function and the temperature at any time.
3.4 Based on setting a cook stop time
Turn the oven as indicated in the paragraph 2.3. Press the button “ ” three times,,
the display shows “End”. Set with buttons “ ” or “ ”, the end of cooking time,
falling in the next 23h59m.
Apply for input time the same procedures of the clock setting: you set the hours and then
the minutes. After 4 sec from the last push of a button, the oven will operate until the
specified cooking duration time.
Select a cooking function, the oven suggests a default temperature, the temperature can
be changed by using the buttons “ ” or “ ”,.
After the elapsed time, the oven enters in “Cooking end” mode

13
3.5 Fully automatic – (Start Later – Stop Later)
Turn the oven as indicated in the paragraph 2.3.
Select a cooking function, the oven suggests a default temperature, the temperature can
be changed by using the buttons “ ” or “ ”,.
The function is a combination of the two function of duration and end, to be set
separately, without the constraints of precedence ( first the duration and then the end or
viceversa).
After 4 sec from the last push of a button, the oven will be in mode of delayed start: it will
later operate automatically for the specified cooking duration and will stop at the set end
cooking time.
After the elapsed time, the oven enters in “Cooking end” mode.
During the delayed start both the temperature and oven function are shown, and both are
adjustable.
The temperature bar remains off to remember that cooking is not currently running.
All loads are turned off until the cooking will take action.
3.6 End cooking mode
At the end of cooking time, the oven turns off all loads, it activates a triple beep
intermittently;
The temperature and programs display are switched off. The timer display shows the time
of the day and the two symbols Pot and Auto flash.
To unlock the oven, just press any button below the timer display: the acoustic signal
ends, the oven is ready to receive new commands, you can select a new cooking
function, or turn it off permanently with the button .
3.7 Cancelling a set program
To cancel a set programme (“A” symbol activated on the programmer display):
– Select “dur” on the programmer display by touching the key “ ” and then touch
“ ” key.
– A set programme is also cancelled when the oven is switched OFF in the “stand-by”
mode. At the next power up the oven is not programmed.
IMPORTANT: If the oven is ON, remember to switch it off manually otherwise it does not
stop operating in the set mode.

14
D- Cooking modes and Instructions
NOTE:
cooking functions will vary from model to model – following is a
description of the functions that are available and some or all of these functions
will be included on the product you have purchased.
By pressing the buttons 7 on the timer display appear “Pr01” “Pr02” etc… and program display
Indicates the active heating elements in any cooking programs.
On a same way each touch of button 8 decreases program number with consequent modification
of the information provided on each display.
The following table summarizes the operating parameters of each cooking mode, for single and
top of double oven.
Display
description Oven
function Grill
element Top
element Bottom
element Fan
element Light Fan
motor Temp
min. °c Temp
preset
°c
Temp
max.
°c
On Light X
Pr01 Defrost/
food
warmer
X X X DEF/40 DEF 60
Pr02 Top +
Bottom
element
X X X 50 180 260
Pr03 Fan
element +
motor
X X X 50 170 260
Pr04 Top +
Bottom +
motor
X X X X 50 185 260
Pr05 Grill X X 50 200 260
Pr06 Double
grill X X X X 50 200 260
Pr07 Double
grill +
motor
X X X 50 200 260
Pr08 Bottom
element +
motor
X X X 50 180 190
Pr09 Bottom
element +
fan
element +
motor
X X X X 50 220 260
Pr 10 Bottom
element X 50 100 200

15
The following table summarizes the operating parameters of each cooking mode, for bottom
of double oven.
Display
description Oven function Grill
element Top
element Bottom
element Fan
element Light Fan
motor Temp
min.
°c
Temp
preset
°c
Temp
max.
°c
On Light X
Pr01 Top+Bottom
element X X X 50 180 260
Pr 02 Bottom
element X 50 100 260
Pr03 Top +
Bottom +
motor
X X X X 50 185 260
Pr04 Bottom
element +
motor
X X X 50 180 190
Pr05 Grill+motor X X X 50 180 190
USING THE LOWER CAVITY- COOKING FUNCTIONS IN BOTTOM OVEN
To select the lower cavity of the oven press simultaneously “+” and “-“ button of the timer function
regulation, till the clock programmer display will show in alternative mode the notice “bot”.
Turn the oven as indicated in the “switching the oven ON/OFF” chapter. Select the oven function
and temperature as indicated in the chapter COOKING MODE AND INCTRUCTIONS “
PREHEATING
Preheating the oven is not essential, but you will achieve better results if you do. Some foods,
particularly cakes and pastry, are better cooked in a preheated oven. Other foods, for example
casseroles, cook just as well when cooked in a non-preheated oven but may need longer cooking
times.
For faster preheating select pizza mode and the required temperature and once the oven has
reached the required level change to cooking mode/function for the task.
To preheat the oven:
1- Set the mode required for preheating.
2- Set the oven to the desired temperature.
Preheating guide (for 180°C settings)
Cooking Mode Preheat Time
CONVENTIONAL
OVEN 15-20 MINUTES
FAN OVEN 15-20 MINUTES
NOTE:
Any food or other cooking utensils placed in the oven during preheating will affect the preheating
time. The preheat time may also vary with installations

16
WARNING
When using an alternative cooking mode for fast preheat, be sure to turn the cooking mode to
your required setting before placing food in the oven.
HINT:
To allow for heat loss while placing food into the oven, preheat the oven 10-20°C higher and then
reduce the temperature to your required cooking temperature.
Always preheat the oven when cooking multiple dishes at the same time.
Roasting guide. These cooking charts are intended as a guide only. Temperature and cooking
times may vary to suit individual tastes.
Type of Meat
Approx. 450 grams =
1lb
Cuts of Meat Time per lb
(allow) Oven Temperature
0
C
Beef Prime Rib, rolled
sirloin bolar blade,
Top Loin, New York
Strip Sirloin
60 minutes per 2lbs
40 minutes per 2lbs
180
0
– 200
0
180
0
- 200
0
Veal Shoulder or leg (with
bone or rolled) 40-50 minutes per
2lbs. 180
0
- 200
0
Lamb Leg, shoulder (loin or
rolled) 40-50 minutes per
2lbs 180
0
- 200
0
Pork Leg loin 90 minutes per 2lbs. 220
0
-230
0
/ 180
0
-200
0
Pork leg should be cooked at a higher temperature for the first 15-25 minutes then reduced to
lower temperature for remaining cooking time.
Type of Poultry Size of Meat Time per lb Oven Temperature
0
C
Chicken Whole or pieces 30 minutes per lb. 180
0
- 200
0
Duck 3lbs – 4.1lbs 30 minutes per lb.
+ 35 minutes extra 180
0
- 200
0
Turkey 5.4lbs – 21lbs 40-50 minutes per lb.
+ 35 minutes extra 180
0
- 200
0
Turkey should be well basted and turned during cooking
Type of Fish Cuts of Fish Time per lb Oven Temperature
0
C
Fish Whole or fillets 10 minutes per lb. 170-190
0
C
In Conventional Oven mode, fish should be covered for the first ¾ of the cooking time to help
retain moisture.

17
Baking guide. These cooking charts are intended as a guide only. Temperature and cooking
times may vary to suit individual tastes.
Oven Temperature
0
C General Times Foods Suitable
130
0
– under Very slow Small meringues, pavlova, custard, reheating
130
0
- 150
0
Slow Rich fruit cake, light fruit cake
150
0
- 180
0
Moderate Casseroles, deep butter cake
180
0
- 200
0
Moderately hot Shallow butter cakes, sponges, biscuits, meat loaf,
baked fish
200
0
- 230
0
Hot Swiss roll, patty cakes, rock cakes, short crust pastry
230
0
– and over Very Hot Scones, Choux pastry
DEFROST
All foods may be defrosted using the Fan Forced Convection mode. It is important to note
that this function active the fan motor and the light only, but it is possible to adjust the
temp between 40°C to 60°C after the program started .
As a general guide, the defrosting time for meat is approximately 15-20 minutes per
kilogram.
PIZZA
This function is also excellent as the fastest oven pre heat, engaging maximum power to heat the
oven to a selected temperature before selecting an appropriate function and temperature for a
task.
In this position the fan and fan element together with the under oven element are engaged
simultaneously. This is used for food that requires a concentration of cooking to the base, and
allows the top to gently cook at the same time.
For best results for pizza and similar items we recommend this function and may be combined
with our optional pizza stone for perfect outcomes.

18
CONVENTIONAL OVEN
In this traditional mode, oven heat is provided from the top and under the oven compartment and
is most suitable when cooking on a single shelf. For best results, arrange the shelves so the top
of the food is near the centre of the oven.
If cooking on more than one shelf, always preheat the oven and position the pans to allow as
much free circulation of heat as possible.
Depending on the food, you may need to rearrange the tray position during cooking.
1- Adjust oven shelves to desired position/s.
2- Select Conventional Oven mode.
3- Set the oven to the desired temperature.
4- When cooking is complete turn the oven off.
HINT:
If water is used in your cooking (such as water placed in a baking dish) the water will evaporate in
the oven in the form of steam. The level of condensation will be reduced when cooking in fan
oven mode where excess moisture is circulated and evaporates during the cooking cycle.
NOTE:
Stand clear of the oven when opening the oven door as steam may escape rapidly
VERY LOW BAKE
This function must be used in conjunction with the thermostat. Set the temperature between 50°C
to 120°C. The door must remain closed
FAN ASSIST
This style of cooking provides traditional cooking heating from top and bottom elements with the
assistance of a circulation fan to ensure fast even results. This mode is most suitable for delicate
cooking such as cakes, pastries, gateaux, biscuits and yeast dough. Best results when
thermostat is set to 150-180 degrees – depending on recipe.

19
HIGH BAKE
The HIGH BAKE mode uses the oven fan to circulate air with heat from the under oven element.
Quick and consistent heat is evenly distributed throughout the oven.
The results are quick, not unlike a microwave oven. With the circulation of heat, foods cooked
with high bake mode retain a crisp, dry texture on the outside especially pizza, pastry and other
foods where you want the base to be well cooked. HIGH BAKE is also excellent for re-heating.
1- Adjust oven shelves to desired position/s.
2- Select HIGH BAKE mode.
3- Set the oven to the desired temperature.
4- When cooking is complete turn the oven off.
FAN FORCED CONVECTION – most commonly used function
In this mode the oven fan circulates heat from behind the fan cover to give a more even
temperature throughout the oven. The even heat provides similar cooking results for each portion
of food. Although temperatures for cooking foods in this type of oven are generally the same as
required by a conventional oven, when cooking foods that require lengthy cooking cycles a fan
forced oven normally cooks more quickly, saving time and energy.
Always place the food as near to the centre of the oven as possible. If cooking on more than one
level, arrange the pan positions to allow for free circulation of heat.
1- Adjust oven shelves to desired position/s.
2- Select FAN OVEN mode.
3- Set the oven to the desired temperature.
4- When the cooking is complete turn the oven off.
HINT:
Always preheat the oven when cooking on multiple shelves at the same time.
Depending on the food, you may need to rearrange the tray positions during cooking.

20
FAN GRILL
NOTE: Door must be closed in Fan Grill Mode
Fan grilling is a combination of direct heat and circulated hot air which gives the appearance and
flavor similar to rotisserie cooking which is ideal for single level roasts. Direct infrared heat from
the grill element is circulated by the fan to cook the food, which should be positioned as near to
the centre of the oven as possible.
For best cooking results, it is recommended that food be turned once only.
1- Oven door must be closed in Fan grill mode.
2- Place food on grill rack and pan supplied (ensure grill rack is inverted to the high position
to allow best circulation of air) as close to the centre of the oven as possible.
3- Select FAN GRILL mode.
4- Set the oven to the desired temperature. (see note below and refer to FAN GRILL
temperature guide).
5- When cooking is complete turn the oven off.
NOTE:
Large grill pans or roasting dishes can restrict the circulation of air in the oven. To prevent
moisture condensing in the cooler lower sections of the oven, preheat the oven for approximately
10 minutes, using CONVENTIONAL OVEN or HIGH BAKE modes, prior to fan grilling.
NOTE: The temperature setting in FAN GRILL mode must not exceed 200°C.
Fan grill guide
These cooking charts are intended as a guide only. Temperatures and cooking times may vary to
suit individual tastes.
Type of meat/poultry/fish Oven Temperature
0
C Approximate Cooking Time
Chicken – whole
pieces 175
0
- 185
0
185
0
- 195
0
30 minutes per lb
15-20 minutes
Lamb - loin/rack
Chops - medium/rare
Chops – medium
175
0
- 185
0
175
0
- 185
0
175
0
- 185
0
25 minutes per lb
10-12 minutes
14-16 minutes
Beef- Steak – rare
Steak – medium
Steak – well done
175
0
- 185
0
175
0
- 185
0
175
0
- 185
0
6-8 minutes
8-12 minutes
12-15 minutes
Pork Chops – medium/rare
Chops - medium
Chops – well done
190
0
- 200
0
175
0
- 185
0
175
0
- 185
0
6-10 minutes
10-12 minutes
12-15 minutes
Sausages- thin
thick 175
0
- 185
0
175
0
- 185
0
8-10 minutes
12-14 minutes
Fish fillets
175
0
- 185
0
10-14 minutes
Sliced vegetables
Tomato halves
Crumb Based dishes
Pasta dishes
180
0
- 190
0
190
0
- 200
0
175
0
- 185
0
175
0
- 185
0
20-30 minutes
6-8 minutes
20-30 minutes
20-30 minutes

21
FULL GRILL & HALF GRILL
This mode of cooking uses infrared heat from the top of the oven to cook foods to your
requirements. Half grill engages only the inner band of the top element and is suitable for smaller
volumes and has a consequently lower energy usage.
This method of grilling in the oven is recommended for short duration (5 minutes or less)
grilling only, which is ideal for toasting (see note below). Foods with higher fat content or
foods, which require more than 5 minutes grilling time, should be grilled using the FAN
GRILL mode.
When in GRILL mode the oven door should be closed. If the door is not closed, over time
discoloration to the control panel may occur.
1- Commence grilling from a cold oven whenever possible.
2- Place food on grill rack and pan supplied.
3- Position the shelf to your preference.
4- Select GRILL mode and, turn to your desired heat setting.
5- When cooking is complete turn the oven off.
NOTE:
The grill element is controlled by the oven thermostat. Once the temperature in the oven has
reached the selected temperature the element will switch off, and then on again, when more heat
is required.
NOTE: The temperature setting in FULL GRILL & HALF GRILL
mode must not exceed 200°C.
This manual suits for next models
5
Table of contents
Other Porter&Charles Oven manuals

Porter&Charles
Porter&Charles SOSS 60 User manual

Porter&Charles
Porter&Charles FEC60B(x) User manual

Porter&Charles
Porter&Charles STPS60TM User manual

Porter&Charles
Porter&Charles SOPS60TC User manual

Porter&Charles
Porter&Charles SOPS76PS User manual

Porter&Charles
Porter&Charles SOPS60GL User manual

Porter&Charles
Porter&Charles SOPS76ECO User manual

Porter&Charles
Porter&Charles SOPS76TM User manual

Porter&Charles
Porter&Charles Oven User manual