Posh MX5 Series User manual

MX5 Manual Rev. D
1
MX5 Series
Magnetic Stripe Card Reader
RFID/SC Reader/Writer
Manual
Revision D
2011-07-13

MX5 Manual Rev. D
2
Table of Content
INTRODUCTION....................................................................................................................................3
Accessories of MX5.......................................................................................................................................... 3
Warranty............................................................................................................................................................ 3
Disclaimer......................................................................................................................................................... 3
GENERAL FEATURES..........................................................................................................................4
Technical Specifications.................................................................................................................................... 5
Dimension Views:............................................................................................................................................. 9
Connection Views: ............................................................................................................................................ 9
MX5-CBL (Add-on Cable for MX5).............................................................................................................. 10
Typical MX5 Device Setup............................................................................................................................. 11
MX5 UTILITY SOFTWARE..................................................................................................................12
System Requirements...................................................................................................................................... 12
MX5 Utility Installation.................................................................................................................................. 12
MX5 Utility General Information ................................................................................................................... 13
Definitions of Settings..................................................................................................................................... 13
MX Device Firmware Upgrade Menu............................................................................................................. 20
Creating a Setup Card ..................................................................................................................................... 22
Hardware Mounting........................................................................................................................................ 23
Hardware Maintenance ................................................................................................................................... 23
Reading / Writing RFID.................................................................................................................................. 23
Reading/ Writing SC Smart IC Cards.............................................................................................................. 23
APPENDICES...................................................................................................................................... 24
HID Software Developer Notes on Mag-Tek Compatible Report Format:..................................................... 24
OPOS/POS.NET Information ......................................................................................................................... 26
Troubleshooting and FAQ............................................................................................................................... 31
Firmware Listing............................................................................................................................................. 36

MX5 Manual Rev. D
3
Introduction
Thank you for purchasing the MX5 Magnetic Swipe Card Reader and RFID/SC Reader/Writer. It is ideal for access
control, time keeping, banking, ID recognition & credit verification and related applications. In fact, wherever a
RFID/SC/Magnetic stripe ID or transaction card is used, one can find a related use for the versatile, user-friendly
MX5 device.
The MX5 is designed to offer a versatile and expandable solution that will attractively complement an existing
system for years to come. The MX5 units are the product of choice for versatility, expandability and productivity.
Accessories of MX5
The accessories content will vary based on the type of device purchased:
1. MX5 Unit
2. Velcro adhesive strip.
3. Quick Set Default Setup Card. (only with MX53 series)
4. CD ROM: Utility, Firmware, SDK, Manual(s) and Product specifications.
Warranty
All the MX5 products are backed by a two year parts and labour limited warranty. Should you have problems
with your MX5 device please contact the dealer from whom you purchased the product. Any alteration and/or
erasure or modification of the MX5 will void the warranty.
Disclaimer
The Manufacturer makes no claims or warranties with respect to the contents or accuracy of this publication or
the product it describes, including warranties of fitness or merchantability for a particular purpose. The
Manufacturer shall not be liable for any special, incidental or consequential damages, nor damages due to use or
misuse born from Integration into any mechanical, electrical or computer system. The Manufacturer is not
responsible for the accuracy of any device connected to the MX5. The Manufacturer reserves the right to make
any changes to this manual or product(s) without the obligation to notify any person of such changes. Any
alteration and/or erasure or modification of the MX5 will void the warranty.

MX5 Manual Rev. D
4
General Features
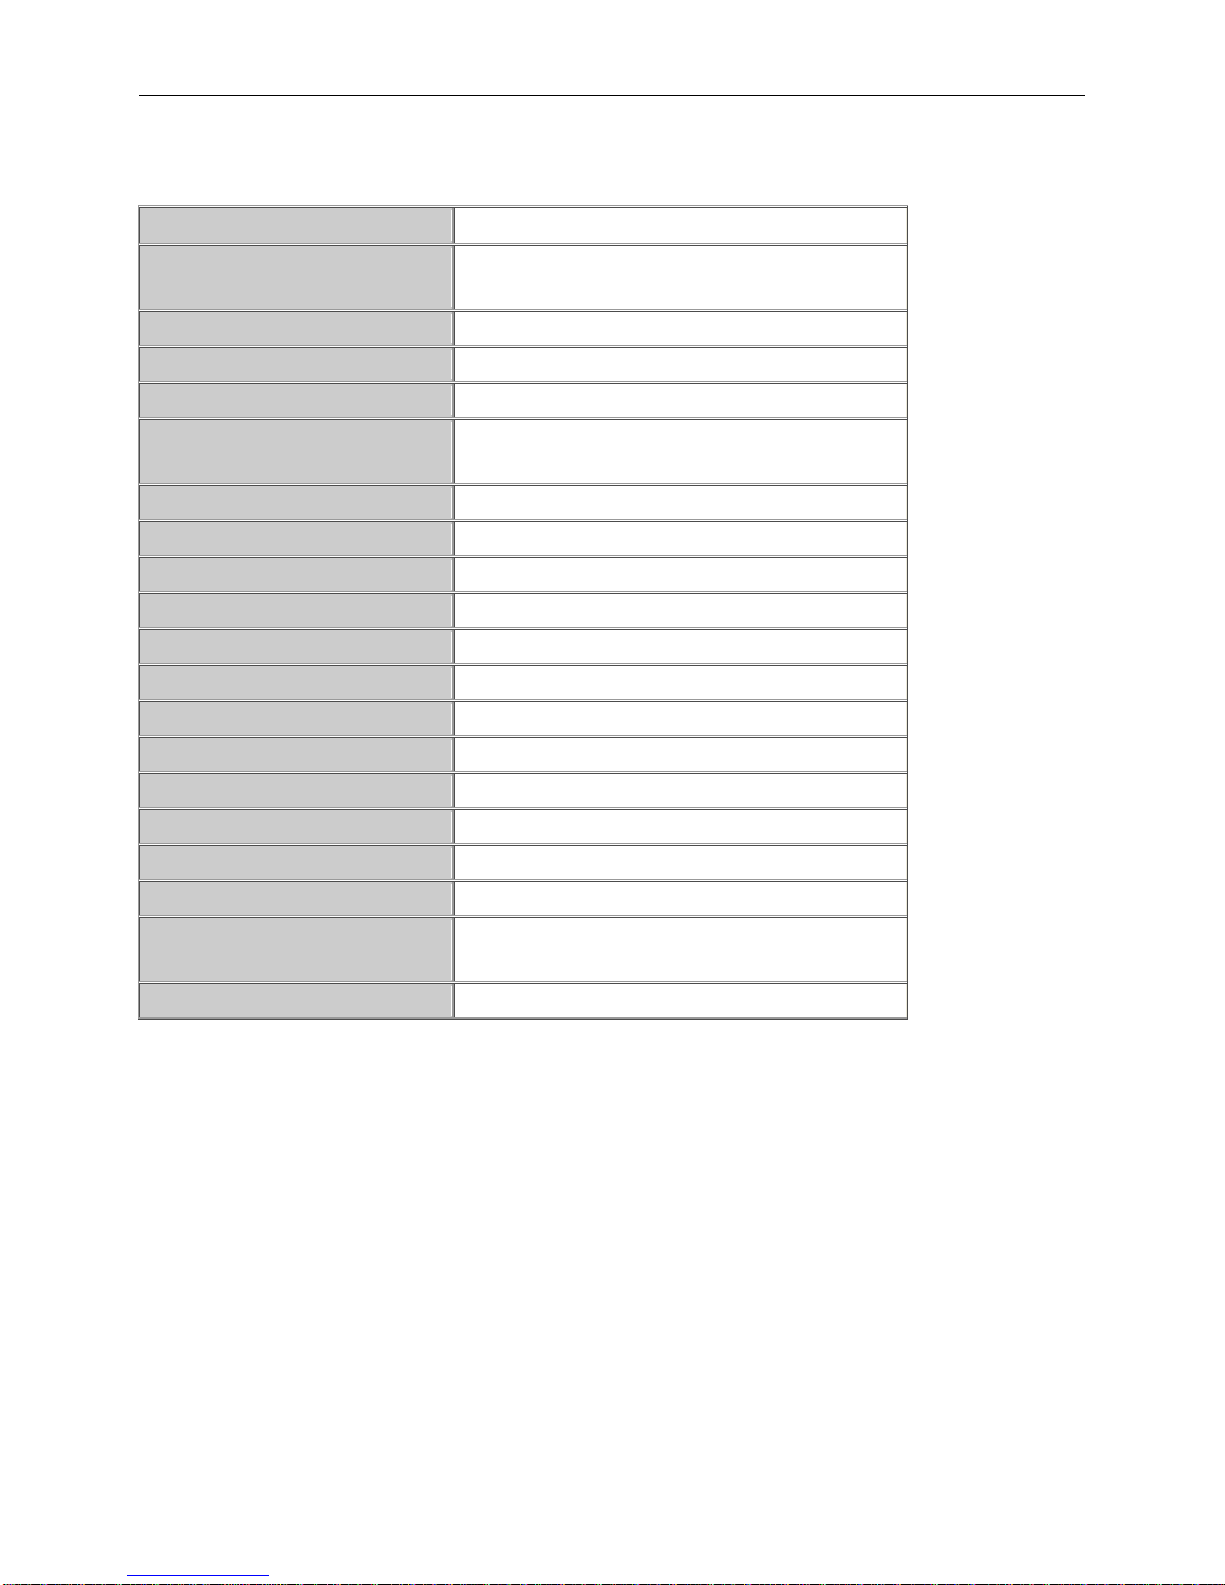
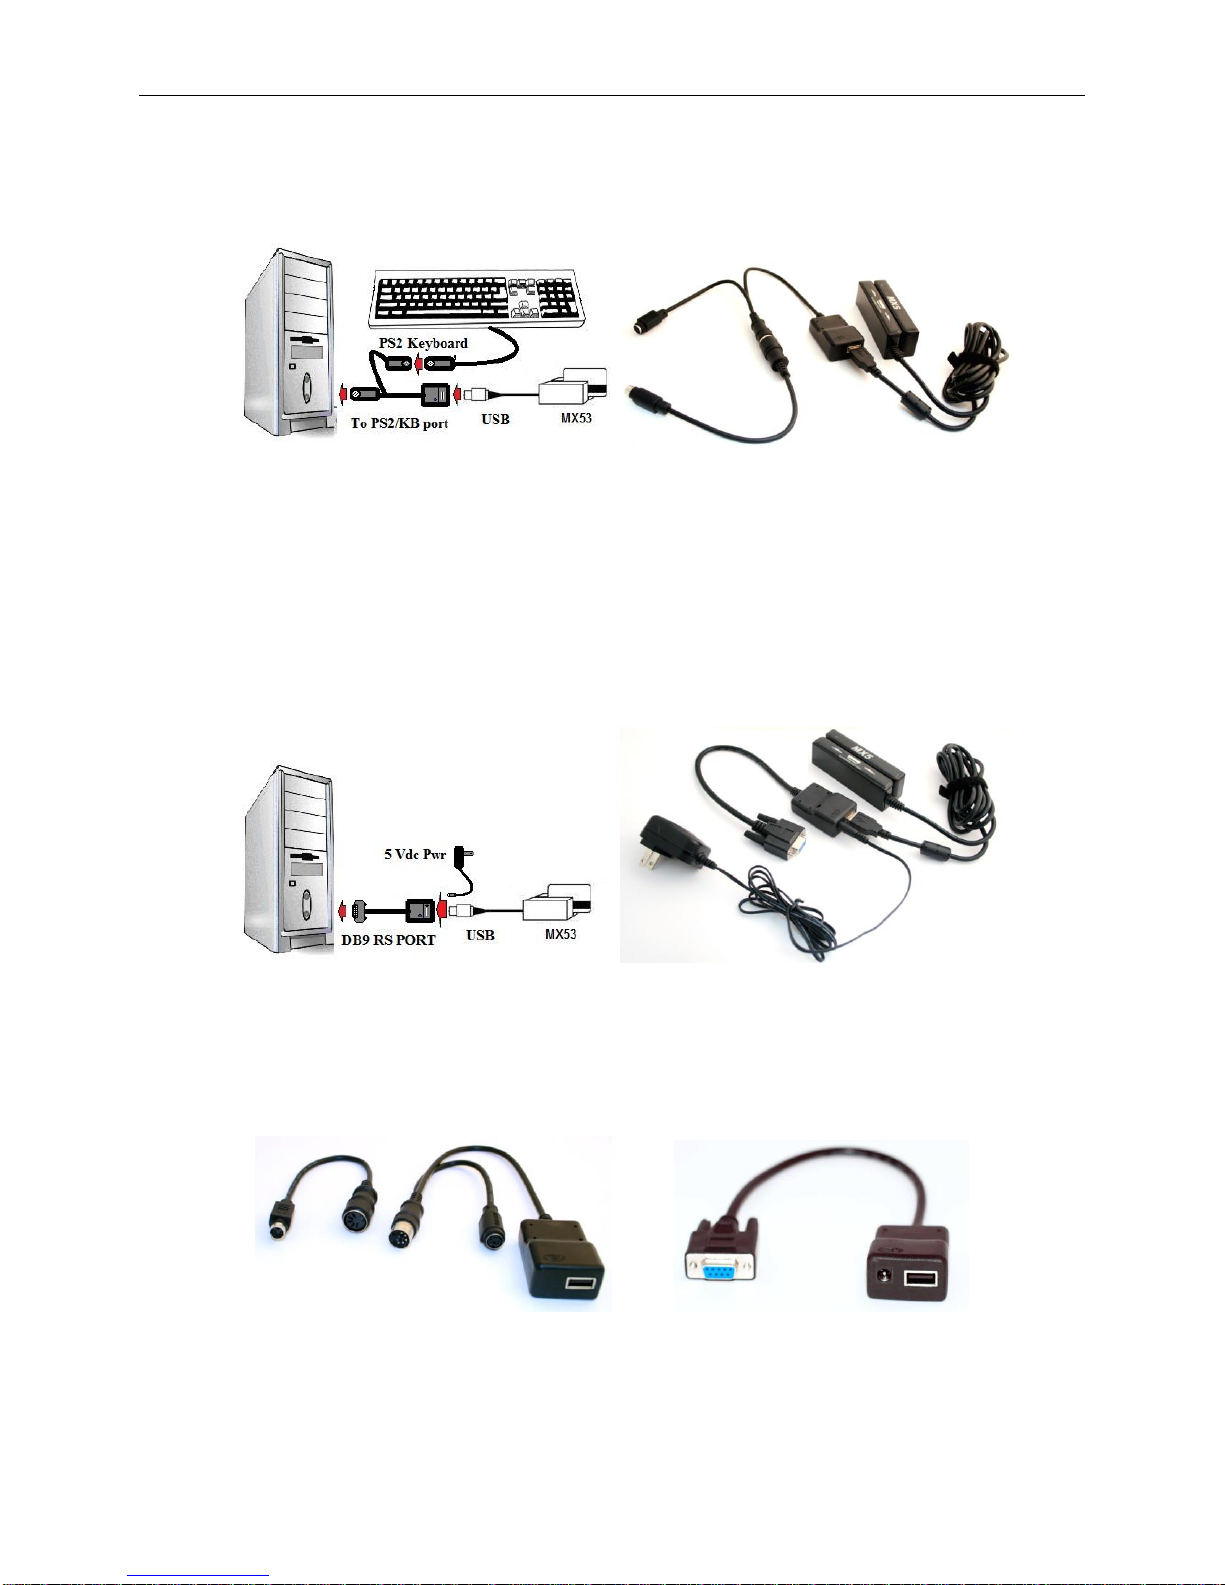
The MX5 series of devices communicates with a host computer or other terminal using a USB interface.
Unlike any other reader on the market today, you will not need to stock different models to support USB Serial,
Keyboard, HID or Custom applications. Just plug in, download the desired firmware and your MX5 is ready to
meet your needs.
The MX5 series product offering is based on the core of MX5 Magnetic Card Readers which utilizes an Arms 7
(32 Bit Processor) CPU. By simply removing the side cover of the MX5 Magnetic card reader, you now can
add a variety of snap on modules designed to add combo Reading/Writing for RFID or IC Smart Cards. If you
do not require a Magnetic Card Reader, the Compact version - MX5C is also available for all the MX5 add on
modules. For the RFID power user, we have created our MX5T table top model which supports both Low
Frequency 125 KHz and High Frequency 13.56 MHz cards/tags; all in one Reader. All of our MX5 product line
is fully flash upgradeable, customizable and a wide range of firmware is available, making the MX5 product the
most versatile product currently on the market. The MX5 product is the One and only Card Device you will
ever need for many years to come.
MX53 MX5C-RFID/SC MX53-RFID/SC MX5T-RFID
The MX53 products currently supports all the ISO, ABA, ANSI, ISO magnetic card standards and AAMVA,
CADMV drivers license standards. We can also provide support for non standard magnetic decoding methods
and Cut & Paste of Magnetic data on the fly. Data encryption can also be performed inside the reader and
various data encryption standards are available for data output. Currently Triple DES, Advanced Security
Features, Masked Data is available and AES-128 encryption will also be available soon for your custom
application requirements. These features are specifically designed to Meet PCI DSS Requirements.
Custom firmware applications can be provided exclusively upon request. A unique feature built into all our
MX5 products will protect your custom firmware and guaranty exclusive hardware to all your clients.
Another exclusive feature only available on the MX53 magnetic card reader or MX53 Combo reader is the
QuickSet setup card. This feature is great when deploying large installations or if you just wish your client to
have a default card customized to their application. All your custom parameters and options for the MX53 can
be programmed in a simple swipe of this card. Custom QuickSet setup cards are available from your supplier.
This great little feature will save you technical support time, increase productivity and help improve hardware
deployment time.
System Development Kits (SDK) are available for all our MX5 series products. Our kits include a DLL, Demo
software, sample code, code description manual and protocol manual. Contact your MX5 device provider for a
listing and pricing.

MX5 Manual Rev. D
5
Technical Specifications
MX53-USB
Built-in Magnetic Card Decoder
Yes
Supported Standard
ABA, ANSI, ISO,AAMVA, CADMV
Communications
USB port (RS232 –DB9, PS2 KB Wedge using MX5-CBL)
Power
Via USB port
Current mA
35 mA
Connectors
USB Type A
Cable Length
6 Ft (180 cm)(Default) also Available in
2 Ft ( 60 cm) and 15 Ft (450 cm)
Dimensions (LxWxH)
100 x 32 x 32 mm
Total Weight
130 g
Operating Temp.
- 20 C to 55 C
Humidity
10% - 90% relative humidity
Quick Set® Factory Default Card
Yes One step Default setup card, Customizable
Boot Load Flash Upgradable Memory
Yes
Selectable Tracks
Yes (Separate Track selection for both ISO & AAMVA)
Selectable Available Tracks
1, 2, 3
Track Swipe Rates
2 : 125 ips at 75 bpi
1, 3: 60 ips at 210 bpi
Head Life
Over 1,000,000 passes
Programmable Sound On/Off
Yes
Programmable Carriage Return
Yes
Programmable Inter character Delay
Yes
Programmable SS/ES Selectable Char.
Yes
Parity and LRC Data Checking
Built-in, audible and LED good read and error indicator
Certifications
CE, FCC, UL, RoHS
Add-on Modules
Smart IC Chip Card, EM RFID, Mifare RFID options
Support Operating Systems
Win 7, Win 2008 ,Vista, Win 2003, Win 2000, XP, Win Ce,
Unix
Warranty
2 years

MX5 Manual Rev. D
6
Technical Specifications continued:
MX53-RFID
Built-in Magnetic Card Decoder
Yes
Supported Card types (Module
Specific)
EM, TI, AT, Mifare, I Code
Communications
USB port (RS232 –DB9, PS2 KB Wedge using MX5-CBL)
Power
Via USB port
Current mA
45 - 65 mA
Connectors
USB Type A
Cable Length
6 Ft (180 cm)(Default) also Available in
2 Ft ( 60 cm) and 15 Ft (460 cm)
Dimensions (LxWxH)
100 x 48 x 35 mm (RFID add on)
Total Weight
150 g
Operating Temp.
- 20 C to 55 C
Humidity
10% - 90% relative humidity
Set-up Utility
Yes
QuickSet® Factory Default Card
Yes One step setup card, Customizable
Flash Memory Upgrade
Yes
Selectable Tracks
Yes (Separate Track selection for both ISO & AAMVA)
Selectable Available Tracks
1, 2, 3
Track Swipe Rates
2 : 125 ips at 75 bpi
1, 3: 60 ips at 210 bpi
Head Life
Over 1,000,000 passes
Programmable Sound On/Off
Yes
Programmable Carriage Return
Yes
Programmable Inter character Delay
Yes
Programmable SS/ES Selectable
Character
Yes
Parity and LRC Data Checking
Built-in, audible and LED good read and error indicator
Classifications Supported
(Module Specific)
ABA, ANSI, ISO,AAMVA, CADMV, ISO14443A, ISO14443B,
ISO15693, ISO 7816 (1-4)
Certifications
CE, FCC, UL, RoHS
Other Modules Available
Smart IC Chip Card module.
Support Operating Systems
Win 7, Win 2008 ,Vista, Win 2003, Win 2000, XP, Win Ce, Unix
Warranty
2 years

MX5 Manual Rev. D
7
Technical Specifications continued:
MX5C
Communications
USB port (RS232 –DB9, PS2 KB Wedge using
MX5-CBL)
Power
Via USB port
Current mA
45 - 65 mA
Connectors
USB Type A
Cable Length
6 Ft (180 cm)(Default) also Available in
2 Ft ( 60 cm) and 15 Ft (460 cm)
Dimensions (LxWxH)
100 x 32 x 35 mm (RFID add on)
Total Weight
130 g
Operating Temp.
- 20 C to 55 C
Humidity
10% - 90% relative humidity
Set-up Utility
Yes
Flash Memory Upgrade
Yes
Programmable Sound On/Off
Yes
Programmable Carriage Return
Yes
Programmable Inter character
Delay
Yes
Programmable SS/ES Selectable
Character
Yes
IC Card Supported (MX5C-SC
ONLY)
ISO7816-(1-4) (T=1, T=0), SLE4418-4428,
SLE4432/4442, SLE4436/5536, I2C Memory cards
Classifications Supported
(Module Specific)
ISO14443A, ISO14443B, ISO15693, Mifare Classic,
DESFire, Ultra
Certifications
CE, FCC, UL, RoHS
Support Operating Systems
Win 7, Win 2008 ,Vista, Win 2003, Win 2000, XP,
Win Ce, Unix
Warranty
2 years

MX5 Manual Rev. D
8
Technical Specifications continued:
MX5T-Tabletop
Communications
USB port (RS232 –DB9, PS2 KB Wedge using
MX5-CBL)
Power
Via USB port
Current mA
65- 100 mA
Connectors
USB Type A
Cable Length
6 Ft (180 cm)(Default) also Available in
2 Ft ( 60 cm) and 15 Ft (450 cm)
Dimensions (LxWxH)
110 x 82 x 27 mm
Total Weight
120 g
Operating Temp.
- 20 C to 55 C
Humidity
10% - 90% relative humidity
Set-up Utility
Yes
Frequency RFID
LF - 125 KHz and HF - 13.56 MHz
Prog. Sound On/Off
Yes
Prog. Carriage Return
Yes
Prog. Inter character Delay
Yes
Data Checking
Built-in, audible good read and error responses
Classifications Supported
ISO14443A, ISO14443B, ISO15693, EM, TK, AT
Certifications
CE, FCC, UL, RoHS,
Support Operating Systems
Win 7, Win 2008 ,Vista, Win 2003, Win 2000, XP,
Win Ce, Unix
Warranty
2 years

MX5 Manual Rev. D
9
Dimension Views:
MX53-USB MX53-COMBO-USB
MX5C-USB MX5T-USB
Connection Views:

MX5 Manual Rev. D
10
MX5-CBL (Add-on Cable for MX5)
Typical connection of the MX5-CBL-KB to a MX53-USB reader
Note that the device connected could be an MX53 (Shown above), MX5C or MX5T device. All devices
connected to this keyboard wedge cable (MX5-CBL-KB) must have a keyboard firmware installed using the
latest version 2.8.0 Utility or higher. This cable is designed to utilize the existing keyboard port on your PC (Mini
DIN6 or DIN5) concurrently with your keyboard. The card information is transferred to your computer as if
someone had manually typed the information. In order to change any settings of the device, you must connect the
device directly to a USB port and use the Utility. Power is provided by the keyboard port.
Typical connection of the MX5-CBL-RS to a MX53-USB reader
When utilizing the MX5-CBL-RS cable, the device must have the latest VRS firmware from Utility
version 2.8.0 or higher. Power is provided by a power adapter. In order to change any settings of the
device, you must connect the device directly to a USB port and use the Utility.
MX5-CBL-KB MX5-CBL-RS

MX5 Manual Rev. D
11
Typical MX5 Device Setup
1. Power on your system (PC).
2. Insert the MX-5 Utility CD into your system and install the MX5 Setup Utility.
3. Connect the USB cable of the MX5 to a free USB port .(See Connection Views)
4. Windows will automatically install the appropriate driver for the device. INF files for VRS firmware versions
maybe needed by Windows. These files are installed by the MX5 Utility and located in the default programs
directory MX5 Device. Select this directory when requested by Windows device manager auto installer.
5. You maybe requested to REBOOT your system.
6. You are now ready to configure your MX5 device using the MX5 Device Utility. Note that the MX53
magnetic card reader or Combo reader can be configures using the QuickSet setup card. All your custom
parameters can be programmed in a simple swipe of this card thru the MX53 reader. Custom QuickSet setup
card settings are available from your supplier. This feature is great when deploying large installations or if you
just wish your client to have a default card customized to their application. This will save you technical support
time and increase productivity.
7. If you require to Upgrade or Change the device characteristic eg: USB serial or HID or custom USB. You will
need to use the MX5 Device Utility to enable the Flash upgrade function of the device. See the MX5 Devise
utility software section for more details.
8. Once you have placed the MX5 Device in upgrade mode, you can select from an extensive list of various
firmware upgrades located on your CD. Select the upgrade based on the device type you are using. Each device
has specific firmware upgrades. See the Firmware list section for descriptions of the available firmware. Do not
worry should you install the wrong firmware, The Utility and MX5 hardware is intuitively designed to prevent
any damage or Lock up of your device. The Flash function of the MX5 Device is designed to be upgraded has
many times as desired to help keep your hardware up to date. All the MX5 Device settings and options are also
saved into the MX5 Device Flash memory. This allows you to move the hardware to any computer without
losing your custom settings.
9. Note that when the MX5 Device is upgraded, the MX5 Device will automatically restart. You do not need to
unplug the Device from the USB port to restart the Device. Windows will automatically install the new drivers
for the Device if required. Also note that each time you plug the MX5 Device into a new USB port on your
computer, Windows will install the drivers for that device for that port. Special care should be noted when
using VRS (USB Virtual Serial Port). Refer to the VRS section for hints on configuring your MX5 Device on
all your computer‟s USB ports.
10. System Development Kit (SDK) Utility located on the CD is designed for software developers who wish to
integrate the MX5 Device to their own application using our DLL and sample code. The SDK Utility is
available to demonstrate proper operation of the device using the DLL with the Hardware.

MX5 Manual Rev. D
12
MX5 Utility Software
Every MX5 comes with a utilities setup and test program that included on the CD. This program is designed to configure
selectable functions for each MX5 Device and to demonstrate the functionality of various MX5 devices. The MX5 Utility can
also be used to demonstrate Smart Card reading and writing functions using the SC Module.
System Requirements
1. AT compatible PC or later model with display.
2. Any of the following operating systems: Windows 2000, XP, VISTA, and Windows 7
3. 256K available conventional memory.
4. A free USB port.
MX5 Utility Installation
Use the following steps below in order to install MX5 Utility program.
A. Execute the self installing application program from the CD or download the Utility from:
www.poshmfg.ca /GeneralInfoFiles/Downloads_MX5.html.
B. The application will be installed in your “All Programs Directory” in a directory called “MX5 Device”
C. Connect your MX5 Device to a free USB port.
D. Select the application MX5Utility to start the program. Your desktop may also contain the MX5Utility Icon.

MX5 Manual Rev. D
13
E. The MX5 Utility program will auto-detect the MX5 Device. If no device is listed press the Lookup Device dialog box.
F. If NO device appears in the information dialog box after pressing Lookup Device, check to see that the Device is plugged
into the USB port and the power LED of the MX5 device is ON. Exit the Utility and Repeat from step C.
G. If you are still unable to see the device in the dialog box, Exit the Utility and go to the Troubleshooting Section.
MX5 Utility General Information
The MX5 Utility is intuitive to the hardware configuration and will automatically read the MX5 Device settings and display
the selection in its appropriate dialog boxes. Dialog boxes which are not related to this firmware version will be grayed out
and disabled. Should you have more then one MX5 Device connected to your system, you can select a different MX5 Device
by using your mouse and selecting the pull down draw bar in the window of the Devices:. The Device Name and device
number will be listed in the pull down draw bar dialog box. After selecting a device, the screen will be automatically updated
and the dialog boxes will be updated with the selected device settings. The Device Info Section will display the internal
device serial number, the device name and the version installed in the device selected.
You may choose to enable or disable any available options which are not grayed out.
Definitions of Settings
General Settings
"Sound On" Selecting this option will enable the sound. A single beep is heard when a good read is made, Two beeps is
heard when an error was detected in a selected track. No data is sent out by the device when an error is detected on any of the
selected tracks.
"Upper-case Selector" By Selecting this option all the card data will be outputted in "CAPITAL" letters. This option
overrides the Caps lock status. By not selecting this option, all the data outputted will be in "lower case" only and this mode
is not affected by the Caps lock status.
"Character Delay (KB/RS) Selector" option is used to add delay between each character sent out by the device. Delay
maybe needed if your computer is busy or slow at accepting data entry. Increase the delay if data lost is noticed when reading
your data Card.
"Hardware Function" You can see the function(s) of the Device. Multiple functions only apply to devices which have more
than one Module attached. (Eg: Mag card / RFID / Chip Card) This display is for your information only.

MX5 Manual Rev. D
14
Magnetic Card Reader Settings
"ISO Track Selectors" Select which Credit Card or Data Card tracks you would like the reader to read. See your application
notes to determine which track should be selected.
"AAMVA Track Selectors" Select which Driver License data tracks you would like the reader to read. This option only
applies to driver licenses and has no effect on ISO cards.
"Track SS Selectors" Enable or Disable the Track Start Character (Start Sentinel). You can also select your own SS by using
the pull down Draw bar. Use default settings unless notified otherwise by your application vendor. Each track can have a
unique SS.
"Track ES Selector" Enable or Disable the Track End Character (End Sentinel). You can also select your own ES by using
the pull down Draw bar. Use default settings unless otherwise notified by your application vendor. All the tracks will share
the same ES. You may also add a unique ES to the data string read from the RFID data card.
"Send CR Track Selectors" Select a Carriage Return "CR" at the end of the selected track of magnetic strip data.
"Track Output Order" This option allows you to change the output order of the selected tracks. Default order is (1,2,3).
"Send Any Valid Selected Tracks Selector" Enabling this option will tell the device to send out ANY VALID data of the
tracks "that have been selected" only (Track Error "OFF"). Not selecting this option will tell the reader to only send ALL the
selected valid tracks only (Default) Any track data error on any selected tracks will flash the LED twice and sound two beeps.
NO DATA will be sent out. This option is handy for trouble shooting.

MX5 Manual Rev. D
15
Function Buttons
All changes will be saved to the MX-Device once you have selected this option. All
saved settings are automatically updated and implemented inside the MX-Device flash Memory.
Your screen settings will be updated to the current device settings when you click on this
button.
Selecting this option will force all the MENU settings and the device to be reset to the
factory defaults based on the hardware.
Select this option to test the Smart Card modules with SLE4428 cards. Refer to the section
following on the functions that can be tested with the utility.
This option brings up a settings dialog that allows for changing the settings of the Serial
communications between the MX Device and the computer.
Select this option if you need to generate the Setup Card Data String of the current settings.
The string will be copied to the clipboard buffer. Paste this data into track 1 of your magnetic card encoder to produce your
new Custom "Default Setup Card".
Select this option if you need to update or change the Firmware inside the Device. The
Device will automatically start to beep and Flash the LED every second to indicate the device is in Update Mode. You may
need to press the "Lookup Devices" button in order to change to the Update Menu.
Select this option to see the results of a card swipe (such as a credit card or a driver's
license card). This will open an output window below the settings area. Once the Output window is opened, you will see the
various commands and responses from the MX5 device. This option is only available when you are using a VRS or HID

MX5 Manual Rev. D
16
version firmware for a reader. “Virtual Serial Port” on a USB port.
RFID UID Reader Settings
“RFID SS & ES” Enable or Disable the RFID Start & End Character (Start Sentinel). You can also select your own SS/ES by
using the pull down Draw bar. Use the default settings unless notified otherwise by your application vendor.
“Send CR” You may add a CR to the UID read from the RFID data card.
UID Output Options
“Decimal/Hex” The UID can optionally be output to any waiting software in either Decimal or Hexadecimal format.
“Padding” Sending the UID in Decimal output without any padding of zero characters is the default. Optionally, the UID can
be padded with leading zeroes to a length of 10 characters or to a maximum length of 17 characters (13 characters for EM
Cards).

MX5 Manual Rev. D
17
Card Testing Options
"Test Card" Selecting this option will put the program into read mode. The utility will wait until a valid card is read with the
MX-HID device. Note that none of the controls will work while the application is in read mode until a card is read or the
system times out at which point the controls will return. The "Test Card" option will put the application in wait for report
from the MX-HID reader mode. If you have read a card before the "Test Card" button is pressed the last card read report will
be sent to the application. This option is only available when you are using a HID version firmware for a reader.
"Display Swipe Strings" If you Check this box, then the card swipe tracks data will be displayed one line at a time in
printable characters. If this box is left unchecked, the card swipe is reported character by character from 0 - 336. This option
is only available when you are using a HID version firmware for a reader
"Hide Data" Select this option to close the Output window.
This option is only available when you are using a VRS or HID version firmware for a reader. “Virtual Serial Port” on a
USB port.

MX5 Manual Rev. D
18
Smart Card Testing
"Smart Card" Selecting this option will open a new window to test the Contact Smart Card Module using an SLE memory
card. SLE 4428 which is a 1 k byte memory card is a recommended or equivalent memory card from SLE. The Smart Card
utility is vary basic and only supports the basic commands for the purpose of TESTING the device only. Once the window is
open the following options become available:
“Card Reset” This option is the first command which needs to be selected once the SLE card has been inserted into the
contact card slot. Press the card down firmly until the RED Led is turned on. If the card contacts are inserted the wrong
way, the Device will sound two short Beeps to indicate an ERROR and the LED will not be turned on. Remove the SLE
card and rotate the card so that the gold contacts on the card face the opposite direction and then insert the card by
pressing the card down firmly. Once the Card is inserted properly the Red Led will be on and other options will be
un-grayed.
“Login” Once you have entered the two byte HEX password (Default is FF FF) press the Login button. If the password
is successful, the “Save Password” and “Data Write” option will be Un-grayed. If the wrong password is entered then an
error screen will pop up.
“Save Password” Once this option is un-grayed, the card is unlocked and the value of the “Password (2 Hex)” can be
changed to a new password. Pressing the Save Password will save the new value of the password onto the card. This can
be repeated many times until you log out. Removing the card performs an Auto Log out. The new password will need
to be entered in order to Login once the card is inserted back into the SC module.
“Data Read”and “Data Write” Before pressing these options, you should select the start address and the data length.
The start address is a two hex byte “FF FF” and should not exceed the memory size of the memory card. A 1 KB card
has an address range off “00 00” hex to “04 00” hex. A data length of “40” hex will fetch 64 bytes of data to be
displayed. Using the default values is recommended for first time user. The card data will be displayed in HEX on the
screen. Each data bytes comprise of two hex characters. “00” to “FF” Hex. You can edit the value of each character by
typing over the data bytes displayed. Care should be taken not to change the data length or use invalid characters. An

MX5 Manual Rev. D
19
error screen will pop up should the data length or data format be invalid once the Data Write option is pressed. The
data written to the card is not verified by this command and a Data Read should be performed to verify the data was
written to the card properly. If you did not login then the Data Write button will be grayed out and you will be unable to
save any data to the card. You can read any data from the card without logging in.
“Clear” This option will clear all the data in the data window. This will not affect or change the information on the
memory card. If you have not saved the data before pressing Clear, the data will be lost.
Special Note: All the Device settings are stored inside the individual device flash memory. This utility is not required
to be running or installed in order to operate the MX-Device. A special QuickSet "Default Card" is provided with our
entire MX5 Magnetic card device line, to setup the device to a known factory default settings.

MX5 Manual Rev. D
20
MX Device Firmware Upgrade Menu
The MX Device Firmware Update menu is automatically opened when the utility recognizes that the selected device has
been turned "ON" to update mode. In upgrade mode the MX-Device will be sounding a beep and flashing the LED every
second.
If no device is found, press the "Lookup Devices" button and the first device found will be listed. If you have more than one
device connected, use the draw down bar to list all the available devices on your system. Select the appropriate MX-Device to
be upgraded. Note that the MX-Device selected must be in Upgrade mode in order for this Menu to shown. Selecting a
MX-Device which is not in Upgrade mode will automatically change the menu selection according to the selected
MX-Device current settings.
The Device Info area will display the MX5 Device‟s current information stored in its flash memory. If you do not wish to
change the firmware, press the ReActivate button and the MX5 Device will restart with the current firmware.
The “Device Update” area lists all the features of each Firmware File that can be flashed into the MX5 Device. The Model,
Device Type, Module(s) and Product ID are listed in the various dropdown boxes.
"Reactivate" This button will Re-Activate the current firmware inside the MX-Device. The Device will automatically restart
once you have completed the "Upgrade" or "Reactivate" action to the MX-Device.
"Upgrade” You may choose to install New Firmware using the "Upgrade" button into the MX-Device. You must select a
valid MX-Device firmware file before the ""Upgrade " Button can be selected. The "Upgrade" button will be grayed out until
you have chosen a valid file. A valid file type will have an .FMW file name extension.
Other manuals for MX5 Series
1
Table of contents
Other Posh Card Reader manuals