manuals.online logo
Brands
  1. Home
  2. •
  3. Brands
  4. •
  5. Postal Pro
  6. •
  7. Digital Mailing System
  8. •
  9. Postal Pro PP3400 User manual

Postal Pro PP3400 User manual

U S
MAIL
Installation Instructions
The Craftsman Mailbox and Post Kit
WARNING: “Call Before You Dig” – Dial 811.
811 is the designated “call before you dig” phone number that directly
connects you to your local One Call center. Each state has different
rules and regulations governing digging to insure that buried utility
lines will not be disturbed.
* PLEASE NOTE: Concrete may be needed if installing in loose soil
RECOMMENDED TOOLS & SUPPLIES
• POST HOLE DIGGER
• POST LEVEL OR STANDARD LEVEL
• PHILIPS HEAD POWER SCREWDRIVER
• HAMMER / RUBBER MALLET
• PRESSURE TREATED 4" x 4" x 50-62" WOODEN POST*
(Not Included) 50" Minimum height. Actual Diameter of a Standard 4" x 4"
Pressure Treated Post: 3-1/2" x 3-1/2"
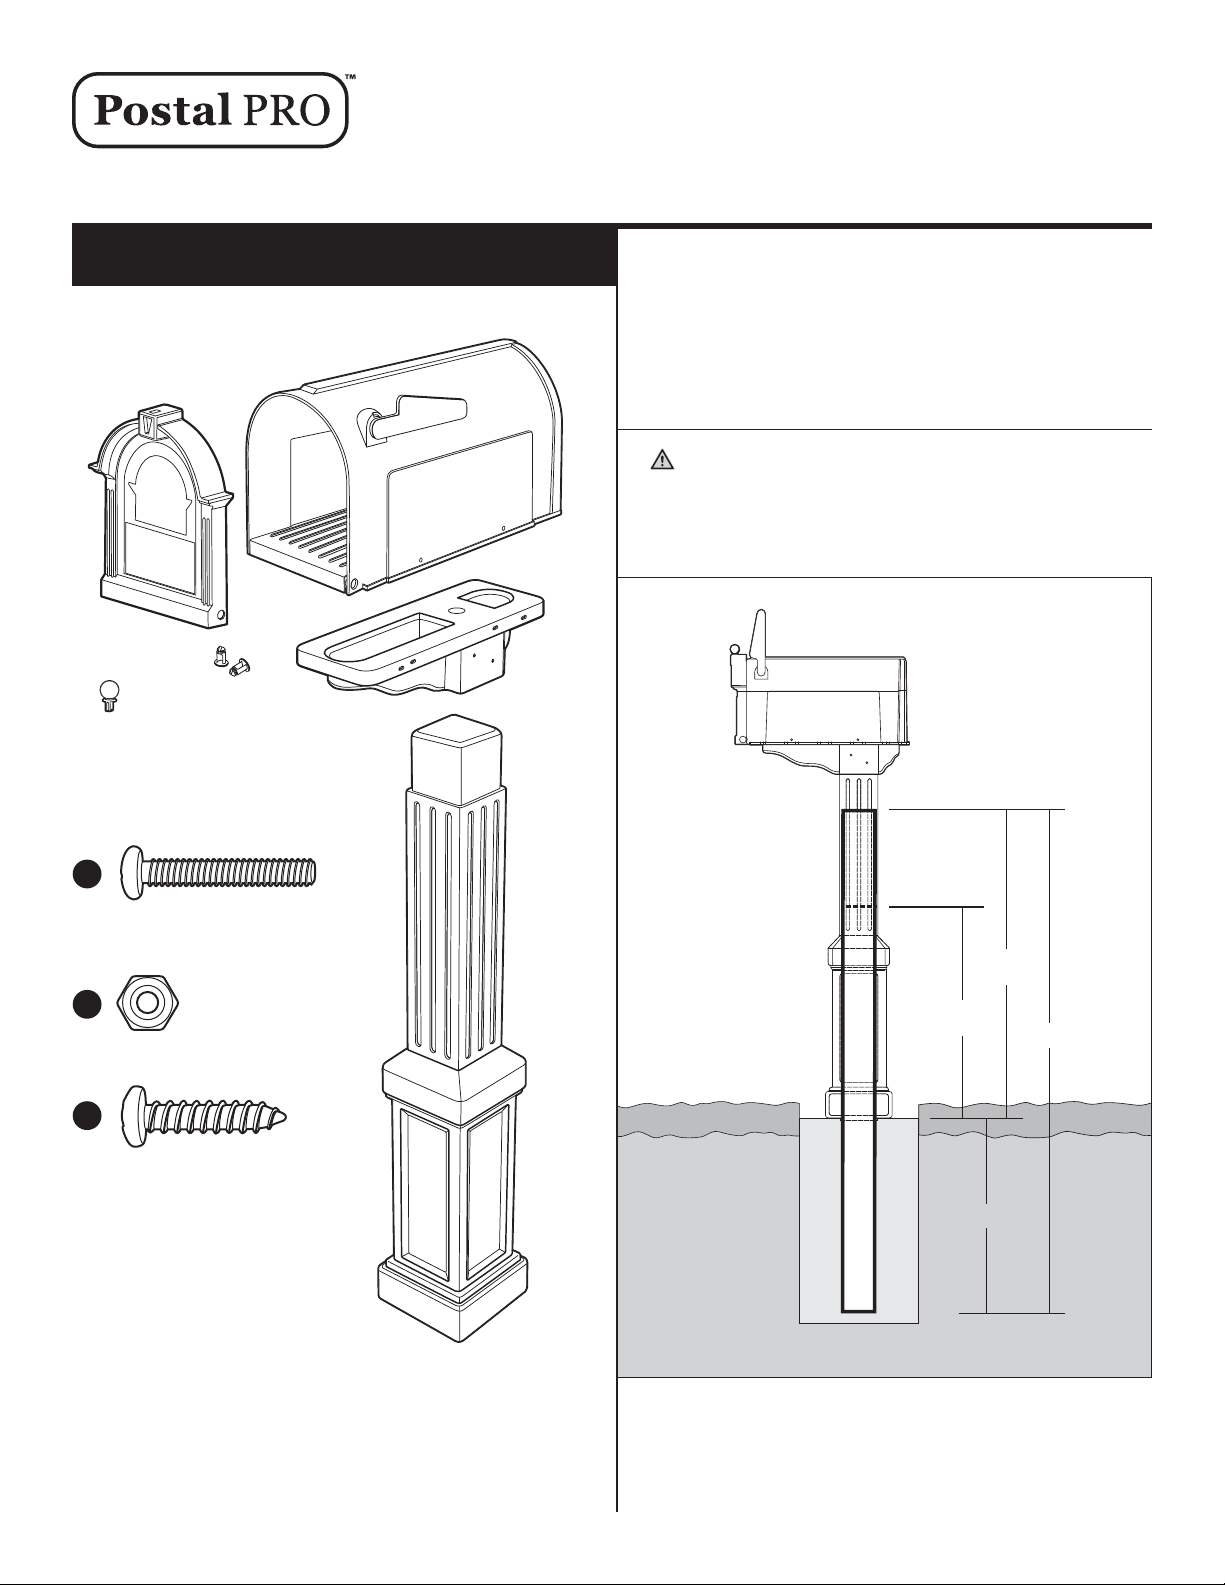
PARTS LIST
Model: PP3400
HARDWARE
Shown at actual size
(8) #12 x 1" Self Tap Screws
(4) #10 – 24 x 1-1/2" Phillips
Machine Bolts
(4) #10 – 24 Nuts
Mailbox
Body
Mailbox
Door
Mailbox
Door Knob Mailbox
Mounting
Bracket
Post
Sleeve
A
B
C
READ ENTIRE INSTRUCTION SHEET BEFORE
BEGINNING PROJECT
24"
26"
Minimum
38"
Maximum
50"– 62"
STEP 1 Determine location for mailbox. Using post hole digger, dig a hole
24" in depth. Install treated pine post by burying 24" of the post in the
ground - leaving at least 26" of post above ground. The 4x4 post can be up
to 38" above ground, but only 26" is necessary. Use level to ensure treated
pine post is in correct vertical position. Stabilize the treated pine post by
rmly tamping down loose soil around post base.
NOTE: Customers are required to contact
the local post oce before installing the mailbox
to ensure its correct placement and height at the street. Generally,
mailboxes are installed at the height of 41–45 inches from the road
surface to inside oor of mailbox or point of mail entry (locked designs)
and are set back 6–8 inches from front face of curb or road edge to the
mailbox door.
(2) Mailbox
Pins
U S
MAIL
U S
MAIL
STEP 2 Slide Mailbox Post Sleeve over 4x4
treated pine post.
STEP 5 Using the (4) #12 x 1" screws Csecure the
Mounting Bracket to the Post Sleeve. Do not over
tighten screws.
STEP 3 Secure the Mailbox Post Sleeve section
to the 4x4 treated pine post using the (4) #12 x 1"
screws Cincluded in the kit. The Plastic post
has (4) Mounting Holes located approximately
23 inches above bottom of post.
STEP 6 Assemble your mailbox by using (2) pins
to attach Mailbox Door to holes in Mailbox Body.
Pins can be snapped into place by pressing rmly
with thumb or tapped in using a rubber mallet.
TIP: Make sure the pins are fully snapped into
place. If they are installed correctly, you will not
be able to remove the pins with your ngers.
STEP 4 Attach Mounting Bracket to top of
Mailbox Post Sleeve.
STEP 7 Place Mailbox on to top of Mailbox Post
Bracket, align holes of mailbox & bracket and
secure with (4) 24 x 1-1/2" Phillips Machine Bolts A
and nuts B.
C
4x
C
A
Postal Pro is a Creative Solutions, LLC Product
Manufactured in Purvis, MS
Customer Service 877-544-5220
customerservice@creativesolutionscp.com
www.postalpromailboxes.com
04/22

Popular Digital Mailing System manuals by other brands

Hasler IM6000 Series user guide

Hasler

Hasler IM6000 Series user guide

Pitney Bowes DM100i Series Service manual & parts list

Pitney Bowes

Pitney Bowes DM100i Series Service manual & parts list

Needit POST IN user manual

Needit

Needit POST IN user manual

Pitney Bowes DM100i Series Quick install guide

Pitney Bowes

Pitney Bowes DM100i Series Quick install guide

quadient IS-5000 quick start guide

quadient

quadient IS-5000 quick start guide

Pitney Bowes E500 operating guide

Pitney Bowes

Pitney Bowes E500 operating guide

Hasler IM440 PLUS user guide

Hasler

Hasler IM440 PLUS user guide

Neopost IJ 110 user manual

Neopost

Neopost IJ 110 user manual

Pitney Bowes DM125 Operator's guide

Pitney Bowes

Pitney Bowes DM125 Operator's guide

Neopost IJ-15K manual

Neopost

Neopost IJ-15K manual

manuals.online logo
manuals.online logoBrands
  • About & Mission
  • Contact us
  • Privacy Policy
  • Terms and Conditions

Copyright 2025 Manuals.Online. All Rights Reserved.