Power Breezer Mach 4 User manual
Technician’s Troubleshooting Guide for
Power Breezer Mach 4
Technician’s
Troubleshooting
Guide for
Power Breezer
Mach 4
SCOPE
This guide provides the Technicians with proper written instructions to ensure standard methodology
for the analysis and repair of the Power Breezer Mach 4.
REVISION HISTORY
Rev. No.
Date
Author
Comment
1
08.01.2019
George Douglas
Original Document
2
01.31.2022
L. Sperring
Copyright Update
Copyright © 2022 Maxify Solutions, Inc. All Rights Reserved. Power Breezer is licensed under U.S. Patent No. 6,789,787 | Page 1

Technician’s Troubleshooting Guide for
Power Breezer Mach 4
This Information is Proprietary:
No part of this document shall be reproduced, stored in a retrieval system, or transmitted by any
means, electronic, mechanical, photocopying, recording, or otherwise, without written
permission from the publisher. Although every precaution has been taken in the preparation of
this Troubleshooting Guide, the publisher and author assume no responsibility for errors or
omissions, nor is any liability assumed for damages resulting from the use of the information
contained herein. The information contained herein is subject to change without notice.
Recommendations:
If after undergoing the complete troubleshooting sequence, and the problem persists, please
contact Power Breezer for assistance Contact Power Breezer customer service for assistance.
1-844-233-5673 | customerservice@powerbreezer.com
Warnings:
●Any repairs on a Power Breezer® should only be made by authorized personnel or Power
Breezer personnel. Any repairs/modifications by others will void the unit’s warranty.
●Power Breezer has made every effort to ensure that the directions provided in this
Troubleshooting Guide are complete and accurate. Any attempt on the reader’s part to
perform a do-it-yourself upgrade, or repair will be solely at the reader’s risk. Even when
the Troubleshooting Guide’s instructions are carefully followed, the slightest misstep in
disassembly or reassembly could result in further damage to the unit. If the reader is
unsure about how to diagnose/repair the unit as described in this Troubleshooting Guide,
please stop and contact Power Breezer customer service for assistance. 1-844-233-5673 |
customerservice@powerbreezer.com
●The information in this Troubleshooting Guide is intended for use by individuals
possessing adequate electrical, electronic and mechanical experience, backgrounds and
skills. Power Breezer shall not be responsible for the interpretation of this
Troubleshooting Guide’s information, nor will it assume any liability in connection with
its use.
Cautions:
●System hazards include mechanical pinch points, electrical hazards, and tipping hazards.
Service should be performed by those with understanding of such hazards.
●Turn off and unplug the Cooling Unit prior to filling or emptying the water reservoir.
●Turn off and unplug the Cooling Unit prior to moving.
●Turn off and unplug the Cooling Unit prior to cleaning it.
●Always unplug the Cooling Unit by pulling on the plug and never on the cord.
●Do not insert fingers or other objects inside the fan head, doing so may cause bodily
injury.
Copyright © 2022 Maxify Solutions, Inc. All Rights Reserved. Power Breezer is licensed under U.S. Patent No. 6,789,787 | Page 2

Technician’s Troubleshooting Guide for
Power Breezer Mach 4
●Children can fall into open water reservoir and drown, even in a small amount of water.
●Keep children away from reservoir. Keep reservoir lid on at all times.
●Closely supervise nearby children and pets when using this Cooling Unit. Do not leave
the Cooling Unit unattended.
●Children shall not play with the Cooling Unit.
●When possible, unplug the system for service actions. Take appropriate precautions
against electrical hazards when servicing live circuits.
●Use only on an outlet protected by a ground-fault circuit-interrupter (GFCI). Avoid using
extension cords.
●Do not allow the plug to become wet. Do not plug in/out while hands are wet. Doing so
causes risk of electric shock.
●Do not alter the plug in any way.
●If the power cord is damaged, do not attempt to repair it yourself. Contact Power Breezer
customer service for assistance. 1-844-233-5673 | customerservice@powerbreezer.com
●The Cooling Unit is not to be used by persons (including children) with lack of
experience and knowledge, unless they have been given supervision or instruction.
●This Cooling Unit can be used by children aged from 8 years and above and persons with
reduced physical, sensory or mental capabilities or lack of experience and knowledge if
they have been given supervision or instruction concerning use of the Cooling Unit in a
safe way and understands the hazards involved.
●When operating Cooling Unit, use common sense. Stay clear of moving parts and only
use water that is safe for drinking.
Copyright © 2022 Maxify Solutions, Inc. All Rights Reserved. Power Breezer is licensed under U.S. Patent No. 6,789,787 | Page 3

Technician’s Troubleshooting Guide for
Power Breezer Mach 4
Table of Contents
Tools and Materials Needed 5
Verification 5
No Power 6
Fan Not Working 7
Atomizer Not Misting 9
Atomizer Not Spinning 12
Head Is Not Rotating 13
Water Pump Not Working Properly 15
Appendix: 17
A. How to Access and Remove the E-Box 17
B. How to Substitute a Control Panel 18
C. Changing the Water Pump 20
Copyright © 2022 Maxify Solutions, Inc. All Rights Reserved. Power Breezer is licensed under U.S. Patent No. 6,789,787 | Page 4

Technician’s Troubleshooting Guide for
Power Breezer Mach 4
Tools and Materials Needed
Tools:
●Complete Socket Set
●Phillip’s Head Screwdriver
●Flat Head Screwdriver
●“Punch-Down” Tool
●Wire cutters
●Wire Strippers
●Universal Crimpers
●Allen wrench set
●Digital VoltMeter (“Meter”)
Parts: (known good)
●Control Panel - (J&W “Shark Fin” Style)
●Electrical Cord
●Water Pump - D.C.
●Atomizer
Supplies:
●Wire nuts, wire connectors, etc.
●Red & Blue Loctite
●Assorted cables
●Duct tape
Documentation:
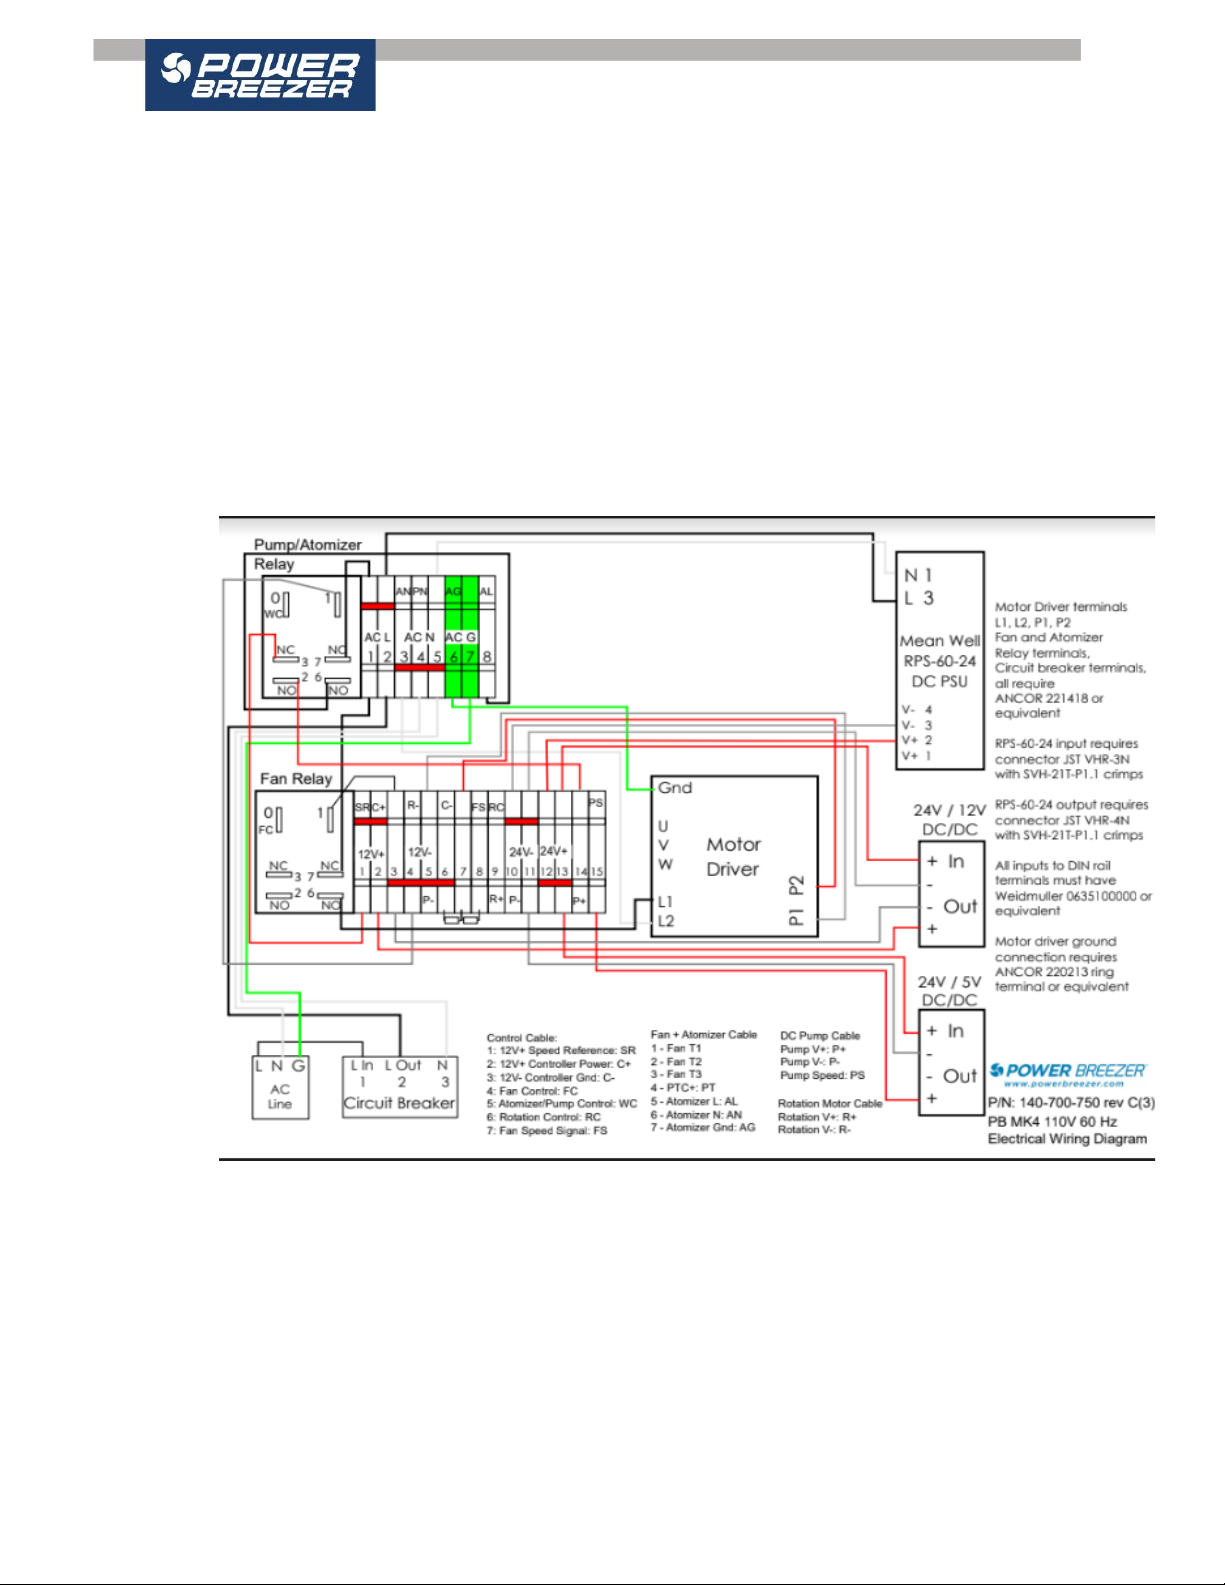
●E-box wiring diagram (140-700-750)
●Other drawings (140-000-000, 140-700-000, 140-700-300)
●Manual, etc.
Verification
The key to any repair is to understand the problem, this begins with being able to duplicate the
problem the customer is seeing.
A tried and true way to “zero- in” on where the root cause is located is to try “substitution”.
Substitution, is using known good parts and substitute them into the unit to identify the possible
defect.
Copyright © 2022 Maxify Solutions, Inc. All Rights Reserved. Power Breezer is licensed under U.S. Patent No. 6,789,787 | Page 5

Technician’s Troubleshooting Guide for
Power Breezer Mach 4
No Power
Make sure to unplug the unit while checking connections or anything pertaining to the electronic
box and plug back in when testing.
Possible Causes of No Power:
1. Power Source
2. Circuit Breaker
3. VFD and Wiring of the E-Box
4. Control Panel
Troubleshooting
Step 1 Power Source
- Inspect the power cord and its connection to the power source.
- Breezer can draw as much as 15 to 20 Amps on start up at full Power, Check the Power
Source’s Circuit Breaker.
-Verify the Power Source with a Digital Volt Meter, Set your meter for MODE: A/C
voltage, RANGE: 300 or higher
- Measure the power Source voltage and be sure that it matches your Breezer Voltage
a. If there is a discrepancy, correct the issue and retest
b. If everything matches and still No Power, go to step 2
Step 2 The Power Breezer’s Circuit Breaker
- The circuit breaker, on the Power Breezer, when turned on, is lit
- Verify the switch is in the correct position.
a. If the breaker light is not on, change the circuit breaker and retest
b. If the breaker is on and still No Power, go to step 3
Step 3 VFD and the wiring of the E-Box
- Open the E-Box and compare the E-Box to the drawing 140-700-750 wiring diagram
a. If the E-Box not wired correctly, fix the issue and re-test
b. If the E-Box is wired correctly, continue
- Verify the VFD voltage setting is correct
a. if not contact Customer Service at customerservice@powerbreezer.com or by
phone at 844-233-5673.
b. If correct, go to step 4
Step 4 Control Panel
- Substitute the Control Panel with a known good Control Panel and test
- If the Breezer is working with the substituted Control Panel then replace the Control
Panel and test
- If the unit is still not working: contact Customer Service by email at
customerservice@powerbreezer.com or by phone at 844-233-5673
End of this section
Copyright © 2022 Maxify Solutions, Inc. All Rights Reserved. Power Breezer is licensed under U.S. Patent No. 6,789,787 | Page 6

Technician’s Troubleshooting Guide for
Power Breezer Mach 4
Fan Not Working
Make sure to unplug the unit while checking connections or anything pertaining to the electronic
box and plug back in when testing.
Possible Causes of Fan Failure:
1. Obstruction
2. Damaged Cable /Incomplete Connections in the E-Box
3. Defective Control Panel
4. Defective Relay
5. Malfunctioning A/C Drive
6. Fan Motor
Troubleshooting
Step 1 Obstruction
- Is there any obstruction in or around the fan blades
- Yes: remove and test
- No: go to step 2
Step 2 Cables and wires in the E-Box
- Inspect the cables, look for any damage to the cable and its connectors.
- Inspect the cable connections in the E-Box, looking at each wire and verifying each wire
is securely connected. Next verify each wire is in its proper location.
- Secure any loose wires; place any misplaced wires into the proper location and test
- Verify continuity from the end of cable to the crimp in the connector (all crimps should
be seated equally inside the connector)
- If the cable fails continuity or the crimps are not uniform in the connector, replace the
cable and test
- If the wires are secure and in the correct location, go to step 3
Step 3 Control Panel
- Verify the wiring of the Control Panel in the E-Box
- Substitute the Control Panel with a known good Control Panel and test
- If the fan is working with the substituted Control Panel then replace the Control Panel
and test
- If the fan is still not working: go to step 4
Step 4 Relay (The Fan Relay) is located at the end of the D/C D-rail
- Verify the wiring
- The relay is activated when the power button (Red) is pressed, this activation gives the
A/C Drive its power
- The relay has an audible “Click” this “click” is heard when the power button (Red) is
pressed on the Control Panel.
- If this “click” is not heard when the power button (Red) is pressed on the Control Panel:
Copyright © 2022 Maxify Solutions, Inc. All Rights Reserved. Power Breezer is licensed under U.S. Patent No. 6,789,787 | Page 7

Technician’s Troubleshooting Guide for
Power Breezer Mach 4
a. Verify the relay, at position 1, on the relay, -12 V coming from the D/C D-rail ( #
3 position)
b. at position 0 will have + 12 V coming from wire # 4 of the control panel when the
power is turned on (Red button)
c. If the relay has + 12 on position 0 and -12 on position 1 and is no audible “click”
is heard when the power button (Red) is pressed on the Control Panel, change the
relay and test
- If the “Click” is heard and no Fan movement, go to step 5
Step 5 A/C Drive- the A/C Drive (VFD) provides power to the Fan Motor
a. The VFD has a self diagnostic software:
b. Unplug power and wait 30 seconds
c. Remove some wires from the VFD - Phase wires T1, T2, T3, speed control wires
P1 & P2, leaving only the L1, L2 and ground connected
d. Plug in power and press the red power button on the control panel
e. The relay will activate and the Two LEDs on the VFD will flash.
f. If one led is steady green and the other led flashes green, go to step 6
g. If one led is steady green and the other led is flashes red, replace the VFD
Step 6 Fan Motor
- Our fans consists of a 3 phase fan motor. Inspect the Motor Hub for signs of heat distress.
Heat stressed Hub is a sign that the Fan Motor has ran hot and needs to be replaced.
If the problem is not resolved, contact Customer Service by email at
customerservice@powerbreezer.com or by phone at 844-233-5673.
End of this section
Copyright © 2022 Maxify Solutions, Inc. All Rights Reserved. Power Breezer is licensed under U.S. Patent No. 6,789,787 | Page 8

Technician’s Troubleshooting Guide for
Power Breezer Mach 4
Atomizer Not Misting
Make sure to unplug the unit while checking connections or anything pertaining to the electronic
box and plug back in when testing.
Possible Causes of Atomizer Failure:
1. Water Pump
2. Water Valve
3. Water Feed Hose
4. Atomizer
Troubleshooting
Step 1 Water Pump
- Unplug the Power Breezer for 30 seconds then begin to troubleshoot the pump
- Ensure there is sufficient water to cover the intake of the pump
- All hoses are connected correctly and clear
- Press Blue button on the control panel, pick up the pump and feel for vibration - ensuring
power is getting to the pump
a. No vibration-check that the pump is getting 12 volts
1. Use E-Box wiring diagram to verify wiring (140-700-750 wiring diagram)
2. If the wiring is correct and motor not turning on, replace Motor, retest
b. Feel Vibration, the pump is working, but no mist, go to step 2
Step 2 Water Valve
- Verify the blue dial on the water valve is parallel to the grey case (perpendicular will shut
- off the water)
- Pull water feed tube from pump to valve off
A. If water is not flowing, return to the pump, return to step 1
B. If water is flowing return the hose to the valve and remove the hose from the other
side of the valve
1. If water is flowing, go to step 3
2. If water is not flowing replace the valve
Step 3 Water Feed Hose
- Using compressed Air, take the nozzle, blow into the Water Feed Tube to the Atomizer;
blow into the tube for 2–3 seconds at a time. Reconnect the Water Feed Line and test.
1. If it is misting (Water flow) Problem resolved
2. If not, go to step 4
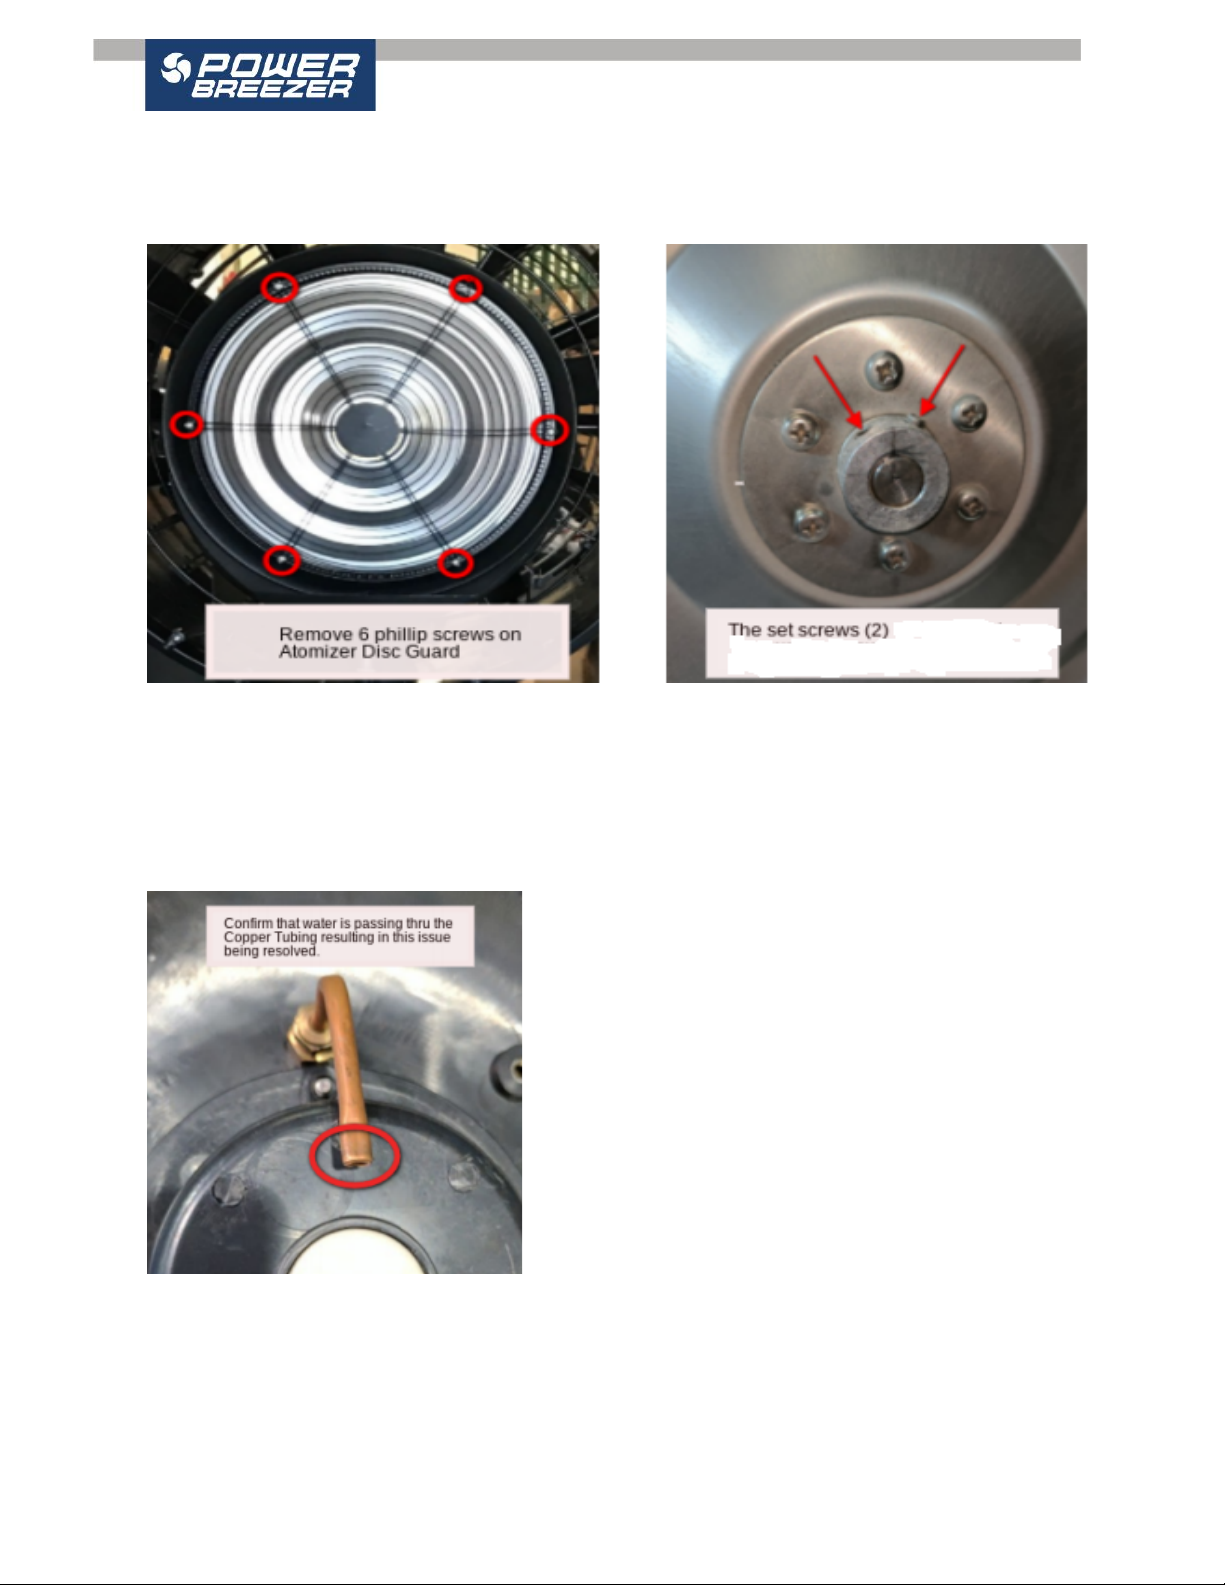
Step 4 Analysis of the Atomizer
- Place a towel inside the atomizer catch tray to avoid losing the screws down the drain
- Remove the 6 screws from the atomizer screen
Copyright © 2022 Maxify Solutions, Inc. All Rights Reserved. Power Breezer is licensed under U.S. Patent No. 6,789,787 | Page 9
Technician’s Troubleshooting Guide for
Power Breezer Mach 4
- The center of the plate is now visible, on the shaft are the (2) set screws make sure they
are not loose
- The plate has six Phillips head screws, remove them.
- The plate can now be removed from the shaft exposing the copper pipe.
- Clear the pipe of any debris
- Turning on the atomizer and allow the water to flow out, issue is now resolved
- Re-assemble atomizer
Copyright © 2022 Maxify Solutions, Inc. All Rights Reserved. Power Breezer is licensed under U.S. Patent No. 6,789,787 | Page 10

Technician’s Troubleshooting Guide for
Power Breezer Mach 4
If the problem is not resolved, contact Customer Service by email at
customerservice@powerbreezer.com or by phone at 844-233-5673.
End of section
Copyright © 2022 Maxify Solutions, Inc. All Rights Reserved. Power Breezer is licensed under U.S. Patent No. 6,789,787 | Page 11

Technician’s Troubleshooting Guide for
Power Breezer Mach 4
Atomizer Not Spinning
Make sure to unplug the unit while checking connections or anything pertaining to the electronic
box and plug back in when testing.
Possible Causes of Atomizer Failure:
1. Control Panel
2. Wiring of the E-Box
3. Atomizer
Troubleshooting
Step 1 Control Panel
- Verify the wiring of the Control Panel
- Substitute the Control Panel with a known good Control Panel and test
- If the Atomizer is working with the substituted Control Panel then replace the Control
Panel and test
- If the Atomizer is still not working, go to step 2
Step 2 Wiring
- Open E-Box
- Compare the E-Box to the drawing 140-700-750 wiring diagram
If the E-Box is not wired correctly, fix the issue and re-test
If the E-Box is wired correctly, go to step 3
Step 3 Atomizer
- Verify you have the correct Atomizer (110 v or 220v) the label is located in the back of
the atomizer (you might need to use a phone camera to read the label)
a. If the Atomizer is not correct, replace the Atomizer with the correct one
b. If the correct Atomizer is being used, please contact Customer Service by email at
customerservice@powerbreezer.com or by phone at 844-233-5673.
End of section
Copyright © 2022 Maxify Solutions, Inc. All Rights Reserved. Power Breezer is licensed under U.S. Patent No. 6,789,787 | Page 12

Technician’s Troubleshooting Guide for
Power Breezer Mach 4
Head Is Not Rotating
Make sure to unplug the unit while checking connections or anything pertaining to the electronic
box and plug back in when testing.
Possible Causes of Rotation Failure:
1. Obstruction
2. Control Panel
3. Wiring of the E-Box
4. Rotation Motor
Troubleshooting
Step 1 Obstruction
- View the Breezer and pay attention to the Head
a. Is the head seated correctly on the pole? Look at the bottom of the head and verify
that the pole is inserted into the head uniformly.
b. Can the head freely move side to side? Verify that cables did not get wrapped
around the pole
c. Grab the head and gently see if you can move it left to right
d. If not, determine why and retest
e. If it can, go to step 2
Step 2 Control Panel
- Verify the wiring of the Control Panel in the E-Box with the 140-700-750 wiring diagram
- Substitute the Control Panel with a known good Control Panel and test
- If the Rotation function is working with the substituted Control Panel then replace the
Control Panel and test
- If the Head is not rotating, go to step 3
Step 3 Wiring
- Verify the rest of the E-Box to the drawing 140-700-750 wiring diagram
- If the E-Box not wired correctly, fix the issue and re-test
- If the E-Box is wired correctly, go to step 4
Copyright © 2022 Maxify Solutions, Inc. All Rights Reserved. Power Breezer is licensed under U.S. Patent No. 6,789,787 | Page 13

Technician’s Troubleshooting Guide for
Power Breezer Mach 4
Step 4 Rotation Motor
- To access the Rotation Motor:
a. The head must be placed on the side or back into the tank.
b. The hex screw, on the bottom of the rotation pipe, must be removed
c. The rotation pipe must be lifted out of the breezer
d. The panel above the E-Box now can be removed and the rotation motor with its
linkage can be viewed
- Look at drawing 140-700-300, Tank Rotation Assembly, verify the rotation motor with its
linkage is connected as it is depicted in the drawing 140-700-300.
a. If it is not, correct the mis-assembly
b. If it is correct contact Customer Service by email at
customerservice@powerbreezer.com or by phone at 844-233-5673.
End of section
Copyright © 2022 Maxify Solutions, Inc. All Rights Reserved. Power Breezer is licensed under U.S. Patent No. 6,789,787 | Page 14

Technician’s Troubleshooting Guide for
Power Breezer Mach 4
Water Pump Not Working Properly
Make sure to unplug the unit while checking connections or anything pertaining to the electronic
box and plug back in when testing.
Possible Causes of Pump Failure:
1. Water Hose
2. Wiring of the E-Box
3. Control Panel
4. Water Pump
Troubleshooting
Since the pump has a “Safe - Mode” to prevent the pump being damaged from running without
water, always unplug the unit and wait 30 Sec.s, then plug the unit back in and test to verify
failure.
Step 1 Water Hose
- Turn on the unit
- Turn on the atomizer
- Trace the hose
a. If the hose is leaking ensure the hose is pushed pass the “O” ring in the adapter
b. Verify the hose is connected to the water valve and the valve is connected to that
connects to the Atomizer.
c. Verify the valve is turned on; this is when the blue arm is parallel to the body of
the valve.
- Verify the hose is not clogged
a. Using compressed Air, take the nozzle, blow into the Water Feed Tube to the
Atomizer; blow into the tube for 2–3 seconds at a time. Reconnect the Water Feed
Line and test.
b. If it is misting (Water flow) Problem resolved
c. If the hose was not clogged, go to step 2
Step 2 Wiring of the E-Box
- Open E-Box
- Compare the E-Box to the drawing 140-700-750 wiring diagram
- If the E-Box not wired correctly, fix the issue and re-test
- If the E-Box is wired correctly, go to step 3
Copyright © 2022 Maxify Solutions, Inc. All Rights Reserved. Power Breezer is licensed under U.S. Patent No. 6,789,787 | Page 15

Technician’s Troubleshooting Guide for
Power Breezer Mach 4
Step 3 Control Panel
- Verify the wiring of the Control Panel
- Substitute the Control Panel with a known good Control Panel and test
- If the water Pump function is working with the substituted Control Panel then replace the
Control Panel and test
- If the water Pump is still not working, go to step 4
Step 4 Water Pump
- Verify DC pump cable is not damaged
- Change DC water pump
If the problem is not resolved, contact Customer Service by email at
customerservice@powerbreezer.com or by phone at 844-233-5673.
End of section
Copyright © 2022 Maxify Solutions, Inc. All Rights Reserved. Power Breezer is licensed under U.S. Patent No. 6,789,787 | Page 16

Technician’s Troubleshooting Guide for
Power Breezer Mach 4
Appendix:
A. How to Access and Remove the E-Box
Make sure to unplug the unit prior to checking connections or anything pertaining to the
electronic box.
A. Look at drawing 140-000-000 and locate where the E- Box is located with respect to the
breezer.
B. Use a socket wrench with a 13 mm socket and remove the bottom two Hex screws.
C. Slide the E-Box out like a dresser drawer and rest it next to the Breezer
D. Turn the E-Box upside-down, this will expose the back cover of the E-Box
E. Removing the two hex screws with a 3.0 mm allen key and this allows the cover of the
E-Box to slide off. Drawing 140-700-750 shows what the inside of the E-Box should
look like and 140-700-750 - wiring diagram, this drawing will show you how it is
electronically wired.
Copyright © 2022 Maxify Solutions, Inc. All Rights Reserved. Power Breezer is licensed under U.S. Patent No. 6,789,787 | Page 17
Technician’s Troubleshooting Guide for
Power Breezer Mach 4
B. How to Substitute a Control Panel
Make sure to unplug the unit while checking connections or anything pertaining to the electronic
box.
A. Have a known good Control Panel with its Control Cable (6 wires in the Control Cable
are black and numbered 1 through 6 and a green wire which is referenced as 7).
B. Open E-Box
C. Look at drawing 140-700-750 - wiring diagram
D. On the bottom of the wiring diagram is the “Control Cable” wiring directions.
E. Remove the current Control Panel cable and substitute the known good Control Panel
cable.
F. Test the Control Panel by
a. Turning on the unit
b. Turning on the Atomizer
c. Turning on the Rotation
Copyright © 2022 Maxify Solutions, Inc. All Rights Reserved. Power Breezer is licensed under U.S. Patent No. 6,789,787 | Page 18

Technician’s Troubleshooting Guide for
Power Breezer Mach 4
d. Vary the Speed of the Fan
Copyright © 2022 Maxify Solutions, Inc. All Rights Reserved. Power Breezer is licensed under U.S. Patent No. 6,789,787 | Page 19

Technician’s Troubleshooting Guide for
Power Breezer Mach 4
C. Changing the Water Pump
Make sure to unplug the unit while checking connections or anything pertaining to the electronic
box and plug back in when testing.
A. Open the E-Box
B. The wiring diagram for the E-box (140-700-750, Page 21) has the DC Pump Cable
wiring instructions are on the bottom
C. Disconnect the DC Pump Cable
D. Remove anything attached to the cable
E. Locate the Control Panel on the Power Breezer and lift the tray that the Control Panel is
seated in; this will expose the DC Pump Cable. Pull the DC Pump Cable up from the
E-Box.
F. Go to the Tank and pull the DC Pump Cable through and place the defective in a
container for analysis at a later date.
G. Take the New DC Pump Cable and thread it through the same path as the old DC Pump
Cable to the E-Box
H. Connect the DC Pump to the E-Box per the wiring diagram.
I. Test the new water pump and the Power Breezer.
J. Close the E-Box and prepare the Power Breezer ready to ship.
You have reached the last page of the Technician’s Troubleshooting Guide for Power Breezer
Mach 4. If your Cooling Unit’s problems cannot be resolved using the procedures found in this
guide, please contact Customer Service by email at customerservice@powerbreezer.com or by
phone at 844-233-5673.
Copyright © 2022 Maxify Solutions, Inc. All Rights Reserved. Power Breezer is licensed under U.S. Patent No. 6,789,787 | Page 20
Table of contents
Other Power Breezer Accessories manuals


