Power Fist 8210536 User manual

7-1/2" Meat Slicer
8210536
Owner’s Manual
Read and understand all instructions before use.
Retain this manual for future reference.

Operating Instructions
Slicer-Operating Instructions
Before using the slicer for the first time please make sure to read carefully and understand these
operating instructions and the safety precautions. Retain this manual for future reference.
Proper use
This device is intended exclusively for slicing household foods. The food to be sliced must be thawed,
unpacked and free from bones before it can be sliced in the device.
Any other use or modification to the equipment shall be considered as improper use and could result in
damage and/or injury.
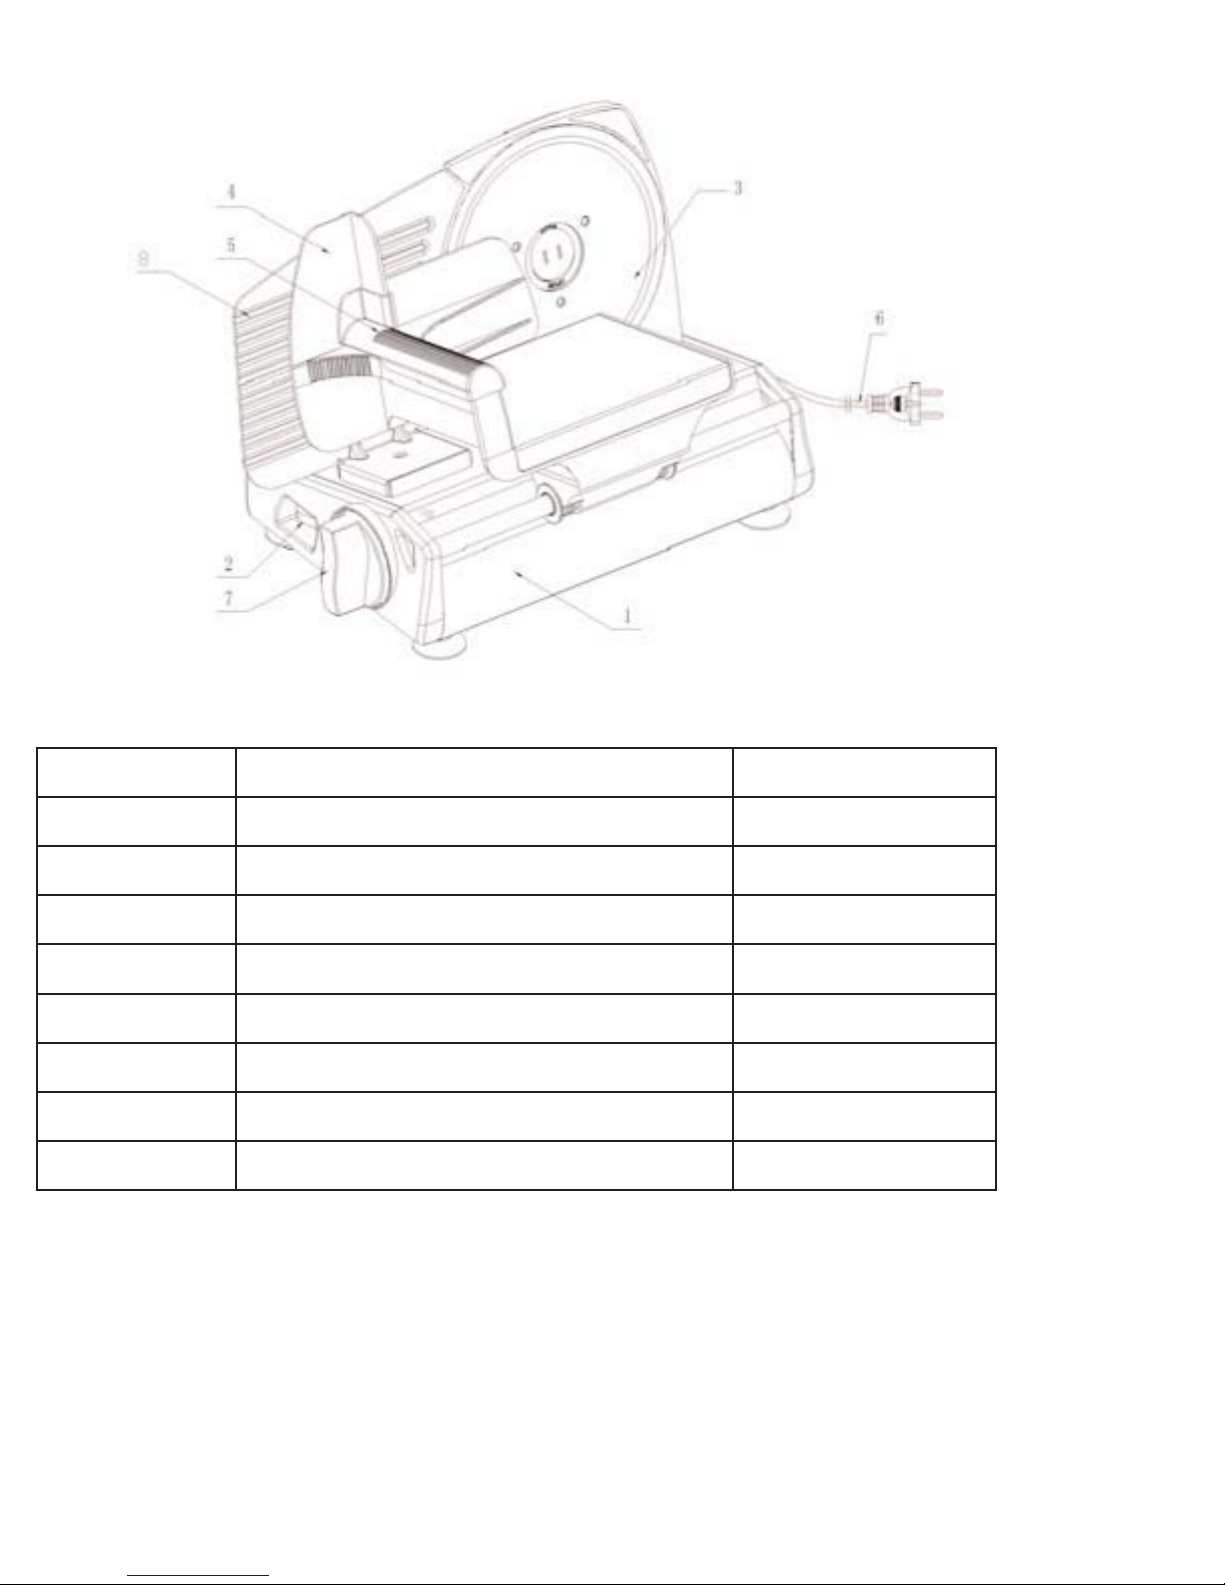
Features
1. Housing
2. Switch
3. Cutting blade
4. Sliding feed table
5. Piece holder
6. Plug
7. Knob for slice thickness
8. Food support plate
Technical information
t
Important safety rules
1. The slicer must be connected to a 110V AC electricity supply only.
2. Always pull the plug out of the socket before you clean the slicer or if it is not running properly.
To disconnect the device from the electricity supply, never pull the plug out using the cord,
always pull directly on the plug.
3. NEVER immerse the slicer in water and do not expose the slicer to rain or moisture .If the slicer
should fall into water unplug immediately, and only then remove the slicer from the water.
Afterwards, have the slicer examined by an authorized service center before you use it again.
4. Do not use the slicer if your hands are wet or if you are standing on a wet floor.
Do not use the slicer if it is wet or moist .
5. The slicer is designed exclusively for domestic use and not for commercial purposes.
6. Set up and store the slicer out of reach of children.
7. Do not leave the slicer unattended if it can be switched on and operated.
Nominal voltage 110V~ 60Hz, KB10 min;
Power rating 130W
Cutting blade Reinforced, non-rusting fine blade, 19 cm
Page 2

8. Always ensure that the slicer is safely set up or installed before you start to use it
9. The slicer should always be used with the sliding feed table and piece holder in position, unless
this is not possible due to the size or shape of the food. Do not use the slicer to slice through bones
or deep-frozen food.
10. Do not use the slicer if it is damaged in any way. Have the slicer immediately repaired at an
authorized service center or other suitably qualified repairer.
11. Use the slicer with the supplied accessories only.
12. No claims under the guarantee or liability for damages will be accepted if they result from improper
or incorrect use of the slicer.
13. The cutting blade continues to rotate after the slicer has been switched off, be sure it has stopped
moving completely before cleaning or adjusting.
14. If the supply cord is damaged, it must be replaced by the manufacturer, its service agent or
similarly qualified person in order to avoid a hazard.
Before first use
Take the slicer carefully out of its packaging. Remove all the packaging material and keep it together
with the packaging. Clean the slicer before it comes into contact with any food (refer to the section
headed ’Cleaning’)
Setting up the slicer
1. Never set the slicer up on a hot surface or near an open flame.
2. Make sure that the electrical cord does not pass over hot or sharp –edged objects
3. Do not allow the cord to become kinked or trapped and do not wind it around the slicer.
• Set up the slicer on a flat, non-slip surface close to an electrical socket.
SSlliicciinngg
1. NEVER touch the blade when the slicer is operating! Injury will result!
2. Use the slicer only for slicing normal household foods and not other purposes. Do not use the slicer
for slicing deep-frozen foods, bones, foods with large kernels or for slicing packaged foods.
3. NEVER use the slicer for more than 10 minutes continuously.
4. The cutting blade(3) continues to rotate after the slicer has been switched off.
5. To prevent accidental injury, the slice thickness must be returned to the “0” setting after use.
Page 3

Running the slicer
Starting continuous operation: Push the switch to the “ON” position
Stopping continuous operation: Move the switch into the “OFF” position and wait until the cutting blade
comes to a complete stop.
Setting the slice thickness
The slice thickness can be set to between 0 and approximately.12 mm. Set the required slice thickness
using the knob(7). The settings on the scale do not correspond with the slice thickness in mm. For
safety reasons the blade is covered in setting”0”.
Place the food to be sliced on to the sliding feed table. Press the food to be sliced with the piece holder
(5) lightly against the food support plate(8). Switch the device on and, lightly pressing the food to be
sliced forward, guide it along the cutting blade(3). After using the slicer always set the food support
plate into the “0” setting so that the sharp blade is covered.
To safeguard your fingers always use the sliding feed table(4) and the piece holder(5) (except when
slicing large pieces of food).
Cleaning
1. Before starting to clean the slicer, switch it off, pull the plug out of the socket and set the food
support plate to the “0” setting.
2. Do not immerse the slicer in water.
3. CAUTION: The cutting blade is very sharp!
It is necessary to clean the slicer at regular intervals as perishable food scraps could accumulate on the
slicer or behind the cutting blade. Remove the piece holder and clean it in with mild dish soap in warm
water (not in the dishwasher). Wipe the housing and sliding feed table using a damp cloth. Do not use
any cleaning powders, scouring pads or hard brushes.
Removing the cutting blade
• Remove the screw clip (right, near the cutting blade) of the blade mount and the blade lock by
screwing out the screw clip
• When taking out the blade make sure that you handle it by the center
• Wash it by hand with mild dish soap in warm water(not in the dish washer!)
• Clean the housing behind the blade with a dry cloth or a soft brush
Page 4


Parts List For MEAT SLICER 7 1/2 IN. BLADE
PARTS# DESCRIPTION Quantity (pc)
1Housing 1
2Switch 1
3Cutting blade 1
4Sliding feed table 1
5Piece holder 1
6Plug 1
7Knob for slice thickness 1
8Food support plate 1
Page 5
Table of contents


