Power Fist 8492910 User manual

V1.0 8492910
Please read and understand all instructions before use. Retain this manual for
future reference.

This page is intentionally left blank.

SPECIFICATIONS
Pressure Range 40 PSI
Flow Rate 2.4 CFM
Voltage Rating AC 120V
Amperage Rating 10A
Frequency Rating 60HZ
Wattage 1,200W
Fluid Delivery Type Air
Nozzle Size 0.9/1.8 mm
Cup Capacity 1 litre
Number of Spray Settings 3
Hose Size 15 feet (4.5 metres)
Cup Material Polypropylene
INTRODUCTION
This paint spray system applies lacquers, stains, water-based nishes and oil-
based paints with minimal overspray. It features a unique turbine system that
delivers airow directly to the spray gun, eliminating the need for an air
compressor. An adjustable spray nozzle allows for horizontal, vertical and
round at patterns.
SAFETY
WARNING! Read and understand all instructions before using this tool.
The operator must follow basic precautions to reduce the risk of
personal injury and/or damage to the equipment.
HAZARD DEFINITIONS
Please familiarize yourself with the hazard notices found in this manual. A
notice is an alert that there is a possibility of property damage, injury or death
if certain instructions are not followed.
DANGER! This notice indicates an immediate and specic hazard that will result in severe
personal injury or death if the proper precautions are not taken.
V1.0 HVLP ELECTRIC PAINT SPRAY SYSTEM 8492910
Page 3 www.princessauto.com / 1-800-665-8685

WARNING! This notice indicates a specic hazard or unsafe practice that could result in a
serious injury if the proper precautions are not taken.
CAUTION! This notice indicates a potentially hazardous situation that may result in minor
or moderate injury if proper practices are not taken.
NOTICE! This notice indicates that a specic hazard or unsafe practice will result in
equipment or property damage, but not personal injury.
WORK AREA
1. Operate in a safe work environment. Keep your work area clean, well-lit
and free of distractions. Place lights so you are not working in a shadow.
2. Keep anyone not wearing the appropriate safety equipment away from
the work area.
3. Store unused tools properly in a dry, safe and secure location to prevent
rust, damage or misuse.
4. Do not install or use in the presence of ammable gases, dust or liquids.
5. Always make sure that the area is well ventilated when using indoors.
6. Observe the wind direction when using the paint spray gun outdoors.
PERSONAL SAFETY
WARNING! Wear personal protective equipment approved by the
Canadian Standards Association (CSA) or American National Standards
Institute (ANSI).
PERSONAL PROTECTIVE EQUIPMENT
1. Always wear impact safety goggles that provide front and side protection
for the eyes. Eye protection equipment should comply with CSA Z94.3-07
or ANSI Z87.1 standards based on the type of work performed.
2. The tool may contain high pressure. Use safety glasses and gloves for
protection during operation. Keep hands clear of the exposed rubber
portions of the hose.
3. Wear protective clothing and gloves designed for the work environment,
materials and tools.
4. The air source used with this tool may cause hearing damage. Wear ear
protection gear to eliminate or reduce the noise.
5. Wear the appropriate rated dust mask or respirator. Wear a NIOSH
approved respirator when working on materials that produce hazardous
fumes, dust or particulate matter.
8492910 HVLP ELECTRIC PAINT SPRAY SYSTEM V1.0
www.princessauto.com / 1-800-665-8685 Page 4

PERSONAL PRECAUTIONS
Control the tool, personal movement and the work environment to avoid
personal injury or damage to tool.
1. Do not operate any tool when tired or under the inuence of drugs,
alcohol or medications.
2. Do not overreach when operating a tool. Proper footing and balance
enables better control in unexpected situations.
3. Keep your ngers away from the trigger/switch while carrying the tool,
attaching an air hose or an accessory. Lock the trigger/switch safety if
available.
4. Avoid unintentional starts. Be sure that the regulator/throttle switch is in
the neutral or OFF position when not in use and before connecting it to
any air source.
5. Never point the air stream or tool at any point of your body, other people
or animals. Debris and dust ejected at high speed can cause an injury.
SPECIFIC SAFETY
WARNING! DO NOT let comfort or familiarity with product (gained from
repeated use) replace strict adherence to the tool safety rules. If you use
this tool unsafely or incorrectly, you can suer serious personal injury.
WARNING! Do not use a paint or a solvent containing halogenated
hydrocarbons (HHC) such as methylene chloride or trichloroethane.
Inhaled or ingested, HHC can cause serious lung or internal injury.
1. Use the correct tool for the job. This tool was designed for a specic
function. Do not modify or alter this tool or use it for an unintended
purpose.
a. Only use a nozzle tip specied for this tool.
2. Know the contents of the paints and solvents being sprayed. Read all
Safety Data Sheets (SDS) and container labels provided with the paints
and solvents.
a. Do not use paint or solvents such as HHC, thinners, paint removers or
acidic cleaning uids. They may react with electroplated components
and promote corrosion in the tool.
V1.0 HVLP ELECTRIC PAINT SPRAY SYSTEM 8492910
Page 5 www.princessauto.com / 1-800-665-8685

3. Tightly recap all containers immediately after mixing and store in another
location to minimize vapours in the spray area and eliminate the potential
for spills.
4. Verify that all connections are secure before operating the paint spray
gun.
5. Do not operate the HVLP turbine in the presence of open containers or
spillage.
a. Make sure all vapours have dispersed prior to turning the HVLP
sprayer on.
6. Do not allow the spray to strike you and do not spray toward people or
animals. Do not spray the tool itself or any electrical sources.
7. Do not leave the spray gun under pressure while unattended. Turn the
HVLP turbine o and relieve the pressure in the paint spray gun.
8. Paint or solvent owing through the equipment is able to produce static
electricity. Static electricity creates a risk of re or explosion in the
presence of paint or solvent fumes. All parts of the spray system,
including the pump, spray gun and any objects in and around the spray
area shall be properly grounded to protect against static discharge and
sparks.
9. Have a working re extinguisher present while operating the spray paint
gun.
10. This paint spray gun is intended for household use only.
11. Do not leave the air tool unattended with its compressed air supply on.
Turn o the compressed air supply and bleed the air tool of any remaining
compressed air before leaving the air tool unattended.
12. Serious injury may occur from loose debris being propelled at high speeds
from the compressed air stream. Always wear OSHA approved safety
glasses to protect the eyes during operation of the air compressor.
13. Do not cover the air vents. Proper cooling of the motor is necessary to
ensure normal life of the tool.
AIR HOSE PRECAUTIONS
1. Inspect the tool's air hose for cracks, fraying or other faults before each
use. Discontinue use if the air hose is damaged or hissing is heard from
the air hose or couplers. Replace the defective air hose.
8492910 HVLP ELECTRIC PAINT SPRAY SYSTEM V1.0
www.princessauto.com / 1-800-665-8685 Page 6

2. Do not allow people, mobile equipment or vehicles to pass over the
unprotected air hose. Position the air hose away from high trac areas, in
a reinforced conduit or place planks on both sides of the air hose to create
a protective trench.
3. Prevent damage to the air hose by observing the following:
a. Never carry the tool by the air hose.
b. Keep the air hose behind the tool and out of the tool's work path.
c. Keep the air hose away from heat, oil, sharp edges or moving parts.
d. Do not wrap the air hose around the tool as sharp edges may pierce
or crack the air hose. Gently coil the hose and either hang on a hook
or fasten with a device to keep hose together when storing.
4. A damaged or disconnected air hose under pressure may whip around and
inict personal injury or damage the work area. Secure the compressor's
air hose to a xed or permanent structure with clamps or cable ties.
ELECTRICAL SAFETY
WARNING! Do not touch or handle a live tool with any part of your body
that is wet or damp. Wet skin reduces resistance to electrical current,
increasing the danger of a serious or fatal shock.
1. Do not alter any parts of the tool or accessories. All parts and accessories
are designed with built-in safety features that may be compromised if
altered.
2. Protect yourself against electric shocks when working on electrical
equipment. Avoid body contact with grounded surfaces. There is an
increased chance of electrical shock if your body is grounded.
3. Do not expose the spray gun to rain, snow, frost or any other damp or wet
conditions. Water entering a tool will increase the risk of electric shock.
4. Do not disconnect the power cord in place of using the power switch. This
will prevent an accidental start-up when the power cord is plugged into
the power supply.
5. In the event of a power failure, turn o or unplug the machine as soon as
the power is interrupted. The possibility of accidental injury could occur if
the power returns and the unit is not switched o.
V1.0 HVLP ELECTRIC PAINT SPRAY SYSTEM 8492910
Page 7 www.princessauto.com / 1-800-665-8685

6. Make certain the power source conforms to requirements of your
equipment (see Specications).
7. A polarized plug has two blades of dierent widths, allowing only one
way to insert the plug into the outlet. If the outlet does not accept a
polarized plug, contact a qualied electrician to install a polarized outlet.
Do not alter the plug, as this may compromise the built-in safety feature.
POWER TOOL PRECAUTIONS
1. Do not use any power tool with a malfunctioning power switch or control.
A power tool that fails to respond to the controls is dangerous and can
cause an injury. A qualied technician must repair and verify the power
tool is operating correctly, before it can be used.
2. Shut the power o and disconnect the spray gun from the power supply
(if possible) before making any adjustments, changing accessories,
cleaning, servicing or when storing. Such preventive safety measures
reduce the risk of starting the tool accidentally.
3. Never force the spray gun. Excessive pressure could break the tool,
resulting in damage to your workpiece or serious personal injury.
Excessive pressure is the cause if your tool runs smoothly under no load,
but roughly under load.
4. Check if the spray gun's moving parts are misaligned or binding before
each use. Correct the issue before using the spray gun to avoid an injury
or damage to the tool.
5. The material and the motor housing can get very hot during operation.
Stop work until the spray gun and the spray nozzle both cool down to a
safe temperature.
6. Do not cover the air vents. Proper cooling of the motor is necessary to
ensure normal life of the tool.
7. Avoid unintentional starts. Be sure that the regulator/throttle switch is in
the neutral or OFF position when not in use and before connecting it to
any air source.
8. Avoid unintentional starts. Make sure the power switch is set to OFF
before connecting the spray gun to a power supply.
8492910 HVLP ELECTRIC PAINT SPRAY SYSTEM V1.0
www.princessauto.com / 1-800-665-8685 Page 8

UNPACKING
WARNING! Do not operate the tool if any part is missing. Replace the
missing part before operating. Failure to do so could result in a
malfunction and personal injury.
Remove the parts and accessories from the packaging and inspect for damage.
Contents:
• HVLP spray gun with sprayer station
• 15 ft ex paint hose
• Viscosity cup
• 0.9 and 1.8 mm tip and needle
IDENTIFICATION KEY
A. Main Housing
B. Screw
C. On/O Switch
D. Motor
E. Cord Holder
F. Power Cord
G. Hose Fixture
H. Motor Connector
I. Rubber Stand Set
J. Screw
K. Cover A
L. Cover B
M. Spray Gun
N. Fluid Adjustment
Knob
V1.0 HVLP ELECTRIC PAINT SPRAY SYSTEM 8492910
Page 9 www.princessauto.com / 1-800-665-8685

ASSEMBLY & INSTALLATION
1. Push the hose tting onto the hose xture on
the HVLP unit and twist to lock it in place (Fig.
1-1).
2. Attach the other end of the hose to the back of
the spray gun (Fig. 1-2). Twist to lock into
place.
3. Attach the paint cup and make sure it is hand-
tight.
OPERATIONS
IMPORTANT! The recommended paint viscosity will vary according to
paint property and painting conditions.
Proper handling of the gun will allow you to achieve the desired paint coating.
1. Hold the paint spray
gun between 6 and 8 in.
from the workpiece.
The distance will vary
depending on the
atomization pressure
and work demand.
2. Grip the gun rmly and
keep it perpendicular to
the surface of the
workpiece at all times.
3. Move the gun in a straight horizontal line. Start and end the stroke
beyond the workpiece's edges to create a smooth coating of paint/varnish.
Fig. 1
Fig. 2
8492910 HVLP ELECTRIC PAINT SPRAY SYSTEM V1.0
www.princessauto.com / 1-800-665-8685 Page 10
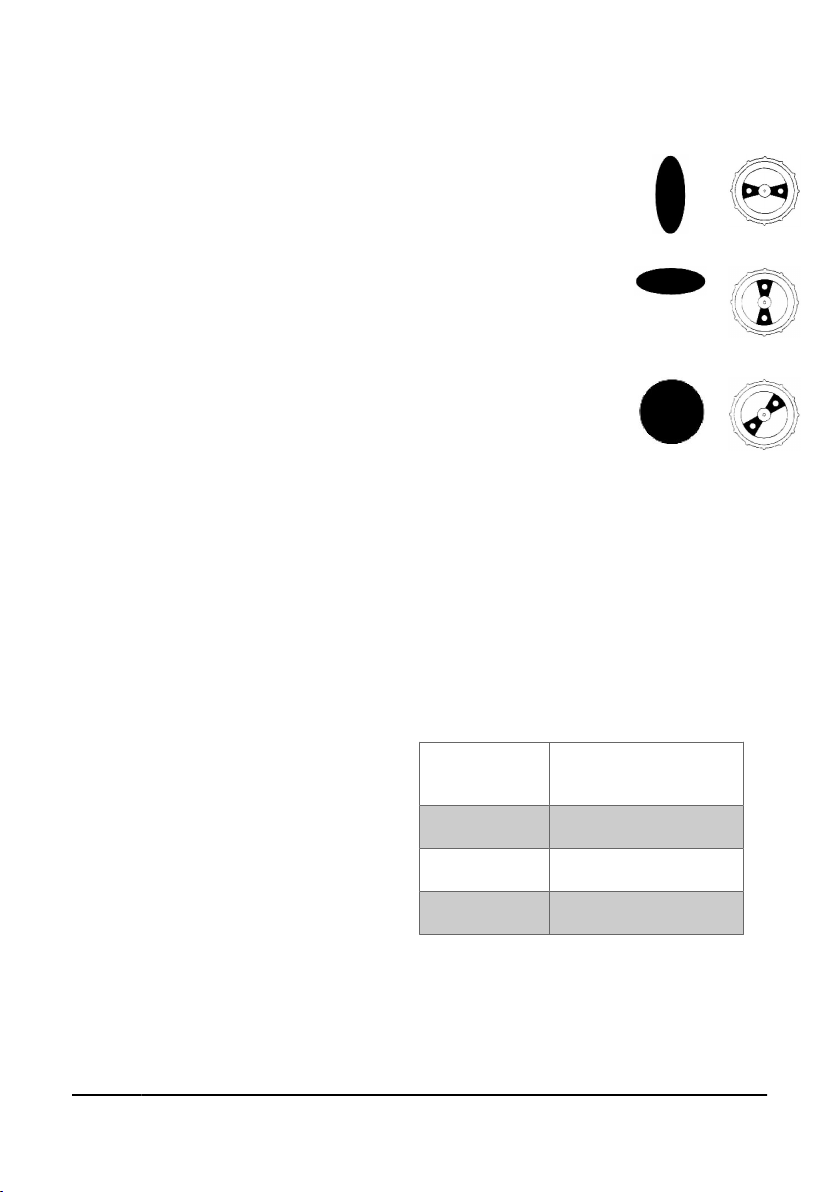
ADJUST THE SPRAY GUN
The HVLP spray gun has three dierent spray patterns.
Select the pattern by changing the air cap's angle.
1. Adjust the air cap so the ridges are horizontal in
relation to the spray gun body. This will create a
vertical, oval spray pattern.
2. Adjust the air cap so the ridges are vertical in relation
to the spray gun body. This will create a horizontal,
oval spray pattern.
3. Ajust the air cap so it is at a 45° angle in relation to the
spray gun body. This will create a round spray pattern.
4. Adjust the amount of material that is sprayed by
turning the uid adjustment knob.
a. For more material, turn the knob to the right.
b. For less material, turn the knob to the left.
MEASURING PAINT VISCOSITY
Paints come in a variety of viscosities and may require dilution to obtain the
best spraying results, as the paint is normally made for brush or roller
applications.
1. Pour the paint or lacquer into a bucket or other container.
2. Consult the Paint/Solvent Ratio
table and add a solvent
appropriate for the paint/
lacquer. Check the
manufacturer’s label for the
specic type of thinner
required. The ratios are
approximate.
3. Stir to mix the paint and
thinner.
4. Fill the included measuring cup with the paint mixture and pour it back
into the container. The mixture is thin enough when it takes 8 to 20
seconds to empty the cup.
Fig. 3
Fig. 4
Fig. 5
Oil-base
interior enamel
paint
1 part solvent to 4 parts
paint
Outdoor oil-
base paint
1 part solvent to 3 parts
paint
Lacquers 1 part solvent to 2 parts
lacquer
Stains and
Varnishes
Generally no thinning is
required
V1.0 HVLP ELECTRIC PAINT SPRAY SYSTEM 8492910
Page 11 www.princessauto.com / 1-800-665-8685

5. Add more thinner if the mixture is too thick or paint if the mixture is too
thin. Repeat steps 3 and 4 until you are satised with the thickness.
6. Stir the thinned-paint each time before relling the paint cup. Remove
lumps or a 'surface skin' by straining the paint mixture through
cheesecloth, nylon stocking material or a commercial paint strainer with a
60-mesh.
CARE & MAINTENANCE
1. Maintain the tool with care. A tool in good condition is ecient, easier to
control and will have fewer problems.
2. Inspect the tool components periodically. Repair or replace damaged or
worn components.. Only use identical replacement parts when servicing.
3. Only use accessories intended for use with this tool. Follow instructions
for changing accessories.
4. Keep the tool handles or gripping surfaces clean and dry.
5. Maintain the tool’s labels and name plates. These carry important
information. If unreadable or missing, contact Princess Auto Ltd. for
replacements.
WARNING! Only qualied service personnel should repair the tool. An
improperly repaired tool may present a hazard to the user and/or others.
CLEAN THE SPRAY GUN
1. Turn o the air source.
2. Disconnect the paint cup from the spray gun and empty out the remaining
contents.
3. Add a small amount of the appropriate solvent. Check paint
manufacturer’s recommendations.
4. Reattach the paint cup.
5. Turn on the air source to the lowest volume.
8492910 HVLP ELECTRIC PAINT SPRAY SYSTEM V1.0
www.princessauto.com / 1-800-665-8685 Page 12
6. Aim the spray gun into a container and continue spraying until the solvent
is clean.
a. Repeat steps 1 to 5 until the sprayed solvent is clean.
b. Immerse the paint cup in solvent for up to 24 hours if the solvent is
not removing the built-up paint.
7. Empty the remaining solvent out of the paint cup. Dispose of the waste
solvent safely. Consult the solvent manufacturer’s Safety Data Sheet.
8. Wipe the paint cup with a lint-free cloth.
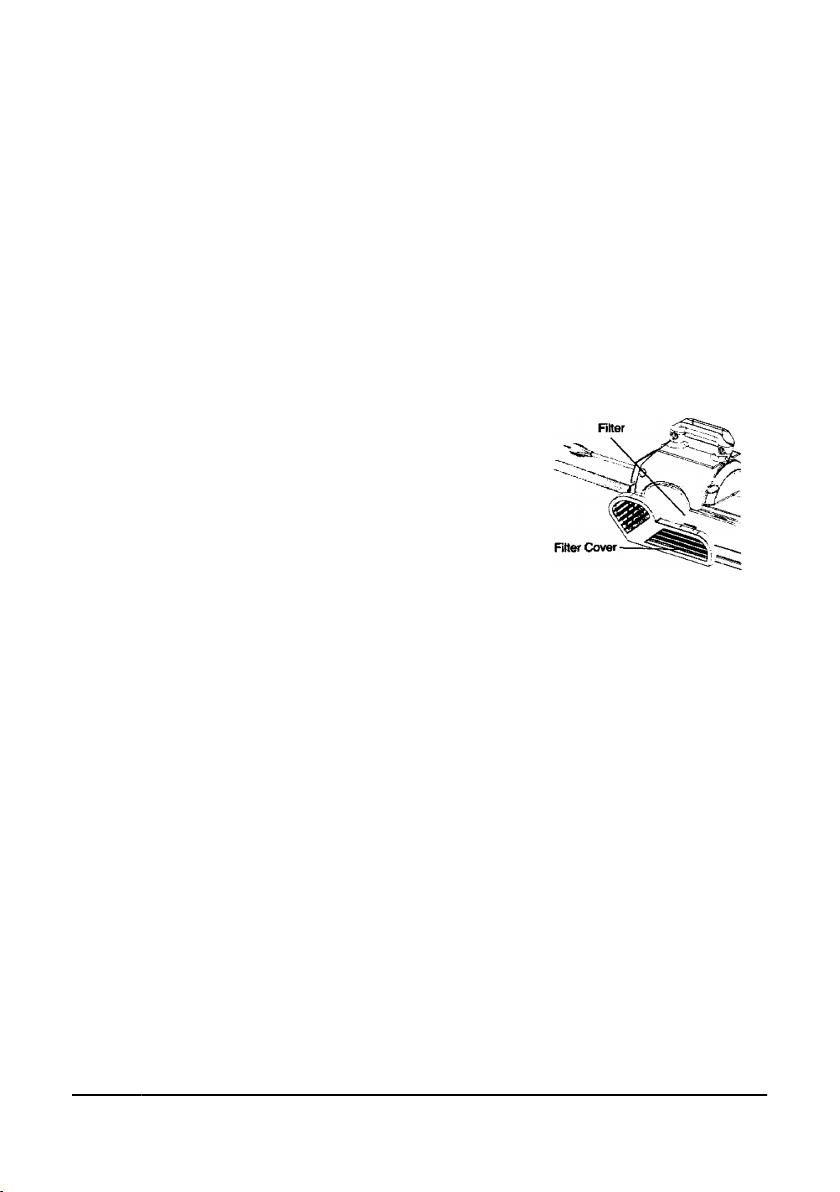
CLEAN THE FILTER
1. Pull the lter grill o to reveal the lter.
Remove the air lter from the air lter cover.
Be sure that the air lter is clean. A dirty air
lter restricts airow and can cause the motor
to overheat.
2. Clean the air lter:
a. Clean latex (water-based) coatings from
the lter with mild soapy water. Remove
excess water with a soft cloth. Allow to dry at before reinstalling
the lter.
b. Replace the lter if it becomes built-up with paint, or if using oil-
based (solvent-based) coatings.
c. Keep the unit at the maximum distance from the spray area to
extend lter life.
DISPOSAL
Recycle a tool damaged beyond repair at the appropriate facility.
Contact your local municipality for a list of disposal facilities or by-laws for
electronic devices, batteries, oil or other toxic liquids.
Fig. 6
V1.0 HVLP ELECTRIC PAINT SPRAY SYSTEM 8492910
Page 13 www.princessauto.com / 1-800-665-8685
TROUBLESHOOTING
Visit a Princess Auto Ltd. location for a solution if the tool does not function
properly or parts are missing. If unable to do so, have a qualied technician
service the tool.
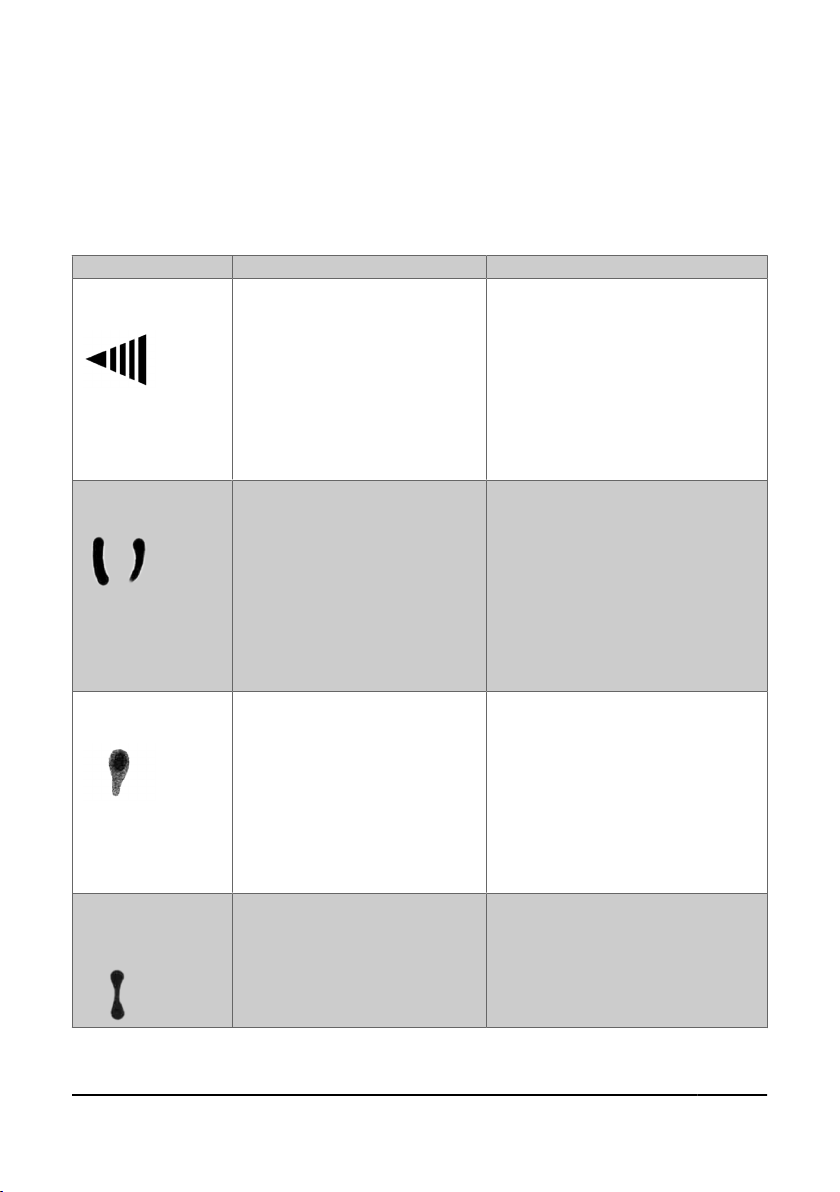
Problem(s) Possible Cause Suggested solution
The spray pattern
is intermittent.
Presence of air in the paint
circuit.
1. Tighten the nozzle with a
wrench.
2. Check the amount of uid in
the container.
3. Ensure that none of the
connector holes are obstructed.
4. Tighten all ttings around the
paint circuit.
The spray pattern
is arched.
1. Material residue in the
holes is obstructing the
passage of material.
2. The nozzle is dirty or
malfunctioning.
3. The atomization cap is dirty
or damaged.
1. Submerge the head in solvent.
2. Clean and open all closed holes
with a jet of compressed air or
a toothpick.
a. Do not use pointed metal
objects for this purpose,
as you may deform the
hole at the end of the
head.
The spray pattern
is uneven.
1. Material has built up on the
outside of the uid nozzle
tip or center hole or
partially clogged the nozzle
orice.
2. The uid nozzle is loose.
1. Clean the head and the nozzle.
2. Ensure that the centering
between the head and nozzle is
precise.
a. Check that the tip of the
pin is not ruined.
b. Replace the head and
nozzle if necessary.
The center of the
pattern is too
narrow.
1. The atomization of the air
pressure is too high.
2. The working material is too
thin.
Reduce the quantity of air and
increase the ow of paint.
8492910 HVLP ELECTRIC PAINT SPRAY SYSTEM V1.0
www.princessauto.com / 1-800-665-8685 Page 14

Problem(s) Possible Cause Suggested solution
There is poor
atomization with
the spray
concentrated in the
center.
The ow of paint is greater than
the pressure and quantity of air
supplied.
1. Clean the head and the nozzle.
2. Ensure that the paint is not too
dense and dilute if necessary.
There is little to no
paint output.
1. The uid passage is clogged
with dirt or the air holes in
the cover are blocked.
2. Fluid needle stroke is too
small.
1. Remove any obstructions.
2. Adjust uid needle stroke.
V1.0 HVLP ELECTRIC PAINT SPRAY SYSTEM 8492910
Page 15 www.princessauto.com / 1-800-665-8685

PARTS BREAKDOWN
PARTS LIST
# DESCRIPTION
A2 Fluid Needle Assembly
A3 Spring
A4 Fluid Adjustment Knob
A5 Gun Body
A6 Airow
A7 Fluid Tip
A8 Air Cap
A9 Lock Ring
A10 Fluid Tube
A11 Container Gasket
A12 Container
A13 Fluid Needle Packing
A14 Needle Packing Screw
A15 Trigger
A16 Trigger Pin
A17 Nozzle Washer
8492910 HVLP ELECTRIC PAINT SPRAY SYSTEM V1.0
www.princessauto.com / 1-800-665-8685 Page 16
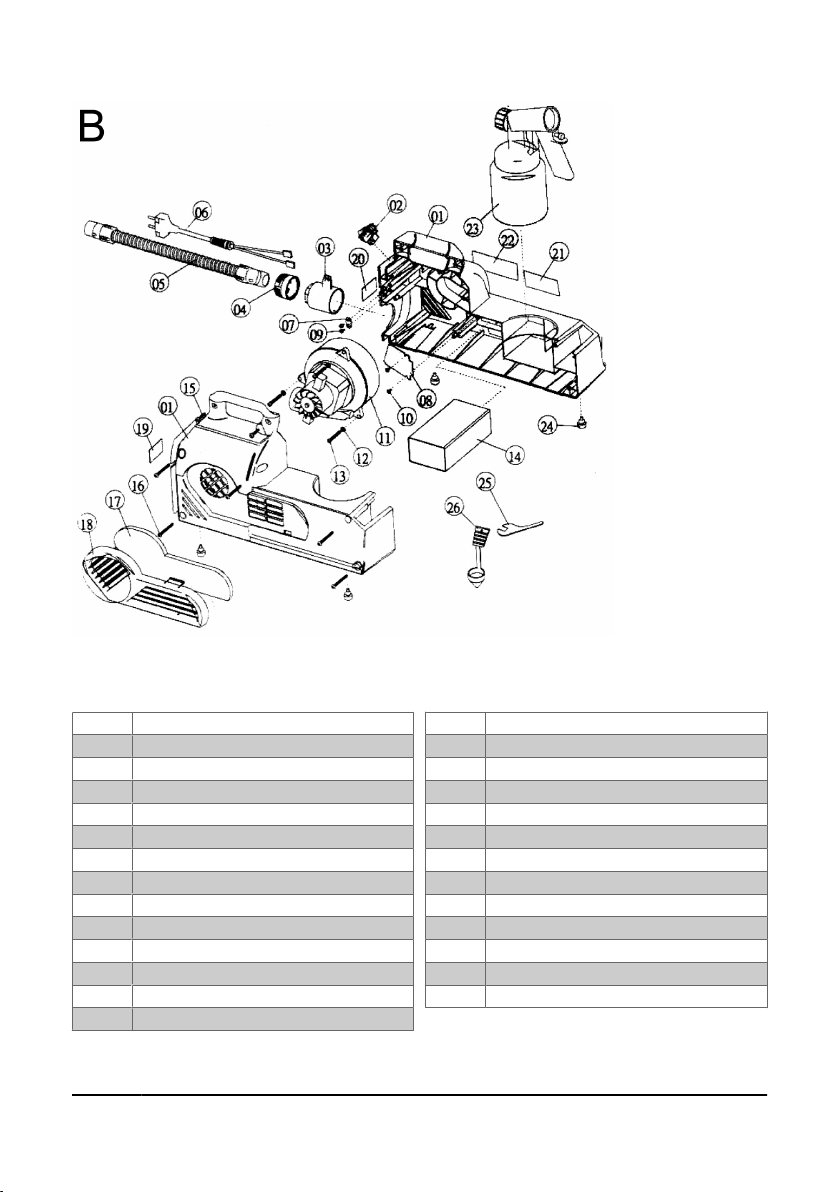
PARTS LIST
#DESCRIPTION
B1 Main Housing
B2 Switch
B3 Motor Connector
B4 Hose Fixture
B5 Hose
B6 Power Cord
B7 Tube Cover A
B8 Tube Cover B
B9 Screw
B10 Screw
B11 Motor
B12 Washer
B13 Screw
B14 Airow Tube
B15 Screw
B16 Housing Screw
B17 Air Filter
B18 Filter Cover
B19 Pointing Label
B20 Hose Connector Pointing Label
B21 Warning Label
B22 Main Label
B23 Paint Spray Gun
B24 Rubber Stand Set
B25 Wrench
B26 Viscosity cup
V1.0 HVLP ELECTRIC PAINT SPRAY SYSTEM 8492910
Page 17 www.princessauto.com / 1-800-665-8685

This page is intentionally left blank.

V1,0 8492910
Vous devez lire et comprendre toutes les instructions avant d'utiliser l'appareil.
Conservez ce manuel afin de pouvoir le consulter plus tard.

Cette page a été laissée blanche intentionnellement.
Table of contents
Languages:
Other Power Fist Paint Sprayer manuals

Power Fist
Power Fist 8604530 User manual

Power Fist
Power Fist 8059833 User manual

Power Fist
Power Fist 0432344 User manual

Power Fist
Power Fist 8059851 User manual

Power Fist
Power Fist 0450071 User manual

Power Fist
Power Fist 8006577 User manual

Power Fist
Power Fist 8160657 User manual

Power Fist
Power Fist 8006578 User manual

Power Fist
Power Fist 8006581 User manual

Power Fist
Power Fist HVLP User manual


