Power Glide 60101816 User manual

IF YOU HAVE ANY PROBLEMS OR QUESTIONS CONCERNING THIS PRODUCT,
DO NOT RETURN IT TO YOUR RETAILER. CONTACT CUSTOMER SERVICE AT
1-888-424-3354
051005rev1
Power Glide®Limited Warranty
Consumer Power Tools for Home Use
World Factory, Inc.®(Seller) warrants to the original Buyer only, that each POWER GLIDE®portable
power tool will be free from defects in material and workmanship for a period of one (1) year from date of
purchase. SELLER’S SOLE OBLIGATION AND BUYER’S EXCLUSIVE REMEDY UNDER THIS LIMITED
WARRANTY SHALL BE THE REPAIR OR REPLACEMENT OF PARTS, WITHOUT CHARGE, WHICH ARE
DEFECTIVE IN MATERIAL OR WORKMANSHIP. ANY PARTS AS DETERMINED BY THE SELLER WHICH
HAVE BEEN MISUSED; ABUSED OR DAMAGED EITHER DIRECTLY OR INDIRECTLY FROM REPAIRS OR
ALTERATIONS ATTEMPTED BY UNAUTHORIZED PERSONS; IMPROPER MAINTENANCE, NEGLECT OR
ACCIDENT ARE NOT COVERED BY THIS LIMITED WARRANTY. To make a claim under this Limited
Warranty, you must return the complete power tool, transportation prepaid, to any World Factory, Inc.®
authorized service center. Call 1-888-424-3354 for the location of the nearest authorized power tool
service center.
Additional Limitations
THIS LIMITED WARRANTY DOES NOT APPLY TO ACCESSORY ITEMS SUCH AS CIRCULAR SAW
BLADES, DRILL BITS, ROUTER BITS, JIGSAW BLADES, SANDING BELTS OR PADS, GRINDING
WHEELS AND OTHER RELATED ITEMS. ALL IMPLIED WARRANTIES SHALL BE LIMITED IN DURATION
TO ONE (1) YEAR FROM DATE OF PURCHASE. IN NO EVENT SHALL SELLER BE LIABLE FOR ANY
INCIDENTAL OR CONSEQUENTIAL DAMAGES, INCLUDING BUT NOT LIMITED TO LIABILITY FOR LOSS
OF PROFITS, ARISING FROM THE SALE OR USE OF THIS PRODUCT.
If any provision of this Limited Warranty is for any reason held to be invalid or unenforceable, such
provision shall not affect any other provision herein, this Limited Warranty shall be construed as if such
invalid and/or unenforceable provision had never been contained herein.
This Warranty contains the entire agreement between Seller and Buyer and supersedes any and all prior
agreements, arrangements, or understandings between the parties relating to product warranty.
Made in China
©2004 World Factory, Inc.
Distributed by:
World Factory, Inc.
Coppell TX 75019
Model No. 60900015
Read the instructions and precautions before use of this product
Please keep this instruction manual for future reference
IF YOU HAVE ANY PROBLEMS OR QUESTIONS CONCERNING THIS PRODUCT,
DO NOT RETURN IT TO YOUR RETAILER, CONTACT CONSUMER SUPPORT AT
1-888-424-3354
OR
IF YOU ARE A STORE MANAGER OR EMPLOYEE IN NEED OF ASSISTANCE CALL
1-888-851-5569
PLEASE HAVE YOUR STORE NUMBER READY
Model No: 60101816
4-1/2" Angle Grinder
Instruction Manual
Due to ongoing product development
the actual product or products may vary from
the illustrations or photos shown within this manual.
Input Voltage 120V- 60HZ
Input Power 5.8 Amp
No Load Speed 11,000 RPM
Grinding Wheel 4-1/2"
Spindle Thread 5/8" - 11 UNC
Double Insulated YES
Power Cord 18/2 AWG polarized plug
Dimensions (L x W x H) 13" x 8-1/2" x 4"
Net Weight 5 lbs 4 oz (2.38 kgs)
SPECIFICATION

WARNING! ELECTRICAL SHOCK. Read and understand all instructions. Failure to follow all
instructions listed below, may result in electrical shock, fire and/or serious personal injury.
NOTE: This portable tool has been manufactured in accordance with the applicable standards and
equipment safety legislation. When using electrical appliances, it is important to take safety
precautions to avoid possible injury and damage. For that reason, you should carefully read and
store these instructions so that this information is available at all times.
SAVE THESE INSTRUCTIONS.
Work Area
1.Keep your work area clean and well lit. Cluttered and dark areas invite accidents.
2.Do not operate power tools in explosive atmospheres, such as in the presences of
flammable liquids, gases, or dust. Power tools create sparks, which can ignite dust or fumes.
3.Keep bystanders, children and visitors away while operating a power tool. Distractions can
cause you to loose control.
Electrical Safety
1.Double Insulated tools are equipped with a polarized plug (one blade is wider than the
other.) This plug will fit in a polarized outlet only one way. If the plug does not fit fully in the
outlet, reverse the plug. If it still does not fit, contact a qualified electrician to install a
polarized outlet. Do not change the plug in any way. Double insulation eliminates the need
for the three wire grounded power cord and grounded power supply system.
2.Avoid body contact with grounded surfaces such as pipes, radiators, ranges and
refrigerators. There is an increased risk of electrical shock if your body is grounded.
3.Don't expose power tools to rain or wet conditions. Water entering a power tool will
increase the risk of electrical shock.
4.Do not abuse the cord. Never use the cord to carry the tools or pull the plug from the
outlet. Keep cord away from heat, oil, sharp edges or moving parts. Replace damaged
cords immediately. Damaged cords increase the risk of electrical shock.
5.When operating a power tool outside, use an outdoor extension cord marked "W-A" or "W."
These cords are rated for outdoor use and reduce the risk of electric shock.
Personal Safety
1.Stay alert, watch what you are doing and use common sense when operating a power tool.
Do not use tool while tired or under the influence of drugs, alcohol or medication. A moment
of inattention while operating power tools may result in serious personal injury.
2.Dress properly. Do not wear loose clothing or jewelry. Contain long hair. Keep your hair,
clothing and gloves away from moving parts. Loose clothes, jewelry or long hair can be
caught in moving parts.
3.Avoid accidental starting. Be sure switch is off before plugging in. Carrying tools with your
finger on the switch or plugging in tools that have the switch on invites accidents.
4.Remove adjusting keys or switches before turning the tool on. A wrench or a key that is left
attached to a rotating part of the tool may result in personal injury.
5.Do not overreach. Keep proper footing and balance at all times. Proper footing and balance
enables better control of the tool in unexpected situations.
6.Use safety equipment. Always wear eye protection. Dust mask, non-skid safety shoes, hard
hat, or hearing protection must be used for appropriate conditions.
GENERAL SAFETY RULES
1
CAUTION: Use only Accessories that are recommended by Power Glide for your model.
Accessories that may be suitable for one tool may become hazardous when used on
another tool.
Recommended Accessories:
1. 4-1/2" Grinding, Sanding Or Cut-off Wheels.
CAUTION: Tools service must be performed only by qualified repair personal. Service or
maintenance performed by unqualified personnel could result in a risk of injury.
1.When servicing a tool, use only identical replacement parts.
2.Follow instruction in the maintenance section of this manual.
3.Use of unauthorized parts or failure to follow maintenance instruction
may create a risk of electric shock or injury.
General Tool Maintenance
1.Clean the tool housing, motor vents and blade after each use.
2.Keep the grip dry, clean and free from oil and grease.
3.Store the tool on a safe and dry place, out of reach of children.
4.Do not use cleaning agents or solvents that could attach to
the plastic parts of the tool.
MAINTENANCE
ACCESSORIES
6

Angle Grinder Safety Warning
WARNING! PERSONAL INJURY RISK Never touch the grinder or other tool while it is
moving. Do not touch the grinding wheel after operation. Grinding wheel will be very hot.
1.If the grinder jams or stalls, stop immediately. Remove the grinder from the work piece and
correct the reason for stall before continuing.
2.If tool speed drops abnormally low, begins to make abnormal noise, vibrations, or if the
motor housing produces smoke or burning odor; turn the tool off immediately and do not
operate, until repaired.
3.Hold tool by insulated gripping surfaces when performing an operation where the grinding
tool may contact hidden wiring. Contact with a "live" wire will also make exposed metal parts
of the tool "live" and shock the operator.
4. Always use proper guard with grinding wheel. A guard protects operator from
broken wheel fragments.
5. Accessories must be rated for at least the speed recommended on the tool warning label.
Wheels and
other accessories running over rated speed can fly apart
and cause injury.
2
Tool Use and Care
1.Use clamps or other practical way to secure and support the workpiece to a stable platform.
Holding the work by hand or against your body is unstable and may lead to loss of control.
2.Do not force tool.Use the correct tool for your application. The correct tool will do the job
better and safer at the rate for which it is designed.
3.Do not use tool if switch does not turn it on or off. Any tool that cannot be controlled with the
switch is dangerous and must be repaired.
4.Disconnect the plug from the power source before making any adjustments, changing
accessories, or storing the tool. Such preventative safety measures reduce the risk of starting
the tool accidentally.
5.Store idle tools out of reach of children and other untrained persons. Tools are dangerous in
the hands of untrained users.
6.Maintain tools with care. Keep grinding tools clean. Properly maintained tools, with are less
likely to bind and are easier to control.
7.Check for misalignment or binding of moving parts, breakage of parts, and any other
condition that may affect the tools operation. If damaged, have the tool serviced before using.
Many accidents are caused by poorly maintained tools.
8.Use only accessories that are recommended by the manufacturer for your model. Accessories
that may be suitable for one tool, may become hazardous when used on another tool.
SERVICE
1.Tool service must be preformed only by qualified repair personnel. Service or maintenance
performed by unqualified personnel could result in a risk of injury.
2.When servicing a tool, use only identical replacement parts. Follow instructions in the
Maintenance section of this service manual. Use of unauthorized parts or failure to follow
Maintenance instructions may create a risk of electrical shock or injury.
SPECIFIC SAFETY RULES
WARNING: PERSONAL INJURY HAZARD.
Always use proper safety guard
with grinding wheel.
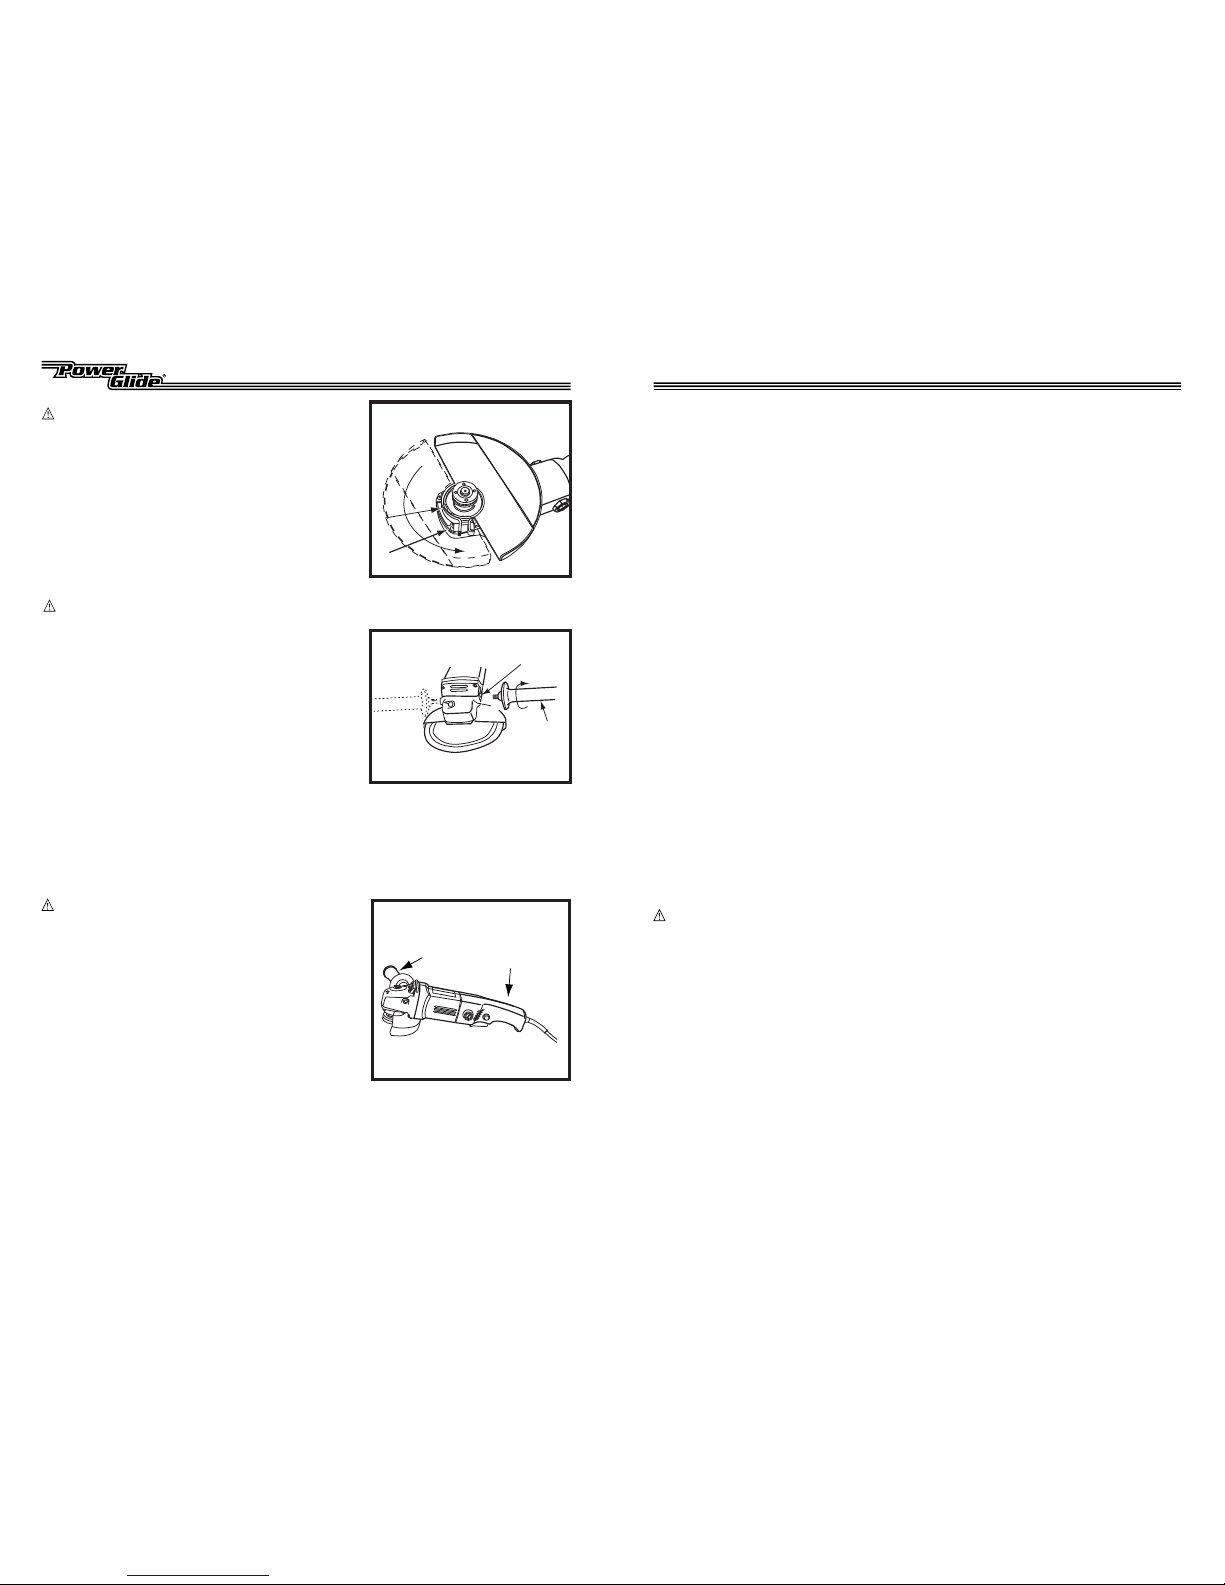
Adjusting The Wheel Guard
1.(SEE FIGURE 4) Loosen the wheel guard
clamp screw (1).
2.Align the dimple on the guard clamp ring
with the notch in the gear case cover (2).
3.Rotate the guard 180 degrees and tighten
the clamp screw (1) to secure.
CAUTION: Do not over tighten auxiliary handle.
Damage to the handle could result.
Installing The Auxiliary Handle
NOTE: The auxiliary handle can be installed
in the left or right positions witch ever best
suits the operator and type of work.
1.(SEE FIGURE 5) Thread the handle (1) into
the left or right threaded hole in
the gear case (2).
2.By hand, rotate the handle clockwise to
tighten or counter clockwise to loosen.
1
2
1
2
Figure 4
Figure 5
1.Wheel Guard Clamp Screw
2.Gear Case Cover
1.Handle
2.Gear Case
OPERATION
3
4
WARNING: PERSONAL INJURY HAZARD.
Never touch the wheel while it is moving.
Do not touch the wheel or workpiece after
operation, it will be very hot.
1.Do not use abrasive wheels beyond their
intended life.
2.Follow wheel manufacturers instructions for
use and replacement.
Basic Operation
1.(SEE FIGURE 6) Hold the tool firmly by
the grip (3) and auxiliary handle (4) during
start-up and while in use.
2. Allow the tool to reach full speed before
contacting the wheel to the workpiece.
Work slowly without applying additional
pressure to the tool, its own weight is
adequate under most conditions.
Figure 6
5
3.Grip
4.Auxiliary Handle

AMP Load Volts Extension Cord Length
120V 25' 50' 100' 150'
AWG
1-5 18 16 16 14
6-10 18 16 14 12
10-12 14 14 14 12
12-16 14 12
Table 1
Minimum Recommended Extension Cord Gauge
FUNCTIONAL DESCRIPTION:
4-1/2" Angle Grinder
Volts .........................................V
Amperes ...................................Amp
Alternating Current ...................~
Double Insulated .......................
Hertz ........................................Hz
Revolutions Per Minute ............RPM
SPECIFIC SAFETY SYMBOLS
Used for the 4-1/2" Angle GrinderTool:
Extension Cords
1.Make sure your extension cord is in good condition. When using an extension cord, be sure
to use one heavy enough to carry the current your product will draw. An undersized cord will
cause a drop in line voltage resulting in loss of power and overheating.
2.Select the correct size to use depending on Ampere (AMP) rating, cord length, Voltage
(Volts) and Gauge (AWG). If in doubt, use the next heavier gauge. The smaller the gauge
number, the heavier the cord. Refer to Table 1.
3.Outdoor Use Extension Cords. When tool is used outdoors, use only extension cords intended
for use outdoors and so marked.
4.Use only UL listed extension cords. Inspect extension cord before use and never use damaged
altered extension cords. Follow extension cord manufacturer safety instructions.
Not recommended
LEGEND
1.Grip 6.Spindle Lock
2.On - Off Switch 7.Spanner
3.Power Cord 8.Grinding Wheel
4.Auxiliary Handle 9.Lock-on Button
5.Wheel Guard
1
2
3
4
5
6
7
8
9
Angle Grinder Trigger Switch
1.(SEE FIGURE 1) To start the grinder: pull the
On-Off trigger switch (1).
To stop the grinder: release the trigger switch.
2.For continuous operation: pull the trigger switch (1) and press the lock-on button (9).
The grinder will continue to run until the trigger is pulled fully and then released.
3
WARNING: RISK OF PERSONAL INJURY.
Always disconnect the tool from the power
outlet before making any adjustment,
installing or changing the wheel.
CAUTION: Never depress spindle lock button
while tool is in use and wheel is spinning.
Installing And Changing Wheels
1.(SEE FIGURE 2) Press the spindle lock button (1)
to stop the spindle from turning.
NOTE: Spindle may require slight back and
forth rotation to engage lock.
CAUTION: Always make sure the retaining
nut is securely tightened before operation.
2.(SEE FIGURE 3) Place the inner washer (2)
on the tool spindle and rotate if necessary
to engage the flats of the spindle.
3.Place a depressed center grinding wheel (3)
over the shoulder on the inner washer and
secure with retaining nut (4).
4.Using the spanner (5) provided, rotate the
retaining nut clockwise to tighten or
counter clockwise to loosen.
ASSEMBLY
1
1.Spindle Lock Button
Figure 1
Figure 2
2
3
4
5
2.Inner Washer 4.Retaining Nut
3.Center Grinding 5.Spanner
Wheel
Figure 3
4
Safety Warning For California Proposition 65
WARNING! BREATHING HAZARD 1) Use of this tool may cause exposure to chemicals
that are known to the state of California to cause cancer, birth defects or other reproductive
harm. 2) Dust and debris created during cutting, drilling, grinding or sanding on some
materials may contain chemicals known to the State of California to cause cancer or birth
defects or other reproductive harm. To reduce exposure to these chemicals, always use
approved safety equipment work in a well-ventilated area and wear dusk mask that
filters out microscopic particles.
Table of contents
Other Power Glide Grinder manuals
Popular Grinder manuals by other brands

Makita
Makita GA7020 instruction manual

Bosch
Bosch GWS 18 V-LI Original instructions

AEG
AEG WS 11-125 Original instructions

Metabo HPT
Metabo HPT G 12SS2 Safety instructions and instruction manual

Parkside
Parkside PWS 125 H7 Translation of the original instructions

TECMIX
TECMIX TM HS 1250 operating instructions