Beta 599 DGT-A/20 User manual

599DGT-A/20
F
E
P
ISTRUZIONI PER L’USO
INSTRUCTIONS FOR USE
MODE D’EMPLOI
INSTRUCCIONES
INSTRUÇÕES DE USO
I
EN
DGEBRAUCHSANWEISUNG
INSTRUKCJA OBSLUGI
PL
HASZNÁLATI ÚTMUTATÓ
HU
NL GEBRUIKSAANWIJZING

EN
13
INSTRUCTIONS
BETA 599 DGT-A/20
Electronic torque wrench
Direct torque and angle readout
MAIN FEATURES
– Digital driving torque and angle readout
– +/- 2% and +/- 2° accuracy (90° rotation at a rate of 30°/sec)
– CW and CCW operation
– Peak hold and track mode selectable
– Buzzer and LED indicator for presettable target driving torque or angle
– 5 selectable engineering units (N-m, ft-lb, in-lb, kg-cm, “ ° ”)
– Auto Sleep after about 5 minutes idle
– Rechargeable batteries are compatible
NAMES AND FUNCTIONS OF PARTS
1
2
6
347
5
9
810
1. Reversible Ratchet Head
2. Direction Lever
3. LCD Readout
4. Buzzer
5. Calibration Port
6. Buttons
7. Battery Cover
8. Handle
9. 1/2” Square Drive
10. Antislip Handle
11. LED Indicators
12. Driving torque/angle value
13. Read-in number
14. Units (N-m,ft-lb,in-lb,kg-cm,“ ° ”)
14. Peak/Track Mode
16. Power On / Clear Button
17. Read-in selection buttons
18. Unit/Setting Button
19. Up/Down Button

14
Model
N°.
Operation
Range
(N-m)
Square
Drive
(inches)
Alarm
Setting
Range
(N-m)
Lenght
(mm)
599 DGT-A/20 40-200 1/2” 10-200 519
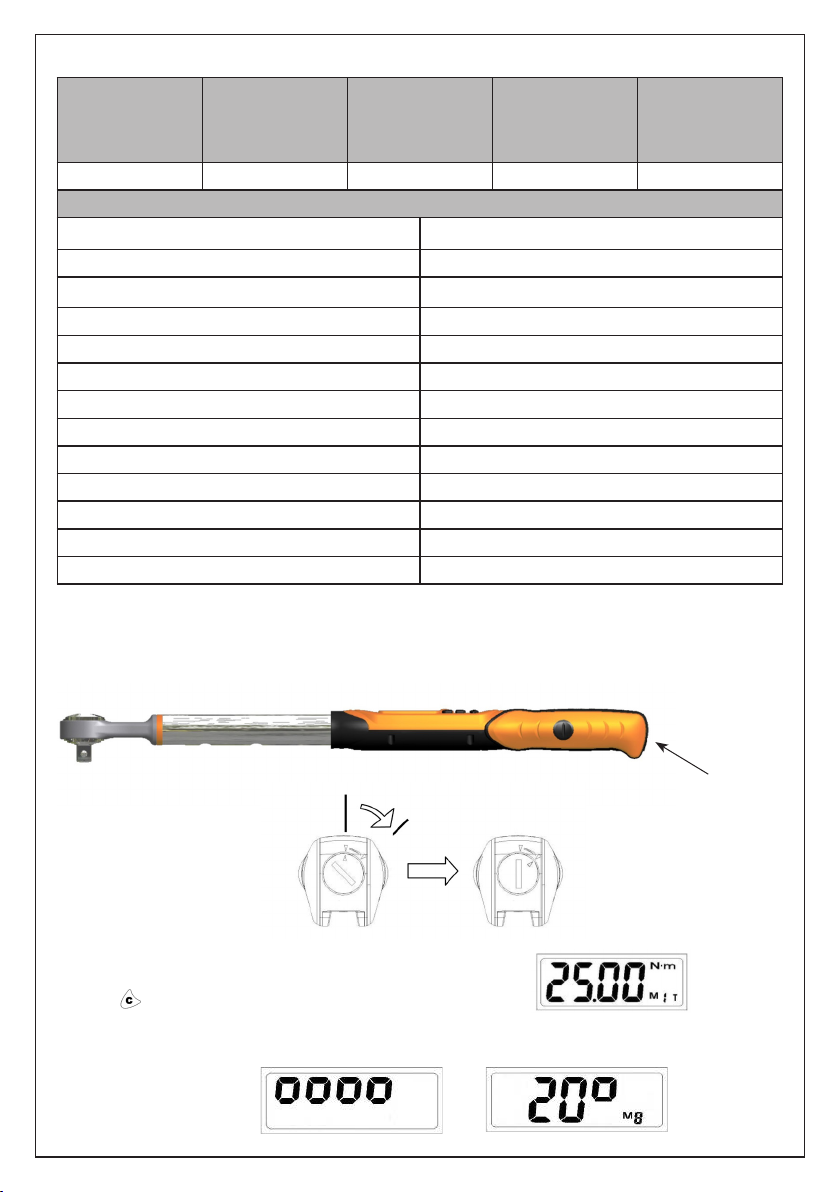
Beta 599 DGT-A/20
Accuracy CW: ±2% CCW: ±2%
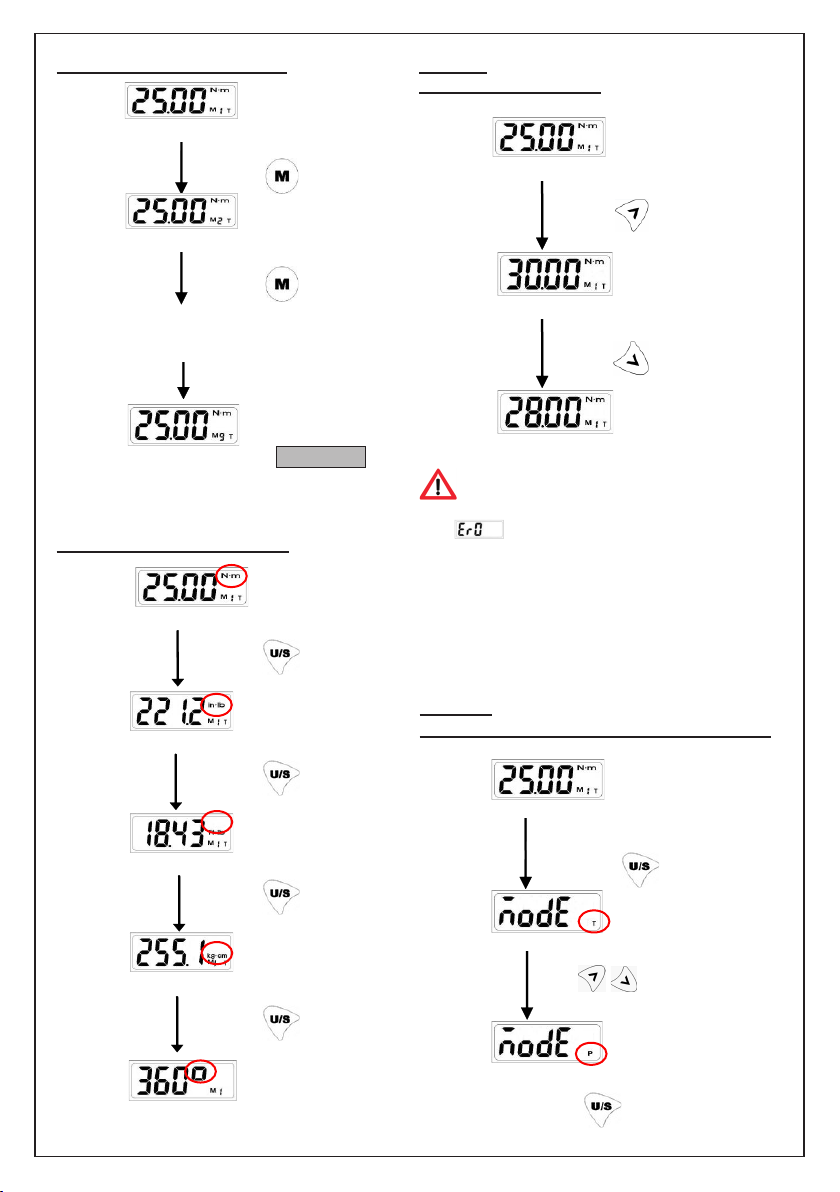
Operation Mode Peak Hold / Track
Unit Selection N-m, ft-lb, in-lb, kg-cm “ ° “
Head Type Reversible ratchet
Gear Teeth 72
Buttons 5
Bright LED 12 LEDs / 4 red + 8 green
Battery AA (R6) x 2
Battery Life (Continuous Operation) ~ 110 hours
Battery Life (Standby) ~ 1 year
Operating Temperature -10°C / 60°C
Storage Temperature -20°C / 70°C
Humidity Up to 90% non-condensingone
SPECIFICATIONS
+
_
Battery and cover
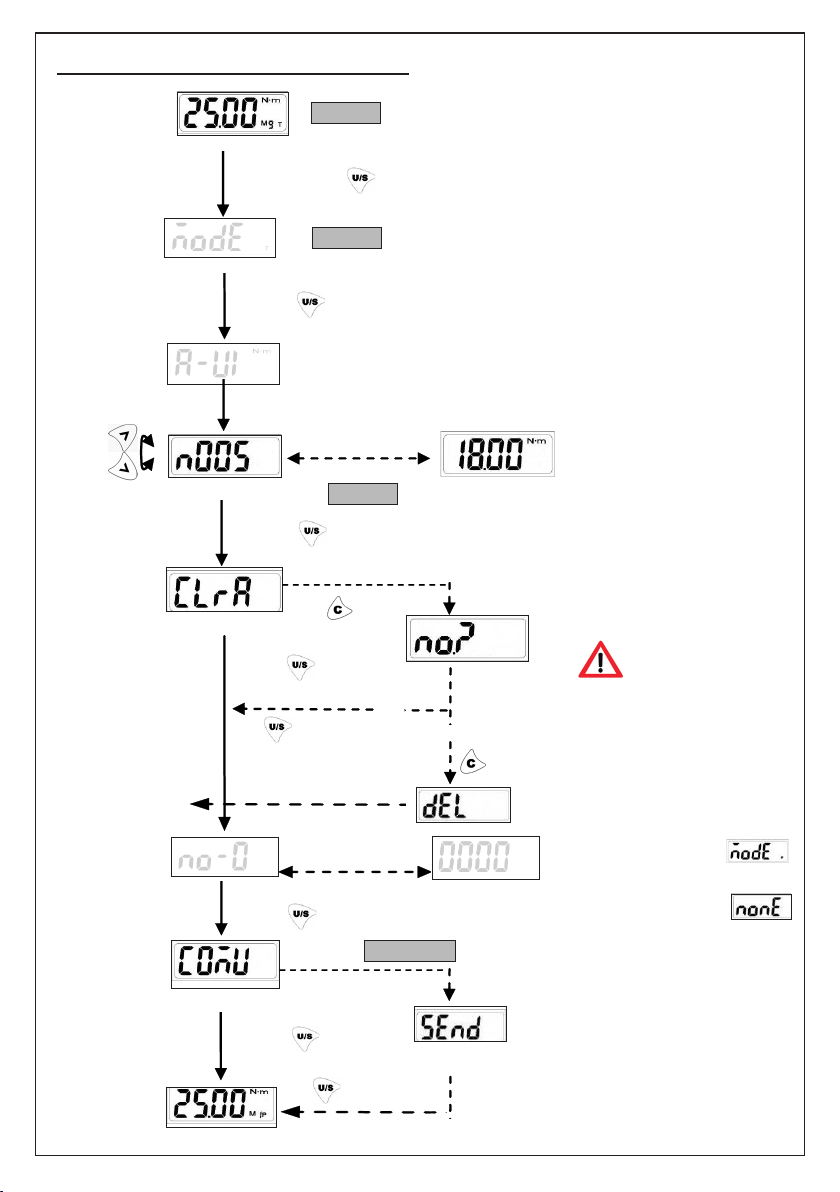
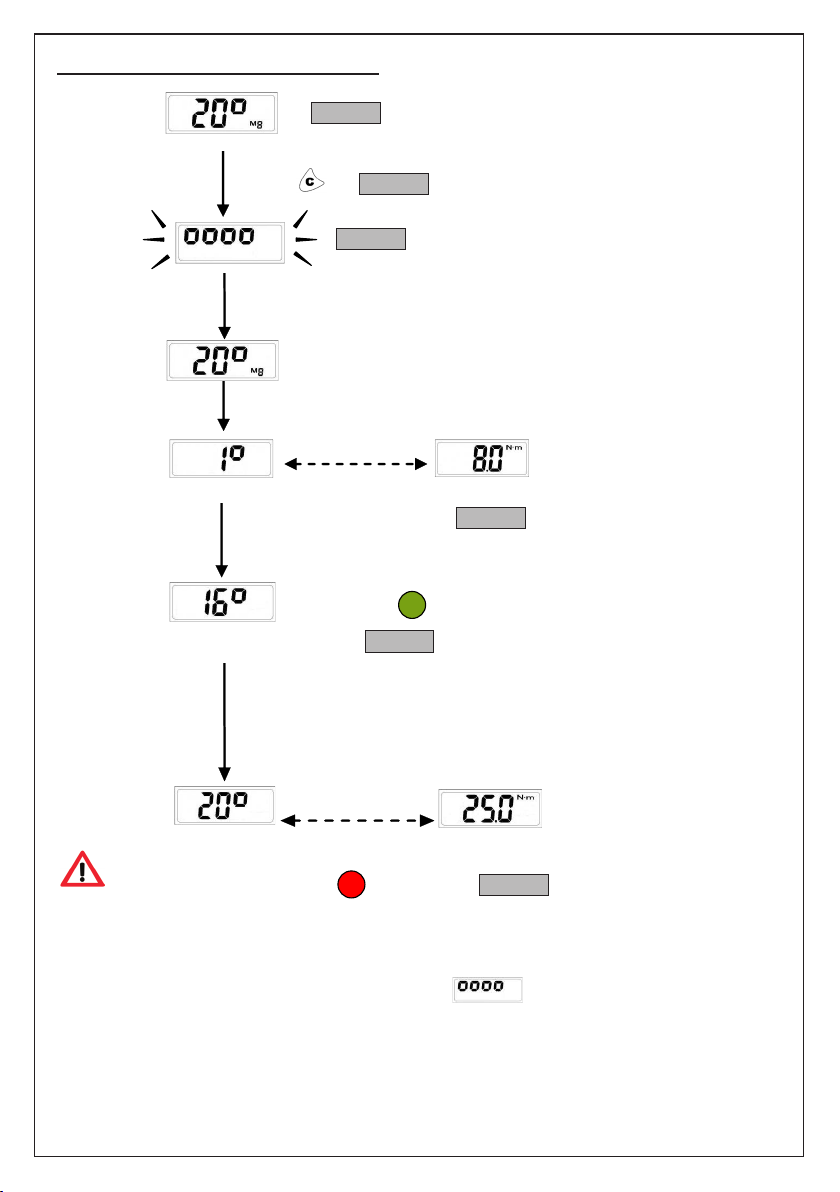
POWER ON AND RESETTINGWRENCH
– Press to power on the digital torque wrench.
– In the “torque” mode, the screen will display a preset value.
– In the “angle” mode, the screen will display rst a “zero” value, and then a preset angle value.
BATTERY INSTALLATION
– Remove the battery cover.
– Insert two R6/AA batteries matching the -/+ polarities of the battery to the battery compartment.
– Put on the battery cover and rotate it tightly according to the following figures.

15
– Usually press to reset the digital torque wrench before using it.
ATTENTION:
If an external force is applied to the torque wrench during the power-on/reset or wake up period, an
initial torque offset will be found in the memory.
IMPORTANT:
When the wrench is used in the “angle” mode, it should be placed horizontally on a plane before any
values are changed. If this instruction is not followed, a set of angle indicators will start blinking on the
dial:
To start the wrench, press
ACTIVATION DURING SLEEP MODE
– The wrench will auto sleep after about 5 minutes idle for power saving.
Press to wake up the wrench during the sleep mode.
RESETTINGWRENCH
– If the wrench does not function normally, press together to reset the wrench.
LOW BATTERY VOLTAGE PROTECTION
– If the battery voltage is under 2.3 volts, the wrench will display a battery symbol and then turn off
after a while.
SETUP
4
3
2
1 - Value storage
2 - Set Torque Value
3 - Unit Selection/Setting
4 - Power On/Clear
1

STEP 2: UNIT SELECTION
Press
Press
Press
Presetting Unit: Nm
Unit Selection: in-lb
Unit Selection: ft-lb
Presetting Torque Value
16
Nota:
1. If appears, that means more than 110%
torque as stated in the specications has been
applied to this wrench.
The wrench will start working again after a few
seconds; however, it should be checked for
calibration at a Beta authorized centre as soon
as possible.
2. The function “Unit Selection” is sequential
Press
Press
STEP 3:
SET TORQUE VALUE
Decrease Max. Torque Value
Increase Max. Torque Value
Press
Unit Selection: kg-cm
STEP 4:
PEAK HOLD / TRACK MODE SELECTION
Track Mode
Long Press
Set Peak/Track Mode
Set Peak/Track Mode
Press for Selection
Press
STEP 1: VALUE STORAGE
NB: Up to 9 stored values can be set
Value storage: M1
Press
Value storage: M2
Press
Value storage: M3
Value storage:M9
*Notes 1, 2

Note:
1. If appears, that means more than 110% of torque as stated in the specications has
been applied to this wrench.
The wrench will start working again after a few seconds; however, it should be checked for
calibration at a Beta authorized centre as soon as possible.
2. If you apply torque over 5 N-m, the LCD display will start to display the torque value. If the
applied torque is less than 5 N-m, the LCD display does not show any changes in value.
3. The green LED will be on for 90% of maximum setting torque.
4. The red LED will be on for 100% of maximum setting torque.
17
TRACK MODE OPERATION
START
(Sistem initial)
* Note 1
Appliy Torque Over 5 N-m
* Note 2
Reach 90% od Max. Target Value
Max. Target Value
Current Target Value
Current Torque Value
Buzzer
Buzzer
Reach Max.Target Value
Green LED
Over 90% of Set Torque
Red LED
Reach Max. Set Torque
* Note 4
* Note 3

18
PEAK HOLD MODE OPERATION
START
(System initial)
* Note 1
Apply Torque
Over 90% of Max. Target Value
Max. Target Value
Current Max. Value
(Peak Hold)
Buzzer
Buzzer
Reach Max. Target Value
Green LED
Reach 90% of Set Torque
Red LED
Reach Max. Set Torque
* Note 3
* Note 2
Released
Apply Torque Flashing
Note:
1. If appears, that means more than 110% of torque as stated in the specications has been
applied to this wrench.
The wrench will start working again after a few seconds; however, it should be checked for
calibration at a Beta authorized centre as soon as possible.
2. The green LED will be on for 90% of maximum setting torque.
3. The red LED will be on for 100% of maximum setting torque.

19
VALUE STORAGE IN PEAK HOLD MODE
Peak/track mode
*Note 2
Keep pressed
Peak/track mode selection
Press
(Delete)
Automatic
change
Press
Storage value
Delete stored value
*Note 1
*Note 3
Storage n°.
Press
(Quit)
No
Yes
Deleted
Automatic
change
Communication
Press
Communication
Press
(Exit)
Note:
1. The value storage system, “peak
mode”, can be used for the “track
mode” as well.
2. If the peak mode is being used, the
screen might display .
.Move on to the next step.
3. If no values are stored,
will be displayed.
4. The communication mode is used
to upload data stored on the PC.
5. The communication mode is also
used to calibrate the torque
wrench.
*Notes 4-5
Peak/track mode

20
ANGLE READOUT MODE OPERATON
Angle mode
*Note 2
Blinking
Release
Over 80% of set value
Apply force and turn
wrench
Current torque
80% of set value reached
*Note 1
*Note 3
Current angle
Set value reached
Release
Current angle
Press
* Nota 4
*Note 5
((…((… …)) …))
Current torque
((…((… …)) …))
*Note 6
Note:
1. When the angle measurement is set, the unit of measurement will become ° (Deg.) .
2. Hold the torque wrench fast, in the horizontal position, when the “angle mode” is entered.
3. After a few seconds the “angle mode” will start, and will blink.
4. When the wrench is released, in the “angle mode”, the display will show the corresponding torque
value with blinking LEDs.
5. When 80% of the set value is reached, the green LEDs will start blinking and an intermittent sound
will be heard.
6. When 99.5% of the set value is reached, a continuous sound will be heard, and the green LEDs
will stop blinking and will remain on together with the red LEDs.

21
SELECTING TORQUE UNIT OF MEASUREMENT IN ANGLE MODE
Angle mode
Peak/track mode
Selecting unit of measurement: in-lb
Keep pressed
*Note 1
Note:
1. The unit of measurement can also be selected in the “torque” mode.
Press
Selecting unit of measurement: N-m
Press
Press
Selecting unit of measurement: ft-lb
Selecting unit of measurement: kg-cm
Press

22
CONNECTING CABLE
- Turn off the torque wrench and connect the cable to the PC and the wrench.
DATA UPLOAD
Select the “Send” mode on the wrench. (See section “Value storage in peak hold mode”)
Insert the CD-ROM into the computer and start the data upload programme.
In the data upload programme, refer to the correct communication port.
Then select the le path to save the uploaded data.
Select the “upload” button, to upload the data from the wrench to the PC.
The uploaded data will be displayed in a column and saved in *.csv le. Use Microsoft Excel to
display *.csv le.
MAINTENANCE
ATTENTION:
The torque wrench needs to be recalibrated on an annual basis to provide accurate measurements.
Please contact your local dealer to recalibrate the wrench.
(UNI EN 26789 ISO 6789)
ATTENTION:
1. Over-torque (105% of max. torque range) could cause breakage or lose accuracy.
2. Do not shake violently or drop wrench.
3. Do not use this wrench as a hammer.
4. Do not leave this wrench in any place exposed to excessive heat, humidity or direct sunlight.
5. Do not use this apparatus in water (it is not waterproof).
6. If the wrench gets wet, wipe it with a dry cloth. The salt in seawater can be especially damaging.
ATTENTION:
Please refer to the guide contained in the upload CD.

23
7. Do not use any organic solvents, such as alcohol or paint thinner, when cleaning the wrench.
8. Keep this wrench away from magnets.
9. Do not expose this wrench to dust or sand, as this could cause serious damage.
10. Do not apply any force to the LCD panel.
BATTERY MAINTENANCE
1. When the Beta 599 DGT-A/20 wrench is not used for an extended period of time, remove the
battery.
2. Keep a spare battery on hand when going on a long trip or to cold areas.
3. Do not mix battery types or combine used batteries with new ones.
4. Sweat, oil and water can prevent a battery’s terminal from making electrical contact. To avoid this,
wipe both terminals before loading a battery.
5. Dispose of batteries in a designated disposal area. Do not throw batteries into a re.
EC Declaration of Conformity:
The product complies with the requirements of Directive 2004/108/EC (EMC).
Conformity is declared in accordance with EN 61000- 6-2 / EN 55011.
Other manuals for 599 DGT-A/20
1
Table of contents
Other Beta Power Tools manuals