PowerFit ELITE DELUXE PFE-1912 User manual

Save These Instructions – For Household/Residential Use Only
Owner’s Manual
MODEL: PFE-1912-Smart POWER: 120W, 110-120V~60Hz
MODEL: PFE-1912 POWER: 150W, 110-120V~60Hz
When using electrical devices, basic safety precautions
should always be followed. Do not use the PowerFit until
you have read this manual thoroughly.
Visit TristarCares.com for tutorial
videos, product details, and more.
Guarantee Information Inside

2 PowerFit®Elite & PowerFit®Elite Deluxe PowerFit®Elite & PowerFit®Elite Deluxe 3
PowerFit Table of Contents
IMPORTANT SAFEGUARDS 4-5
_______________________________________________________________________________
Features & Benefits 6
_______________________________________________________________________________
Parts & Accessories 7-8
_______________________________________________________________________________
Walking, Jogging and Running 9
_______________________________________________________________________________
General Operating Instructions 10-11
_______________________________________________________________________________
Stretching 12–14
_______________________________________________________________________________
Complementary Workouts 15–17
_______________________________________________________________________________
Maintenance & Cleaning 18
_______________________________________________________________________________
Frequently Asked Questions 20
_______________________________________________________________________________
60-Day Guarantee 23
_______________________________________________________________________________
BEFORE YOU BEGIN
It is very important that you read this entire manual,
making certain that you are completely familiar with
this device’s operation and precautions.
Model Number Supply Power Rated Power Maximum Weight
PFE-1912-Smart AC 110-120V~60Hz 120W 220.46 lb. (100 kg)
PFE-1912 AC 110-120V~60Hz 150W 220.46 lb. (100 kg)
ELITE DELUXE
PFE-1912
ELITE
PFE-1912-Smart

4 PowerFit®Elite & PowerFit®Elite Deluxe PowerFit®Elite & PowerFit®Elite Deluxe 5
When using an electrical appliance, basic precautions
should always be followed, including the following:
1. This device should never be left unattended when
plugged in. Unplug the device from the power
outlet when not in use and before putting on or
taking off parts.
2. Do not operate under a blanket or pillow.
Excessive heating can occur and cause re,
electric shock, or injury to persons.
3. Do not operate this device under any object.
4. This device is not intended for use by persons
with reduced physical, sensory, or mental
capabilities or lack of experience and knowledge
unless they are under supervision or have been
instructed how to use the device by a person
responsible for their safety. Keep children under
the age of 13 away from this device.
5. Use this device only for its intended use as
described in this manual. Do not use attachments
not recommended by the marketer.
6. Never operate this device if it has a damaged cord
or plug, if it is not working properly, if it has been
dropped or damaged, or if it has been dropped
into water. Contact Customer Service using the
contact information on the back of this manual.
7. Do not carry this device by its power cord or use
the cord as a handle.
8. Keep the power cord away from heated surfaces.
9. Never operate the device with the air openings
blocked. Keep the air openings free of lint, hair,
and the like.
10. Never drop or insert any object into any opening.
11. Do not use outdoors.
12. Do not operate where aerosol (spray) products
are being used or where oxygen is being
administered.
13. To disconnect, turn all controls to the off position
and then remove the plug from outlet.
IMPORTANT SAFEGUARDS
WARNING: READ ALL INSTRUCTIONS BEFORE USING THIS DEVICE.
CONSULT YOUR DOCTOR BEFORE BEGINNING ANY NEW HEALTH REGIME.
IMPORTANT SAFEGUARDS
SAVE THESE INSTRUCTIONS –
FOR HOUSEHOLD/RESIDENTIAL USE ONLY
This product can expose you to Bisphenol A, which is known
to the State of California to cause birth defects or other
reproductive harm. For more information, go to
www.P65Warnings.ca.gov.
For California Residents
WARNING:
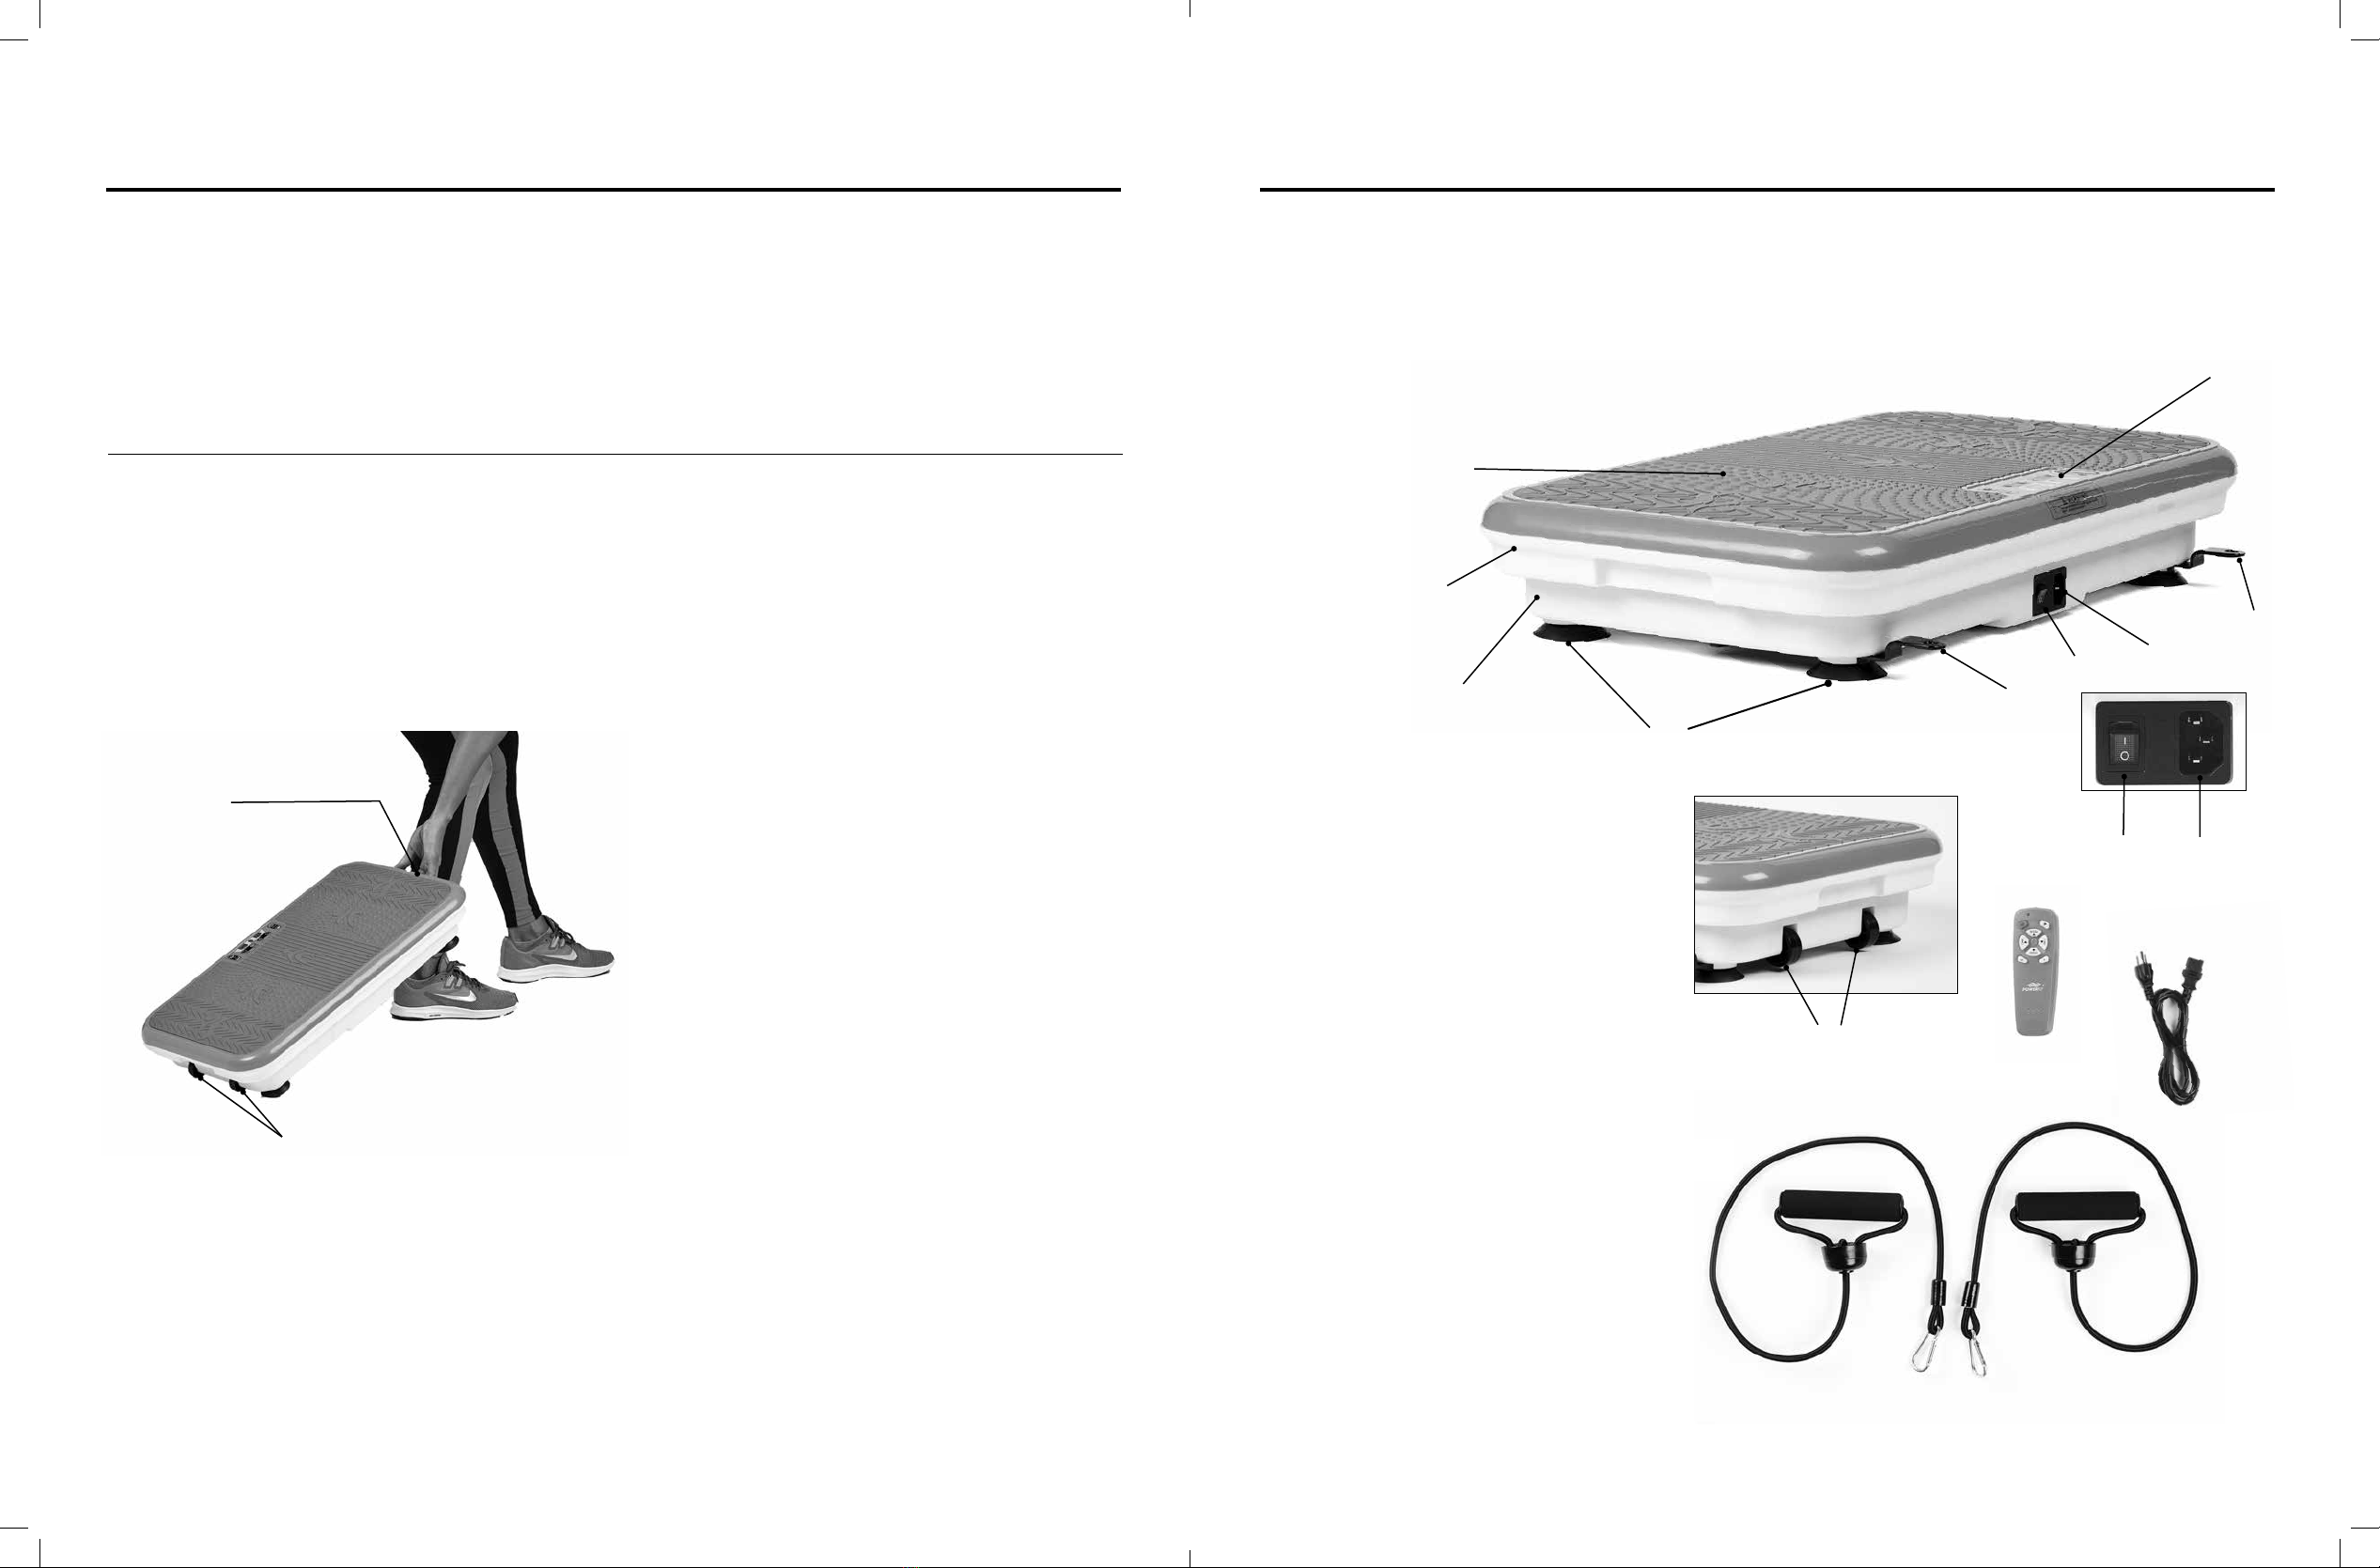
• NOTE: The PowerFit is fitted with a Quick-Release
Magnetic Power Cord.
• DO NOT USE WITH ANY OTHER ELECTRICAL
OUTLET or modify the plug.
• The PowerFit has been designed for use with a
3-prong, 120V dedicated electrical outlet only.
Always attach electrical cord to the PowerFit
before plugging the device into an outlet. Plug into
a 3-prong wall outlet with no other appliances on
the same outlet. Plugging other appliances into
the outlet may cause the circuit to overload.
• In the event of device malfunction, disconnect the
Power Cord quickly from the device with a gentle
tug where it is connected to the device.
• Never tug the plug forcefully from the wall outlet.
• NEVER USE WITH AN EXTENSION CORD.
A detachable power-supply cord is provided to
reduce the risk from becoming entangled in or
tripping over a longer cord.
• A short power supply cord is provided to reduce
risk of becoming entangled or presenting a
tripping hazard.
• Always step off the device before adjusting the
device’s settings.
CAUTION: Attaching the Power Cord
Grounding Instructions
This device must be grounded. If it should malfunction
or breakdown, grounding provides a path of least
resistance for electric current to reduce the risk of
electric shock. This device is equipped with a cord
that has an equipment-grounding conductor and
a grounding plug. The plug must be plugged into
an appropriate outlet that is properly installed and
grounded in accordance with all local codes and
ordinances.
DANGER:
Improper connection of the equipment-grounding
conductor can result in a risk of electric shock. Check
with a qualied electrician or serviceman if you are in
doubt as to whether the device is properly grounded.
Do not modify the plug provided with the device – if it
will not t the outlet, have a proper outlet installed by
a qualied electrician.
This device is for use on a
nominal 120-V circuit and has
a grounding plug that looks
like the plug illustrated in Fig. A.
Make sure that the device is
connected to an outlet having
the same conguration as the
plug. No adapter should be
used with this device.
DANGER:
TO REDUCE THE RISK OF ELECTRIC SHOCK:
Always unplug this device from the electrical outlet
immediately after using and before cleaning.
TO REDUCE THE RISK OF PERSONAL INJURY, READ AND
UNDERSTAND ALL INSTRUCTIONS BEFORE USING THIS DEVICE
• Keep children under the age of 13 away from this device.
• Servicing or cleaning must be performed with the device
disconnected from the power supply.
WARNING:
Fig. A

6 PowerFit®Elite & PowerFit®Elite Deluxe PowerFit®Elite & PowerFit®Elite Deluxe 7
1. ANTI-SLIP COVER
2. INTERMEDIATE COVER
3. BASE COVER
4. ANTI-SLIP RUBBER BASES
5. ELASTIC BAND ANCHOR POINTS*
6. POWER SWITCH
7. POWER CORD SOCKET
8. CONTROL PANEL
9. TRANSPORT WHEELS*
10. REMOTE CONTROL
11. POWER CORD
12. EXERCISE ELASTIC BANDS
WITH FIT TENSOR TECHNOLOGY*
* (Elite Deluxe model only)
How Does it Work?
By placing your feet in different positions on the exercise area, you will be able to simulate walking, jogging, and
running while you stand on PowerFit inside the comfort of your own home. It is recommended to use PowerFit
for 10 minutes a day 3 days a week.
Features & Benets
• To transport PowerFit*, grasp the handle located
on the right side of the device and pick up the
right side so that the device is at an angle and the
wheels touch the floor. Then, pull the device gently
to move.
*For Model PFE-1912
• Always use the device on a stable, horizontal
surface.
• Keep the device at least 8 inches away from any
wall or object.
• When using the device for first time, sit down on
a chair placed in front of the device and put your
feet on it. Then, turn on the device in order to test
the intensity of the movements. This method will
allow you to get used to the device’s vibrations.
• Make sure to wear comfortable clothes and
footwear for exercise.
Before Using the PowerFit for the First Time
Parts & Accessories
Your PowerFit has been shipped with the parts and
accessories shown below. Check everything carefully
before use. If any part appears damaged, do not use
this device and contact Customer Service using the
number located in the back of this manual.
12
2
3
8
67
5
5
1
67
9
4
HANDLE
TRANSPORT
WHEELS
10
11

8 PowerFit®Elite & PowerFit®Elite Deluxe PowerFit®Elite & PowerFit®Elite Deluxe 9
4
5
61 23
78 9 10 11
A. ON/OFF
B. START/STOP
C. INCREASE SPEED
D. DECREASE SPEED
E. INCREASE TIME
F. DECREASE TIME
G. SKIP SPEED TO 30, 60, AND 90
H. PROGRAM SELECTION
Parts & Accessories
1. TIME/PROGRAM DISPLAY
2. SPEED/PROGRAM DISPLAY
3. INFRARED RECEPTOR
FOR THE REMOTE CONTROL
4. INCREASE TIME
5. DECREASE TIME
6. INCREASE SPEED
7. DECREASE SPEED
8. ON/OFF
9. PROGRAM SELECTION
10. START EXERCISE
11. STOP EXERCISE
PowerFit Control Panel
PowerFit Remote Control
A
D
F
H
B
C
E
G
Walking, Jogging and Running
PowerFit is a vibrating platform that simulates the action of walking, jogging, or running through horizontal
oscillatory movements. Placing your feet closer together while standing on the device simulates walking, while
placing your feet farther apart simulates jogging.
The Three Stances
With PowerFit, you can experience
the sensation of walking, jogging, or
running in the comfort of your home.
The Feet Position table shows the
differences between the three different
stances availble for use on the PowerFit.
Feet Position
Walking Close together
on the center of the Unit
Jogging Slightly separated
Running Separated and planted
toward the edge of the Unit
• Non-rechargeable batteries
are not to be recharged.
• Rechargeable batteries are
only to be charged under adult
supervision.
• Rechargeable batteries are to
be removed from the device
before being charged.
• Different types of batteries or
new and used batteries are
not to be mixed.
• Batteries are to be inserted
with the correct polarity.
• Exhausted batteries are to be
removed from the remote.
Never drop or insert any object
into any opening.
Remote uses two AAA batteries
(not included).

10 PowerFit®Elite & PowerFit®Elite Deluxe PowerFit®Elite & PowerFit®Elite Deluxe 11
Automatic Mode
When using Automatic Mode, the device will follow
your selected preset exercise program. To use
Automatic Mode:
1. Connect the Power Cord of the device
to the outlet. Use the Power Switch to turn
on the device.
2. Press the On/Off Button on the Control Panel or
the Remote Control.
3. Press the Program Selection Button to cycle
between the three available preset program (P1,
P2, and P3). P1 is intended for beginners. P2 is
intended for intermediate users. P3 is intended for
advanced users. Refer to the table on the right for
detailed information about the preset programs.
4. When you have selected your desired program,
press the Start Button on the Control Panel or the
Start/Stop Button on the Remote Control to begin
the exercise.
5. Press the Stop Button on the Control Panel or the
Start/Stop Button on the Remote Control to stop
the exercise at any time.
6. When you are done with the exercise, press the
On/Off Button on the Control Panel or the Remote
Control to turn off the device.
General Operating Instructions
Time
(minutes)
Beginners
P1
Intermediate
P2
Advanced
P3
916 20 10
818 40 44
728 60 99
638 80 33
548 99 99
458 40 22
348 99 99
238 40 11
128 99 99
Speed for Each Program
NOTE: Always step off of the device before adjusting
the device’s Control Panel.
General Operating Instructions
Modes of Use
PowerFit gives you two modes of use: manual mode
and automatic mode. In both modes, you can use
the exercise Elastic Bands. To use the Elastic Bands,
attach the hook on each Elastic Band to one of the
Elastic Band Anchor Points, located at the back of
the device.
CAUTION: Before each use, ensure that the Elastic
Bands are undamaged and properly anchored to the
PowerFit. Do not use if the Elastic Bands or Anchor
Points are damaged.
Manual Mode
Using manual mode, you can set the time and the
speed of the exercise. To use manual mode:
1. Connect the Power Cord of the device in the
outlet. Use the Power Switch to turn on the device.
2. Press the On/Off Button on the Control Panel or
the Remote Control.
3. Use the Increase Time and Decrease Time
Buttons on the Control Panel or Remote Control
to set an exercise time (range: 1–10 minutes;
interval: 1 minute). The current exercise time is
displayed on the Time/Program Display on the
Control Panel.
4. Press the Start Button on the Control Panel or
the Start/Stop Button on the Remote Control to
begin the exercise.
5. Use the Increase Speed and Decrease Speed
Buttons on the Control Panel or Remote Control to
adjust the vibration speed (range: 1–99; interval: 1).
You can press the Skip Speed Button on the
Remote Control to rapidly increase vibration speed
to 30. Refer to the table on the right for
recommended vibration speeds and exercise times
according to your level of experience.
6. Press the Stop Button on the Control Panel or
the Start/Stop Button on the Remote Control to
stop the exercise at any time.
7. When you are done with the exercise, press the
On/Off Button on the Control Panel or the Remote
Control to turn off the device.
Time
(minutes) Beginners Intermediate Advanced
10 30-33 64-66 98-99
927-39 62-64 96-98
824-26 60-62 94-96
720-23 56-59 92-94
616-19 53-55 88-91
513-16 49-52 84-87
4 10-12 45-48 81-83
36-9 41-44 75-78
24-5 37-40 71-74
11-3 34-36 67-70
Speed for Each Level
NOTE: Always step off of the device before adjusting
the device’s Control Panel.

12 PowerFit®Elite & PowerFit®Elite Deluxe PowerFit®Elite & PowerFit®Elite Deluxe 13
StretchingStretching
Stretching Routines
TALK TO YOUR PHYSICIAN BEFORE STRETCHING AND USING THIS DEVICE.
Before starting any exercise routines with this device, we recommend stretching to gain exibility and reduce
muscle pain. Stretching routines must be done slowly and gently without any swift movements or jumping.
Perform the exercises until you feel a slight but not painful tension while stretching for 20–30 seconds. You must
breathe slowly, rhythmically, and naturally in order to oxygenate your body thoroughly. NOTE: You do not need
to stretch before using the device. Do not perform these stretches if you have any physical limitations.
Quadriceps Stretching
Standing with your back straight, step forward with
your right foot and place your left foot behind your
body and your right hand on your leg. Stretch your
left side while maintaining a straight position. Maintain
this position for 20–30 seconds and then repeat by
switching leg positions.
Back Stretching
Stand up with your feet shoulder width apart. Lean
forward and place your hands on your thighs for
support. Flex your lower back in an arched position
and hold the position for 20–30 seconds. Then,
straighten your back and repeat.
Tendon Stretching
Stand with your feet close together and pointing
forward. Extend your right foot with the heel on the
ground and toes facing upward while exing your left
leg slightly. Lean your upper body forward with your
hands on the thighs for support. Maintain the position
for 20–30 seconds and then repeat with the other leg.
Calf Stretching
With your toes pointing in front of you, step forward
with your right foot and lean forward while bending
your right knee. Do not allow your knee to pass
the tip of your foot. Keep your left leg straight and
your left foot on the oor. Maintain the position for
20–30 seconds and then repeat with the other leg.
Calf And Hip Stretching
With your toes facing forward, step forward with
your right foot. Lean forward while bending your right
knee. Do not allow your knee to pass the tip of your
foot. Keep your left leg straight and your left heel on
the oor. Twist your torso toward your left leg while
keeping your hip facing forward. Maintain the position
for 20–30 seconds and then repeat with the other leg.
Shoulder Stretching
Stand upright with your feet together. Cross your right
arm to the other side of the your body. Use your left
hand to keep your arm in position and push. Maintain
the position for 20–30 seconds and then repeat with
the other arm.
Inner Thigh Stretching
Stand with your legs apart at a comfortable distance.
Lean forward, bending your right knee. Do not
allow your knee to pass the tip of your foot. Place
your hands on your thighs for support. Maintain the
position for 20–30 seconds and then repeat with the
other leg.
Oblique Muscles Stretching
Stand with your legs apart and feet pointing forward.
Extend your right arm above your head as far as you
can. Maintain the position for 20–30 seconds and
then repeat with the other arm.
Buttocks, Hip, And
Oblique Muscles Stretching
While seated on the oor, bend one leg over the other.
While keeping the body in a straight position, press
your hand against the outer part of your thigh in order
to bring the thigh closer to the body. Maintain the
position for 20–30 seconds and then repeat with the
other leg.

14 PowerFit®Elite & PowerFit®Elite Deluxe PowerFit®Elite & PowerFit®Elite Deluxe 15
Complementary Workouts
NOTE: All workouts should be performed with the device
powered on.
AStand on the device with your legs separated
and aligned with your shoulders. Take the Elastic Bands in
your hands. Place your hands on the outside of your legs
and then raise your arms upward and outward as far as
you can with your elbows always in a straight position.
Repeat the motion until the device stops vibrating.
WORKS: Abs, thighs, biceps, and arms.
BStand on the device with your legs separated and
aligned with your shoulders. Take the Elastic Bands in
your hands. Place your hands on the outside of your legs
and then lift your right hand up to chest height while
keeping your elbow straight. Lower your right hand and
raise your left hand. Repeat the motion until the device
stops vibrating.
WORKS: Abs, thighs, arms, back, and biceps.
CStand holding the Elastic Bands in each hand with
your arms by your sides. Ensure your elbows are close to
your torso and your palms are facing forward. Keep your
upper arms stationary and exhale as you curl the Elastic
Bands up to shoulder level while contracting your biceps.
Lower your left arm and raise your right arm in the same
manner. Repeat until the set exercise time is complete.
WORKS: Abs, thighs, arms, back, and biceps.
DStand on the device with your legs separated and
aligned with your shoulders and your knees slightly bent.
Cross your arms and place your palms on the opposite
forearm in order to maintain balance. Tighten your abs to
help with balance. Repeat the motion until the device
stops vibrating.
WORKS: Abs, thighs, triceps, and buttocks.
EStand on the device with your legs separated
and aligned with your shoulders. Place your hands on
your neck and perform squats very slowly while
maintaining balance.
WORKS: Abs, thighs, triceps, buttocks, and back.
Stretching
Triceps Stretching
Raise your left elbow and reach toward your upper
back. Stand upright with your feet together or apart
and your knees bent slightly. Point your left elbow
toward the ceiling and touch the center of your upper
back with your left hand. If you cannot reach your
upper back, put your hand on the back of your head
instead. Bend your head forward when you put your
hand on it and then push your head back gently
Back And Thighs Stretching
Sit down on the device with your legs apart and the
soles of your feet on the oor. Arch your back and
lean forward to touch your toes with your hands.
Abs And Hip Stretching
Lie on your side with your hip on the device. Elevate
your legs and hold on with only one arm on the oor
while keeping your abdomen tight. Then, switch sides
and repeat.
Calves And Legs Stretching
Stand with the device in front of you. With your hands
on your hips, put your right leg in front of the device
and bend your left knee down to touch the surface of
the device. Maintain the position for 20–30 seconds
and then repeat with the other leg.
Workout
A
D
B
C
E

16 PowerFit®Elite & PowerFit®Elite Deluxe PowerFit®Elite & PowerFit®Elite Deluxe 17
Workout
MPlace your palms on the device and the tips of
your toes on the oor. Keep your whole body straight
and tighten your abs and buttocks.
WORKS: Arms, back, abs, buttocks, thighs, calf, and
shoulders. Also helps to strengthen the neck.
NLie on your back on the oor with the soles of
your feet on the device. Lift your hips, raising your
lower back off the oor. Tighten your abs and
buttocks. Maintain the position for a few seconds
before returning to the starting position and repeating.
WORKS: Calf, thighs, buttocks, abs, and back.
OLie on your side on the oor, place your forearm
on the device, and support all your weight on your
forearm. Stretch your legs with one leg against the
other. Tighten your whole body.
WORKS: Forearm, biceps, triceps, shoulders, back,
buttocks, and abs. Also helps to strengthen the neck.
PSit down on the device with your hands behind
your neck or crossed on your chest. While keeping
your spine straight, lean back slightly and lift your feet,
bringing your shins parallel to the oor. Alternatively,
you can bend your knees.
WORKS: Abs, buttocks, and legs.
QPlace your left foot on the device and the other
foot on the oor with your knee slightly bent. Keep
your back straight.
WORKS: Calf and thighs.
RPlace your body in a push-up position. Then,
place the tips of your toes on the device and your
palms on the oor. Keep your back straight.
WORKS: Back, chest, shoulders, buttocks, and calf.
Workout
F
P
J
M
H
R
L
N
G
O
I
Q
K
FPlace the heel of one foot on the device. Bend
your legs without moving the other foot from the oor
and keep your back tight.
WORKS: Calf, thighs, and buttocks.
GPlace your left foot on the device and the other
foot on the oor. Keep both legs straight. Stretch
toward the leg on the device, sliding your left arm
down your leg and your right arm above your head.
Then, repeat with the other leg.
WORKS: Hips, calf, and adductor muscles.
HPlace your feet at on the ground in front of the
device. Place both hands on the device with your
elbows slightly bent to support your body weight.
Keep your abs tight.
WORKS: Triceps, biceps, abs, forearm, dorsal muscles,
back, shoulders, and pectorals.
IKneel on the oor with both hands on the
device and keep your arms straight while bending
the back slightly.
WORKS: Back, hips, shoulders, forearms, biceps,
and triceps.
JSit down on the oor and place your calves
on the device with the palms of your hands on the
oor. Keep your back straight.
WORKS: Calf, femoral muscles, and quadriceps.
KSit on the device with your legs crossed or in lotus
position with your back straight. Keep your abs tight.
WORKS: Hips, abs, buttocks, and back.
LPlace your forearms on the device and the tips of
your toes on the oor. Keep your whole body straight
and tighten your abs and buttocks.
WORKS: Arms, back, abs, buttocks, thighs, calf, and
shoulders. Also helps to strengthen the neck.

18 PowerFit®Elite & PowerFit®Elite Deluxe PowerFit®Elite & PowerFit®Elite Deluxe 19
Issue Cause Fix
The device
does not work.
The Power Cord is not plugged into a power outlet. Connect the Power Cord to a power outlet.
The Power Switch is in the Off position. Place the Power Switch in the On position.
The Remote Control
does not work.
The Remote Control’s batteries are dead. Replace the batteries.
The remote control is too far away from the device’s
Infared Receptor.
The effective distance of the Remote Control
is 6.56 feet (2 m).
The machine stopped
working suddenly. The programmed exercise time ended. Reset the exercise time.
The device is
not responding.
Too many commands were input at once and
the device cannot respond to all of them.
Turn off the device, wait 1 minute, and turn the device
back on again.
Maintenance & Cleaning
Troubleshooting
Before cleaning the device, make sure that the
Power Switch is off and that the Power Cord is
unplugged from the outlet.
• You can use a dry, clean broom or brush to
sweep dust from device.
• The exercise area can be cleaned with a slightly
wet cloth.
• Do not clean the device with corrosive
substances because they can damage
the device.
• Clean the remote control with a clean cloth.
• If you are not using the device for a long time,
put it in its packaging box and store the box in
a cool, dry place. Remove the batteries from the
remote control.
• If PowerFit presents any issues that cannot be
solved using the solutions in the Troubleshooting
section, please contact Customer Service using
the contact information in the back of this manual.
Maintenance & Cleaning
Replacing the Fuse
If the device is plugged in but will not power on,
you may need to replace the fuse:
1. Use a screwdriver to pry open the fuse holder
in the middle of the socket (see Fig. A).
NOTE: Screwdriver not included.
2. Remove the fuse from the fuse holder
(see Fig. B).
3. Install a new fuse into the fuse holder
(see Figs. C &D).
NOTE: New fuse not included.
4. Insert the new fuse and holder into the middle
of the switch socket according to the direction
of the notch (see Figs. E &F).
FUSE HOLDER
FUSE
Fig. A
Fig. C Fig. D
Fig. E Fig. F
Fig. B

20 PowerFit®Elite & PowerFit®Elite Deluxe PowerFit®Elite & PowerFit®Elite Deluxe 21
Exercise LogFrequently Asked Questions
How often should I use the device for
best results?
The recommended routine is 10 minutes a day,
3 times each week – total 30 minutes per week.
Review the instruction manual and workout guide
for more options.
Are there programs available for beginners?
Yes, there are programs for beginners, intermediate,
and advanced users.
What is the length of the power cord?
The power cord length is 70 inches (1.8 m).
What do I do if the device is plugged in but will
not power on?
Check the fuse (see Replacing the Fuse, p. 19). If
the fuse is blown, follow the instructions on p. 19 to
replace the fuse.
Can I use the PowerFit while pregnant?
It is not recommended to be used during pregnancy.
Can I use PowerFit after a recent surgery?
If you have any known health concerns or recently
had surgery, It is recommended that you consult your
doctor or physician rst before using the device.
Is PowerFit similar to a treadmill?
No, it is not. Vibration is a gentle workout that is
easy on the joints. Unlike the treadmill, you don’t
do any walking. You simply stand and/or perform
simple exercises on a movable, vibrating platform.
This causes your muscles to contract while using
your own body weight.

PowerFit®Elite & PowerFit®Elite Deluxe 23
60-Day Money-Back Guarantee
If you decide that you don’t love this product, your order is covered by our 60-Day Money-Back
Guarantee. You have 60 days from the day you receive your product to request a replacement
product or refund of the purchase price minus processing and handling fees.
To receive a refund or replacement, you must return the product to us at your expense. To
return the product, call customer service at 1-973-287-5186 and request a return merchandise
authorization number. Pack the product carefully and include in the package a note with
(1) your name, (2) mailing address, (3) phone number, (4) email address, (5) reason for return,
and (6) proof of purchase or order number, and (7) specify on the note whether you are
equesting a refund or replacement. Write the return merchandise authorization number on the
outside of the package.
Send the product to the following return address:
PowerFit
Tristar Products Inc.
500 Returns Road
Wallingford, CT 06495

We are very proud of the design and quality of our
PowerFit®
This product has been manufactured
to the highest standards. Should you have any questions,
our friendly customer service staff is here to help you.
Visit us at www.TristarCares.com,
or call us at 973-287-5186
Distributed by:
Tristar Products, Inc.
Faireld, NJ 07004
© 2020 Tristar Products, Inc.
Made in China
PF-PFE-1912_IB_TP_ENG_V1_200128
This manual suits for next models
1
Table of contents
Popular Fitness Equipment manuals by other brands

Mark Of Fitness
Mark Of Fitness XM-4434 owner's manual

NordicTrack
NordicTrack NTL99010.2 user manual

Russell Corporation
Russell Corporation M85544C owner's manual

Titan Fitness
Titan Fitness NEMESIS CFNTLTNR300 Operator's manual

Weslo
Weslo Inversion Flex WLBE0109.0 user manual

Deltech Fitness
Deltech Fitness DF820LS Assembly instructions