manuals.online logo
Brands
  1. Home
  2. •
  3. Brands
  4. •
  5. Powertow
  6. •
  7. Truck
  8. •
  9. Powertow 65 EZ VIPER User manual

Powertow 65 EZ VIPER User manual

OWNER'S
MANUAL
NORMST
MANUFACTLII
uwm
,
IN,
9101010jj
(Advanced Assembly)
LOTS OF PICTURES…LITTLE WORDING 3
Tools – Phillips, 9/16” - ½” box wrench, ½” socket & ratchet (2 Allen wrenches included)
Set-up tips - Open the shipping carton and remove the handle assembly only
Cut engine end of carton and lay flat (work platform)
Remove the bolts from the top of the 2 metal
shipping
stands, and raise engine end of unit to place
wooden block under frame. Wood is an assembly aid only. Discard bolts and shipping stands.
Important … Remove the tire retaining band LAST, after handle assembly
Remove the black 3/8” bolt from the engine plate.
Remove the 5/16” x 2 1/2” bolts from handle and use
to attach handle to rear of engine plate, reinstalling
the 3/8” top bolt. But only finger tight. Bolt
needs to be fairly loose, until final adjustment.
Tighten the two bolts in front of each caster,
into frame.
But only finger tight. Bolt needs to be
fairly loose, until final adjustment.
Securing Clutch Cable
Remove the 10-24 self-tapping screw from left side
of handle; reinstall with clutch cable.
Secure clutch cable on bottom of frame.
Now tighten all the bolts in the correct order.
Otherwise, you will have a heck of a time!
1. 5/16” – By caster mount)
2. 3/8” bolt on top of frame
Clutch cable – Connect the ends of the Clutch Cable, leaving most
of the screw portion showing. This barrel twist chamber adjusts the
tension of the clutch. Adjust your clutch cable so the idler arm
pulley is just off the belt, so when it disengages, it’s not touching the
belt or spinning all the time. Don’t forget to tighten the jam nuts.
It’s important for the clutch to fully disengage when released. If
you have this adjustment too tight, the machine will continue to
travel even when the handle is release.
Shift Rod –Secure shift rod using Push Nuts at transmission and
shift handle. Do not push on too tight or the handle will bind.
Lanyard Cable –With the lanyard handle flipped open, slip the end
of the lanyard cable into swing arm eyebolt. Close handle and
adjust eyebolt till the swing arm and stationary arm are parallel
when the lanyard is in the closed (tow) position. The two wing
nuts hold it secure. Refer also to the Adaptor-Adjustment Page.
Brake Handle - Attach to right handle bar. Your brake
adjustment will be pre-set, however with time you may need to
adjust either the brake lever or where the cable adjuster enters
the engine plate.
Throttle Cable Control – Attach to the upper left side of
handle, up and over handle, not under. Cable runs down the
left side of handle. Remove screws and replace, securing
throttle lever to handle.
Tie Wraps – The brake cable needs to be kept fairly tight at
the top with a tie wrap, so it will not interfere with the swing
arm lanyard cable. Then space the tie wraps starting halfway
down the handle, to secure the throttle, clutch and brake cable and loosely secure to handle.
Engine Oil –Don’t forget
to put the supplied oil in
your engine.
Gas - We spec the engine
to run on 100 Low Lead.
You can put your test fuel
in the Powertow tank, no
more tossing it on the
tarmac.
Automotive fuel is also
okay to use
Idler Arm Belt Guides Idler Arm Pulle
y
ADAPTER-LANYARD ADJUSTMENT
With the swing arm positioned parallel to the stationary arm, the adapter set
screws loose and the adapters fully retracted, move the machine up to the
aircraft nose wheel so that the Powertow tire and aircraft nose tire are in line.
Slide in adapters evenly on each side snug.. Tighten the stationary side adapter.
Next –loosen the swing arm adapter 1/16” of an inch and tighten down. This
will allow the lanyard cable to lock down without undo pressure. Too tight
and the adaptors will pop off or the z-swag will break.
IMPORTANT! – The swing arm and the stationary arm should always be parallel
when the lanyard lever is in the down position. BEFORE MOVING THE AIRCRAFT,
TRY OUT THE POWERTOW UNDER POWER BY ITSELF TO GET USED TO THE
CLUTCHING CONTROL.
EZ HOOK-UP: Open the lanyard handle, move unit up to aircraft, at an angle
slightly from the right side to engage the stationary adaptor. By using the
stationary arm adapter, as a pivot to lift the wheel, you can swing the machine
to your left far enough to engage the hookup, while pulling the lanyard lever into
the down and locked position. (It may be necessary to shift the machine left and
right and/or up and down to get the lanyard lever completely down and the
swing arm adapter to fully seat.)
IF THE ADAPTERS SLIP OFF OR OUT OF POSITION – Check that the stationary
arm and swing arm are parallel and that both adapter set screws are tight on
each of the adaptors.
IF THE SWING ARM OPENS UNDER LOAD – check that the arms are parallel and
that the lanyard lever goes past center to the down lock position.
SHORT & SWEET PLEASE READ
Please take a few minutes to! Maybe even read them.
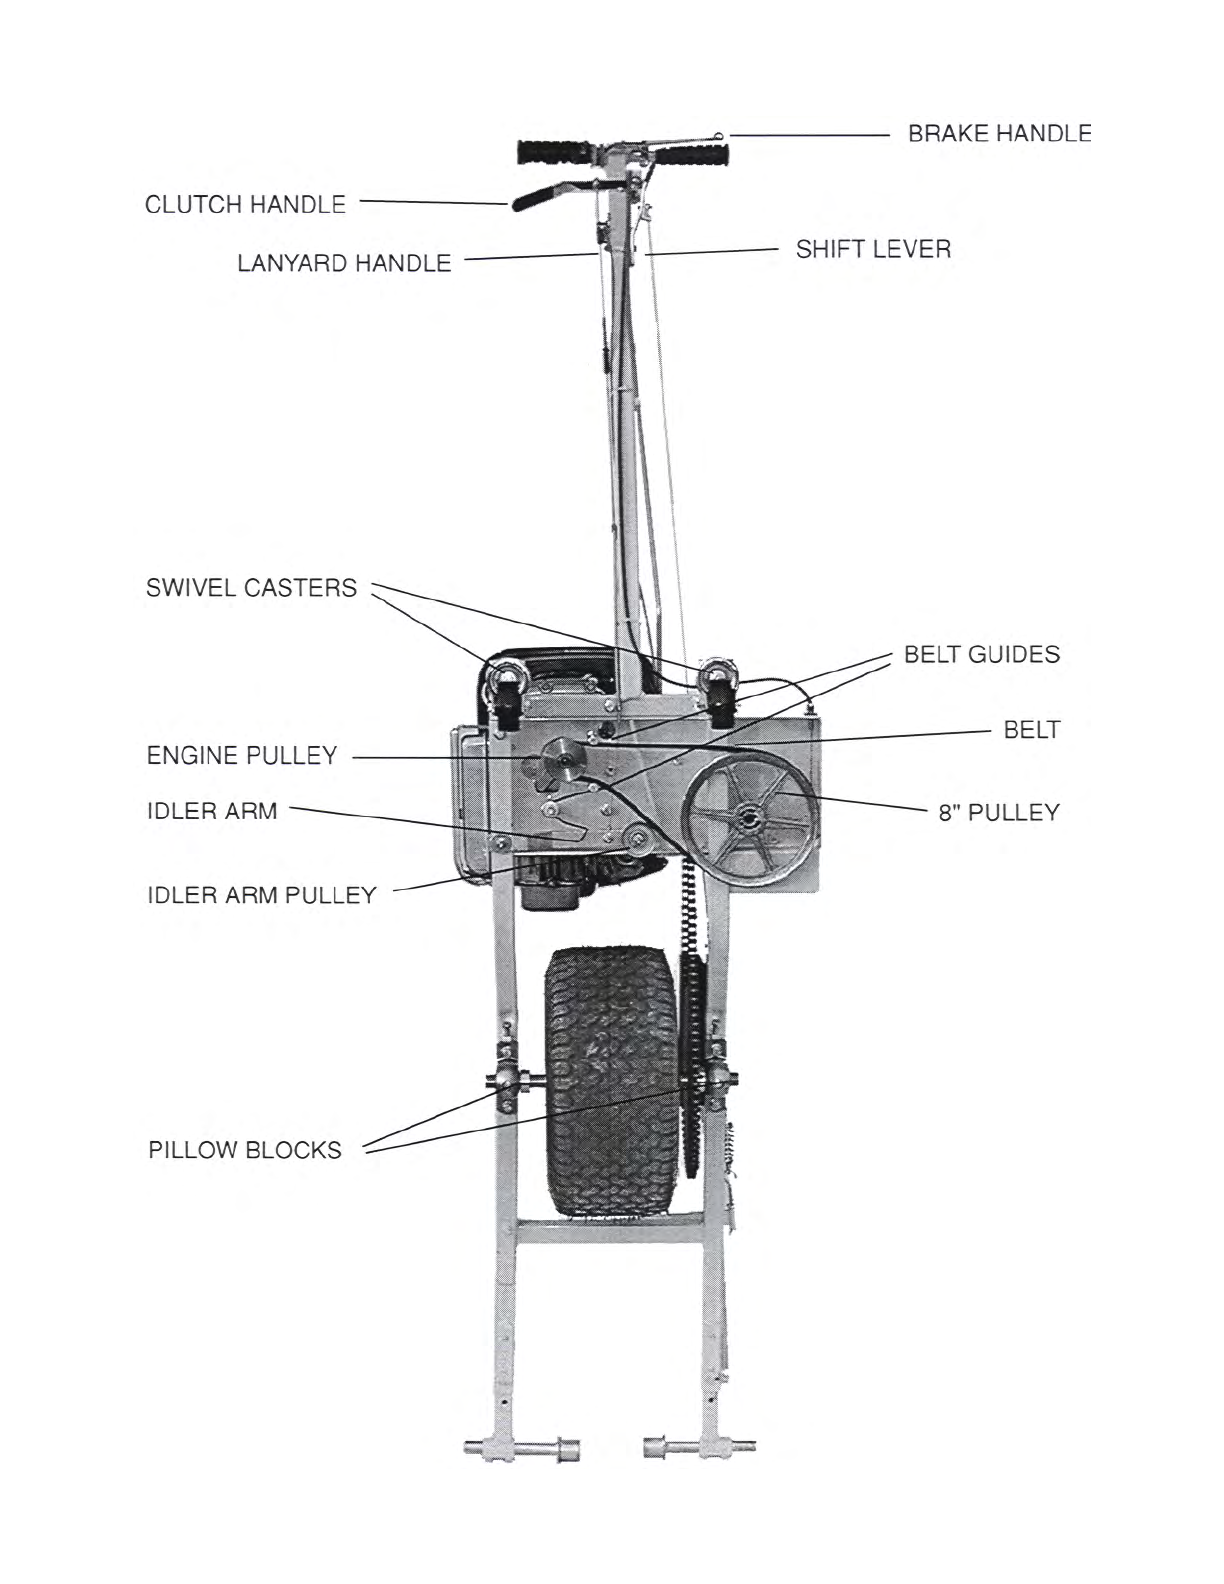
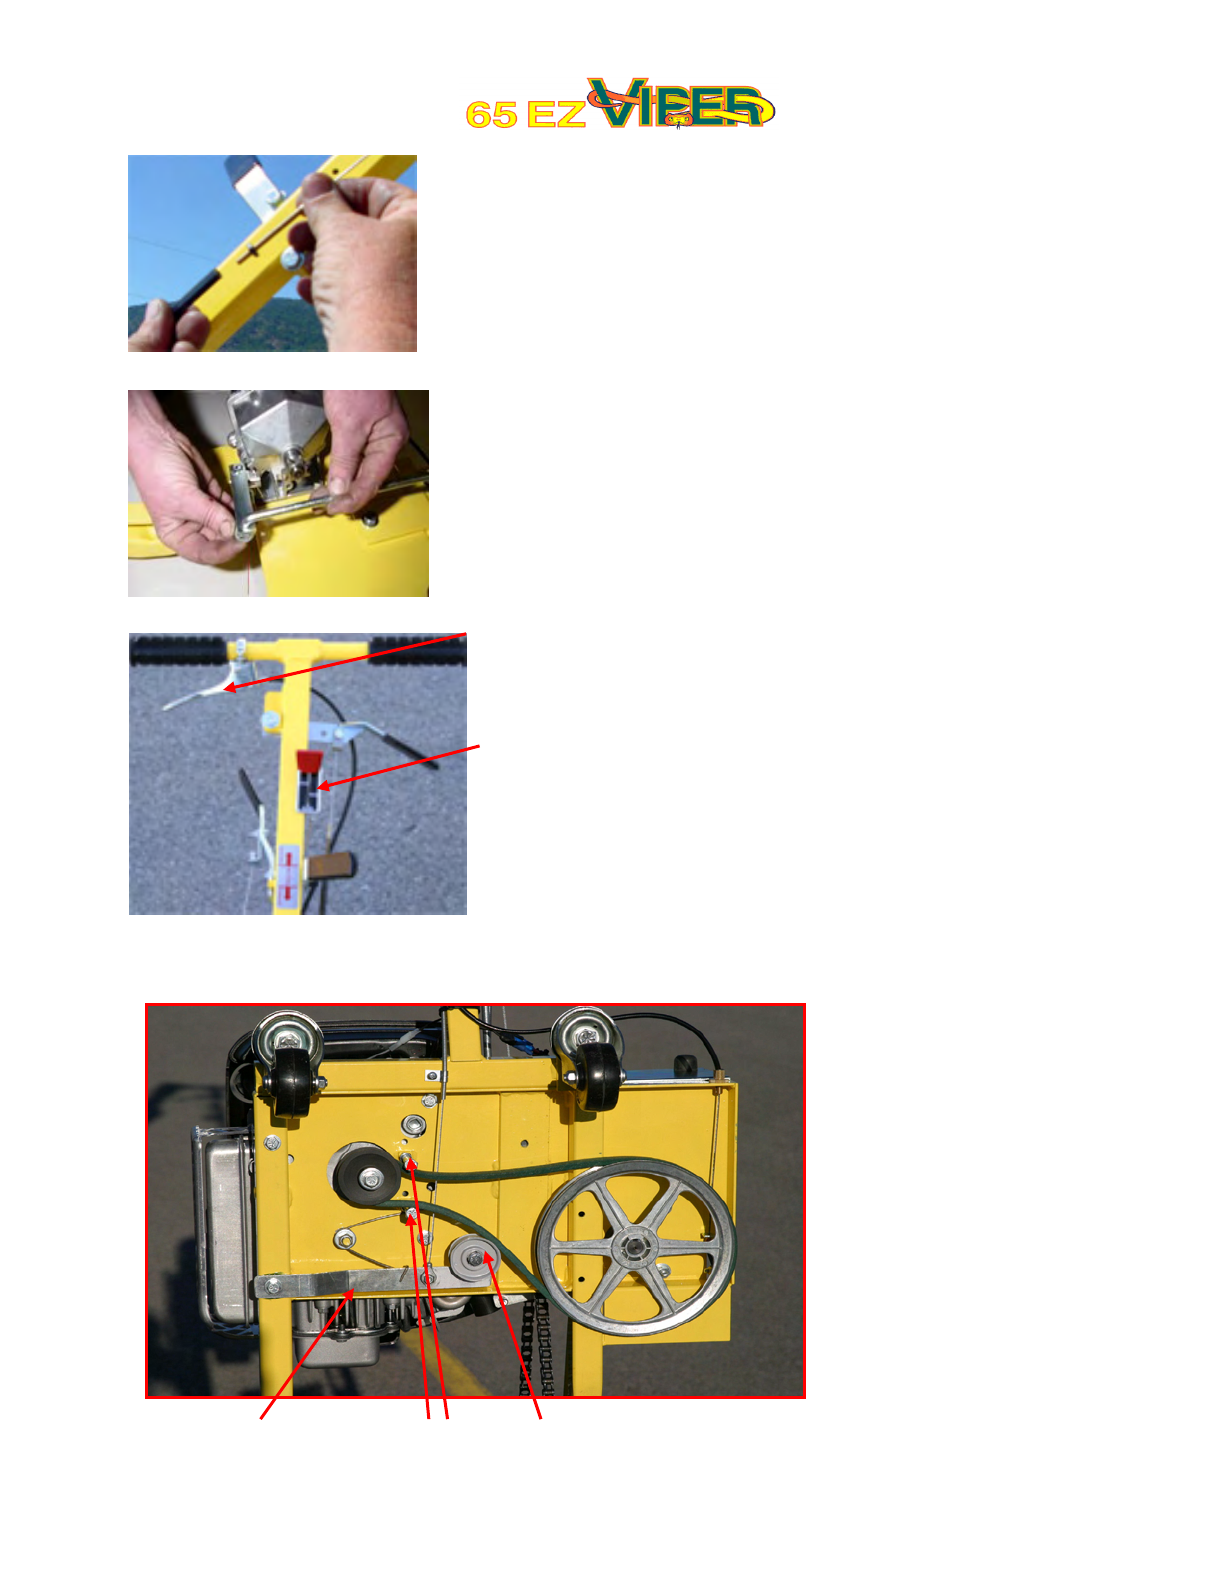
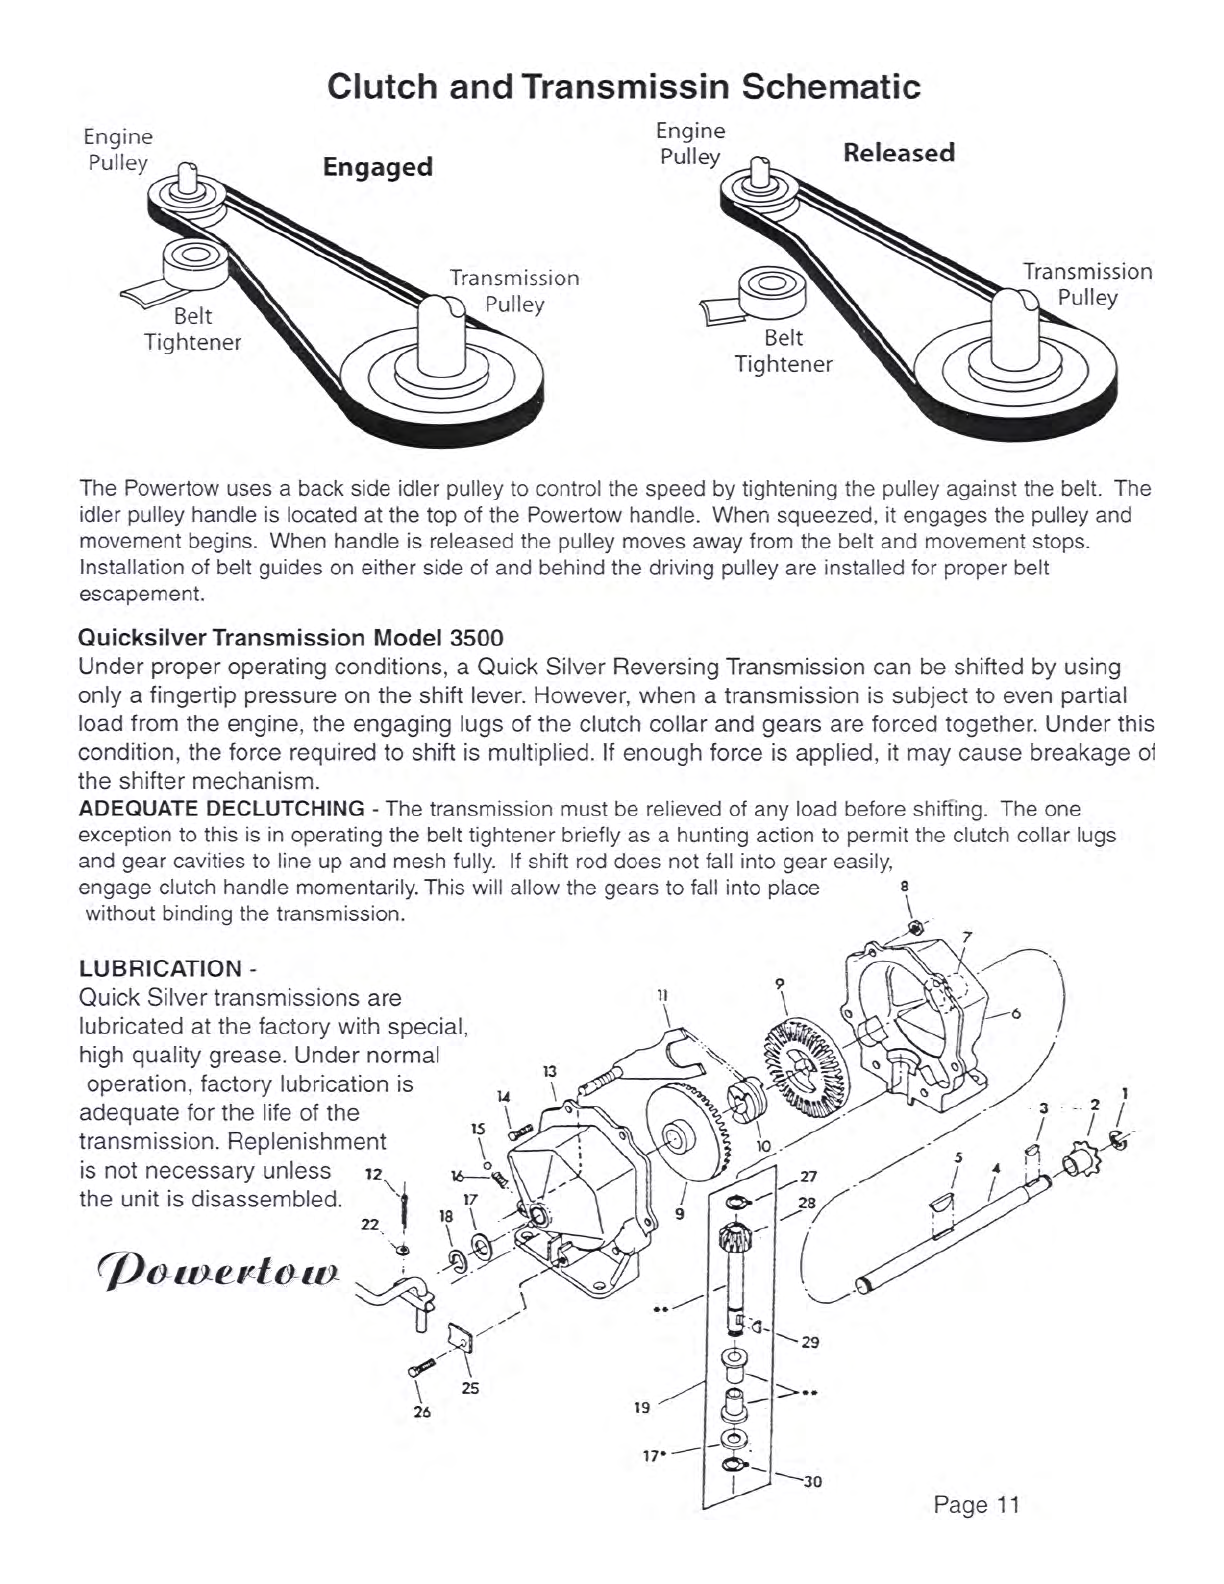
Transmission
The transmission has three positions, Forward – Neutral – Reverse. Neutral is the center
detent. Roll the machine up to the plane hook up to aircraft. Always start the unit neutral.
Time to take the 65EZ Viper out for a solo, without your aircraft! It’s very important to make
sure the controls are all working correctly before you hook your beautiful bird up to it.
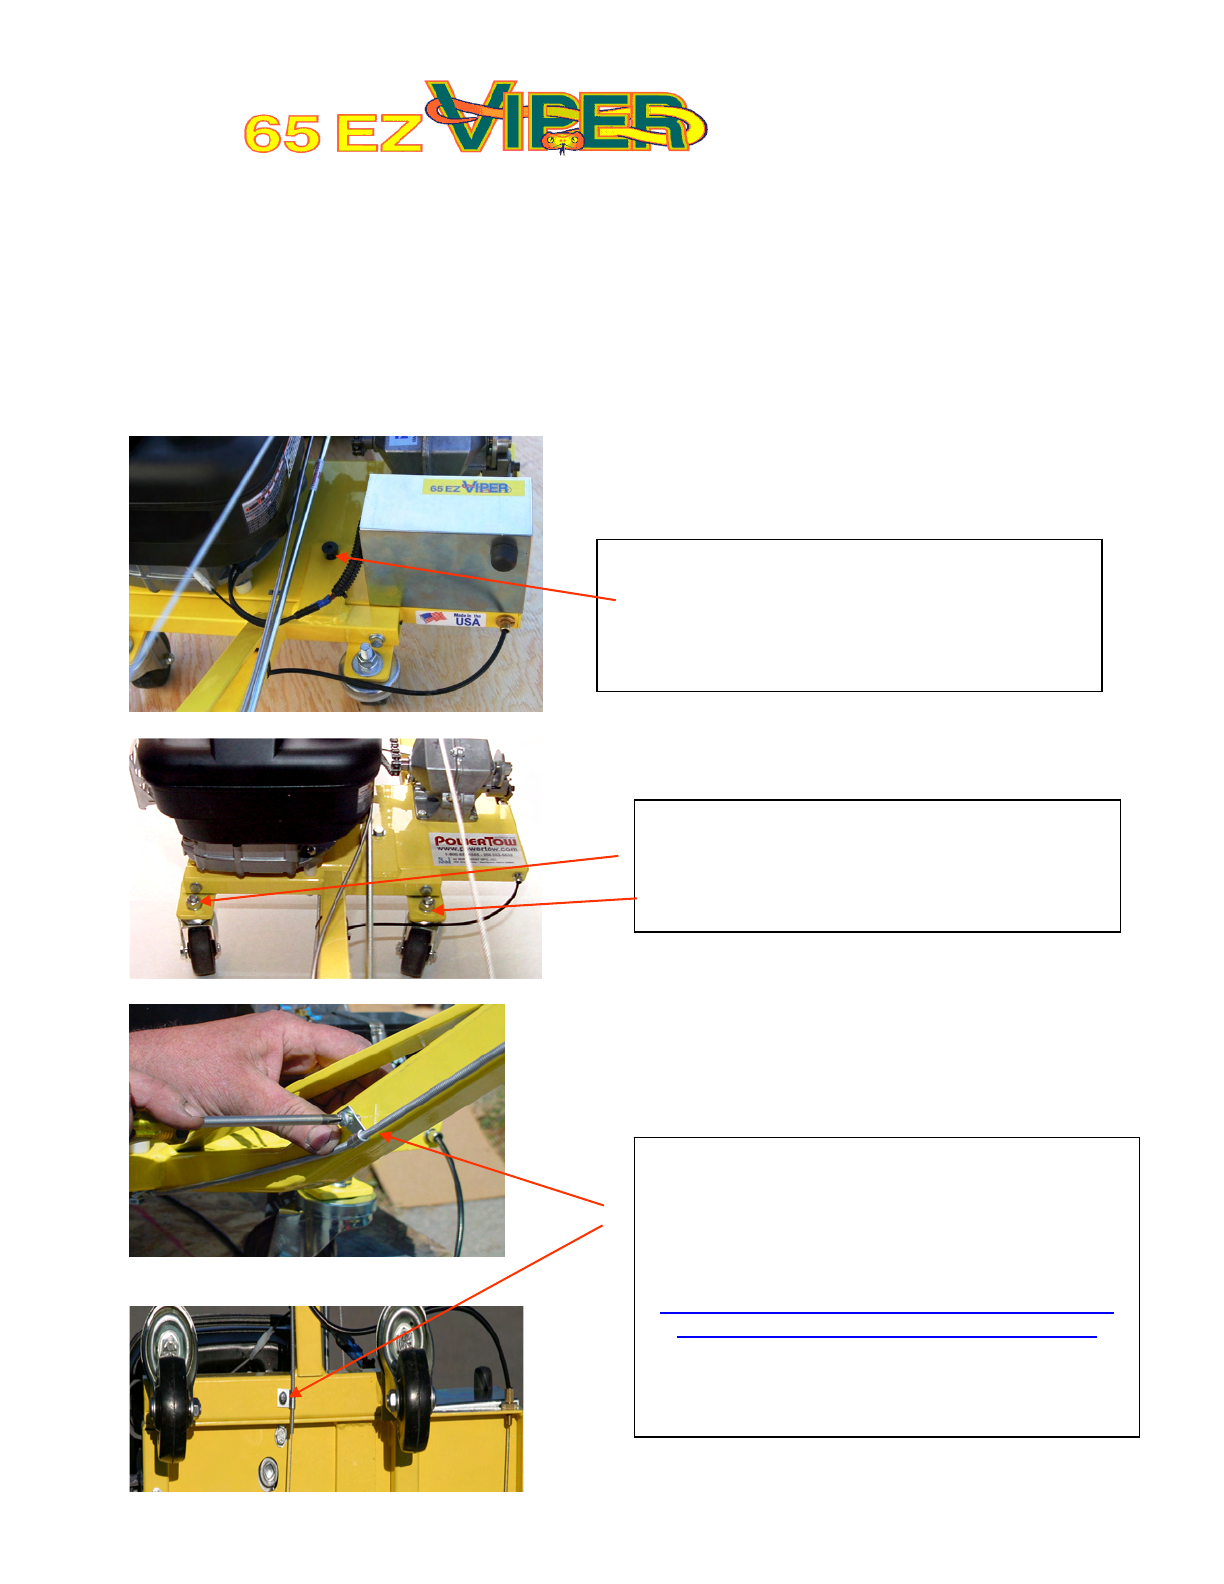
Engine – Don’t forget the oil for the engine, it will take approximately ¾ of quart. A
splash of 100LL, and we’re ready to start up the unit. First, place the throttle control in
the choke position (full forward) and push starter button on battery box and return to run
after starting. Move control to run position at about medium speed. Greatest torque is
developed at two-thirds throttle setting.
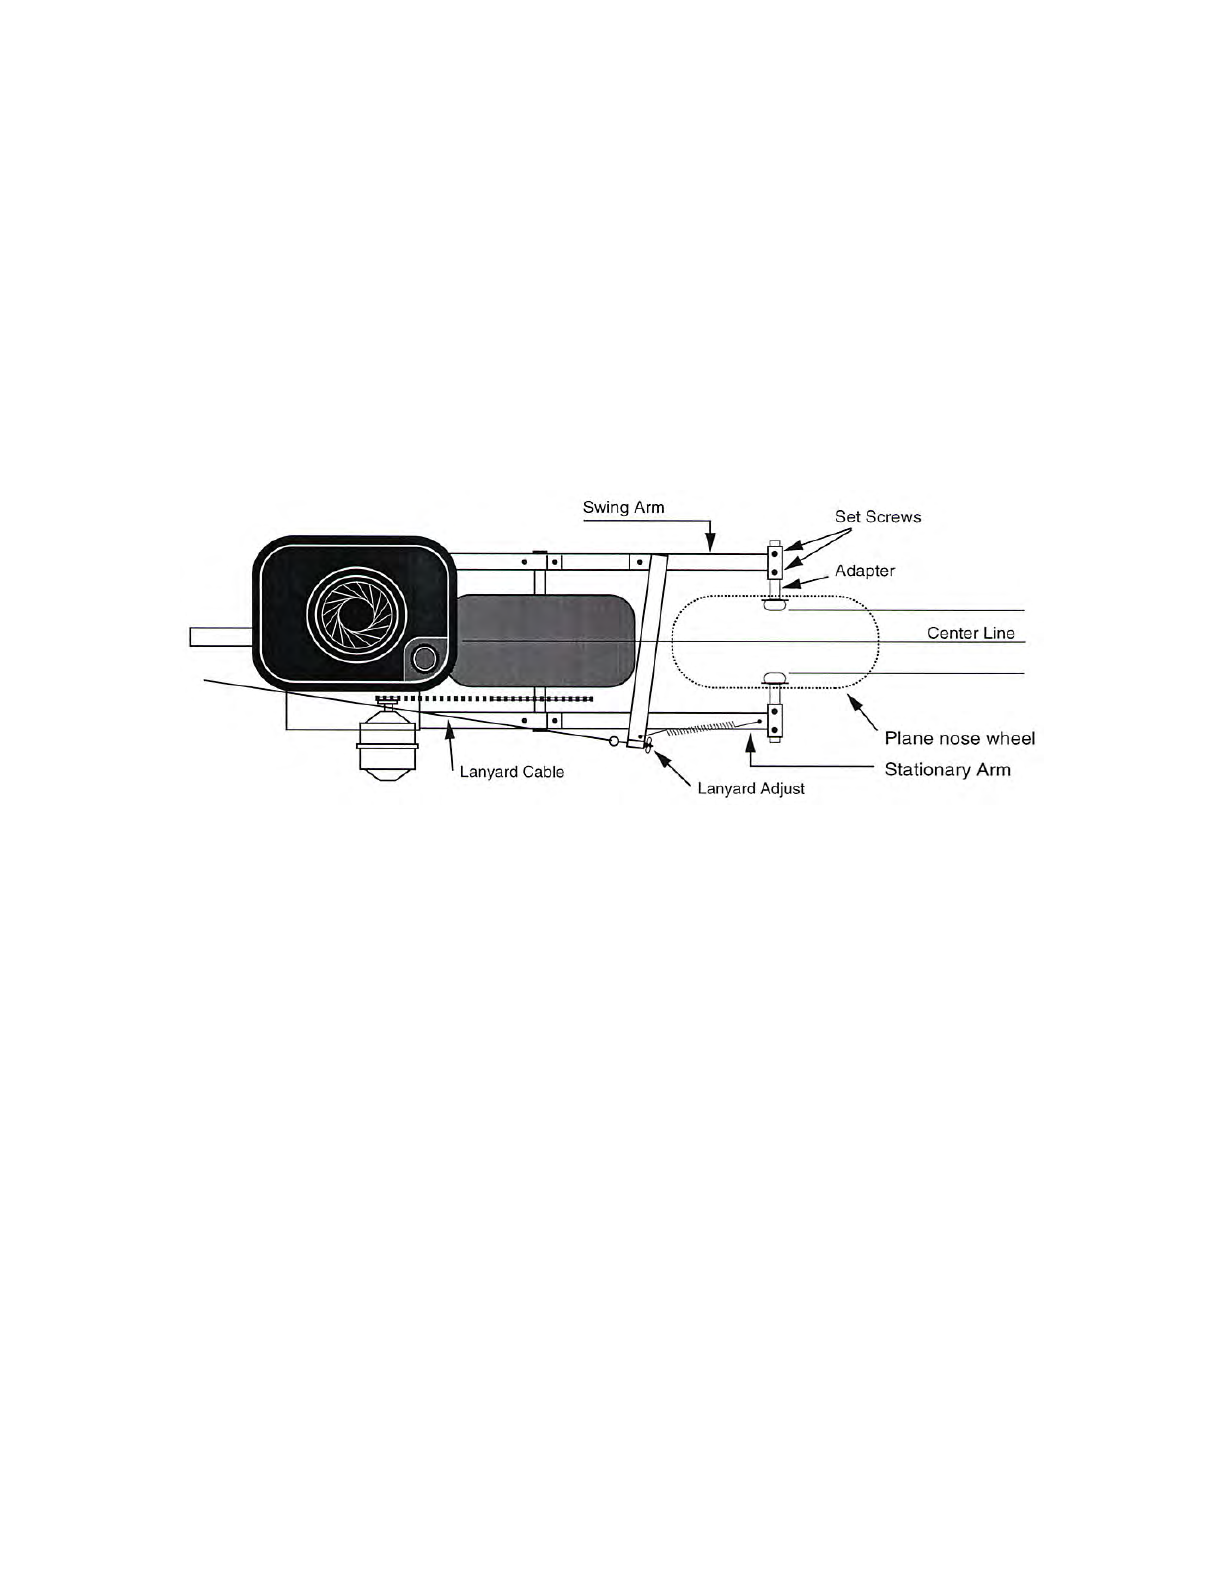
HANGARING AIRCRAFT
Move the shift rod in the direction you want to go. If shift rod does not fall into gear –
engage clutch handle momentarily.
Clutch Handle To move the airplane, squeeze the clutch handle slowly. A slight down
pressure on the Powertow handle and away you go. Release clutch to stop drive.
When you release the clutch handle, the drive belt should disengage completely, there
should be no creeping (If there is, refer back to set-up instructions). Run the unit out in
the open for a few minutes to break in a new belt. You can also stop by lifting the
Powertow handle up.
Steering – Steering is accomplished by lifting and shifting the Powertow handle left or
right, just like a hand towbar. In the case of a heavy plane, especially with cold tires, a
rocking technique, with power applied, and using down handle pressure at the right time
get the plane rolling.
Tips: Door Tracks -To get a heavy plane over door rails or ledges, a moderate amount of
speed is necessary so that the momentum of aircraft mass will help carry it over, but smoothly.
Icy surfaces are naturally a traction problem, as well as smooth painted concrete floors. A bit of
sand spread around will help. Wing walk for the Powertow drive tire is great for traction on the
hangar floor.
Now here’s a good tip. Get up kind of early on Saturday morning, and get out to
the airport before the rest of the hangar bums get there. Pull your plane out of the hangar by
hand for the last time, and get it out on the apron well away from all hard objects. Go through
the above procedures until you really have it down. By the time those guys show up, you will
have become super proficient and will be able to put on a good show. Always have chock
blocks of some kind anchored at the rear of your main wheel position in the hangar to prevent
inadvertent travel through the rear of your hangar.
Last Tip: If you really want to get smart, re-read this stuff after you have actually used
the machine a few times – it will be more meaningful. 3-2006
65EZ Viper™TROUBLESHOOTING
CHAIN IS TOO LOOSE……………………… Pillow blocks are slotted for take-up.
CHAIN BREAKS……………………………… Chain is too loose. Check sprocket alignment.
BELT SLIPPAGE WHEN
CLUTCH IS FULLY ENGAGED…………… Shorten clutch cable by turning turnbuckle at handle.
Adjust cable so clutch is fully engaged with approximately
1”of space remaining between clutch handle and
machine handle grip. Need new belt.
DRIVES WHEN NOT SQUEEZED…………. Lay a straight edge over the 8” pulley and engine pulley and
make sure they are in the exact same plane (level).
Check to make sure belt guides are in place.
Check Clutch arm and make sure it is adjusted up and not
Hanging down against the belt.
BELT SLIPS OFF PULLEY…………………. Tighten turnbuckle – check to make sure motor and
transmission pulleys are in line.
CLUTCH DOES NOT RELEASE…………… Lengthen cable at turnbuckle. Check belt guides.
See clutch cable this page. Check Clutch Arm adjustment
Make sure the arm is adjusted up not contacting the belt.
GAS UNIT: ENGINE SURGES……………… See engine manual.
ENGINE DIES UNDER LOAD……………… Check high-speed mixture adjustment.
See engine page.
EXCESSIVE NOISE UNDERNEATH UNIT… Check belt guides, “use no belt dressing”.
USE EXTREME CAUTION WHEN
OPERATING ANY POWER EQUIPMENT!
1. Do not operate this machine until you have read and
understand all instructions for proper use.
2. Do not operate unit when not running smoothly.
3. Keep hands and feet out from under towing equipment.
4. Operate in well ventilated area.
5. Do not leave a running machine unattended.
6. Do not operate electric unit in wet conditions or if cords are frayed.
7. Do not start engine when unit is in gear.
8. Hangar storage area should include anchored chocks to
control inadvertent movement of planes into hangar walls.
9. Do not change gearing to increase speed.
10. Do not move planes up any inclines...flat surface only.
11. Do not attach any device to activate throttle when both hands -
are not on throttle control.
12. Do not run engine without checking oil level.
13. Do not spill gasoline on hot engine.
14. Do not smoke when filling tank with gasoline.
15. Use caution when operating machine on icy / slippery surfaces.
16. Do not move planes in excess of speed that cannot be easily
stopped... there is no braking device on the unit.
17. Do routine maintenance to insure proper operation of unit.
18. Do not use unit if the Powertow engine is not running smoothly.
We hope you enjoy this Northwest Manufacturing product.
It was designed and built to give many years of reliable
service with proper use and routine maintenance.
GENERAL WARRANTY AND CONDITIONS
NORTHWEST MANUFACTURING, INC.
910179 N. Navion Dr., Hayden, ID 83835
208-635-5352 FAX: 208-635-5251
E-mail: sales@powertow.com
Homepage: www.powertow.com 7-2009
Thank you for buying POWERTOW
™
NOTE: Adding any unauthorized third party attachments or accessories to any Powertow, Voids all
warranty and claims of responsibility by Powertow, or Northwest Mfg., its parent company. Any damage
to tow or aircraft is the responsibility of the aircraft owner and accessory manufacturer.

Popular Truck manuals by other brands

U-Line Magliner H-1382 manual

U-Line

U-Line Magliner H-1382 manual

SPIERINGS AT4 user manual

SPIERINGS

SPIERINGS AT4 user manual

Volvo VNL 780 Operator's manual

Volvo

Volvo VNL 780 Operator's manual

Paccar Peterbilt 587 owner's manual

Paccar

Paccar Peterbilt 587 owner's manual

Utilimaster Aeromaster 1997 Wiring Manual

Utilimaster

Utilimaster Aeromaster 1997 Wiring Manual

Komatsu HM400-1 brochure

Komatsu

Komatsu HM400-1 brochure

GMC 4000 Series Service manual

GMC

GMC 4000 Series Service manual

Volvo VNL Service manual

Volvo

Volvo VNL Service manual

Dodge D250 1990 Service manual

Dodge

Dodge D250 1990 Service manual

Mack Granite GU Series Operator's handbook

Mack

Mack Granite GU Series Operator's handbook

stertil COMBILOK manual

stertil

stertil COMBILOK manual

Rail-Ability Komatsu D41 Series Operator's manual

Rail-Ability

Rail-Ability Komatsu D41 Series Operator's manual

RAM 2014 TRUCK 1500 owner's manual

RAM

RAM 2014 TRUCK 1500 owner's manual

DAF 95XF manual

DAF

DAF 95XF manual

Sealey CST997.V2 manual

Sealey

Sealey CST997.V2 manual

freightliner BUSINESS CLASS M2 100 Maintenance manual

freightliner

freightliner BUSINESS CLASS M2 100 Maintenance manual

HERKULES AHW 2500 Original operating instructions

HERKULES

HERKULES AHW 2500 Original operating instructions

MacDon M155E4 Operator's manual

MacDon

MacDon M155E4 Operator's manual

manuals.online logo
manuals.online logoBrands
  • About & Mission
  • Contact us
  • Privacy Policy
  • Terms and Conditions

Copyright 2025 Manuals.Online. All Rights Reserved.