PR PR-6000 User manual

2
INDEX
1.
SAFETYANDWARNINGS ………………………………………………………………………………………
3
2.
INSTRUCTIONS……………………………………………………………………………………………………
4
●CLEANINGANDMAINTENANCE………………………………………………………………………………
4
●LUBRICATION……………………………………………………………………………………………………
4
●TROUBLESHOOTING……………………………………………………………………………………………
5
3.
APPEARANCE………………………………………………………………………………………………………
5
4.
INSTALLATION……………………………………………………………………………………………………
5
●RIGGING…………………………………………………………………………………………………………
5
●POWERCONNECTIONS………………………………………………………………………………………
6
●DMXCONTROLCONNECTIONS………………………………………………………………………………
6
●DMXTERMINATOR……………………………………………………………………………………………
7
●ALIGNMENT/INSTALLATION/REPLACEMENTOFA LAMP………………………………………………
7
●GOBOREPLACEMENT…………………………………………………………………………………………
7
5.
SETUPANDCONFIGURATION……………………………………………………………………………………
8
●FRONTPANELOPERATION……………………………………………………………………………………
9
●DMXSTARTADDRESS…………………………………………………………………………………………
9
●DMXWIRELESS CONTROL……………………………………………………………………………………
9
●STAND-ALONEMODE…………………………………………………………………………………………
9
●MASTER/SLAVEMODE…………………………………………………………………………………………
10
6.
OPERATION MENU………………………………………………………………………………………………
10
7.
DMXPROTOCOL…………………………………………………………………………………………………
12
8.
SIGNSONTHETOUCHSCREEN…………………………………………………………………………………
19
9.
ERRORMESSAGE ………………………………………………………………………………………………
20
10.
TECHNICALDATA…………………………………………………………………………………………………
21
11.
CIRCUITDIAGRAMANDPCBCONNECTIONS…………………………………………………………………
25
12.
COMPONENTORDERCODES……………………………………………………………………………………
27
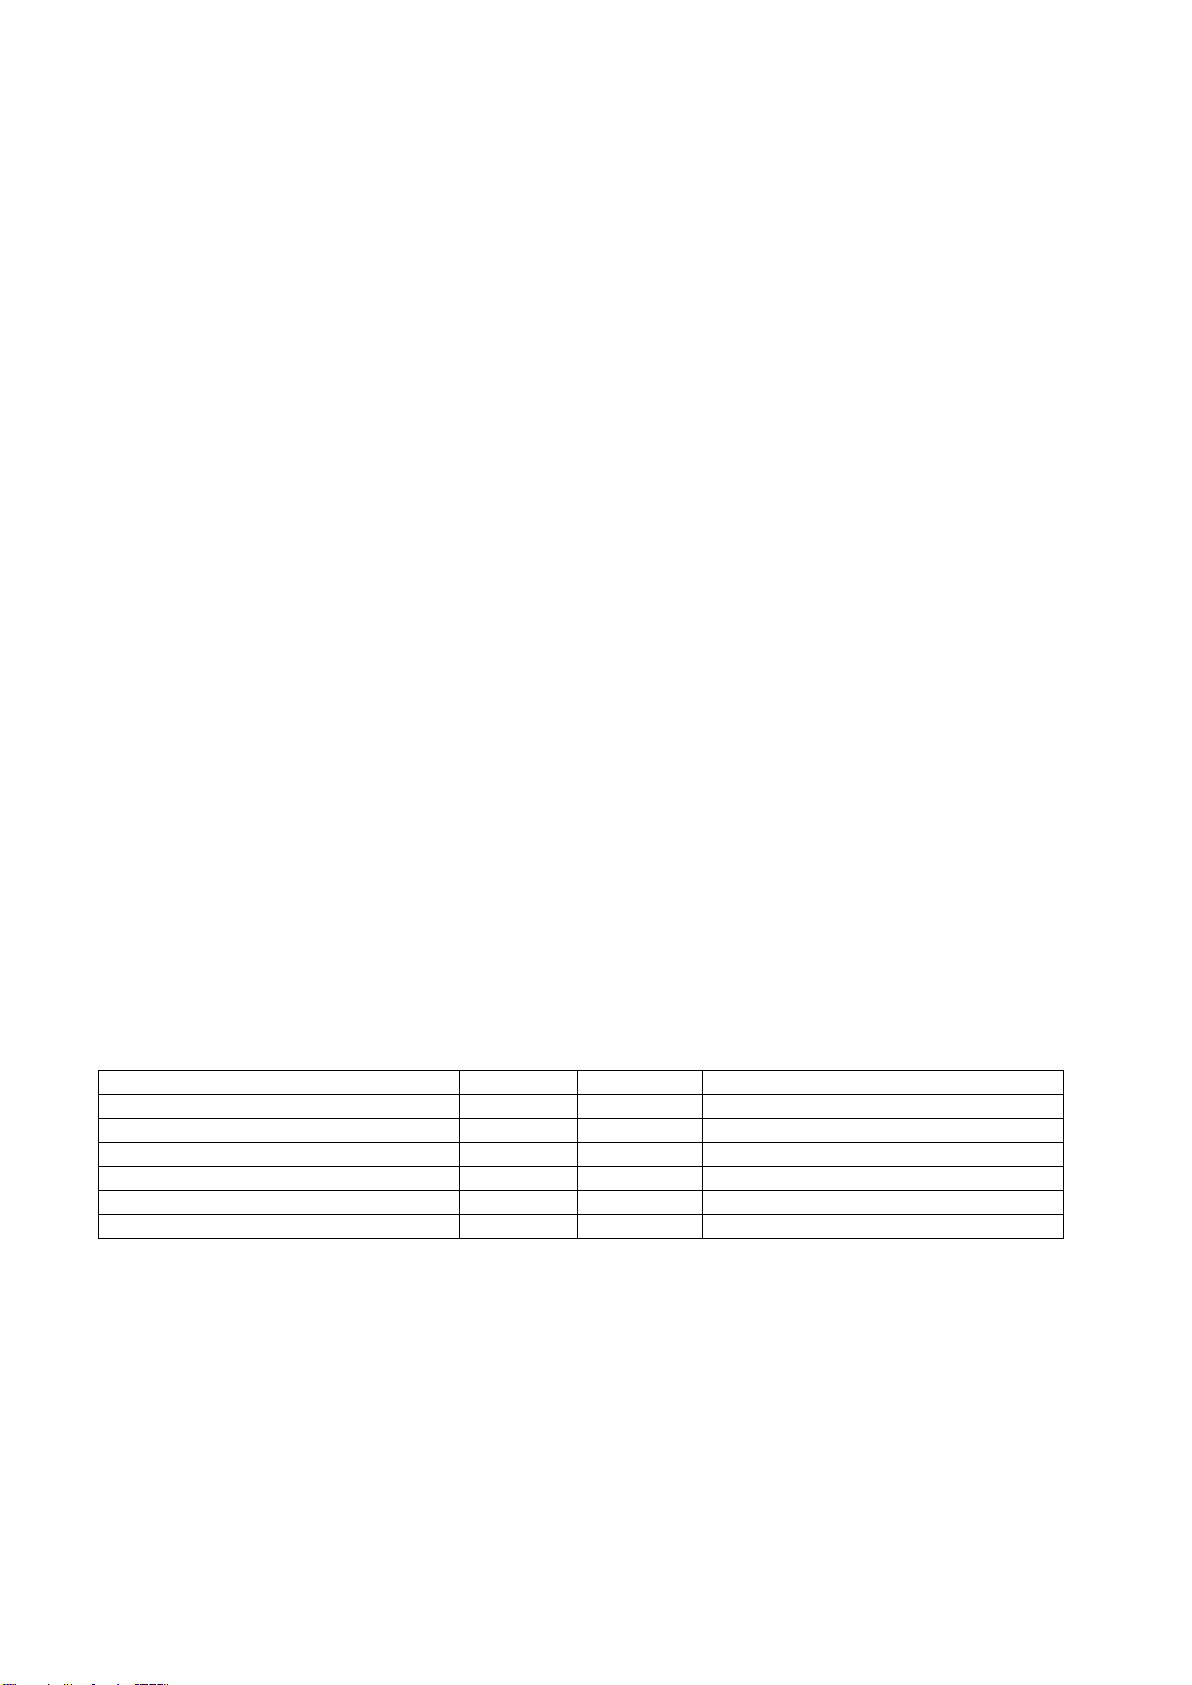
ACCESSORIES
Thefollowingitemsaresupplied withthe projectorandplease check:
Name
Quantity
Unit
Remark
Gclamps
2
pcs
XLRConnector
1
set
Male andfemale
Safetycord
2
pc
SpareGobos
4
pcs
User manual
1
pc
Ω clamps
2
pcs
Optional
Please note that as part of our ongoing commitment to continuous product development, specifications are subject to change
without notice. Whilst every care is taken in the preparation of the manual we reserve the right to change specifications in the
course of product improvement. The publishers cannot be held responsible for the accuracy of the information herein, or any
consequence arising from them.
Every unit is tested completely and packed properly by the manufacturer. Please make sure the packing and / or the unit are in
good condition before installation and use. Should there be any damage caused by transportation, consult your dealer and do not
use the unit. Any damage caused by improper use will not be assumed by the manufacturer and / or dealer.
Any future technical change in the user manual won’t be with any notice.
Note: For the products made by Guangzhou PR lighting Ltd, the warranty for the whole product is one year starting from the
delivery date but the light source is not within the warranty

3
1.SAFETYANDWARNINGS
NOTE
Before a projector’s installation, power-on, operation and maintenance, please carefully read
thesafety informationhereinafter!
Thefollowingsafetysignsareusedintheusermanual.
Warning
User
Manual
Electrical
shock
Goggles
Protective
Gloves
Flames
High
Temperature
● When unpacking , check if there is transportation damage before using the projector. Should there be any
damagecausedbytransportation,consultyourdealeranddonotuseit.
●The manufacture is not responsible for loss caused by the user not following the manual or changing the projector as
he/shelikes
●Pleasebenotedthatthedamagecaused bychangingtheprojectoratwillisnotwarranted.
●Do nothesitate to contact the dealeror the manufacturer if any questions or advice.
● Theprojector is forindoor useonly,IP20.
● Use only in dry locations. Keep this unit away from rain and moisture, excessive heat, humidity and dust. Do not allow
contactwithwateroranyotherliquids.
●The projector should be kept away from high temperature, fire, electrical surge, vibration and strong light while being
operated
●The projector is only intended for installation, operation and maintenance by qualified personnel. And the operation
must strictlyfollowtheproceduresinthemanual
●Norepairablepartsintheprojectorand donotopencoversfor maintenance byyourself.
●Don’t look straightly into the light sources especially for epileptics, otherwise eyes will be burned.
●Do not connectthisdevice toanytypeofdimmer pack
●After lampswitchedon,theminimumdistancebetween theprojectorandilluminatedsurface is 10m
●lens and other optical parts shall be replacedimmediatelyifthey have deformed or been damaged, otherwise the light
outputwillbecompromised.
●Before operation, please confirm that all covers(housing) are on and screws tightened. It’s forbidden to use a projector
whilecovers(housing)areoff
●Keep thelamp cleananddonot touchitwithbarehands.
●Whileoperatingit, wearprotectiveitems.
●Anyelectricalconnectionmustbecarriedoutbyaqualifiedperson.
●Before installation,pleaseconfirmthevoltagesupplied matcheswhat isrequiredforthe projector
●Eachprojector mustbeproperlyearthedand installedasperrelated electricalstandards.
●Donot usepower cordwithitsinsulatordamaged andconnectthepowercordwithothercables.
●Ifthe projectoris not used or under cleaning,, please hold the plug and unplug it. Do not unplugit forcefullyorby
pullingthepower cable.
●All powercordsmustconformto relatedsafetyandregulations
●Whilebeingoperated,theprojectorshould notbeunder rainsorinhumidity.
●Do not switch on and off the projector constantly in very short intervals, otherwise the light source’s and other
electricalparts’ life willbe shortened .

4
●There are safety cord holes at the bottom of the base of a projector. In view of safety, please run the safety cord
suppliedthroughthesafetycord holesfor safety support.
●Before any installation, maintenance and cleaning work, please ensure the projector is disconnected from power
mains.
●After running for 5 minutes, the temperature of the housing of the projector is 80℃.After stable operation , its
temperatureis170℃.
●While the lamp is stricken for the first time, there will be smoke and strange smell. It’s normal and does not
meantheprojector has somedefects.
●Donot mountthe projectordirectlyoninflammable surface.
●Do not project the beam straightly on combustible items and the minimum distance between the projector
andilluminateditemsis18m.
●Aprojector should be installed with good ventilation and the minimum distance between the projector and
wallsis 50cm.Atthesametime,pleaseensure thefansandairinletsand outletsare workable.
2. INSTRUCTIONS
●CLEANINGANDMAINTENANCE
If a projector can’t start. Please check if the fuse is blown up. If it does, replace it with a new fuse with same ratings. And the projector
has over-temperature protective device. If the temperature is too high, the protective device will be triggered to shut the projector off.
Whenithappens,pleasecheckifthefansrunnormallyorfanshield isblockedbydust.Aftertheissueis solved, restart theprojector.
The accumulationofoil, smoke and dust on the lens will compromise the light output. Cleaning a projector isvery necessaryto ensure
a reliable use ofit. Cooling fans need to be cleaned every15days. Internal lens, reflector and hot mirror need to be cleaned periodically
to optimize lightoutput.
Cleaningfrequencyis to be decided by operationsand its environment. Use softclothand normal detergent for glass forcleaning work.
It’s advised external optical system be cleaned every 20days and internal optical systems every 30/60days. Keep lens clean and do not
touch opticalpartswithbare hands.
●Beforeanymaintenance andcleaning,pleaseensuretheprojectisoffthepower
●Onlyqualifiedpersonisallowedtodomaintenance
●Duringmaintenance and beforemaintenance, the projector mustbeoffpower.
●To avoid internal damage, sun light or other light mustn’t penetrate into the projector via front lens whether
itrunsornot
●Donot usealcohol orotherorganic solventtocleanthehousingtoavoid damage.
●Donot useany solventwithchemicalelementstocleancolorfiltersor hotmirror.
●LUBRICATION
To ensure smooth movement of gobos and zoom and focus lens, it’s advised rotators’ bearings and 2 sliding bars for zoom and focus
lensbelubricatedevery2 months.High qualityandhightemperature lubricant/greaseisadvised..

5
●TROUBLESHOOTING
PROBLEM
ACTION
The projector doesn’t switch on
Checkthefuseonthepowersocket.
Checkthelamp.
Thelampison but the projector doesn’t respond
to thecontroller
Makesurethatthe fixture’s start address is right
ReplaceorrepairtheXLRsignalcable.
Theprojectorfunctions intermittently
Makesurethefanisworkingwellorfansandtheirshieldsarenotblocked
Beam appearsdim, Lowinbrightness
Makesure the lamp is withinits lifespan
Removedustor greasefromthelenses.
Theprojectimageappearsto havea halo
Carefullycleanthe lamp, opticallensesandothercomponents.
HeavilyDefectiveBeam
Checkif lensare ingoodcondition(not cracked)
Cleandustorgreaseonthelens.
3.APPEARANCE
4.INSTALLATION
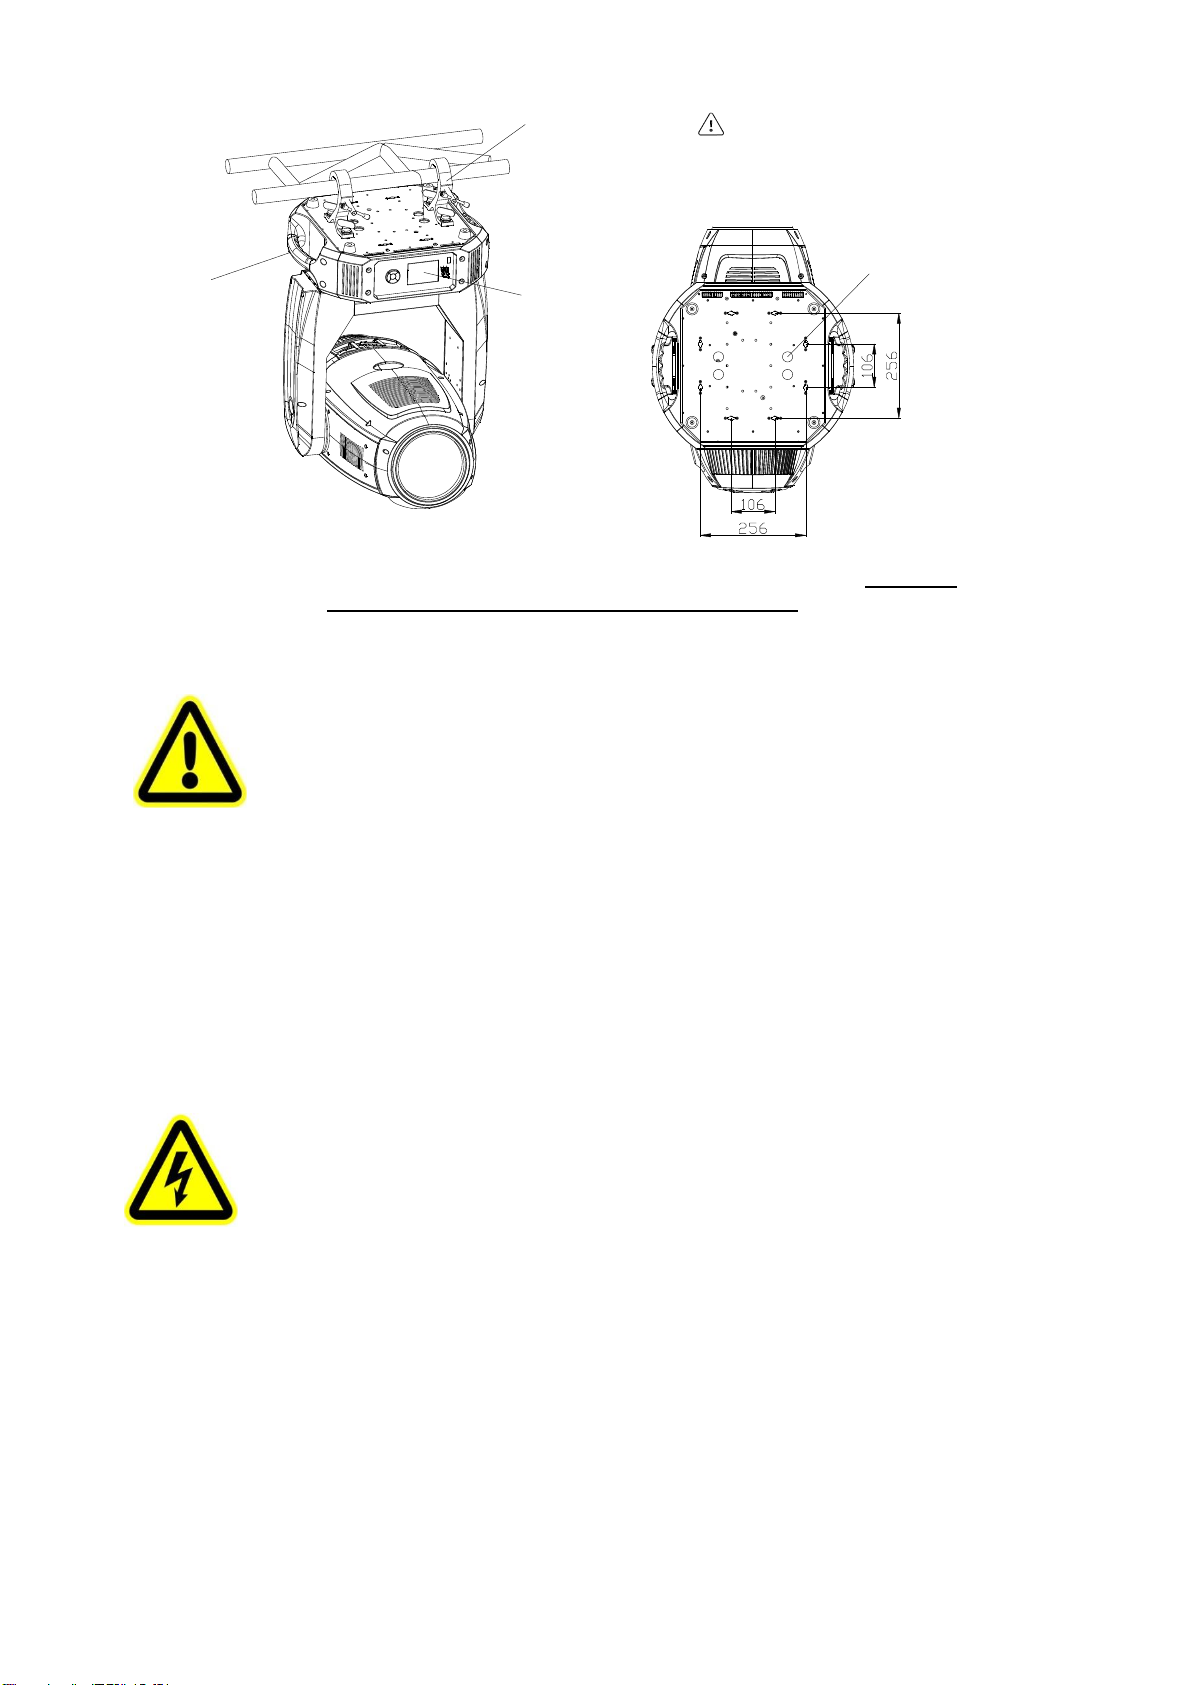
●RIGGING
Before moving a projector, Please lock Pan and Tilt. Before its operation, please unlock them. It’s forbidden to run a projector
withpowerwhileitislocked
Body
Arm
Base
6
Take 2 clamps and the safety cord out from the package and mount 2 clamps on the underside of fixture with 2 retainers attached to
eachclamp. Hang the fixture on the structure and fasten the screws attached to eachclamp. (See the WARNINGon the underside of
the base as shown above) To pass the SAFETYCORD throughthe HOLES for safety! Always ensure that the projector is firmly
anchored to avoid vibrationand slipping whilst functioning. Always ensure that the structurethat you are going to mount the projector
to issecure and strongenough tosupporttheweightofthe unit.
WARNING:
●TheprojectorMUSTbe liftedorcarriedbytheHANDLESinsteadofclamps.
●.For safety the safety cord should afford 10 times the Projector’s weight.
●POWERCONNECTION
Connectthepower cordasfollows:
L(live)=brown
E(earth) =yellow/green
N(neutral) =blue
Before power connection, please ensure the power supplied must match what the nameplate says. It is recommended that each
projectorbeconnectedwithpowerseparatelysothattheymaybeindividuallyswitchedonandoff.
●The earth wire(yellow/green) mustbe connected to the ground. And electrical connection
mustbeinaccordancewiththestandardsconcerned.
●If any questions about the electrical installation, do not continue but consult a qualified
electrician.
CLAMP
HANDEL CONTROL
PANEL
HOLES for SAFETY CORDS
WARNING
TO pass 2 SAFETY CORDS
through 4 HOLES for safety

7
●DMX CONTROLCONNECTION:
Connection between controller and projector and between one projector and another must be made with a twin-screened cable, with each
wire having at least a 0.5mm in diameter. Connection to and from the projector is via cannon 5 pin (which are included with the projector)
or 5pin XLR plugsand sockets.The XLR's are connectedasshown in the figureabove.
Note: care should be taken to ensure thatnone of the pins touch the metallic body of the plug or each other. XLR plugs and sockets mustn’t
be connected in any way other than mentioned in the above figure. The projector accepts digital control signals in protocol DMX512
(1990).
Connect the controller’s DMX output to the first fixture’s DMX input, and connect the first fixture’s DMX output to the second fixture’s
DMX input and connect the rest fixtures in the same way. Eventually connect the last fixture’s DMX output to a DMX terminator asshown
inthefigurebelow.
●DMXTERMINATOR
Inthe Controller mode, at the last fixture in the chain, the DMX output hasto be connected with a DMX terminator. This prevents electrical
noise fromdisturbingandcorruptingtheDMX controlsignals.
The DMX terminator is simply an XLR connector with a 120(ohm) resistor connected across pins 2 and 3, which is then plugged into
theoutputsocketonthelastprojectorinthechain.Theconnectionsareillustratedbelow.
● ALIGNMENT/INSTALLATION/REPLACEMENTOFALAMP
Before installation/replacement/alignmentofa lamp,disconnect the unit fromthepower andlet itcool first.
LockTiltinthefigurebelowandopenthelamp cover after its4 screwsare loosened.
Afterremovalofthe lampcover,takeout the lampwhile the2screws at bothendsofthelampare loosened.
Insert a newlamp. Note: while placing a new lamp, do not touch the burner ofthe lamp with bare hands, otherwise the light output will be
compromised.
Fastenthe4 fast-fit screwsafterthelampcoverison
Important: The unit uses high voltage discharge lamp with external igniter( ). While using the lamp, please carefully read
DMX
Terminator
DMX
Controler
21
3
120
DMX TERMINATOR
CONNECTION
Connect a 120 (OHM) resistor
across pins 2 and 3 in an XLR plug
and insert into the DMX out socket
on the last unit in the chain. PIN 3
PIN 2

8
“INSTRUCTIONS” packed with the lamp.
●Don’t touch the internal surface of the reflector and the burner of the lamp with bare hands so as not to impair the beam output. While
lamp’s installation, do not damage the metal wirearoundtheburner.
●Pleaseread"Instructions" enclosedwiththelamp
●Do operatethe projector whileadjusting thelamp
●GOBOREPLACEMENT
Lock the tilt and loosen the 6fast-fit screwsonthe upper cover,After removingthe cover, you will see the structuresasthe figurebelow.
Before replacing a gobo onthe fixed gobo wheel, use your finger to remove the springtighteningit and take the old one out withdue care.
At lastput the newinto thewheel.
To replace a gobo on the rotating gobo wheel: take the rotator from the wheel, take the gobo out from the rotator by removing the
tightening spring. Put the new gobo back to the rotator, then tighten it with the spring. Please ensure the spring is in the narrow location of
the rotator, which is the internal ring of it and flatten it. At last, pull up the spring strip using proper tool and put the rotator back to the
wheelwiththe assistanceby another hand.
Note: Do nottouchthe glassgobowithbarehand.Placecleanandsoftpaperorclothbetweenhandandglass gobos.
Tighten6 fast-fitscrewsafterthe cover ison. Unlockthetilt.
DANGER!
BEFOREREPLACEMENTOFGOBOS,THE PROJECTORMUSTBEOFFTHE POWER!
Fastfitscrews
Lampcover
Lamp
Color wheel
Rotating gobo wheel2
Fixedgobowheel
Rotating gobo wheel1

9
5.SETUPANDCONFIGURATION
●FRONTPANELOPERATION
Theprojectorconfigurationcanbesetconvenientlyviapushbuttonsandcolortouchscreen.
To browse through or change the projector ’s settings, touch the white area of the touch screen or press OK button for more than 3s(Only
powered by the battery, pressing the OK button) to unlock the screen , then press ►key to enter the projector ’s function menus. Each
main menu has its sub-menus. And each menu stands for special function. For the details, please see the following 6th point ”Operation
Menu”.:
1. At the page to set the fixture’s functions, press ◄,►,▲,▼keysortheirrespectiveiconsto select the functions desired.
2. While at 2nd,3rd and 4th level of menus, the◄key is for ESCAPE, but ►key won’t work, and OK key is used for ENTER. Press
OK keyto save the changesor enter into the sub menus. Press ▲or ▼keystochangethenumbers(minus orplus).Ortouchthe
optionneededfor change.
Shortcut keys: After the Function Menu is entered into, there are all options for the functions on the top of the screen. On the right
thereare 3shortcutkeyslike ←,LampControl and English/Chinese.
●DMXSTARTADDRESS
Each projector must be given a DMX start address so that the correct projector responds to the correct control signals. This DMX start
addressisthechannelnumber fromwhichtheprojectorstartsto“listen” to the digital control information being sent out from the controller.
The projector has 2DMX modes. There are standard mode and short mode . For example standard mode has 32channels, so set the No. 1
projector’s address 001, No. 2 projector’s address033, No. 3 projector’s address 065,No. 4 projector’s address 97,and soon.
Switch on the Projector . Press OK key more than 3 seconds to unlock panel, then press ►key to enter into the fixture’s operation
menus.
Select DMX Address icon and press OK key or touch the icondirectly on the displayand select DMX address at the 2nd level menu for the
addresssetting.
Press▲or ▼keysortouch<、>displayedfor theDMX addressdesired.
PressOKkeytoconfirm.
Pressthe◄keytogobacktotheupper levelmenu.
.
●DMXWIRELESSCONTROL
The wireless control is optional. If fitted with wireless DMX module and the antenna, the fixture can achieve remote control and do as
commanded.
Thesetupofitisbelow:
1. Press OK for more than3s to unlock thecontrolpanel, thenpress ►key to enter into the operation menu and select “Config
Settings”.
2. Select “Wireless First” or “Wireless Only” from the menu of “Signal Select”.
Only after the projector is linked with a transmitter, can it receive wireless signal sent by the transmitter. If unlinking it, Press
OK

10
“Enter” for the menu of Un-link Wireless under the upper level menuof Config Settigns , then the fixture is unlinked with the
wirelesstransmitter.
●STAND-ALONEMODE
Operate the projector without connecting with a controller, enable the master mode through the operation panel, the
projector will run in Stand-Alone mode automatically.
DMX address can be set at any number within 512.
●MASTER/SLAVEMODE
Many projectors can run synchronously in the Master/Slave mode by linking them with each other. First,
connect the first fixture’s DMX output to the second fixture’s DMX input using XLR-XLR control cable and then connect the second
fixture’s DMX output to the third fixture’s DMX input, and so on until all projector are connected in this way. Eventually connect the last
fixture’s DMX output to a DMX terminator. Set 1st projector as the master and others are Slaves.
Start Addresses of all Slaves are 001; Operation mode of the Master can be set any mode for a Master’ and Slaves’ operation mode can be
setaccordingly.
AfterPoweredon,the group willruninMaster/SlaveMode
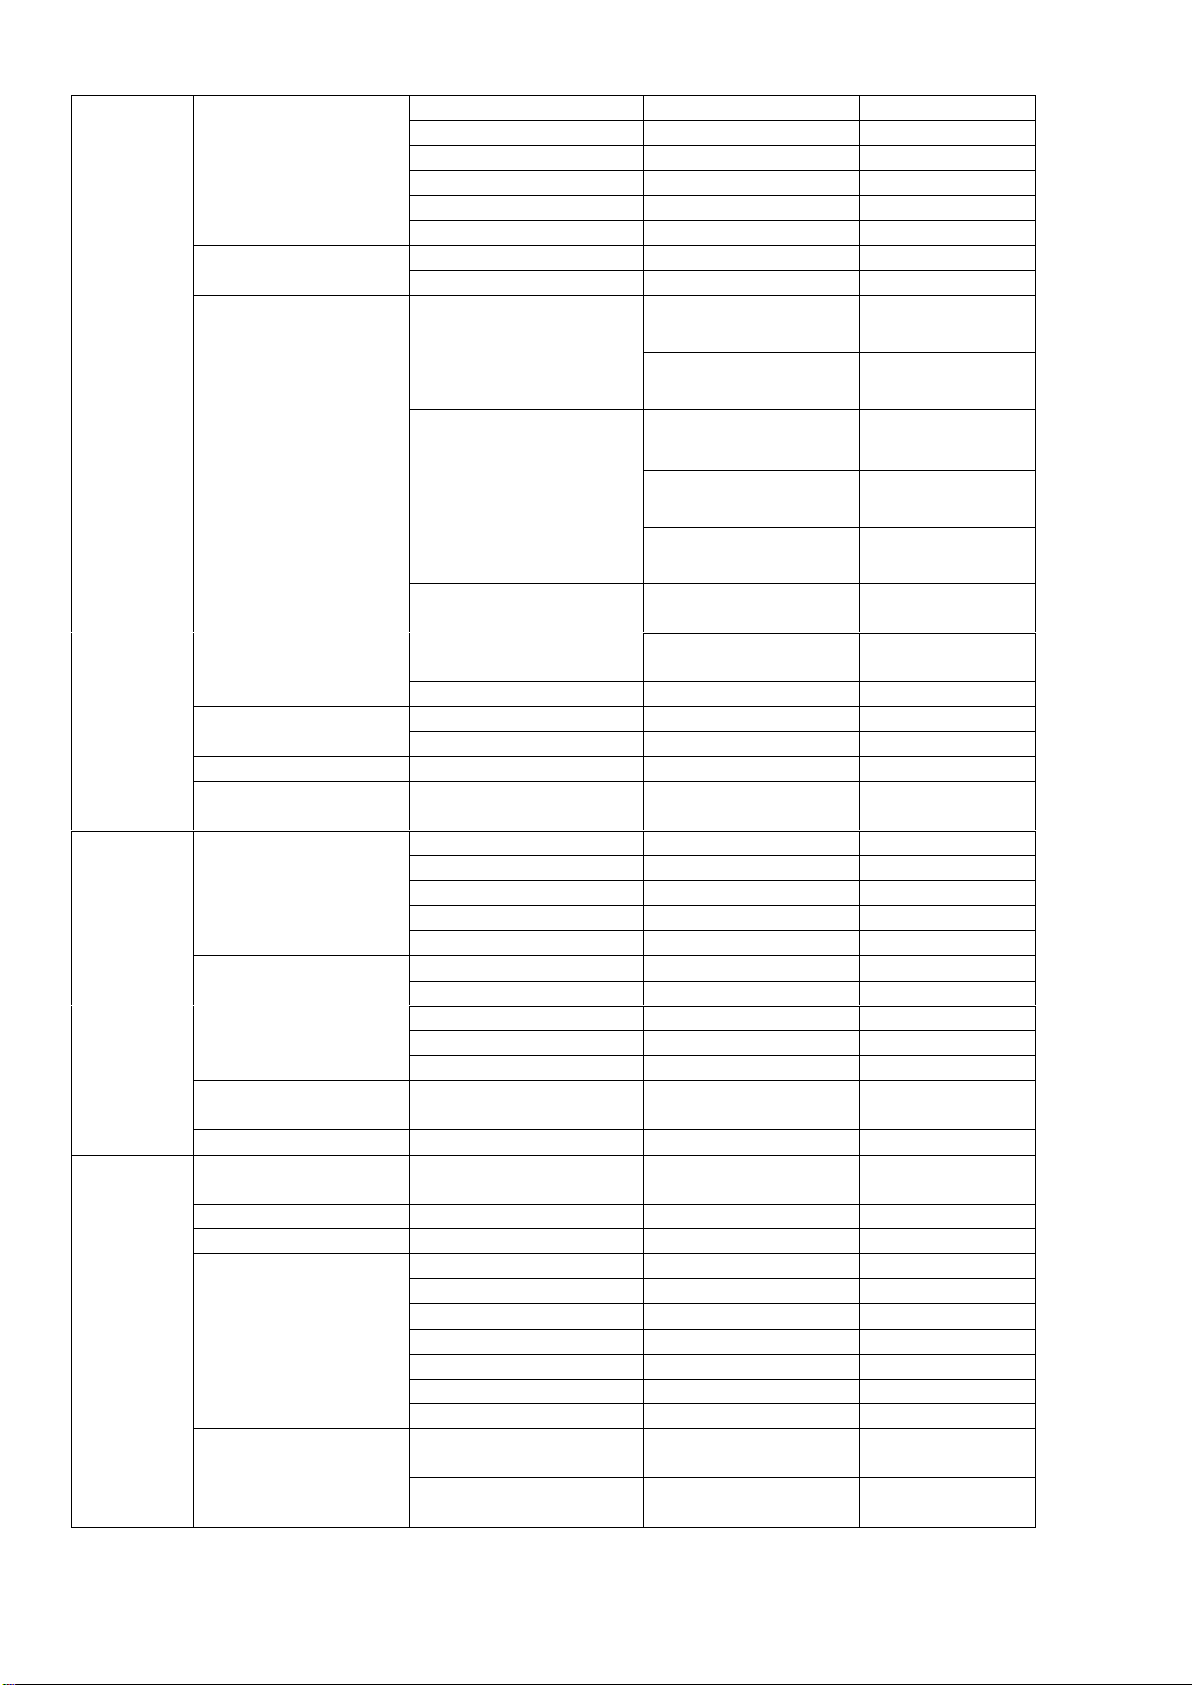
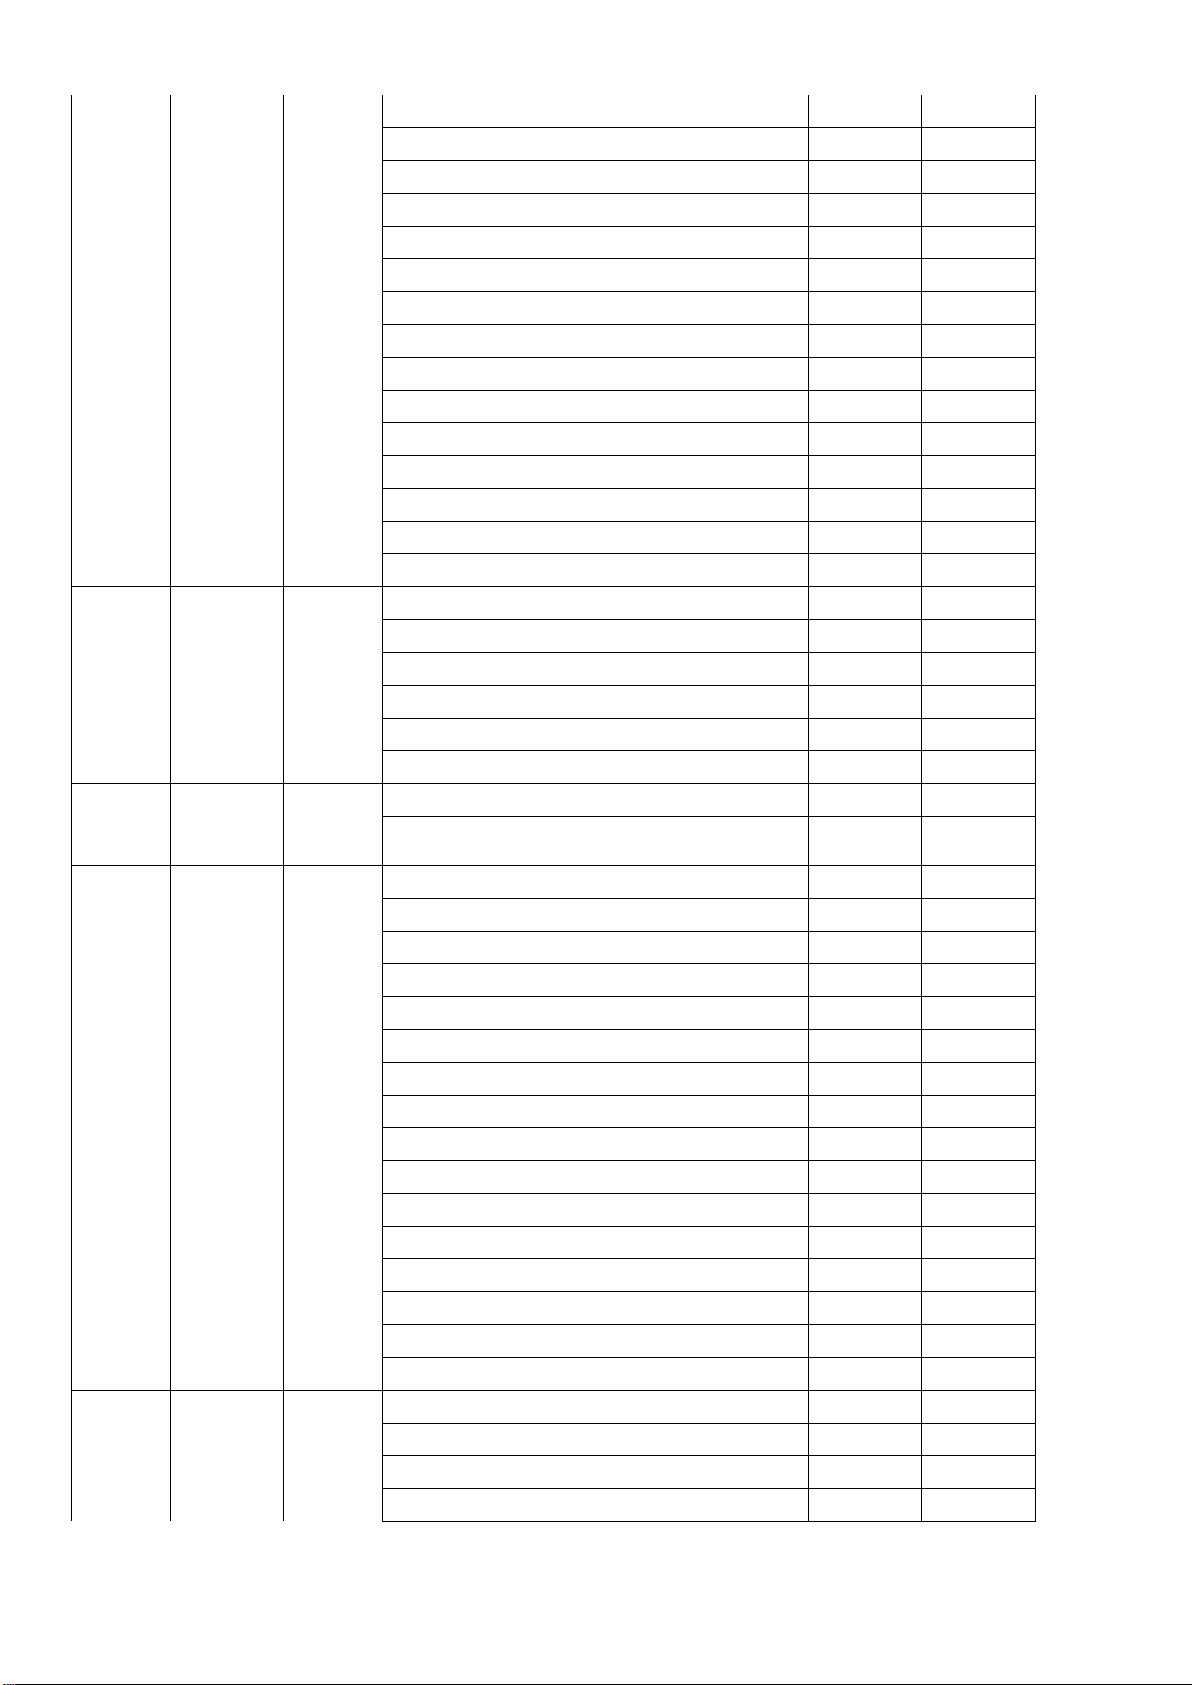
6.OPERATIONMENU
1stLEVEL
2ndLEVEL
3rdLEVEL
4thLEVEL
5thLEVEL
Address
DMX 地址
DMXAddress
1-484 Short mode
1-480 Standardmode
1-473 Extend mode
IP Address
DefaultIPAddress
2.X.X.X/10.X.X.X
CustomIPAddress
X.X.X.X
SubNetMask
X.X.X.X
ArtNetUniverse
0-255
Reset
TotalReset
ReallyReset?
Pan&TiltReset
ReallyReset?
ColourSystemReset
ReallyReset?
Gobo Reset
ReallyReset?
Dimmer/Strobereset
ReallyReset?
Zo.Fo.Fr.Pr.Reset
ReallyReset?
OtherReset
ReallyReset?
ConfigSettings
DMXChannelMode
ShortMode
StandardMode
ExtendedMode
ViewSelected Mode
LampControl
LampControl
OFF/ ON
On ByPowerOn
OFF/ ON
ControlByDMX
OFF/ ON
Lamp Power
1600/2000
SignalSelect
XLROnly
Master Slave
DMX
Terminator
DMX
Controler
Slave
11
XLRFirst
WirelessOnly
WirelessFirst
WirelessIn/XLROut
ARTNETOnly
ARTNET/XLROut
LossofDMX
Normal timeout
Hold LastValue
DisplayConfig
DisplayMode
OffAfterDelay
OnAlways
DisplayInvert
InvertOFF
InvertON
InvertAuto
LanguageSetting
English
Chinese
TouchCalibration
InputPassword123
TemperatureUnit
CelsiusDegree
Fahrenheit Degree
Un-LinkWireless
ReallyUn-Link?
FactoryDefaults
RestoreDefaults?
Option Settings
Pan/Tilt Settings
PanDMXInvert
OFF/ ON
TiltDMXInvert
OFF/ ON
PanTiltSwap
OFF/ ON
XYFeedback
OFF/ ON
Pan/Tilt mode
Speed/Time
InvertSettings
Dimmer Invert
OFF/ ON
IrisMode
OFF/ ON
ZoomInvert
OFF/ ON
CMYInvert
OFF/ ON
CTOInvert
OFF/ ON
Dimmer Curve
Linear/SquareLaw
Defaults
RestoreDefaults?
Information
ViewDMXValues
LampHours
ResetLampHours
TotalHours
Temperature
DisplayBoardXX℃/F
PanandTiltXX℃/F
DriverBoard1XX℃/F
DriverBoard2XX℃/F
DriverBoard3XX℃/F
DriverBoard4XX℃/F
HeadSensorXX℃/F
SoftwareVersion
DisplayBoard
System=XXX
Boot =XXX
PanandTilt
System=XXX
Boot =XXX

12
Driver Board1
System=XXX
Boot =XXX
Driver Board2
System=XXX
Boot =XXX
Driver Board3
System=XXX
Boot =XXX
Driver Board4
System=XXX
Boot =XXX
ElectronicSN
ElectronicSN=
************
RDMDevice Label
RDMDevice Label
ANSIE1.20RDM
VersionX.X
FanStatus
BaseFan
XYEncoder
LampFanerror
Service
Manual EffectControl
StrobeXXX
DimmerXXX
…
USBUpdate Software
FactoryTest
Operation
Mode
DMXMode
ChangeOperation Mode?
MasterMode
PresetMemory
ChangeOperation Mode?
User Memory1
ChangeOperation Mode?
User Memory2
ChangeOperation Mode?
Stand-AloneMode
PresetMemory
ChangeOperation Mode?
User Memory1
ChangeOperation Mode?
User Memory2
ChangeOperation Mode?
StaticScene
ChangeOperation Mode?
User
Memories
Edit UserMemory
Edit UserMemory1
/EditUserMemory2
SceneXX
(1~200Scenes)
StrobeXXX
Dimmer XXX
…
DelayTimeXXX
DelayUnit
LinkToStepXXX
Edit StaticScene
StrobeXXX
Dimmer XXX
…
Init UserMemory
ResetUser Memory1
ResetUser Memory?
InputPassword123
ResetUser Memory2
ResetUser Memory?
InputPassword123
ResetStatic Scene
ResetStatic Scene?
InputPassword123
7.DMX PROTOCOL
Short mode
Standard
mode
Extended
mode
Description
Decimallow
DecimalHigh
1
1
1
Strobe
Close(The lamp’s power changes into 1600W 5s after strobe
bladesclose.)
0
10
Open
11
25
Strobefromslowto fast
26
225
Strobe macros(Strobeatrandomfromfasttoslow)
226
246
Open
247
255
2
2
2
Dimmer

13
Close
0
0
Lineardimmer(0-100%)
1
255
3
3
Dimmerin16bit
Dimmerin16bitadjustment
0
255
3
4
4
CYMmacros
ThefollowingfunctionswilldisableCMY,CTO,colorwheel
Nofunction
0
7
Colormacro1
8
9
Colormacro2
10
11
Colormacro3
12
13
Colormacro4
14
15
Colormacro5
16
17
Colormacro6
18
19
Colormacro7
20
21
Colormacro8
22
23
Colormacro9
24
25
Colormacro10
26
27
Colormacro11
28
29
Colormacro12
30
31
Colormacro13
32
33
Colormacro14
34
35
Colormacro15
36
37
Colormacro16
38
39
Colormacro17
40
41
Colormacro18
42
43
Colormacro19
44
45
Colormacro20
46
47
Colormacro21
48
49
Colormacro22
50
51
Colormacro23
52
53
Colormacro24
54
55
Colormacro25
56
57
Colormacro26
58
59
Colormacro27
60
61
Colormacro28
62
63
Colormacro29
64
65
Colormacro30
66
67
Colormacro31
68
69
Colormacro32
70
71
Colormacro33
72
73
Colormacro34
74
75
Colormacro35
76
77
Colormacro36
78
79
Colormacro37
80
81

14
Colormacro38
82
83
Colormacro39
84
85
Colormacro40
86
87
Colormacro41
88
89
Colormacro42
90
91
Colormacro43
92
93
Colormacro44
94
95
Colormacro45
96
97
Colormacro46
98
99
Colormacro47
100
101
Colormacro48
102
103
Colormacro49
104
105
Colormacro50
106
107
Colormacro51
108
109
Colormacro52
110
111
Colormacro53
112
113
Colormacro54
114
115
Colormacro55
116
117
Colormacro56
118
119
Colormacro57
120
121
Colormacro58
122
123
Colormacro59
124
125
Colormacro60
126
127
Colormacro61
128
129
Colormacro62
130
131
Colormacro63
132
133
Colormacro64
134
135
Colormacro65
136
137
Colormacro66
138
139
Colormacro67
140
141
Colormacro68
142
143
Colormacro69
144
145
Colormacro70
146
147
Colormacro71
148
149
Colormacro72
150
151
Colormacro73
152
153
Colormacro74
154
155
Colormacro75
156
157
Colormacro76
158
159
Colormacro77
160
161
Colormacro78
162
163
Colormacro79
164
165
Colormacro80
166
167
Colormacro81
168
169

15
Colormacro82
170
171
Colormacro83
172
173
Colormacro84
174
175
Colormacro85
176
177
Colormacro86
178
179
Colormacro87
180
181
Colormacro88
182
183
Colormacro89
184
185
Colormacro90
186
187
Colormacro91
188
189
Colormacro92
190
191
Colormacro93
192
193
Colormacro94
194
195
Colormacro95
196
197
Colormacro96
198
199
CMYcolormixingfadefromslowtoast
200
255
4
5
5
Cyan
Cyan (Linear 0-100%)
0
255
6
Cyanin16bit
Cyan16bitadjustment
0
255
5
6
7
Yellow
Yellow(Linear0-100%)
0
255
8
Yellowin16bit
Yellow16bitadjustment
0
255
6
7
9
Magenta
Magenta(Linear0-100%)
0
255
10
Magentain16bit
Magenta16bitadjustment
0
255
7
8
11
CTO
LinearCTOfromhightlow
0
255
12
CTOin16bit
CTO16bitadjustment
0
255
8
9
13
Colorwheel
Continuouspositioning
Indexing0-360°
0
63
Positioning
White/Color1()
64
67
Color1()
68
71
Color1()/Color2()
72
75
Color2()
76
79
Color2()/Color3()
80
83
Color3()
84
87
Color3()/Color4()
88
91
Color4()
92
95

16
Color4()/Color5()
96
99
Color5()
100
103
Color5()/Color6()
104
107
Color6()
108
111
Color6()/Color7()
112
115
Color7()
116
119
Color7()/White
120
123
White
124
127
Clockwiserainboweffectfromslowtofast
128
191
Anti-clockwiserainboweffectfromslowtofast
192
255
10
14
Colorwheelin16bit
Colorwheelcontinuouspositioning,16bitadjustment
0
255
9
11
15
Iris
Linearirisfrombigtosmall
0
255
16
Irisin16bit
Iris16bitadjustment
0
255
10
12
17
Irismacros
Disableiris macro
0
10
Irismacro1:Irisfrombigtosmall(speedfromslowto fast)
11
74
Irismacro2:Irisfromsmalltobig(speedfromslowto fast)
75
138
Irismacro3:Iriscontractsfromslowtofast
139
202
Irismacro4(Macro1atrandom) (fromslowtofast)
203
210
Irismacro5(Macro2atrandom) (fromslowtofast)
211
218
Irismacro6(Macro3at random) (fromslowtofast)
219
226
Open
227
255
11
13
18
Fixedgobowheel
White
0
15
Gobo1
16
31
Gobo2
32
47
Gobo3
48
63
Gobo4
64
79
Gobo5
80
95
Gobo6
96
111
Gobo7
112
127
Clockwiserotation fromslowtofast
128
149
Anti-clockwiserotation fromslowtofast
150
171
Gobo1shakesfromslowto fast
172
183
Gobo2shakesfromslowto fast
184
195
Gobo3shakesfromslowto fast
196
207
Gobo4shakesfromslowtofast
208
219
Gobo5shakesfromslowtofast
220
231
Gobo6shakesfromslowtofast
232
243
Gobo7shakesfromslowtofast
244
255
12
14
19
Rotatinggobowheel1
17
White
0
31
Gobo1
32
47
Gobo2
48
63
Gobo3
64
79
Gobo4
80
95
Gobo5
96
111
Gobo6
112
127
Clockwiserotation fromslowtofast
128
143
Anti-clockwiserotationfromslowtofast
144
159
Gobo1shakesfromslowto fast
160
175
Gobo2shakesfromslowto fast
176
191
Gobo3shakesfromslowto fast
192
207
Gobo4shakesfromslowtofast
208
223
Gobo5shakesfromslowtofast
224
239
Gobo6shakesfromslowtofast
240
255
13
15
20
Gobo rotation 1
Indexing 0-360°
0
127
Stop
128
128
Clockwiserotation fromslowtofast
129
188
Stop
189
195
Anti-clockwiserotationfromslowtofast
196
255
16
21
Goborotation1in16bit
Goborotation1 16 bitadjustment
0
255
14
17
22
Rotatinggobowheel2
White
0
31
Gobo1
32
47
Gobo2
48
63
Gobo3
64
79
Gobo4
80
95
Gobo5
96
111
Gobo6
112
127
Clockwiserotation fromslowtofast
128
143
Anti-clockwiserotationfromslowtofast
144
159
Gobo1shakesfromslowto fast
160
175
Gobo2shakesfromslowto fast
176
191
Gobo3shakesfromslowto fast
192
207
Gobo4shakesfromslowtofast
208
223
Gobo5shakesfromslowtofast
224
239
Gobo6shakesfromslowtofast
240
255
15
18
23
Gobo rotation 2
Indexing 0-360°
0
127
Stop
128
128
Clockwiserotation fromslowtofast
129
188

18
Stop
189
195
Anti-clockwiserotation fromslowtofast
196
255
19
24
Goborotation2in16bit
Goborotation216bitadjustment
0
255
16
20
25
Prism
No
0
16
Prismin
17
255
17
21
26
Prismrotation
Prismindexing
0
127
Stop
128
128
Clockwiserotation fromslowtofast
129
191
Stop
192
192
Anti-clockwiserotation fromslowtofast
193
255
18
22
27
Effectwheel
No
0
19
Effectwheelin
20
255
19
23
28
Effectwheelrotation
Clockwiserotation fromfasttoslow
0
127
Anti-clockwiserotation fromslowtofast
128
255
20
24
29
Frost
Linearfrost0%-100%
0
255
21
25
30
Focus
Linearfocus
0
255
31
Focusin16bit
Focus16bitadjustment
0
255
22
26
32
Zoom
LinearZoom
0
255
33
Zoomin16bit
Zoom16bitadjustment
0
255
23
27
34
Pan
Panmovement
0
255
24
28
35
Panin16bit
Panmovementin16bit
0
255
25
29
36
Tilt
Tilt movement
0
255
26
30
37
Tiltin16bit
Tilt movementin16bit
0
255
27
31
38
Pan&Tiltspeed
Timemode
0
1
Speed mode (speedfromfast toslow)
2
255
28
32
39
Specialfunction
Nofunction
0
4
Reserved
5
19
Thefollowingfunctionmuststayin the DMX rangeformore

19
than5stoactivateit
2.Thelamp can beturnedoff5minutesafteritison, Andthe
lampcanbeturnedon5minutesafteritisoff.
3.toturnonorturnoffthelamp,keeplampcontrol-DMX
controlsignal asON
Displayon
20
24
Displayoff
25
29
Lamppower1600W
30
39
Lamppower 2000W
40
44
Reserved
45
89
Panandtiltspeedmode
90
94
Panandtilttimemode
95
99
Reserved
100
129
Lampon
130
139
Panandtiltreset
140
149
Colorsystemreset
150
159
Gobo wheelreset
160
169
Dimmer/strobereset
170
179
Zoom/Focus/Frost/Prismreset
180
189
Other(Iris)reset
190
199
Totalreset
200
209
Reserved
210
229
Lampoff
230
239
Reserved
240
255
Remark:
1. The projector can’t be turned onwithin5 minutesafterthe lamp-off.
2. Fanerrorcancauselamp-off.
3. "SpeedMode"meansPanandTiltwillmovefromPointAtoPointBattheirrespective maximumspeeds."TimeMode"means
bothPanandTiltwillarriveatdesignatedpointatthesame time.It'sadvisedTimeModebeusediftheprojectorrunscirclesorin
oblique lines
8.SIGNS ONTHETOUCHSCREEN
LampControl
OptionSettings
Chinese/English
Information
ErrorMessages
Service
Address
OperationMode
Reset
UserMemories
ConfigSettings

20
9.ERRORMESSAGE
Thesystemcan detect someerrorsduringthereset,if displayed, touch to viewtheerror.
Theerror messagesareasfollows:
Name
Type
Correction
Pan
Timeout/magnetSensor/Encoder
Checkifwiring,positioningpartsandmotorsarenormal
Tilt
Timeout/magnetSensor/Encoder
Checkifwiring,positioningparts and motors are normal
Cyan
Timeout
Checkifwiring,positioningpartsandmotorsarenormal
Yellow
Timeout
Checkifwiring, positioningpartsand motorsare normal
Magenta
Timeout
Checkifwiring,positioningpartsandmotorsarenormal
CT
Timeout
Checkifwiring,positioningparts and motors are normal
ColorWheel
Timeout
Checkifwiring,positioningpartsandmotorsarenormal
Fixedgobowheel
Timeout
Checkifwiring,positioningparts and motors are normal
Rot. GoboWheel
Timeout
Checkifwiring,positioningpartsandmotorsarenormal
Rot. GoboRotation
Timeout
Checkifwiring,positioningparts and motors are normal
Dimmer
Timeout
Checkifwiring,positioningpartsandmotorsarenormal
Prism
Timeout
Checkifwiring,positioningparts and motors are normal
Prism Rotation
Timeout
Checkifwiring,positioningpartsandmotorsarenormal
Focus
Timeout
Checkifwiring,positioningparts and motors are normal
Zoom
Timeout
Checkifwiring,positioningparts and motors are normal
LampTPointFan1
Error
Checkiffan anditswiringarenormal
LampTPointFan2
Error
Checkiffan and its wiringare normal
LampFan
Error
Checkiffan anditswiringarenormal
StrobeFan
Error
Checkiffan and its wiringare normal
CMYFan
Error
Checkiffan and its wiringare normal
HeadFan
Error
Checkiffan and its wiringare normal
LampRPointFan1
Error
Checkiffan and its wiringare normal
LampRPointFan2
Error
Checkiffan and its wiringare normal
PanandTilt Board
Error
Checksignal wire
DriverBoard1
Error
Checksignal wire
DriverBoard2
Error
Checksignal wire
DriverBoard3
Error
Checksignal wire
DriverBoard4
Error
Checksignal wire
Lampon
Timeout
Checkifhelamp isdamaged
LampLife
TimeoutWarning
Replacementofalamp
Lamp Off[Fan
Error]
Error
Re-strikealampandcheckif all fansarenormal
TimeIC
Error
This manual suits for next models
1
Table of contents
Other PR Lighting Equipment manuals


Popular Lighting Equipment manuals by other brands

ADJ
ADJ Galaxian 3D User instructions

IMMAX
IMMAX 08485L quick start guide

Flash Technology
Flash Technology VANGUARD FTS 370i-2 Reference manual

Inspire
Inspire Sanka instruction manual

EuroLite
EuroLite 51930393 user manual

Clevertronics
Clevertronics CLP Ultrablade Pro CUBPRO Series Installation & Maintenance Instruction Leaflet


Fotodiox
Fotodiox WIDE ANGLE Series user manual

Blue Lagoon
Blue Lagoon PROFIHEATER 3KW manual

Lightolier
Lightolier Lighting Systems Baselyte-BSL25 Specifications

Foxfury Lighting Solutions
Foxfury Lighting Solutions RUGO 700-300 product manual

BOSS ILLUMINATION
BOSS ILLUMINATION MATA 1 product manual

Poltronova
Poltronova Passiflora instructions