PR PR-8837 User manual


2
INDEX
1. SAFETYAND WARNINGS……………………………………………………………………………………
2. INSTRUCTIONS………………………………………………………………………………………………
3.APPEARANCE…………………………………………………………………………………………………
4.INSTALLATION…………………………………………………………………………………………………
5. SETUPAND CONFIGURATION ………………………………………………………………………………
6.OPERATION MENU ……………………………………………………………………………………………
7. DMX PROTOCOL………………………………………………………………………………………………
8.SINGS ON THE TOUCH SCREEN ……………………………………………………………………………
9.ERROR MESSAGES ……………………………………………………………………………………………
10.TECHNICAL DATA ……………………………………………………………………………………………
11.CIRCUIT DIAGRAM …………………………………………………………………………………………
12.COMPONENT ORDER CODES………………………………………………………………………………
3
4
5
6
8
11
16
26
26
27
32
34
The following items are supplied with the projector and please check:
Name
Quantity
Unit
Remark
G clamp
2
Pcs
XLR connector
1
Set
Male and female
Safety cord
2
Pcs
User manual
1
Pc
Ω clamp
2
Pcs
Optional
Please note that as part of our ongoing commitment to continuous product development, specifications are subject to change
without notice. Whilst every care is taken in the preparation of the manual we reserve the right to change specifications in the
course of product improvement. The publishers cannot be held responsible for the accuracy of the information herein, or any
consequence arising from them.
Every unit is tested completely and packed properly by the manufacturer. Please make sure the packing and / or the unit are
in good condition before installation and use. Should there be any damage caused by transportation, consult your dealer and
do not use the unit.Any damage caused by improper use will not be assumed by the manufacturer and / or dealer.
Any future technical changes are not subject to further notice.
Note: For the products made by Guangzhou PR lighting Ltd, the warranty for the whole product is one year starting from
the delivery date but the light source is not within the warranty.
3
1. SAFETYAND WARNINGS
NOTE
Before a projector’s installation, power-on, operation and maintenance, please carefully read
the safety information hereinafter!
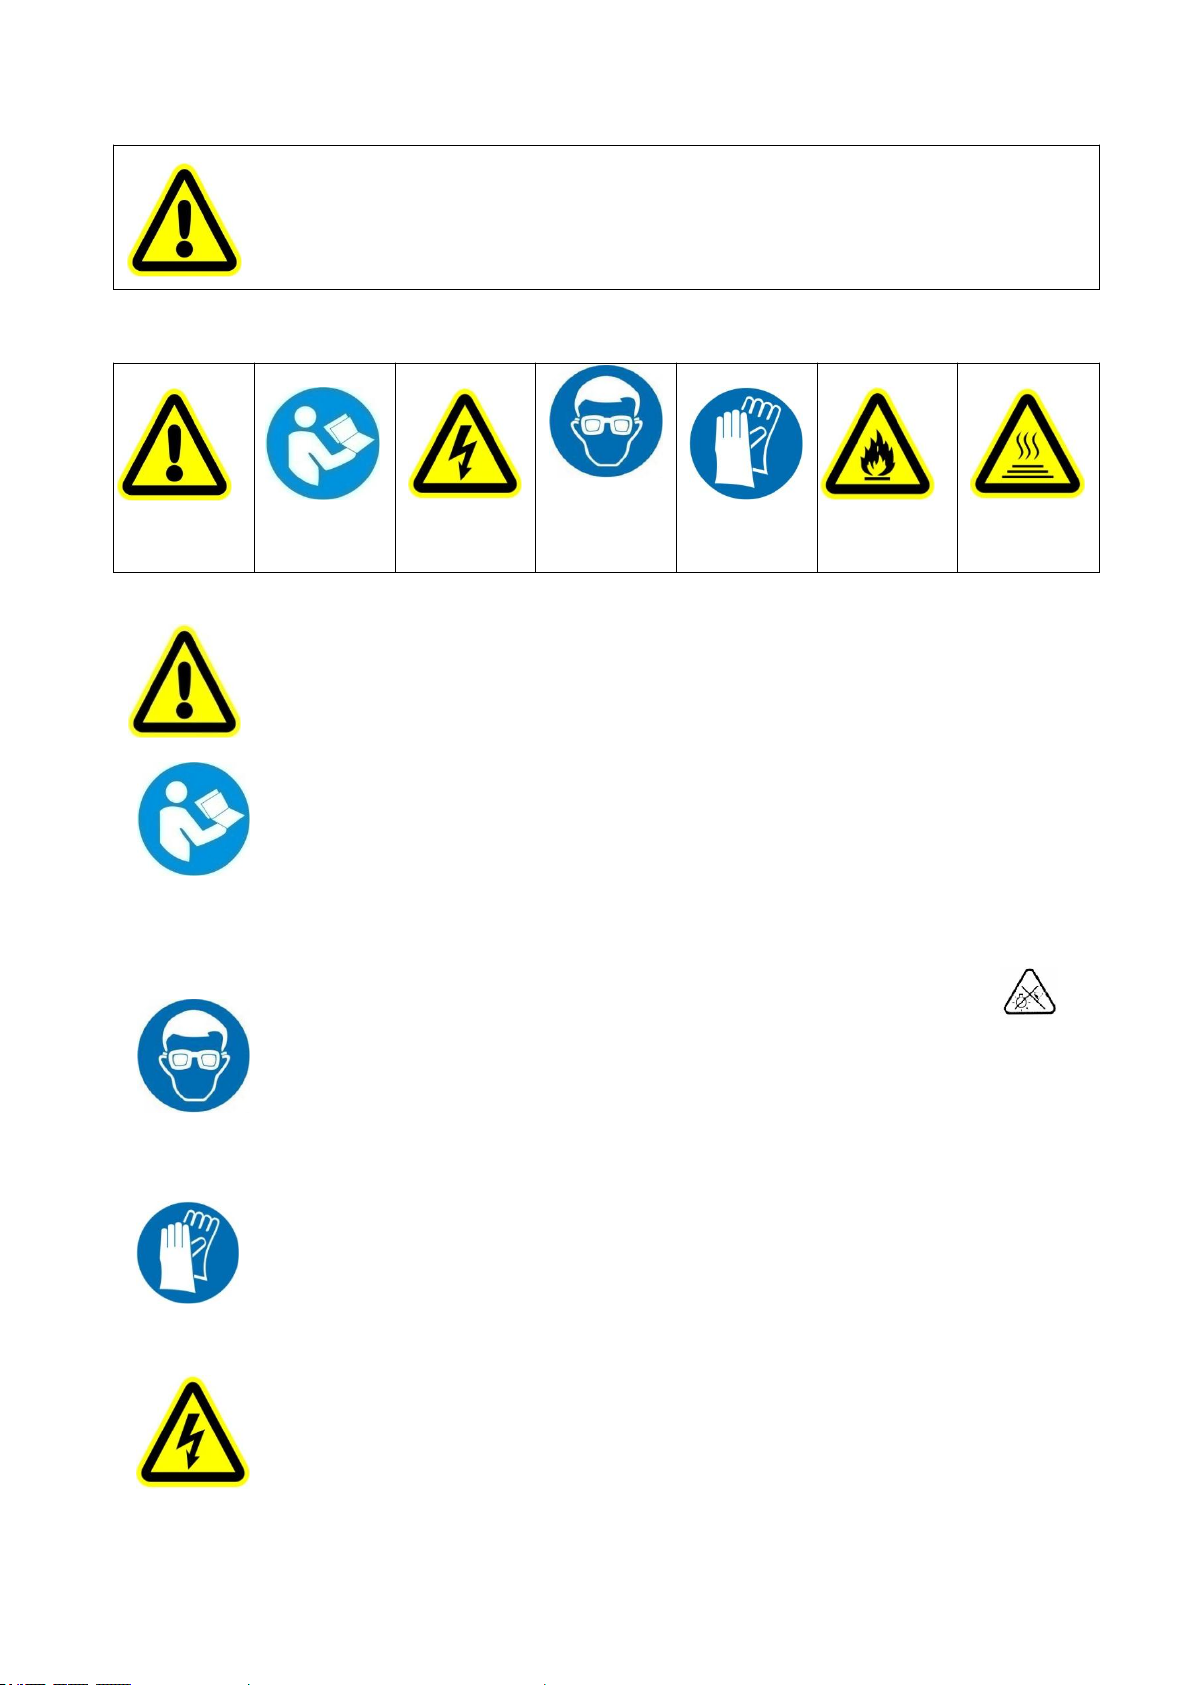
The following safety signs are used in the user manual.
Warning
User
Manual
Electrical
shock
Goggles
Protective
Gloves
Flames
High
Temperature
● When unpacking , check if there is transportation damage before using the projector. Should there be any
damage caused by transportation, consult your dealer and do not use it.
●The manufacture is not responsible for loss caused by the user not following the manual or changing the
projector as he/she likes.
●Please be noted that the damage caused by changing the projector at will is not warranted.
● Do not hesitate to contact the dealer or the manufacturer if any questions or advice.
● The projector is for indoor use only, IP20.
● Use only in dry locations. Keep this unit away from rain and moisture, excessive heat, humidity and dust. Do
not allow contact with water or any other liquids.
●The projector should be kept away from high temperature, fire, electrical surge, vibration and strong light while
being operated.
●The projector is only intended for installation, operation and maintenance by qualified personnel. And the
operation must strictly follow the procedures in the manual.
●The projector is not for a user for any replacements and the user shouldn't open the projector for repair and
maintenance.
●Don’t look straightly into the light sources especially for epileptics, otherwise eyes will be burned..
●Do not connect this device to any type of dimmer pack.
●If the lamp, lens and screen protective cover of the a lighting fixture have obvious damage, i.e., to the extent that
it hurts the performance like cracking or deformation. Please stop use it and replace them with the original parts,
otherwise its performance will be compromised.
● For the location of a lighting fixture, it shouldn’t be seen in the distance of less than 4 meters.
●Before operation, please confirm that all covers(housing) are on and screws tightened. It’s forbidden to use a
projector while covers(housing)are off .
●Keep the lamp clean and do not touch it with bare hands.
●While operating it, wear protective items.
●Any electrical connection must be carried out by a qualified person .
●Before installation, please confirm the voltage supplied matches what is required for the projector.
●Each projector must be properly earthed and installed as per related electrical standards.
●Do not use power cord with its insulator damaged and connect the power cord with other cables.
●If the projector is not used or under cleaning,, please hold the plug and unplug it. Do not unplug it forcefully or
by pulling the power cable.
●All power cords must conform to related safety and regulations.

4
●While being operated, the projector should not be under rains or in humidity.
●Do not switch on and off the projector constantly in very short intervals, otherwise the light source’s and other
electrical parts’ life will be shortened .
●There are safety cord holes at the bottom of the base of a projector. In view of safety, please run the safety cord
supplied through the safety cord holes for safety support.
●Before any installation, maintenance and cleaning work, please ensure the projector is disconnected from power
mains.
●.After stable operation under normal ambient temperature ,the temperature of the external surface of the housing
of the LED lighting fixture (the surface of the heat sink) is 65℃after the stable running.
●While the lamp is stricken for the first time, there will be smoke and strange smell. It’s normal and does not mean
the projector has some defects.
●Do not touch the metallic housing of a projector to avoid being burnet.
●Do not mount the projector directly on inflammable surface.
●Do not project the beam straightly on combustible items and the minimum distance between the projector
and illuminated items is 10m.
●A projector should be installed with good ventilation and the minimum distance between the projector and
walls is 50cm.At the same time, please ensure the fans and air inlets and outlets are workable.
●The product meets The General Technical Requirements and Standards for Recycle and Use Of
ExpiredAppliance and Electronic Products.
●When the product meets disposal standards and needs to be disposed, a client needs to dispose and recycle it.
2. INSTRUCTIONS
●CLEANINGAND MAINTENANCE
If a projector can’t start. Please check if the fuse is blown up. If it does, replace it with a new fuse with same ratings. And the
projector has over-temperature protective device. If the temperature is too high, the protective device will be triggered to shut the
projector off. When it happens, please check if the fans run normally or fan shield is blocked by dust. After the issue is solved,
restart the projector.
The accumulation of oil, smoke and dust on the lens will compromise the light output. Cleaning a projector is very necessary to
ensure a reliable use of it. Cooling fans need to be cleaned every 15days. Internal lens, reflector and hot mirror need to be cleaned
periodically to optimize light output.
Cleaning frequency is to be decided by operations and its environment. Use soft cloth and normal detergent for glass for cleaning
work. It’s advised external optical system be cleaned every 20days and internal optical systems every 30/60days. Keep lens clean
and do not touch optical parts with bare hands.
●Before any maintenance and cleaning, please ensure the project is off the power.
●Only qualified person is allowed to do maintenance.
●During maintenance and before maintenance, the projector must be off power.

5
●To avoid sunlight or other light penetrating into the head via the front lens, resulting in high temperature internally
causing damages to the projector. Before power-off, please use Tilt channel to move the head and make it facing
downward.
●Do not use alcohol or other organic solvent to clean the housing to avoid damage.
●Do not use any solvent with chemical elements to clean color filters or hot mirror.
●LUBRICATION
To ensure smooth movement of gobos and zoom and focus lens, it’s advised rotators’ bearings and 2 sliding bars for zoom and
focus lens be lubricated every 2 months. High quality and high temperature lubricant/grease is advised..
●TROUBLESHOOTING
PROBLEM
ACTION
The projector can’t be switched on
Check if the fuse is burned
Check if the power cord is connected well
Check if the switching power supply is bad or not connected well. A
professional technician is required for the repair
Check if the control board is connected well. .A professional technician
is required for the repair
The projector can be switched on , but the LED
lamp’s brightness can’t be controlled
Check if the LED driver board is connected well. A professional
technician is required for the repair
The projector can be switched on normally, but
not controlled by the DMX controller
Make sure that the fixture’s start address is right
Replace or repair the XLR signal cable.
The beam is not bright and its brightness
decreases sharply
Make sure the fans are working well or fans and their shields are not blocked
bydust.
Makesurethatthe internalopticsisclean.
The project image appears to have a halo
Carefully clean the LED lamp, optical lenses and other components.
Heavily Defective Beam
Check if lens are in good condition(not cracked)
Clean dust or grease on the lens.
3. APPEARANCE
BASE
ARM
HEAD
6
4. INSTALLATION
●RIGGING
During transportation, please lock the projector well; Before the use of projector please unlock the head. It’s forbidden to run the
projector without unlock Pan and Tilt
Take 2 clamps and 1 safety cords out from the package and mount 2 clamps on the underside of fixture with 4 retainers attached to
each clamp. Hang the fixture on the structure and fasten the screws attached to each clamp. (See the WARNING on the underside of
the base as shown above) Always ensure that the projector is firmly anchored to avoid vibration and slipping whilst functioning.
Always ensure that the structure that you are going to mount the projector is secure and is strong enough to support the weight of the
fixture.
WARNING:
●The projector MUST be lifted or carried by the HANDLES instead of clamps.
●.For safety the safety cord should afford 10 times the Projector’s weight.
CLAMP
SAFETY CORD
WARMING
Please run safety cord through
the safety hole circled in the
diagram for safety
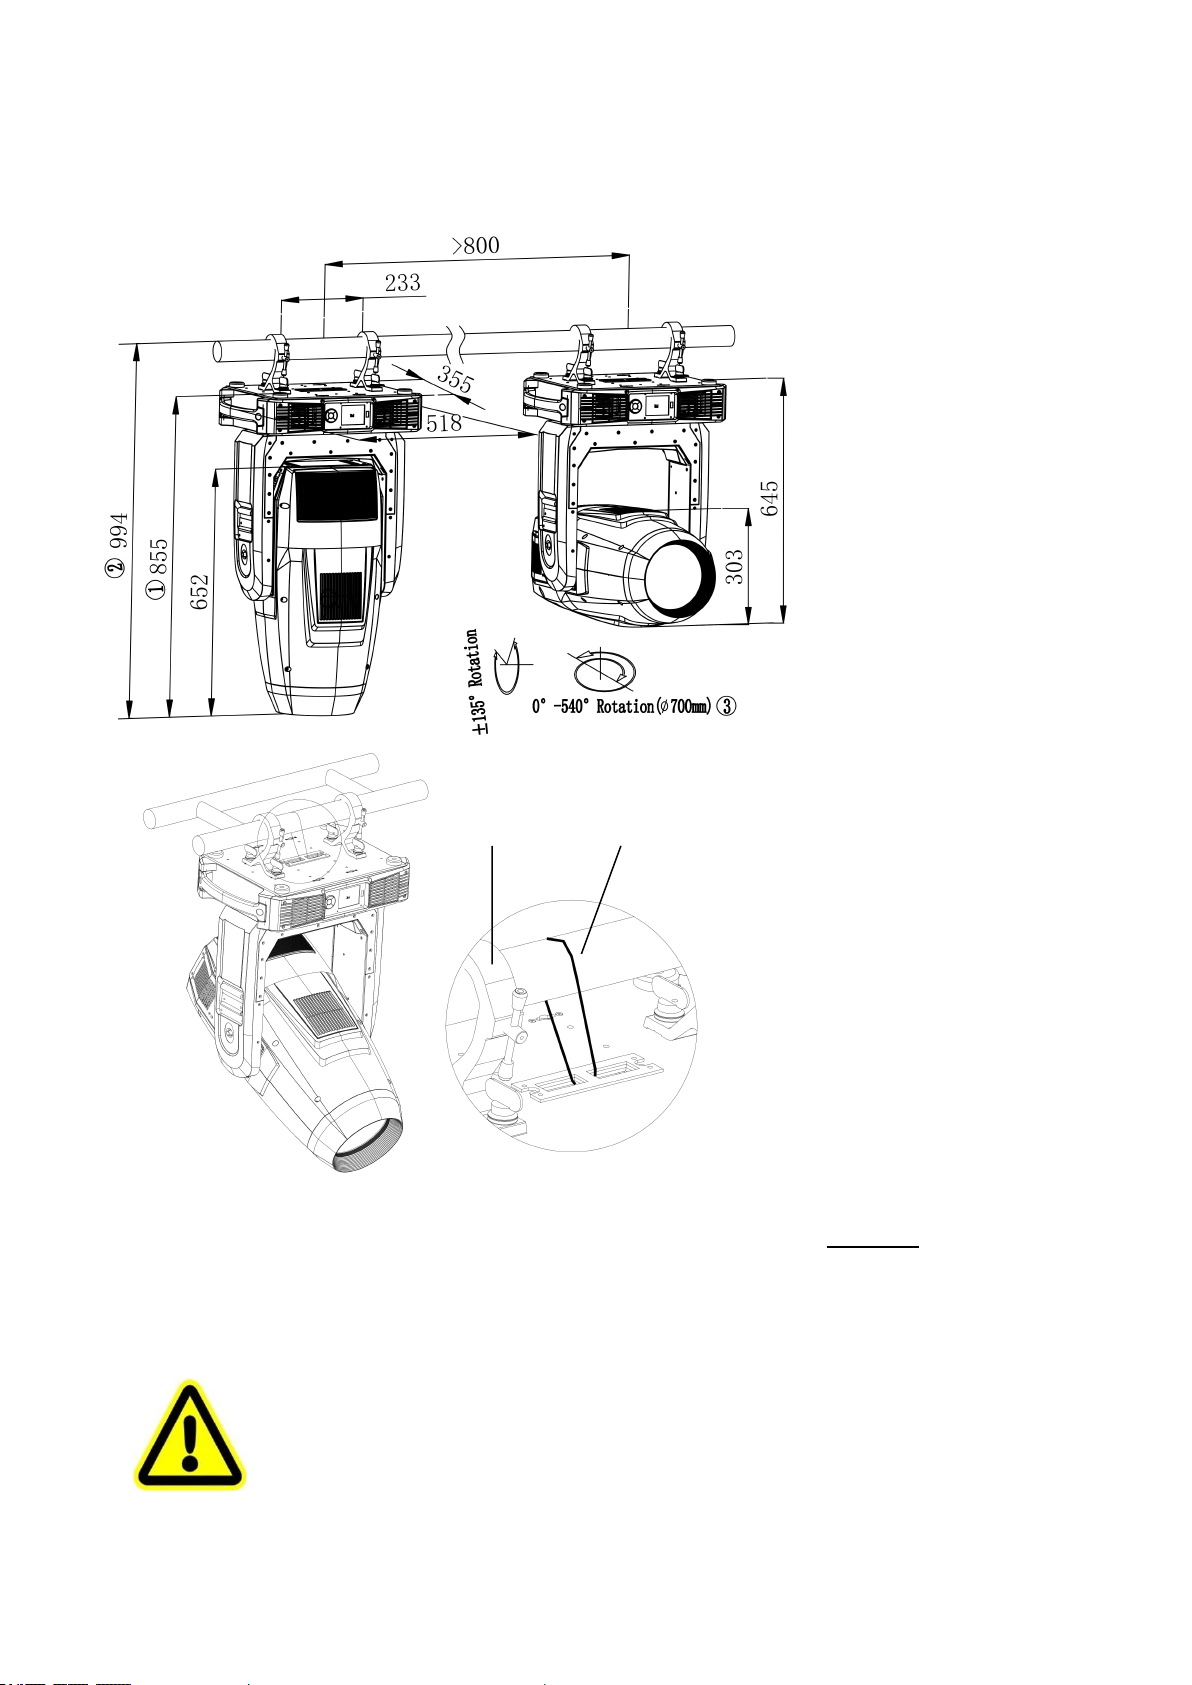
Note:
1. the distance between the foot
of the base and the front lens
cover(the head facing
downward)
2. the distance between
mounting truss and the front
lens cover( the head facing
downward)
3. The maximum diameter of
the rotating head ( minimum
spacing between fixtures)
7
●POWER CONNECTIONS
Connect the power cord as follows:
L (live) =brown
E (earth) =yellow/green
N (neutral) =blue
Before power connection, please ensure the power supplied must match what the nameplate says. It is recommended that each
projector be connected with power separately so that they may be individually switched on and off.
●The earth wire(yellow/green) must be connected to the ground. And electrical connection must be in
accordance with the standards concerned.
●If any questions about the electrical installation, do not continue but consult a qualified electrician.
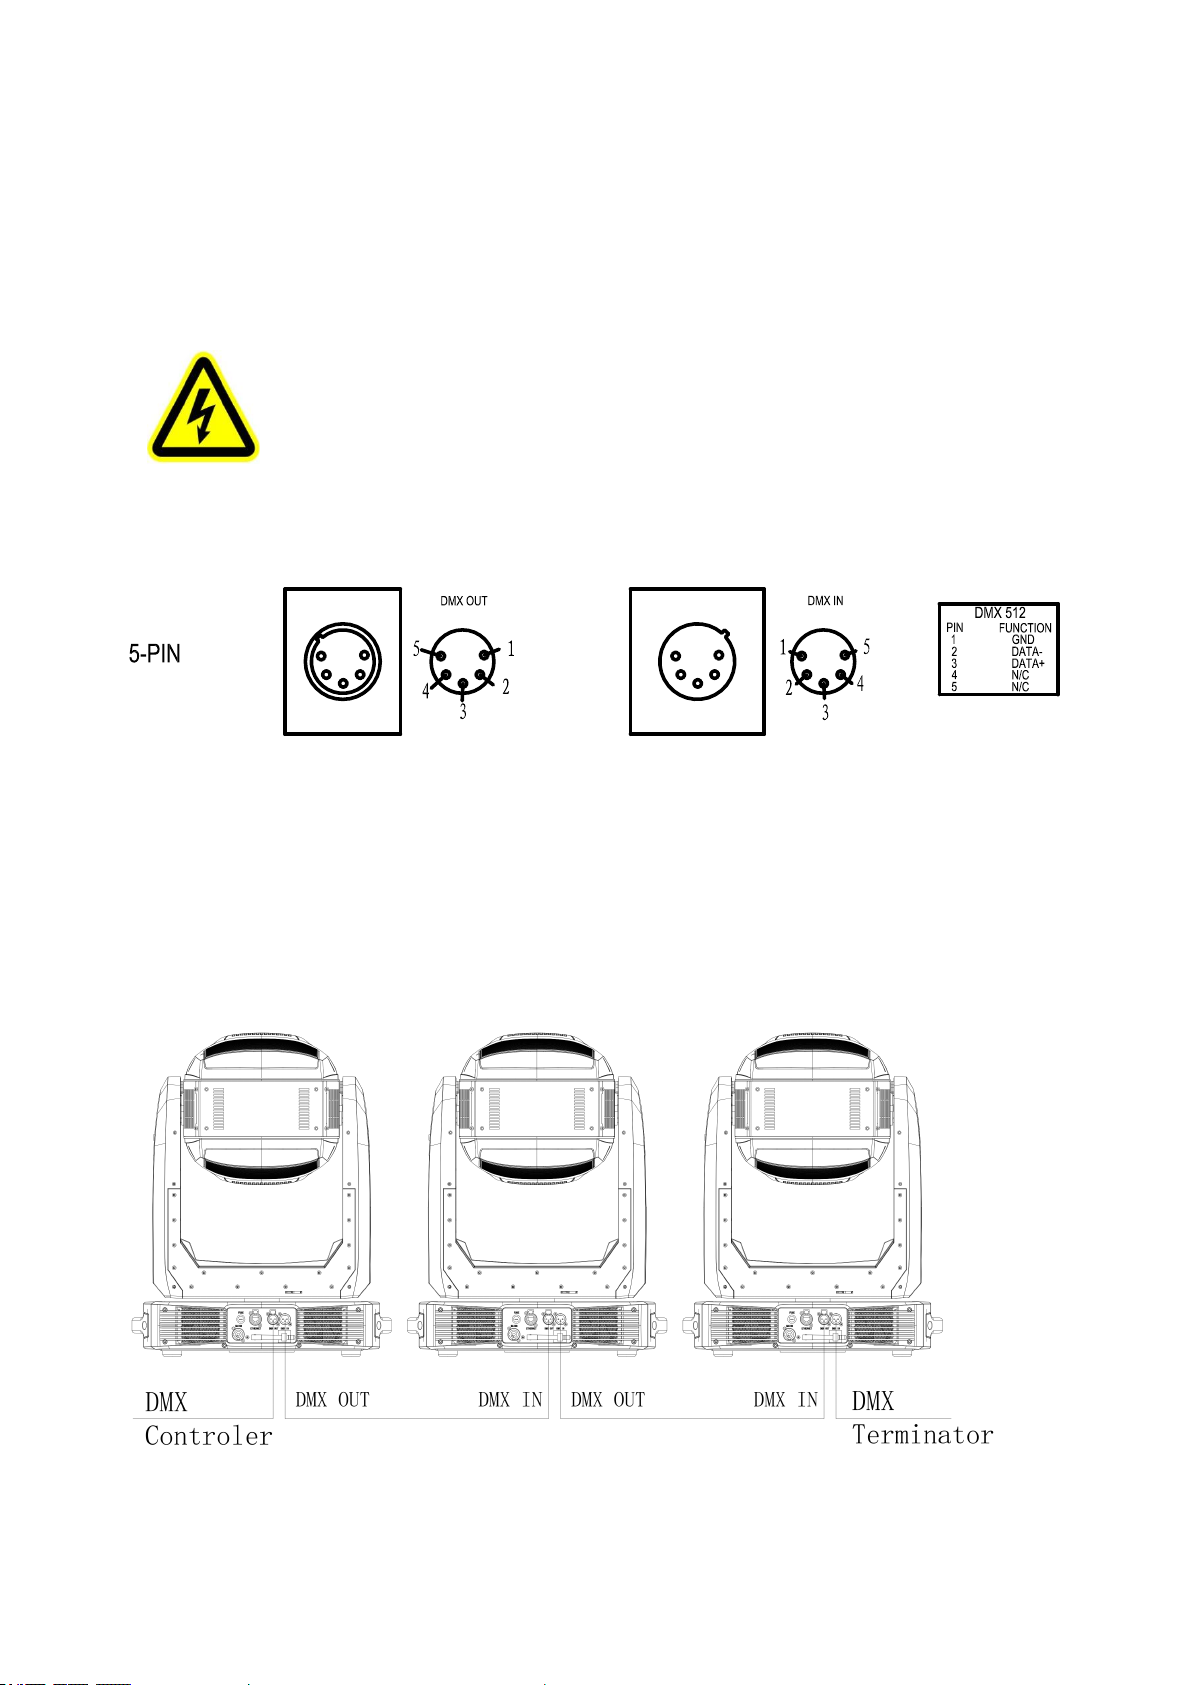
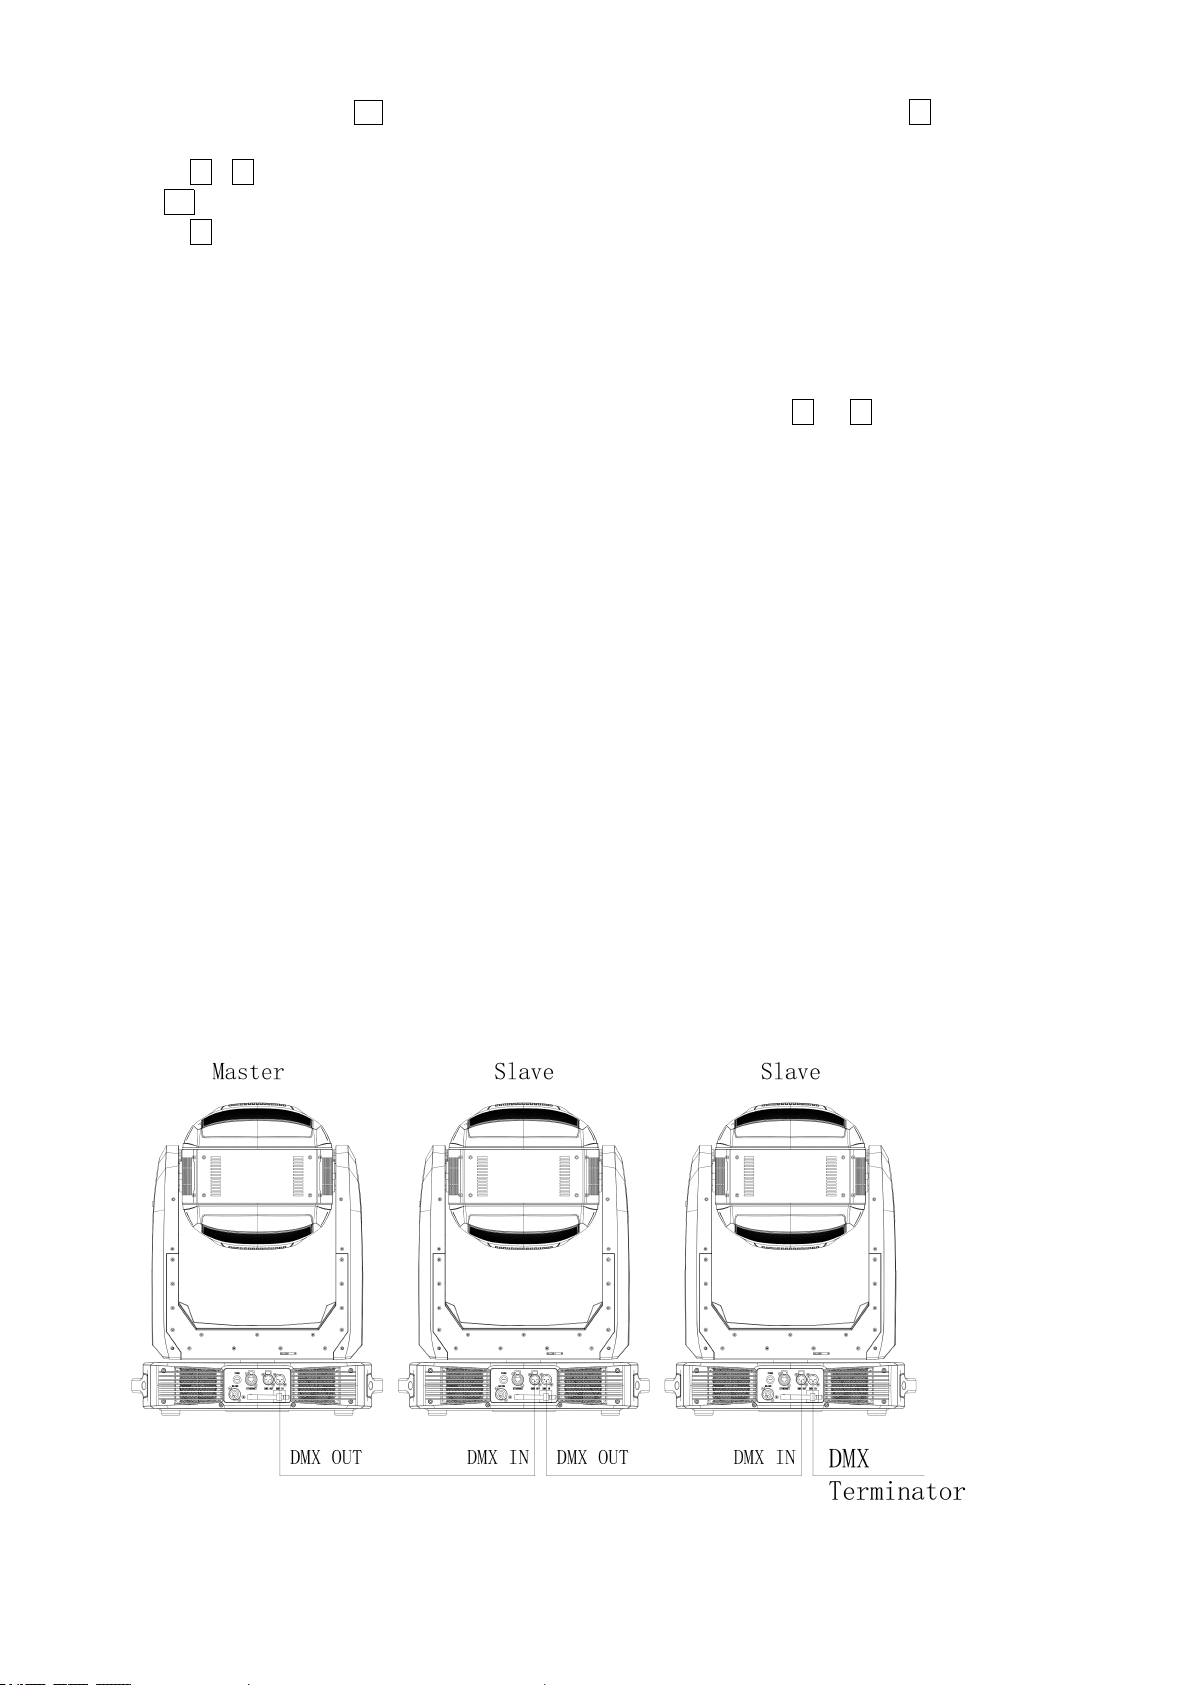
●DMX CONTROLCONNECTION
Connection between controller and projector and between one projector and another must be made with a twin-screened cable, with
each wire having at least a 0.5mm in diameter. Connection to and from the projector is via cannon 5 pin (which are included with the
projector) or 5 pin XLR plugs and sockets. The XLR's are connected as shown in the figure above.
Note: care should be taken to ensure that none of the pins touch the metallic body of the plug or each other. XLR plugs and sockets
mustn’t be connected in any way other than mentioned in the above figure. The projector accepts digital control signals in protocol
DMX512 (1990).
Connect the controller’s DMX output to the first fixture’s DMX input, and connect the first fixture’s DMX output to the second
fixture’s DMX input and connect the rest fixtures in the same way. Eventually connect the last fixture’s DMX output to a DMX
terminator as shown in the figure below.
●DMX TERMINATOR
8
In the Controller mode, at the last fixture in the chain, the DMX output has to be connected with a DMX terminator. This prevents
electrical noise from disturbing and corrupting the DMX control signals.
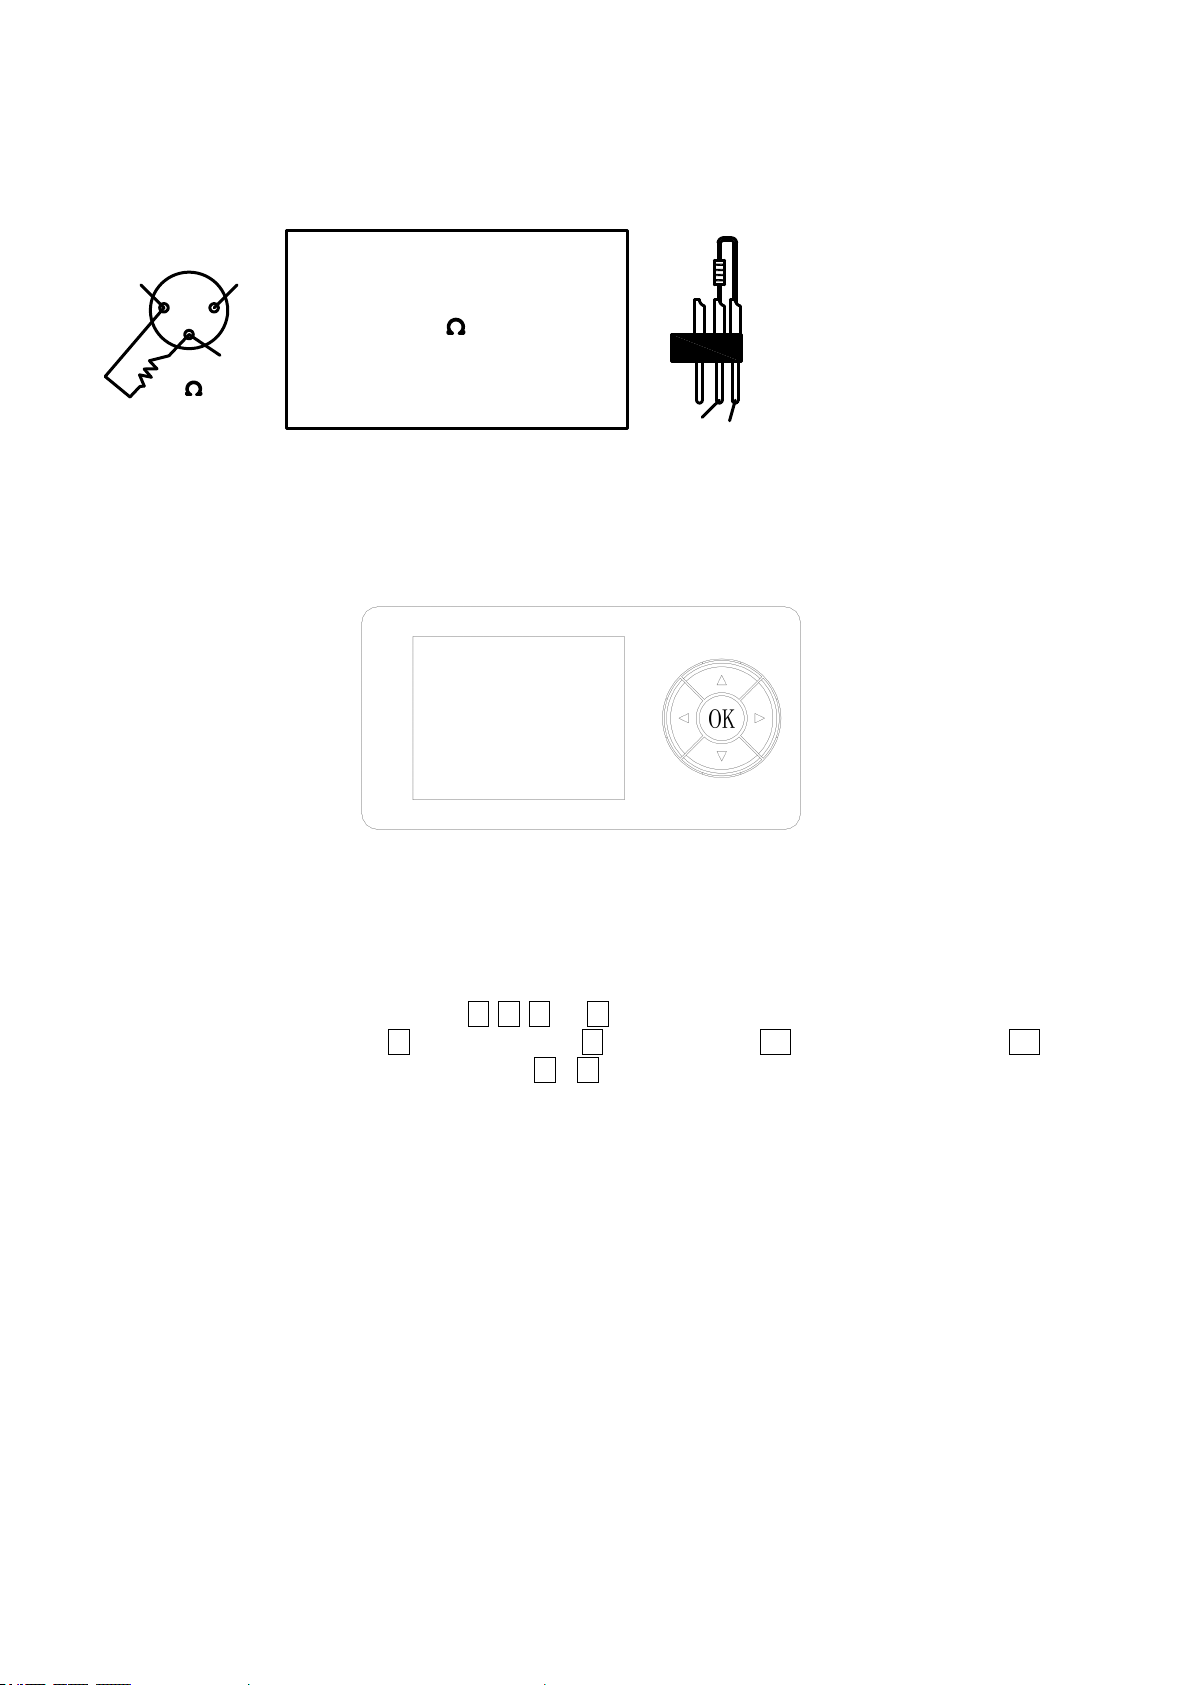
The DMX terminator is simply an XLR connector with a 120(ohm) resistor connected across pins 2 and 3, which is then plugged
into the output socket on the last projector in the chain. The connections are illustrated below
21
3
120
DMX TERMINATOR
CONNECTION
Connect a 120 (OHM) resistor
across pins 2 and 3 in an XLR plug
and insert into the DMX out socket
on the last unit in the chain.
PIN 3
PIN 2
5. SETUPAND CONFIGURATION
●FRONT PANEL OPERATION
The configuration and start address can be set conveniently via push button and color touch screen.
To view or change its setup, touch any white area of the screen or push the key OK for more than 3 seconds to unlock the
display(While only on battery, push OK key).After the unlocking, push ► key to enter into function menus. Each main menu has its
submenus and each submenu has a specific function. For details, please see the “OPERATION MENU” with following
the 6th point..
1. In the page of function setup, push any key of ◄, ►, ▲ and ▼ or icon for the function desired.
2. At 2nd ,3rd and 4th level menus, key ◄ means ESCAPE, key ► won’t function, key OK means ENTER. Push key OK to
save any changes o enter into submenus. Push key ▲or ▼ to change numbers(plus or minus) or tap any item required
for changes.
Push the left key or shortcut key X to go back to the upper level menu. If none pushed, the system will go back to initial display
automatically.
Shortcut keys: after the interface of FUNCTION MENU, the upper part is with menus for many functions. On the right, there are 4
shortcut keys, which are ←,→,lamp control or English/Chinese menus.
●DMX STARTADDRESS
Each projector must be given a DMX start address so that the correct projector responds to the correct control signals.This DMX start
address is the channel number from which the projector starts to “listen” to the digital control information being sent out from the
controller. The projector has 3 DMX modes. There are short mode ,standard mode and extended mode. For example standard mode
has 52 channels, so set the No. 1 projector’s address 001, No. 2 projector’s address 053, No. 3 projector’s address 105, No. 4
projector’s address157, and so on.
9
Launch the projector. Press key OK more than 3seconds to unlock the display. After the unlocking, push key ► to enter into menus.
After selecting the sign of DMX setting, push OK key or tap the screen directly and select DMX address at 2nd level menus.
Push key▲ or▼ or tap sign < or > to set the number desired.
Push OK key to confirm.
Push key◄ and it will return to the upper menu
.The DMX address can be set via RDM protocol if control panel is not convenient.
The projector has wireless control function with wireless receiver module and antenna for remote control.
The setup of it is below:
1. Enter into the projector’s menu. Select the menu “Config Settigns” via the keys of ▲ and ▼
2. Select DMX control Mode---- Wireless First (Note: Do not select XLR ONLY). The DMX wireless control
function is activated.
Only after the projector is linked with a transmitter, can it receive wireless signal sent by the transmitter. If unlinking it, Press
“Enter” for the menu of Unlink Wireless under the upper level menu of Config Settigns.
●STAND-ALONE MODE
Operate the projector without connecting with a controller, enable the master mode through the operation panel, the
projector will run in Stand-Alone mode automatically.
DMX address can be set at any number within 512.
●MASTER/SLAVE MODE
Many projectors can run synchronously in the Master/Slave mode by linking them with each other. First,
connect the first fixture’s DMX output to the second fixture’s DMX input using XLR-XLR control cable and then connect the second
fixture’s DMX output to the third fixture’s DMX input, and so on until all projector are connected in this way. Eventually connect the
last fixture’s DMX output to a DMX terminator. Set 1st projector as the master and others are Slaves.
StartAddresses of all Slaves are 001; Operation mode of the Master can be set any mode for a Master’and Slaves’operation mode can
be set accordingly.
After Powered on, the group will run in Master/Slave Mode( It is advised the number of projectors in a DMX chain is 32 at
maximum)

10
●FIRMWARE UPGRADE VIAUSB PORT
After the .PRS files for upgrade copied to the U flash drive and then it plugged into USB port, the name of the file or its folder will be
seen under the menu of Service/USB Firmware Upgrade . Select the needed PRS file and push the upgrade button, the system will
show Please Waiting while the file being copied into the system. Then the display will show Bootloader interface and within the
countdown of 10S, push both UP and DOWN buttons together, the system will enter into upgrade interface. During the upgrade, do
not disrupt the power. If both bottoms are not pushed within 10s, it won’t enter into firmware upgrade interface.
●TO SET UP COLOR TEMPEARATUEAND COLOR MACRO
A projector has 7 color temperature macros and 89 standard color macros. Color temperatures are for respective
2700K,3000K,3500K,4000K,4500K,5000K and 5700K. Under the DMX channel of CMY macro, color macro and its color
temperature macro can be selected.
●TO SET UPDIMMER CURVE AND LED REFRESH FREQUENCY
Aprojector has 4 gamma dimmer curves: gamma 2.0, gamma 2.2, gamma 2.4 and gamma 2.6.
It has 8 LED refresh frequency: LED refresh frequency 1200Hz, LED refresh frequency 2400Hz, LED refresh frequency 4800Hz,
LED refresh frequency 10000Hz, LED refresh frequency 12000Hz, LED refresh frequency 15000Hz, LED refresh frequency
20000Hz and LED refresh frequency 25000Hz.
It has fast, medium and slow dimmer speeds.
Its setups are as follows:
1. Hold the OK button for more than 3s to unlock the control panel and then push ► button to enter into the menus and select
“Option Settings”.
2. Select “Dimmer Settings” and select any mode of gamma curve /LED frequency /dimmer speed for adjustment.
●FAN SPEED MODES
It has standard and theater modes. Theater mode is quiet mode.
Its setups are as follows:
1. Hold the OK button for more than 3s to unlock the control panel and then push ► button to enter into the menus and select
“Option Settings”.
2. Select either of Standard and theater modes after the menu of Fan Settings.
●PROJECTOR TYPE
It has 3 modes of moving head light, fixed focus profile light and zoom profile light.
For moving head light: linear zoom 6°-54°, standard fan mode ;
For fixed focus profile light, it has 6 beam angles: 6°、10°、19°、26°、36°、50°. After the beam angle selected, zoom lens can’t
move and the light spot can be focused via focus lens;
For zoom profile light, it has 3 bean angle ranges: 6-15°、15-35°、35-54°. If the beam angle range selected, zoom lens can
move in the exact range accordingly and the light spot be focused via focus lens.
For fixed focus profile light and zoom profile light, it can enter into quiet theater mode automatically.
The setups are as follows:
1. Hold OK key for more than 3s to unlock control panel.After unlocking the control panel, push ►button to enter into operation
menus and select “Options Settings”
2. Select the projector type after entering into the menu of “Light Type”
●AUTO-FOCUS SETUP
A projector has auto-focus function for the distance ranges of 5m,10m,15m and 20m respectively. While any of Iris, Framing Blade,
Fixed gobo wheel and Rotating Gobo Wheel is in use, Auto-Focus channel for specified distance can automatically focus the image.
11
Then use Auto-Focus Calibration channel to fine tune the focused image. Priority sequence: Rotating gobo wheel>Fixed gobo
wheel>Iris>Framing blades
●BRIGHTNESS CALIBRATION
For brightness calibration function, a controller can be used on the projectors in a DMX chain or a projector be done individually.
After running for some time, the projectors need to be recalibrated in brightness for conformity with the help of LED brightness
calibration channel via controller. The function has the following characteristics:
1. LED brightness calibration channel has 50 levels for adjustment with each level meaning power consumption decreases by 1%.
2. Calibration can be done on projectors in a DMX chain or a single one. After calibration done on a lot of projectors in a DMX
chain, it can be done individually also if needed.
3. To avoid erroneous operation, after the fader of a DMX controller is at proper place for LED BRIGHTNESS CALIBRATION
channel, the fader for channel of LED BRIGHTNESS CALIBRATION CONFIRMATION channel should be at right DMX
value range to save parameters. The calibration is completed after the desired parameters are store d into the projectors.
●CRI MODE
It has HIGH CRI MODE and select it via DMX controller to activate it.The mode ensures high CRI optical effect.
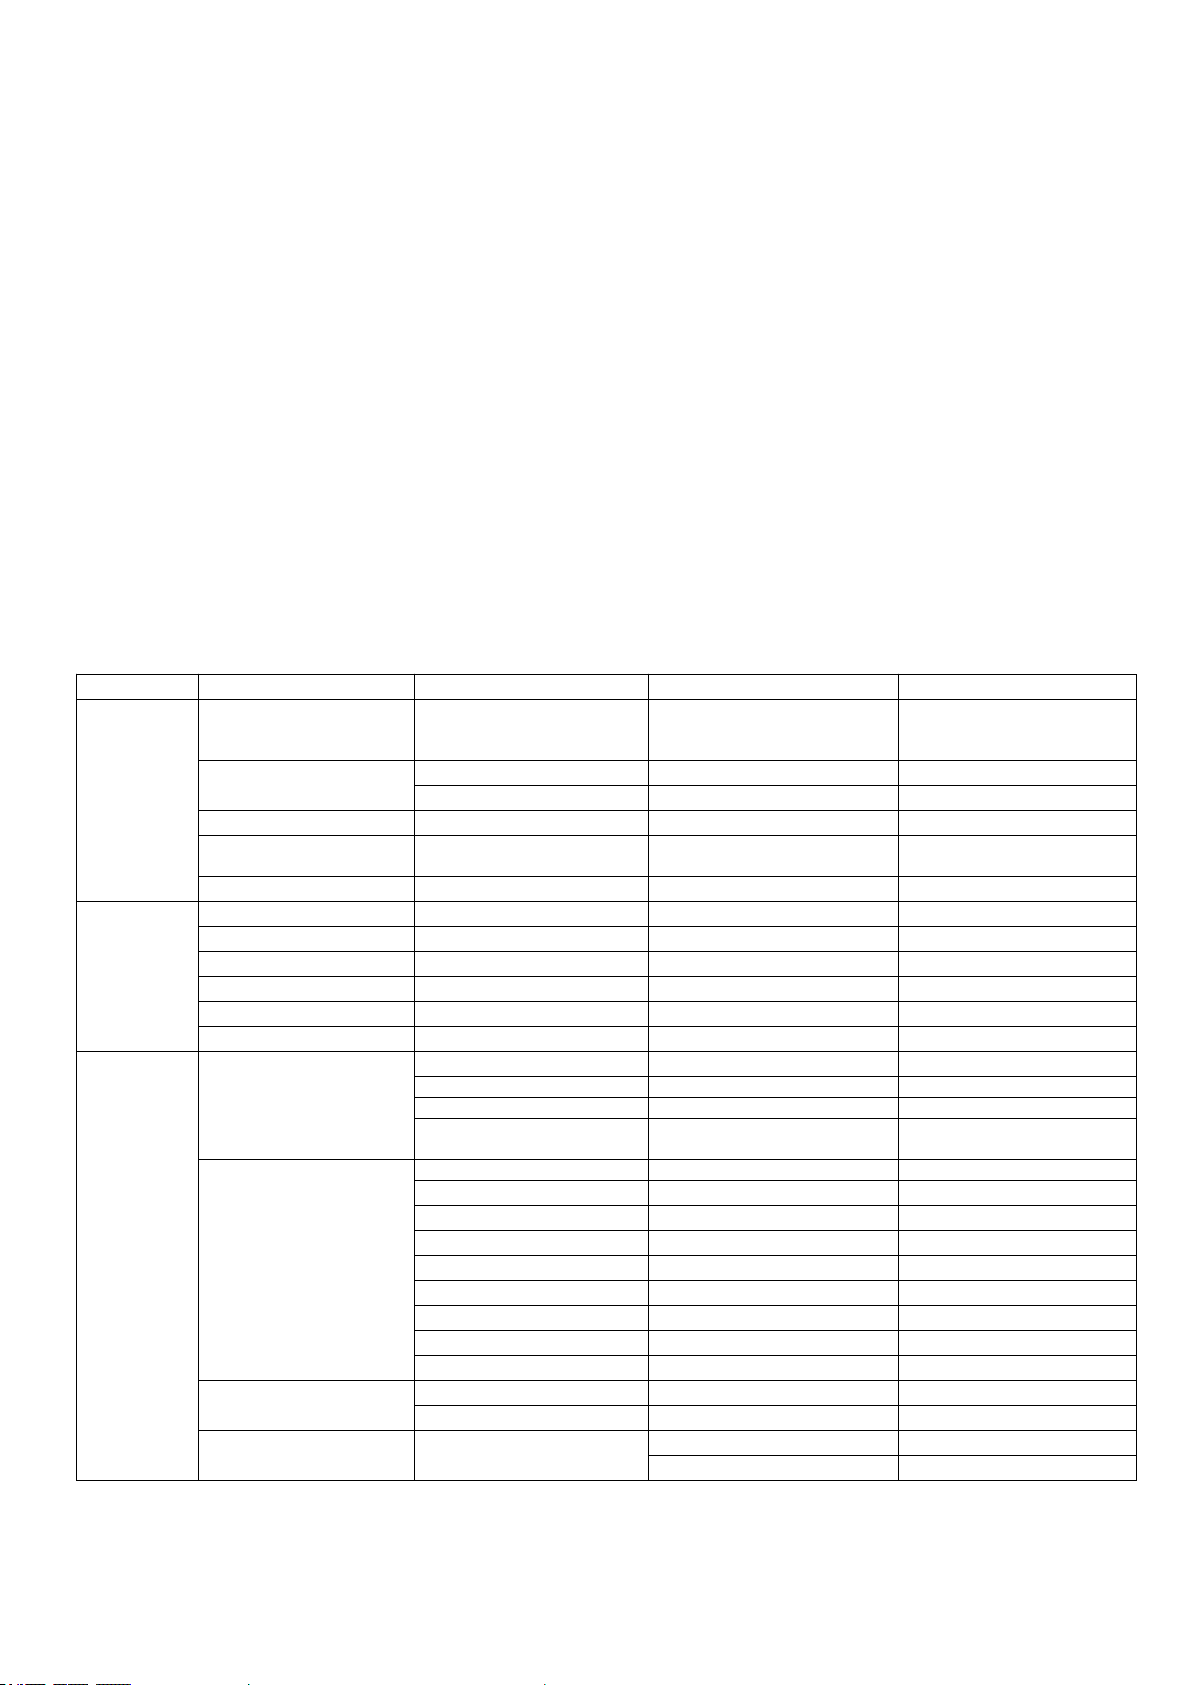
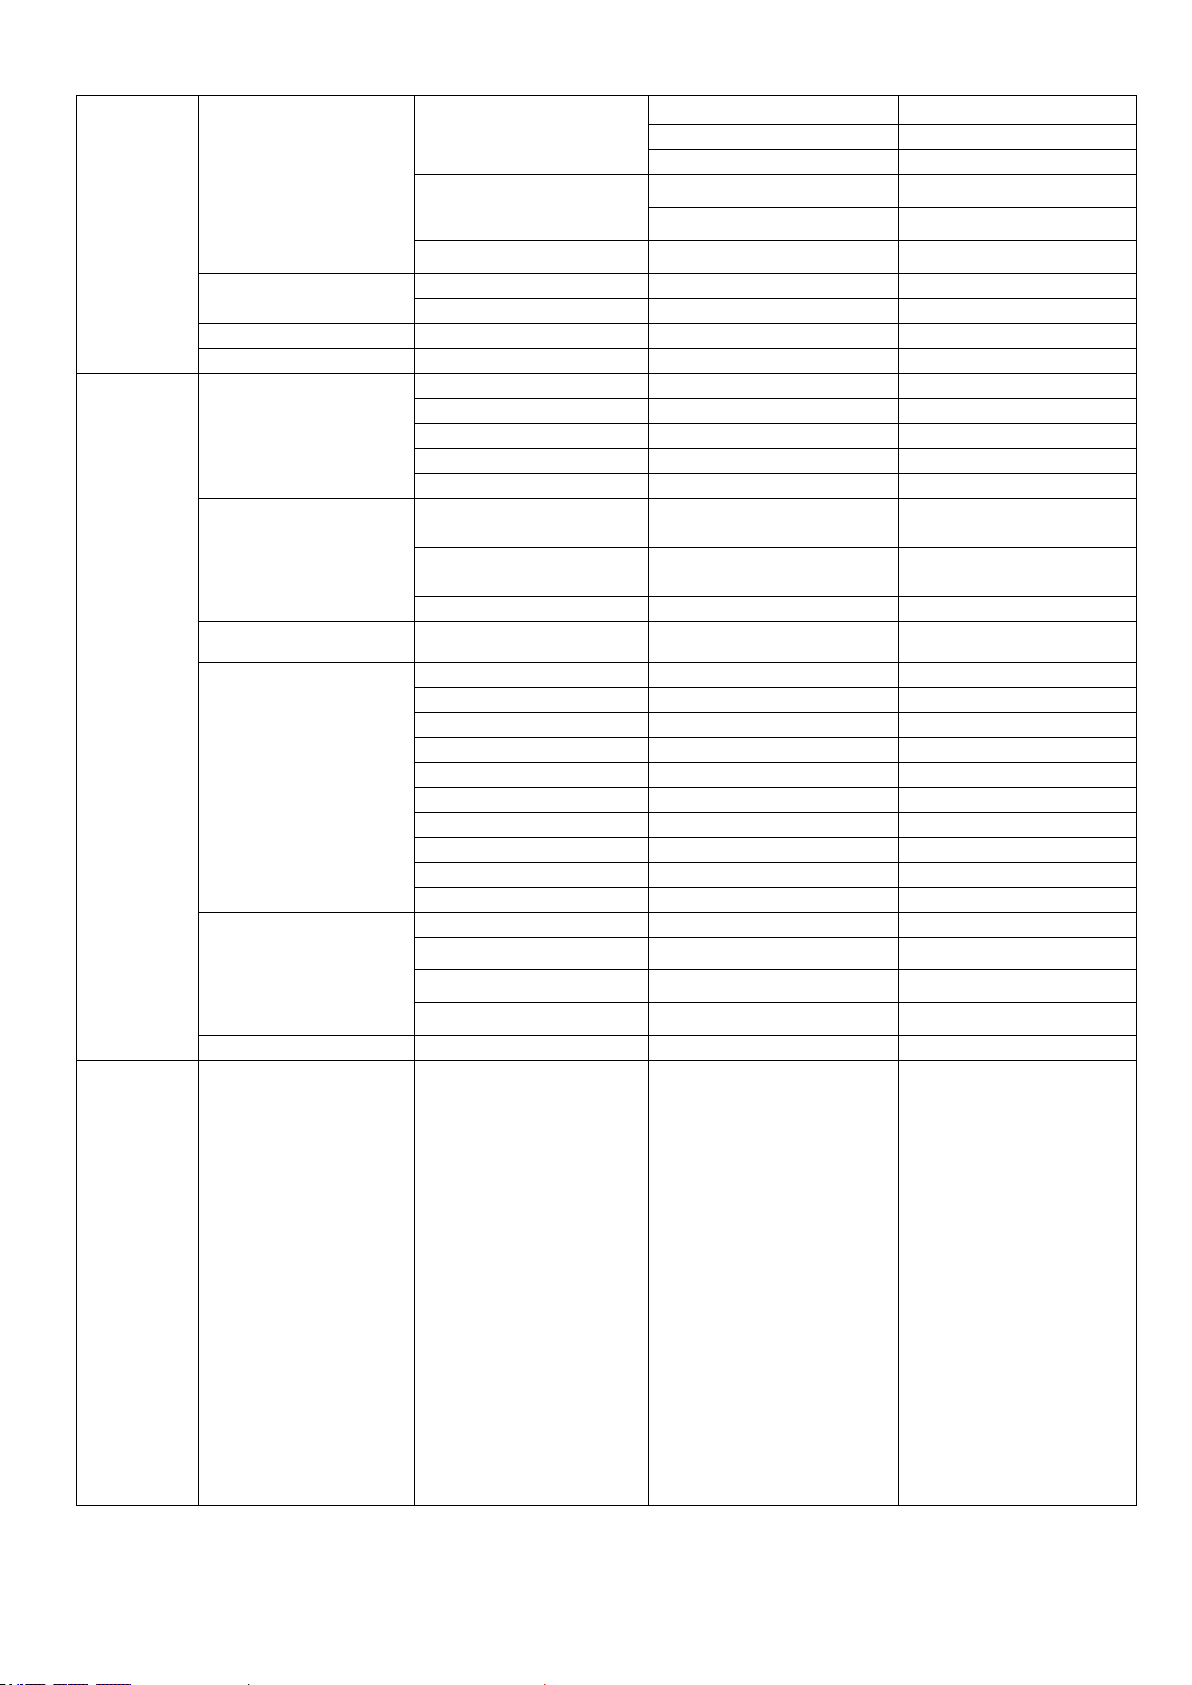
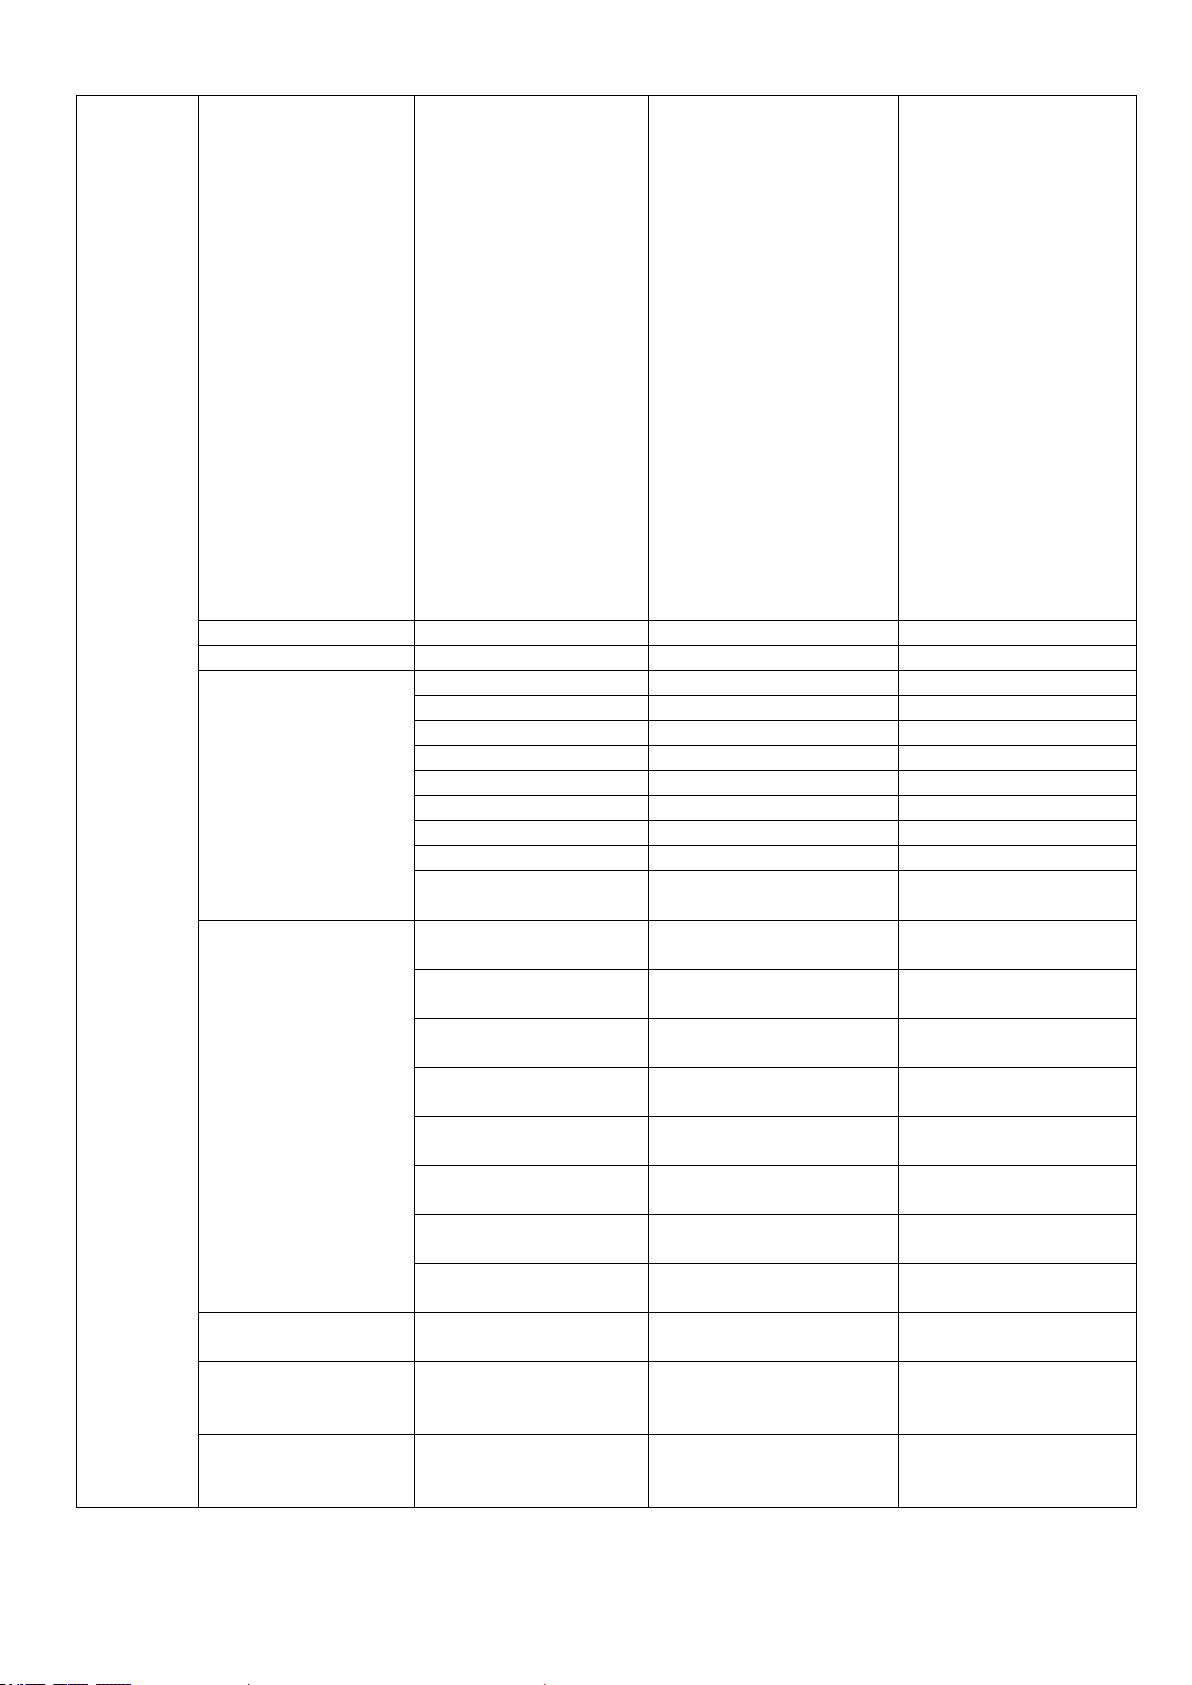
6. OPERATION MENU
1st LEVEL
2nd LEVEL
3rd LEVEL
4th LEVEL
5th LEVEL
Address
DMX Address
1-466(Short Mode)
1-461(Standard Mode)
1-446(Extended Mode)
IP Address
Default IPAddress
2.X.X.X /10.X.X.X
Custom IPAddress
X.X.X.X
SubNet Mask
X.X.X.X
ArtNet
ArtNet Universe
0-255
sACN Universe
1-63999
Reset
Total Reset
Really Reset?
Confirm/ Cancel
Pan&Tilt Reset
Really Reset?
Confirm/ Cancel
Colour System Reset
Really Reset?
Confirm/ Cancel
Gobo Reset
Really Reset?
Confirm/ Cancel
Zo.Fo.Fr.Pr. Reset
Really Reset?
Confirm/ Cancel
Other Reset
Really Reset?
Confirm/ Cancel
Config Settings
DMX Channel Mode
Short Mode 47CH
Standard Mode 52CH
Extended Mode 67CH
View Selected Mode
Strobe
…..
Signal Select
XLR Only
XLR First
Wireless Only
Wireless First
Wireless In/XLR Out
Artnet Only
Artnet In/XLR Out
sACN Only
sACN In/XLR Out
Loss of DMX
Normal time out
Hold last Value
Display Config
Display Mode
OffAfter Delay
OnAlways
12
Display Invert
Invert OFF
Invert ON
InvertAuto
Language Setting
English
Chinese
Touch Screen Calibration
XXX
Temperature Unit
Celsius Degree
Fahrenheit Degree
Un-LinkWireless
Really Un-Link?
Confirm/ Cancel
Defaults
Restore Defaults?
Confirm/ Cancel
Option Settings
Pan/Tilt Settings
Pan DMX Invert
OFF/ ON
Tilt DMX Invert
OFF/ ON
Pan Tilt Swap
OFF/ ON
XYFeedback
OFF/ ON
Pan/Tilt mode
Speed/Time
Dimmer Settings
Gamma Curve
Gamma 2.0/2.2/2.4/2.6
LED Refresh Rate
1200/2400/4800/10000/12000/150
00/20000/25000Hz
Dimmer Speed
Fast/Medium/Slow Speed
Fan Settings
Standard/Theatre
LightType
Moving Head 6-54
Profile 35-54
Profile 15-35
Profile 6-15
Profile 50
Profile 36
Profile 26
Profile 19
Profile 10
Profile 6
Invert Settings
Iris Invert
OFF/ ON
Invert Settings
Zoom Invert
OFF/ ON
CYM Invert
OFF/ ON
CTO Invert
OFF/ ON
Defaults
Restore Defaults?
Confirm/ Cancel
Information
View DMXValues
Channel Value
Strobe XXX
Dimmer XXX
Dimmer Fine XXX
CMY Macro XXX
Cyan XXX
Yellow XXX
Magenta XXX
CTO XXX
Color Wheel1 XXX
Color Whee1l Fine XXX
Color Wheel21 XXX
Color Whee12 Fine XXX
Iris XXX
Iris macro XXX
Fixed gobo wheel XXX
Ro. Gobo wheel XXX
Gobo Rota. XXX
Gobo Rota. Fine XXX
Blade 1 Left XXX
Blade 1 Right XXX
Blade 2Left XXX
13
Blade 2 Right XXX
Blade3Left XXX
Blade 3Right XXX
Blade4 Left XXX
Blade 4 Right XXX
Framing module R. XXX
Framing Module R.F. XXX
Prism 1 XXX
Prism 1 Rotation XXX
Prism 2 XXX
Prism 2 Rotation XXX
Effect Wheel XXX
Effect Wheel Ro. XXX
Frost 1 XXX
Frost 2 XXX
Focus XXX
Zoom XXX
Auto Focus XXX
Auto Focus Calibration XXX
Pan XXX
Pan Fine XXX
Tilt XXX
Tilt Fine XXX
Pan and Tilt Speed XXX
CRI mode XXX
Control Function XXX
Lamp Hours
Reset Lamp Hours
Total Hours
Temperature
Display Board XX℃/F
Pan and Tilt Board XX℃/F
Driver Board 1 XX℃/F
Driver Board 2 XX℃/F
Driver Board 3 XX℃/F
Driver Board 4 XX℃/F
Blade Board XX℃/F
Fan Board XX℃/F
LED XX℃/F
LED Sensor XX℃/F
SoftwareVersion
Display Board
System= XXX
Boot =XXX
Pan andTilt Board
System= XXX
Boot =XXX
Driver Board 1
System= XXX
Boot =XXX
Driver Board 2
System= XXX
Boot =XXX
Driver Board 3
System= XXX
Boot =XXX
Driver Board4
System= XXX
Boot =XXX
Blade Board
System= XXX
Boot =XXX
Fan Board
System= XXX
Boot =XXX
Electronic SN
Electronic SN=
************
RDM Device Label
RDM Device Label
ANSI E1.20 RDM
Fan status
Fan Speed Status
Base Fan1 XXX XXX
Base Fan2 XXX XXX
14
Gobo Fan XXX XXX
Framing Fan XXX XXX
Head Fan XXX XXX
Prism Fan XXX XXX
CYM Fan1 XXX XXX
CYM Fan2 XXX XXX
LED Fan1 XXX XXX
LED Fan2 XXX XXX
LED Fan3 XXX XXX
LED Fan4 XXX XXX
Service
Manual Effect Control
Channel Value
Strobe XXX
Dimmer XXX
Dimmer Fine XXX
CMY Macro XXX
Cyan XXX
Yellow XXX
Magenta XXX
CTO XXX
Color Wheel1 XXX
Color Whee1l Fine XXX
Color Wheel21 XXX
Color Whee12 Fine XXX
Iris XXX
Iris macro XXX
Fixed gobo wheel XXX
Ro. Gobo wheel XXX
Gobo Rota. XXX
Gobo Rota. Fine XXX
Blade 1 Left XXX
Blade 1 Right XXX
Blade 2Left XXX
Blade 2 Right XXX
Blade3Left XXX
Blade 3Right XXX
Blade4 Left XXX
Blade 4 Right XXX
Framing module R. XXX
Framing Module R.F. XXX
Prism 1 XXX
Prism 1 Rotation XXX
Prism 2 XXX
Prism 2 Rotation XXX
Effect Wheel XXX
Effect Wheel Ro. XXX
Frost 1 XXX
Frost 2 XXX
Focus XXX
Zoom XXX
Auto Focus XXX
Auto Focus Calibration XXX
Pan XXX
Pan Fine XXX
Tilt XXX
Tilt Fine XXX
Pan and Tilt Speed XXX
CRI Mode XXX
USB Upgrade
FactoryTest
Operation
Mode
DMX Mode
Change Operation Mode?
Confirm/ Cancel
Master Mode
Preset Memory
Change Operation Mode?
Confirm/ Cancel
User Memory 1
Change Operation Mode?
User Memory 2
Change Operation Mode?
Stand-Alone Mode
Preset Memory
Change Operation Mode?
User Memory 1
Change Operation Mode?
User Memory 2
Change Operation Mode?
Static Scene
Change Operation Mode?

15
User
Memories
Edit User Memory
Edit User Memory 1
/
Edit User Memory 2
Scene XX
(1~200 Scenes)
Strobe XXX
Dimmer XXX
Dimmer Fine XXX
CMY Macro XXX
Cyan XXX
Yellow XXX
Magenta XXX
CTO XXX
Color Wheel1 XXX
Color Whee1l Fine XXX
Color Wheel21 XXX
Color Whee12 Fine XXX
Iris XXX
Iris macro XXX
Fixed gobo wheel XXX
Ro. Gobo wheel XXX
Gobo Rota. XXX
Gobo Rota. Fine XXX
Blade 1 Left XXX
Blade 1 Right XXX
Blade 2Left XXX
Blade 2 Right XXX
Blade3Left XXX
Blade 3Right XXX
Blade4 Left XXX
Blade 4 Right XXX
Framing module R. XXX
Framing Module R.F. XXX
Prism 1 XXX
Prism 1 Rotation XXX
Prism 2 XXX
Prism 2 Rotation XXX
Effect Wheel XXX
Effect Wheel Ro. XXX
Frost 1 XXX
Frost 2 XXX
Focus XXX
Zoom XXX
Auto Focus XXX
Auto Focus Calibration XXX
Pan XXX
Pan Fine XXX
Tilt XXX
Tilt Fine XXX
Pan and Tilt Speed XXX
CRI Mode XXX
Fade Time XXX
Hold Time XXX
Delay MS/S/MIN
Next scene XXX
Edit Static Scene
Strobe XXX
Dimmer XXX
Dimmer Fine XXX
CMY Macro XXX
Cyan XXX
Yellow XXX
Magenta XXX
CTO XXX
Color Wheel1 XXX
Color Whee1l Fine XXX
Color Wheel21 XXX
Color Whee12 Fine XXX
Iris XXX
Iris macro XXX
Fixed gobo wheel XXX
Ro. Gobo wheel XXX
Gobo Rota. XXX
Gobo Rota. Fine XXX
Blade 1 Left XXX
Blade 1 Right XXX
16
7. DMX PROTOCOL
Short
mode
Standard
mode
Extended
mode
Function Description
Decimal
Low
Decimal
High
1
1
1
Strobe
Close
0
Pulse strobe speed from slow to fast
1
127
Strobe speed slow to fast
128
255
2
2
2
Dimmer
Close
0
0
Non-linear dimmer from dark to light (0-100%)
1
255
3
3
Dimmer Fine
Dimmer in 16 bit
0
255
3
4
4
CYM Macro
The following functions will disable CMY ,CTO
No function
0
7
Color Temperature 2700K
8
9
Color Temperature 3000K
10
11
Color Temperature 3500K
12
13
Color Temperature 4000K
14
15
Color Temperature 4500K
16
17
Color Temperature 5000K
18
19
Color Temperature 5700K
20
21
Color Macro1
22
23
Blade 2Left XXX
Blade 2 Right XXX
Blade3Left XXX
Blade 3Right XXX
Blade4 Left XXX
Blade 4 Right XXX
Framing module R. XXX
Framing Module R.F. XXX
Prism 1 XXX
Prism 1 Rotation XXX
Prism 2 XXX
Prism 2 Rotation XXX
Effect Wheel XXX
Effect Wheel Ro. XXX
Frost 1 XXX
Frost 2 XXX
Focus XXX
Zoom XXX
Auto Focus XXX
Auto Focus Calibration XXX
Pan XXX
Pan Fine XXX
Tilt XXX
Tilt Fine XXX
Pan and Tilt Speed XXX
CRI Mode XXX
Init User Memory
Reset User Memory 1
Reset User Memory?
Input Password 123
Reset User Memory 2
Reset User Memory?
Input Password 123
Reset Static Scene
Reset Static Scene?
Input Password 123

17
Color Macro2
24
25
Color Macro3
26
27
Color Macro4
28
29
Color Macro5
30
31
Color Macro6
32
33
Color Macro7
34
35
Color Macro8
36
37
Color Macro9
38
39
Color Macro10
40
41
Color Macro11
42
43
Color Macro12
44
45
Color Macro13
46
47
Color Macro14
48
49
Color Macro15
50
51
Color Macro16
52
53
Color Macro17
54
55
Color Macro18
56
57
Color Macro19
58
59
Color Macro20
60
61
Color Macro21
62
63
Color Macro22
64
65
Color Macro23
66
67
LEE 4 (Medium Bastard Amber)
68
69
LEE 10 (Medium Yellow)
70
71
LEE 19 (Fire)
72
73
LEE 26 (Bright Red)
74
75
LEE 58 (Lavender)
76
77
LEE 68 (Sky Blue)
78
79
LEE 71 (Tokyo Blue)
80
81
LEE 79 (Just Blue)
82
83
LEE 88 (Lime Green)
84
85
LEE 90 (Dark Yellow Green)
86
87
LEE 100 (Spring Yellow)
88
89
LEE 101 (Yellow)
90
91
LEE 102 (Light Amber)
92
93
LEE 103 (Straw)
94
95
Lee 104 (Deep Amber)
96
97
LEE 105 (Orange)
98
99
LEE 106 (Primary Red)
100
101
LEE 111 (Dark Pink)
102
103
LEE 115 (Peacock Blue)
104
105
LEE 116 (Medium Blue-Green)
106
107
LEE 117 (Steel Blue)
108
109

18
LEE 118 (Light Blue)
110
111
LEE 119(Deep Blue)
112
113
LEE 120 (Dark Blue)
114
115
LEE 121 (LEE Green)
116
117
LEE 128 (Bright Pink)
118
119
LEE 131 (Marine Blue)
120
121
LEE 132 (Medium Blue)
122
123
LEE 134 (Golden Amber)
124
125
LEE 135 (Deep Golden Amber)
126
127
LEE 136 (Pale Lavender)
128
129
LEE 137 (Special Lavender)
130
131
LEE 138 (Pale Green)
132
133
LEE 139 (Primary Green)
134
135
LEE 141 (Bright Blue)
136
137
LEE 147 (Apricot)
138
139
LEE 148 (Bright Rose)
140
141
LEE 152 (Pale Gold)
142
143
LEE 154 (Pale Rose)
144
145
LEE 157 (Pink)
146
147
LEE 158 (Deep Orange)
148
149
LEE 162 (Bastard Amber)
150
151
LEE 164 (Flame Red)
152
153
LEE 165 (Daylight Blue)
154
155
LEE 169 (Lilac Tint)
156
157
LEE 170 (Deep Lavender)
158
159
LEE 172 (Lagoon Blue)
160
161
LEE 179 (Chrome Orange)
162
163
LEE 180 (Dark Lavender)
164
165
LEE 181 (Congo Blue)
166
167
LEE 197 (Alice Blue)
168
169
LEE 201 (Full C.T. Blue)
170
171
LEE 202 (Half C.T. Blue)
172
173
LEE 203 (Quarter C.T. Blue)
174
175
LEE 204 (Full C.T. Orange)
176
177
LEE 205 (Half C.T. Orange)
178
179
LEE 206 (Quarter C.T. Orange)
180
181
LEE 247 (LEE Minus Green)
182
183
LEE 248 (Half Minus Green)
184
185
LEE 281 (Three Quarter C.T. Blue)
186
187
LEE 285 (Three Quarter C.T. Orange)
188
189
LEE 352 (Glacier Blue)
190
191
LEE 353 (Lighter Blue)
192
193
LEE 715 (Cabana Blue)
194
195

19
LEE 778 (Millennium Gold)
196
197
LEE 793 (Vanity Fair)
198
199
CMY colour mixing from slow to fast
200
255
4
5
5
Cyan
Cyan (Linear 0-100%)
0
255
6
Cyan Fine
Cyan in 16 Bit precision
0
255
5
6
7
Yellow
Yellow (Linear 0-100%)
0
255
8
Yellow Fine
Yellow in 16 Bit precision
0
255
6
7
9
Magenta
Magenta (Linear 0-100%)
0
255
10
Magenta Fine
Magenta in 16 Bit precision
0
255
7
8
11
CTO
Linear adjust from high to low
0
255
12
CTO Fine
CTO in 16 Bit precision
0
255
8
9
13
Colour Wheel 1
Continual positioning
index 0-360°
0
63
positioning
White
64
67
White/Color1(Red)
68
71
Color1(Red)
72
75
Color1(Red)/Color 2(Green)
76
79
Color 2(Green)
80
83
Color 2(Green)/Color 3(Blue)
84
87
Color 3(Blue)
88
91
Color 3(Blue)/ Color 4(Orange)
92
95
Color 4(Orange)
96
99
Color 4(Orange) /Color 5(Pink)
100
103
Color 5(Pink)
104
107
Color 5(Pink)/Color 6(Light cyan)
108
111
Color 6(Light cyan)
112
115
Color6(Light cyan)/ White
116
119
White
120
127
Clockwise rainbow effect rotation speed from slow to fast
128
191
Anti-clockwise rainbow effect rotation speed from slow to fast
192
255
10
14
Color Wheel 1 Fine
Color Continual positioning in 16 Bit precision
0
255
9
11
15
Colour Wheel2
20
Continual positioning
index 0-360°
0
63
positioning
White
64
67
White/Color1(Deep Red)
68
71
Color1(Deep Red)
72
75
Color1(Deep Red)/Color 2(Amber)
76
79
Color 2(Amber)
80
83
Color 2(Amber)/Color 3(Tea red)
84
87
Color 3(Tea red)
88
91
Color 3(Tea red)/ Color 4(Apple Green)
92
95
Color 4(Apple Green)
96
99
Color 4(Apple Green ) /Color 5(Dark magenta)
100
103
Color 5(Dark magenta)
104
107
Color 5(Dark magenta)/Color 6(UV)
108
111
Color 6(UV)
112
115
Color6(UV)/ White
116
119
White
120
127
Clockwise rainbow effect rotation speed from slow to fast
128
191
Anti-clockwise rainbow effect rotation speed from slow to fast
192
255
12
16
Color Wheel 2 Fine
Color Continual positioning in 16 Bit precision
0
255
10
13
17
Iris
Linear Iris from small to big 0-100%
0
255
18
Iris in 16 bit
Iris in 16 bit precision
0
255
11
14
19
Iris Macro
Iris Macro disabled
0
10
Iris Macro1: from big to small with speed from slow to fast
11
74
Iris Macro2: from small to big with speed from slow to fast
75
138
Iris Macro3: Iris contracts from slow to fast
139
202
Iris Macro4(Macro1 at random) with speed from slow to fast
203
210
Iris Macro5(Macro2 at random) with speed from slow to fast
211
218
Iris Macro6(Macro3 at random) with speed from slow to fast
219
226
Open
227
255
12
15
20
Fixed gobo wheel
Open
0
15
Gobo1
16
31
Gobo2
32
47
Gobo3
48
63
Gobo4
64
79
Table of contents
Other PR Lighting Equipment manuals


