Precision Drone Pacesetter 2015 User manual

User's Manual
Pacesetter Model
2015
Serial Number:
Version 1.12

Table of Contents
(1) Warnings........................................................................................2
(2) What's in the case?.........................................................................4
(3) Detailed Co ponents......................................................................5
(4) Getting Everything Charged...........................................................10
(5) GPS Recalibration..........................................................................11
(6) Setting Up a Route........................................................................14
(7) Pre-Flight......................................................................................17
(8) Flight............................................................................................18
(9) Post-Flight.....................................................................................21
(10) Stitching In Agisoft.........................................................................22
(11) NDVI Creation using Global Mapper.................................................29
(12)Motor Rotation Diagra ..................................................................47
(13)LED Guide......................................................................................48
(14) Technical Specifications..................................................................49
(15)Flight and Service Log.....................................................................50
1 2 Page 1

WARNINGS
Obey all federal, state, and local regulations
Do not fly in rain or other harsh conditions
Do not fly in wind ore than 25 ph
Do not fly faster than 10 /s (22.5 ph)
Operating in te peratures below 50° Fahrenheit (10° Celsius) will result in
decreased flight ti es
Operating in te peratures below 32° Fahrenheit (0° Celsius) and below the
echanical and electrical co ponents run the chance of seizing, resulting in
drone alfunction and ulti ately property da age, injury, and/or death
Always use the provided battery chargers
The drone will return ho e when it reaches less than 14.5v
The drone will land in place when it reaches less than 14.0v
Keep away fro spinning otors at ALL TIMES.
Do not atte pt to odify the drone
Do not atte pt to repair the drone
NEVER allow inors to charge battery packs
NEVER drop power supply or batteries
NEVER atte pt to charge da aged or swollen batteries
NEVER let batteries fully discharge unless you are disposing of the
NEVER atte pt to charge a battery pack containing different types of batteries
NEVER charge a battery if the cable has been pinched or shorted
NEVER allow batteries to co e into contact with oisture at any ti e
NEVER charge batteries in extre ely hot or cold places or in direct sunlight
ALWAYS disconnect the battery after charging
ALWAYS end the charging process if the charger or battery beco es too hot
1 3 Page 2

*Failure to exercise caution while using this product and co ply with the warnings above
could result in product alfunction, electrical issues, excessive heat, fire, and ulti ately
injury, property da age, or death. Never allow use of this product by anyone without
providing the with these instructions. You ust read, understand, and follow all instructions
and warnings for any product(s) to which this product is used in conjunction with or installed.
The operator is choosing to use this product and does so at his or her own risk. Save these
instructions with the product for use as a reference in the future
1 4 Page 3

What's in the case?
List of Case Com onents
1x Precision Drone Pacesetter
6x 7600 Ah 2S LiPo Battery
1x Co and Center Laptop
1x Co and Center Charger
1x Live Feed Monitor
1x Live Feed Monitor Charger
1x Precision Vision Ca era (NIR)
1x Precision Vision Ca era (RGB)
2x Ca era Charger Access Cable
1x DX8 Controller
1x Controller Charger
1x Controller Strap
1x Bind Plug
1x Data Link
1x Data Link Cable
2x Battery Charger
2x Balancing Board
2x Gator Clips
2x Charger Wall Plug
2x Charger Battery Plug
2x 16GB icroSD card (pre-installed in ca eras)
OEM Manuals (Located under first layer of foa )
1 5 Page 4

Com onents
DX8 Controller:
1 6 Page 5

Battery Charger:
1 7 Page 6

Live Feed Monitor:
1 8 Page 7

Notes on Live Feed Monitor :
1. All units are in etric as shown in picture above
2. You do not need to plug the live feed cable on the drone into a ca era in order to see
the tele etry on the live feed screen
3. Flight Modes:
•GPS- GPS and Gyroscope correction
•ATT- Gyroscope correction only
•M- Manual. No GPS or Gyroscope correction. Never fly when the screen says this
•GPS FS- Failsafe ode
•Gho e- Go ho e ode. Drone will be flying in autopilot
•WPT- Waypoint ode. Drone will be flying in autopilot
•Landing- Drone is auto atically landing itself in place
•Pause- Drone is hovering in place after “Pause” button in Ground Station is hit
1 9 Page 8
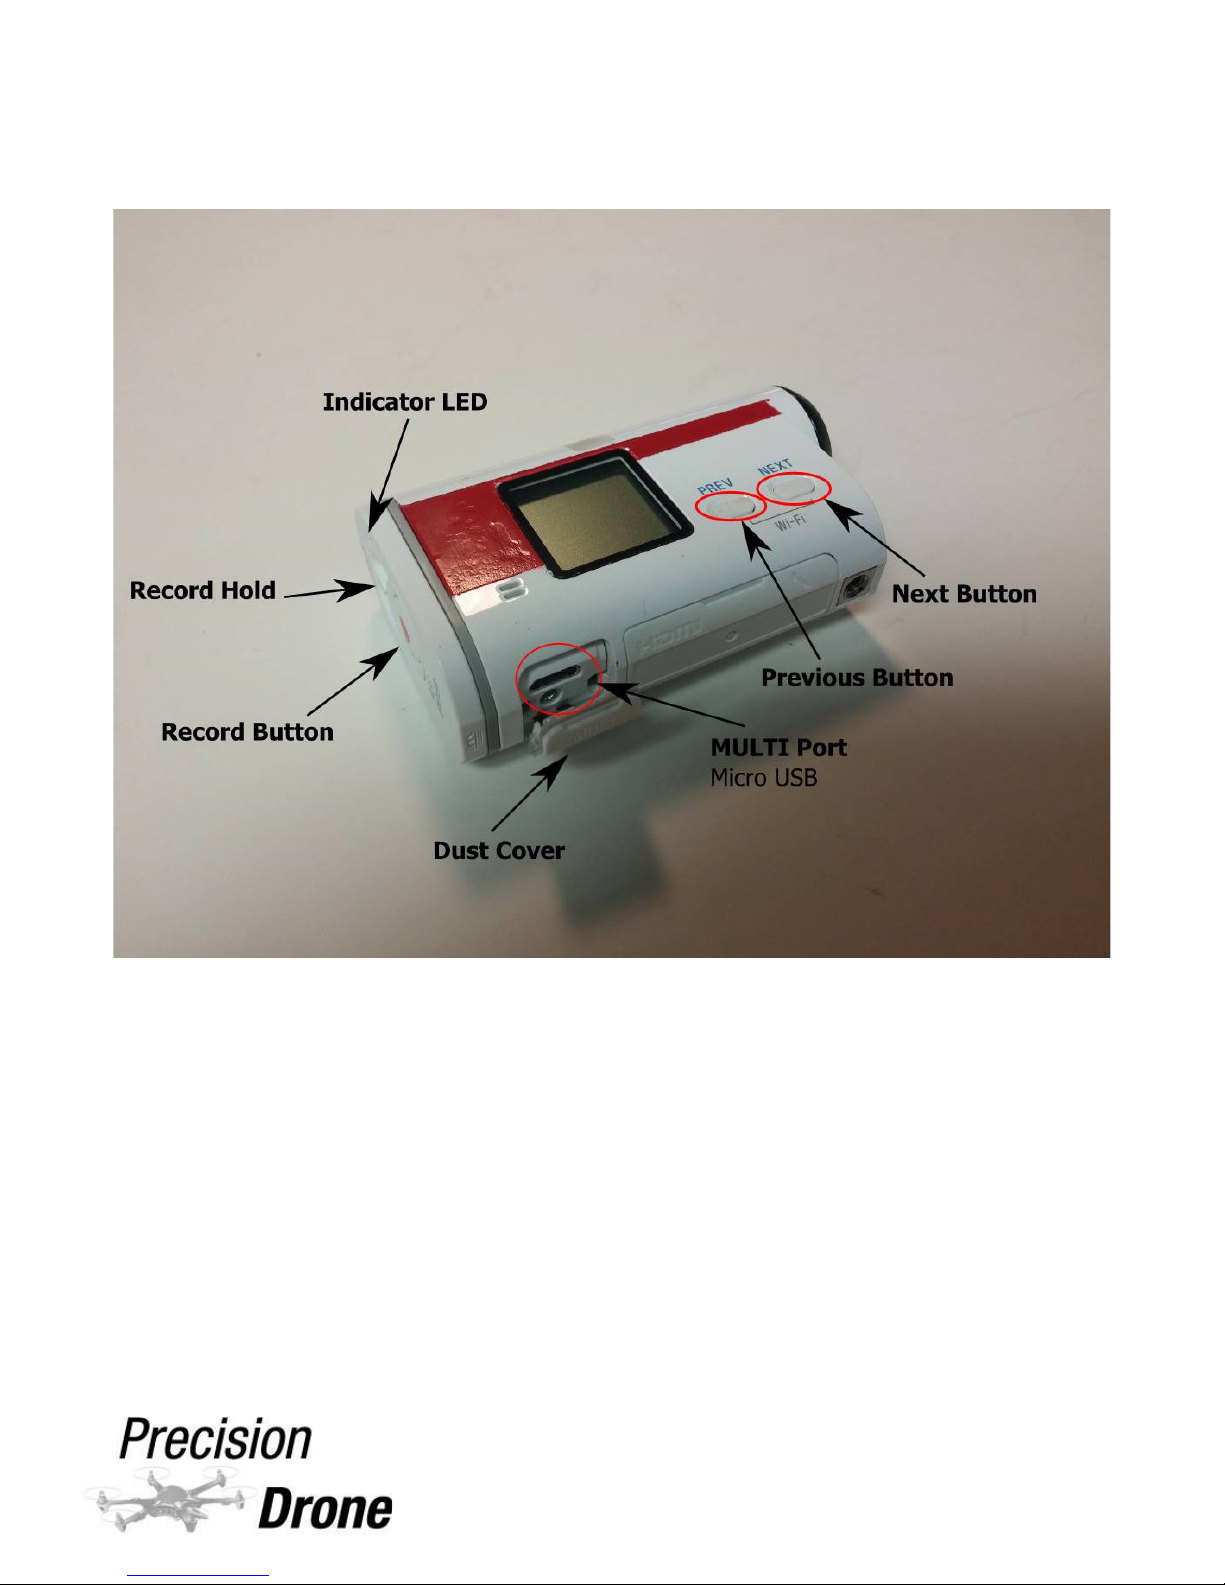
Precision Vision Ca era:
1 10 Page 9

Battery Voltage Checker
Notes on the Battery Checker
•To check the charge of a single battery, plug the balancing lead
into the battery checker, using the three pins closest to the top
as shown above. Make sure the red wire is towards the botto .
•Make sure the checker is set for the correct battery type. As
shown above, to the left of the total voltage, it should read
“LiPo”. If it does not, press the “Type” button until it does.
•Batteries will never read 100%. 99% is the highest reading, and
a battery at 99% will have 8.4 total voltage
1 11 Page 10

Getting Everything Charged
DX8 Controller: Turn the controller off. Plug one end of the charging cable into the
charging port (see p. 5), and the other end into a power outlet. The controller
indicator LED will glow blue indicating it is charging and turn off when fully charged.
Precision Vision Camera: Turn the ca era off. Plug the icro USB cable into the
MULTI port on the ca era (see p. 9), and the other end into a generic USB port on a
laptop or si ilar device connected to power. The Indicator LED will glow red when
charging, and turn off when fully charged.
Live Feed Monitor: The onitor can re ain powered on while charging. Plug one
end of the charging cable into the botto DC IN port on the onitor (see p. 7), and
the other end into a power outlet. The charging indicator LED will glow red. It will turn
green when finished.
IMPORTANT:
DO NOT leave it in prolonged exposure to sunlight while charging! DO
NOT plug the adapter into the DC OUT port. This will ruin the battery.
Command Center La to : The laptop can re ain powered on while charging.
Si ply plug one end into the charging port on the laptop, and the other end into a
power outlet. The charging indicator LED will glow red. It will turn green when
finished. Laptop battery percentage can also be checked in Windows, in the lower
right hand corner of the desktop.
Batteries: (see p. 6) Plug the battery charger into a power outlet using the power
cable. Attach the red and black leads to their respective positions on the charger.
Attach the balancing board to the balancing port on the charger. Now take the
red/black leads and connect it to the battery. Connect the white balancing cable to the
balancing board. Make sure everything is secure and snug. The charger should now be
switched to “CHARGE” ode (it is already on by default). Now hold down the enter
button for a few o ents, then tap it again to confir , it will now charge the battery.
The charger will beep and flash “FULL” when finished. Hit “STOP”.
IMPORTANT:
DO NOT disconnect the red/black ter inals fro the charger at all.
Si ply unplug the battery fro its end. Failure to do so will create an arc in between
the leads, this will da age the battery! The Pacesetter co es equipped with 7600
Ah 2s LiPo batteries. It is i portant that the batteries are charged with these
settings. Failure to do so could result in achine under perfor ance or da age to
the battery.
Note: Refer to the battery charging video for visual instruction.
1 12 Page 11

GPS Recalibration
•If your drone “toilet bowls” when hovering, or “fish tails” when flying straight
•Once every 2 or 3 weeks depending on perfor ance
•When oving fro one region to another
1. Make sure your DX8, live feed screen, and one (1) set of batteries are all charged.
2. Turn on DX8 (see page 5 for locations of switches entioned fro here on) and live
feed screen (see page 7 for locations entioned fro here on).
3. Place drone in an open outside area and plug batteries in.
4. On the DX8, hit the "select" button. Click on "Servo Setup". Scroll down to
"Throttle" and click, then scroll right until you see "Gear". Click again, and scroll
down so a % is highlighted. Put the Flight Mode switch in position 2. At this point,
the percentage to the left should be highlighted (have a box around it). Click again,
and bring it fro 105% down to 83-85%. Check on the live feed screen that there
is an "M" in the lower left hand corner now when that switch is in position 2. This
step allows you to be able to calibrate the GPS.
5. Make sure you have AT LEAST 8 satellites before doing the next step. The ore
satellites acquired the better the chances of the calibration succeeding.
6. Starting in position 0 on the Flight Mode switch, cycle fro 0, to 2, and back to 0.
Repeat this “cycle” 11 ti es. The LED indicator on ar 4 of the drone will
i ediately turn a solid blue.
7. Grab the drone by ar 5, lift it straight up fro the ground and hold above the
waist
8. Rotate the drone 360 degrees clockwise around the drone's axis. (I agine there is
a pole running through the iddle of the do e) When it is co plete the LED will
turn solid green.
9. Now turn the drone so the ca eras point down, perpendicular to the ground.
10. Rotate the drone another 360 degrees clockwise, aintain its downward posture.
Once a full rotation is co plete the LED will turn solid purple. If it turns red instead
of purple, set the drone down and repeat steps 6-10
(cont.)
1 13 Page 12

11. Take drone up to roughly 20 feet. Take it through typical ove ents (forward,
backward, left, right). If it "toilet bowls", or oves in a constant circular pattern
land the drone and repeat steps 6-10. If it locks onto a position and does not
wander, land the drone and continue. The GPS calibration was a success.
12. With the drone on the ground, go back to "Servo Setup" on the controller. Put the
Flight Mode switch back into position 2, and set the left-hand % under "Gear" back
to 105%. Double check what flight ode position 2 is set to by switching to it and
looking on the botto left-hand corner of the live feed onitor. If it says “GPS FS”,
you set your fail-safe correctly and can continue with flying. If it still says “M”,
repeat step 12. THIS IS EXTREMELY IMPORTANT: FAILURE TO RESET THE
LEFT GEAR VALUE TO 105% MEANS THERE WILL BE NO FAIL-SAFE IF THE DRONE
LOSES COMMUNICATION WITH THE CONTROLLER!
13. DO NOT FORGET STEP 12
GPS Declination
When first set, the drones are progra ed for true north in relation to Indiana. If the
drone does not fly straight where you are, you will need to adjust the declination.
NOTE: It is advised by the anufacturer that you have your authorized dealer
perfor this calibration. Once declination is set, it will not have to be set again if the
drone stays in the sa e geographic location.
1) Figure out which way it is rotated in relation to forward. Exa ple: Is it pointing
forward ore with ar 1 or ar 2?
2) Land the drone, re ove the do e and batteries.
3) Rotate the GPS puck away fro the ar it is “favoring”.
Exa ple: If it is flying and points forward ore with ar 1, rotate the puck ore
towards ar 2. The foa under the puck can be rotated roughly 20 degrees
without needing to be re oved
4) Test the drone and repeat this process until proper flight orientation is achieved
5) The ap on the following page will give you a rough idea on how far you will
need to rotate it. Each line is 2 degrees, with negative being counter-clockwise
(left towards ar 2), and positive being clockwise (right towards ar 1).
1 14 Page 13

1 15 Page 14

Setting u a route
Laptop w/ Ground Station open
1) Watch the “Setting Your Scout Route” video on the Youtube channel.
2) Locate the field you wish to fly within Ground Station.
◦Tip: There is a search box in the upper left-hand corner of Ground Station
that you can use to locate your field easily. Si ply use it to search for a
nearby address or latitude and longitude.
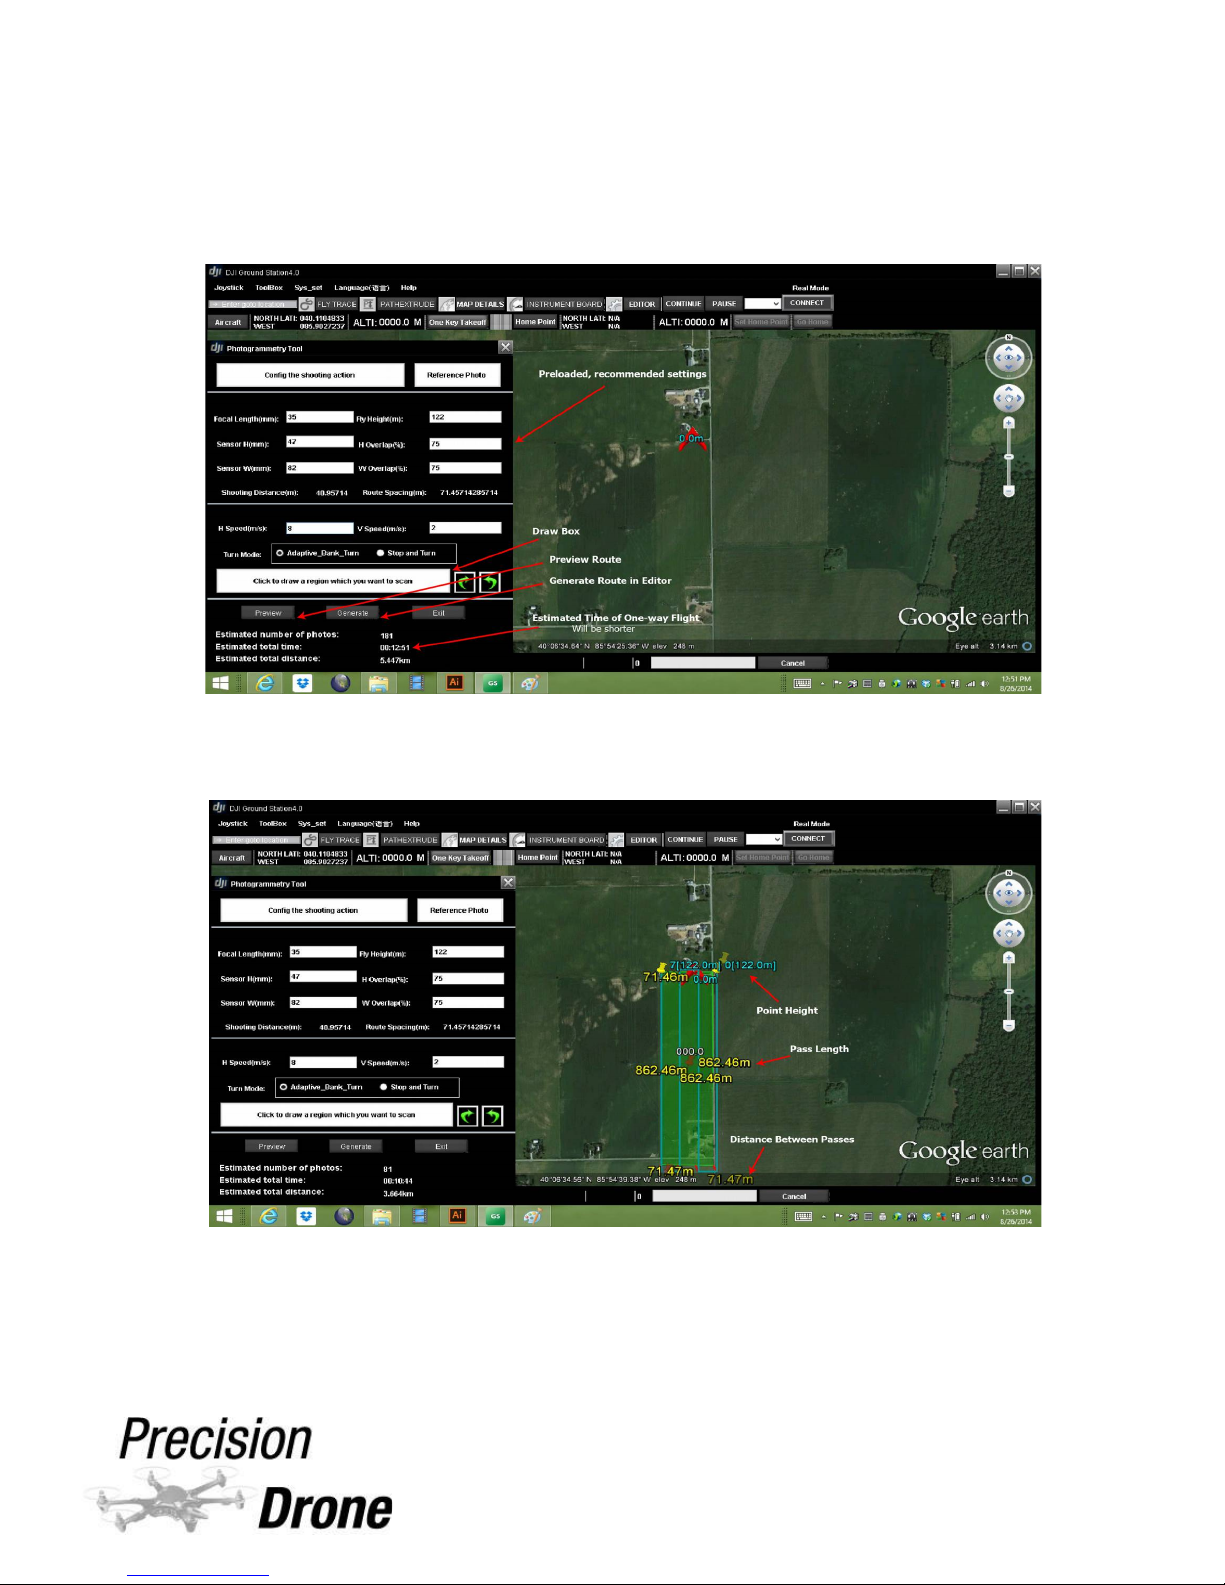
3) Go up to Toolbox, and click “Photogra etry Tool”
4) Make sure the settings are correct:
◦Focal Length = 35
◦Sensor H = 47
◦Sensor W = 82
◦Fly Height = 122
◦H Overlap = 60%
◦W Overlap = 60%
◦H Speed = 10 /s
◦V Speed = 2 /s
Note: If you are having issues getting photos to align in later steps, increase
the overlap and decrease the horinzontal (H) speed. Never fly at less than
60% overlap, and never fly faster than 10 /s.
1 16 Page 15

5) Click “Click to draw a region in which you want to scan”, a box will appear on the
ap. The yellow pin is where the route will start and the red pin is where it will
end. You can rotate the box by right clicking the center red pin or by clicking on
the green arrows in the photogra etry box. Refer to photos on the next page
for visual reference.
6) Make the box inside the borders of the field except for overflying the turns by 30
feet. Refer to photos on the next page for visual reference.
7) Click “Preview” under the Photogra etry Tool, and the box will preview a
route for that current position. You can continue to adjust the box and hit
“preview” until you are satisfied with where all of the waypoints are located.
8) Clicking “Generate” will create the route, you can now edit individual waypoints
to fit the shape of the field. Maintain the unifor flight pattern.
IMPORTANT:
Point 0 is the very first waypoint the drone will ove to and it is
critical to ake sure it is in a safe location above the take off spot. The drone will
follow a straight line fro its ho e point to point 0, and will hit any obstructions in its
path. It is highly reco ended you ove point 0 to directly above where you will be
taking off. Point 1 is the very first point in your actual route and should be a “Stop
and Turn”
9) Check each individual waypoint and its height/speed settings to ake sure they
are consistent with the values above.
10) Save this route for future use, click the “Save” button under the Editor window.
Note: For ore infor ation, refer to the Youtube video.
1 17 Page 16
1 18 Page 17

Pre-Flight Checklist
Drone
Controller
Live Feed Monitor
Batteries
1) Check the drone for any signs of da age or loose cables/straps
2) Make sure all co ponents are fully charged.
3) Check that the propeller direction of rotation is correct. (See page 47)
4) Check that the propellers are tight and won't slip.
5) Make sure otor leads are fastened securely into the ESCs.
6) Make sure all switches on the controller are forward. Flight Mode Switch and
Flight Orientation Switch should both be in position 0 (see page 5). Make sure
the throttle is all the way down.
7) Turn on the controller.
8) Make sure batteries are strapped in and tight.
9) Power on your live feed onitor and check that voltage is nor al, it should be
16.8/16.9v. If voltage is higher, take the drone to your authorized dealer. If
voltage is lower, check batteries with the provided battery checker.
10) Make sure the drone and its propellers are free of any and all obstructions
before ar ing.
11) Start the otors and check that individual rotation is correct. To ar the ,
take both sticks and ove the down and towards the center. Refer to the
otor rotation diagra on page 47.
IMPORTANT:
Never take off with less than 8 satellites.
1 19 Page 18

Flight
Manual:
IMPORTANT:
If the drone has difficulty standing still while in hover, it will need a GPS
recalibration, refer to pages 11-12 for the instructions
1) Follow all of the steps under the Pre-Flight section first
2) Refer to the FAA guidelines for safe and proper drone operation
•To take off, bring the throttle stick up past 50%
•To hover in place, leave the throttle at 50%
•To descend, bring the throttle a little under 50%
•To rotate the ca era, turn the Aux 3 knob on the controller
GPS Mode
•Position 0 (GPS): GPS is ON, Gyro active
•Position 1 (Att.): GPS is OFF, Gyro active
•Position 2 (FS): Failsafe (
For e ergency use only!
)
◦NOTE:
If you had to recalibrate the GPS as described on pages 11-12, ake
sure you followed step 12
Flight Mode Orientation
•Position 0: The default Flight Mode will ake the drone ove in relation to its
own heading. Basically, its left will always be its left, forward is forward, back is
back, etc.
•Position 1: The Course Lock ode will save the current heading as the forward
orientation whenever. So no atter how you rotate the drone in flight
forward/back/left/right always re ain the sa e. A new course can be set with a
flick of the switch during flight.
(cont.)
1 20 Page 19
Table of contents
Other Precision Drone Quadcopter manuals


