PrepPal PPM 60 User manual

1
OWNER/OPERATOR
MANUAL
Model
PPM‐60,Mixer,60Qt
IMPORTANTNOTICE
ThismanualcontainsImportantSafetyInstructionswhichmustbestrictlyfollowedwhenusingthisequipment.
Rev.19b

2
Safety Reminding
Theseprecautionsshouldbefollowedatalltimes.Failuretofollowtheseprecautionscould
resultininjurytoyourselfandothersordamagetheequipment.
Plugonlyintogroundedelectricaloutletsmatchingthenameplateratedvoltage.
Donotmodifyortamperwithsafetyswitches.
Donotoperateunattended.
Donotoperateequipmentinpublicareasand/oraroundchildren.
Donotuseanextensioncordwiththisequipment.Donotplugthisequipmentintoapowerstripor
multi‐outletpowercord.
Non‐PrepPalattachmentsarenotrecommended.Theywillnotworkproperlyandwillvoidthewarranty.
Checkequipmentbeforeeachusetoinsuretheequipmentisclean.
Donotuseahosetocleanmixer.Useadampclothtowipedowntheexteriorofthemixer.
Wearproperapparel!Donotwearloosefittingorhanginggarmentswhileoperatingthisequipment.
Haveequipmentinstalledbyaqualifiedpersonnelinaccordancewithlocalcodesandordinances.
Useequipmentinaflat,levelposition.
Unplugequipment,turnoffandletitcoolbeforecleaningormoving.
Donotspraycontrolsoroutsideofequipmentwithliquidsorcleaningagents.
Donotcleantheequipmentwithsteelwool.
Keepequipmentandpowercordawayfromopenflames,electricburnersorexcessiveheat.
Donotoperateifequipmenthasbeendamagedorismalfunctioninginanyway.
Donotusetheattachmentsonhubwhilemixing.
ImportantSafeguards
PPM‐60 Mixers complies with all safety requirements of UL standards for commercial kitchen
equipment&CanadianstandardsforCanada.
PPM‐60MixerscomplieswithNSF
USA Toll Free: 1-800-683-8660
Canada Toll Free: 855-885-6518
Email: [email protected]
www.atosa.com
www.atosausa.com
3
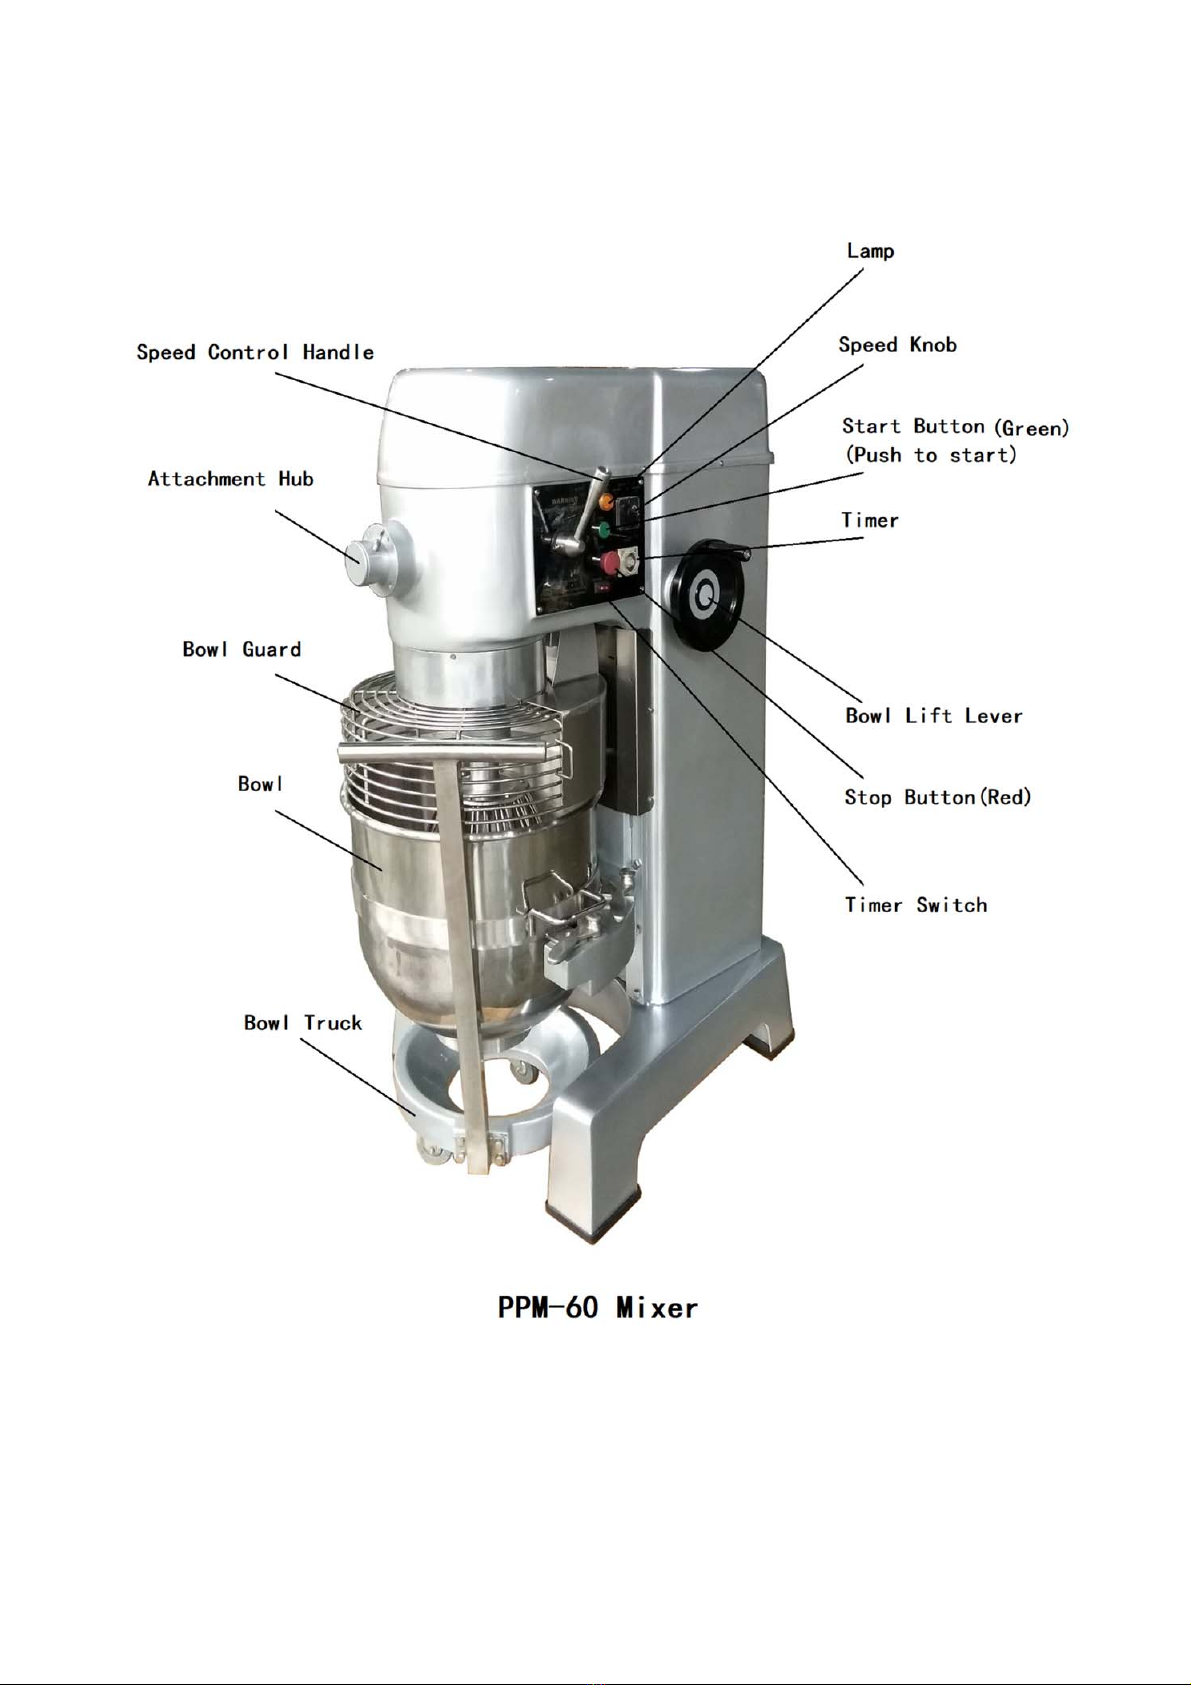
Product Description

4
Technical Specifications
Note:Selectspeedaccordingtospecifiedaccessorymode
a) DoughHook‐suitableformixingflourandbreaddoughonthelowspeedmode
Note:Mixshouldequal45%to50%oftheflourweight(SeeFigureH)
b) FlatBeater‐suitableformixingcrushed,powderedandpastyfood,suchasstuffingonmediumspeed
mode(SeeFigureI)
c) WireWhip‐suitableformixingliquidfood,suchascream,eggonhighspeedmode(SeeFigureJ)
Model Bowl
Capacity
Voltage Frequency Power MixingSpeed Maximum
Kneading
Capacity
Dimensions
(LXWXH)
Net
Weight
PPM‐60 60qt. 240V
3Phase 60Hz 3.75hp 73/109/143/216
rpm40lbs 41”x28”x57”1080lbs

5
Installation
UnpackingandInitialSetup:
Immediatelyafterunpackingthemixer,checkforpossibleshippingdamage.Ifthismachineisfound
tobedamagedafterunpacking,savethepackagingmaterialandcontactthecarrierwithin15daysof
delivery.Safetyunpackingstepasbelowphotos:
Step01:Carefullyremovethepackagematerialfromequipment.
Step02:Takeawaythetrailer.
Step03:Anticlockwiserotatethehandletolowdownthebowlandunlockit.
Step04:Takeawaythebowl.
Step05:FindthewrenchfortheM12bolt.
Step06:UnscrewtheM12boltsinsidethefourlegs.
Step07:Puttwoforksintothebottomofmachineandprotectthebottom.
Step08:Slowlyliftthemixermachineupabout4”fromthepallet.
Step09:Pullpalletawayfromthebottomofmixerfeet.
Step10:Declineforklift,standmixerontheground.
Placethemixeronasolid,levelsurfacewithsufficientspacearoundmixertoallowforthesafecleaningand
service.
Plugonlyintogroundedelectricaloutletsmatchingthenameplateratedvoltage.
Note:Donotplugmixerintoapowerstripormulti‐outletpowercord.

6
CheckthePlanetaryShaftRotateDirection
Operation Instruction
AttachingtheAgitatortotheMixerShaft(Beater,Hook,Whip)
1. Rotatethebowlguardtotheleftsoitrestsintheopenposition.Excessiveforceusedtoopenandclosethe
bowlguardmaydamagethespringlockandbowlguardmicroswitch,andwillvoidthewarranty.
2. Slidetheagitatorslowlyupwardsontotheplanetaryshaftfittingtheshaftpinthroughtheslotinthe
agitator.
3. Rotatetheagitatorclockwisetosecureitontotheplanetaryshaft.
AttachingtheBowltotheMixer
1. lowerthebowlbyrotatethebowlliftlevercounter‐clockwisetoitsrestingposition.
2. liftthebowlbyrotatingthebowlliftleverclockwiseand
a) slowlypositionthelockingpin(locatedonthebothsideofthebowl)intotheholeinthebothsideofthe
cradle.
b) lowerthebowlontothepinslocatedoneithersideofthebowlcradle.
3. Oncethebowlispositionedonthecradle,securethebowlbypullingeachbowlclampforwarduntilthebowl
islockedtight.
Makesurethereisnotanythinginbowl,andno
mixertoolontheshaft,putspeedleveronone
speedandturnonthemixer.
Observetheshaftrotatedirectioniscomplywith
thearrowshowedontheplanetaryshaftornot.
Ifshaftrotatesinthewrongdirection,havea
licensedelectrictechnicianswitchtheelectrical
connectionandreset.
DONOToperatethemixerbeforereadingtheinstructionfirst;
ALWAYSdisconnectorunplugelectricalpowerbeforeleaning,servicing
oradjustinganypartsorattachments;
ALWAYSkeephands,hair,andclothingawayfrommoving
parts.

7
SettingSpeeding
Selecttheappropriatespeedsettingbyrotatingthespeedcontrollever.
Fourfixedspeedsareavailableforuse:First(1),Second(2),Third(3)andFourth(4).
Speedsettingbydifferenttypeoffoodandingredientasfollowing:
GearSpeedProductType/ingredientThepositionofthespeedcontrolleverandknob
1(Low)
Handleto(1/2)
Knobto1
73rpm
Heavy:mixingpizza,bread,pastaand
donutdough’s,waffle/cakebatter,
mashingpotatoes
2(Medium)
Handleto(1/2)
Knobto2
109rpm
Medium:2ndstageofmixingfor
donutdough,etc.
3(Medium)
Handleto(3/4)
Knobto1
143rpm
Medium:3thstageofmixingfordonut
dough,etc.
4(High)
Handleto(3/4)
Knobto2
216rpm
light:whippingcream,eggwhites,
meringue.
Pleasefollowthecapacitycharttochooseagitatorandspeed.

8
CRAWLforspeedhandleswitch
SettingTimer
UsetheAttachmentHub
TimedOperation: PresstheredbuttontotheTIMERside.Tosetthe
timefortheappropriatemixingtime,turnthetimerknobina
clockwisedirectionatthepositionbetween“0”to“30”,toget
mixingtimebetween0minsto30mins.
Non‐TimedOperation: PresstheredbuttontotheNON‐TIMEside
tosetthemixerfornon‐timedoperation.
NOTE: Heavyloadsshouldnotbemixedlongerthanfifteen(15)minutes
atthissettingwithoutanequalamountofresttimeforthemixer. failure
toadheretotheseinstructionsmaycausethemixertoautomaticallyshut
offduetooverloading.
Neverputyourhandintothefeedchutewhenusingamixerattachment.
OnlyoperatetheattachmenthubinMANUALmode.
DONOTattempttomixingredientsinbowlwhileusingthehub.
MixermustbeOFFbeforeinstallingattachment.
DoNOTuseattachmentswhilemixing.
1.Loosenandremoveattachmenthubfastenscrew.ThenRemovehubcover.
2.Lubricateattachmentshaftwithafoodqualitygreaseormineraloil.
3.Insertattachmentshaftintohubmakingsuretolineupthealignmentpin
withhubhole.
4.Tightenthumbscrewbackintohubandsecurelytightenit.
5.Selecttheappropriatespeedsettingbyliftingorloweringspeedcontrol
lever.
6.Usetheuntimedoperationdescribedonthepreviouspagetoadjusttimer.
7.PressthegreenSTARTbuttonlocatedonthecontrolpanel.
RecommendedSpeedwhileusingattachments:
Attachment: RecommendedSpeed:
MeatGrinder 1only
NOTE:Makesurebowlisupandbowlguardisclosed.Mixerwillnotstartif
bowlandbowlguardarenotintheproperoperatingposition.
Ifitisdifficulttoswitchthespeedhandleatrightposition,youcanpress
thebuttonof(LAMP&CRAWL)transitorily.
Pressthebuttonof(LAMP&CRAWL)transitorilycanlettheplanetary
shaftrotatebyalittleangle,sogearscanocclude.
Canpressthebuttonof(LAMP&CRAWL)transitorilyforseveraltimes
untilthespeedhandlecanbeswitchtorightposition.

9
Cleaning & Maintenance Instructions
1. ALWAYSdisconnectorunplugtheelectricalpowerfromthemixerbeforecleaning.
2. Theentiremixer,includingremovableparts,mustbethoroughlycleanedandsanitizedusingthe
proceduresidentifiedbyyourlocalhealthdepartmentandtheServSafeEssentialspublishedby
theNationalRestaurantAssociationEducationalFoundation(NRAEF).
3. NEVERuseascrubberpad,steelwool,orabrasivematerialtocleanthemixer.
RecommendedCleaningActionas:
PART REQUIREDACTION FREQUENCY
Agitators hand‐washusingmildsoapandwater,rinse,dryand
sanitize.
Cleanaftereachuse.
Removablebowl
Guard
hand‐washusingmildsoapandwater,rinse,dryand
sanitizeorplaceindishwasher.
Cleanaftereachuse.
Bowl usingaspongeorcloth,mildsoapandwater,apply
pressuretoensurethebowlisclean,rinse,dry,and
sanitize.Thebowlcanalsobeplacedinadishwasher.
Cleanaftereachuse.
RearSplashGuard hand‐washusingmildsoapandwater,rinse,dryand
sanitize.
Cleanaftereachuse.
bowlcradle hand‐washusingmildsoapandwater,rinse,dryand
sanitize.
Daily
PlanetaryShaft Wipewithcleandampcloth,dryandsanitize.applyalight
quantityofGlobeoil(mineraloil)totheplanetaryshaft
aftercleaning.
Cleanaftereachuse.
exterior hand‐washusingmildsoapandwater,rinse,dry,and
sanitize.DONOTuseawaterhose!
Daily
hubinterior Wipewithcleandampcloth,dry,andsanitize. Daily

10
Mixing Capacity Chart
Product Agitator Speed PPM‐60
60Quart
BreadandRollDough‐60%AR DoughHook 1stspeedonly 90lbs.
HeavyBreadDough‐55%AR DoughHook 1stspeedonly 70lbs.
Pizza Dough,Thin‐40%AR DoughHook 1stspeedonly 40lbs.
PizzaDough,Medium‐50%AR DoughHook 1stspeedonly 60lbs.
Pizza Dough,Thick‐60%AR DoughHook 1stspeedonly 70lbs.
RaisedDonutDough‐65%AR DoughHook 1stspeedonly 40lbs.
PieDough FlatBeater AllSpeeds 60lbs.
MashedPotatoes FlatBeater AllSpeeds 45lbs.
Cake FlatBeater AllSpeeds 60lbs.
WaffleorHotCakeBatter FlatBeater AllSpeeds 24qts.
EggsWhites WireWish AllSpeeds 3qts.
Meringue WireWish AllSpeeds 3qts.
WhippedCream WireWish AllSpeeds 12qts.
Cake,Pound FlatBeater AllSpeeds 60lbs.
Whenmixingdoughcheckthe“AR”(AbsorptionRatio)=Waterweighdividedbyflourweight.
The capacities listed above are based on 12% flour moisture at 70 °F(21℃) water temperature. If high
glutenflour
isusedreducebatchsizeby10%.
1gallonofwater=8.3lbs.
1quartofwater=2.1lbs.
Example:
Ifarecipecallsfor5lbs.ofwaterand10lbs.offlour,then5dividedby10=0.50x100=50%AR.
Donotuse2ndspeedwithmixtureswithbelow50%AR.

11
Troubleshooting
Problem PossibleCauses ActionRequired
Mixerwillnotrun.
bowlguardnotinclosed
position.
rotateguardtotherightuntilfullyclosed.
bowlnotraised. raisebowltohighestposition.
Timerisnotengaged. Turntimertodesiredtimeorsettimetothe
“on”position.
Powernotconnectedproperly. checkallpowerconnections.Plugintoalive
socket.(Donotuseextensioncord!)Testsocket
withanotheritem
buildingcircuitbreakerisoff. checkbreakerbox.
internaloverloadtripped. Pressstopbuttonthenpressresetbutton.
(Ifoverloadcontinuestotrip,reducebatchsize
and/oradjustrecipe!)
Gearnotengaged. Switchgearfullyintoposition.(Mixerwillnot
operateifthespeedcontrolleverispositionedin
betweenspeeds)
Mixerstopsduring
mixing.
internaloverloadtripped. Pressstopbuttonthenpressresetbutton.
(Ifoverloadcontinuestotrip,reducebatchsize
and/oradjustrecipe!)
Motortemperatureistoohigh Voltageistoolow,orusewrongagitatororset
incorrectspeed.
Mixerisnoisy.
Mixerisnotinstalledonlevel
surface.
adjustsurfaceorrelocatemixer.Makesure
rubberfeetareinstalled.
bowlnotseatedcorrectlyor
clampsnotinplace.
ensurebowlisseatedintobowlcradlecorrectly
andbowlclampsarelockedintoplace.
Agitatornotfittedproperly. Removeandattachagitatorintoposition
properly.
Overloadingbowl. reducebatchsize.(SeeCapacityChart)
Planetaryringgearneedsmore
grease.
Techniciantoinspectforsourceofnoise.
reapplyhigh‐pressuregrease.contacttechnician.
Safety guard seized
(will not move
freely).
clean & lubricate slide
sheath.
Technicianmustdropdownplanetaryassemblyto
accessmat&sheath.contacttechnician.
Agitatorswon’tgo
ontotheplanetary
shafteasily.
lackoflubricationand/or
cleaningoftheplanetaryshaft.
Wipeplanetaryshaftwithacleandampclothand
lubricatetheshaftwithmineraloilorfoodquality
grease.
Agitatorstouching
bottomorsidesof
bowl.
Defectiveordentedbowl. removedentsorreplacebowl.
Defectiveagitator. replaceagitator.

12
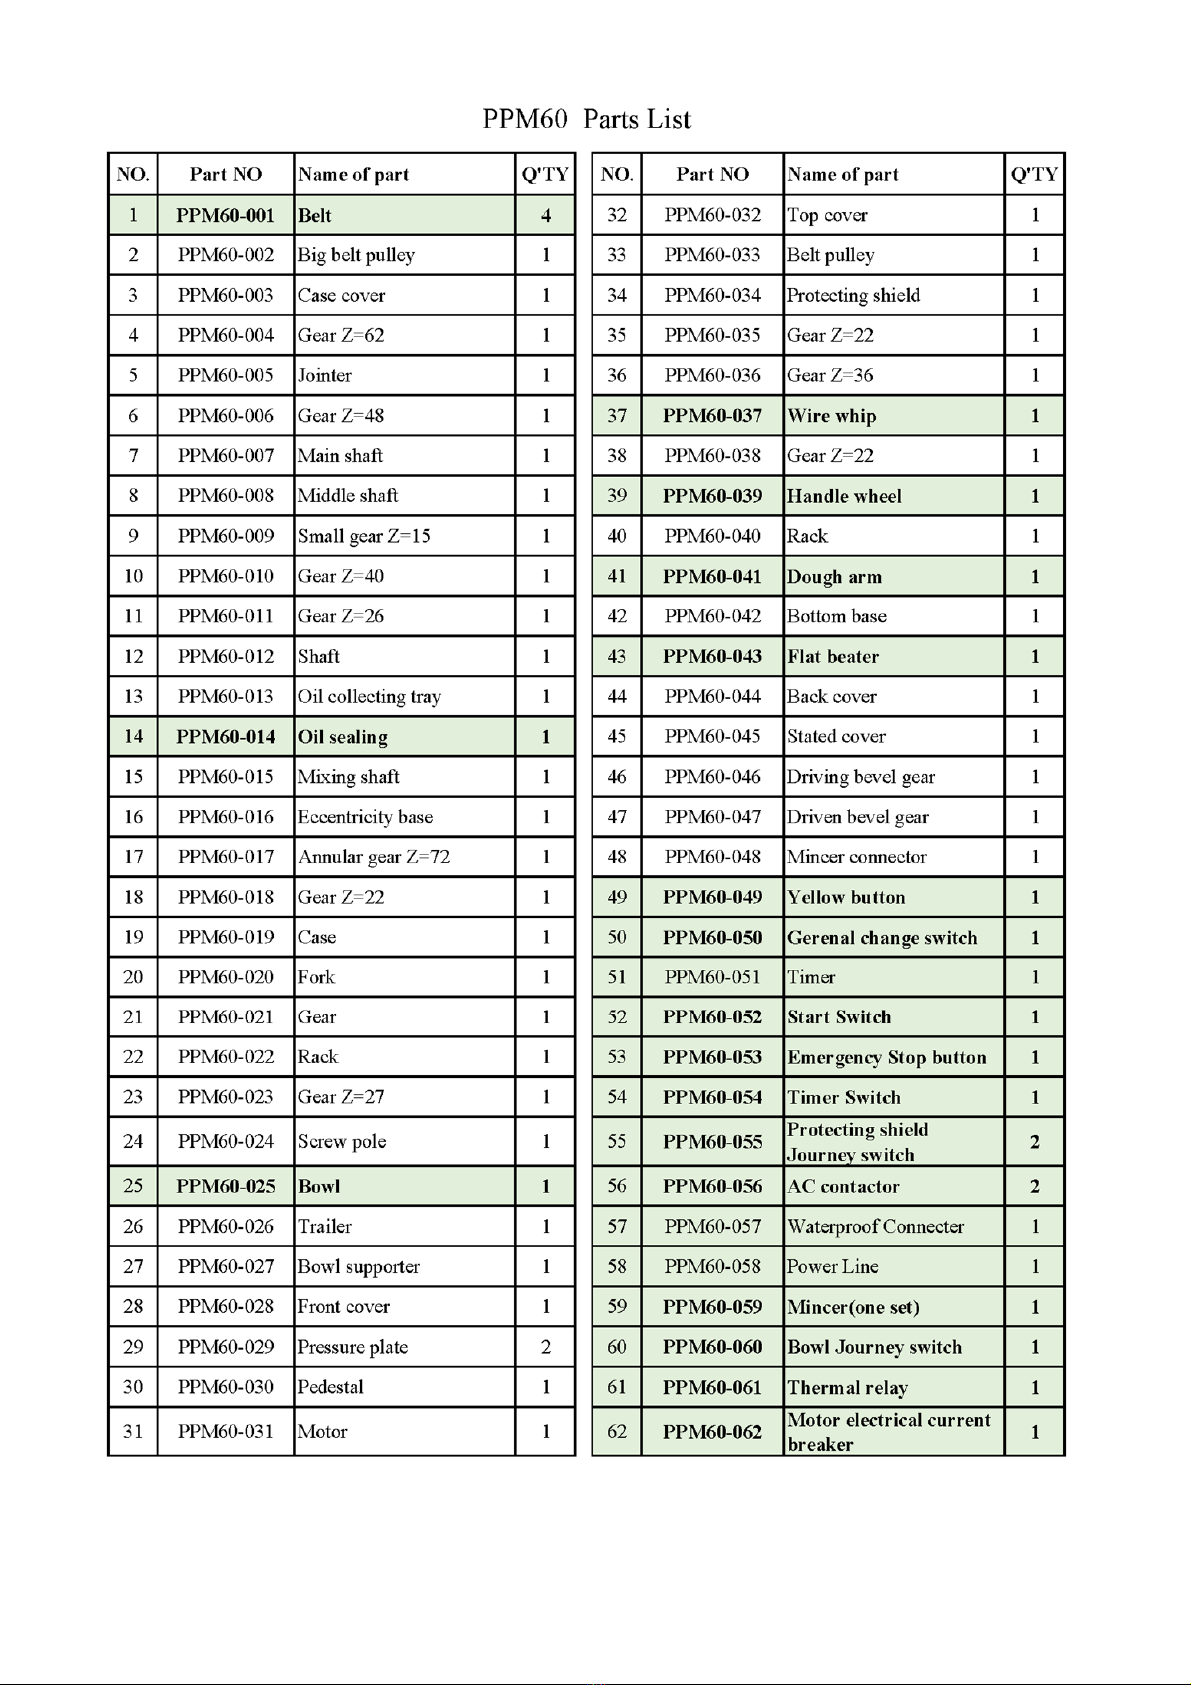
Service Parts
13

14
Table of contents
Other PrepPal Mixer manuals


