PrepPal PPM-10 Owner's manual

1
OWNER /OPERATOR
MANUAL
Models
PPM-10 , Planetary Bench Mixer, 10 Qt
PPM-20 , Planetary Floor Mixer, 20 Qt
PPM-30 , Planetary Floor Mixer, 30 Qt
IMPORTANT NOTICE
This manual contains Important Safety
Instructions which must be strictly
followed when using this equipment.
Toll Free : 1-800-683-8660(USA)855-885-6518(Canada)
Email:warranty@atosausa.com

2
Safety Reminding
These precautions should be followed at all times. Failure to follow these precautions could
result in injury to yourself and others or damage the equipment.
Plug only into grounded electrical outlets matching the nameplate rated voltage.
Do not modify or tamper with safety switches.
Do not operate unattended.
Do not operate equipment in public areas and/or around children.
Do not use an extension cord with this equipment. Do not plug this equipment into a power
strip or multi-outlet power cord.
Non-PrepPal attachments are not recommended. They will not work properly and will void the
warranty.
Check equipment before each use to insure the equipment is clean.
Do not use a hose to clean mixer. Use a damp cloth to wipe down the exterior of the mixer.
Wear proper apparel! Do not wear loose fitting or hanging garments while operating this
equipment.
Have equipment installed by a qualified personnel in accordance with local codes and
ordinances.
Use equipment in a flat, level position.
Unplug equipment, turn off and let it cool before cleaning or moving.
Do not spray controls or outside of equipment with liquids or cleaning agents.
Do not clean the equipment with steel wool.
Keep equipment and power cord away from open flames, electric burners or excessive heat.
Do not operate if equipment has been damaged or is malfunctioning in any way.
Do not use the attachments on hub while mixing.

3
Product Description

4
Installation
Unpacking and Initial Setup:
Note: Do not plug mixer into a power strip or multi-outlet power cord.
Check the Planetary Shaft Rotate Direction
Operation Instruction
Carefully remove carton, crating or
package material from equipment. Mixers
on pallets are bolted on the pallet, insert
wrench under pallet to loose belt. When
no longer need, dispose of all packing
material in an environmentally responsible
manner.
Place the mixer on a solid, level
surface with sufficient space around mixer
to allow for the safe cleaning and service.
Plug only into grounded electrical
outlets matching the nameplate rated
voltage.
Make sure there is not anything in bowl, and no mixer
tool on the shaft, put speed lever on one speed and
turn on the mixer;
Observe the shaft rotate direction is comply with the
arrow showed on the planetary shaft or not
If shaft rotates in the wrong direction, have a licensed
electric technician switch the electrical connection
and reset.
DO NOT operate the mixer before reading the instruction
first;
ALWAYS disconnect or unplug electrical power before
leaning, servicing or adjusting any parts or attachments;
ALWAYS keep hands, hair, and clothing away from moving
parts.
5
Attaching the Agitator to the Mixer Shaft(Beater, Hook, Whip)
1. Rotate the bowl guard to the left so it rests in the open position. Excessive force used to open
and close the bowl guard may damage the spring lock and bowl guard micro switch, and will
void the warranty.
2. Slide the agitator slowly upwards onto the planetary shaft fitting the shaft pin through the slot
in the agitator .
3. Rotate the agitator clockwise to secure it onto the planetary shaft.
Attaching the Bowl to the Mixer
1. lower the bowl by pulling the bowl lift lever forward and down to its resting position.
2. lift the bowl by the bowl handles and
a) slowly position the locking pin (located on the rear of the bowl) into the hole in the middle
rear of the cradle.
b) lower the bowl onto the pins located on either side of the bowl cradle.
3. Once the bowl is positioned on the cradle, secure the bowl by pulling each bowl clamp forward
until the bowl is locked tight.
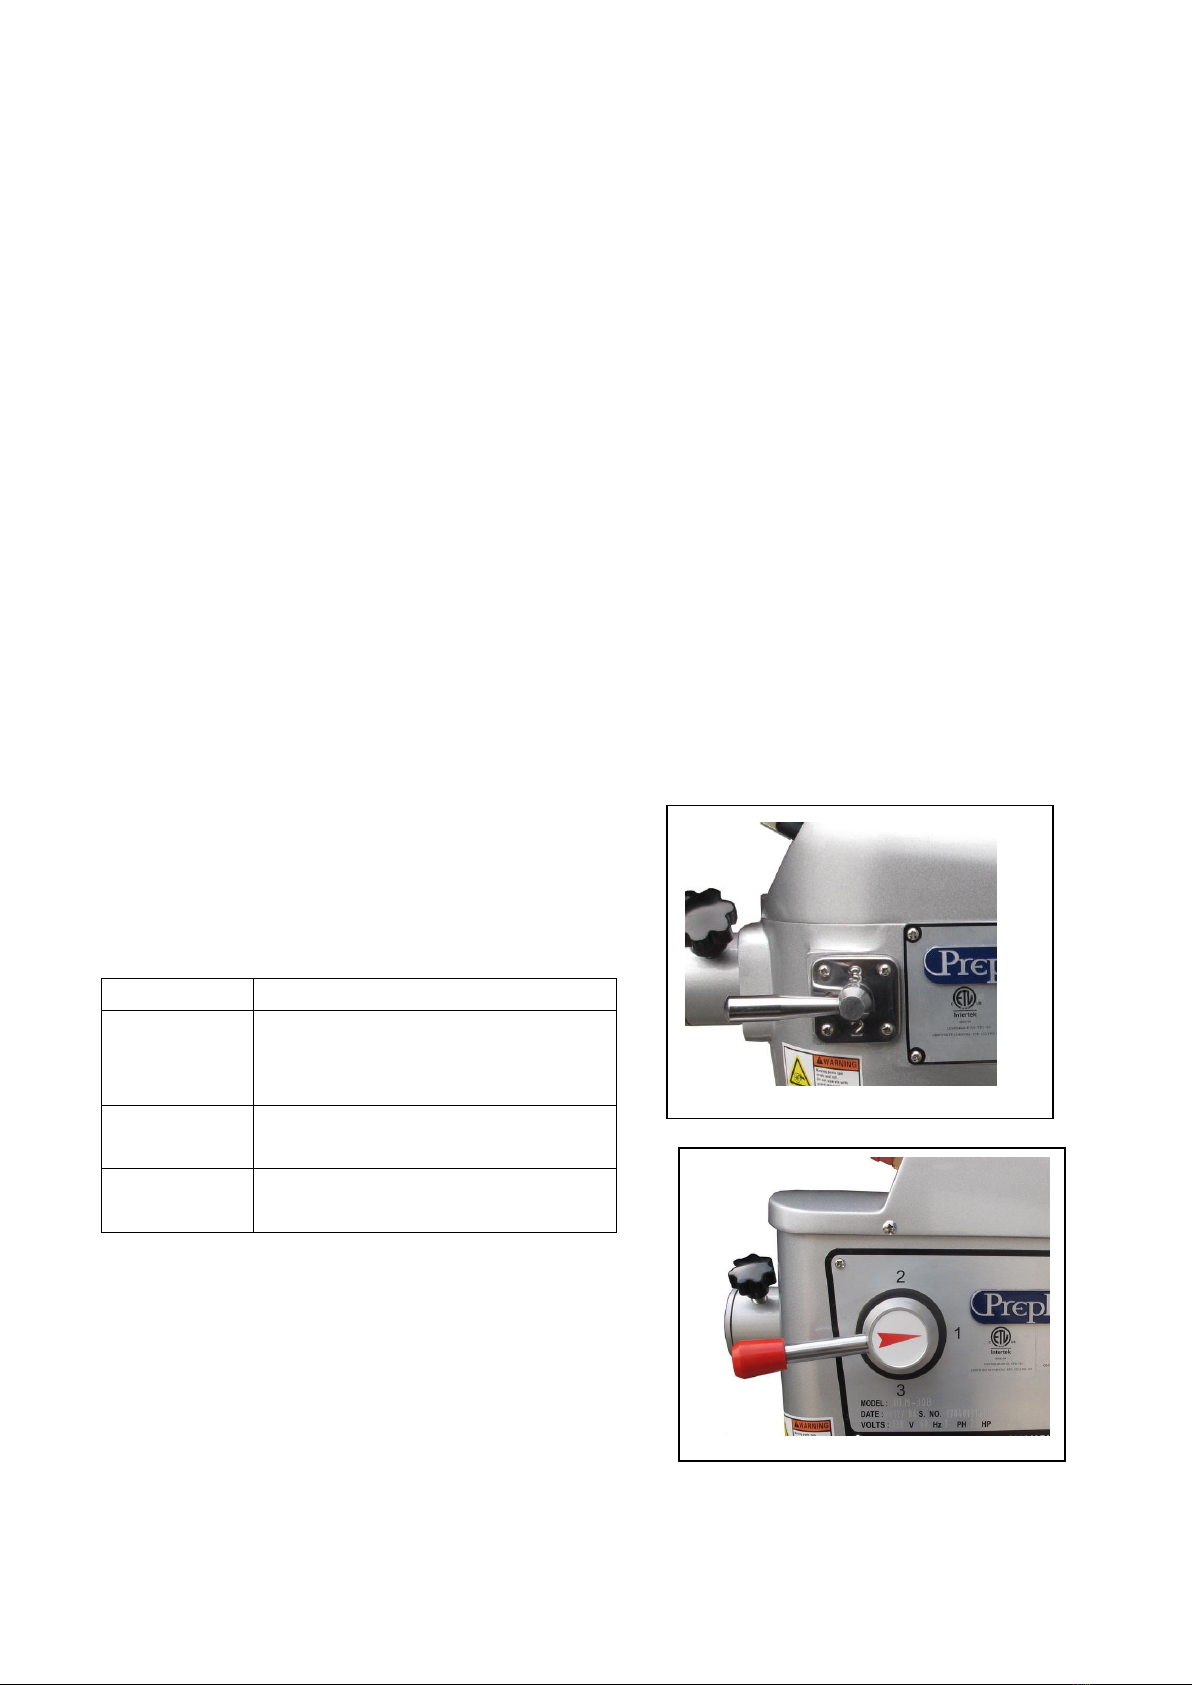
Setting Speeding
Select the appropriate speed setting by lifting or lowering
the speed control lever. Three fixed speeds are available
for use: first (1), second (2), and third (3).
Speed setting by different type of food and ingredient as
following:
Gear Speed
Product Type/ingredient
1 (low)
Heavy: mixing pizza, bread, pasta and
donut dough’s, waffle/cake batter,
mashing potatoes
2 (medium)
Medium: 2nd stage of mixing for donut
dough, etc.
3 (high)
light: whipping cream, egg whites,
meringue
Please follow the capacity chart to choose agitator
and speed.
NOTE: AlWAYS STOP the mixer before
changing speeds!

6
Setting Timer
Use the Attachment Hub
Set the timer for the appropriate mixing time or set
the mixer for non-timed operation.
a. Timed Operation: Turn the timer knob in
a clockwise direction at the position
between “5” to “30”, to get mixing time
between 5 mins to 30mins.
b. Non-Timed Operation: Turn the timer
knob in a counterclockwise direction to the
green “on” position.
NOTE: Heavy loads should not be mixed
longer than fifteen (15) minutes at this setting
without an equal amount of rest time for the mixer.
failure to adhere to these instructions may cause the
mixer to automatically shut off due to overloading.
Loosen and remove the attachment hub fasten screw.
Remove the plastic hub cover from the attachment hub.
lubricate the attachment shaft with a food quality grease or mineral oil.
Insert the attachment shaft into the hub making sure to line up the alignment pin with
the hub hole.
Tighten the thumbscrew back into the hub and securely tighten it.
Select the appropriate speed setting by lifting or lowering the speed control lever.
Recommended Speed while using attachments:
attachment recommended Speed
Vegetable Slicer 1 or 2
cheese Shredder/Grater 2 or 3
Meat Grinder 1 only

7
Cleaning & Maintenance Instructions
1. ALWAYS disconnect or unplug the electrical power from the mixer before cleaning.
2. The entire mixer, including removable parts, must be thoroughly cleaned and
sanitized using the procedures identified by your local health department and the
ServSafe Essentials published by the National Restaurant Association Educational
Foundation (NRAEF).
3. NEVER use a scruber pad, steel wool, or abrasive material to clean the mixer.
Recommended Cleaning Action as:
PART
REQUIRED ACTION
FREQUENCY
Agitators
hand-wash using mild soap and water, rinse, dry
and sanitize.
Clean after each use.
Removable
bowl Guard
hand-wash using mild soap and water, rinse, dry
and
sanitize or place in dishwasher.
Clean after each use.
Bowl
using a sponge or cloth, mild soap and water, apply
pressure to ensure the bowl is clean, rinse, dry, and
sanitize. The bowl can also be placed in a
dishwasher.
Clean after each use.
Rear Splash
Guard
hand-wash using mild soap and water, rinse, dry
and
sanitize.
Clean after each use.
bowl cradle
hand-wash using mild soap and water, rinse, dry
and
sanitize.
Daily
Planetary Shaft
Wipe with clean damp cloth, dry and sanitize. apply
a light quantity of Globe oil (mineral oil) to the
planetary shaft after cleaning.
Clean after each use.
exterior
hand-wash using mild soap and water, rinse, dry,
and sanitize. DO NOT use a water hose!
Daily
hub interior
Wipe with clean damp cloth, dry, and sanitize.
Daily

8
Mixing Capacity Chart
Product
Agitator
Speed
PPM-10
10Quart
PPM-20
20Quart
PPM-30
30Quart
PPM-40
40Quart
PPM-60
60Quart
Bread and Roll
Dough-60% AR
Dough Hook
1st speed
only
5 lbs.
25 lbs.
45 lbs.
50 lbs.
90 lbs.
Heavy Bread
Dough-55% AR
Dough Hook
1st speed
only
3 lbs.
15 lbs.
30 lbs.
40 lbs.
70 lbs.
Pizza Dough,
Thin-40% AR
Dough Hook
1st speed
only
3 lbs.
9 lbs.
14 lbs.
25 lbs.
40 lbs.
Pizza Dough,
Medium-50% AR
Dough Hook
1st speed
only
4 lbs.
10 lbs.
20 lbs.
32 lbs.
60 lbs.
Pizza Dough,
Thick-60% AR
Dough Hook
1st speed
only
5 lbs.
20 lbs.
40 lbs.
50 lbs.
70 lbs.
Raised Donut
Dough-65% AR
Dough Hook
1st speed
only
2 lbs.
9 lbs.
15 lbs.
25 lbs.
40 lbs.
Pie Dough
Flat Beater
All Speeds
4 lbs.
18 lbs.
30 lbs.
35 lbs.
60 lbs.
Mashed Potatoes
Flat Beater
All Speeds
5 lbs.
15 lbs.
23 lbs.
30 lbs.
45 lbs.
Cake
Flat Beater
All Speeds
8 lbs.
20 lbs.
30 lbs.
12 lbs.
60 lbs.
Waffle or Hot Cake
Batter
Flat Beater
All Speeds
4 qts.
8 qts.
12 qts.
16 qts.
24 qts.
Eggs Whites
Wire Wish
All Speeds
1 pt.
1 qts.
1-1/2 qts.
2 qts.
3 qts.
Meringue
Wire Wish
All Speeds
3/4 pt.
1 qts.
1-1/2 qts.
2 qts.
3 qts.
Whipped Cream
Wire Wish
All Speeds
2 qts.
4 qts.
6 qts.
8 qts.
12 qts.
Cake,Pound
Flat Beater
All Speeds
8 lbs.
20 lbs.
30 lbs.
40 lbs.
60 lbs.
When mixing dough check the “AR”(Absorption Ratio) = Water weigh divided by flour weight.
The capacities listed above are based on 12% flour moisture at 70 °F(21℃) water temperature. If high gluten
flour
is used reduce batch size by 10%.
1 gallon of water = 8.3 lbs.
1 quart of water = 2.1 lbs.
Example :
If a recipe calls for 5 lbs. of water and 10 lbs. of flour, then 5 divided by 10 = 0.50x100=50% AR.
Do not use 2nd speed with mixtures with below 50% AR.

9
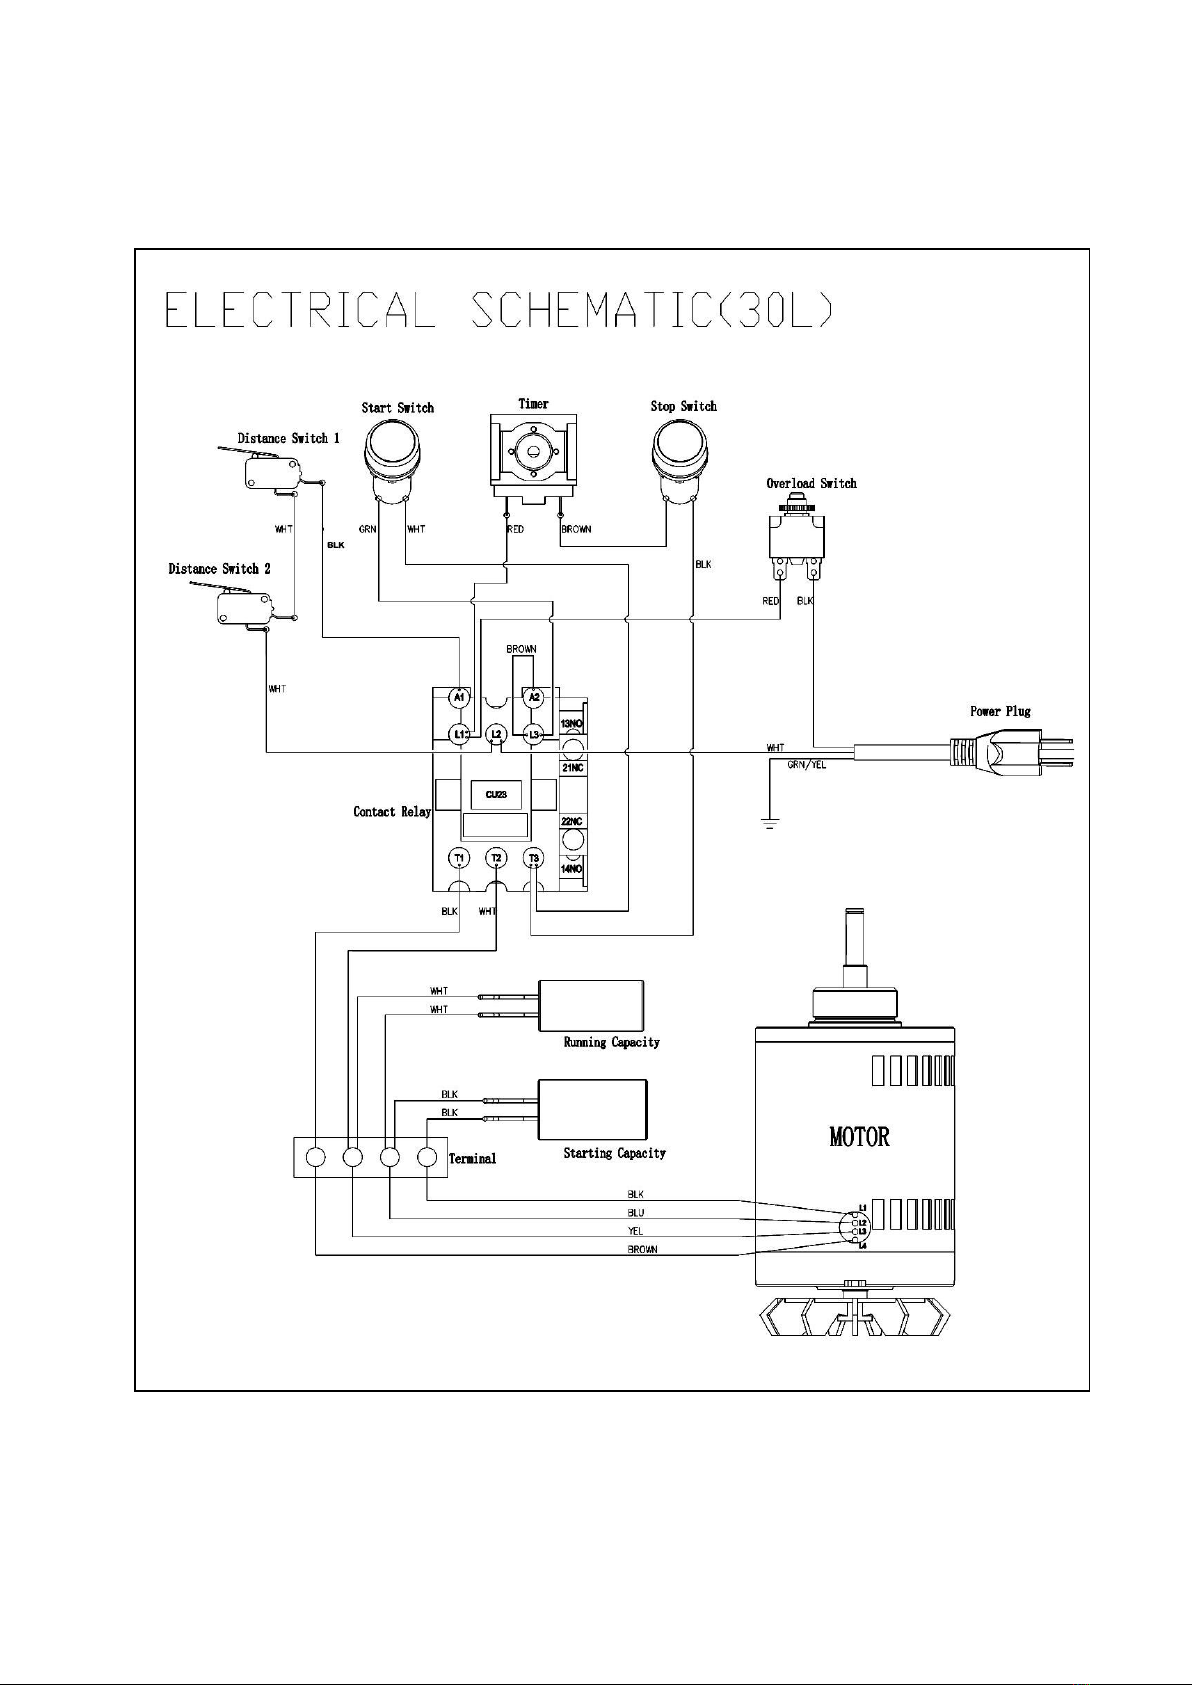
Troubleshooting
Problem
Possible Causes
Action Required
Mixer will not run.
bowl guard not in closed
position.
rotate guard to the right until fully closed.
bowl not raised.
raise bowl to highest position.
Timer is not engaged.
Turn timer to desired time or set time to the “on”
position.
Power not connected properly.
check all power connections. Plug into a live
socket.(Do not use extension cord!) Test socket
with another item
building circuit breaker is off.
check breaker box.
internal overload tripped.
Press stop button then press reset button.
(If overload continues to trip, reduce batch size
and/or adjust recipe!)
Gear not engaged.
Switch gear fully into position. (Mixer will not
operate if the speed control lever is positioned in
between speeds)
Mixer stops during
mixing .
internal overload tripped.
Press stop button then press reset button.
(If overload continues to trip, reduce batch size
and/or adjust recipe!)
Motor temperature is too high
Voltage is too low, or use wrong agitator or set
incorrect speed.
Mixer is noisy.
Mixer is not installed on level
surface.
adjust surface or relocate mixer. Make sure rubber
feet are installed.
bowl not seated correctly or
clamps not in place.
ensure bowl is seated into bowl cradle correctly
and bowl clamps are locked into place.
Agitator not fitted properly.
Remove and attach agitator into position properly.
Overloading bowl.
reduce batch size. (See Capacity Chart)
Planetary ring gear needs more
grease.
Technician to inspect for source of noise.
reapply high-pressure grease. contact technician.
Safety guard seized
(will not move
freely).
clean & lubricate slide
sheath.
Technician must drop down planetary assembly to
access mat & sheath. contact technician.
agitators won’t go
onto the planetary
shaft easily.
lack of lubrica
lack of lubrication and/or
cleaning of the planetary shaft.
Wipe planetary shaft with a clean damp cloth and
lubricate the shaft with mineral oil or food quality
grease.
agitators touching
bottom or sides of
bowl.
Defective or dented bowl.
remove dents or replace bowl.
Defective agitator.
replace agitator.

10
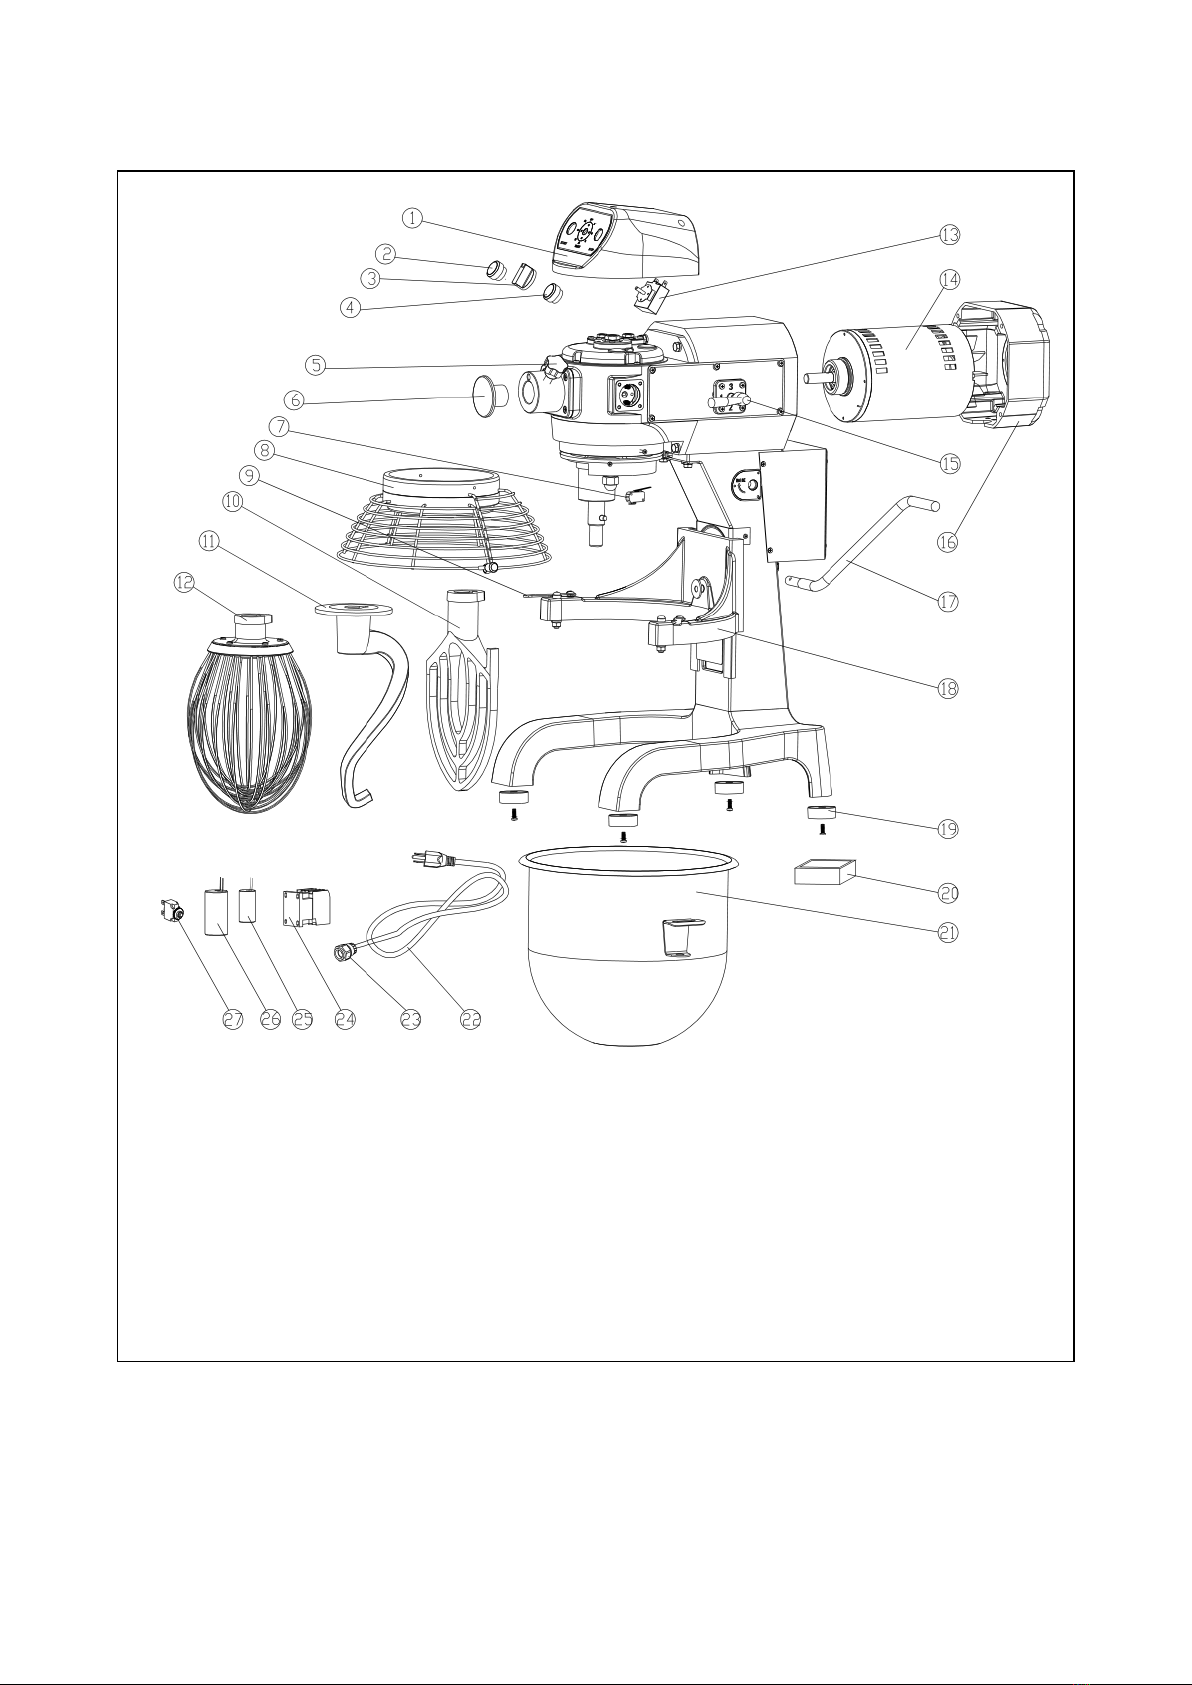
Service Parts
Exploded View of PPM-30

11
Parts list of PPM-30
Ref. No. on
exploded view
Part Number
Description
Qty
1
PPM3001
Top cover(with six screws)
1
2
PPM0001
Start button(Green) for 20/30
1
3
PPM0002
Timer knob for 10/20/30
1
4
PPM0003
Stop button(Red) for 20/30
1
5
PPM0004
Hub fasten screw for 20/30
1
6
PPM0005
Attachment hub cover for 20/30
1
7
PPM3002
Speed handle assy
1set
8
PPM3003
Bowl safety guard
1
9
PPM3004
Bowl hold clamp
2
10
PPM3005
Beater
1
11
PPM3006
Hook
1
12
PPM3007
Wire Whip
1
13
PPM0006
Timer(with four screws)
1
14
PPM3008
110V/60HZ Motor(with tool)
1
15
PPM3009
Back cover
1
16
PPM3010
Distance switch
1
17
PPM3011
Bowl lift lever handle
1
18
PPM3012
Support
1
19
PPM3013
Rubber feet
1 set
20
PPM3014
Sleeve rubber feet
1 set
21
PPM3015
Bowl
1
22
PPM3016
Power cord
1
23
PPM3017
Power supply proof connectors
1
24
PPM3018
Contact relay
1
25
PPM3019
Running Capacitor
1
26
PPM3020
Starting Capacitor
1
27
PPM3021
Overload switch
1
12
Exploded View of PPM-20

13
Parts list of PPM-20
Ref. No. on
exploded
view
Part No
Description
Qty
1
PPM2001
Top cover(with screws)
1
2
PPM0001
Start button(Green) for 20/30
1
3
PPM0002
Timer knob for 10/20/30
1
4
PPM0003
Stop button(Red) for 20/30
1
5
PPM0004
Hub fasten screw for 20/30
1
6
PPM0005
Attachment hub cover for 20/30
1
7
PPM2002
Distance switch
1
8
PPM2003
Safety guard
1
9
PPM2004
Bowl hold kits /Clip
2
10
PPM2005
Beater
1
11
PPM2006
Hook
1
12
PPM2007
Wire Whip
1
13
PPM0006
Timer(with four screws)
1
14
PPM2008
110V/60HZ Motor(with tool)
1
15
PPM2009
Speed handle assy
1set
16
PPM2010
Back cover
1
17
PPM2011
Handle-shifter
1
18
PPM2012
Support
1
19
PPM2013
Rubber feet
1 set
20
PPM2014
Sleeve rubber feet
1 set
21
PPM2015
Bowl
1
22
PPM2016
Power cord
1
23
PPM2017
Power waterproof connectors
1
24
PPM2018
Contact relay
1
25
PPM2019
Running Capacitor
1
26
PPM2020
Starting Capacitor
1
27
PPM2021
Overload switch
1

14
Exploded View of PPM-10

15
Parts list of PPM-10
Ref. No. on
exploded view
Part No
Description
Qty
1
PPM1001
Gear box
1
2
PPM1002
Distance switch
1
3
PPM1003
Back shield
1
4
PPM1004
Safety guard
1
5
PPM1005
Beater
1
6
PPM1006
Hook
1
7
PPM1007
Wire Whip
1
8
PPM1008
Back cover
1
9
PPM1009
110V/60HZ Motor(with tool)
1
10
PPM1010
Speed handle assy
1set
11
PPM1011
Start button(Green)
1
12
PPM1012
Stop button(Red)
1
13
PPM0006
Timer(with four screws)
1
14
PPM0002
Timer knob
1
15
PPM1013
Handle-shifter
1
16
PPM1014
Support
1
17
PPM1015
Rubber feet
1 set
18
PPM1016
Sleeve rubber feet
1 set
19
PPM1017
Bowl
1
20
PPM1018
Power cord
1
21
PPM1019
Power waterproof connectors
1
22
PPM1020
Contact relay
1
23
PPM1021
Running Capacitor
1
24
PPM1022
Starting Capacitor
1
25
PPM1023
Overload switch
1

16

17
18
This manual suits for next models
2
Table of contents
Other PrepPal Mixer manuals


