PRESONUS FADERPORT User manual


1 Overview 概述 —1
6Live (MCU)
—23
7
StudioOneArtistQuickStart
快速入门
—
27
8 Appendix —41
TableofContents
目录内容
1.1
Introduction 概要 —1
1.2
What’s in the Box 包装有什么
—
2
1.3
What’sinyourMyPreSonusAccount 我的
PreSonus账户里有什么
—3
1.4
Firmware Updates 固件更新
—
3
2.1
Getting Started开始使用
—
5
2.2
Channel Strip 通道条插件
—
7
2.3
Transport Controls 传输控制
—
7
2.4
The Session Navigator 会话导航
—
8
2.4.1
F1-F4 Functions
功能
—
9
2.5
Automation Controls 自动化控制
—
9
2.6
Control Link 控制链接
—
9
3.1
Getting Started开始使用
—
10
3.2
Channel Strip 通道条插件
—
11
3.3
Transport Controls 传输控制
—
11
3.4
The Session Navigator 会话导航
—
12
3.5
Automation Controls 自动化控制
—
12
4.1
Getting Started开始使用
—
13
4.2
Channel Strip 通道条插件
—
15
4.3
Transport Controls 传输控制
—
15
4.4
The Session Navigator 会话导航
—
16
4.5
Automation Controls 自动化控制
—
17
4.6
Bypass —17
6.1
Getting Started 开始使用
—
23
6.2
Channel Strip 通道条插件
—
24
6.3
Transport Controls 传输控制
—
24
6.4
The Session Navigator 会话导航
—
25
6.5
Automation Controls 自动化控制
—
26
7.1
Installation and Authorization 安装和授权
—
27
7.2
Setting Up Studio One 设置 Stuido One
—
28
7.2.1
Configuring Audio Devices
配置音频设备
—
29
7.2.2
Configuring MIDI Devices
配置
MIDI
设备
—
30
7.3
Creating a New Song 创建一首新歌
—
35
7.3.1
Configuring Your AudioI/O
配置你的音频
I/O—
36
7.3.2
Creating Audio and Instrument Tracks 创
建音频和乐器轨道 — 37
7.3.3
Recording an Audio Track
录制一个音轨
—
38
7.3.4
Adding Virtual Instruments and Effects 添
加虚拟乐器 和 效果器 — 39
8.1
Operation Modes 操作模式
—
41
8.2
FaderPort Multichannel Controller MIDI Protocol
多通道控制器 MIDI协议— 41
8.2.1
SysEx
—
41
8.2.2
Fader
—42
8.2.3
Session Navigator Encoder —
42
8.2.4
Buttons and LEDs
按钮和
LED
灯
—
42
5 Cubase/Nuendo(MCU)—18
5.1
Getting Started 开始使用
—
18
5.2
Channel Strip 通道条插件
—
20
5.3
Transport Controls 传输控制
—
20
5.4
The Session Navigator 会话导航
—
21
5.5
Automation Controls 自动化控制
—
22
4 Logic (MCU)
—13
3 Pro Tools (HUI)
—10
2 Studio One —
5

1
Overview
FaderPort™ Multichannel Production Controllers
1
1 Overview 概述
1.1 Introduction 简介
1.1 Introduction Owner’sManual
Thankyou for purchasing the PreSonus® FaderPort™ production controller.
Featuring an ultra-smooth, touch-sensitive, motorized fader; complete
automation and transport controls; and the unique Session Navigator,
FaderPort controllers make mixing in your favorite DAW application quick and
easy.
感谢你购买 PreSonus ® FaderPort™ 生产控制器。FaderPort UBS产品控制器具
有超平顺、触控式感应机动控制器;完整的自动化和传输控制;以及独特的会
话导航器,使你在最喜欢的DAW应用程序中,混音变得快速而简单。
PreSonus Audio Electronics is committed to constant product
improvement, and we highly value your suggestions. We believe the
best way to achieve our goal of constant product improvement is by
listening to the real experts: our valued customers. We appreciate the
support you have shown us through the purchase of this product and
are confident that you will enjoy your FaderPort!
PreSonus Audio Electronics 致力于不断改进产品,我们高度重视你的
建议。我们相信,不断改进产品,实现目标的最佳方式是听取专家的建
议:我们尊贵的客户。感谢你通过购买本产品对我们的支持,相信你会
喜欢上 FaderPort!
About this manual: We suggest that you use this manual to familiarize
yourself with the features, applications, and correct connection procedures for
your FaderPort before trying to connect it to your computer. This will help you
avoid problems during installation and setup.
关于本手册:我们建议你尝试将 FaderPort 连接到计算机之前,使用本手册来
熟悉产品的功能、应用和正确的连接程序。这将有助于你在安装和设置过程中
避免问题。
This manual describes the FaderPort behavior in the DAWs for which each
operation mode was designed. Please see Section
8.1 for applications
not listed in the Table of Contents
.
本手册描述了FaderPort 在DAW 中的性能,每个操作模式都是为其设计的。
请参阅第8.1,了解目录中未列出的应用。

1
Overview
FaderPort™ Multichannel Production Controllers
2
Through out this manual, you will find Power User Tips that can quickly make
you a FaderPort expert and help you get the most out of your investment.
在这本手册中,你会发现一些 Power User Tips 用户提示,可以让你迅速成为
FaderPort 的专家,帮助你从投资中获得最大的回报。

3
1
1.2
Overview
What’s in the Box
FaderPort™ Multichannel Production Controllers
Owner’s Manual
1.2 What’s in the Box
包装有什么
Your FaderPort package contains the following 你的 FaderPort 软件包包含以
下内容:
FaderPort production controller FaderPort 产品控制器
Quick Start Guide 快速入门指南
6’ (1.8m) USB cable 线缆
External Power Supply 外部电源供应
PreSonus Health, Safety, and Compliance Guide
PreSonus健康、安全和合规指南
F
ader
P
o
r
t
™
Production Controller
Get ting St arted • Ers te Sch ritte • Cóm o emp eza r •P our co mme ncer
Go on line to my.p resonus.
com an d reg ist er yo ur ser ial
number.
Navegue online a
my.pre sonus.com y registre
su número de serie.
TheFaderPortofferscustomizedoperationmodesforfive FaderPort ofrecemodosdefuncionamientopersonal-
(5)majorDAWs. To selectyourOperationMode,pressand izados paracinco(5) grandesDAWs.Paraseleccionarsu
NEXTmientras enciendesuFaderPort,y luego pulseel
thenpressthebutton for thedesiredmode(seebelow).botóndel mododeseado(veamásabajo).
holdthe NEXTbutton whilepoweringon your FaderPort,
Modode funcionamiento,mantengapulsadoel botón
Öffn en S ie die W eb seit e
My. PreS onus.c om un d
registrieren Sie Ihre
Seriennummer.
Allez sur my.presonus. com
et en reg istre z votre n um éro
de série.
FaderPort bietetangepassteBetriebsmodifürfünf (5) LeFaderPort offredes modesdefonctionnement per-
bekannte DAWs.UmeinenBetriebsmodus auszuwählen, sonnalisés pourcinq (5)grandesstationsde travail
haltenSiebeimEinschaltenIhresFaderPortdieNEXT- audionumériques. Pour sélectionner votre mode de
TastegedrücktunddrückendanndieTastedes gewün- fonctionnement,pressezet maintenez la toucheNEXT
schtenModus(sieheunten). pendantque vousmettezvotreFaderPortsoustension,
puispressezlatouchecorrespondant au modedésiré
(voirci-dessous).
Studio One MCU (Logic) MCU (Live) MCU (Cubase) HUI (ProTools)
www.p res on us. co m
©2018PreSonusAudioElectronics,Inc.AllRightsReserved.FaderPort, PreSonus,andUni versalControl aretrademarksorregi steredtrademarksofPreSonusAudi oElectronics,Inc.S tudioOneis a
registeredtrademarkofPreSonusSoftwareLtd.MacandMacOSareregisteredtrademarks ofAppl e,Inc.,inthe U.S.and other countries.Windowsi saregis teredtrademarkofMi crosoft,Inc.,intheU.S . and
otherc ountries.Oth er productnames andtec hnologi es menti oned herei nmay be trade mar ks of their respecti ve c ompanies . Allspec ifi cations sub jectto c hange without noti ce.

4
1
Overview
FaderPort™ Multichannel Production Controllers
1.4 Firmware Updates 固件更新
1.3 What’s in your My PreSonus Account
My PreSonus 账户里有什么?
Once you register your FaderPort, you will be able to download the
following: Studio One Artist recording software and content
你的 FaderPort 一旦注册,你可以下载下方内容:Studio One Artist 录音
软件和内容
Universal Control (necessary for firmware updates)
通用控制(固件更新所需)
Visit http://my.presonus.com to register your FaderPort and download your
software and license.
请访问 http://my.presonus.com ,注册你的 FaderPort 并下载你的软件和许可
证。
PreSonus is committed to constant product improvement. As part of this
commitment, we offer periodic firmware updates that add features, improve
functionality, and resolve issues that are discovered in the field. Because of
this, it is highly recommended that you download Universal Control from your
My PreSonus account after registering your FaderPort.
PreSonus 致力于不断改进产品。作为这一承诺的一部分,我们提供定期的固
件更新,增加功能,改进功能,并解决在现场发现的问题。因此,强烈建议你
在注册完 FaderPort 后,从你的 My PreSonus 账户下载 Universal Control。
Note:
At the time of this manual’s publication, a firmware update is required
for full functionality of your FaderPort. You must download and install
Universal Control and run the firmware update on your unit.
注意:在本手册出版时,需要进行固件更新以实现
FaderPort
的全部功能。
你必须下载并安装
Universal Control
,在你的设备上运行固件更新。
During installation, you will be given the option to install various PreSonus
audio drivers. No driver installation is required to use the FaderPort.
在安装过程中,你可以选择安装各种 PreSonus 音频驱动程序。使用
FaderPort 不需要安装驱动程序。
Once installed, connect your FaderPort to your computer.
安装完毕后,将 FaderPort 连接到你的电脑。

5
1
Overview
FaderPort™ Multichannel Production Controllers
1.4 Firmware Updates Owner’sManual
Universal Control will alert you if there is new firmware available for your
FaderPort. Clicking on the Update Firmware button will begin the update
process. This process can take up to five minutes. At the end of the firmware
update, you will be prompted to reboot your FaderPort.
如果你的 FaderPort 有新的固件可用,Universal Control会提醒你。点击
"Update Firmware " 按钮将开始更新过程。这个过程最多需要5分钟。在固件
更新结束时,会提示你重新启动你的 FaderPort。
Once rebooted, your FaderPort fader may require recalibration. This is an
automated process. Do not interfere with or interrupt the fader calibration
process.
一旦重启,你的FaderPort 控制器可能需要重新校准。这是一个自动过程。不
要干扰或中断控制器的校准过程。
Note: One of the Operating Modes must be selected to perform a firmware
update.
注意:必须选择其中一个操作模式来执行固件更新。

6
2
2.1
Studio One
Getting Started
FaderPort™ Multichannel Production Controllers
Owner’s Manual
2.1 Getting Started 开始使用
2 Studio One
By default, your FaderPort is configured for Studio One. No further device
setup is required.
在默认情况下,你的 FaderPort 是为 Studio One 配置的。不需要进一步的设
备设置。
If you have changed the FaderPort’s Operation Mode and would like to return
to using it with Studio One, press and hold the NEXT button while powering
on your FaderPort, then press the Solo button to enable Studio One.
如果你已经改变了FaderPort的操作模式,并希望回到 Studio One 的使用,请
在FaderPort开机时,按住NEXT按钮,然后按Solo按钮,启用Studio One。
Note: In addition to Studio One, this operation mode should be used with
other DAWs that provide native FaderPort support. A complete list of native-
support DAW applications is available at www.presonus.com.
注意:除了
Studio One
之外,这种操作模式,应该与其他提供本地
FaderPort
支持的
DAW
一起使用。可以在
www.presonus.com
上获得本机支持
DAW
应
用程序的完整列表。
The FaderPort is a class-compliant device in both macOS® and Windows®.
Simply connect your FaderPort to a free USB port on your computer. No
further installation is necessary.
FaderPort 在macOS® 和Windows® 中,都是一个符合等级标准的设备。只
需将FaderPort 连接到电脑上的一个空闲 USB 端口。不需要进一步安装。
To configure your FaderPort in Studio One:
要在 Studio One 中配置你的 FaderPort:
1.
From the Start page, click on the Configure External Devices link.
在"Start" 页面,点击 "Configure External Devices"链接。
2.
Click the Add button.
点击 ”Add” 键
Studio One

7
2
2.1
Studio One
Getting Started
FaderPort™ Multichannel Production Controllers
Owner’s Manual
3.
From the manufacturers list at the left, click on PreSonus and then select FaderPort
(2018).
从左边的制造商列表中,点击PreSonus,然后选择 FaderPort(2018)。
Note: The originalFaderPortuses a differentmappingthan its successor.Youmust select FaderPort
(2018) for proper functionality.
注意:
原始的
FaderPort
使用的映射与它的后续版本不同。你必须选择
FaderPort
(
2018
)以获得专有的功能。
4.
Set the Send To and Receive From fields to “PreSonus FP2”
将”To” 和“Receive” 字段设置为 "PreSonus FP2"。
Your FaderPort is now ready for use.
你的FaderPort现在已经可以使用了。

8
2
2.2
Studio One
Channel Strip
FaderPort™ Multichannel Production Controllers
Owner’s Manual
2.3 Transport Controls 传输控制
2.2 Channel Strip 通道条插件
1.
Arm. Pressing the Arm button will allow you to arm
track for recording by pressing the corresponding
track’s Select button. Press with SHIFT to arm all
tracks for recording.
Arm. 按"Arm " 键,可以按相应轨道的 "Select" 按钮
来为录音配备轨道。按下 ”SHIFT” 键,可以为录音配
备所有轨道。
2.
Mute.Mutes the corresponding channel’s output
signal. Press and hold to mute momentarily. Press
with SHIFT for Mute Clear.
Mute. 将相应通道的输出信号静音。按住不放,可以瞬
间静音。按住 ”SHIFT” 键可以清除静音。
3.
Solo. Isolates the corresponding channel’s output
signal in the mix. Press and hold to solo momentarily.
Press with SHIFT for Solo Clear.
Solo. 隔离混音中相应通道的输出信号。按住不放可
以瞬间独奏。按住 ”SHIFT” 键,则独奏清除。
4.
Bypass / Bypass All. Press the Bypass button to
bypass every plug-in on the selected channel. Press
SHIFT + Bypass to disable every plug-in in the
Session.
Bypass / Bypass All. 按“Bypass” 键可以绕过所选
通道上的每个插件。按 ”SHIFT+Bypass” 键,可以
禁用会话中的每个插件。
5.
Touch-Sensitive Fader. This 100 mm motorized fader
can be used to control volume levels and panning in
Pan Flip mode. See Section 2.4 for details.
Touch-Sensitive Fader. 这个100毫米机动控制器可以
用来控制音量大小和 ”Pan Flip” 模式下的声像。详见第
2.4节。
1 2 3 4 5 6
1.
Stop. Stops playback. Press twice to return playback-cursor to zero.
停止播放。按两次可以使播放光标返回到零。
2.
Loop. Engages / disengages Looping.
启用 /取消 Looping播放。
4 3
1
5

9
2
2.2
Studio One
Channel Strip
FaderPort™ Multichannel Production Controllers
Owner’s Manual
3.
Play / Pause. Starts playback at the current playback- cursor position.
Press again to pause playback.
在当前的播放光标位置开始播放。再按一次就可以暂停播放。
4.
Rewind. Press once to regress playback by bar, second, frame, or base
sample rate depending on mode. Press and hold for continuous rewind.
Press the Rewind and Fast Forward buttons simultaneously to Return to
Zero.
按一次可以按小节、秒、帧或基本采样率倒退播放,具体取决于模式。按住
不放可以连续倒退。同时,按 ”Rewind” 和“Fast Forward” 键,可 “Return”
返回到 “Zero”。
5.
Fast Forward. Press once to advance playback by bar, second, frame,
or base sample rate depending on mode. Press and hold for continuous
fast forward.
按一次可以按小节、秒、帧或基本采样率推进播放,具体取决于模式。按住
不放可以连续快进。
6.
Record. Press to start recording at the current playback- cursor position
for record-enabled tracks.
按住开始在当前播放的光标位置进行录音,用于支持录音的轨道。
10
2
2.4
Studio One
The Session Navigator
FaderPort™ Multichannel Production Controllers
Owner’s Manual
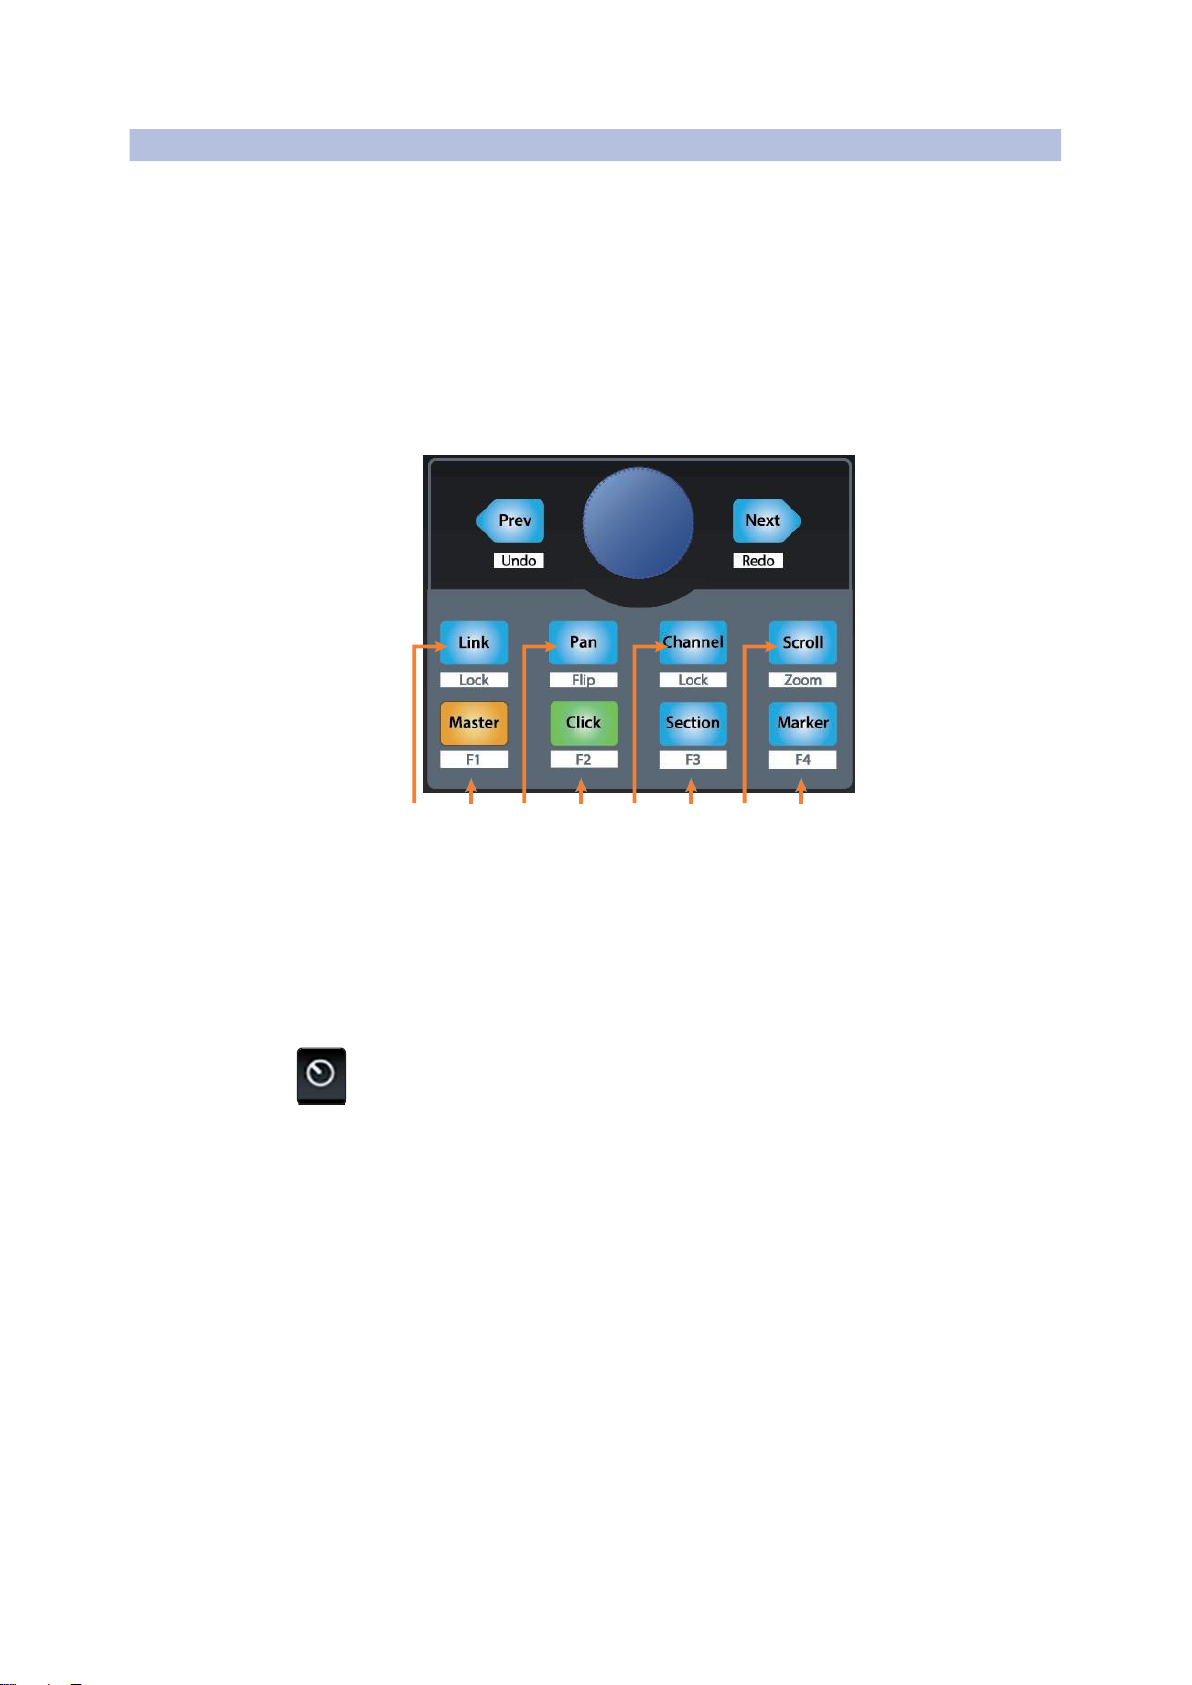
2.4 The Session Navigator 会话导航
The Session Navigator provides quick navigation and
session controls. Each button alters the functions of the
push-button encoder and the Next and Prev buttons on
either side.
Pressing SHIFT + Prev will Undo the last action. Pressing
SHIFT + Next will Redo the last action.
会话导航仪提供快速导航和会话控制。每个按钮都改变了
按钮编码器和两侧的 "下一步 "和"上一步 "按钮的功能。
按”SHIFT+Prev” 可以撤销上一个动作。按 “SHIFT +
Next” 将重做上一个动作。
1 2 3 4 5 6 7 8
1.
Link. Encoder controls any parameter beneath your mouse.
Navigation buttons select Next and Previous tracks
respectively. To lock a parameter to this encoder, press
SHIFT + Link.
Link. 编码器控制你的鼠标下面的任何参数。”Navigation”
按钮分别选择 ”Next” 和”Previous” 轨道。要把一个参数锁
定在这个编码器上,按 “SHIFT + Link”。
PowerUser Tip: The Channel Editor is a powerful feature in Studio One Pro that allows
you to map multiple parameters to the same control, with independent range/polarity/
curve controls. Additional XY vector pads can be assigned with individual parameters;
and muchmore.
PowerUser Tip: ChannelEditor
通道编辑器是
Studio One Pro
的一个强大功能,
它允许你将多个参数映射到同一个控制上,并有独立的范围
/
极性
/
曲线控制。
额外的
XY
矢量垫可以与单个参数进行分配;以及更多。
2.
Master.Encoder controls the Master level. Push the Encoder to reset the
Master level to 0 dB. While in this mode, the navigation buttons will control
banking. Press SHIFT + Master to enable F1 User function. See Section
2.4.1 for details.
Master. Encoder controls 编码器控制主水平。按下编码器可以将主控电平
重置为0dB。在这个模式下,导航按钮将控制组。按SHIFT + Master键,
启用F1用户功能。详见 2.4.1节。
3.
Pan. Encoder controls panning. Navigation buttons scroll through track
list. Push the Encoder to reset the level to 0 dB. Press SHIFT + Pan to
use the fader to control panning.
11
2
2.4
Studio One
The Session Navigator
FaderPort™ Multichannel Production Controllers
Owner’s Manual
Pan. 编码器控制声像。Navigation 按钮在轨道列表中滚动。按下
Encoder编码器可以将电平重置为 0dB。按 SHIFT + Pan 来使用控制器
来控制声像。
4.
Click. Turns the metronome on/off. The metronome can be engaged or
disengaged while any mode is active. Press SHIFT + Click to enable F2
User function. See Section 2.4.1 for details.
Click. 将节拍器打开/关闭。在任何模式下,节拍器都可以被激活或解除。
按SHIFT + Click来启用F2用户功能。详见2.4.1节。
5.
Channel. Encoder controls individual channel scrolling. Navigation
buttons adjust the currently visible fader bank on the FaderPort by one
channel. Press SHIFT + Channel to lock the channel controls to the
currently selected track.
Channel. Encoder 编码器控制单个通道的滚动。Navigation 按钮按一个
通道调整FaderPort上当前可见的控制器组。按SHIFT + Channel 可以将
通道控制锁定在当前选定的轨道上。
Note: Channel Lock is only available in Studio One v4 and higher.
注意:频道锁定只在
Studio One v4
及以上版本中可用。
6.
Section. Encoder nudges the selected event. Use the navigation buttons
to navigate through the events on the Arranger track. Press SHIFT +
Section to enable F3 User function. See Section 2.4.1 for details.
Section. Encoder编码器对选定的事件进行点动。使用导航按钮,在
Arranger track.上的项目中导航。按 SHIFT + Section 键,启用F3用户
功能。详见第2.4.1节。
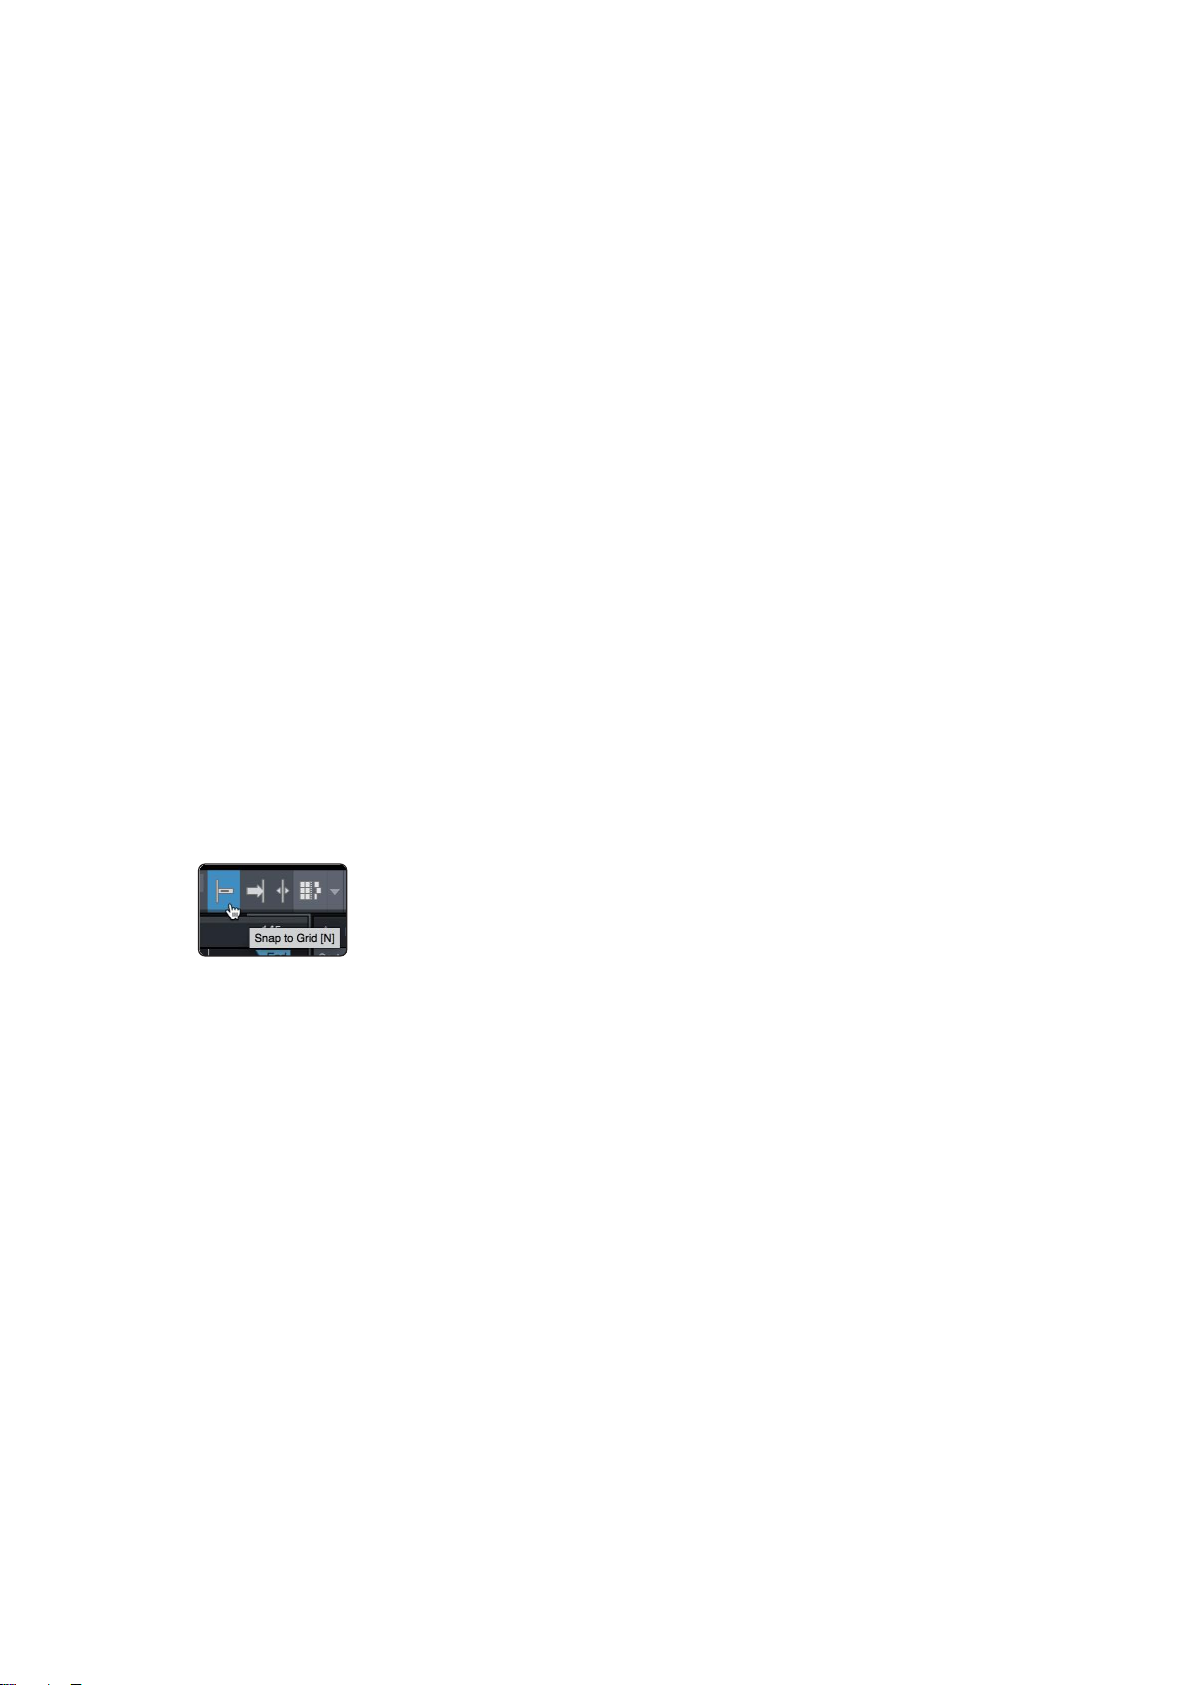
Power User Tip: Enable Snap to Grid for coarse nudging. Disable it for
fine tuning
.
Power User Tip:
启用
"
Snap to Grid
"
以进行粗略的调整。禁用它来
进行微调。
7.
Scroll/Zoom. Encoder controls timeline scrolling. Push the encoder to fit
the timeline to the window size. Use the navigation buttons to scroll
through the track list. Press SHIFT + Scroll to enable Zooming. While
Zoom is active, encoder controls horizontal zooming. Navigation buttons
control vertical zooming. Press the encoder to undo zooming in both
directions.
8.
Scroll/Zoom. Encoder 编码器控制时间线的滚动。按下编码器,使时间
线适合窗口的大小。使用导航按钮来滚动轨道列表。按SHIFT + Scroll 来
启用 Zooming。当缩放处于活动状态时,编码器控制水平缩放。
Navigation 按钮控制垂直缩放。按编码器可以撤销两个方向的缩放。
9.
Marker. Encoder moves the playback cursor in the Timeline. Use the
navigation buttons to scroll through markers. Press Encoder to drop a
marker. Press SHIFT + Marker to enable F4 User function. See Section
2.4.1 for details.
Marker. Encoder 编码器在时间轴上移动播放光标。使用导航按钮,滚动
浏览标记物。按 Encoder 来删除一个标记。按SHIFT + Marker ,启用F4
用户功能。详情见第2.4.1节。
12
2
Studio One
FaderPort™ Multichannel Production Controllers
2.5 Automation Controls 自动化控制
2.6 Control Link 控制链接
2.5 Automation Controls
Owner’s Manual
2.4.1 F1-F4 Functions 功能
Using Shift plus the lower four Session Navigator button will access alternate
functions for your FaderPort. By default, these are assigned as follows:
使用Shift和下面四个
Session Navigator
会话导航按钮,可以访问FaderPort的备
用功能。默认情况下,这些功能被分配如下:
•
F1. Open Inspector 打开检查器
•
F2. Open Editor 打开编辑器
•
F3. OpenMixer 打开混音器
•
F4. Open Browser 打开浏览器
Power User Tip:
The default assignments for the Function buttons can be
customized using the FaderPort device editor. See Section 2.6 for more
information.
Power User Tip:
功能按钮的默认分配可以通过
FaderPort
设备编辑
器来定制。
更多信息见第
2.6
节。
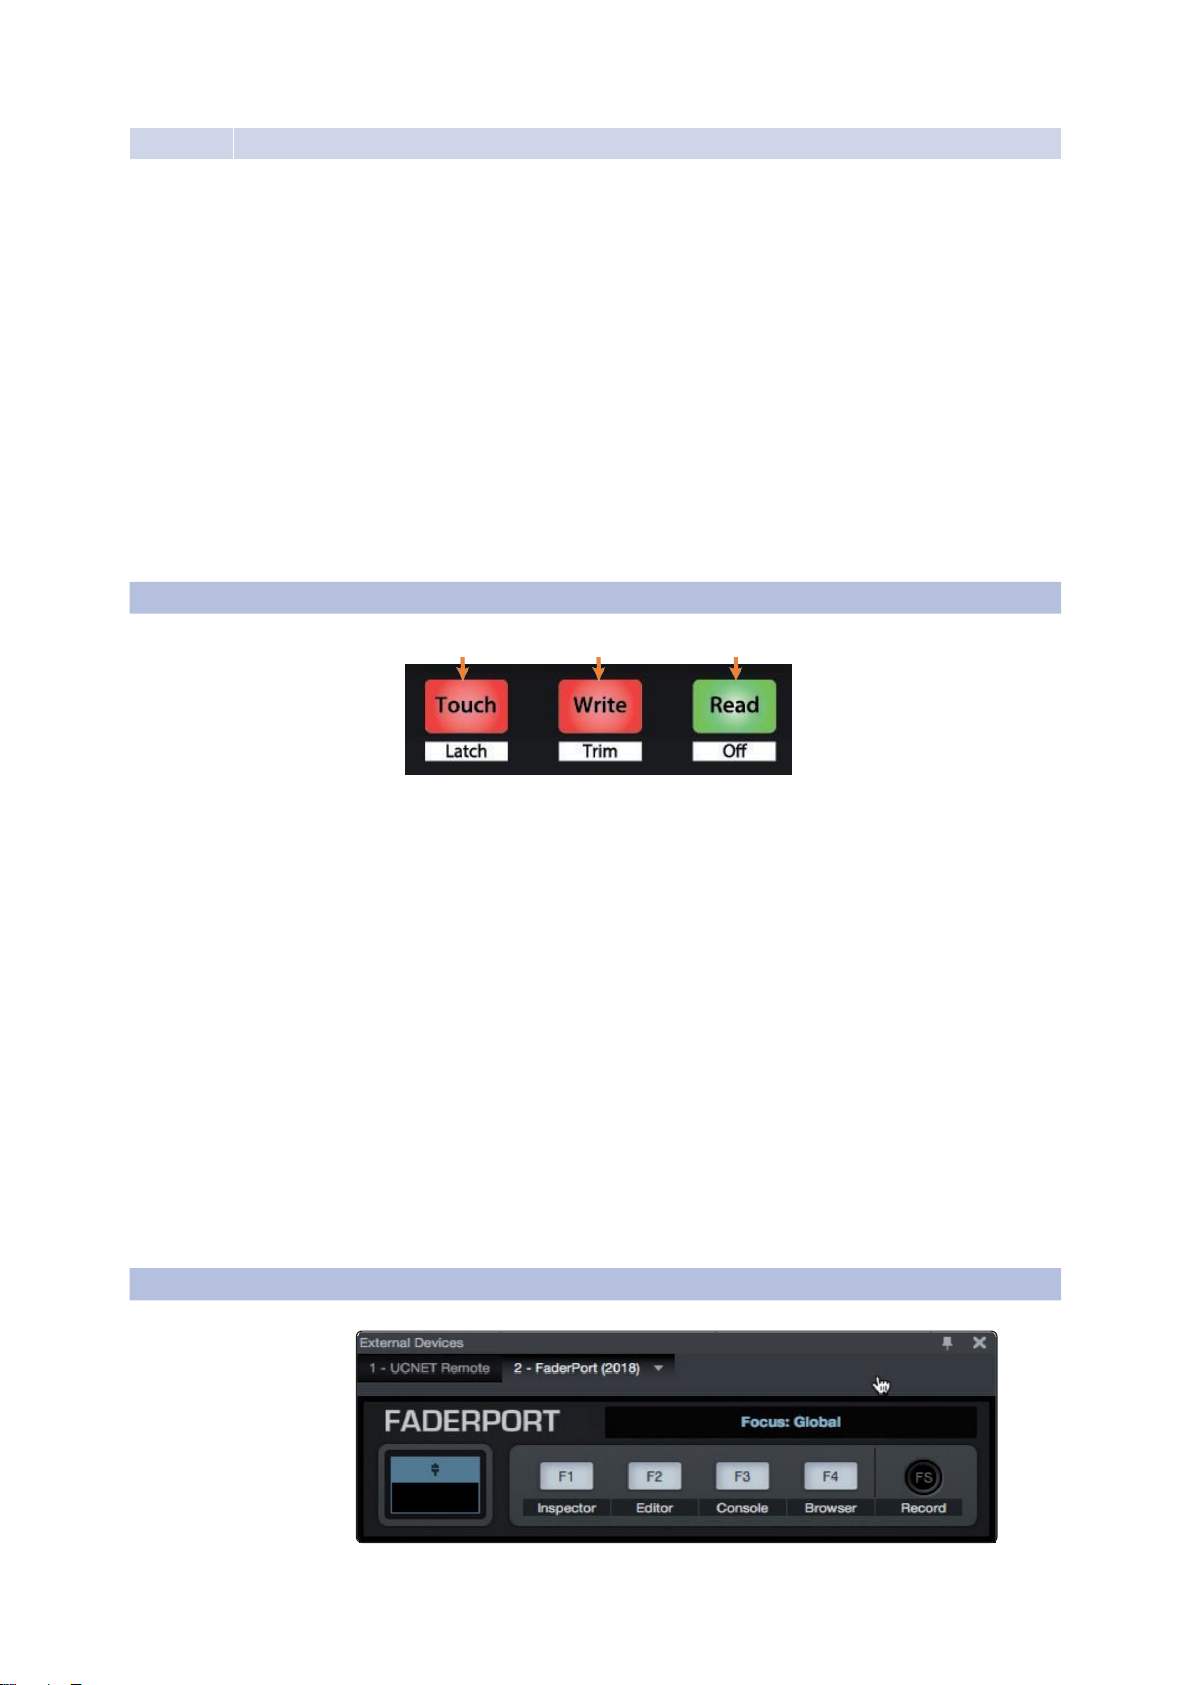
1 2 3
1.
Touch / Latch. Engages Touch Automation on the currently
selected track. Press the SHIFT and Touch buttons
simultaneously to engage Latch Automation on the currently
selected track.
Touch / Latch. 在当前选定的轨道上,启动触感自动化。同
时,按 SHIFT 键和Touch键,在当前选定的轨道上,实现锁
存自动化。
2.
Write/Trim.Engages Write Automation on the currently selected track.
At the time of publication, Trim Automation is not available in Studio
One.
Write/Trim.在当前选择的轨道上,启用 Write Automation。在出版之
时,修剪自动化在Studio One中是不可用的。
3.
Read / Off. Engages Read Automation on the currently selected track.
Press the SHIFT and Read buttons simultaneously to turn automation
off on the selected channel.
Read / Off. 在当前选定的轨道上启动 Read Automation。同时按下
SHIFT和Read按钮,可以关闭所选通道上的自动化。

13
2
Studio One
FaderPort™ Multichannel Production Controllers
Click on the pull-down menu in the Control Link
display to launch the FaderPort editor window.
点击在控制链接中显示的下拉菜单,启动 FaderPort
编辑窗口。
Right-click on any FaderPort control and select
“Assign Command” to customize your FaderPort.
在任何 FaderPort 控制上按右键,选择 “Assign
Command” 来定制你的 FaderPort。

14
3
Pro Tools(HUI)
FaderPort™ Multichannel Production Controllers
3 Pro Tools(HUI)
3.1 Getting Started 开始使用
3.1 Getting Started Owner’sManual
By default, the FaderPort is in Studio One operation mode. To switch to Pro
Tools operation, press and hold the NEXT button while powering on your
FaderPort, then press the Touch button to enable Pro Tools (HUI) operation.
默认情况下,FaderPort 处于 Studio One 操作模式。要切换到Pro Tools操作,
在打开FaderPort电源的同时,按住 NEXT 按钮,然后按 Touch 按钮,启用Pro
Tools(HUI)操作。
TheFaderPort is a class-compliant device in both macOS ® and Windows ®.
Simply connect your FaderPort to a free USB port on your computer. No further
installation is necessary.
FaderPort 在macOS ® 和Windows ® 中都是一个符合等级标准的设备。只需
将FaderPort 连接到计算机上的一个空闲 USB 端口。不需要进一步安装。
Once you have connected your FaderPort to your computer and the power
supply, power it on and launch Pro Tools to set up the FaderPort as a HUI
device.
你的 FaderPort 一旦连接到你的电脑和电源上,打开电源并启动 Pro Tools,
将FaderPort 设置为HUI设备。
1.
Go to Setups | Peripherals. 进入 "Setups" | "Peripherals"。
2.
Create one HUI device under MIDI Controllers. 创建一个在MIDI控制器下的HUI设备。
3.
Set the Receive From and Send To menus to “PreSonus FP2” and #Ch’s to 8.
将"Receive From" 和"Send To" 菜单设置为 "PreSonus FP2",将#Chs设置为8。
4.
Click“OK.” 点击 “OK”
Your FaderPort is now ready to use. Enjoy!
你的FaderPort现在就可以使用了。请享受吧!
ProTools (HUI)

15
3
3.4
Pro Tools (HUI)
The Session Navigator
FaderPort™ Multichannel Production Controllers
Owner’s Manual
3.3 Transport Controls
3.2 Channel Strip 通道条插件
1.
Arm. Pressing the Arm button will allow you to arm
the currently selected track for recording. Press with
SHIFT to arm all tracks for recording.
Arm. 按"Arm"按钮,可以为录音配备当前选定的轨
道。按下SHIFT键,可以为录音配备所有轨道。
2.
Mute.Mutes the corresponding channel’s output
signal. Press with SHIFT to clear mutes on the
active bank.
Mute. 将相应通道的输出信号静音。按 SHIFT 键可
以清除活动库的静音。
3.
Solo.Isolates the corresponding channel’s output
signal in the mix. Press with SHIFT clear soloes on
the active bank.
Solo.隔离混音中相应通道的输出信号。用 SHIFT键
清除活动库上的独奏。
4.
Bypass / Bypass All. At the time of publication,
this button has no functionality in Pro Tools.
Bypass / Bypass All. 在公布之时,这个按钮在
Pro Tools中没有任何功能。
5.
Touch-Sensitive Fader. This 100 mm motorized
fader can be used to control volume levels and
panning in Pan Flip mode. See Section 3.4 for
details.
Touch-Sensitive Fader. 这个100毫米的机动控制器,
可以用来控制音量大小和在 Pan Flip模式下的声像控
制。详见第3.4节。
1 2 3 4 5 6
1.
Stop. Stops playback. 停止播放。
2.
Loop. Engages / disengages Looping. 启用/取消Looping播放。
3.
Play / Pause. Starts playback at the current playback-cursor position. 在当
前播放光标的位置,开始播放。
4.
Rewind.
Press once to regress playback by bar, second, frame, or
base sample rate depending on mode. Press and hold to regress in
finer increments. Press the Rewind and Fast Forward buttons
simultaneously to Return to Zero. 按一次可以按小节、秒、帧或基本采
样率回放,取决于模式。按住不放可以以更细的增量回放。同时按
Rewind和Fast Forward 按钮可以Return 返回到零点 Zero。
4 3
1
5

16
3
3.4
Pro Tools (HUI)
The Session Navigator
FaderPort™ Multichannel Production Controllers
Owner’s Manual
5.
FastForward.Press once to advance playback by bar, second, frame, or
base sample rate depending on mode. Press and hold to advance in
finer increments. 按一次可以按小节、秒、帧或基本采样率推进播放,具
体取决于模式。按住不放可以以更细的增量前进。
6.
Record. Press to enable record ready. Press with Play to start recording at
the current playback-cursor position for record-enabled tracks. 按一下,
使录音准备就绪。在播放时按下,可以在当前播放光标位置,开始录音,
用于录音轨道的支持。
3.4 The Session Navigator 会话导航
The Session Navigator provides quick navigation and session controls.
Each button alters the functions of the push-button encoder and the Next
and Prev buttons on either side.
Session Navigator会话导航仪提供快速导航和会话控制。每个按钮都改变了
按钮编码器和两侧的 Next 和Prev 按钮的功能。
Pressing SHIFT+Prev will Undo the last action. Pressing SHIFT + Next will
Redo the last action.
按SHIFT+Prev 将撤销上一个动作。按 SHIFT+Next 将重做上一个动作。
1 2 3 4 5 6 7 8
1.
Link. At the time of publication, this button has no function in Pro Tools. 在公布之时,
这个按钮在Pro Tools中,没有任何功能。
2.
Master. This function is not available in HUI mode.这个功能在HUI模式下,是不可用
的。
3.
Pan. Encoder controls panning. Navigation buttons scroll through track list. Press
SHIFT + Pan to use the fader to control panning. Pressing the encoder toggles pan
control between Left and Right for stereo channels. Encoder 编码器控制声像。导航
按钮在轨道列表中滚动。按 SHIFT + Pan 来使用控制器来控制声像。按编码器可以
在立体声通道的左和右之间切换声像控制。
4.
Click. Turns the metronome on/off. The metronome can be engaged or disengaged
while any mode is active. Note: This only functions if a click track has been created
for the Pro Tools session. 打开/关闭节拍器。在任何模式下,节拍器都可以被激活或
关闭。
注意:只有在为
Pro Tools session
创建,点击轨道的情况下才有此功能。
5.
Channel. Encoder and navigation buttons select the previous or next channel.
Press SHIFT + Channel to lock the channel controls to the currently selected
track. Encoder 编码器和导航按钮,选择上一个或下一个频道。按 SHIFT+Channel,
将通道控制锁定在当前选定的轨道上。

17
3
3.4
Pro Tools (HUI)
The Session Navigator
FaderPort™ Multichannel Production Controllers
Owner’s Manual
3.5 Automation Controls 自动化控制
6.
Section. This function is not available in HUI mode. 此功能在HUI模式下不可用。
7.
Scroll / Zoom. Press once to enable audio scrubbing. Press twice to enable faster
audio scrubbing. Press Stop or any other Session Navigator button to disengage
scrubbing. Press SHIFT + Scroll to enable Zooming. While Zoom is active, encoder
and navigation buttons control horizontal zooming. 一旦按住,启用 audio scrubbing。
按两下可使 audio scrubbing 速度加快。按 "Stop" 或任何其他会话导航器按钮来解除
清理。按SHIFT + Scroll键,启用缩放功能。当缩放激活时,编码器和导航按钮控制
水平缩放。
8.
Marker. Encoder and navigation buttons scroll through markers 1-9. Press Encoder
to drop a marker. Press Shift and Marker to cycle through the tools. 编码器和导航按
钮在标记物1-9中滚动。按编码器可以放下一个标记。按Shift和Marker来循环使用这
些工具。
1 2 3
1.
Touch / Latch. Engages Touch Automation on the
currently selected track. Press the SHIFT and Touch
buttons simultaneously to engage Latch Automation on the
currently selected track.
在当前选定的轨道上,启动触感自动化。同时按 SHIFT 和
Touch键,在当前选定的轨道上,启用锁存自动化。
2.
Write / Trim. Engages Write Automation on currently
selected track. Press the SHIFT and Write buttons
simultaneously to engage Trim Automation on the
currently selected track.
在当前选定的轨道上,进行Write Automation。同时按下
SHIFT和Write按钮,在当前选定的轨道上,进行Trim
Automation。
3.
Read / Off. Engages Read Automation on the currently
selected track. Press the SHIFT and Read buttons
simultaneously to undo the last action.
在当前选定的音轨上,启动 Read Automation功能。同
时按下SHIFT和Read 按钮,可以撤销上一个动作。

18
4
4.1
Logic (MCU)
Getting Started
FaderPort™ Multichannel Production Controllers
Owner’s Manual
4.1 Getting Started 开始使用
4 Logic (MCU)
By default, the FaderPort is in Studio One operation mode. To
switch to Logic operation, press and hold the NEXT button while
powering on your FaderPort, then press the Mute button to enable
Logic (MCU) operation.
默认情况下,FaderPort 处于Studio One操作模式。要切换到Logic
操作,在打开 FaderPort电源的同时,按住NEXT按钮,然后按Mute
按钮,启用 Logic(MCU)操作。
The FaderPort is a class-compliant device in both
macOS ® and Windows ®. Simply connect your
FaderPort to a free USB port on your computer. No
further installation is necessary. FaderPort在macOS ®和
Windows ®中都是一个符合等级标准的设备。只需将
FaderPort 连接到计算机上的一个空闲USB端口。不需要
进一步安装。
Once you have connected your FaderPort to your computer
and the power supply, power it on and launch Logic. The
FaderPort will auto- configure as a Mackie Control Universal
device. If for some reason this does not happen, you will need
to enable it manually.
一旦你的FaderPort连接到你的电脑和电源上,打开电源并启动
Logic。FaderPort会自动配置为Mackie Control Universal设备。
由于某种原因如果没有实现,你需要手动启用它。
1.
If you do not have Advanced preferences
enabled, go to Logic Pro | Preferences |
Advanced Tools…
如果你没有启用 Advanced preferences,请进入
Logic Pro | Preferences | Advanced Tools...
2.
Enable “Show Advanced Tools.” 启用 "显示先进工具"。
Logic (MCU)
Other manuals for FADERPORT
2
Table of contents
Other PRESONUS Controllers manuals

PRESONUS
PRESONUS FaderPort 16 User manual

PRESONUS
PRESONUS FaderPort 16 User manual

PRESONUS
PRESONUS FaderPort 16 User manual

PRESONUS
PRESONUS TubePre V2 User manual

PRESONUS
PRESONUS ATOM SQ User manual

PRESONUS
PRESONUS FaderPort 16 User manual

PRESONUS
PRESONUS FADERPORT User manual

PRESONUS
PRESONUS Studio 24c User manual

PRESONUS
PRESONUS FaderPort 16 User manual

PRESONUS
PRESONUS FaderPort 8 User manual


