Presto 7912 User manual

This is a Listed appliance. The following important safeguards are recommended by most portable appliance manufacturers.
IMPORTANT SAFEGUARDS
When using electrical appliances, basic precautions should always be followed to reduce the risk of re, electrical shock, and injury to persons,
including the following:
1. Read all instructions before using this heater.
2. This heater is hot when in use. To avoid burns, do not let bare skin touch hot surfaces. Use handle when moving this heater. Keep combustible
materials, such as furniture, pillows, bedding, papers, clothes, and curtains at least 3 feet (.9m) from the front of the heater and keep them
away from the sides and rear.
3. Extreme caution is necessary when any heater is used by or near children or invalids and whenever the heater is left operating and
unattended.
4. Always unplug heater from wall outlet when not in use.
5. Do not operate this heater with a broken element or ceramic cone or with a damaged cord or plug, or after the heater malfunctions, or after
it has been dropped or damaged in any manner. Return the heater to the Presto Factory Service Department for examination, repair, or
electrical or mechanical adjustment.
6. Do not use outdoors.
7. This heater is not intended for use in bathrooms, laundry areas and similar indoor locations. Never locate heater where it may fall into a
bathtub or other water container.
8. Do not run cord under carpeting, do not cover cord with throw rugs, runners or the like. Arrange cord away from trafc area and where it
will not be tripped over.
9. To disconnect heater, turn controls to off, then remove plug from wall outlet.
10. Connect cord to a polarized outlet only. The plug has one blade wider than the other. It can be plugged into the wall outlet only one way.
11. Do not insert or allow foreign objects to enter the grille or any ventilation or exhaust opening as this may cause an electrical shock, re, or
damage the heater.
2006 by National Presto Industries, Inc.
1000 Watts
3415 BTUs
120 Volts AC
Feels like three times the heat…costs a third less to operate.
Illuminated Footlightbase tells you at a glance if the heater is
plugged in. Uses no more energy than a standard night light.
Parabolic reector focuses energy like a satellite dish.
Warmth you can feel almost instantly…without rst heating
the entire room.
InstructIons
Visit us on the web at www.GoPresto.com
HeatDish
Plus Footlight
parabolic electric heater
1

GETTING ACQUAINTED WITH YOUR
PRESTOPARABOLIC HEATER
How the “Parabolic Heater” keeps you warm...
The Presto HeatDishPlus Footlight parabolic electric heater is designed to heat people and objects directly, without rst
heating the air space around them. This allows the actual room temperature to be kept at a lower level while personal comfort is
maintained.
The heat is produced by a coiled wire element wrapped around a ceramic cone. This heat is directed in a concentrated beam, by a
parabolic reector, which results in most of the heat being directed on the individual.
The element heats directly only when the power is ON, however, the ceramic cone, after it is heated by the element, will retain
heat. Even when the thermostatic control is positioned to cycle ON/OFF, the ceramic cone will emit heat when the power is OFF
resulting in a uniform feeling of heat.
How the “Parabolic Heater” can help save energy...
The parabolic reector focuses heat output, like a satellite dish concentrates TV signals, so it requires less energy than convection
electric heaters to deliver all the warmth you’ll want.
It provides super concentrated heat to keep you much warmer than 1500 watt convection heaters. Yet, because it uses just 1000
watts, it costs a third less to operate and could help you save money on electric bills.
A “parabolic heater” coupled with other conservation measures will help save energy in your home. For example, energy savings
may be realized by keeping the thermostat on your central heating system at a lower than normal setting and thereby decreasing the
average room temperature. Personal comfort can be maintained at these lower room temperatures by using a parabolic heater.
How your PrestoParabolic Heater
works...
Heat output is controlled by an automatic
“switch”builtintotheunit.This“Thermostatic
Control” switch continually turns the heating
element ON and OFF in a brief cycle period.
The “Thermostatic Control” knob (Fig. A),
located on the top of the heater, adjusts the
length of the ON and OFF portions of the
cycle. The “Thermostatic Control” contains
a special switch which provides you with
an innite range of settings. This type of
switch does produce a ash of light each
time the thermostatic control cycles on and
off. The ash always occurs, but tends to be
more visible when the room is darkened. It
is normal. The illuminated Footlightbase tells you at a glance if the heater is plugged in.
12. To prevent a possible re, do not block air intakes or exhaust in any manner. Do not use on soft surfaces, like a bed, where openings may
become blocked.
13. This heater has hot and arcing or sparking parts inside. Do not use it in areas where gasoline, paint, or ammable liquids are used or
stored.
14. Use this heater only as described in this folder. Any other use not recommended by the manufacturer may cause re, electric shock, or injury
to persons.
15. Avoid the use of an extension cord because the extension cord may overheat and cause a risk of re. However, if you have to use an extension
cord, the cord shall be No. 16 AWG minimum size and rated not less than 1500 watts.
16. This heater includes an audible alarm to warn that parts of the heater are getting excessively hot. If the alarm sounds, immediately turn the
heater off and inspect for any objects on or adjacent to the heater that may cause high temperatures. DO NOT OPERATE THE HEATER
WITH THE ALARM SOUNDING.
17. Do not operate heater with base removed.
18. Do not attempt to repair, adjust, or replace parts, other than the Footlightbulb, in the heater. The Presto Factory Service Department should
check and repair broken heaters.
SAVE THESE INSTRUCTIONS
Heating element
Lens cover
Protective grille
Top-mounted
thermostatic control
Recessed handle
Power cord
Parabolic reector
Wide base
Fig. A
2

The heater features an automatic safety switch which turns the unit OFF in case of accidental tip-over. Plus a loud buzzer sounds a
warning if tip-over occurs while the element is cycled ON. The buzzer is designed to be extremely sensitive and to provide a warn-
ing tone whenever the heater is moved while cycled ON. In addition, the buzzer may sound and the heater will shut off if too much
dust or dirt has accumulated on the parabolic reector. To clean the parabolic reector, see cleaning instructions on page 4.
With the “Thermostatic Control” knob (Fig. B) set to the “HI” position, the electricity is sup-
plied to the heating elements 100% of the time and the heater is ON constantly. In the “LOW”
position, electricity is supplied to the heating elements only part of the time. This varies with the
room temperature. The colder the temperature is in the room, the more often the heater will cycle
on. The heater will automatically cycle on and off at the “LOW” setting and maintain a constant
temperature.
The desired comfort level can be maintained by adjusting the “Thermostatic Control” knob and
thereby regulating the total heat output of the unit.
The Footlightbase feature…
The Footlightbase lights up whenever the cord is plugged into an outlet. It not only produces an
attractive glow, but also lets you know at a glance when the heater is plugged in. And, the glow is energy efcient. The Footlight
base uses no more power than a standard night light.
The Footlightbase operates independently from the rest of the heater. It is even independent of the automatic safety switch (which
turns the heater’s element off if the heater is tipped in any direction) and the buzzer (which sounds an audible warning if the heater
is tipped while the element is cycled on). The Footlightbase is designed to let you know at all times that the heater is plugged in.
That means that if the heater is plugged in:
1. The Footlightbase will glow even if the thermostatic control is turned to OFF.
2. The Footlightbase will continue to glow even if the unit is tipped and is buzzing.
3. The Footlightbase will glow, but the buzzer will not sound, if the heater is plugged in and tipped, and the element is not
cycled on.
Your Presto Parabolic Heater is shipped completely assembled. Before using the heater for the rst time, familiarize yourself
with the parts of the heater (Fig. A, page 2) and read the information on the following pages. For proper operating position, stand
the heater upright with the bottom of the base resting at on the oor.
Locating the heater...
When positioned correctly, the parabolic heater will keep you toasty warm. Follow these suggestions for maximum warmth:
1. Point the front grille towards the area in which heat is desired.
2. Check to make sure there are no objects between you and the heater. Such objects will absorb the heat and prevent it from
reaching you.
3. Place the heater at least 3 feet, but no more than 10 feet away. The parabolic design of the reector focuses heat at persons 3
to 10 feet away. Thus for your entire body to enjoy the heat produced by the heater, it must be placed at least 3 feet from you.
Placing it closer will turn the heater into a foot warmer, rather than a body warmer. Experiment with various positions until
you nd the one that is right for you.
4. Remember, this unit is primarily a people heater rather than a room heater, and using it to heat a room is not recommended.
The infrared heat produced by this heater will travel through glass, just like the sun’s rays. If the heater is aimed at a window,
objects outside will be heated.
When using any heater, the following safety precautions should always be observed:
Close attention is necessary when the heater is used where children are present.
The heater should always be in a stable, upright position with at least 3 feet of space between the front of the unit and any
other surface.
The heater should never be placed in a closed area such as beneath furniture, in cabinets, or beneath or behind curtains or
drapes. Nor should it be hung from a wall or ceiling.
Heat produced by any heater tends to pull moisture from the air. It is recommended that you avoid sitting with your face directly
in front of the heating element. The intense heat may dry your eyes and cause irritation.
Operating the heater...
1. Turn the “Thermostatic Control” (Fig. B) to the OFF position.
2. Plug the power cord into a 120 volt, 60 cycle circuit which serves nothing else and has a polarized outlet. As a safety feature,
this appliance has a polarized plug (one blade is wider than the other). This plug will only t in a polarized outlet one way. If
Fig. B
3

the plug does not t fully in the outlet, reverse the plug. If it still does not t, contact a qualied electrician. Do not attempt
to defeat this safety feature. Because the heater is a 1000 watt appliance, it is normal for the plug to feel warm to the touch
during operation.
Note: The Footlightbase will illuminate whenever the cord is plugged into an outlet to indicate the heater is electrically
activated.
Caution: Plug directly into a wall outlet. This heater is not intended for use with an extension cord.
3. Turn the “Thermostatic Control” knob to its “HI” position. There may be a vibrating sound when the heater is turned on.
This is normal and should last only about a half minute. When using the heater for the rst time, there may also be a slight
odor or light smoking as manufacturing coatings “burn” off. This, too, is normal during the rst several uses.
4. Allow the heater to operate on its “HI” setting for at least three minutes to bring the heating element to its optimum operating
temperature. Anytime after that, the “Thermostatic Control” knob may be adjusted to any position necessary to maintain the
desired comfort level.
Remember, after the “Thermostatic Control” knob is turned to any ON position below “HI”, the heater will be continually
turning itself ON and OFF to control the heat output. This may not always be obvious because, due to residual heat in the
heating element, it will continue to glow at most settings. You may also hear a slight “clicking” sound as the automatic switch
cycles the heating elements ON and OFF, or, when in a darkened room, see a ash of light.
If additional heat is desired, turn the “Thermostatic Control” knob to a higher setting. This will lengthen the ON cycle and the
heater will produce more heat. If less heat is desired, turn the knob to a lower setting. The ON cycle will then be shortened,
producing less heat.
5. After use, turn the “Thermostatic Control” knob to the OFF position and disconnect the plug from the wall outlet.
Care, Cleaning and Storage...
Allow heater to cool completely before any care or cleaning or storage. Also be sure
heater is turned off and unplugged.
1. Do not pour or spray any water, cleaners, or any liquid on or into any portion of the
heater. Do not submerge heater in any liquid.
2. Use a soft lint free damp cloth and a mild detergent to clean the exterior surfaces.
Harsh or abrasive cleaners will damage the nish.
3. Occasionally the parabolic reector inside the grille will need to be cleaned to remove
dust accumulation. To remove dust from the parabolic reector, you may purchase a
specially designed cleaning device such as the one offered on the Important Instructions
sheet enclosed. You may also dust the reector by following these simple steps: 1) Unplug
the heater and allow to cool; 2) support the heater on its back; 3) slip a soft lint free cloth
through the grille; 4) move the cloth over the surface of the parabolic reector by inserting
a long thin handle (such as a dowel or the handle portion of a wooden spoon) through
the grille, using it to slide the cloth from spot to spot over the surface of the reector;
5) remove the handle and the cloth when the surface is dust free.
Note:Ifyouallowdusttobuildupontheparabolicreector,thedustaccumula-
tion may cause the heater to overheat and the warning buzzer to sound. If this
should occur, clean the parabolic reector as previously instructed. Once the dust is
removed, the heater should work normally again. If however after cleaning, the heater
does not work properly or the buzzer continues to sound, send the heater to the Factory
Service Department listed on the next page.
4. Wrap the cord around the base pedestal and store heater in a dry location.
5. The Footlightbase contains a standard 4 watt light bulb (type C7) which can be found
at any hardware or discount store. Should there ever be a need to replace the bulb*, it’s
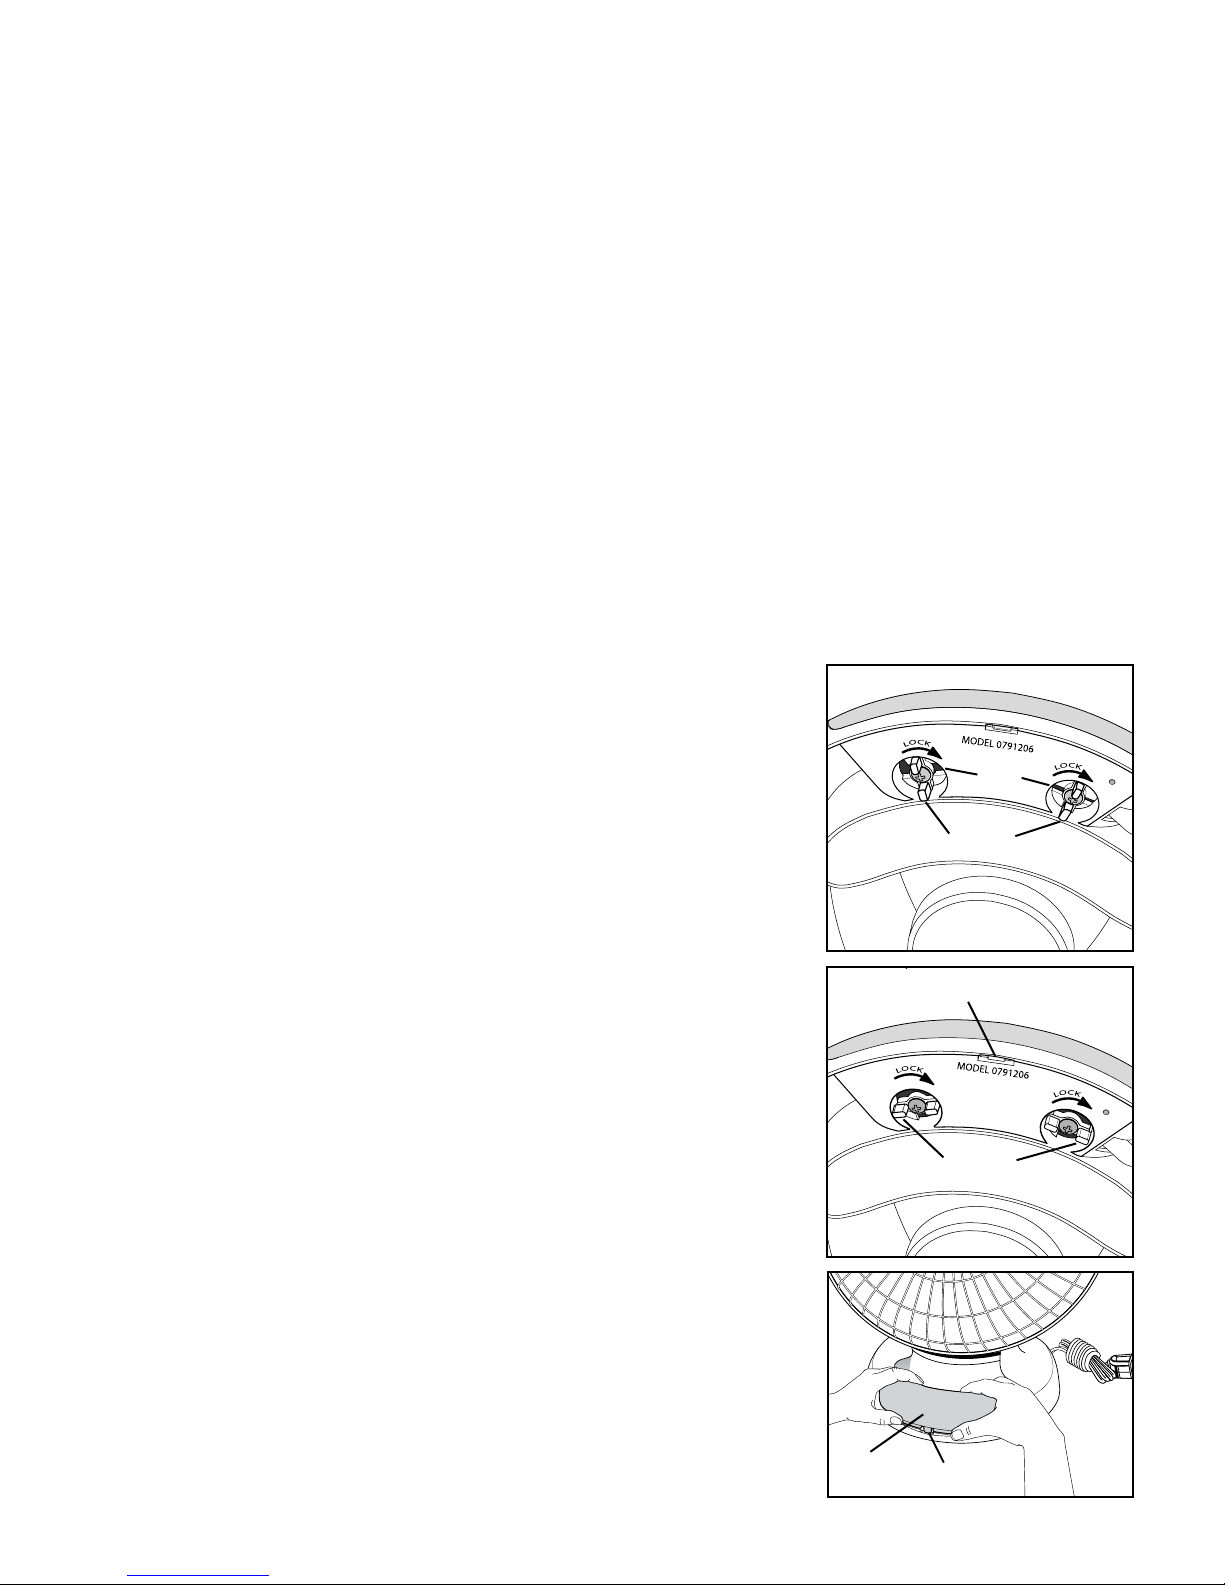
easy to do. First, unplug the heater. Lay the heater on its back with the base towards you.
On the bottom of the base below the model number are two lock lugs (Fig. C). Rotate
the two lock lugs counterclockwise a quarter turn until the lugs are aligned in the slots
(Fig. D). Then with your thumbs, push the lock lugs up through the slots. The lens
cover will be ajar. Return the heater to the upright position. Position your thumbs on
the base and your ngertips at the top of the lens cover. Using your ngertips, pull
the top of the lens cover toward you (Fig. E). You will hear a snapping noise as the
front locking tab disengages.
Now unscrew (turning counterclockwise) the original light bulb and discard. Replace
it with a new bulb.
Lens
cover Fig. E
Locking tab
Fig. D
Lock lugs aligned in slots
Locking tab
Fig. C
Lock lugs in locked position
Slots
4

This quality PRESTOappliance is designed and built to provide many years of satisfactory
performance under normal household use. Presto pledges to the original owner that should
there be any defects in material or workmanship during the rst year after purchase, we will
repair or replace it at our option. Our pledge does not apply to damage caused by shipping. To
obtain service under the warranty, return this PRESTOappliance, shipping prepaid, to the
Presto Factory Service Department. When returning a product, please include a description
of the defect and indicate the date the appliance was purchased.
We want you to obtain maximum enjoyment from using this PRESTOappliance and ask
that you read and follow the instructions enclosed. Failure to follow instructions, damage
caused by improper replacement parts, abuse or misuse will void this pledge. This warranty
gives you specic legal rights, and you may also have other rights which vary from state to
state. This is Presto’s personal pledge to you and is being made in place of all other express
warranties.
NATIONAL PRESTO INDUSTRIES, INC.
Eau Claire, WI 54703-3703
PRESTOLimited Warranty
U. S. Patent D456,067 Form 72-676A
Place the lens cover back on the heater. Then press on the cover’s sides and top until the lens cover and front locking tab snap
into place. Rotate the lock lugs clockwise to the lock position (Fig. C).
*CAUTION: Use ONLY a standard 4 watt, 120 volt light bulb (type C7) for replacement of the bulb in the Footlightbase; use of a higher
wattbulbcouldcauseare.
Service Information...
If the heater is used with a loose or worn AC outlet, this poor connection may cause overheating and distortion of the plug. If the plug
is distorted, we suggest you contact the Presto Consumer Service Department.
If you have any questions regarding the operation of your Prestoappliance or need parts for your appliance, call our Consumer Service
Department weekdays 8:00 AM to 4:30 PM (Central Time) at 1-800-877-0441 or write:
NATIONAL PRESTO INDUSTRIES, INC.
Consumer Service Department
3925 North Hastings Way, Eau Claire, WI 54703-3703
You may also contact us at our website www.GoPresto.com. Inquiries will be answered by telephone, letter, or email. When writing,
please include a phone number and a time when you can be reached during weekdays if possible.
Any maintenance required for this product, other than normal household care and cleaning should be performed by our Factory Service
Department. Be sure to indicate date of purchase and a description of defect when sending an appliance for repair. Send appliances for
repair to:
CANTON SALES AND STORAGE COMPANY
Presto Factory Service Department
555 Matthews Drive, Canton, MS 39046-0529
The Presto Factory Service Department is equipped to service all PRESTOappliances and supply genuine PRESTOparts. Genuine
PRESTO replacement parts are manufactured to the same exacting quality standards as PRESTOappliances and are engineered
specically to function properly with its appliances. Presto can only guarantee the quality and performance of genuine PRESTO
parts. “Look-alikes” might not be of the same quality or function in the same manner. To ensure that you are buying genuine PRESTO
replacement parts, look for the PRESTOtrademark.
When ordering replacement parts, please specify the model number found stamped or imprinted on the bottom side of the plastic base.
5
This manual suits for next models
1
Table of contents
Other Presto Heater manuals
Popular Heater manuals by other brands

Simfer
Simfer S1800WT instruction manual

netta
netta NTH20-JRA manual

Advanced Radiant Systems
Advanced Radiant Systems KMI Installation, operation and service instructions

Argo
Argo LOXO operating instructions

ARDES
ARDES AR4P12 Instructions for use

Pinnacle Climate Technologies
Pinnacle Climate Technologies REMINGTON REM-45-KFA-B User's manual & operating instructions