Prevue Pet Products 465 User manual
5...
6...
7. . . 8...
9...
10...
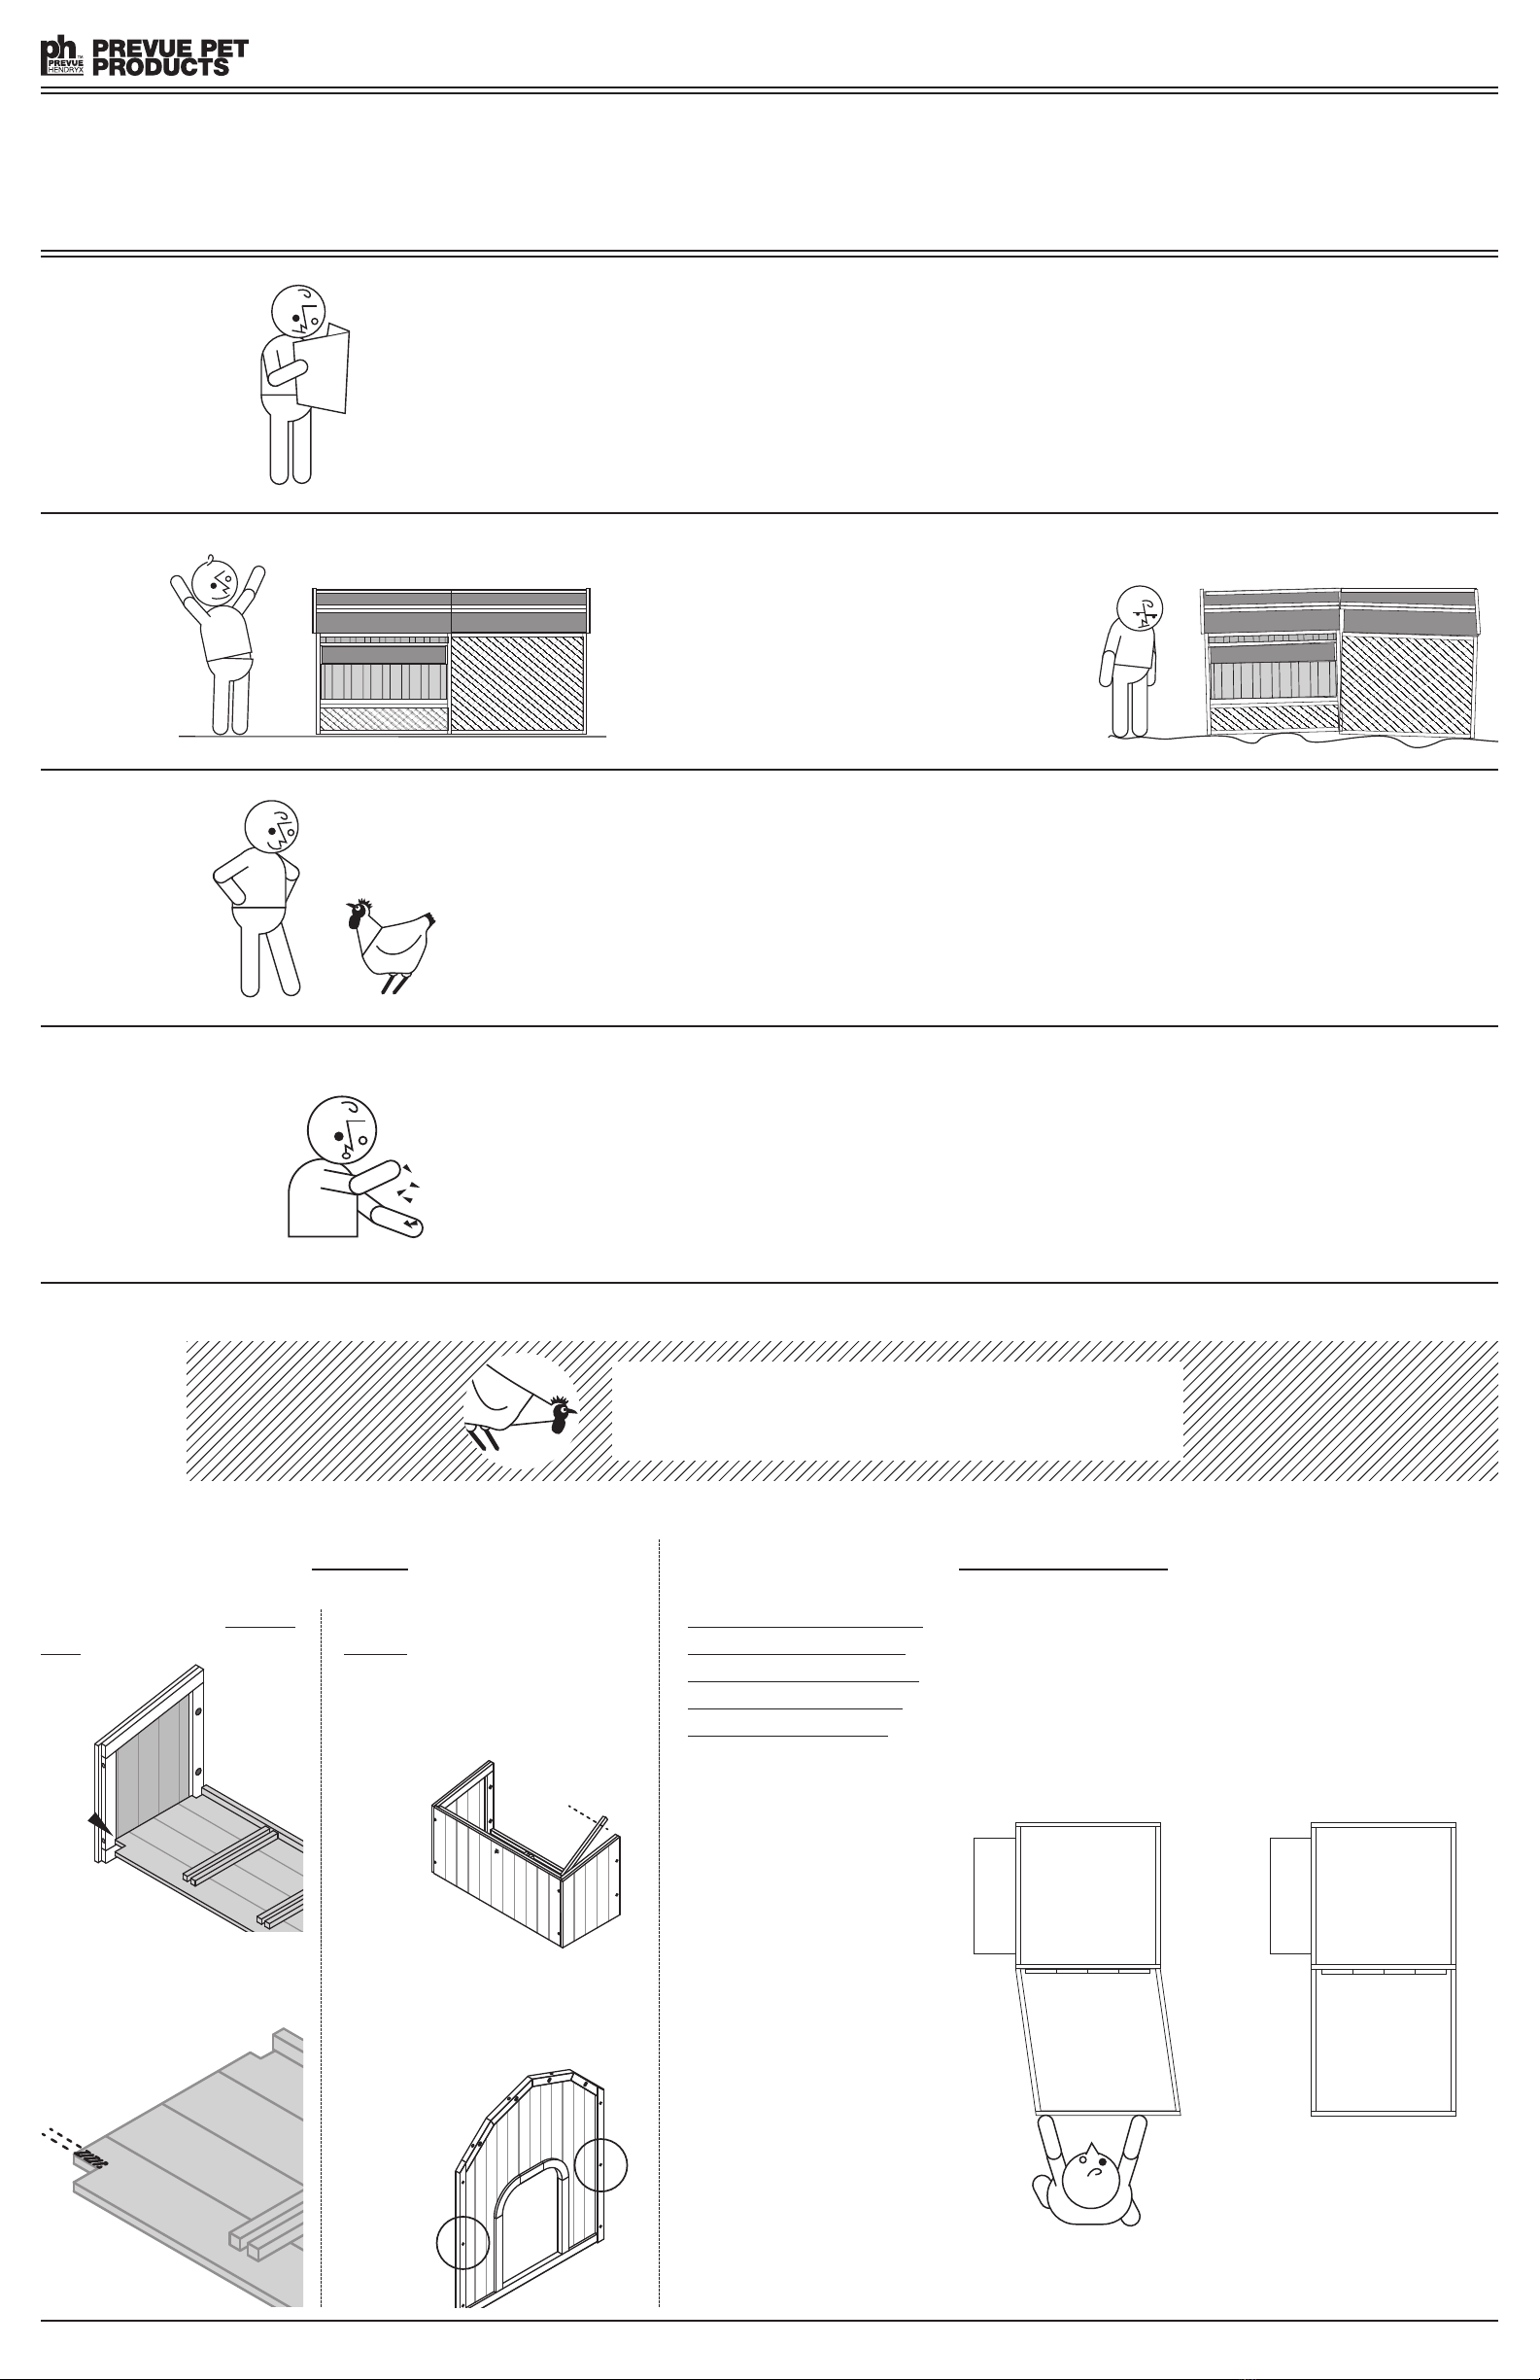
For uccessful Assembly of Your Chicken Coop (MODEL #465)
Follow this pecking order
465 SUPPLEMENTAL —10/16—UST Made in China for Prevue Pet Products, Inc., 224 N Maplewood Ave, Chicago IL 60612 USA • www.prevuepet.com • 1 [800] 243-3624 • customerservice @ prevuepet.com
You may experience a nest box
floor that fits too tightly.
If necessary, cut away approxi-
mately a ⅛" slice from the
non-divider stop bar side,
as illustrated.
A production error has the nest box
lid prop too long in some models.
Cut ½"– ¾" off the end, so it can
clear the underside of the nest box
lid. Assemble first and only cut if
necessary.
A production error has two unnec-
essary pre-drilled holes on the door
frame. Please ignore—they are not
required.
LEVEL = GOOD! NOT LEVEL = NOT GOOD
If you’ve never followed instructions before, this is a good
time to start! These tips have been compiled to lead you to a
successful assembly. We know you can do this! Good luck!
(If you still run into trouble, call Prevue Customer ervice at
(800) 243-3624.)
If you follow these steps, coop assembly will be easy for one
person. But you may find a second person’s assistance useful
in some steps.
If you have to move the assembled cage to its final location,
you will definitely need assistance to protect the integrity
of the cage.
After unpacking all components, count the contents of the
screw and dowel packets. Compare the counts against the
instructions. There should be one spare for each packet.
If any packets are short, please contact Prevue or use your
own appropriate-size replacements.
READ THESE
INSTR CTIONS!
FIND A LEVEL S RFACE
FIND A FRIEND
(or GO IT ALONE
—both are OK)
CO NT CONTENTS
OF ALL HARDWARE
PACKETS
PAY SPECIAL ATTENTION TO
STEP3: Assembling the NEST BOX STEP5: Assembling the ROOF PANELS & TRIM
CHICKEN
RUN
COOP
HOUSE
NEST BOX
CHICKEN
RUN
COOP
HOUSE
NEST BOX
EAD!
EAD!
EAD!
ALIGNED = GOOD!
quaring up the cage before
assembling the roof is the
single most-important step
you can take to guarantee
the best roof alignment.
A squared-up frame will
result in correct alignment
and a nicer finished product.
IMPORTANT: DO NOT screw
the roof panels down until
all panels have been laid in
position and aligned evenl .
Place the roof panels over
the chicken run first. Check
alignment. Place the roof
panels over the coop house
area. Check alignment.
When all panels have been
positioned and aligned,
attach each with the appro-
priate screws.
The view of the coop
framework from above
shows good alignment
of all coop and chicken
run panels.
SKEWED = BAD!
The view of the coop
framework from above,
with skewed alignment.
This will result in bad
roof panel placement.
Just slide the frame-
work over to realign.
1
2
3
4
5
Build your coop on a flat surface and, with a friend,
carry it to the location where it will be used.
Assembling the coop on the flattest surface available
will help you greatly when squaring up panels and
aligning the roof.
F IEND ME!
EASY AS 1-2-3 !
465 SUPPLEMENTAL —10/16—UST For more wonderful cages, toys, and accessories for dogs, cats, birds, chickens, rabbits, ferrets and small animals, visit www.prevuepet.com
Chicken Coop
4–6 Hens
Model: #465 Instructions online at www.prevuepet.com
read first
RE IEW BEFORE ASSEMBLY
For best results:
• Read all instructions and count the
contents of hardware packets first
before proceeding
• Please follow the CARE ADVI ORY
to maintain product longevity
TOOLS
ome tools are required:
• mall rubber mallet or hammer
for wood pegs
• Phillips-head screwdriver or
power drill with Philips head bit
for all screws
CUSTOMERSUPPORT
Please contact Prevue Pet Products:
PHONE 312.243.3624
ONLINE www.prevuepet.com
EMAIL customerservice@prevuepet.com
The most-current instructions are
online at www.prevuepet.com under
the item’s detail listing.
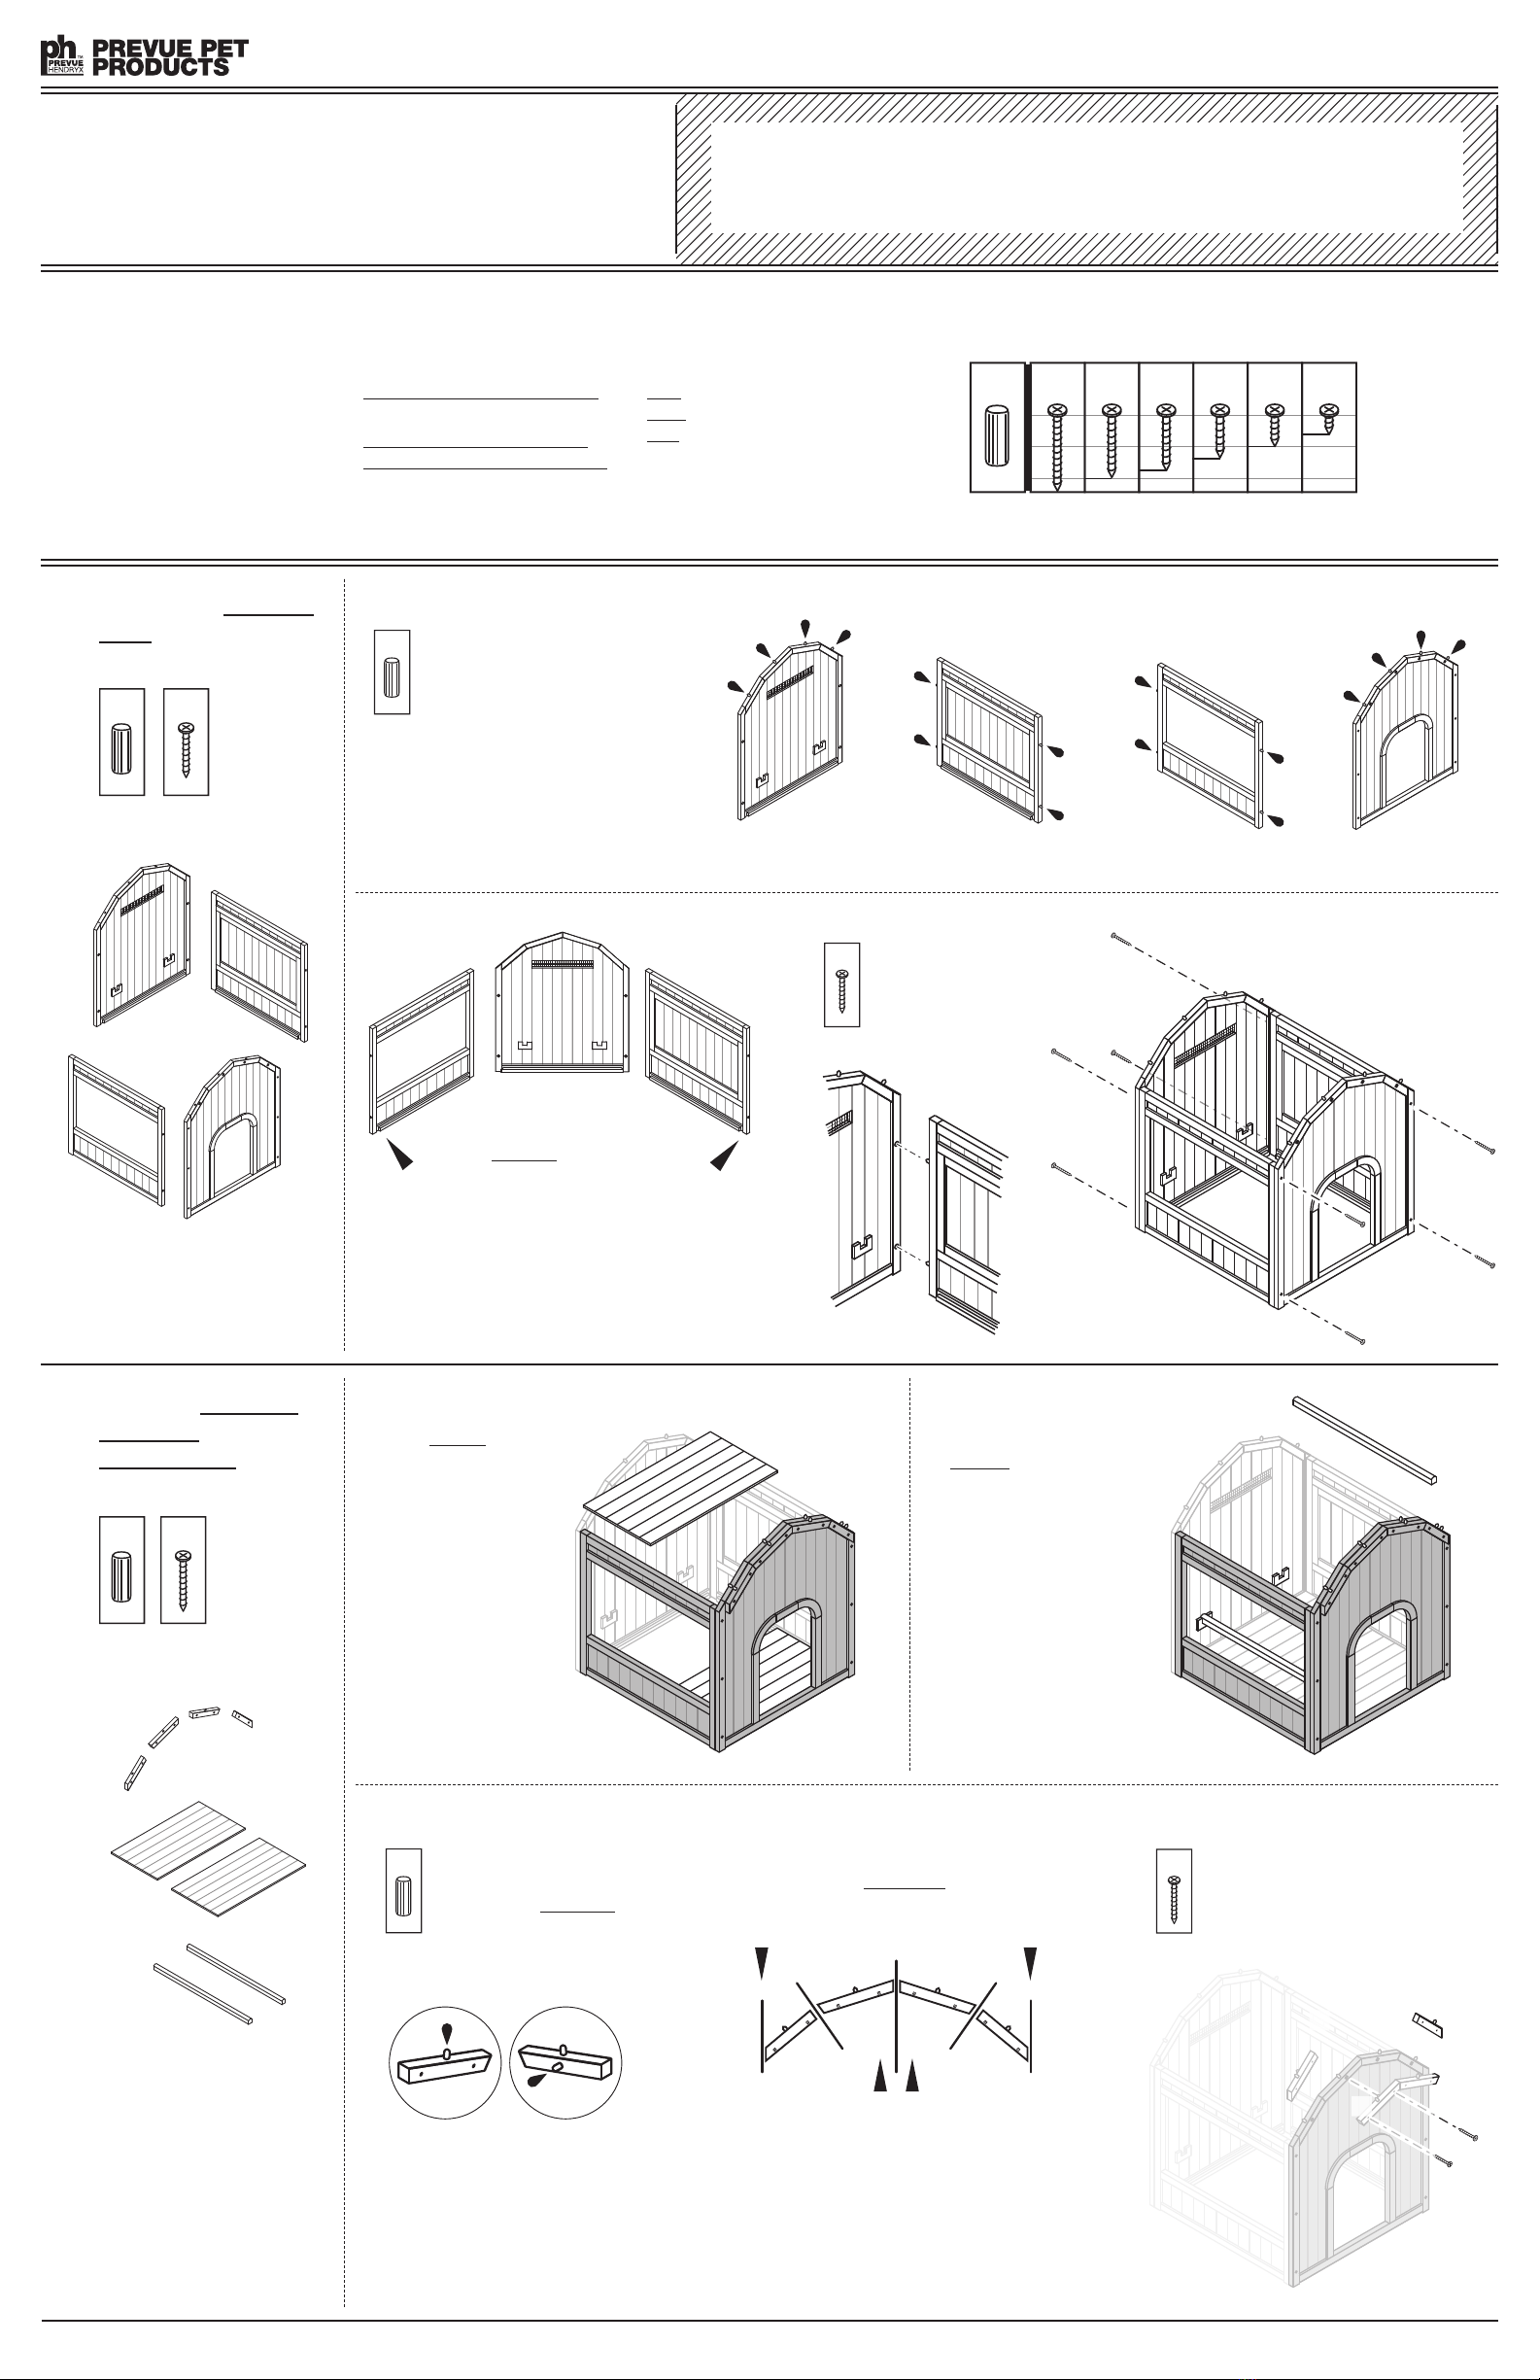
1To assemble the MAIN COOP
HOUSE, you will need these
pieces:
CARE ADVISORY To maintain the longevity of your purchase,
we recommend that you periodically treat it with a non-toxic sealant and protect it
with a tarp or other covering during extended periods of inclement weather.
KEY TO HA DWA E
P= wood pegs
P1 =2⅜"screw
P2 =2"screw
P3 =1¾"screw
P4 =1⅜"screw
P5 = 1" screw
P6 = ⅝" screw
P
P3
P
Tap wood pegs [P] into predrilled holes
indicated by the osymbol.
If a dowel snaps in the hole:
a). Drill the hole out and replace with a spare
b). Use a spare screw
c). Use a nail
Dowels are mainly for guidance when
aligning panels and are not structural.
× 16 × 8
× 8 × 8
P3
HARDWARE INCLUDED
28ct 4ct 8ct 22ct 56ct 40ct 6ct
(spares are included but not reflected in counts)
P3P1PP2P4 P5 P6
Orient the side panels with the rails along the
bottom edge facing the inside of the coop.
2To install the COOP FLOOR,
PERCH BARS, and
ROOF EXTENDERS,
you will need these pieces:
P
P2
Align wood pegs with
the predrilled guide
holes and attach the
panels together with
[P3] screws.
view from
FRONT
view from
BACK
P
PREP: Tap wood pegs [P] into
predrilled holes indicated by the
osymbol on all roof extender
pieces.
P2 P5
Attach middle extenders first.
PREP: Arrange the pieces in order. Viewed
from the front, the roof extenders with the most
extreme end angle cuts are positioned on the
outside.
ROOF EXTENDERS:
Insert the roosting
perch bars into the
notched holders.
Align the wood peg on the back of
the extender with the guide hole on
the coop door frame. Attach with
[P2] screws.
PERCH BARS:
Set the coop floor
panels into the coop
base.
COOP FLOOR:
PERCH
BARS
ROOF
EXTENDERS
FLOOR
PANELS
1
2
3
P3
P5
P6
465 SUPPLEMENTAL —10/16—UST For more wonderful cages, toys, and accessories for dogs, cats, birds, chickens, rabbits, ferrets and small animals, visit www.prevuepet.com
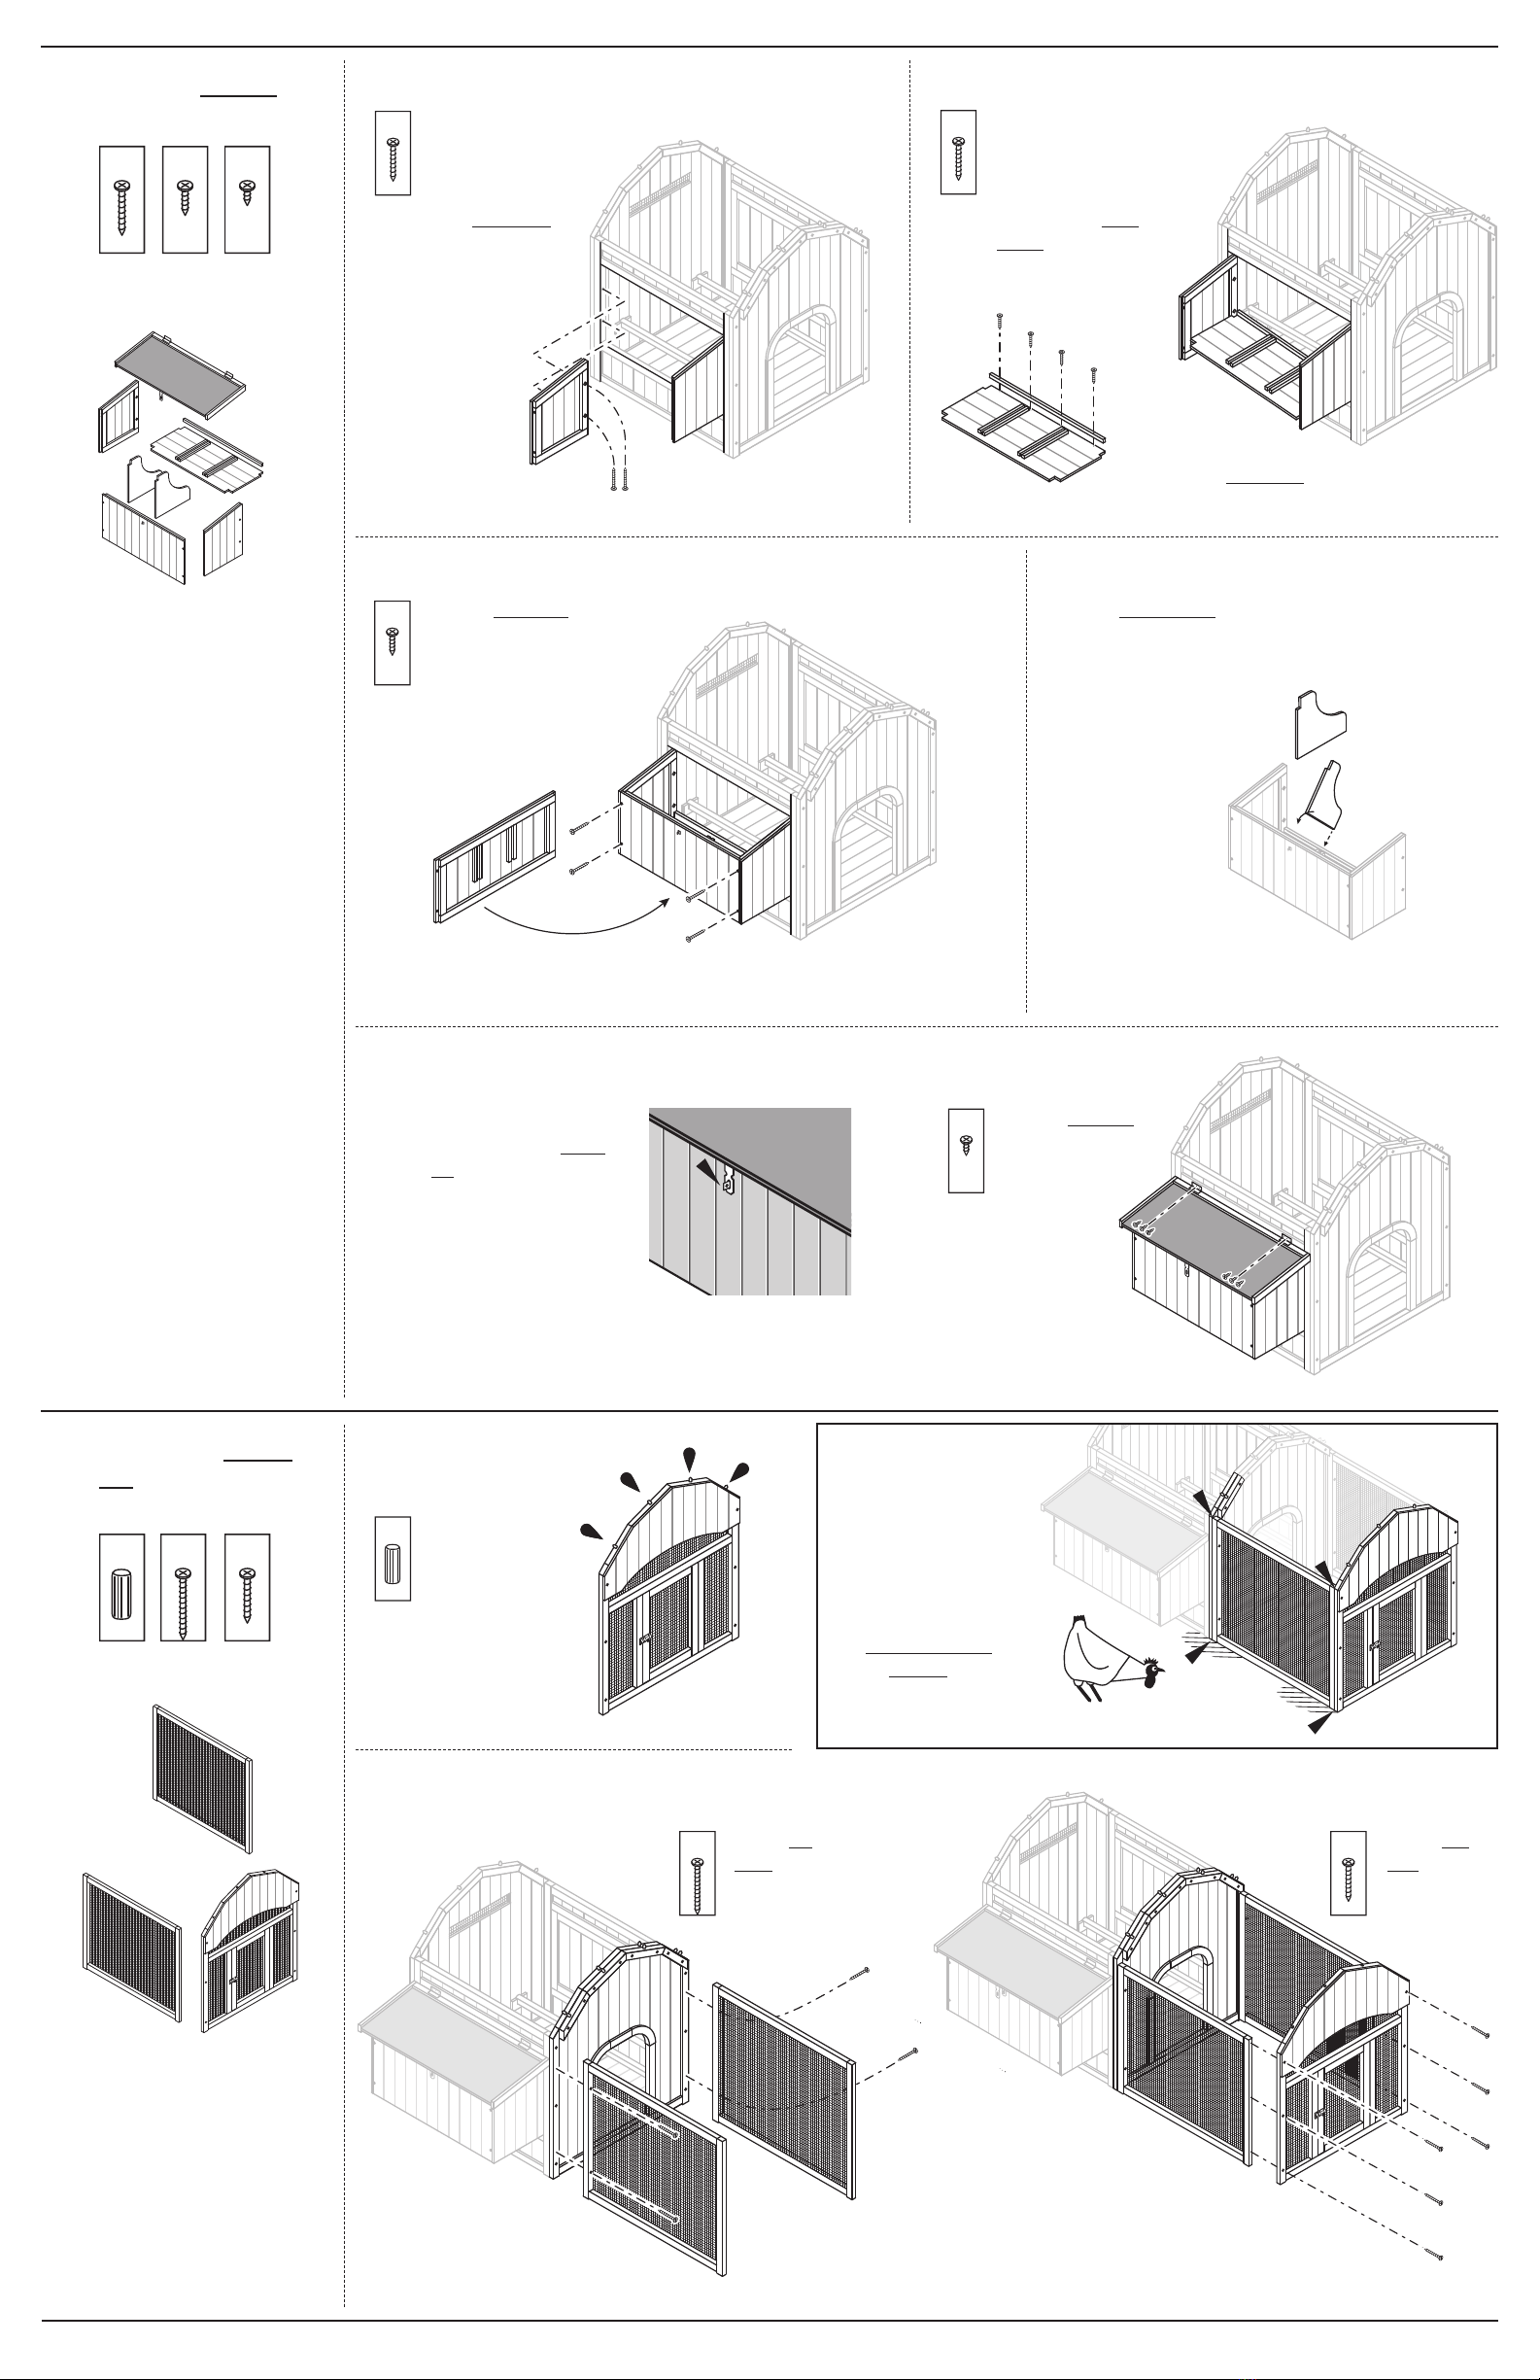
PREP: Before attaching the nest
box lid, lay the nest box roof in
position and close the padlock
flap on the lid over the hardware
on the nest box face.
This will align the nest box lid
in the correct position.
To install the NEST BOX,
you will need these pieces:
LID:
4To assemble the CHICKEN
RUN, you will need these
pieces:
P1
Align the side
panels flush with
the coop and attach
with [P1] screws.
P3
Align the front
panel flush with
the sides and
attach with [P3]
screws.
ATTENTION: When attaching
the chicken run ide panel
and the front panel, make ure
the panel align flu h with
the out ide edge .
× 8 × 4 × 6
P
P1
P3
× 4 × 4 × 6
P
PREP: Tap wood pegs
[P] into predrilled
holes indicated by
the osymbol.
P6P
Attach the nest box lid
hinges to the coop with
[P6] screws.
P3
Attach nest box ends
with [P3] screws.
× 4 (2 per ox end)
ENDS:
PREP: Center the divider
stop bar from side-to-side
and flush with the outer edge.
Attach with [P3] screws.
FLOOR:
P3
× 4
Tip the nest box floor into position between the end
panels with the divider stop bar facing the coop interior.
SIDE:
P5
Attach the nest box side
with [P5] screws.
DIVIDERS:
Insert the nest box dividers
into the slots by tipping the
inside corner (1) in first and
rotating the outside corner
(2) down into place.
Q2
Q1
Q1
S8
S1
S4
S5
S1
S5
S5
S1
S2
S3 S4
S6
S7 S8
Attach the
roof trim end
caps with
[P4] screws.
P4
× 24
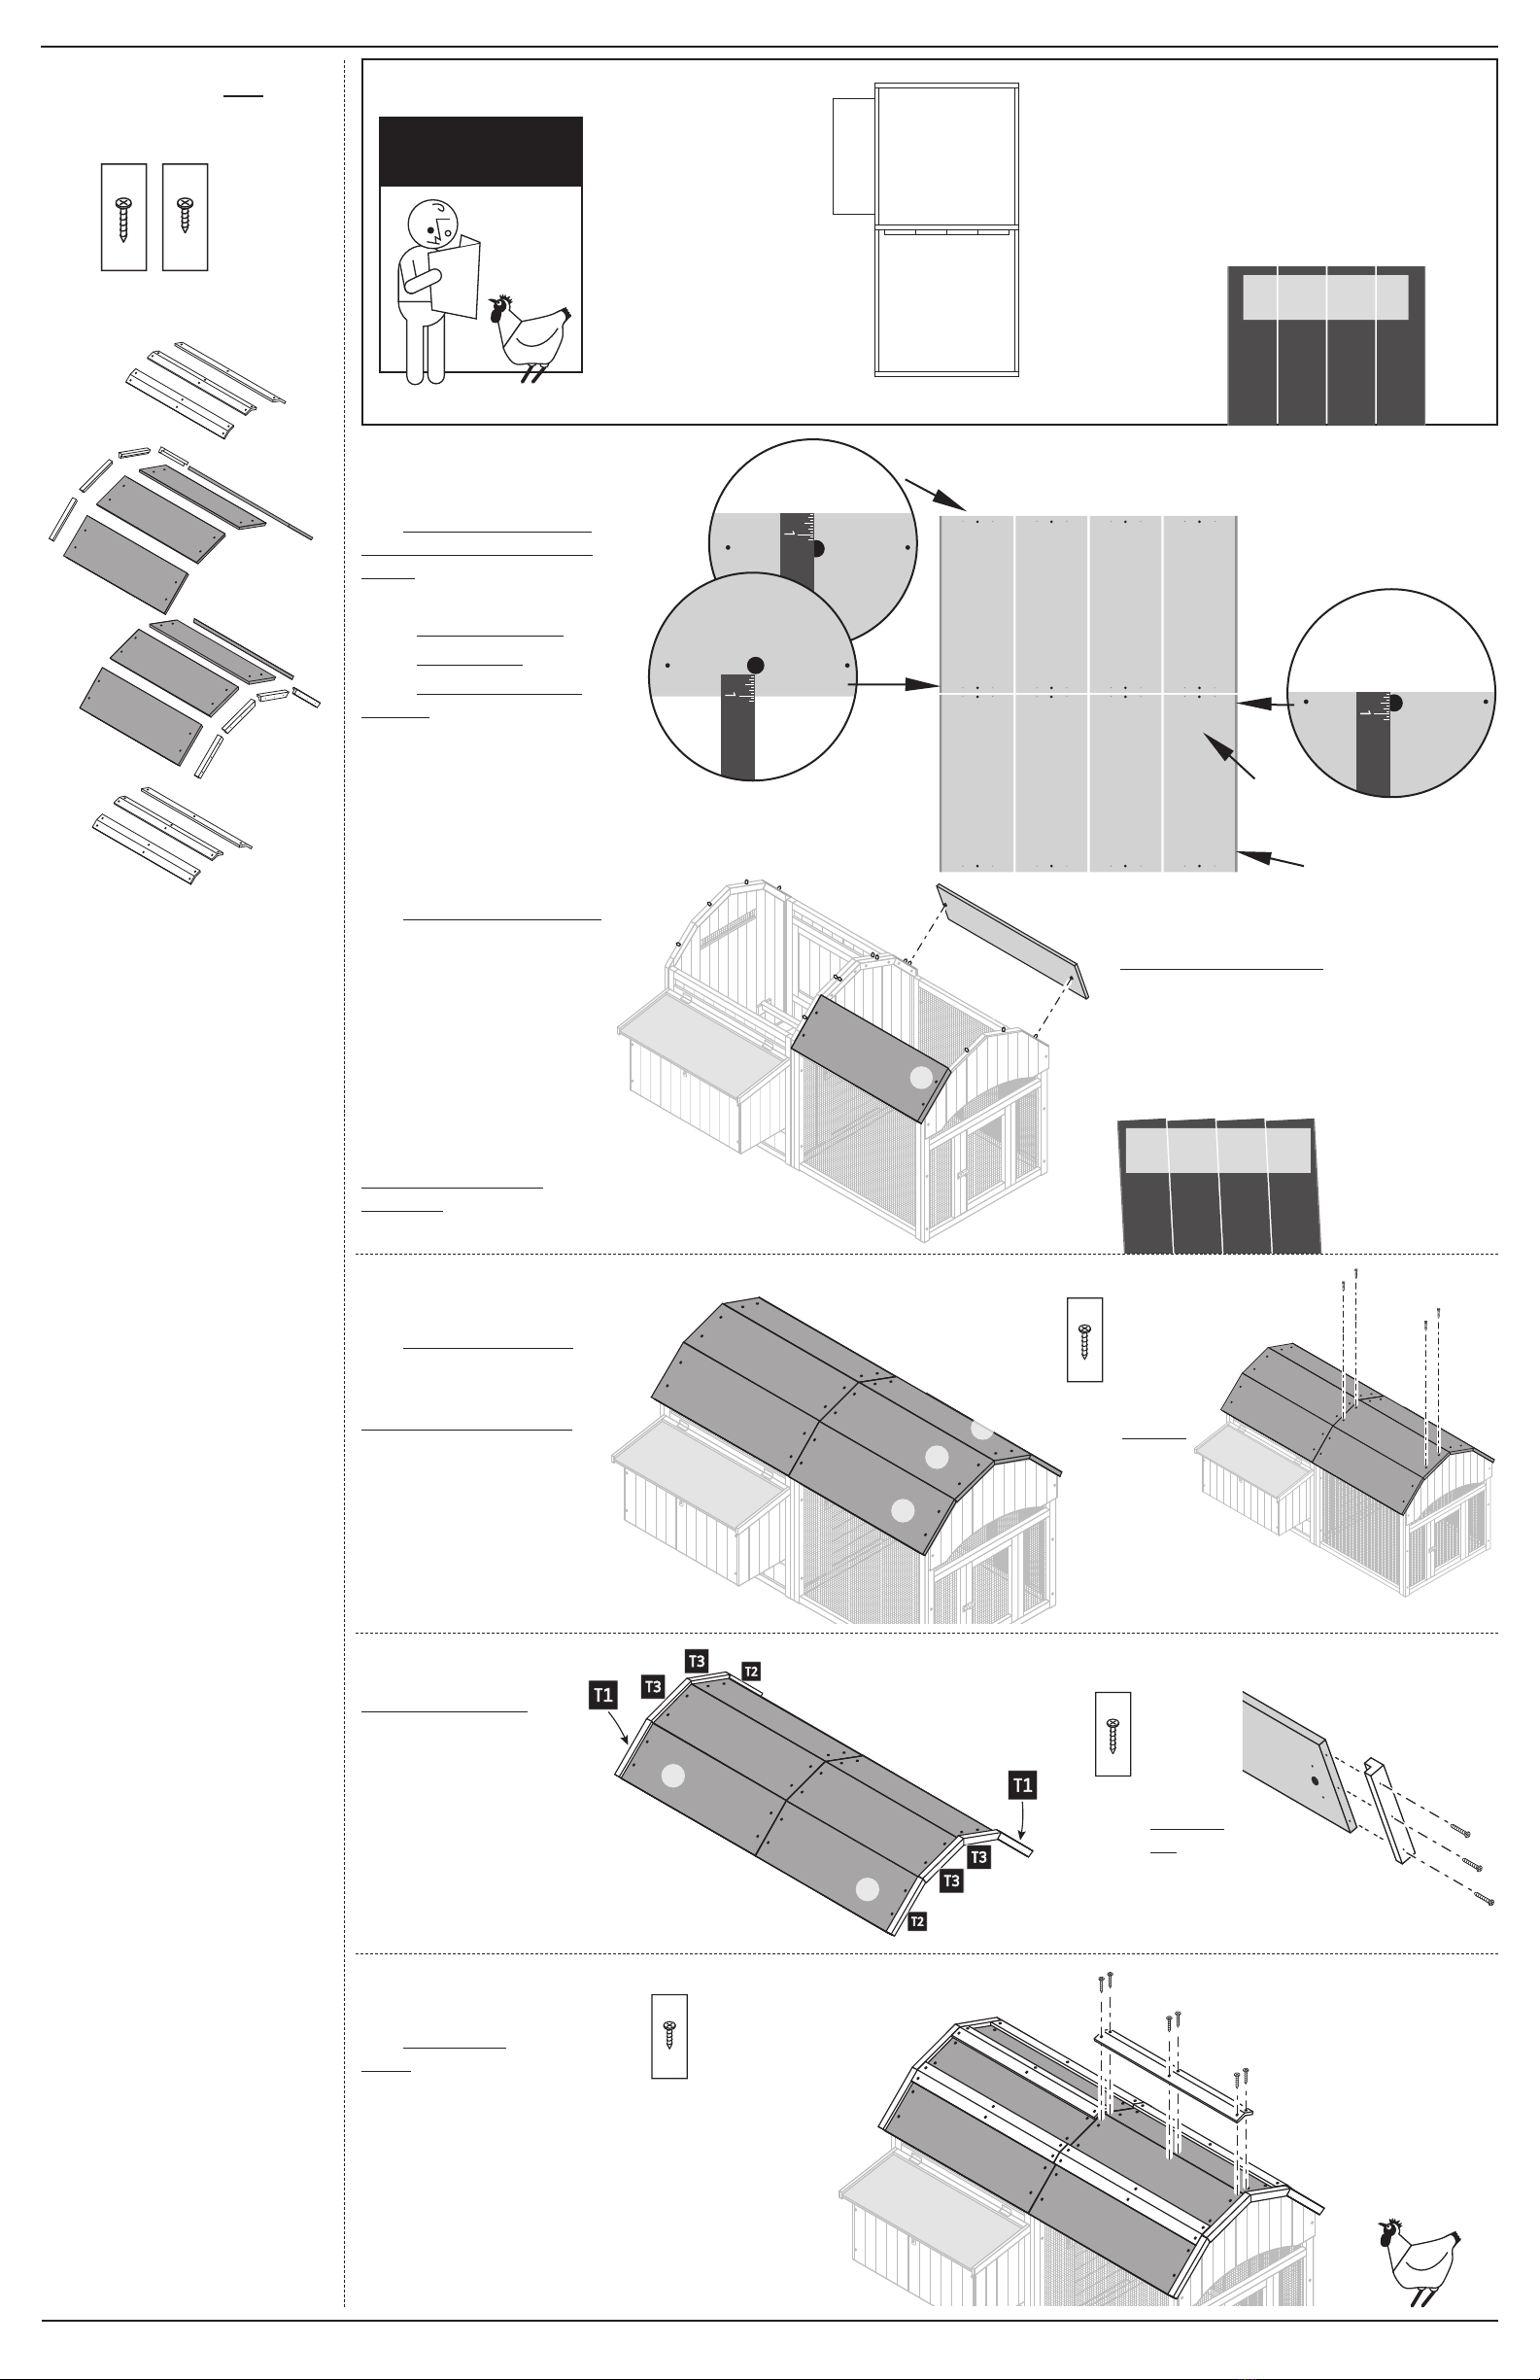
5To assemble the ROOF,
you will need these pieces:
PREP: Add the Coop House panels.
Lay the outer-edge roof panels (S1) (S4)
in position first. Add the center panels.
Recheck the roof panel alignment.
Adjust the coop frame as necessary to
get as clean and straight an alignment
as possible.
Once the roof panels look aligned, start
along the center/inside ends and begin
attaching your roof.
Add the roof trim end caps
Start with the two middle [T3]
end caps. Install those first.
[T1] endcaps are the outside right,
and [T2] are on the outside left,
when facing the roof end head-on.
Align the outer end caps off of
the middles for the best result.
PREP: Lay the roof trim
in place
[Q2] trim slats are positioned
along the peak. [Q1] trim
slats are positioned over the
side seams.
Lay all the trim in position
and adjust for the cleanest
alignment.
★
Your Deluxe Coop is
now fully assembled
and ready for use.
P5
Start in the center
and work to the
outer ends. Attach
with [P5] screws.
× 36
465 SUPPLEMENTAL —10/16—UST For more wonderful cages, toys, and accessories for dogs, cats, birds, chickens, rabbits, ferrets and small animals, visit www.prevuepet.com
S4
S8
S3
S7
S2
S6
S1
S5
coop house
chicken run
PREP: Lay all roof panels face-down
on the ground, in the order shown at
the right.
NOTE the guide hole measurements.
NOTE the numbering stamps.
NOTE the asphalt coating on the outer-
edge panels extends to the panel sides.
( anels S1, S4, S5, S8.)
COOP HOUSE INSIDE ENDS
1" space
ALL OUTSIDE ENDS
1¼" space
CHICKEN UN INSIDE ENDS
⅛" space
CHICKEN
RUN
COOP
HOUSE
NEST BOX
GOOD ALIGNMENT IS EVE YTHING
To assure a clean
finish to your coop,
pay special attention
to the coop frame
alignment.
quaring up your
frame will result in
the correct alignment
for the roof panels,
roof seams, and all
roof trim.
•A diagram of the coop framework as viewed from above, showing
square 90° corners and perfect, flush alignment of all coop frame panels.
An off-kilter frame alignment will make it difficult to place the roof panels
correctly, will create poor roof seams, will make it difficult to finish the
end trim neatly or align the top trim correctly, and will result in a jagged
and sloppy coop roof.
ROOF PANELS WITH
CORRECT ALIGNMENT
P4
P5
× 56 × 36
PAY SPECIAL
ATTENTION
P4
Attach the
roof panels
with [P4]
screws.
× 32
Check coop and panel alignment.
If you are getting a jagged, uneven,
stair-stepped alignment along the roof
panels, shift the chicken run frame
end right or left to get a satisfactory,
clean, even alignment edge.
ROOF PANELS WITH
INCORRECT ALIGNMENT
PREP: Begin with the Chicken Run end.
Lay the two outer-edge roof panels (S8) (S5)
in position first by aligning the predrilled
guide holes in the panels with the wood
pegs along the roof lines.
If dowels and guide holes don’t properly
align at first, gently contort the front panel
until alignment is achieved.
Add the center panels. Center panels
should fall into place.
DO NOT ATTACH ANY ANELS
AT THIS TIME.
asphalt-coated
outer edges
numbering
stamps
Other Prevue Pet Products Farm Equipment manuals


Popular Farm Equipment manuals by other brands

KUHN
KUHN GA 4511 GM Assembly & operators manual

Krone
Krone KW 7.70/6x7 operating instructions

Westeel
Westeel Bin on Hopper Pea Installation and Storage Instructions

HMF
HMF LEOFANT 24 ABB2471 instruction manual

Raven
Raven FLOWMAX 220 quick start guide

Major
Major 1150 Slurry Vac Operator's manual & parts list


